
The easiest recycled Halloween crafts for kids turn toilet paper tubes, egg cartons, milk jugs, paper bags, and cereal boxes into bats, spiders, ghosts, mummies, and pumpkins. Kids 3 to 5 do best with tearing, gluing, and wrapping (paper bag ghost puppets, tube mummies), while kids 8 to 12 can take on bigger builds like jar luminaries and a cereal box haunted house, with an adult handling the craft knife. Wash and fully dry every container first, use battery lights only, and choose multi surface paint for anything plastic.
Every year, around the first week of October, our recycling bin stops being trash and starts being inventory. Last year I tipped a laundry basket of clean tubes, jugs, cereal boxes, and egg cartons onto the kitchen floor and told my two kids they could make anything Halloween out of it.
My son was four. His sister was nine. Within an hour we had a milk jug ghost glowing on the counter, three toilet paper tube bats hanging off the light switch, and a cereal box haunted house my daughter refused to let anyone touch.
That afternoon is why this list of recycled Halloween crafts for kids is grouped by age. A four year old and a nine year old want completely different things from the same egg carton, so each craft below says who it’s really for, how messy it gets, how long it takes, and what goes wrong the first time.
Updated for Halloween 2026 with a proper paint guide, because the question I hear most from other parents about recycled Halloween crafts is why the paint keeps peeling off the yogurt cups.
Before You Start: Collecting and Cleaning Recyclables
Start saving about two weeks before you plan to craft. Two weeks of normal family life gets you a dozen tubes, a couple of egg cartons, a milk jug, and more cereal boxes than you’ll ever need.
Keep one bin, not a pile. I use a single laundry basket, and when it’s full, the oldest stuff goes out to the real recycling. Otherwise the craft stash quietly takes over the garage.
How To Clean Each One
- Yogurt cups: hot soapy water and a bottle brush around the inner lip, where yogurt hides. Soak for 10 minutes if the label won’t peel.
- Milk jugs: rinse twice with hot water and a squirt of dish soap, shake hard with the cap on, then dry upside down for a full day.
- Juice boxes: squeeze out the last of the juice, snip off one top corner, rinse, and dry upside down. Leftover sugar brings ants, and the cut corner hides under the paper wrap later.
- Plastic bottles and glass jars: soak off labels in warm water. Stubborn label glue comes off with a little cooking oil rubbed in, then soap.
- Egg cartons: cardboard only, and skip any carton with dried raw egg on it.
- Cereal boxes: pull open the glued seams and flatten. The plain gray inside is the side you’ll paint.
- Cardboard tubes: if you’re doing toilet paper roll Halloween crafts for a classroom, check with the teacher first. Some schools don’t accept used toilet paper tubes, and paper towel tubes cut into thirds are the easy swap.
Practical note: Dry everything for a full day, not an hour. A milk jug that looks dry still hides water inside the handle, and a few days later your glowing ghost smells like sour milk.
Supplies: What To Save And What To Buy
The recyclables are free. The rest is a short shopping list, and you’ll use most of it for every one of these Halloween crafts with recycled materials.
Save These
- Toilet paper and paper towel tubes
- Cardboard egg cartons
- Yogurt cups, juice boxes, milk jugs, and clear plastic bottles
- Glass jars with lids removed
- Cereal boxes and shipping boxes
- Newspaper, junk mail, and paper lunch bags
- Plastic bottle caps and takeout spoons
- Tissue paper and ribbon from gift bags
- Bread bag twist ties (they make good spider legs)
Buy These, Or Swap Them For Free
| Item | What I use | Free or cheap swap |
| Glue for paper | Elmer’s School Glue and glue sticks | Flour and water paste |
| Glue for plastic | Aleene’s Original Tacky Glue or glue dots | Hot glue, run by an adult |
| Paint for paper and cardboard | Washable tempera | Markers or crayons |
| Paint for plastic | Multi surface acrylic, or Posca paint pens | Tempera with a few drops of dish soap stirred in |
| Googly eyes | A mixed size pack | White paper circles with a marker dot |
| Pipe cleaners | Black and orange | Bread bag twist ties |
| Yarn | White plus a few bright colors | Strips cut from an old shirt |
| Decoupage glue | Mod Podge Matte | Half school glue, half water |
| Mummy wrap | White crepe paper streamers | Masking tape |
| Lights | Battery LED tea lights and fairy lights | No swap: never real candles |
| Magnets | Small ceramic disc magnets | Squares cut from old promotional fridge magnets |
| Mask strap | Thin round elastic cord | A paint stirrer taped on as a handle |
| Hole punch | Single hole punch | A sharp pencil pushed through into a ball of playdough |
| Cutting tool | Craft knife and cutting mat (adults only) | Makedo’s plastic kids’ cardboard saw lets kids 6 and up cut cardboard themselves |
Which Paint Sticks To Which Recyclable
This is the part most guides to Halloween crafts with recycled materials skip, and it’s why so many end with paint flaking off by the next morning.
| Recyclable | What works | What happens with plain washable paint |
| Cardboard tubes, cereal boxes, egg cartons, paper bags | Washable tempera | Works fine; corrugated cardboard may need a second coat |
| Yogurt cups, plastic spoons, plastic bottles | Multi surface acrylic, paint pens, or tempera with dish soap, on plastic scuffed with sandpaper | Beads up, dries, then flakes off at the first squeeze |
| Milk jugs | Permanent marker or glued paper shapes | Slides right off the slippery plastic |
| Glass jars | Tissue paper and Mod Podge | Peels off in sheets once dry |
| Shiny printed juice boxes | Wrap in paper first | Streaky, and the printing shows through |
One trade off to know before you start: acrylic and multi surface paints don’t wash out of clothes once dry. If you’re switching from washable paint to acrylic for the plastic crafts, put an old shirt on your kid first.
Safety and Mess Notes for Recycled Halloween Crafts
Recyclables bring a few hazards that store bought craft kits don’t: cut plastic edges, glass, and containers that used to hold food. None of them are reasons to skip a craft. They’re reasons to do a couple of steps yourself.
- Cut plastic is sharp. A freshly cut milk jug or bottle edge can slice a finger like paper. Cover every cut edge with masking tape before it goes back to your child.
- Craft knives are adults only. Cut on a mat, keep your other hand behind the blade, and keep kids on the far side of the table while you work.
- Glass is for older kids. Check jar rims for chips, and give anyone under 8 a plastic jar instead.
- Lights are battery LED only. Many LED tea lights run on coin batteries, which can cause serious internal burns within hours if swallowed. Use lights with a screw shut battery cover and keep spares put away.
- Magnets and small parts. Bottle cap magnets are for the 8 to 12 crowd, but younger siblings find them. Swallowing more than one strong magnet is a medical emergency.
- Masks need big eye holes. Kids should be able to see the floor and their feet, and masks come off before crossing a street or using stairs.
- Permanent markers smell. Open a window, and expect a few marks on the table that won’t come off.
Each craft also gets one of three supervision levels:
- Nearby: you can be cooking dinner in the same room.
- At the table: you’re sitting with them the whole time.
- Hands on: you’re doing part of it yourself (usually the cutting).
Mess level is Low, Medium, or High. High means paint or glue in places it shouldn’t be, so put down a plastic tablecloth or an old shower curtain first.
All 18 Recycled Halloween Crafts for Kids at a Glance
Start with what’s in your bin, then match it to the kid. Every one of these easy recycled Halloween crafts fits in an afternoon; the time column shows which ones also need a drying break.
| # | Craft | Main recyclable | Best ages | Mess | Time | Supervision |
| 1 | Cardboard Tube Mummies | Toilet paper tube | 4 to 5 | Low | 15 min | At the table |
| 2 | Juice Box Monsters | Juice box | 4 to 6 | Low | 20 min | At the table |
| 3 | Toilet Paper Roll Bats | Toilet paper tube | 4 to 6 | Medium | 20 min + 30 min dry | At the table |
| 4 | Milk Jug Ghost Lantern | Milk jug | 4 to 6 | Low | 15 min | Hands on |
| 5 | Paper Plate Spider Web | Paper plate | 4 to 7 | Low | 20 min | At the table |
| 6 | Cardboard Roll Frankenstein | Toilet paper tube | 4 to 6 | Medium | 20 min + 30 min dry | At the table |
| 7 | Plastic Spoon Monsters | Takeout spoons | 4 to 6 | Medium | 15 min + 1 hr dry | At the table |
| 8 | Egg Carton Spiders | Egg carton | 4 to 6 | Medium | 20 min + 30 min dry | Hands on |
| 9 | Recycled Jar Halloween Luminaries | Glass jar | 8 to 12 | Medium | 30 min + 1 hr dry | Nearby |
| 10 | Bottle Cap Halloween Magnets | Plastic bottle caps | 8 to 12 | Low | 30 min + overnight | Nearby |
| 11 | Cereal Box Haunted House | Cereal box | 8 to 12 | Medium | 45 min + dry | Hands on |
| 12 | Yogurt Cup Ghosts | Yogurt cups | 3 to 4 | Low | 15 min | At the table |
| 13 | Paper Bag Ghost Puppets | Paper lunch bag | 3 to 4 | Low | 15 min | At the table |
| 14 | Cardboard Box Monster Masks | Shipping box | 5 to 7 | Medium | 40 min + dry | Hands on |
| 15 | Recycled Cardboard Pumpkin Puzzle | Cereal box | 5 to 7 | Medium | 30 min + dry | At the table |
| 16 | Plastic Bottle Jack-o’-Lantern Lanterns | Plastic bottle | 5 to 7 | Medium | 25 min + dry | Hands on |
| 17 | Newspaper Pumpkin Collage | Newspaper | 5 to 7 | High | 30 min + 2 hr dry | At the table |
| 18 | Cardboard Pumpkin Garland | Cardboard | 5 to 7 | Medium | 45 min + dry | Hands on |
Preschoolers (Ages 4–5)
This is the biggest group on the list, because 4 and 5 year olds are the sweet spot for recycled Halloween crafts for kids. They’re old enough to wrap, glue, and bend, and young enough to think a toilet paper tube bat is genuinely thrilling.
Three of these use cardboard tubes, so if you’ve been saving them, start here.
1. Cardboard Tube Mummies

The fastest of the toilet paper roll Halloween crafts, and the least messy. Wrapping is great fine motor practice, and there’s no way to get it wrong.
Ages: 4 to 5 (3 year olds with help) | Mess: Low | Time: 15 minutes | Supervision: At the table
Materials:
- Toilet paper tubes (or paper towel tubes cut into thirds)
- White crepe paper streamer
- Googly eyes
- Glue stick and a little tape
Steps:
- Cut the crepe paper into strips about half an inch wide and a foot long. Short strips are much easier for small hands than one long roll.
- Tape the end of the first strip to the back of the tube, near the bottom.
- Rub glue stick on a section of tube and wrap the strip around, overlapping as you move up.
- Leave a gap near the top for the eyes, then tape the last end at the back.
- Glue two googly eyes into the gap and trim any loose ends.
What goes wrong: liquid glue. Crepe paper tears the second it gets wet, so stick with a glue stick.
Easier version: Wrap the tube in masking tape instead. It sticks to itself, needs no glue at all, and looks surprisingly like real bandages. It’s the version I give 3 year olds.
2. Juice Box Monsters
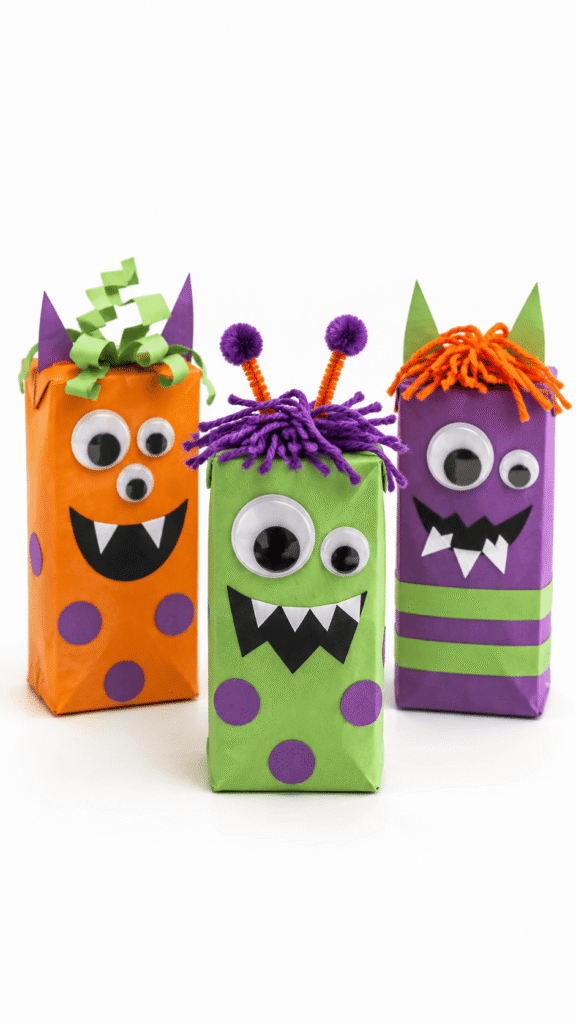
Lunchbox juice boxes make perfect monster bodies: square, sturdy, and the right size for a small hand. This is one of the easy recycled Halloween crafts I save for rainy afternoons, because there’s no paint and no drying.
Ages: 4 to 6 | Mess: Low | Time: 20 minutes | Supervision: At the table
Materials:
- Empty juice boxes, rinsed and dried
- Colored paper (junk mail and old wrapping paper count)
- Googly eyes in mismatched sizes
- Glue stick, plus tape for the folded ends
- Yarn scraps or paper strips for hair
Steps:
- Wrap the box in colored paper like a present, using glue stick on the sides and tape on the folded ends.
- Cut a mouth with zigzag teeth and glue it on.
- Add googly eyes, plus horns or antennae from paper scraps.
- Glue yarn or curled paper strips on top for hair. Pull a paper strip over a pencil to curl it.
Younger vs older: 4 year olds do best choosing from a bowl of precut eyes, mouths, and horns. Older kids like designing a whole monster family and naming each one.
3. Toilet Paper Roll Bats

My son made three of these and hung them off the light switch, where they stayed until November. Of all the toilet paper roll Halloween crafts, bats are the ones kids most want to display, because they actually look like bats.
Ages: 4 to 6 | Mess: Medium (black paint) | Time: 20 minutes plus 30 minutes drying | Supervision: At the table
Materials:
- Toilet paper tubes
- Black paint (or black paper wrapped around the tube for a no paint version)
- Googly eyes
- White paint pen
- Black cardstock or painted cereal box cardboard
- Glue
Steps:
- Paint the outside of the tube black, plus the top inch of the inside, which shows once the ears are folded. There’s no need to paint the whole inside.
- Once it’s completely dry, push the top edge down and inward from both sides so it folds into two pointed ears.
- Cut wings from black cardstock with a scalloped bottom edge and glue one on each side of the back.
- Add googly eyes and dot on two small fangs with the white paint pen.
What goes wrong: Folding the ears while the paint is wet. Damp cardboard tubes collapse instead of creasing, so wait the full 30 minutes.
4. Milk Jug Ghost Lantern
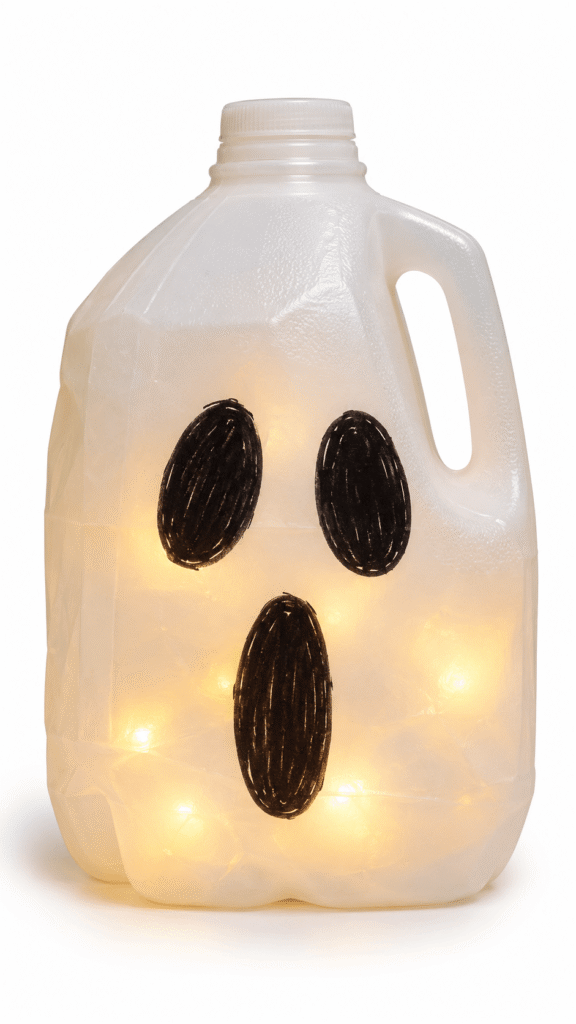
A gallon milk jug is the best free lantern you’ll find. The cloudy plastic spreads light evenly, so even a cheap string of LEDs makes the whole thing glow.
Ages: 4 to 6 (an adult does the cutting) | Mess: Low | Time: 15 minutes | Supervision: Hands on
Materials:
- Empty plastic milk jug, washed and dried for a full day
- Black permanent marker (or black paper shapes and tacky glue)
- Battery LED fairy lights
- Craft knife (adult only)
- Masking tape
Steps:
- Peel off any label. Have your child draw the ghost face on the side opposite the handle: big oval eyes and a tall “oooo” mouth.
- Adult: cut a 2 inch slit low on the back of the jug. The spout is too narrow to fit a coil of lights through.
- Feed the lights in through the slit and tape the battery pack to the back.
- Cover the cut edge with masking tape so nobody catches a finger.
- Switch it on at dusk.
Tip: Draw the face bigger than feels right. From across a dark room, small eyes disappear.
Permanent marker smudges on the jug until it dries, so give it 10 minutes before anyone handles it.
5. Paper Plate Spider Web

Lacing yarn through holes is a classic fine motor activity, and this one looks good enough to hang in a window afterward.
Ages: 4 to 7 | Mess: Low | Time: 20 minutes | Supervision: At the table
Materials:
- Paper plate (sturdy ones; thin plates tear when kids pull the yarn tight)
- Hole punch
- White yarn, about 4 feet
- Masking tape
- A plastic or paper spider (or an egg carton spider from #8)
Steps:
- Adult: fold the plate in half to start the cut, then cut out the center, leaving a ring about 1½ inches wide.
- Punch 8 to 10 holes evenly around the ring. Single hole punches are hard for 4 year olds to squeeze, so you may need to do this part.
- Wrap one end of the yarn tightly in tape, like a shoelace tip. It becomes a needle kids can push through the holes.
- Tie the other end to a hole and let your child lace across the ring in any pattern until it looks like a web.
- Tie it off and attach the spider with a dot of glue or a short thread.
Tip: Random crisscrosses look more like a real web than a neat star. Let them go wild.
Older kids: Use two colors of yarn, or have them punch their own holes.
6. Cardboard Roll Frankenstein

Green paint, spiky hair, and two bolts. Of all the toilet paper roll Halloween crafts here, this one has the most personality, mostly because no two kids draw the stitched mouth the same way.
Ages: 4 to 6 | Mess: Medium | Time: 20 minutes plus 30 minutes drying | Supervision: At the table
Materials:
- Toilet paper tube
- Green paint (or green paper wrap)
- Black paper for hair
- Gray paper for bolts (the plain inside of a cereal box is exactly the right gray)
- Googly eyes
- Black marker
- Glue
Steps:
- Paint the tube green and let it dry.
- Cut a strip of black paper about 2 inches tall and long enough to wrap around the top. Snip zigzags along one edge.
- Glue the strip around the top of the tube for hair.
- Glue on googly eyes and draw a zigzag mouth with little stitch lines across it.
- Glue a small gray rectangle on each side near the bottom for bolts.
Tip: One fringed strip of hair is far faster than gluing a dozen separate spikes, and it stays on better.
7. Plastic Spoon Monsters
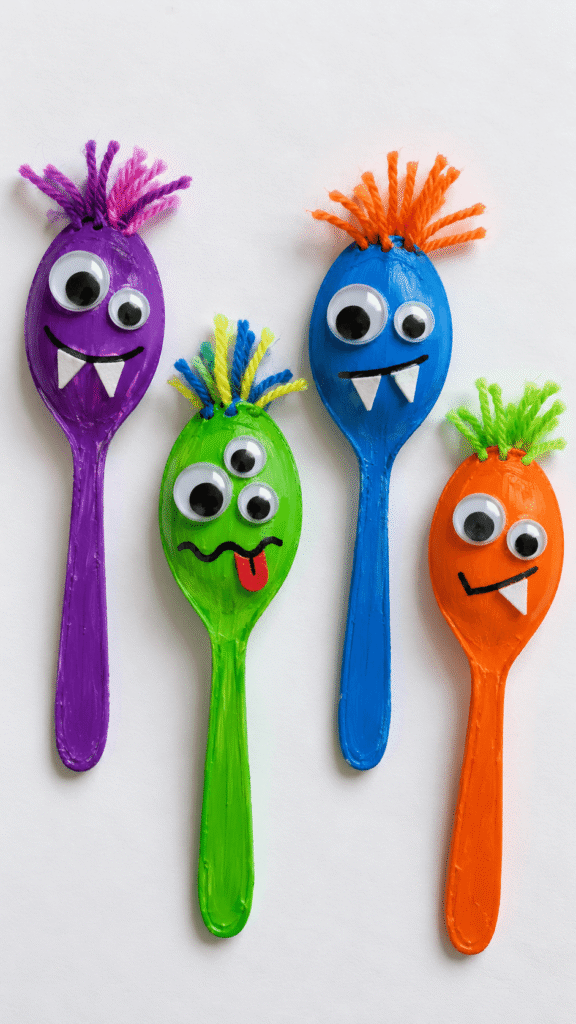
These double as tiny puppets, so they get played with long after Halloween. The catch is paint: regular kids’ paint won’t stay on plastic spoons.
Ages: 4 to 6 | Mess: Medium | Time: 15 minutes plus about 1 hour drying | Supervision: At the table
Materials:
- Plastic spoons saved from takeout
- Multi surface acrylic paint or paint pens
- Googly eyes
- Yarn scraps
- Tacky glue or glue dots (school glue slides off plastic)
Steps:
- Rub the back of each spoon bowl with sandpaper or a scrubby sponge so the paint can grip.
- Paint the bowl a bright monster color in two thin coats, drying between them.
- Stick on googly eyes in different sizes with tacky glue or glue dots.
- Glue yarn hair along the top of the bowl.
- Rest the spoons across the rim of a cup to dry, so the wet side doesn’t touch anything.
Trade off: Acrylic won’t wash out of clothes once it’s dry, so smocks on. And these are toys now, not spoons. Keep them away from toddlers who chew, since the eyes are choking sized.
8. Egg Carton Spiders
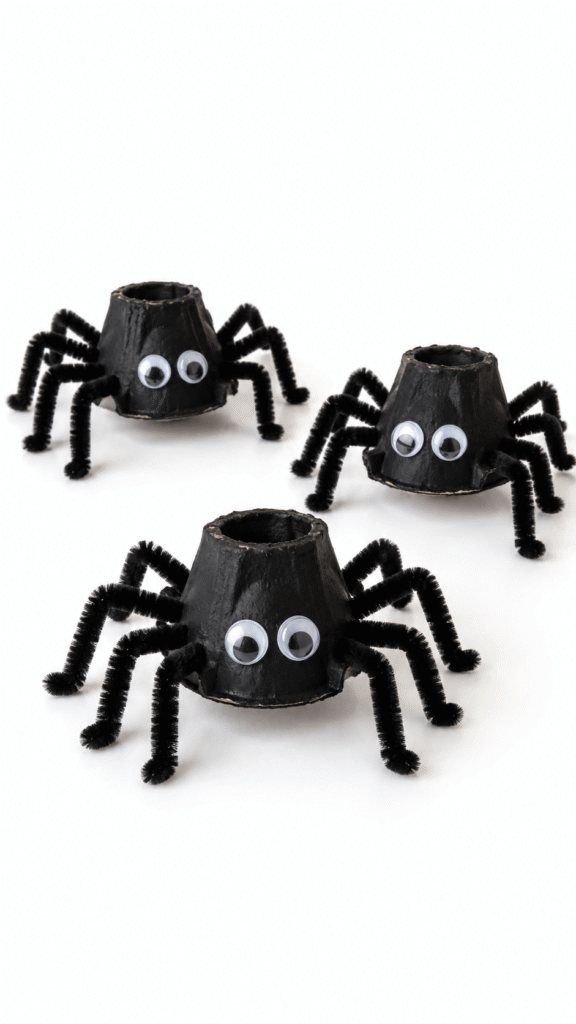
One carton gives you a dozen spiders. In this version the legs pass straight through the body, which makes them much sturdier than glued on legs.
Ages: 4 to 6 | Mess: Medium | Time: 20 minutes plus 30 minutes drying | Supervision: Hands on (you poke the holes)
Materials:
- Cardboard egg carton (foam cartons won’t hold paint)
- Black paint
- 4 pipe cleaners per spider (or bread bag twist ties)
- Googly eyes
- Glue
- A toothpick and a sharp pencil
Steps:
- Cut the carton into single cups and trim the edges so each one sits flat.
- Paint each cup black. Cardboard drinks paint, so load the brush.
- Once dry, poke four holes in a row down each side with a toothpick, then widen them with the pencil tip. This is an adult job for 4 year olds.
- Push each pipe cleaner in one hole and straight out the matching hole on the other side, so one pipe cleaner makes two legs.
- Bend each leg at the knee, fold a tiny foot at the tip, and glue on the eyes.
Tip: folding the foot also covers the sharp wire at the end of each pipe cleaner.
Older Kids (Ages 8–12)
Older kids get bored with tube crafts fast. These three take longer, need more care, and end up looking like real decor, which is exactly what this age wants from Halloween crafts with recycled materials.
9. Recycled Jar Halloween Luminaries

Tissue paper on glass is the closest kids can get to stained glass without a soldering iron. My daughter made four last year and lined them up on the porch steps. Of all the recycled Halloween crafts we’ve made, these are the ones neighbors ask about.
Ages: 8 to 12 (younger kids can use a plastic jar) | Mess: Medium (sticky) | Time: 30 minutes plus about 1 hour drying | Supervision: Nearby
Materials:
- Glass jars with labels and glue residue removed
- Tissue paper in orange, purple, and black (saved from gift bags)
- Mod Podge Matte (or half school glue, half water)
- Foam brush
- Black paper for silhouettes
- Battery LED tea lights
- Rubbing alcohol and a paper towel
Steps:
- Wipe the outside of the jar with rubbing alcohol so the glue grips the glass.
- Tear tissue paper into pieces about 2 inches across. Torn edges blend into each other; cut edges look like tiles.
- Brush Mod Podge on a small section, press tissue onto it, and brush a thin layer over the top. Keep overlapping until the jar is covered.
- Let it dry for about an hour. It looks milky white while wet, which panics every kid the first time. It dries clear.
- Cut silhouettes from black paper (a cat, a moon, bats, tombstones) and Mod Podge them on, then add one final thin coat.
- Drop in a tea light.
What goes wrong: cheap tissue paper bleeds its dye the moment it gets wet, so fingers turn purple and orange runs into black. Some kids love the blurry look. If you want crisp colors, lay the lightest color first and let it dry before adding the darker ones.
Check the rim for chips before you start, and keep the tea light’s battery cover screwed shut.
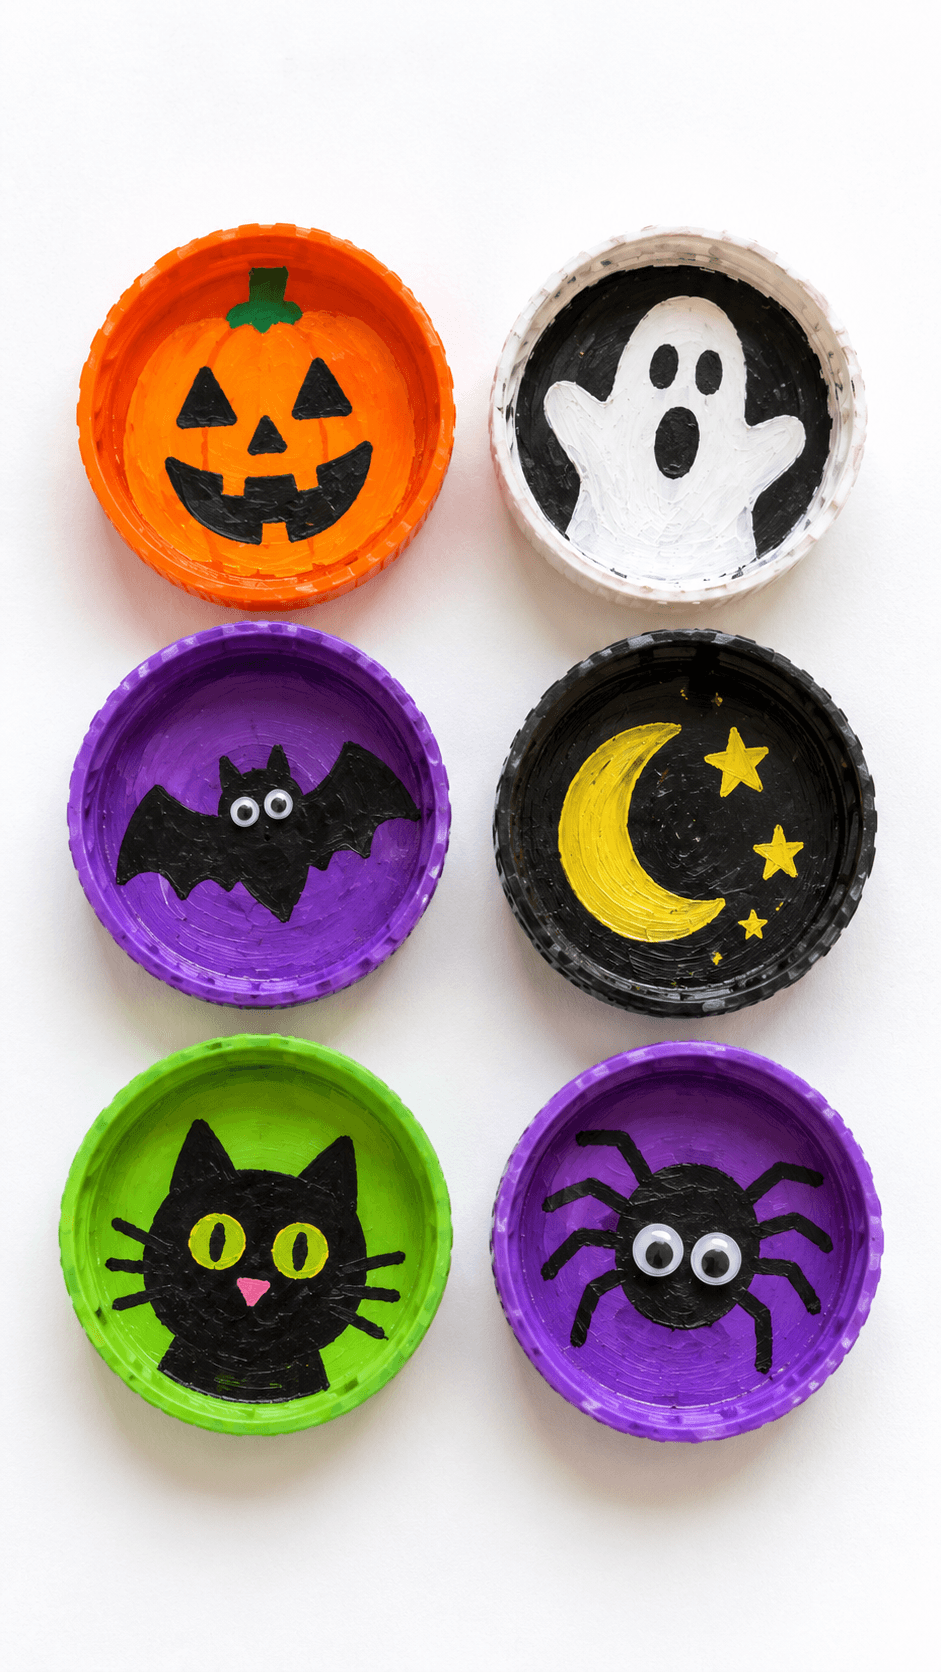
10. Bottle Cap Halloween Magnets

Tiny canvases. This is a detail craft, so it suits kids who like drawing small and hate waiting for big things to dry.
Ages: 8 to 12 | Mess: Low | Time: 30 minutes plus overnight curing | Supervision: Nearby (magnets)
Materials:
- Plastic bottle caps from water and soda bottles, washed
- Acrylic paint and a fine brush, or Posca paint pens (the easiest option on plastic)
- Small ceramic disc magnets (or squares cut from old promotional fridge magnets)
- E6000 or hot glue (adult)
- A ¾ inch circle punch and white cardstock (optional)
- Sandpaper
Steps:
- Scuff the flat inside of each cap with sandpaper so the paint grips.
- Paint or draw a small Halloween design inside each cap: a pumpkin, ghost, bat, or black cat silhouette.
- For more detail, punch ¾ inch circles from cardstock, draw the design on paper with a fine marker, and glue it inside the cap. That size fits inside most water bottle caps.
- Once dry, glue a magnet to the flat outside top of each cap. An adult handles the E6000 or hot glue, then the caps cure overnight.
Trade off: painting inside a cap is fiddly, and threads around the inner wall catch the brush. The paper circle version looks neater and takes half the time, but it isn’t waterproof.
Keep finished magnets above little siblings’ reach. If your kids get hooked on caps, 20 bottle cap crafts for colorful wall art and upcycled decor has bigger projects for the rest of the stash.
11. Cereal Box Haunted House

The one my daughter guarded like a museum piece. It’s the most involved craft on this list, and the one older kids are proudest of.
Ages: 8 to 12 | Mess: Medium | Time: 45 minutes plus drying | Supervision: Hands on (craft knife)
Materials:
- Empty cereal box (a family size box makes a bigger house)
- Black paint
- Colored paper (yellow for windows)
- Glue
- Craft knife and cutting mat (adult only)
- Optional: yellow tissue paper and a small flashlight
Steps:
- Pull the box seams open and flatten it, plain gray side up.
- Draw a haunted house silhouette: pointed roofs, a crooked tower, a chimney. Keep the outline fairly simple, because tiny spikes are hard to cut cleanly.
- Adult: cut out the outline with the craft knife on a cutting mat.
- Paint it black in one thin coat, then dry it flat under a heavy book so the cardboard doesn’t curl.
- Glue on yellow windows and a door, then paper ghosts, bats, and a pumpkin by the entrance.
- Glue a folded cardboard triangle to the back as a stand.
Upgrade for 10 to 12 year olds: instead of gluing windows on, cut them out (adult cuts), back the openings with yellow tissue paper, and set the house in a window or put a flashlight behind it. The windows glow.
Toddlers (Ages 3–4)
Quick honesty: 3 and 4 year olds are technically preschoolers, not toddlers. These two are gentle enough that a 2 year old can join in with you doing every cut, and they’re the easy recycled Halloween crafts I’d start with for the youngest kids.
Both have big pieces, no sharp edges, and nothing that has to be done “right.”
12. Yogurt Cup Ghosts
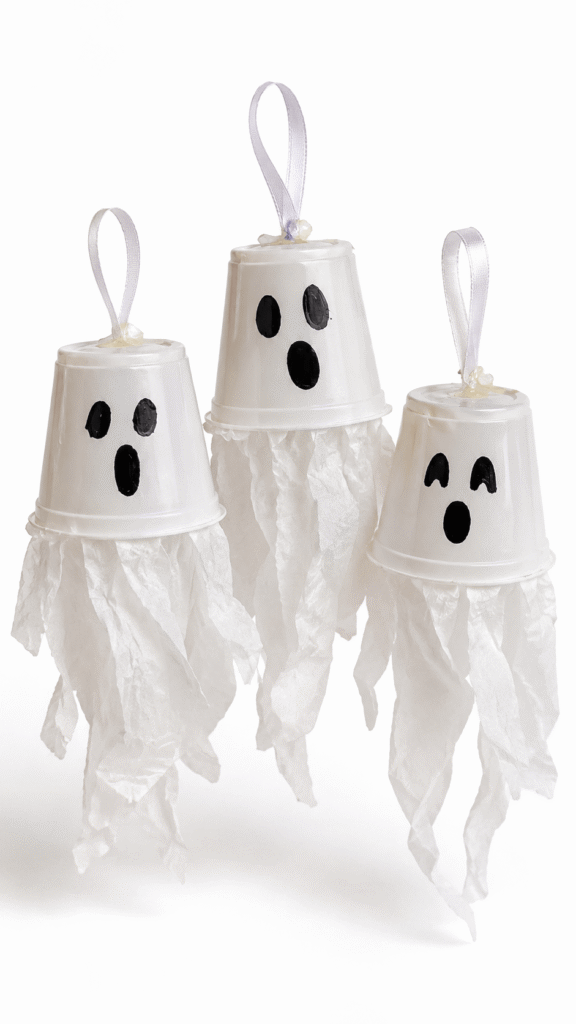
Here’s the shortcut most versions miss: a lot of yogurt cups are already white. Peel off the label and you can skip painting entirely. That’s good news, because paint on yogurt cups tends to crack and flake the moment a small hand squeezes one.
Ages: 3 to 4 | Mess: Low (Medium if you paint) | Time: 15 minutes, plus drying if you paint | Supervision: At the table
Materials:
- Empty yogurt cups (white ones save a step)
- White multi surface paint, only if your cups are colored
- Black permanent marker or black paper shapes
- White ribbon or string
- Pushpin (adult)
- White tissue paper (optional, for a tail)
Steps:
- Wash the cups, peel off the labels, and dry them upside down overnight.
- If a cup is colored, paint two thin coats of white multi surface paint, letting the first dry fully so it doesn’t streak.
- Turn the cup upside down. The bottom becomes the top of the ghost’s head.
- Draw two oval eyes and an “oh” mouth, or let your child stick on black paper shapes. Paper shapes are easier for 3 year olds than a marker on a curved surface.
- Adult: poke a hole in the center of the top with a pushpin, thread the ribbon through, and knot it inside.
- For a wispy tail, glue strips of white tissue paper inside the rim.
Trade off: these are light enough to blow around outdoors and crack on the patio. Hang them inside a window instead.
13. Paper Bag Ghost Puppets

Every kid I know switches to a spooky voice the moment their hand goes inside one of these. The trick is where you draw the mouth.
Ages: 3 to 4 | Mess: Low | Time: 15 minutes plus a few minutes for the glue to set | Supervision: At the table
Materials:
- White paper lunch bags (brown bags work too; the ghost just looks more like a mummy)
- White tissue paper
- Black marker
- Glue stick
Steps:
- Lay the bag flat with the folded bottom flap on top, facing you. That flap is the puppet’s head.
- Let your child crumple small pieces of tissue paper into loose balls and glue them across the front of the bag, below the flap.
- Draw two eyes on the flap.
- Draw the top half of the mouth along the bottom edge of the flap, and the bottom half on the bag just underneath it. When a hand opens and closes inside, the mouth actually moves.
- Let the glue set for a few minutes before the puppet show starts.
Younger vs older: for 2 and 3 year olds, you draw the face and they do all the tissue. Four year olds can draw their own face and add tissue streamer arms.
Early Elementary (Ages 5–7)
Five to seven year olds can cut, plan, and finish something across two sessions, so this group leans on cardboard and bigger builds. These easy recycled Halloween crafts also make good weekend projects, because most need a drying break in the middle.
14. Cardboard Box Monster Masks
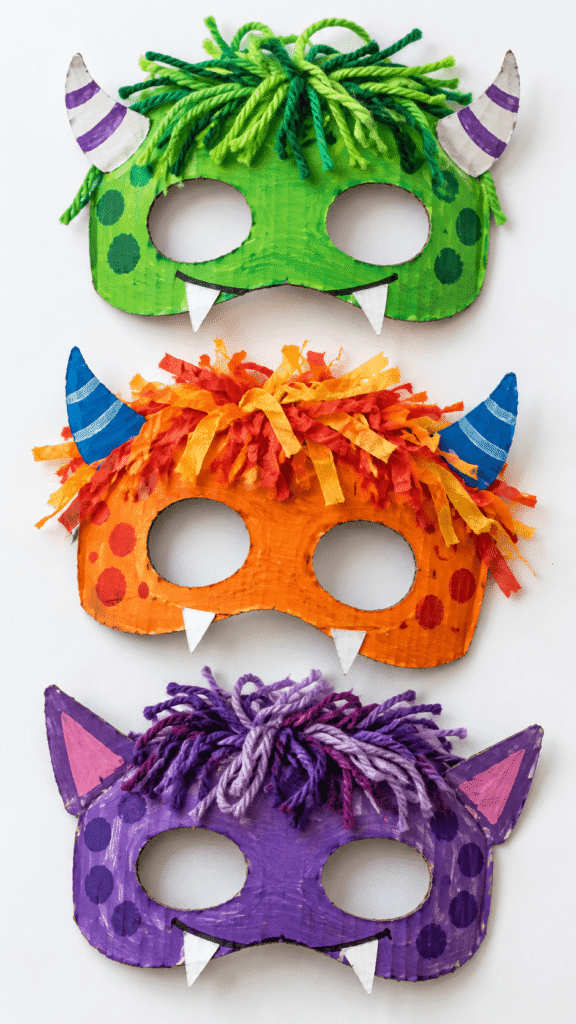
Shipping boxes are free monster masks waiting to happen. The one rule: cut the eye holes bigger than you think, so kids can actually see where they’re walking.
Ages: 5 to 7 | Mess: Medium | Time: 40 minutes plus drying | Supervision: Hands on (cutting)
Materials:
- A side panel from a shipping box (thinner boxes bend better)
- Paint
- Yarn, or shredded paper from package stuffing, for fur
- Thin round elastic cord, or a paint stirrer for a handle
- Tacky glue (it holds yarn to cardboard better than school glue)
- Craft knife (adult only)
Steps:
- Hold the cardboard up to your child’s face, mark where their eyes are, and draw a mask shape covering the eyes and forehead.
- Adult: cut out the mask and the eye holes. Make each eye hole about 1½ inches across.
- Roll the cardboard gently over the edge of a table so it curves to fit a face. Flat corrugated cardboard won’t sit on a face otherwise.
- Paint it a bold monster color and let it dry.
- Glue on yarn fur, plus paper horns or fangs.
- Poke a hole on each side, thread the elastic, and knot it snug but not tight. Check for red marks after a minute of wearing.
Safety note: A mask on a stick (a paint stirrer taped to one side) is the better choice for younger kids and for trick or treating, because nothing goes around the head and it comes off instantly. Either way, masks come off before crossing a street.
15. Recycled Cardboard Pumpkin Puzzle
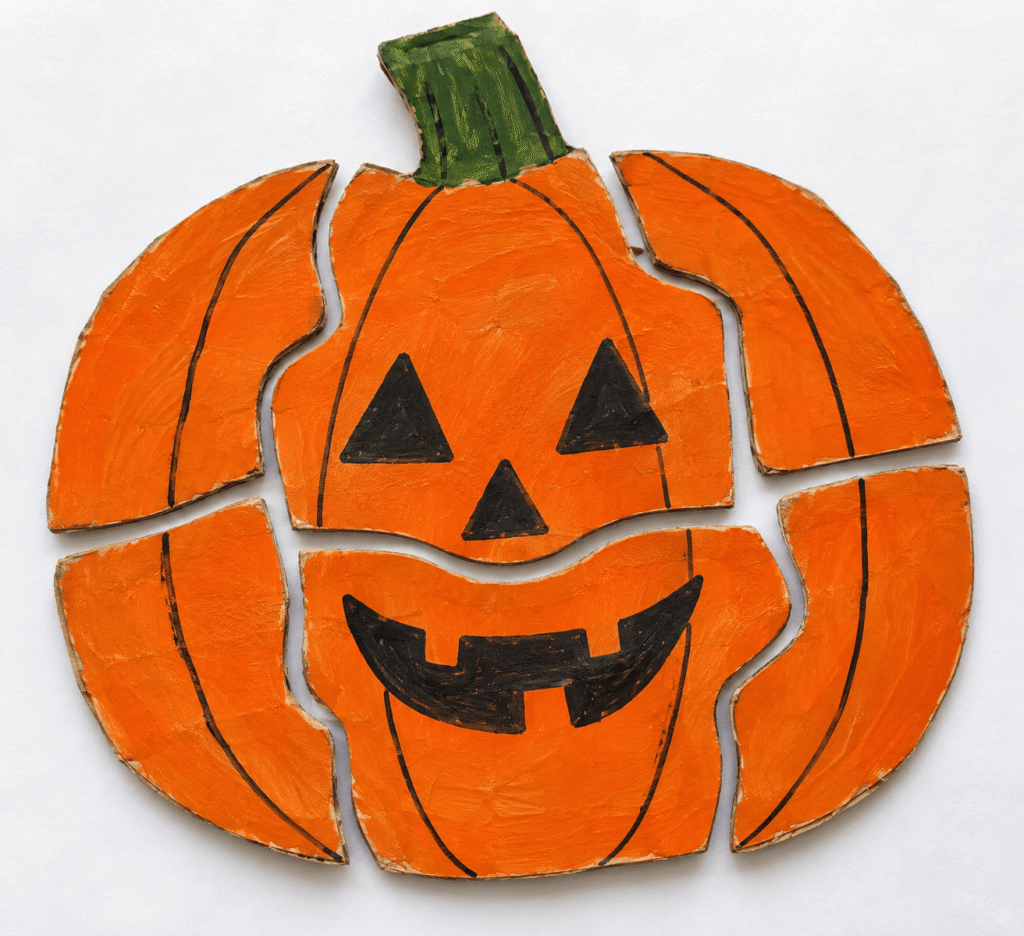
A craft that turns into a toy. Make it from cereal box cardboard rather than shipping box cardboard, because thick corrugated pieces start peeling apart at the cut edges after a few days of play.
Ages: 5 to 7 | Mess: Medium | Time: 30 minutes plus drying | Supervision: At the table (an adult cuts for 5 year olds)
Materials:
- Cereal box cardboard
- Orange and green paint
- Black marker
- Scissors
- Clear packing tape (optional)
Steps:
- Draw a big pumpkin that fills most of the cardboard panel, with a stem.
- Paint it orange and green and let it dry completely.
- Outline the stem and the ridges in black marker. Add a face if your child wants one.
- Optional: cover the painted side with clear packing tape so the pieces survive more play.
- Flip it over and draw curvy cut lines on the back: 5 or 6 pieces for a 5 year old, 8 to 10 for a 7 year old.
- Cut along the lines, then mix the pieces up in a bowl.
Tip: Drawing the cut lines on the back keeps the front artwork clean. Make two different pumpkins and siblings can swap.
16. Plastic Bottle Jack-o’-Lantern Lanterns

This is the craft where most lanterns don’t glow, and here’s why: two coats of orange acrylic is opaque. Your tea light ends up lighting the inside of a solid orange tube that nobody can see.
Ages: 5 to 7 | Mess: Medium | Time: 25 minutes plus drying | Supervision: Hands on (cutting)
Materials:
- Clear plastic bottles with labels soaked off
- Orange tissue paper and Mod Podge, or orange paint mixed half and half with Mod Podge
- Black permanent marker or black paper shapes
- Battery LED tea lights
- Craft knife (adult only)
- Masking tape
Steps:
- Adult: cut around the bottle just below where it starts to narrow, so a tea light fits inside. A tea light won’t go through the neck.
- Cover the cut edge with masking tape.
- Have your child brush on orange tissue paper with Mod Podge, or one thin coat of the paint and Mod Podge mix.
- Once dry, draw a pumpkin face with black marker or glue on black paper shapes.
- Drop in the tea light and set the top back on, or leave it open.
Practical note: Before covering a whole bottle, test one stripe and hold it up to a lamp. If you can’t see the bulb through it, a tea light won’t glow through it either.
17. Newspaper Pumpkin Collage
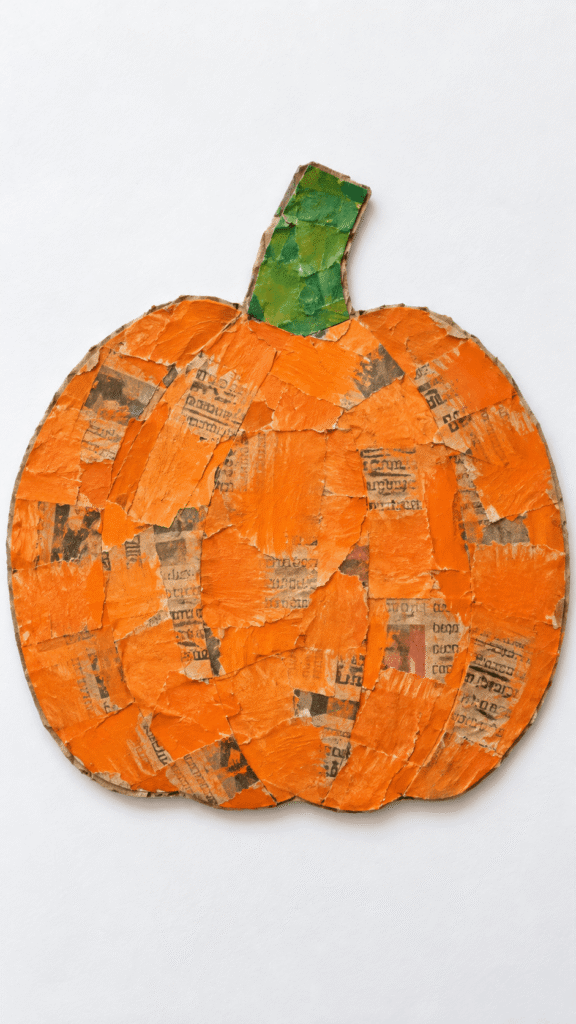
Tearing newspaper is the best part for kids, and the finished pumpkin has a texture flat paper never gets. Paint lightly and the newsprint shows through the orange, which looks great framed.
Ages: 5 to 7 | Mess: High (glue and paint) | Time: 30 minutes plus about 2 hours drying | Supervision: At the table
Materials:
- Newspaper or junk mail
- A piece of cardboard (thin cardstock buckles under wet glue)
- School glue thinned with a little water, and a brush
- Orange paint
- Green paper
Steps:
- Draw a large pumpkin outline on the cardboard.
- Tear newspaper into small, irregular pieces. Torn edges blend together, while cut edges look like tiles.
- Brush glue on a section, lay the pieces down overlapping, and brush a little more glue over the top. Keep going until the whole pumpkin is covered.
- Let it dry completely, at least an hour. Painting over wet newspaper turns it into pulp.
- Paint it orange: one light coat lets the headlines peek through, two coats gives solid color.
- Glue on a green paper stem.
Trade off: Newsprint ink smudges gray onto hands and anything they touch next. Keep wipes nearby.
18. Cardboard Pumpkin Garland
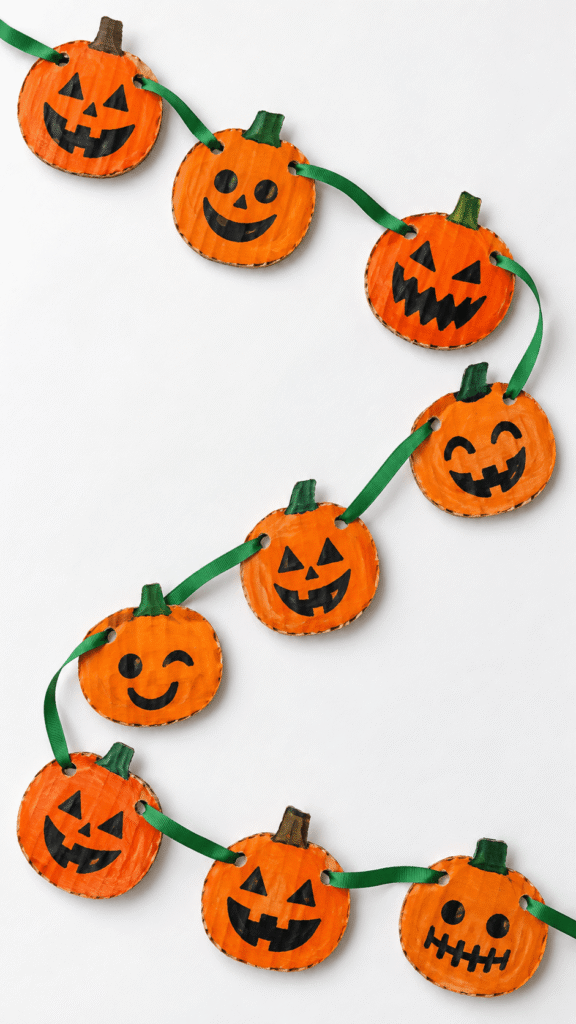
This one decorates a whole mantel, and it has the most cutting of any craft here. Corrugated cardboard is too tough for kids’ scissors, so either the cutting is your job or you swap in cereal box cardboard.
Ages: 5 to 7 | Mess: Medium | Time: 45 minutes plus drying | Supervision: Hands on (cutting)
Materials:
- Scrap cardboard (cereal boxes are easiest for kids to cut)
- Orange paint, plus black or green for stems and faces
- Green ribbon (saved gift ribbon works)
- Hole punch
- A mug or small bowl to trace
Steps:
- Trace around a mug or small bowl so all the pumpkins come out about the same size. Ten pumpkins make roughly a 5 foot garland.
- Cut them out (adult for corrugated, kids for cereal box cardboard) and add a stem bump at the top.
- Paint them orange, let them dry, then add stems and faces.
- Punch two holes near the top of each pumpkin, about an inch apart, and thread the ribbon in one hole and out the other.
- Space them evenly along the ribbon and hang.
Tip: Two holes per pumpkin keeps them facing forward. With one hole, half of them spin around and show their plain backs.
Common Mistakes With Recycled Crafts
Most recycled Halloween crafts fail for boring reasons, not creative ones. These are the ones I see every October, and I’ve made most of them myself.
- Crafting with containers that aren’t fully dry. Milk jugs and yogurt cups start to smell within days, and juice boxes grow mold inside where you can’t see it.
- Using washable kids’ paint on plastic. It’s the most common problem with Halloween crafts with recycled materials, and it shows up the first time anyone picks the craft up. Scuff the plastic and use multi surface paint or paint pens.
- Painting lanterns solid. Opaque paint blocks the light. Use tissue paper or a thinned paint and Mod Podge mix.
- Handing kids corrugated cardboard to cut. Their scissors chew it instead of cutting it, and frustration ends the craft. Give them cereal box cardboard and save the corrugated for yourself.
- Gluing things to plastic with school glue. Googly eyes slide right off yogurt cups and spoons. Tacky glue or glue dots hold.
- Trying to fit lights through a bottle neck or jug spout. Cut a slit or remove the top instead.
- Cutting mask eye holes the size of real eyes. Kids need to see the floor. Go bigger than you think.
- Giving glass jars to little kids. Under 8, use a plastic jar. It glows slightly less evenly, and nobody gets cut.
- Painting over wet newspaper or tissue. Wait for the glue underneath to dry, or the paper turns to pulp under the brush.
Practical note: Keep a small “craft ready” box next to the recycling, and only clean, dry, label free items go in it. When a rainy afternoon hits, you’re crafting in two minutes instead of scrubbing yogurt cups for twenty.
FAQs
What are easy recycled Halloween crafts for toddlers?
Paper bag ghost puppets, yogurt cup ghosts (white cups need no paint), and masking tape tube mummies. They use big pieces, need no paint, and an adult handles any cutting or poking.
What paint sticks to plastic for kids’ crafts?
Multi surface acrylic paint or paint pens stick best to plastic cups, spoons, and bottles. Scuff the plastic with sandpaper first, and in a pinch, stir a few drops of dish soap into tempera paint. Washable kids’ paint on its own flakes off once dry.
Are toilet paper roll Halloween crafts okay for school?
Some schools don’t accept used toilet paper tubes for hygiene reasons, so check with the teacher first. Paper towel tubes cut into thirds are the same size and get around the rule.
How do you clean recyclables for crafts?
Wash them in hot soapy water, soak labels for about 10 minutes before peeling, and dry everything upside down for a full day. Milk jugs and yogurt cups need the longest drying time, or they start to smell.
What are good Halloween crafts with recycled materials for older kids?
Tissue paper jar luminaries, bottle cap magnets, and a cereal box haunted house. Each takes 30 to 45 minutes and lets 8 to 12 year olds do detailed work, with an adult on the craft knife.
How do you light a milk jug ghost safely?
Use battery LED fairy lights fed through a small slit cut in the back of the jug, with the battery pack taped outside. Never put a candle in plastic.
Where to Go Next
If you’re crafting with a preschooler, 20 Easy Halloween Crafts for Preschoolers has paper plate, handprint, and sensory crafts with the same age, mess, and time ratings, and they pair well with the tube crafts above.
And if your kids loved turning trash into something, 20 Halloween Cardboard Crafts keeps the recycling theme going well past October.
My advice: don’t wait until you’ve saved the perfect pile. Pull whatever’s in the recycling right now, find its match in the table above, and make one tonight. The recycled Halloween crafts for kids that end up on our windowsill every year are always the ones made on a random weeknight with whatever happened to be in the bin.
