
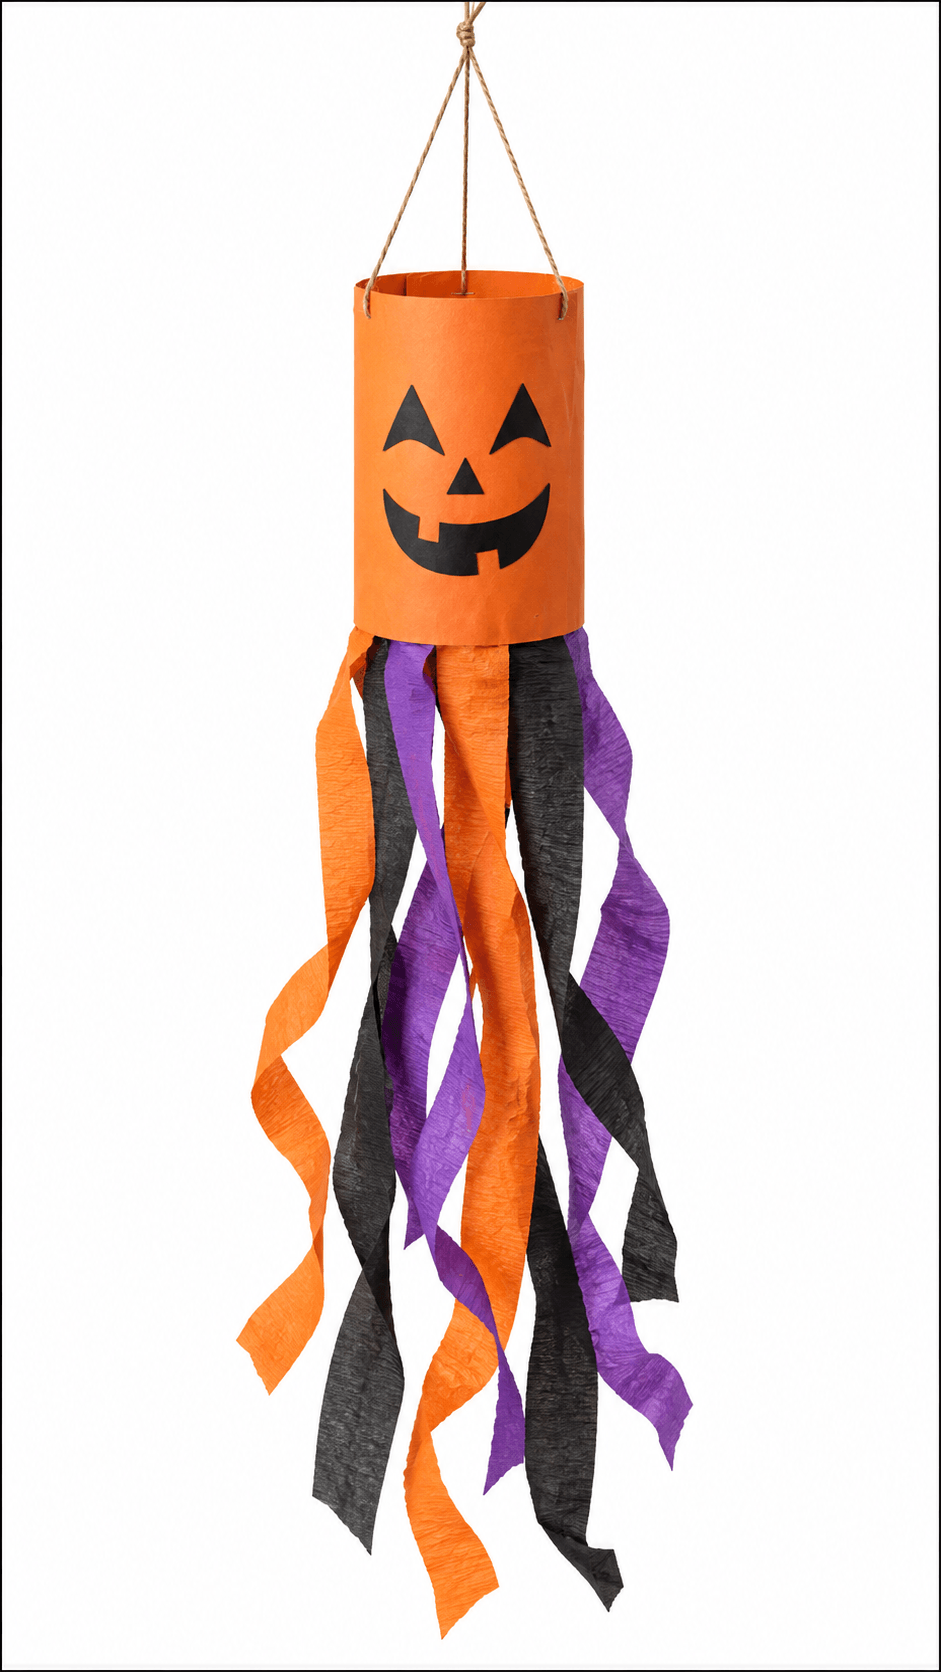
The easiest Halloween crafts for kids use paper plates, handprints, cotton balls, coffee filters, toilet paper tubes, and popsicle sticks, and most take 10 to 30 minutes. Toddlers and preschoolers (ages 2 to 5) do best with handprint ghosts, cotton ball ghosts, and coffee filter ghosts. Kids 5 to 10 can handle popsicle stick haunted houses, yarn wrapped pumpkins, painted monster rocks, and bat mobiles. For school, pick crafts with no drying time and prep a bag of precut pieces for each child.
Last October I signed up to run the craft table at my daughter’s class Halloween party. Twenty two kids, a 40 minute slot, and a teacher who quietly mentioned that glitter had been banned since “the incident” in September.
That same week, my son (four at the time) and I made coffee filter ghosts at the kitchen table. We took as long as we liked and nobody was waiting their turn.
The same craft works completely differently in those two places. At home you can wait for paint to dry. At school you have about 8 minutes per group and one adult for every six kids. So every craft below has a mess rating, an honest time estimate, and a note on whether it works for a classroom or is better saved for the kitchen table.
Updated for Halloween 2026: more schools are asking families to avoid food and loose glitter at class parties this year, so none of the Halloween party crafts below need either one.
Supplies for Easy Halloween Crafts for Kids (and Free Swaps)
Most of these 20 Halloween art projects for kids share the same basics, so one shopping trip in early October covers nearly all of them. Dollar stores and the back to school aisle are cheapest for paper plates, cotton balls, and popsicle sticks.
| Supply | What I use | Free or cheap swap |
| Paper plates | Plain, uncoated white plates (orange ones skip a painting step) | Circles cut from cereal box cardboard |
| Kids’ paint | Crayola Washable Kids’ Paint in orange, black, white, green, purple | Washable markers or crayons |
| Acrylic paint | Any craft acrylic, for rocks and popsicle sticks | Two coats of washable paint, sealed with Mod Podge |
| Glow paint | Glow in the dark acrylic (DecoArt and FolkArt both make one) | Glow in the dark stickers |
| Glue | Elmer’s School Glue and glue sticks | Flour and water paste for paper projects |
| Tacky glue | Aleene’s Original Tacky Glue, for yarn, cups, and rocks | Glue dots |
| Googly eyes | A mixed size pack | White paper circles with a marker dot |
| Cotton balls | Any store brand | Torn tissues or toilet paper |
| Coffee filters | White, round, flat bottom basket filters | Squares of white tissue paper |
| Popsicle sticks | Jumbo craft sticks (easier for small hands) | Paint stirrers from the hardware store, often free |
| Yarn | Orange, white, black | Strips cut from an old shirt |
| Contact paper | Clear self adhesive shelf liner | Wax paper and watered down school glue |
| Embroidery hoop | A 6 or 8 inch wooden hoop | A sturdy stick from the yard |
| Scissors | Blunt tip kids’ scissors (Fiskars makes good ones) | You do the cutting |
| Tea lights | Battery LED tea lights | No swap: never a real flame |
The recycling bin covers the rest: toilet paper tubes, cardboard egg cartons, paper cups, brown paper lunch bags, cereal boxes, and jars.
Two things are worth paying a little more for. The first is decent glue sticks, because cheap ones dry out and barely hold construction paper. The second is thick washable paint, because thin paint needs three coats and every extra coat costs you a kid’s attention.
If you’re buying for a class, look for the AP seal from the Art and Creative Materials Institute (ACMI) on paint, markers, and glue. Many schools ask for it, and it means the product has been certified nontoxic.
Making Halloween Crafts for Kids at School
Halloween classroom crafts live or die on prep. Twenty kids won’t wait while you cut cat ears, so everything that needs scissors happens at your kitchen table the night before.
Ask The Teacher First
Send a short message a week ahead. These five questions saved me from at least two disasters:
- Allergies: any food, latex, or wool allergies in the class?
- Banned supplies: glitter, hot glue, permanent markers, or toilet paper tubes? Some schools don’t accept used tubes for hygiene reasons.
- Time: how long is the slot, and do kids rotate through stations or all craft at once?
- Help: how many adults will be in the room?
- Drying space: is there a counter or windowsill where wet crafts can sit until pickup?
Pick For The Slot You Have
For a 30 to 45 minute party, the best Halloween party crafts need no drying time, like coffee filter ghosts, paper bag monster puppets, the ghost garland, or the paper cup witch. Anything painted works better on a regular classroom day, with the painting in the morning and assembly after lunch.
Prep One Bag Per Child
This is the single habit that makes Halloween classroom crafts run on time. Put every precut piece for one child into its own zip bag, and write the child’s name on the bag if the teacher sends you a class list.
Write names on the back of every plate, card, and bag before the craft starts, not after. Twenty two identical ghosts are impossible to sort at pickup time.
How Much To Buy For A Class Of 20
| Craft | What a class of 20 needs |
| Cotton Ball Ghosts | About 300 cotton balls (15 stretched balls per ghost) |
| Coffee Filter Ghosts | One 100 pack of basket filters, plus 20 cotton balls |
| Egg Carton Spiders | Two cardboard egg cartons (12 cups each) and 80 pipe cleaners cut in half |
| Friendly Paper Ghost Garland | 10 sheets of white cardstock (two ghosts per sheet) and about 12 feet of twine |
| Paper Plate Spider Web | One 25 pack of sturdy plates and one skein of white yarn |
| Popsicle Stick Haunted House | About 200 jumbo craft sticks (8 to 10 per house) |
Practical note: One adult per five or six kids is the limit for anything with paint. If you’re the only adult, choose a craft with glue sticks and markers only, and save the paint for home.
Safety and Mess Notes
None of these crafts are risky if you set them up right. A few hazards are easy to miss, though, because they show up after the craft is finished.
- Hanging strings and cords. Coffee filter ghosts, bat mobiles, garlands, and windsocks all hang by string. Hang them well out of reach of babies and toddlers, never near a crib or bed, since cords are a strangulation risk for young children.
- Coin batteries. Most LED tea lights run on a coin battery, and a swallowed one can cause serious internal burns within hours. Use lights with a screw shut battery cover, and keep spares put away.
- Glass jars. For the glow jars, check the rim for chips and give kids under 8 a plastic jar instead.
- Small parts. Googly eyes and pom poms are choking sized. For kids under 3, draw the eyes on or use peel and stick eyes you press down yourself.
- Pipe cleaner ends. The cut wire is sharp. Fold each tip back on itself before it goes into small hands.
- Glue guns. Adults only, or a low temp gun for kids 8 and up with you sitting beside them.
- Acrylic and glow paint. Neither washes out of clothes once dry. Old shirts on, sleeves rolled up.
- A dropped rock hurts toes, so rock painting stays at the table. Bring rocks from your own yard or a bag from a garden center, and don’t collect them from parks or beaches where it isn’t allowed.
Each craft also has one of three supervision levels:
- Nearby: you can be cooking dinner in the same room.
- At the table: you’re sitting with them the whole time.
- Hands on: you’re doing part of it yourself, usually the cutting or poking.
Mess level is Low, Medium, or High. High means paint is going places it shouldn’t, so put down a plastic tablecloth or an old shower curtain first.
All 20 Halloween Crafts for Kids at a Glance
Use the last column to sort the classroom friendly crafts from the ones better made at home. Times are active time, and any drying is listed after the plus sign.
| # | Craft | Ages | Mess | Time | Good for school? | Supervision |
| 1 | Cotton Ball Ghosts | 2 to 5 | Medium | 15 min + overnight | Yes, with a drying spot | At the table |
| 2 | Coffee Filter Ghosts | 3 to 7 | Low | 10 min | Yes, no drying | At the table |
| 3 | Spider Handprint Craft | 3 to 7 | High | 10 min + 20 min | Only as a one child station | Hands on |
| 4 | Handprint Ghost | 2 to 6 | High | 10 min + 15 min | Only as a one child station | Hands on |
| 5 | Mummy Paper Craft | 3 to 7 | Low | 15 min | Yes, no drying | At the table |
| 6 | Paper Plate Jack-o’-Lantern | 2 to 5 | Medium | 15 min + 20 min | Yes, with orange plates | Nearby |
| 7 | Paper Cup Witch | 4 to 8 | Low | 20 min | Yes, no drying | At the table |
| 8 | Paper Bag Monster Puppets | 4 to 9 | Low | 20 min | Yes, no drying | Nearby |
| 9 | Toilet Paper Roll Bat | 4 to 8 | Medium | 20 min + 30 min | Yes, paper wrapped version | At the table |
| 10 | Egg Carton Spiders | 4 to 8 | Medium | 20 min + 30 min | Yes, holes poked ahead | Hands on |
| 11 | Hanging Bat Mobile | 5 to 10 | Low | 30 min | Better at home | At the table |
| 12 | Pumpkin Suncatcher | 4 to 8 | Low | 20 min | Yes, no drying | At the table |
| 13 | Glow-in-the-Dark Halloween Jars | 6 to 10 | Medium | 30 min + 1 hr | Home only | Hands on |
| 14 | Halloween Windsock | 4 to 8 | Low | 25 min | Yes, no drying | At the table |
| 15 | Friendly Paper Ghost Garland | 5 to 10 | Low | 20 min | Yes, as a class garland | Nearby |
| 16 | Halloween Monster Rocks | 4 to 10 | Medium | 20 min + 1 hr | Better at home | At the table |
| 17 | Pumpkin Yarn Wrapping | 5 to 10 | Low | 25 min | Yes, no drying | Nearby |
| 18 | Popsicle Stick Black Cat | 5 to 9 | Medium | 25 min + 30 min | On a classroom day, not a party | At the table |
| 19 | Paper Plate Spider Web | 5 to 10 | Low | 20 min | Yes, holes punched ahead | At the table |
| 20 | Popsicle Stick Haunted House | 5 to 10 | Medium | 30 min + 30 min | On a classroom day, not a party | At the table |
Soft, Fluffy, and Handprint Crafts (Ages 2 to 7)
These six are where the youngest kids should start. Nothing needs precise cutting, there’s no wrong answer, and the finished pieces look sweet even when the eyes end up on the chin.
The handprint ones are also the Halloween art projects for kids that parents actually keep. Write the name and date on the back of every one.
1. Cotton Ball Ghosts (Ages 2–5)
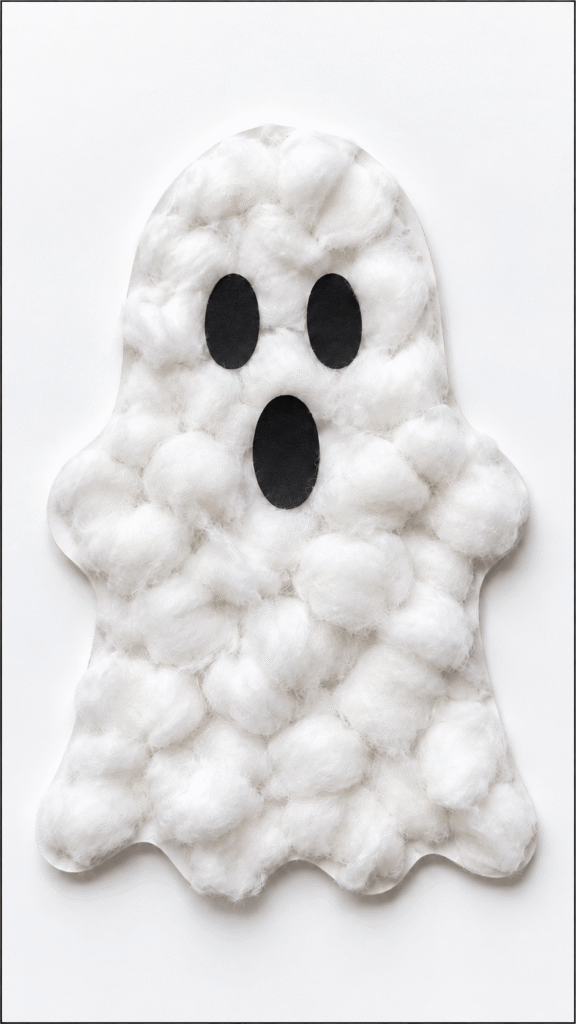
The most satisfying craft on this list for 2 year olds. Pressing fluffy cotton into glue is the whole activity, and they’ll happily do it for 15 minutes straight.
Mess: Medium (glue) | Time: 15 minutes plus overnight drying | Supervision: At the table | School: Yes, if there’s a place to dry them flat
You’ll Need
- White cotton balls
- White cardstock (or black, so the ghost stands out)
- School glue poured into a shallow puddle on a paper plate
- Black construction paper or googly eyes for the face
- A black marker for the outline
How to Make It
- Draw a simple ghost outline on the cardstock: a tall rounded top with a wavy bottom.
- Pour a puddle of school glue onto a paper plate.
- Show your child how to dip the flat side of a cotton ball into the glue and press it inside the outline.
- Keep going until the ghost is fully covered, then let it dry flat overnight.
- Add the face with black paper eyes and mouth, or googly eyes.
Tip: Dipping works far better than spreading glue on the paper first. Little kids spread glue everywhere except inside the lines, and glue sticks barely hold cotton at all.
What goes wrong: Drawing the face on with marker after it dries. The tip snags in the cotton fibers and the face barely shows up. Paper shapes or googly eyes look much better.
2. Coffee Filter Ghosts (Ages 3–7)
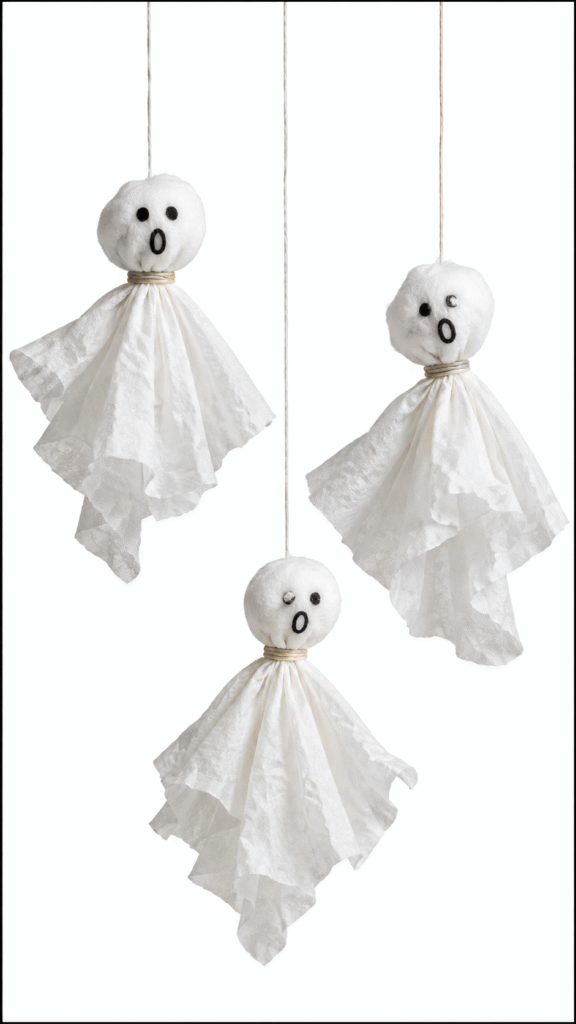
My son made a whole family of these at the kitchen table, and they floated over the dining room for the rest of October. They need no glue and no drying, which also makes them one of the best quick Halloween party crafts.
Mess: Low | Time: 10 minutes | Supervision: At the table | School: Yes, no drying
You’ll Need
- White coffee filters (the round, flat bottom basket style, not cone filters)
- Cotton balls
- Twist ties or small rubber bands
- Black marker
- String or clear thread
How to Make It
- Place one cotton ball in the center of a flattened filter.
- Gather the filter down around the cotton ball to make a round head.
- Wrap a twist tie or rubber band tightly under the head to make a neck.
- Tap two dot eyes and an “oh” mouth onto the head with the marker.
- Tie a string around the neck, or poke it through the top of the head, and hang it up.
What goes wrong: Coffee filters soak up marker ink like a paper towel. If a child holds the marker against the filter, the eye spreads into a big blurry blob. Tap quickly, don’t draw.
Younger vs older: 3 year olds need you to do the twist tie. Kids 6 and up can make two filters per ghost for a fuller skirt, or color the edges with washable markers before gathering.
3. Spider Handprint Craft (Ages 3–7)
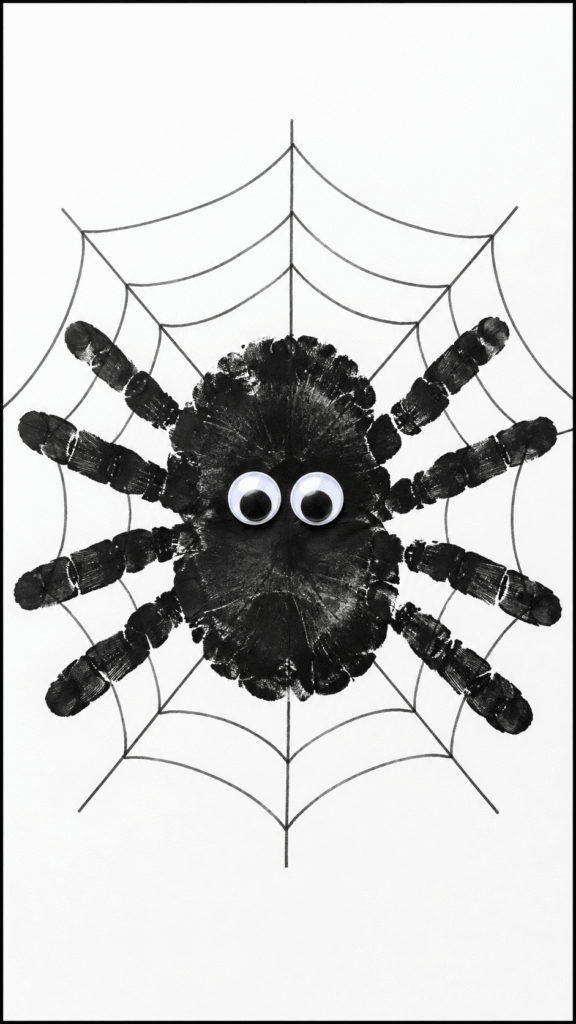
Two handprints facing opposite ways, thumbs tucked under, give you exactly eight legs. Leave the thumbs in and you get a ten legged spider, which some kids think is even better.
Mess: High | Time: 10 minutes plus about 20 minutes drying | Supervision: Hands on | School: Only as a station, one child at a time
You’ll Need
- Black washable paint
- White paper or cardstock
- Foam brush
- Googly eyes
- Glue
- Optional: a gray or black fine marker for the web
How to Make It
- Paint your child’s palm and four fingers black, leaving the thumb clean.
- Press the hand down with fingers spread, thumb tucked under.
- Wipe, repaint, and press the second hand facing the opposite way so the palms overlap.
- Once dry, glue big googly eyes where the palms overlap.
- Draw a web around the spider.
Tip: The classic suggestion is a silver marker for the web, but silver on white paper is almost invisible. Use a gray or black fine marker on white, or make the spider on orange paper and then use silver.
At school: Set this up as a station at the edge of the table with one adult, a bowl of warm soapy water, and a towel. Kids come over one at a time while everyone else works on something dry.
4. Handprint Ghost (Ages 2–6)
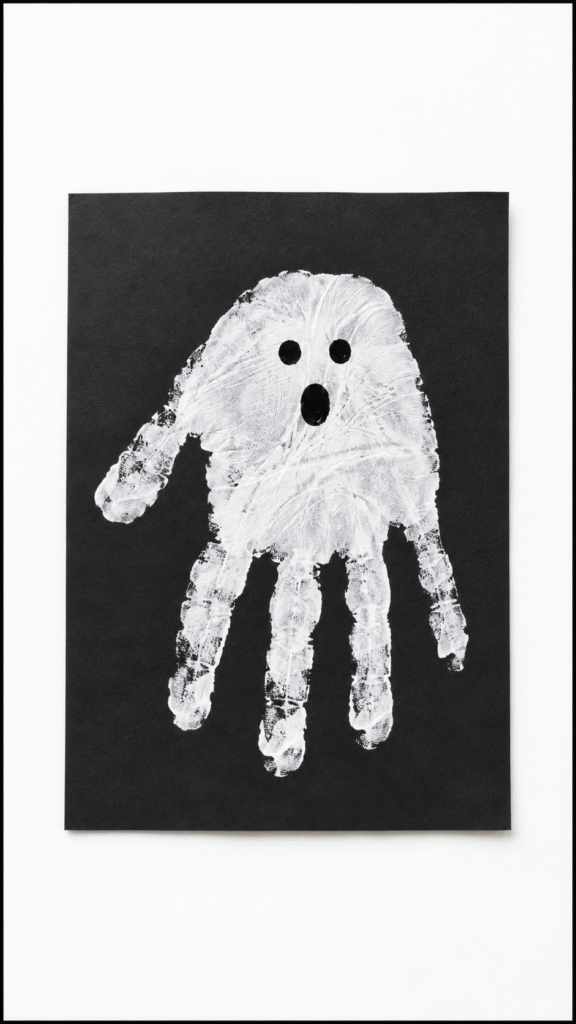
White paint on black paper, turned so the fingers point down, makes a ghost with a wispy tail. It takes two minutes of actual painting, and it’s the one grandparents always ask for a copy of.
Mess: High (white paint shows on everything) | Time: 10 minutes plus about 15 minutes drying | Supervision: Hands on | School: Only as a station
You’ll Need
- Black construction paper
- White paint
- Paintbrush
- Black marker
- Googly eyes (optional)
How to Make It
- Brush white paint over your child’s palm and fingers. Be quick, because it tickles.
- Press the hand onto the black paper with the fingers pointing down toward you.
- Press each finger down gently with your own fingers so the tips print fully.
- Once dry, add two eyes and a round “boo” mouth with marker or googly eyes.
Trade off: White kids’ paint goes on thin, and a thin print looks gray and see through on black paper. Load the brush heavily or press twice in the same spot. A thicker poster paint covers in one go but takes longer to dry.
5. Mummy Paper Craft (Ages 3–7)
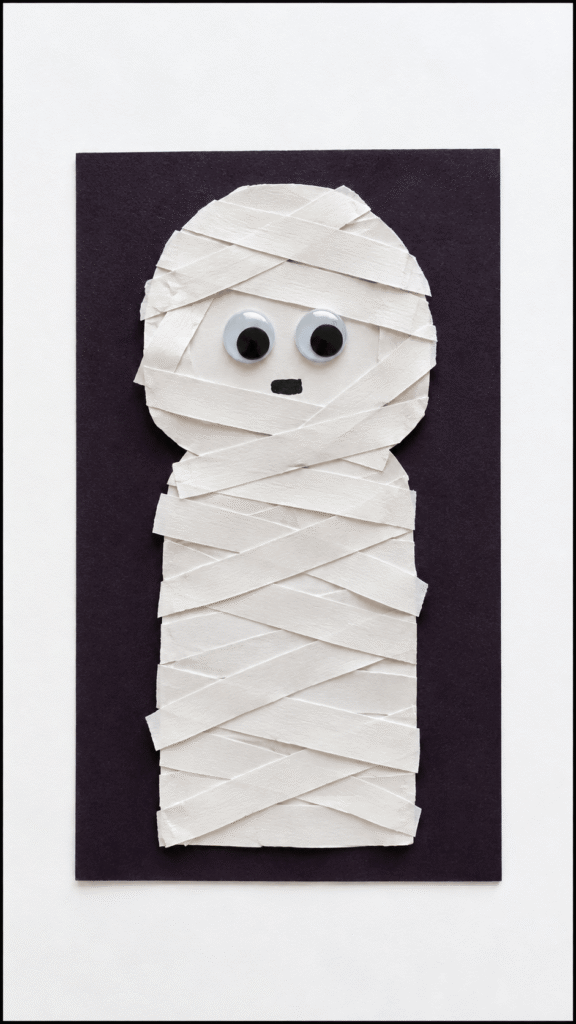
Tearing and gluing paper strips is ideal for kids who don’t want paint on their hands. It’s also one of the easy Halloween crafts for kids I reach for when I have 15 minutes and a stack of scrap paper.
Mess: Low | Time: 15 minutes | Supervision: At the table | School: Yes, no drying
You’ll Need
- White cardstock
- White paper, cut into strips about half an inch wide
- Scissors
- Glue stick
- Googly eyes
- Black marker
- A sheet of black or purple paper for the background
How to Make It
- Cut a simple mummy shape from cardstock: a rounded head on a rectangle body works fine.
- Rub glue stick over a section and lay strips across it at different angles, letting them hang off the edges.
- Leave a small gap near the top for the face.
- Flip it over and trim the overhanging strips along the edge of the cardstock.
- Glue on googly eyes in the gap and draw a small mouth.
- Glue the mummy onto the black or purple background.
Tip: White strips on white cardstock disappear in photos and on the fridge. The dark background is what makes the wrapping actually show. For more texture, swap the paper strips for crepe paper or gauze.
6. Paper Plate Jack-o’-Lantern (Ages 2-5)
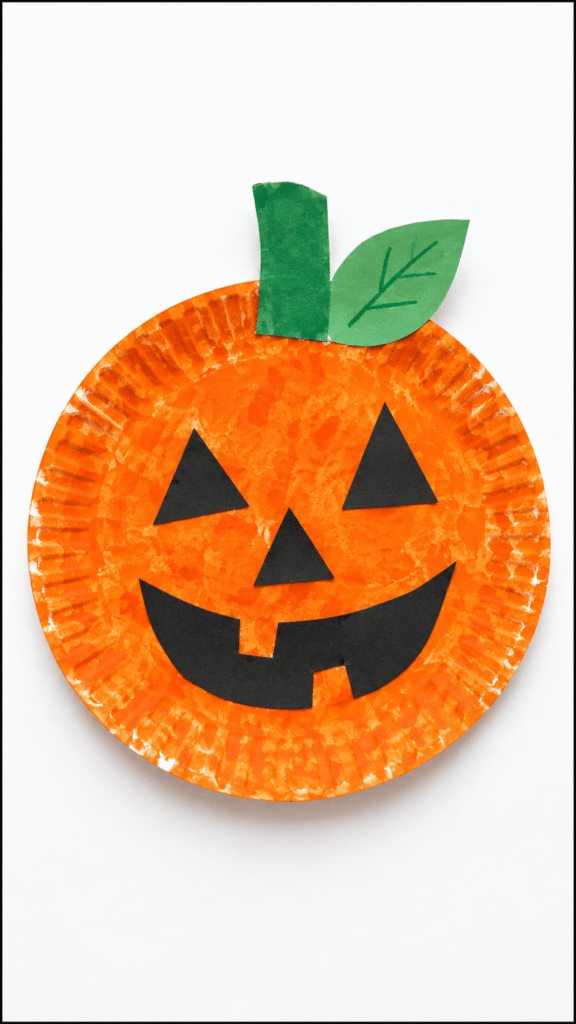
The classic. A 2 year old can paint it, and a 5 year old can cut their own face shapes.
Mess: Medium | Time: 15 minutes plus about 20 minutes drying | Supervision: Nearby | School: Yes, with orange plates
You’ll Need
- Paper plate (orange plates skip the painting)
- Orange paint and a sponge
- Green and black construction paper
- Glue stick
- Blunt tip kids’ scissors
How to Make It
- Sponge the plate orange. Sponges drip less than brushes and cover faster.
- While it dries, cut a green stem and leaf and a handful of black triangles, circles, and a wide mouth.
- Glue the stem and leaf at the top.
- Let your child glue the face on wherever they like, silly or spooky.
What goes wrong: Heavily painted paper plates curl into a bowl as they dry. Use one thin coat and dry them face up on a flat surface, or stack a heavy book on top once they’re barely damp.
At school: Use orange plates and precut face pieces. The whole craft then takes 10 minutes with no drying.
Crafts From the Recycling Bin (Ages 4 to 9)
Cups, bags, tubes, and egg cartons turn into characters with a little paper and glue. These four are also the cheapest Halloween classroom crafts on the list, since families can send in the supplies from home.
7. Paper Cup Witch (Ages 4–8)

The hat makes this one of my favorite Halloween party crafts. Kids are always surprised that a flat piece of paper rolls into a perfect cone.
Mess: Low | Time: 20 minutes | Supervision: At the table | School: Yes, no drying
You’ll Need
- Paper cup
- Green, black, and purple construction paper
- Tacky glue or glue dots
- Googly eyes
- Black marker
- Yarn (orange, yellow, or black)
- Tape
How to Make It
- Turn the cup upside down. Wrap it in purple paper for the witch’s dress if you like.
- Cut a green circle about 2 inches across for the face and glue it near the top. Add googly eyes and draw a smile.
- Glue short lengths of yarn around the top of the cup for hair, letting them hang down the sides.
- For the hat, trace a small bowl about 6 inches across on black paper and cut out a quarter of the circle. Roll it into a cone and tape the seam.
- Cut a black circle about 3 inches across for the brim. Glue the brim on top of the cup over the hair, then glue the cone on the brim.
What goes wrong: Most paper cups have a waxy or plastic coating, and glue sticks slide right off. Tacky glue or glue dots hold; school glue needs 10 minutes of holding still, which no 4 year old will do.
At school: Precut the hats and roll them yourself. The cone is the only fiddly step, and kids love decorating everything else.
8. Paper Bag Monster Puppets (Ages 4–9)
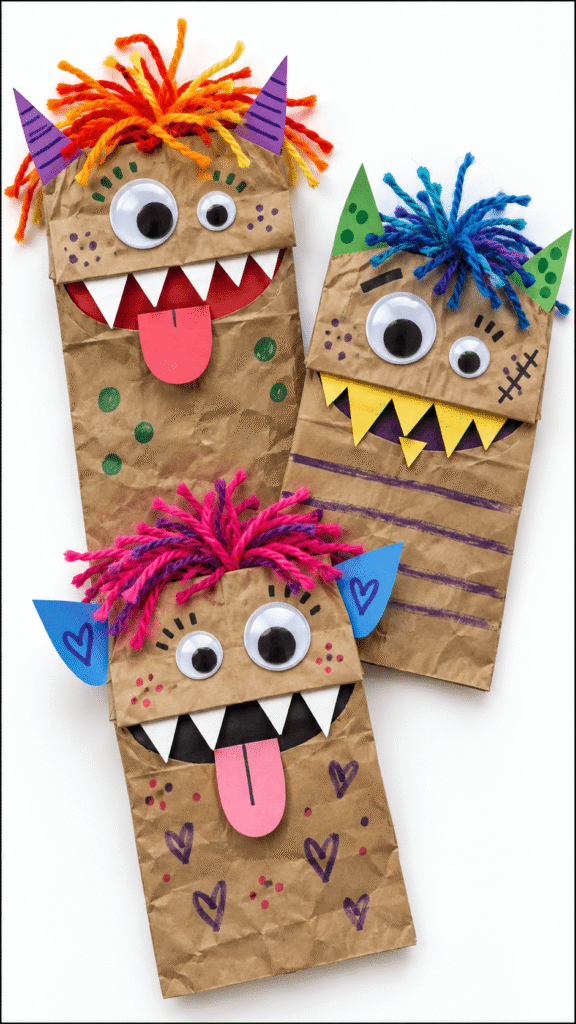
These are pure imagination, and they get played with for weeks. I keep a bowl of precut eyes, horns, and teeth in different colors and let kids build whatever monster they want.
Mess: Low | Time: 20 minutes | Supervision: Nearby | School: Yes, no drying
You’ll Need
- Brown paper lunch bags
- Construction paper scraps
- Markers
- School glue and a glue stick
- Googly eyes in mixed sizes
- Yarn
How to Make It
- Lay the bag flat with the folded bottom flap on top. The flap is the monster’s head.
- Glue on eyes, horns, and ears with a glue stick.
- For a mouth that moves, glue the top teeth along the bottom edge of the flap, and the bottom teeth on the bag just underneath it.
- Add yarn hair with school glue and press it for 30 seconds, or tape it to the underside of the flap.
- Draw freckles, eyebrows, or scars with marker, then slip a hand inside.
Younger vs older: 4 year olds do best picking pieces from a precut bowl. Kids 7 to 9 like designing a monster, giving it a name, and writing a short backstory on the back of the bag.
At school: This is my favorite way to end Halloween party crafts. When kids finish, they do a two minute puppet show for their table, and that fills the last 10 minutes of the party with no extra setup.
9. Toilet Paper Roll Bat (Ages 4–8)
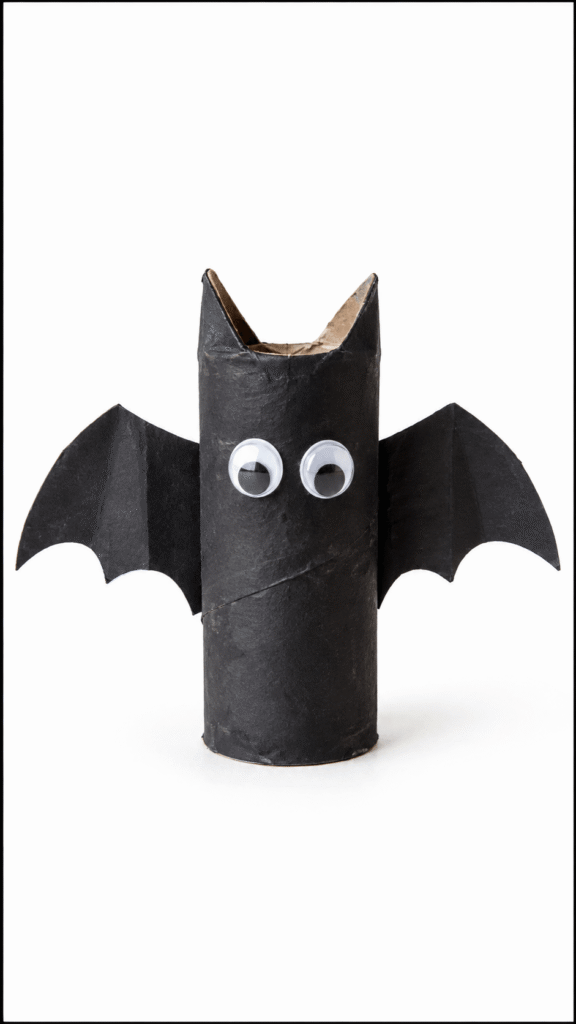
The original painted version is great at home. For school, I wrap the tube in black paper instead. It looks just as good and there’s nothing to dry.
Mess: Medium painted, Low wrapped | Time: 20 minutes plus 30 minutes drying (or 15 minutes wrapped) | Supervision: At the table | School: Yes, paper wrapped version
You’ll Need
- Empty toilet paper roll (or a paper towel tube cut into thirds)
- Black paint, or a 4 by 6 inch piece of black construction paper
- Black construction paper for wings
- Googly eyes
- Glue stick
- String (optional)
How to Make It
- Paint the tube black and let it dry, or wrap it in the black paper rectangle using glue stick. That size fits a standard tube with a small overlap.
- Push the top edge down and inward from the front and the back so it folds into two pointed ears.
- Fold a sheet of black paper in half. Draw half a bat wing against the fold, with a scalloped bottom edge, and cut it out.
- Open it up and glue the wings across the back of the tube.
- Add googly eyes, and tape a loop of string inside the top if you want to hang it.
Tip: Cutting the wings on a fold gives you two matching wings in one piece, and one piece is much easier for small hands to glue on straight.
What goes wrong: Folding the ears on a painted tube before it’s fully dry. Damp cardboard collapses instead of creasing.
10. Egg Carton Spiders (Ages 4–8)

One carton makes 12 spiders, so two cartons cover a whole class. The trick here is a tiny hook inside each leg so the legs don’t fall out the first time someone plays with it.
Mess: Medium | Time: 20 minutes plus 30 minutes drying | Supervision: Hands on (you poke the holes) | School: Yes, with holes poked ahead
You’ll Need
- Cardboard egg carton (foam cartons won’t hold paint and crack when poked)
- Black paint, or a thick black marker for a no paint version
- 4 black pipe cleaners per spider, cut in half
- Googly eyes
- Glue
- A pushpin and a sharp pencil
How to Make It
- Cut the carton into single cups and trim the edges so each one sits flat.
- Paint each cup black, or color it with a thick black marker. Cardboard soaks up marker fast, and there’s no drying.
- Adult: poke four holes in a row along each side with a pushpin, then widen them with the pencil tip.
- Push one pipe cleaner half about half an inch into each hole. Bend the inside tip into a small hook so it can’t pull back out.
- Bend each leg into a knee and a foot, then glue on the eyes.
Trade off: The marker version is faster and much cleaner for school, but the cardboard texture shows through as gray streaks. Paint gives a solid black finish if you have time to let it dry.
Decorations Kids Can Hang or Light Up
These five are the Halloween crafts for kids that actually decorate the house, not just the fridge. Most are hung by string, so check the cord note in the safety section before they go up near little ones.
11. Hanging Bat Mobile (Ages 5–10)
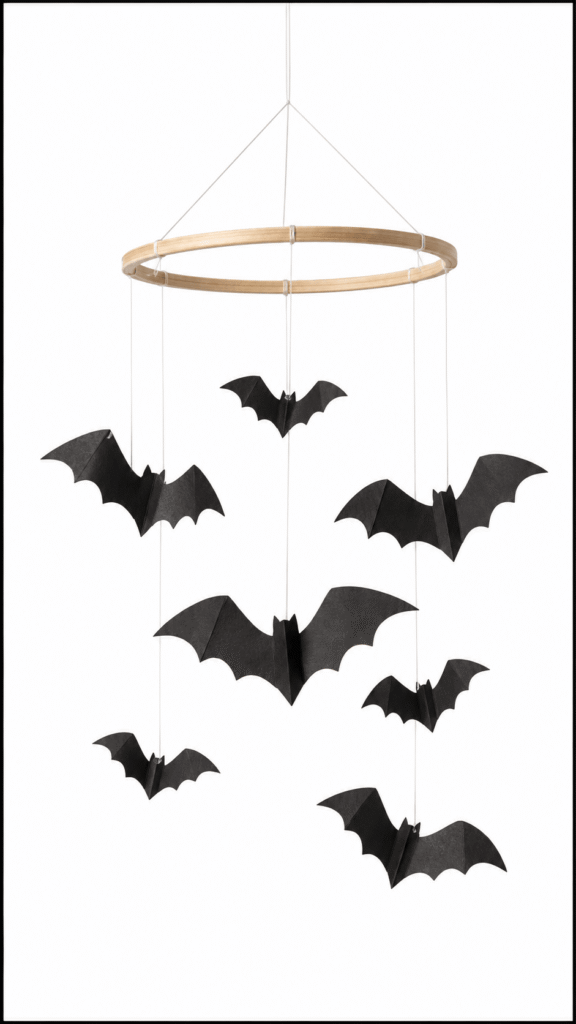
A mobile looks simple until you hang it and the whole thing tips to one side. The fix is to hang the hoop first and add bats while it’s already in the air.
Mess: Low | Time: 30 minutes | Supervision: At the table | School: Better at home (it needs somewhere to hang while you build it)
You’ll Need
- Black cardstock
- String, or clear thread so the bats look like they’re floating
- Embroidery hoop (inner ring only) or a sturdy stick
- Tape
- Blunt tip kids’ scissors
- A bat template drawn on cereal box cardboard
How to Make It
- Trace and cut six to eight bats in two or three sizes. Older kids can cut freehand.
- Fold each bat gently down the middle so the wings tilt up. Folded bats catch the air and slowly turn.
- Tape a string to the back of each bat. Tape holds better than glue on cardstock.
- Tie three equal strings around the hoop, spaced evenly, and knot them together above the center. Hang it from that knot.
- Tie the bats on at different lengths, adding them in opposite pairs so the hoop stays level.
Younger vs older: 5 year olds cut along a traced template while you do the tying. Kids 8 and up can balance the whole mobile themselves, and they get oddly competitive about it.
12. Pumpkin Suncatcher (Ages 4–8)
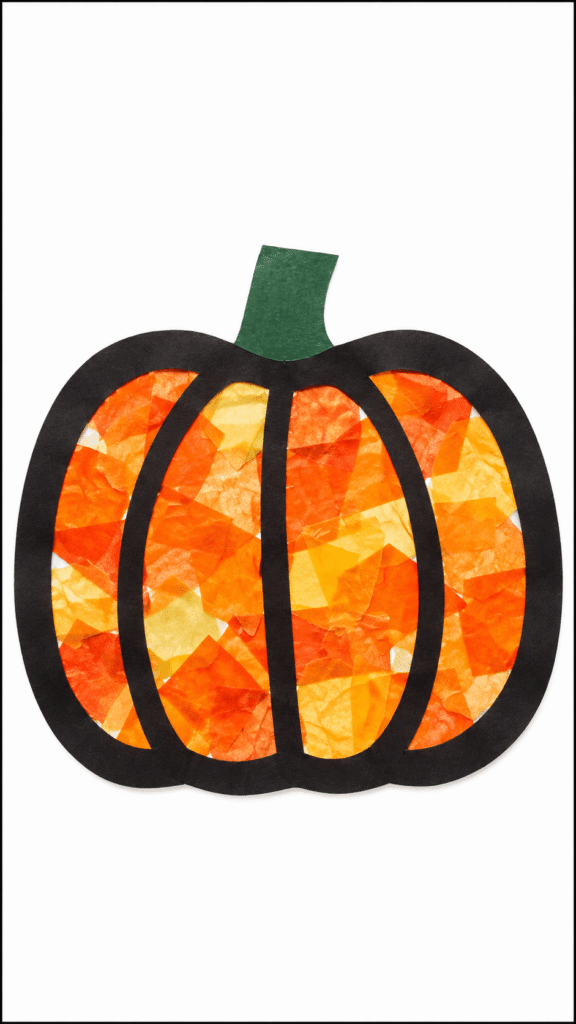
Torn tissue paper on sticky contact paper, framed in black and stuck to a sunny window. It’s one of the easiest no glue Halloween art projects for kids, and the light through it really does glow.
Mess: Low | Time: 20 minutes | Supervision: At the table | School: Yes, no drying
You’ll Need
- Orange and yellow tissue paper, torn into small pieces
- Clear contact paper (two pieces per pumpkin)
- Black construction paper
- Green paper
- Scissors
- Masking tape
How to Make It
- Cut a pumpkin outline from black paper, leaving a frame about an inch wide, with a stem bump at the top.
- Peel the backing off one piece of contact paper and tape it to the table sticky side up, taping all four corners.
- Press the black frame onto the sticky side.
- Let your child fill the inside with torn tissue paper, mostly orange with a few yellow pieces, plus a green stem.
- Press the second piece of contact paper on top, sticky side down, and trim around the frame.
What goes wrong: Contact paper curls up the moment you peel the backing, and then sticks to itself. Taping all four corners down before your child starts saves the whole craft.
Trade off: Tissue paper fades fast in strong sun. On a south facing window, the orange looks noticeably paler within a couple of weeks, so make it close to Halloween.
13. Glow-in-the-Dark Halloween Jars (Ages 6–10 with adult supervision)
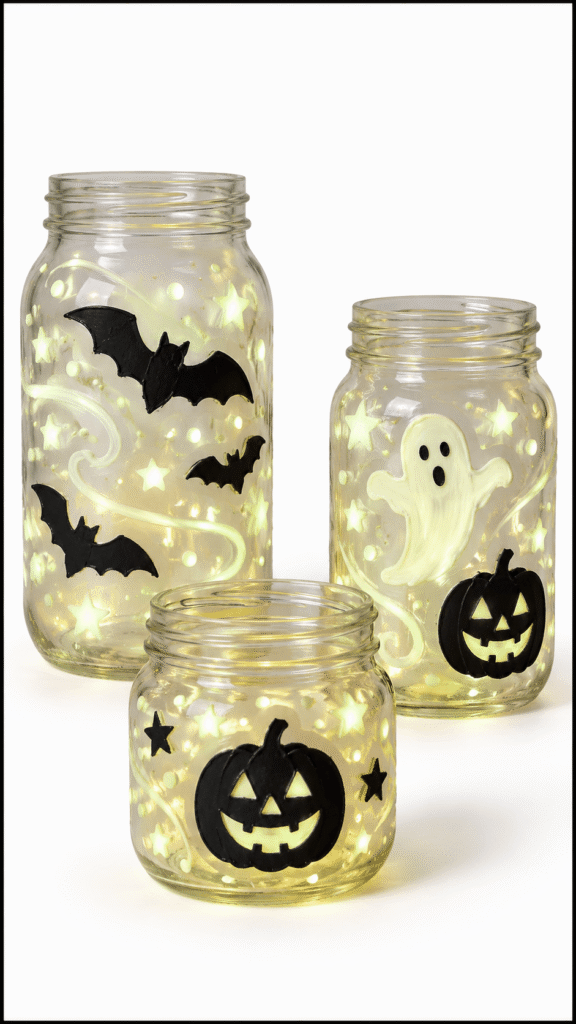
Nobody tells you this: glow paint looks almost invisible in daylight. It goes on as a pale cream or green, and every kid I’ve done this with has decided it didn’t work. Then the lights go off.
Mess: Medium | Time: 30 minutes plus about 1 hour drying | Supervision: Hands on | School: Home only (you need a dark room)
You’ll Need
- Clean jar (glass for kids 8 and up, plastic for younger kids)
- Glow in the dark acrylic paint
- Paintbrush and cotton swabs
- Black construction paper (or black vinyl, cut by an adult)
- Glue
- Battery LED tea light with a secure battery cover
How to Make It
- Wash the jar, peel off the label, and wipe the outside with rubbing alcohol.
- Dab glow paint onto the outside in dots, stars, or swirls with a cotton swab. Reaching inside a jar with a brush is frustrating for kids.
- Let it dry, then add a second coat over the same spots. Thicker glow paint glows brighter.
- Glue black paper bats, pumpkins, or ghosts between the glowing dots.
- Set the jar under a bright lamp or in sunlight for at least 10 minutes to charge it, then switch off the lights.
Tip: The tea light and the glow are two different effects. Leave the white LED on for a while to help recharge the paint, then switch it off to see the glow. With the tea light on, you can barely see the glow at all.
Trade off: Most craft glow paints fade noticeably within half an hour of the lights going off. It’s a bedtime trick, not an all night decoration.
14. Halloween Windsock (Ages 4–8)
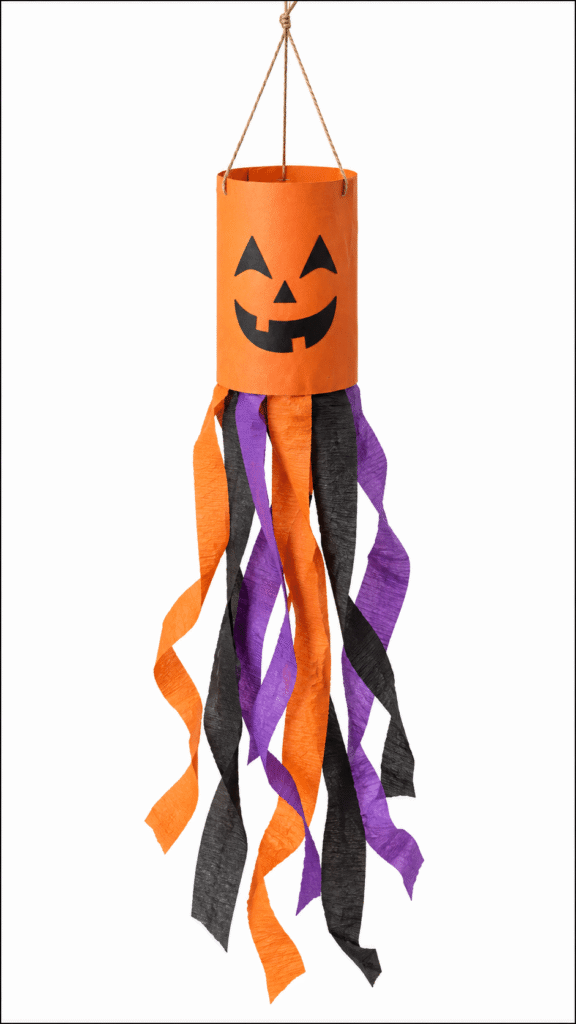
The best tip for this one: decorate the paper flat, before you roll it. Gluing a pumpkin face onto a curved tube is twice as hard for small hands.
Mess: Low | Time: 25 minutes | Supervision: At the table (adult staples) | School: Yes, no drying
You’ll Need
- Orange or black construction paper
- Crepe paper streamers
- Glue stick
- Stapler and tape
- Markers and paper scraps
- String
- Hole punch
How to Make It
- Lay the paper flat and decorate it as a pumpkin, ghost, bat, or monster face.
- Glue streamer strips about 18 inches long along the inside of one long edge.
- Roll the paper into a tube, overlapping the edges by an inch, and staple near the top and bottom.
- Cover the inside of each staple with a piece of tape.
- Punch three evenly spaced holes around the top, tie a string through each, and knot them together.
Trade off: Construction paper fades fast in sun and goes floppy in rain. Hang it under a covered porch or just inside a window, not out in the open yard.
15. Friendly Paper Ghost Garland (Ages 5–10)
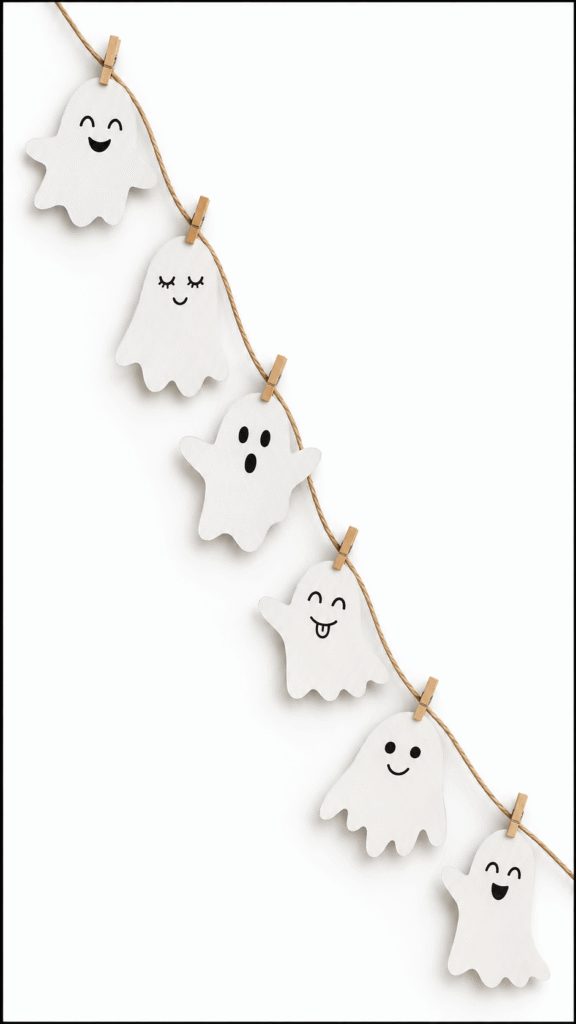
This is the best whole class craft on the list. Every child decorates one ghost, and together they make a garland that runs the length of the classroom window.
Mess: Low | Time: 20 minutes | Supervision: Nearby | School: Yes, as a class garland
You’ll Need
- White cardstock
- Black marker
- String or twine
- Hole punch
- Tape or mini clothespins
- A ghost template traced onto cereal box cardboard
How to Make It
- Trace the template onto cardstock. Two ghosts fit on one sheet.
- Cut them out (kids 7 and up can cut their own).
- Draw a different face on each ghost: happy, sleepy, surprised, silly.
- Clip each ghost onto the twine with a mini clothespin, or punch a hole at the top and thread it on.
- Hang it across a window, doorway, or mantel.
Tip: Clothespins keep every ghost facing forward, while a single punched hole lets them spin around. Clothespins also let kids swap ghosts around and add pumpkins and bats between them.
At school: 22 ghosts spaced about 6 inches apart make a garland about 11 feet long. Measure your window before you buy the twine.
Popsicle Sticks, Yarn, and Rocks for Older Kids
Kids 5 to 10 want a craft that takes some building. These five take a bit longer, need a bit more patience, and give older kids something to be properly proud of.
16. Halloween Monster Rocks (Ages 4–10)
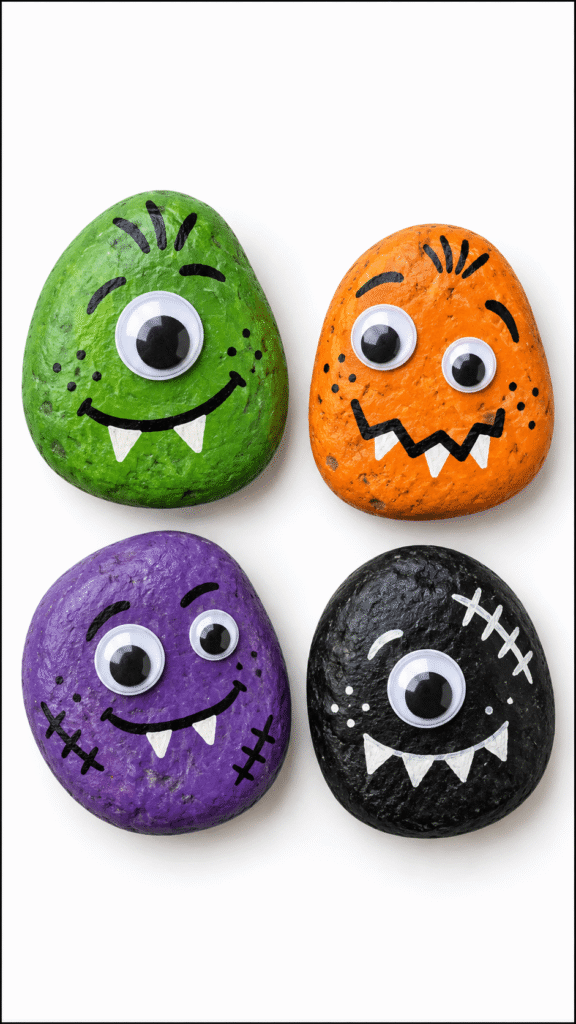
We painted a whole tray of these last fall, and three still sit by the front door a year later. The two that didn’t survive were painted with washable paint, which rubbed off in the first rain.
Mess: Medium (acrylic doesn’t wash out) | Time: 20 minutes plus about 1 hour drying | Supervision: At the table | School: Better at home
You’ll Need
- Smooth, flat, palm sized rocks (from your yard, or a bag of river rocks from a garden center)
- Acrylic paint, plus white for a base coat
- Paintbrushes
- Paint pens for details (Posca pens work well on rock)
- Googly eyes and tacky glue
- Mod Podge or a clear outdoor sealer (adult, outdoors)
How to Make It
- Scrub the rocks with soapy water and let them dry completely.
- Paint a white base coat. Bright colors look dull and muddy straight on gray rock.
- Once it’s dry, paint the monster color: green, orange, purple, or black.
- Add mouths, teeth, freckles, and eyebrows with paint pens once the color is dry.
- Glue on googly eyes with tacky glue and let them set.
- Seal with Mod Podge for indoor rocks, or have an adult spray outdoor rocks with clear sealer outside.
What goes wrong: Regular markers smear on acrylic paint and wear off with handling. Paint pens stay put.
Younger vs older: 4 year olds do the base coats and googly eyes while you add the faces. Kids 8 and up can do fine details like stitched mouths and fangs.
17. Pumpkin Yarn Wrapping (Ages 5–10)
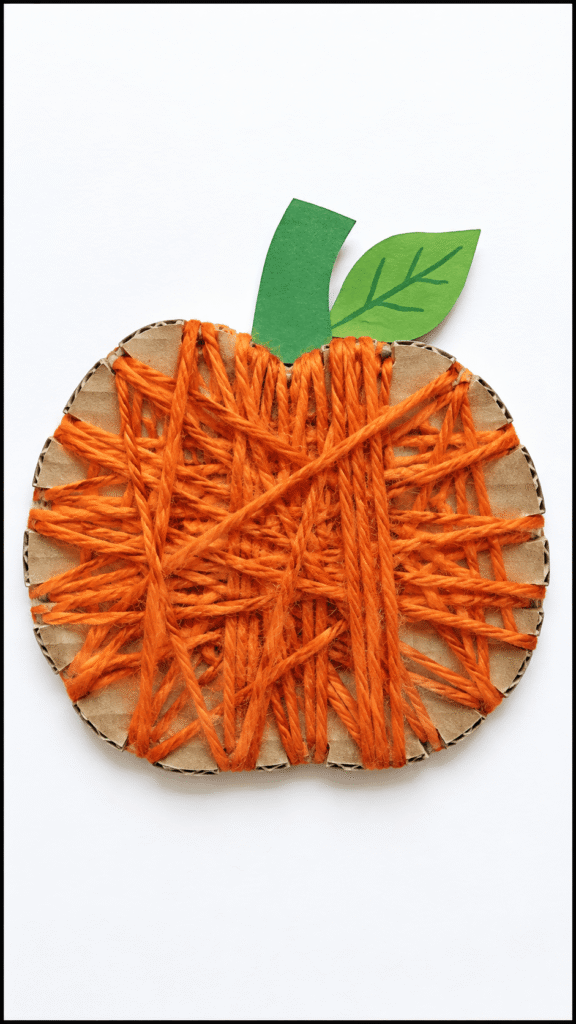
This is the quiet one among these Halloween art projects for kids. Wrapping yarn around and around is calming, and it’s my go to when a kid needs to settle down after a sugar heavy class party.
Mess: Low | Time: 25 minutes | Supervision: Nearby | School: Yes, no drying
You’ll Need
- Corrugated cardboard (a shipping box side)
- Orange yarn wound into a small ball
- Green paper
- Glue and tape
- Blunt tip kids’ scissors
How to Make It
- Cut a pumpkin shape about 6 inches wide from the cardboard (adult job).
- Snip small notches about half an inch apart all around the edge.
- Tape the end of the yarn to the back.
- Wrap the yarn around the pumpkin in different directions, catching it in the notches so it doesn’t slide off.
- When most of the cardboard is covered, tape the end on the back.
- Glue a green paper stem and leaf at the top.
Tip: Hand kids a small ball of yarn, never the whole skein. A long loose strand knots up within three wraps, and then you’re spending the craft untangling.
Trade off: Kids’ scissors can’t cut corrugated cardboard cleanly, so the pumpkin shapes and notches are your job. Cereal box cardboard is easy to cut but bends as soon as the yarn pulls tight.
18. Popsicle Stick Black Cat (Ages 5–9)
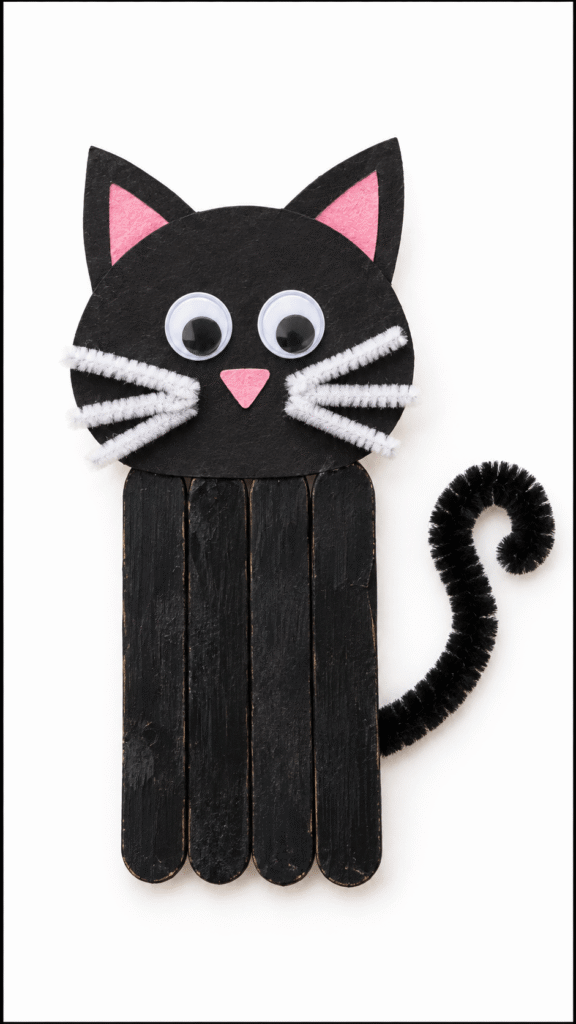
A row of jumbo sticks becomes the body, and a cardstock head sits on top. The curled pipe cleaner tail is everyone’s favorite part.
Mess: Medium | Time: 25 minutes plus about 30 minutes drying | Supervision: At the table | School: On a classroom day, not a party
You’ll Need
- Jumbo popsicle sticks (about 6 per cat)
- Black acrylic paint
- Black cardstock
- Pink paper
- Googly eyes
- School glue
- White pipe cleaner, plus one black pipe cleaner for the tail
- A white paint pen or white gel pen
How to Make It
- Lay four sticks side by side and glue two more across the back as braces. Let it set for 20 minutes.
- Paint the front black. Acrylic covers in one coat, while washable paint needs two.
- Cut a cat head from black cardstock with two pointed ears, and glue small pink triangles inside the ears.
- Glue the head to the top of the sticks and add googly eyes.
- Glue on short pieces of white pipe cleaner for whiskers.
- Curl a black pipe cleaner around a pencil and glue it to the back for a tail.
What goes wrong: Drawing the nose and smile with a regular marker. Black marker on black cardstock is invisible. Use a white paint pen, or glue on a tiny pink paper nose.
19. Paper Plate Spider Web (Ages 5–10)
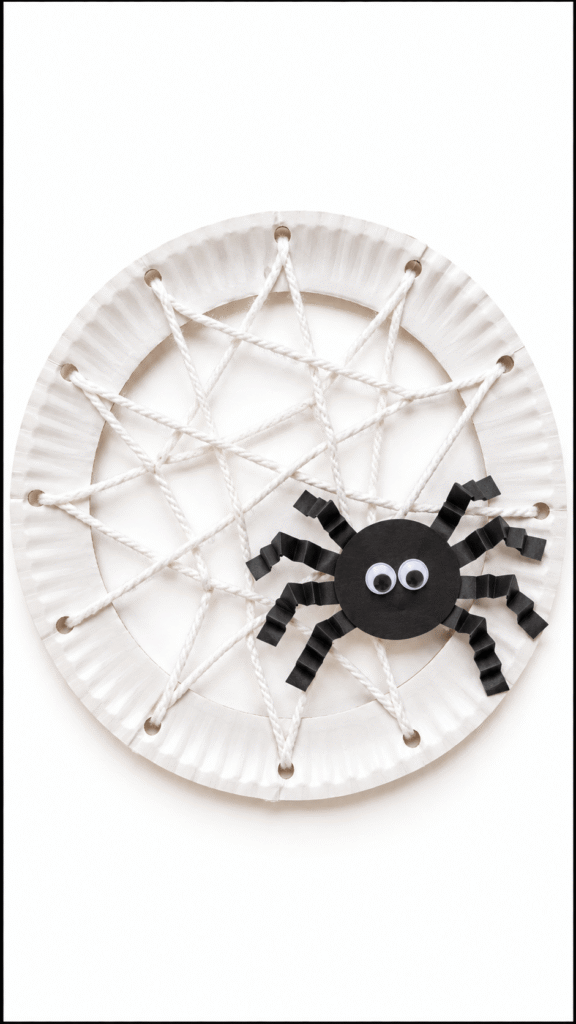
Lacing is hard work for 5 year olds and oddly satisfying for 10 year olds. A blunt plastic yarn needle makes all the difference.
Mess: Low | Time: 20 minutes | Supervision: At the table | School: Yes, with holes punched ahead
You’ll Need
- Sturdy paper plate
- Hole punch
- White yarn, about 4 feet per web
- A blunt plastic yarn needle (they come in cheap multipacks)
- Black construction paper
- Glue
- Plastic spider (optional)
How to Make It
- Cut out the center of the plate, leaving a ring about 1½ inches wide.
- Punch 10 to 12 holes evenly around the ring.
- Thread the needle, tie the yarn to one hole, and lace back and forth across the ring, crossing the middle each time.
- Tie it off when the web looks full.
- Make a paper spider: a black circle for the body and eight thin strips folded like an accordion for legs. Glue it on the web.
At school: Cut the plates and punch the holes the night before. Hole punches are surprisingly hard for small hands to squeeze, and 20 kids taking turns with one punch eats the whole party.
20. Popsicle Stick Haunted House (Ages 5–10)
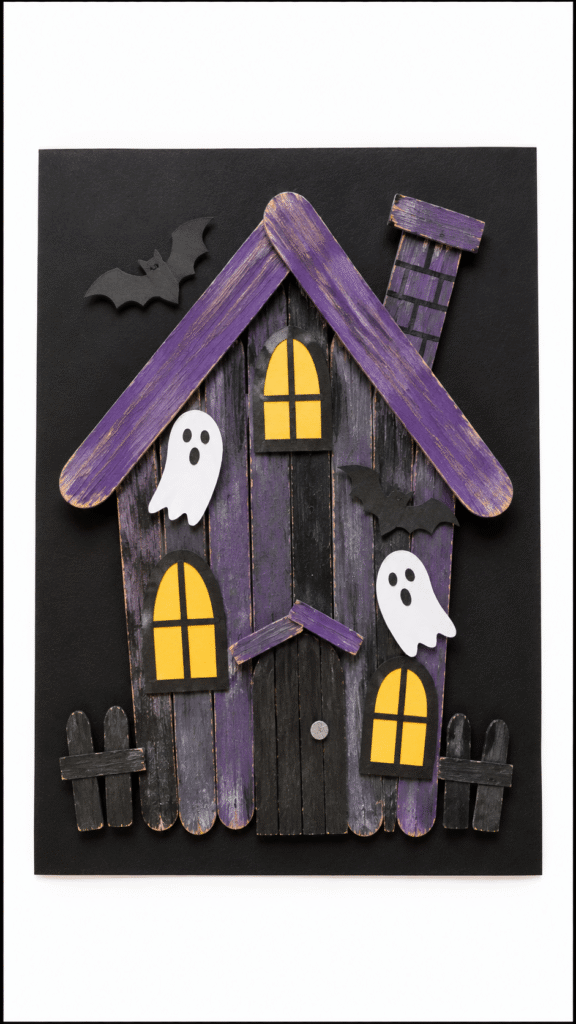
The more crooked it is, the better it looks. I tell kids to build their house like it’s been leaning in the wind for a hundred years.
Mess: Medium | Time: 30 minutes plus about 30 minutes drying | Supervision: At the table | School: On a classroom day, not a party
You’ll Need
- Jumbo popsicle sticks (8 to 10 per house)
- Black, gray, and purple paint
- School glue
- Black cardstock
- Yellow paper for windows
- Small paper cutouts of ghosts and bats
- Glitter glue (optional)
How to Make It
- Lay five or six sticks side by side for the walls and glue two sticks across the back as braces.
- Glue two sticks in an upside down V on top for the roof. Add a short tower or a crooked chimney if you like.
- Let the glue set for about 20 minutes before painting.
- Paint the house in black, gray, or purple and let it dry.
- Glue on yellow paper windows and a door, then paper ghosts, bats, pumpkins, or spiders.
- Glue the finished house onto black cardstock to make a Halloween picture.
Trade off: Loose glitter is banned in plenty of classrooms, and at home it shows up in your carpet until spring. Glitter glue gives the same sparkle along the roofline and stays where you put it.
Older kids: 8 to 10 year olds can build a two story house with a separate tower, or use a low temp glue gun with you beside them so the build goes faster.
Common Mistakes at Home and at School
Even easy Halloween crafts for kids go sideways for the same few reasons, and most of them have nothing to do with the craft.
- Bringing a painted craft to a 30 minute party. Nothing dries in time, and 20 wet plates go home smeared in backpacks. Save paint for classroom days and home.
- Doing the cutting during the craft. For Halloween classroom crafts, every piece should be cut and bagged the night before. Kids waiting for you to cut is how a craft time falls apart.
- Forgetting names until the end. Write names on the back first. Twenty two identical ghosts can’t be sorted at pickup.
- Using glue sticks on cotton, yarn, or coated cups. They don’t hold. Use school glue for cotton, tacky glue or tape for yarn, and glue dots for paper cups.
- Drawing faces with the wrong pen. Marker blurs on coffee filters, snags on cotton, smears on acrylic, and disappears on black cardstock. Each craft above names the pen that works.
- Handing kids the whole skein of yarn. It tangles in seconds. Wind small balls ahead of time.
- Expecting glow paint to look like anything in daylight. It looks pale and patchy until the lights go off. Warn kids before they decide it failed.
- Hanging crafts on long strings near a baby’s crib or play area. Keep mobiles, garlands, and coffee filter ghosts high and out of reach.
- Skipping the teacher check. Glitter, food, latex, and even toilet paper tubes are off limits in some classrooms. One message a week ahead saves a wasted shopping trip.
Practical note: Make one sample of every craft at home before you bring it to school. Twenty minutes of practice the night before tells you exactly which step needs prepping, and kids follow a finished example far better than spoken instructions.
FAQs
What are easy Halloween crafts for kids with no drying time?
Coffee filter ghosts, paper bag monster puppets, paper cup witches, pumpkin suncatchers, yarn wrapped pumpkins, and a paper ghost garland all need no paint and no drying. Each takes 10 to 25 minutes.
What are good Halloween classroom crafts for a 30 minute party?
Pick crafts with precut pieces and no paint, like coffee filter ghosts, paper bag monster puppets, or a class ghost garland. Bag each child’s pieces the night before and write names on everything first.
What Halloween crafts can a 2 year old do?
Handprint ghosts, cotton ball ghosts, and a paper plate pumpkin with precut face shapes. An adult does any cutting and uses peel and stick googly eyes, or draws the eyes on.
How do you make a coffee filter ghost?
Put a cotton ball in the center of a flat bottom basket coffee filter, gather the filter around it, and wrap a twist tie or rubber band under the head. Tap on dot eyes with a marker, since dragging the pen makes the ink spread.
What paint should kids use on rocks?
Acrylic paint over a white base coat, with paint pens for details and a sealer on top. Washable kids’ paint rubs off with handling and washes away in the rain.
Are glow in the dark Halloween art projects for kids safe?
Yes, with nontoxic glow paint (look for the ACMI AP seal) and adult supervision. Use a plastic jar for kids under 8, and only battery tea lights with a secure battery cover.
