
The best St Patrick’s Day crafts for kids are quick paper and paint projects, like shamrock handprints, coffee filter rainbows, and paper plate leprechauns, that take 15 to 30 minutes with washable supplies. Do the cutting yourself for kids under five, and swap googly eyes, buttons, and gems for paper circles when a kid still mouths things. Pick one project that matches your kid’s age, and add a second only if the energy holds.
It’s the night before St Patrick’s Day, and your preschooler has just announced that a leprechaun is coming to the house. By morning there needs to be a trap, a rainbow, and at least one shamrock.
That’s the honest picture of St Patrick’s Day crafts for kids. You need ideas that finish fast, use what’s already in the house, and still look like a leprechaun’s work.
These 15 easy St Patrick’s Day crafts, plus one bonus trick, are built for that. Each one has a mess rating, a realistic time, and a note on what to cut ahead. They work for parents, teachers, and anyone crafting with a group of kids.
It’s late October, so you have about five months. St Patrick’s Day 2027 falls on Wednesday, March 17, which makes the weekend of March 13 and 14 the best window to craft.
How To Choose St Patrick’s Day Crafts For Kids By Age, Mess, and Time
Every project here is beginner level for you. What changes is your kid’s age and how much you cut ahead.
- 2 to 3 years: Handprints, coloring, scooping, and gluing pre cut pieces. Try the shamrock handprint, the coffee filter rainbow, and the sensory bin, and expect to do every cut. Skip anything with small parts.
- 4 to 5 years (preschool): They can use a glue stick, paint with a brush, and follow two steps. This is the sweet spot for easy St Patrick’s Day crafts like the paper plate leprechaun, the tissue shamrock, and the paper chain.
- 6 to 9 years: They can trace, cut, and plan. Hand over the craft stick leprechaun, the windsock, the clover crown, and the leprechaun trap, and let them run it.
Mess ratings mean this. Low is paper and a glue stick, so a wiped table is enough. Medium is liquid glue, water, or small loose pieces. High is paint on hands, so you want a smock and a washable tablecloth. Time covers cutting, gluing, and decorating but not drying.
Most leprechaun crafts are paper and glue, and the shamrock crafts all start with the same template, so trace a cookie cutter once and reuse it. For rainbow crafts for kids, a coffee filter, a paper chain, and a handprint arch each give a different look from the same six colors.
Practical note: A shamrock has three leaves, and a four leaf clover is the lucky variant. Decide which one you’re making before you cut, since the template changes. Kids like counting the leaves.
Safety and Mess Notes Before You Start
Every craft here needs an adult nearby for scissors, paint, and small parts. Even easy St Patrick’s Day crafts go better with someone at the table.
Practical note: Test your paint on a hidden spot before you use it on a floor. Washable doesn’t mean stain proof on grout, carpet, or unsealed wood, so use paper or removable decals for the footprint trail.
- Small parts: If a piece fits through a toilet paper tube, treat it as a choking hazard for kids under three. That covers googly eyes, buttons, gem stickers, gold coins, mini erasers, and dried peas or rice. Use paper circles instead.
- Knives: You carve the potato stamp and cut the bottom out of the windsock canister. Use a sharp paring knife or a craft knife, and cut on a board.
- Pipe cleaners and wands: Fold the wire ends of pipe cleaners over, and use a paper straw or a craft stick for wands, with rounded ends. Keep wands away from faces.
- Pins: An adult attaches any safety pin on a pipe cleaner shamrock pin, and closes it.
- Dyed rice: Dye it with vinegar and food coloring, not rubbing alcohol. Dyed rice isn’t food, so keep it out of mouths.
- String: Keep windsock and garland string short and hang them high, never over a crib or bed.
- Paint and glitter: Use washable paint labeled nontoxic, and use glitter glue instead of loose glitter.
- Set up a mess kit first: An old T shirt, a vinyl tablecloth, baby wipes within reach, and painter’s tape to hold paper down make every one of these projects easier to clean up.
I keep a mess kit in one bin so setup takes two minutes.
Supplies, Where To Buy Them, and Free Swaps
Most St Patrick’s Day crafts for kids need paper, glue, and green paint, and most of it is a dollar store, Walmart, Target, or Michaels run. Here are the items that come up most, with a free or cheap swap for each.
| Supply | Where to buy | Free or low cost swap |
| Green washable paint | Walmart, Target (Crayola Washable Kids Paint) | Plain yogurt stirred with green food coloring |
| Construction paper | Dollar store, Walmart, Michaels | Cereal box cardboard, colored junk mail, or gift wrap scraps |
| Craft foam | Dollar store, Michaels | Thin cardboard painted green |
| Googly eyes | Dollar store, Michaels | Paper circles with a marker dot |
| Pipe cleaners | Dollar store, Michaels | Twisted strips of green paper |
| Coffee filters | Grocery store | White paper towels, folded |
| Washable markers | Walmart, Target (Crayola) | Water based markers from the junk drawer |
| Craft sticks | Dollar store, Michaels | Strips cut from a cereal box |
| Gold plastic coins | Dollar store | Paper circles wrapped in gold foil or yellow paper |
| Ribbon | Dollar store, Michaels | Strips of fabric or gift wrap |
| Shamrock cookie cutter | Michaels, kitchen stores | A shamrock traced from a printout |
Practical note: A glue stick holds paper and not much else. Foam, craft sticks, buttons, and gems need tacky glue, such as Aleene’s Original Tacky Glue, so keep a bottle on the table.
I keep one bin of basics for every holiday, and it saves an hour every season.
St Patrick’s Day Crafts For Kids At A Glance
The projects below show up in a mixed order, so use this table as your index. It’s sorted from least messy to most messy, and each name jumps to its section. Leprechaun Footprints is the bonus, since it’s more of a setup than a craft.
| Craft | Mess | Time | What you prep | Best ages |
| Pipe Cleaner Shamrocks | Low | 15 minutes | Nothing | 4 to 8 |
| Shamrock Wands | Low | 20 minutes | Cut the foam | 3 to 8 |
| Paper Chain Rainbow | Low | 30 minutes | Cut the strips | 3 to 9 |
| Lucky Clover Crown | Low | 30 minutes | Cut the band and shamrocks | 3 to 9 |
| Paper Plate Leprechaun | Low | 25 minutes | Cut the hat and beard | 3 to 8 |
| Leprechaun Footprints | Low | 15 minutes | Cut the footprints | 3 to 8 |
| Coffee Filter Rainbow | Medium | 15 minutes plus drying | Set out markers and a spray bottle | 2 to 8 |
| Paper Bag Leprechaun Puppet | Medium | 30 minutes plus drying | Cut the hats and beards | 4 to 9 |
| Popsicle Stick Leprechaun Hat | Medium | 30 minutes plus drying | Glue the sticks together | 5 to 9 |
| Tissue Paper Shamrocks | Medium | 25 minutes plus drying | Cut the shamrock and tissue squares | 3 to 8 |
| St. Patrick’s Day Sensory Bin | Medium | 15 minutes to set up | Dye or gather the filler | 3 to 6 |
| St. Patrick’s Day Windsock | Medium | 40 minutes | Cut the canister and streamers | 4 to 9 |
| Leprechaun Traps | Medium | 45 minutes | Gather boxes and paper strips | 5 to 9 |
| Shamrock Handprint Art | High | 20 minutes plus drying | Tape paper down, set out wipes | 2 to 6 |
| Handprint Rainbow Craft | High | 20 minutes plus drying | Tape paper down, set out paint | 2 to 8 |
| Shamrock Potato Stamps | High | 20 minutes plus drying | Carve the stamps | 3 to 8 |
If you’re planning a few craft weekends before March 17, save this page to your St Patrick’s Day board on Pinterest so the table and supply list are easy to find at the store.
The 15 St Patrick’s Day Crafts For Kids, Plus One Bonus
Each project lists its mess level, time, and what you prep ahead. Pick the one that matches your kid’s mood that day, not the one that photographs best.
1. Coffee Filter Rainbow
Four Half Circle Rainbows on a Clothesline
Four half circle coffee filter rainbows hang from a length of twine, each pinned with a wooden clothespin. The colors bleed softly into one another, with red along the outer edge, then orange and yellow, a green ring, bright blue, and a pale purple and white center near the straight edge. No two look alike, and the white patches near the middle show where the water didn’t reach.
This is one of the best rainbow crafts for kids because the color mixing does the work. The trade off is water. A fine mist blends the colors, and a heavy spray turns them to muddy brown.
Mess: Medium. Time: 15 minutes, plus about 30 to dry. You prep: Set out markers and a spray bottle. Best for: 2 to 8 years.
What you need
- White basket style coffee filters (or white paper towels)
- Washable markers, such as Crayola Washable Markers (permanent markers won’t bleed)
- A spray bottle with a fine mist, or a dropper
- A tray or newspaper to work on
- Wooden clothespins and twine to hang them
How to make it
- Flatten a filter on the tray and color rainbow bands starting at the outer edge, with red first, then orange, yellow, green, blue, and purple toward the center.
- Color the bands thick and dark. Pale lines disappear when the water hits them.
- Mist the filter two or three times and watch the colors blend. Stop before it’s soaked.
- Let it dry flat for about 30 minutes.
- Fold it in half and clip it to a length of twine.
Tip: Mist from about a foot away. A close, heavy spray punches holes in the filter and floods the colors.
2. Shamrock Potato Stamps
A Potato Half With a Raised Green Shamrock
A halved red skinned potato lies cut side up on a white paper towel. A raised shamrock carved into the cut face is painted deep green, with three heart shaped leaves and a short stem sitting at the center of the yellow flesh. Behind it, soft green leaves and a small green container blur into the background.
Potato stamps are a classic, and a shamrock is an easy shape to carve. The trade off is the knife work, which is an adult job, and the moisture, which makes blobby prints if you don’t blot.
Mess: High. Time: 20 minutes, plus drying. You prep: Carve the stamps. Best for: 3 to 8 years.
What you need
- 1 large potato
- A mini shamrock or clover cookie cutter (or a paring knife)
- Green washable paint and a paper plate for a palette
- White cardstock, butcher paper, or plain fabric to stamp on
- A sponge brush and paper towels
How to make it
- Cut the potato in half across the middle and blot the cut face on a paper towel.
- Press the cookie cutter about a quarter inch into the cut face, then carve away the flesh around it with a paring knife so the shamrock stands up. You do this part.
- Brush a thin layer of green paint onto the stamp with the sponge brush.
- Press it straight down on the paper, hold for two seconds, and lift straight up.
- Let the prints dry flat.
Tip: Make a test print on scrap paper first. The first print is always light and the second is the best.
3. Paper Bag Leprechaun Puppet
Three Green Bag Leprechauns in a Row
Three flat paper lunch bags painted bright green stand shoulder to shoulder, each with a peach face circle, big googly eyes, a curved black smile, and a scalloped orange paper beard. Lime green paper hats with black bands sit on top, fastened with oversized buttons in yellow, olive, and orange. A row of buttons runs down each coat front, in orange, yellow, and black.
These leprechaun crafts double as storytelling props. Slide a hand in and let the puppet talk. The trade off is drying time, since green paint on a paper bag takes a while to dry.
Mess: Medium. Time: 30 minutes, plus about 30 to dry. You prep: Cut the hats and beards. Best for: 4 to 9 years.
What you need
- 1 brown paper lunch bag per puppet
- Green washable paint and a sponge brush
- Peach or tan paper for the face, orange paper for the beard, lime green paper for the hat, and a black paper band
- Googly eyes and buttons (or paper circles for kids under three)
- Glue stick and tacky glue
- A black marker
How to make it
- Paint the bag green and let it dry.
- Cut a face circle and a scalloped beard from the paper. Kids can snip the scallops.
- Glue the face near the top of the bag and the beard just below it.
- Add the eyes and a marker smile.
- Glue the hat above the face with a black band and a button buckle, then glue a row of buttons down the front.
Tip: Use tacky glue for buttons and googly eyes. A glue stick lets them pop off.
4. Handprint Rainbow Craft
Rainbow Fingertips Arching Across White Paper
Rows of small painted handprints curve in a wide half circle across a white sheet resting on a light wooden table, their fingers fanned outward. Each print blends from red at the fingertips through orange, yellow, green, and blue to purple at the palm, and where palms overlap near the center, the colors smear into deeper greens and violets. About ten hands make up the arch, leaving an empty space inside the curve.
This is a keepsake and a group project, since each kid adds one hand to the arch. The trade off is mess, and what goes wrong is color mixing, because paint on overlapping hands turns brown fast.
Mess: High. Time: 20 minutes, plus drying. You prep: Tape the paper down and set out paint. Best for: 2 to 8 years.
What you need
- A large sheet of white paper, about 12 by 18 inches
- Washable paint in red, orange, yellow, green, blue, and purple, such as Crayola Washable Kids Paint
- A paintbrush
- A bowl of soapy water and a towel
- Painter’s tape and a pencil
How to make it
- Tape the paper down and sketch a light half circle arc with a pencil, as a guide.
- Brush stripes of paint across one hand in rainbow order, red at the fingertips and purple at the palm.
- Press the hand onto the arc with the fingers pointing outward, and lift straight up.
- Wash the hand right away, then repeat around the arc with each kid or each hand.
- Let it dry flat.
Tip: Paint stripes with a brush instead of dipping the whole hand. It keeps the colors apart and the paint thin.
5. Pipe Cleaner Shamrocks
Pink and Purple Three Loop Shapes on Green
Four chenille stem shapes lie on a muted green surface, three in hot pink and one smaller in violet. Each one is twisted into three rounded loops joined at a center point, with a short tail sticking out like a stem. The fuzzy texture of the stems shows clearly, and the loops are slightly uneven, which gives them a hand twisted look.
Green is the classic color for shamrock crafts, but a bright twist like this is fun too. This is a fine motor workout. The trade off is that sharp wire ends poke, so fold them over.
Mess: Low. Time: 15 minutes. You prep: Nothing. Best for: 4 to 8 years.
What you need
- 4 green pipe cleaners per shamrock (or any color you like)
- Scissors
- A safety pin or tape, if you want to make a pin (an adult attaches it)
How to make it
- Fold a pipe cleaner in half, bend it into a heart, and twist the ends together at the point.
- Make two more hearts.
- Twist the three heart points together at the center to make a three leaf shamrock.
- Wrap a fourth pipe cleaner around the center and let the end hang as a stem.
- Fold all the cut ends over so nothing pokes.
Tip: Make the hearts the same size by folding each pipe cleaner at the same spot. Uneven hearts make a lopsided shamrock.
6. Leprechaun Traps
A Rainbow Tunnel Baited With Gold Coins
A rainbow arch of curved paper strips stands on a green paper floor on a classroom table, with red, orange, yellow, green, blue, and purple bands overlapping into a tunnel. White paper clouds with cotton ball tops sit at the base, and one gold coin lies inside the tunnel. A trail of embossed gold coins with four leaf clover designs spills out in front, while a green box with glittery shamrocks and gold chenille trim waits in the background and navy chairs line the desks behind.
Kids design and build their own, and one of these leprechaun crafts keeps going after the building is done. The trade off is time, since a good trap takes 45 minutes and some planning. You set it up the night before and check it in the morning.
Mess: Medium. Time: 45 minutes. You prep: Gather boxes and paper strips. Best for: 5 to 9 years.
What you need
- A shoebox or cereal box for the base (or a piece of cardboard)
- Strips of colored paper in rainbow colors, about 1 by 12 inches
- Cotton balls and white paper for clouds
- Gold plastic coins (or foil wrapped paper circles)
- Green paper, tape, and glue
How to make it
- Cover the base with green paper.
- Curve each paper strip into an arch and tape the ends to the base, with red on the outside and purple on the inside.
- Glue cotton ball clouds to the base of each end.
- Add a trap: a trapdoor flap, a ramp, or a string. Let your kid decide.
- Place a gold coin as bait and a trail of coins leading to the entrance.
Tip: Hold trapdoors with a weak piece of masking tape so they pop open when a toy steps on them. Test it with a toy leprechaun first.
7. Shamrock Wands
A Foam Heart Clover on a Striped Straw
A shamrock built from three layered foam hearts lies on a pale surface, with darker green hearts underneath and lighter green hearts on top. Each light heart carries a small translucent green gem sticker shaped like a four leaf clover. A green and white striped paper straw runs behind the shamrock, with ribbons in polka dot green, pale green, and shiny mint trailing alongside it.
This one is pure pretend play, great for a parade or a leprechaun hunt. The trade off is the straw. Keep the wand away from faces, and use a paper straw or a craft stick with a rounded end.
Mess: Low. Time: 20 minutes. You prep: Cut the foam hearts. Best for: 3 to 8 years.
What you need
- Craft foam in two shades of green (or thin cardboard painted green)
- A paper straw or a craft stick for the handle
- Ribbons, about 12 inches each
- Gem stickers, optional (small parts, so skip them for kids under three)
- Tacky glue and scissors
How to make it
- Cut three hearts from the darker foam and three smaller hearts from the lighter foam.
- Arrange the dark hearts with the points together in the center to make a shamrock, and glue them down.
- Glue a light heart on top of each dark one, and stick a gem in the middle of each.
- Glue the straw and the ribbons to the back, with the ends trailing down.
- Let the glue set for 10 minutes before waving.
Tip: Use tacky glue on foam. A glue stick doesn’t hold it.
8. Paper Chain Rainbow
A Classroom Wall Wrapped in a Chain Rainbow
A tall rainbow arch of paper chain links rises along a cream colored wall, with red on the outside curving through orange, yellow, green, blue, and purple on the inside, and the links spill down to a wooden floor. To the left, a magenta umbrella with silver and green polka dots hangs near the ceiling, with glittery paper raindrops falling below. Under the arch, a paper flower pot overflowing with colorful pompoms sits with paper flowers growing from it, and a blue cloud and a paper sun decorate the far wall.
A paper chain is one of the simplest rainbow crafts for kids, and a lot of them add up to a wall display. The trade off is length, because a big arch takes a lot of links and a lot of kids. A short chain is a 30 minute job.
Mess: Low. Time: 30 minutes for a short chain. You prep: Cut the strips. Best for: 3 to 9 years.
What you need
- Construction paper in red, orange, yellow, green, blue, and purple
- Scissors, for you
- Glue stick or clear tape
- A stapler, for you, if tape fails
- Painter’s tape for hanging
How to make it
- Cut the paper into strips about 1 by 8 inches.
- Bend the first strip into a circle and tape or glue the ends together.
- Thread the next strip through the first loop and seal it. Keep going in one color.
- Make one chain per color, with each one a bit longer than the one inside it.
- Tape the chains to the wall in an arch, with red on the outside.
Tip: Use tape instead of a glue stick. Tape holds right away, so the chain doesn’t fall apart while your kid waits.
9. Popsicle Stick Leprechaun Hat
A Craft Stick Leprechaun With a Wide Green Brim
A leprechaun face built from craft sticks lined up side by side fills the frame against a silvery metallic backdrop. The upper sticks are painted deep green with rounded tops to form a tall hat, a black band crosses them with a yellow outlined buckle at the center, and a single wider green stick forms the brim. Below the brim, tan sticks make the face with two googly eyes, orange eyebrows, a small curved nose, and a wide smile drawn in black, while bright orange sticks run down both sides for the beard and hair.
The finished craft is a whole face, not only a hat, and it’s one of the sturdier leprechaun crafts here. The trade off is paint and glue time. Build the stick base first and let it dry before painting.
Mess: Medium. Time: 30 minutes, plus drying. You prep: Glue the sticks together. Best for: 5 to 9 years.
What you need
- 8 craft sticks for the face and hat, plus 2 more for back supports and 1 wider stick for the brim
- Paint in green, black, yellow, tan, and orange (washable or acrylic)
- Googly eyes
- Tacky glue
- A black marker
How to make it
- Line up 8 sticks side by side and glue two sticks across the back to hold them together. Let it dry for 30 minutes.
- Paint the top three inches of the sticks green, then a black band below that, with a yellow buckle in the center.
- Paint the middle sticks tan for the face and the outer two sticks on each side orange for the beard.
- Glue the wider stick across as the brim, and add the googly eyes.
- Draw the smile and nose with the marker, and paint two orange eyebrows.
Tip: Glue the back supports first, then paint. Loose sticks slide around and smear the paint.
10. Tissue Paper Shamrocks
A Ruffled Green Shamrock Made From Scrunched Tissue
A shamrock made of dozens of bright lime green tissue paper puffs rests on white fabric. Each piece is crinkled into a tiny ruffle and packed together so tightly that the surface looks like curly lettuce, and a short stem made from the same ruffles extends from the bottom of the clover shape.
This is a good pick among the shamrock crafts for kids who like texture. The trade off is the number of pieces, so a shamrock takes a while to fill. Tearing the tissue is easier than cutting for little hands.
Mess: Medium. Time: 25 minutes, plus drying. You prep: Cut the shamrock and the tissue squares. Best for: 3 to 8 years.
What you need
- A shamrock cutout, about 6 inches, from cardstock or a cereal box
- Green tissue paper in one or two shades, cut into 2 inch squares
- A pencil with an eraser
- White school glue in a shallow dish
- Scissors, for you
How to make it
- Cut the shamrock out of cardstock.
- Wrap a tissue square around the eraser end of the pencil so the edges ruffle up.
- Dip the tissue and eraser into the glue and press it onto the shamrock.
- Fill the shamrock from the edges in, packing the ruffles close together.
- Let it dry flat.
Tip: Younger kids can tear and crumple the tissue and press it down with a finger. It looks more textured, and it’s easier.
11. St. Patrick’s Day Sensory Bin
Green Split Peas, Gold Coins, and Two Black Cauldrons
A white rectangular plastic bin is filled with dried green split peas, hiding gold coins stamped with clover designs, dark green foam shamrocks, and tiny rainbow shaped erasers. Two black plastic cauldrons sit at the left and right edges, one holding a white scoop, and a second scoop rests on the peas. A stack of laminated Pot O’ Gold counting cards leans against the back, each card showing a black pot, a rainbow, and a coin next to numbers like 7 and 8.
A sensory bin is open ended play, and with a pot of gold hunt it becomes one of the easiest St Patrick’s Day activities for kids on a quiet afternoon. The trade off is small parts. Peas, coins, and erasers are choking hazards, so this is for kids who no longer mouth things, and you stay close.
Mess: Medium. Time: 15 minutes to set up. You prep: Dye or gather the filler. Best for: 3 to 6 years, supervised.
What you need
- A shallow plastic storage bin
- Filler: dried green split peas, or white rice dyed green (1 cup rice, 1 teaspoon vinegar, and green food coloring, shaken in a zip bag and dried on a tray)
- Gold plastic coins and green foam shamrocks
- Two small black cauldrons from a dollar store (or small black cups)
- Scoops and spoons
- Counting cards, optional
How to make it
- If you’re dyeing rice, shake it in a zip bag with the vinegar and food coloring, then spread it on a baking sheet to dry for about an hour.
- Pour the filler into the bin.
- Hide the coins, shamrocks, and any other small items in it.
- Add the cauldrons and scoops, and lay a sheet or towel under the bin.
- Let your kid scoop, pour, and count the coins into the cauldrons.
Tip: Put the bin on an old sheet or a shower curtain. Dried peas and rice roll everywhere, and a sheet makes cleanup a shake out the back door.
12. Lucky Clover Crown
A Wreath of Two Tone Felt Shamrocks
A young woman with auburn braided hair and side swept bangs looks down with a soft smile. She wears a crown of overlapping felt shamrocks in two shades of green, one deep emerald and one pale lime, set like a flower crown around her head. A dark green knit sweater and a plain white background keep the focus on the crown.
A paper version is perfect for preschoolers, and a felt version works for older kids and grown ups. The trade off is fit, so size the band before you add the shamrocks.
Mess: Low. Time: 30 minutes. You prep: Cut the band and the shamrocks. Best for: 3 to 9 years.
What you need
- Green construction paper (or felt, in two shades of green)
- A cardstock strip about 2 by 22 inches (or a plain headband)
- A shamrock template, traced from a cookie cutter
- Tacky glue (for felt) or a glue stick (for paper)
- Clear tape
How to make it
- Wrap the strip around your kid’s head, mark the overlap, and tape it closed.
- Trace and cut 12 to 16 shamrocks, half in each shade.
- Glue the shamrocks onto the band, overlapping each one by about a third and alternating the shades.
- Let the glue set, then check the fit.
Tip: Tape the band closed. Staples near a child’s head are not worth the risk.
13. Shamrock Handprint Art
Four Green Handprints Forming a Clover
A four leaf clover made of green handprints sits on a warm yellow orange background. Four painted hands, two across the top and two below, spread their fingers outward to form the leaves, and the overlapping palms join at the center in a darker, glittery patch. White paper is trimmed into a scalloped clover outline around the prints, and a flat green paper stem curves down from the bottom.
Handprint shamrock crafts capture a moment in time, and they make a good keepsake for grandparents. Use three hands for a true shamrock and four for a lucky clover. The trade off is mess, so tape the paper down and have wipes ready.
Mess: High. Time: 20 minutes, plus drying. You prep: Tape the paper down and set out wipes. Best for: 2 to 6 years.
What you need
- White cardstock
- Green washable paint, such as Crayola Washable Kids Paint
- A sponge brush
- Green paper for the stem
- Glitter glue, optional
- Scissors and baby wipes
How to make it
- Tape the cardstock down. Sponge green paint onto your kid’s palm and fingers.
- Press the hand onto the paper with the fingers pointing outward to make a leaf. Lift straight up.
- Rotate the paper, not your kid’s arm, and print the next leaf with the palms meeting at the center. Repeat for three or four leaves.
- Let the paint dry, then cut around the prints, leaving a half inch border.
- Glue a paper stem to the bottom and add glitter glue at the center if you like.
Tip: Rotate the paper instead of twisting your kid’s wrist. The prints come out cleaner and nobody complains.
14. St. Patrick’s Day Windsock
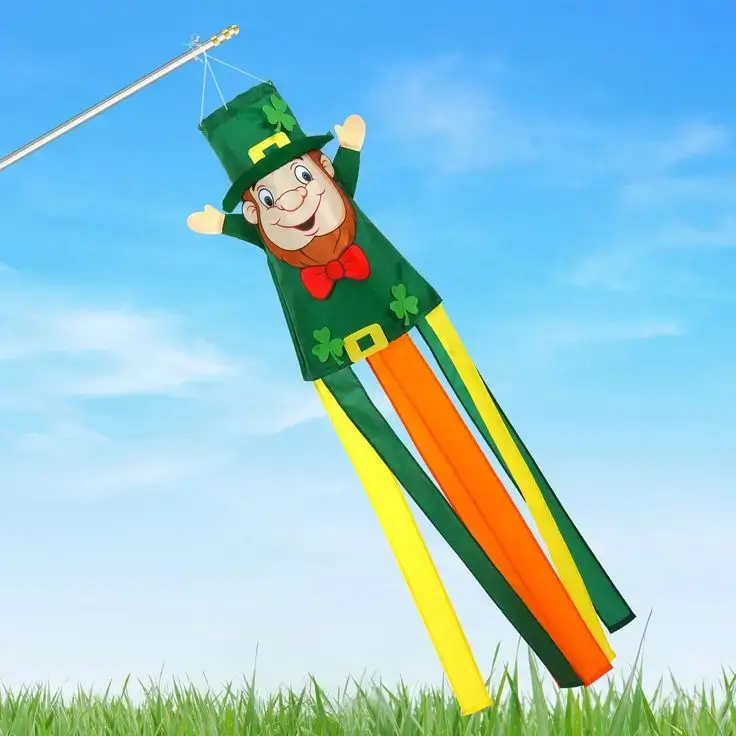
A Leprechaun Windsock Streaming From a Pole
A fabric leprechaun windsock hangs at an angle from a metal pole against a bright blue sky, with green grass along the bottom edge. The body is a green coat with a yellow buckle belt and shamrock patches, topped by a smiling face with an orange beard, a red bow tie, a tall green top hat with a yellow buckle, and hands raised in a wave. Long streamers in yellow, orange, and dark green trail from the bottom, flapping in the breeze.
That’s a ready made fabric windsock, and the paper version below is a kid made cousin of it. It looks great and catches a breeze. The trade off is weather, since paper and crepe streamers don’t survive rain, so hang it under a porch.
Mess: Medium. Time: 40 minutes. You prep: Cut the canister bottom and the streamers. Best for: 4 to 9 years.
What you need
- An empty oatmeal canister (Quaker or similar), with the bottom cut out by an adult
- Green and gold construction paper
- Crepe paper streamers in green, yellow, and orange, about 3 feet long
- Glue or tape, and a hole punch
- String for hanging
How to make it
- Have an adult cut the bottom off the canister with a craft knife, so it’s open at both ends.
- Cover the canister with green paper, and glue on a gold buckle and paper shamrocks.
- Glue or tape the streamers inside the bottom edge, spaced evenly around the rim.
- Punch two holes at the top, opposite each other, and tie a string loop through them.
- Hang it from a porch hook or a doorframe where the breeze reaches it.
Tip: Hang it high and keep the string short, never over a crib or bed.
15. Leprechaun Footprints
Green Footprints Trailing Across a Wood Floor
Green boot shaped footprints with curled toes march diagonally across a herringbone wood floor, each print decorated with white shamrocks and small gold lettering that spells lucky. Gold coins, horseshoes, and tiny clovers are scattered between the prints, a small card marked 17 lies near the middle, and a trailing ivy vine and the edge of a round wooden table mark the top left corner.
This is the bonus, and it’s more of a setup than a craft. Those footprints are printed floor decals. At home you can cut paper footprints, and your kids will follow them to the pot of gold. The trade off is paint. Skip washable paint on grout, carpet, and unsealed wood, since it can stain.
Mess: Low. Time: 15 minutes. You prep: Cut the footprints. Best for: 3 to 8 years.
What you need
- Green cardstock
- A shoe to trace
- Painter’s tape
- Gold coins and a small prize, or a pot of gold from a dollar store
- Scissors (or removable green footprint decals)
How to make it
- Trace a boot shape on green cardstock and cut out 10 footprints, with a curled toe if you like.
- Tape each footprint down at the corners with painter’s tape. Paper on a hard floor is slippery.
- Lay the trail from a window or door to the pot of gold.
- Scatter a few gold coins along the way.
- Let your kids find the trail in the morning.
Tip: Add one footprint that goes the wrong way. Kids love catching the leprechaun in a trick.
16. Paper Plate Leprechaun
A Smiling Plate Face With a Two Tone Orange Beard
A white paper plate becomes a leprechaun face on a whitewashed plank backdrop, with two large googly eyes, a black marker smile, and a beard of overlapping orange paper rectangles. The squares on the left side are a pale peach orange and those on the right are a deeper tangerine, so the beard looks shaded. A tall green paper hat with a black band and a yellow rectangular buckle sits above a wide green brim strip across the top of the plate.
This is the easiest of the leprechaun crafts, and each face ends up with its own expression. The trade off is the beard, which has lots of small pieces. Start at the bottom edge and overlap upward, like roof shingles.
Mess: Low. Time: 25 minutes. You prep: Cut the hat pieces and the beard rectangles. Best for: 3 to 8 years.
What you need
- A white paper plate
- Orange paper (construction or tissue), cut into small rectangles
- Green paper for the hat and brim, a black paper band, and a yellow paper buckle
- Googly eyes (or paper circles)
- A black marker
- Glue stick
How to make it
- Glue the brim strip across the top of the plate and the hat above it.
- Add the black band and the yellow buckle to the hat.
- Glue the googly eyes on, and draw a smile with the marker.
- Glue orange rectangles around the bottom edge for the beard, overlapping them like shingles and working upward.
Tip: Cut the rectangles in two shades of orange. It makes the beard look shaded and real.
Common Mistakes First Timers Make
Most first timers hit the same few snags with St Patrick’s Day crafts for kids. Here are the ones that come up most.
- Cutting while your kid waits. Cut everything before they sit down. Once you start cutting at the table, the attention is gone.
- Dipping the whole hand in paint. Paint stripes with a brush instead, or the colors turn to brown.
- Using permanent markers on coffee filters. They don’t bleed. Use washable markers.
- Soaking the coffee filters. Mist lightly from a foot away.
- Not blotting the potato. A wet stamp makes a blob. Blot the cut face first.
- Using a glue stick on foam, buttons, or craft sticks. It holds paper only. Use tacky glue.
- Painting footprints on the floor. Washable paint can stain grout, carpet, and unsealed wood. Use paper footprints or decals.
- Handing wands with pointed ends to little kids. Use a paper straw or a rounded craft stick.
- Skipping the test print. The first potato stamp print is always light. Make a test.
FAQs
What are easy St Patrick’s Day crafts for toddlers?
The shamrock handprint, the coffee filter rainbow, and the sensory bin are the easiest for toddlers. You do the cutting and the setup, and they stamp, color, and scoop. Skip small parts for kids who mouth things.
What are good shamrock crafts for preschoolers?
Preschoolers do well with the handprint shamrock, the tissue paper shamrock, and the pipe cleaner shamrock. All three use big, simple shapes and a glue stick. Cut the shapes ahead and let them do the pressing.
How do you make a leprechaun trap?
Build a base from a shoebox or cardboard, curve strips of colored paper into a rainbow arch, and add a trapdoor, a ramp, or a string. Bait it with gold coins and a trail leading in. Set it up the night before and check it in the morning.
How do you make a coffee filter rainbow?
Color rainbow bands on a flat filter with washable markers, mist it lightly with water, and let it dry. The colors blend into each other. Fold it in half and clip it up as a rainbow decoration.
When is St Patrick’s Day in 2027?
St Patrick’s Day 2027 falls on Wednesday, March 17. The weekend of March 13 and 14 is the best time to craft before it.
How do I keep these crafts safe for kids who mouth things?
Swap googly eyes, buttons, gem stickers, and gold coins for paper circles, and skip the sensory bin filler until they stop mouthing things. Stay within arm’s reach, and use washable nontoxic paint.
Read Next
If you loved the coffee filter rainbows, there’s a bigger batch of rainbow crafts for kids waiting for a rainy afternoon.
If the leprechaun traps were a hit, a few more play setups keep the magic going.
SEO Notes
- Optimised title: 15 Easy St Patrick’s Day Crafts For Kids (With Mess Ratings). Use this as the title tag. The on page H1 stays as your original title.
- Meta description: St Patrick’s Day crafts for kids, from shamrock handprints to leprechaun traps, with mess ratings, prep notes, and safe swaps for small parts. Start with one.
- Image alt text 1: Four coffee filter rainbows with blended colors clipped to twine with wooden clothespins
- Image alt text 2: Craft stick leprechaun with a green hat, googly eyes, and an orange beard
- Image alt text 3: Rainbow handprints curved in an arch across white paper
- Internal link topics for the cluster:
- [LINK: Easy Shamrock Crafts For Preschoolers] for the shamrock cluster page.
- [LINK: Leprechaun Trap Ideas For Classrooms] for the classroom cluster page.
- [LINK: Simple Spring Crafts For Kids] for the seasonal cluster page.
- FAQ schema candidate: Question: How do you make a leprechaun trap? Answer: Build a base from a shoebox or cardboard, curve strips of colored paper into a rainbow arch, and add a trapdoor, a ramp, or a string. Bait it with gold coins and a trail leading in. Set it up the night before and check it in the morning.
