
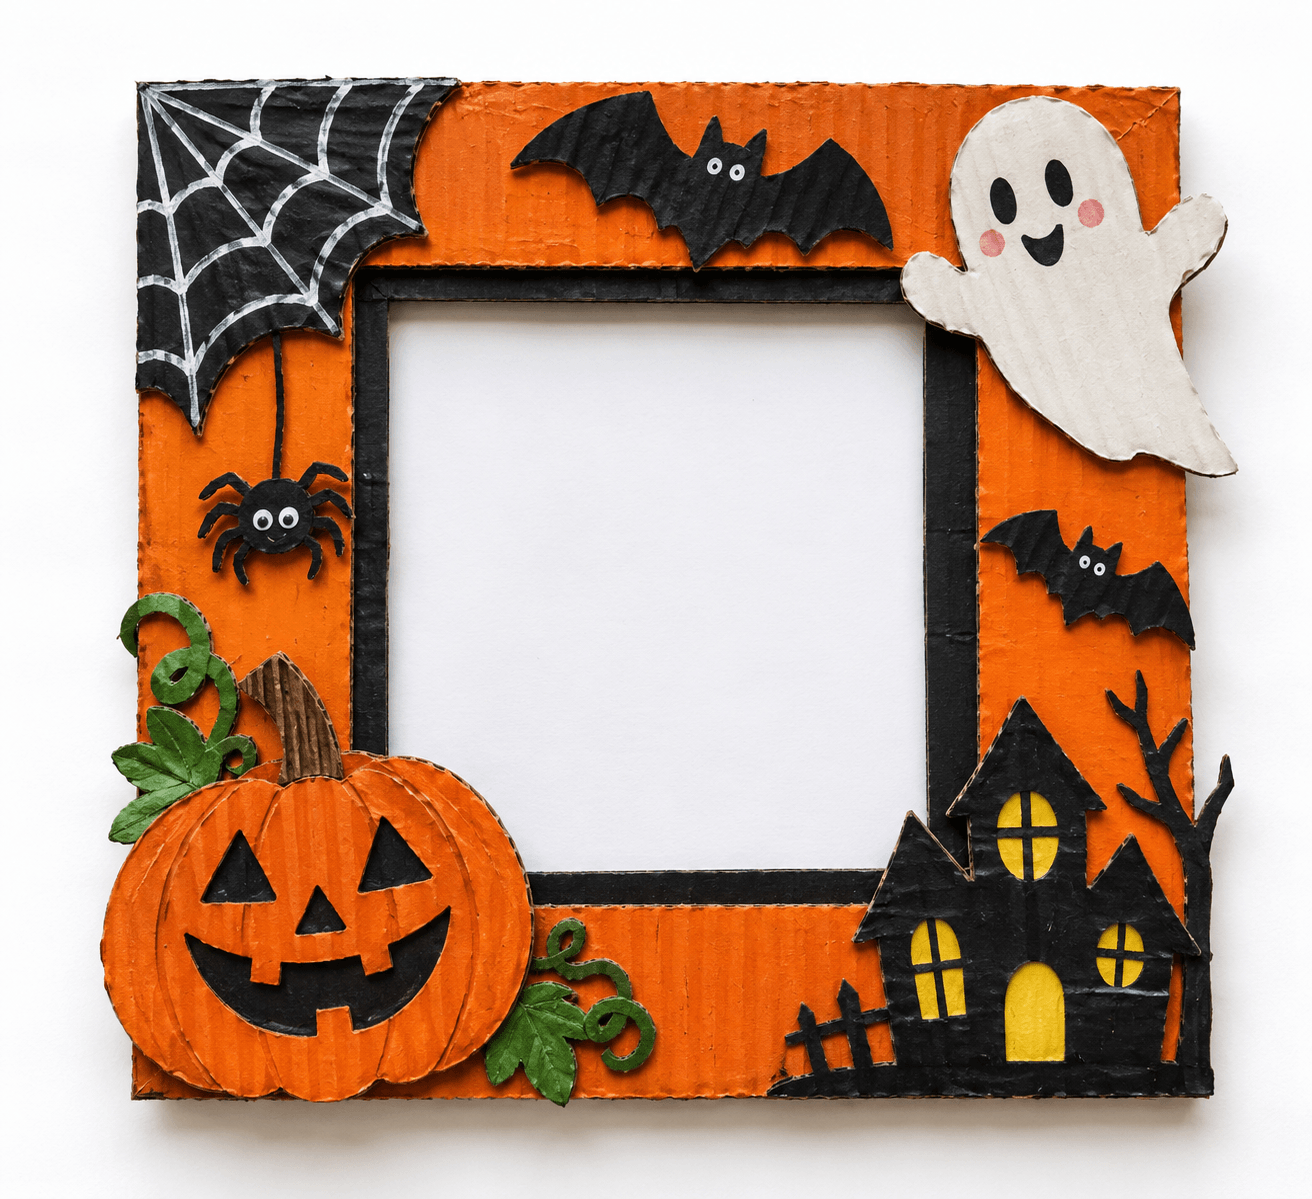
Halloween cardboard crafts turn free shipping boxes, cereal boxes, and paper towel tubes into decorations like ghosts, bats, black cats, skeletons, lanterns, and haunted houses, using scissors, glue, and acrylic paint. The easiest ones (the tube bat, the ghost cutout, and the pipe cleaner spider) take 15 to 20 minutes and suit kids from about age 3, while the lantern, coffin, and haunted house need a craft knife, so an adult does the cutting. For a clean finish, prime brown cardboard with white paint first and paint both sides so it doesn’t warp.
It’s the second week of October and there’s a tower of delivery boxes by the back door. Your kid drags the biggest one into the living room, draws two wobbly windows on it in marker, and announces it’s a haunted house. Three evenings later it has a tower, a porch, and orange windows glowing from an LED tea light, and it’s the first thing anyone notices when they walk in.
That’s the case for Halloween crafts with cardboard. The material is free, it takes paint and glue well once you know a couple of tricks, and if a piece gets crushed in storage, you make a new one next year without feeling bad about it.
The look right now leans into the cardboard itself: raw brown edges left showing, peeled ribs for texture, twine instead of ribbon, and a few bold black details. These 20 Halloween cardboard crafts run from a 15 minute tube bat a preschooler can finish to a haunted house that takes a couple of evenings. Each one comes with an honest age range, mess level, and time estimate, plus a free swap for every supply.
Halloween 2026 falls on a Saturday. If you want decorations up for the weekend before, start the bigger builds by mid October, since paint and glue on cardboard need overnight drying more often than you’d expect.
How To Pick Halloween Cardboard Crafts By Age, Skill, And Time
The cutting decides who can do what. Kids can paint, glue, and design almost every project here, but corrugated cardboard is too thick for most kids’ safety scissors. Whoever holds the blade sets the pace.
Here’s how I’d split the work by age:
- Ages 2 to 4: You cut, they paint and stick. Big surfaces like the ghost, the monster box, and the Frankenstein box are perfect, since they can slap on paint without ruining anything.
- Ages 5 to 7: They can cut thin cereal box card with kid scissors, design faces, and glue paper details. Corrugated pieces are still your job.
- Ages 8 to 11: With you right beside them, they can use a kid safe serrated tool like the Canary cardboard cutter or a Makedo safe saw, and a low temp glue gun.
- 12 and up, and adults: Craft knife work, the lantern windows, the coffin, and the full haunted house build.
| Project | Best ages | Skill | Mess | Time | Works best as |
| Batty Cardboard Friend | 3+ | Beginner | Low | 15 min | Shelf or classroom |
| Cheery Cardboard Ghost | 3+ | Beginner | Medium | 20 min plus drying | Mantel or covered porch |
| Glossy Pipe Cleaner Spider | 4+ | Beginner | Low | 15 min | Table or wall |
| Sweet Cardboard Mummy Friend | 3+ | Beginner | Low | 20 min | Shelf |
| Playful Frankenstein Box | 4+ | Beginner | Medium | 30 min plus drying | Shelf or treat box |
| Creepy Cardboard Eyeball | 4+ | Beginner | Medium | 30 min plus drying | Table |
| Black Cat Cardboard Cutie | 5+ | Beginner | Medium | 35 min plus drying | Shelf |
| Colorful Monster Cardboard Friend | 4+ | Beginner | High | 45 min plus drying | Floor or toy bin |
| Webbed Spider Wall Hanger | 6+ | Beginner | Low | 30 min | Door or wall |
| Autumn Pumpkin Garland | 5+ | Beginner | Medium | 45 min plus drying | Mantel or window |
| Masked Cardboard Halloween Characters | 5+ (you cut eye holes) | Intermediate | Medium | 30 min per mask | Wearing or wall display |
| Elegant Witch Hat Decor | 7+ | Intermediate | Low | 40 min | Table centerpiece |
| Witch Cauldron Cardboard Decor | 5+ | Intermediate | Medium | 45 min | Shelf or wall |
| Pumpkin Ghost Frame Decor | 5+ | Beginner | Medium | 40 min | Photo display |
| Hanging Halloween Cardboard Tree | 6+ | Intermediate | Medium | 1 hour | Table centerpiece |
| Cheerful Cardboard Jack-O’-Lantern | 7+ | Intermediate | Medium | 1 hour plus drying | Shelf or covered porch |
| Classic Cardboard Skeleton | 6+ | Intermediate | Medium | 1.5 hours | Door or wall |
| Skeleton Coffin Wall Decor | 8+ (adult cutting) | Intermediate | Medium | 1 hour plus drying | Wall |
| Glowing Cardboard Lantern | 8+ (adult cutting) | Advanced | Low | 1.5 hours | Shelf or doorway |
| Spooky Cardboard Haunted House | 8+ (adult cutting) | Advanced | High | 3 to 4 hours over 2 or 3 sessions | Centerpiece |
“Plus drying” usually means 30 to 60 minutes per coat of acrylic paint. For anything that needs two coats or a primer, plan on finishing it the next day.
Supplies For Halloween Crafts With Cardboard (Plus Free Swaps)
The best part of Halloween crafts with cardboard is that the main material costs nothing. You’ll want three kinds on hand: corrugated shipping boxes for anything that needs to stand up, thin cereal box card for small details kids can cut, and cardboard tubes.
Grocery and liquor stores will usually give you boxes if you ask. Liquor store boxes are worth asking for because the cardboard dividers inside slide apart into ready made walls, towers, and stands.
One thing I learned the slow way: the glossy printed outside of a shipping box repels paint. It beads up and peels off once it dries. Turn the box inside out and paint the plain brown side.
| Supply | Where to get it | Free or cheap swap |
| Acrylic craft paint (FolkArt, Apple Barrel) | Walmart, Michaels, dollar stores | Sample pots of leftover wall paint, or washable tempera for young kids |
| White primer (Liquitex Basics gesso) | Craft stores | A coat of cheap white acrylic, or white printer paper glued over the cardboard |
| Craft glue (Aleene’s Original Tacky Glue) | Craft stores, Walmart | White school glue, with clothespins holding joints while it sets |
| Low temp hot glue gun | Craft stores, Walmart | Tacky glue plus binder clips (slower, but no burns) |
| Craft knife or box cutter (Olfa) | Hardware stores | A serrated kitchen knife, sawed gently, adults only |
| Kid safe cutter (Canary cardboard cutter, Makedo safe saw) | Online, some craft stores | Kids cut cereal box card with scissors while you handle the corrugated pieces |
| Self healing cutting mat | Craft stores | A thick scrap of cardboard as a throwaway cutting surface |
| Metal ruler | Office or hardware stores | No real free swap for knife cuts; plastic rulers get sliced. For scoring only, any straight edge works |
| Googly eyes | Dollar stores | White paper circles with marker pupils, or painted bottle caps |
| Black pipe cleaners | Dollar stores | Black paper strips folded accordion style |
| Orange tissue paper | Dollar stores, saved gift bags | Baking parchment colored with orange marker |
| LED tea lights | Dollar stores | A small flashlight set behind the piece |
| White crepe paper streamers or gauze | Party aisle, pharmacy | Masking tape, or an old white pillowcase torn into strips |
| Twine or jute string | Hardware stores | Kitchen string or yarn scraps |
| White yarn | Yarn aisle | White kitchen string |
| Purple ribbon | Gift wrap aisle | Saved ribbon, or a strip of purple paper |
| Elastic cord | Fabric stores | Ribbon ties on each side |
| White paint pen (Uni POSCA) | Craft and office stores | A white gel pen, or a toothpick dipped in white paint |
| Brass paper fasteners (brads) | Office supply aisles | Short pieces of pipe cleaner poked through and twisted |
| Mod Podge (sealer) | Craft stores | For indoor pieces, school glue thinned with a little water |
Keep a pencil, scissors, a few clothespins, a damp rag, and newspaper or a plastic tablecloth within reach. The clothespins matter more than you’d think, because cardboard joints love to spring apart while glue dries.
Safety And Mess Notes Before You Start Cutting
Cardboard itself is harmless. The risks come from the tools around it: blades, hot glue, and the temptation to put a real candle in a paper lantern.
Blades
- Craft knife cuts are an adult job, or a teen job with an adult watching.
- Cut on a cutting mat with a metal ruler, and keep the fingers holding the ruler well away from the blade’s path.
- Make three or four light passes instead of one hard push. Forcing the blade through corrugated cardboard is how it jumps the ruler.
- Retract the blade every single time you set the knife down.
- Kids who want to watch stand across the table from you, not beside your cutting hand.
Practical note: The dull blade is the dangerous one. When your cut starts tearing the top paper instead of slicing it, snap off the old blade segment. A fresh edge needs half the pressure and is far less likely to slip.
Hot glue
A high temp glue gun can leave a real burn, and the glue sticks to skin while it does it. Kids 8 and up can use a low temp gun with you beside them. Keep a cup of cold water on the table for quick dunking, and use tacky glue for younger kids.
Lights
Only battery LED tea lights or string lights go inside the lantern and the haunted house. Never a real candle. Cardboard and tissue paper burn fast, and it only takes a moment of nobody watching.
Masks
Cut eye holes big enough for side vision, and keep the nose and mouth uncovered. Use elastic around the back of the head, never a tie around the neck. If your kid is wearing one out trick or treating near traffic, a mask they can push up onto their head is the safer choice.
Small parts
Googly eyes, pom poms, and brads are choking hazards for kids under 3. Pipe cleaners hide a sharp wire core, so fold every cut end back on itself.
Mess level
Paint is where the mess lives. Cutting also leaves little cardboard crumbs everywhere. Cover the table, put kids in an old shirt, and remember that acrylic paint doesn’t wash out of clothes once it dries. For under 5s, washable tempera is the easier choice, even though it can flake off glossy cardboard.
Cardboard Basics That Fix Most First Try Problems
Every project below uses the same handful of techniques. Learn these once and the 20 Halloween crafts with cardboard that follow get a lot easier, and a lot neater.
- Find the grain. Look at the cut edge of corrugated cardboard and you’ll see little tunnels running one direction. The sheet bends smoothly along those tunnels and cracks across them. Plan curved pieces (pumpkin panels, the cauldron, the lantern handle) so the tunnels run parallel to the bend.
- Draw on the plain side. Pencil on the unprinted side, and for any shape you’ll repeat (pumpkin panels, bones, bat wings), cut one template from cereal box card and trace it.
- Cut flat, assemble later. Cut windows, eye holes, and doors while the piece is still lying flat. Trying to cut a window into a box that’s already glued together is how hands get cut.
- Score before folding. Run an empty ballpoint pen or the back of a butter knife along a ruler, then fold away from the line. You get a crisp edge instead of a crumpled one.
- Prime the brown. One coat of white acrylic or gesso first. Orange painted straight onto brown cardboard dries a dull, rusty shade, and white needs three coats to look white at all.
- Paint both sides. Even a thin coat on the back helps. Once the paint is dry to the touch, lay the piece flat under a heavy book overnight.
- Glue with a clamp. Tacky glue for flat layers, hot glue for structural joints. Hold every tacky glue joint with a clothespin or binder clip for at least ten minutes.
Practical note: Painting only one side is the most common reason cardboard decor curls. The painted side takes on moisture, swells, and then shrinks as it dries, while the bare side doesn’t. Paint both sides, even if the back gets a quick coat of whatever color is already on your brush.
The peeled cardboard texture
This is the detail behind the textured look you see all over Halloween decor this year. Dab the top paper layer with a damp sponge, wait about a minute, then peel it away to reveal the ribbed layer underneath.
Let it dry completely before you paint, at least an hour. The ribs look great on pumpkins, haunted house roofs, and the mummy. The trade off: the peeled area is weaker and dents easily, so don’t peel anything that needs to hold weight.
Tip: Peel in one slow, steady pull at a low angle. Yanking upward tears the ribs along with the paper.
1. Batty Cardboard Friend
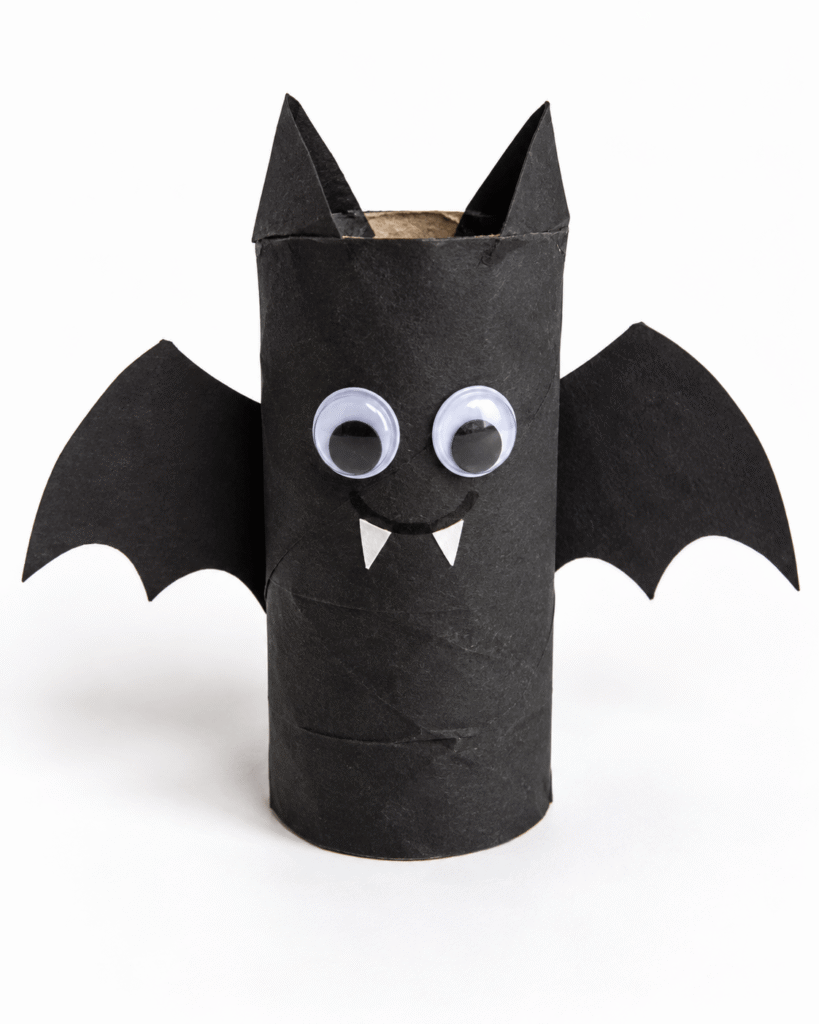
This is the one to start with. A toilet paper tube, two black wings, and a face, and a preschooler can finish it in the time it takes you to make coffee.
The trick that makes it look like a bat and not a tube with wings: press the top rim of the tube down from the front and the back so it folds inward. You get two pointed ears without cutting anything.
Ages: 3 and up · Skill: Beginner · Mess: Low · Time: 15 minutes
Younger kids: you cut the wings, they wrap the tube and stick on the face. Older kids: they can design their own wing shape and add a few to hang from a string.
What you need
- 1 cardboard tube (toilet paper or half a paper towel tube)
- Black craft paper or card (a cereal box painted black works for stiffer wings)
- 2 googly eyes (or white paper circles with marker pupils)
- A black paper scrap for the mouth
- A white paper scrap for fangs
- Craft glue (a glue stick works for the paper wrap, not for the wings)
- Scissors
How to make it
- Wrap the tube in black paper and glue the seam at the back. It’s faster and cleaner than painting, since bare tubes soak up paint.
- Press the top rim down from front and back to form two ears, and pinch the folds flat.
- Cut two wings with a scalloped bottom edge and glue them to the back of the tube, not the sides, so the bat still stands.
- Add googly eyes, a small smile, and two tiny white fangs.
Tip: Wings glued to a curved tube spring off. Use tacky glue and hold each wing with a clothespin for a few minutes.
Safety note: Googly eyes are a choking risk for under 3s. Swap in paper eyes for toddlers.
2. Cheery Cardboard Ghost

A flat ghost cutout with a wavy bottom, two little arms, and a big smile. It’s the easiest painted project on this list, and the one where kids get the most freedom, because a lopsided ghost still reads as a ghost.
The trade off is the white paint. Straight onto brown cardboard, it takes three coats to stop looking beige. Prime it, or glue white printer paper on before painting the face.
Ages: 3 and up · Skill: Beginner · Mess: Medium · Time: 20 minutes plus drying
Younger kids: you draw and cut the shape, they paint it. Older kids: they can draw a whole ghost family in different sizes.
What you need
- Cardboard sheet (the side of a shipping box)
- White acrylic paint (or white printer paper glued on)
- Black paint or a black paint marker
- Scissors (or a craft knife for thick cardboard, adults only)
- Glue
- A strip of cardboard for a stand
How to make it
- Draw a rounded ghost shape with little side arms and a wavy bottom edge.
- Cut it out and paint the front white. Let it dry, then add a second coat.
- Pencil the face first, then go over it with black paint or a marker.
- Fold a strip of cardboard into a triangle and glue it to the back as an easel stand.
Tip: Make the eyes tall ovals and set them a little lower on the head than feels right. High, round eyes make the ghost look startled instead of cheerful.
Safety note: For a porch display, keep it under cover. Cardboard soaks up overnight dew and goes soft by morning, unless you seal both sides with outdoor Mod Podge.
3. Glossy Pipe Cleaner Spider
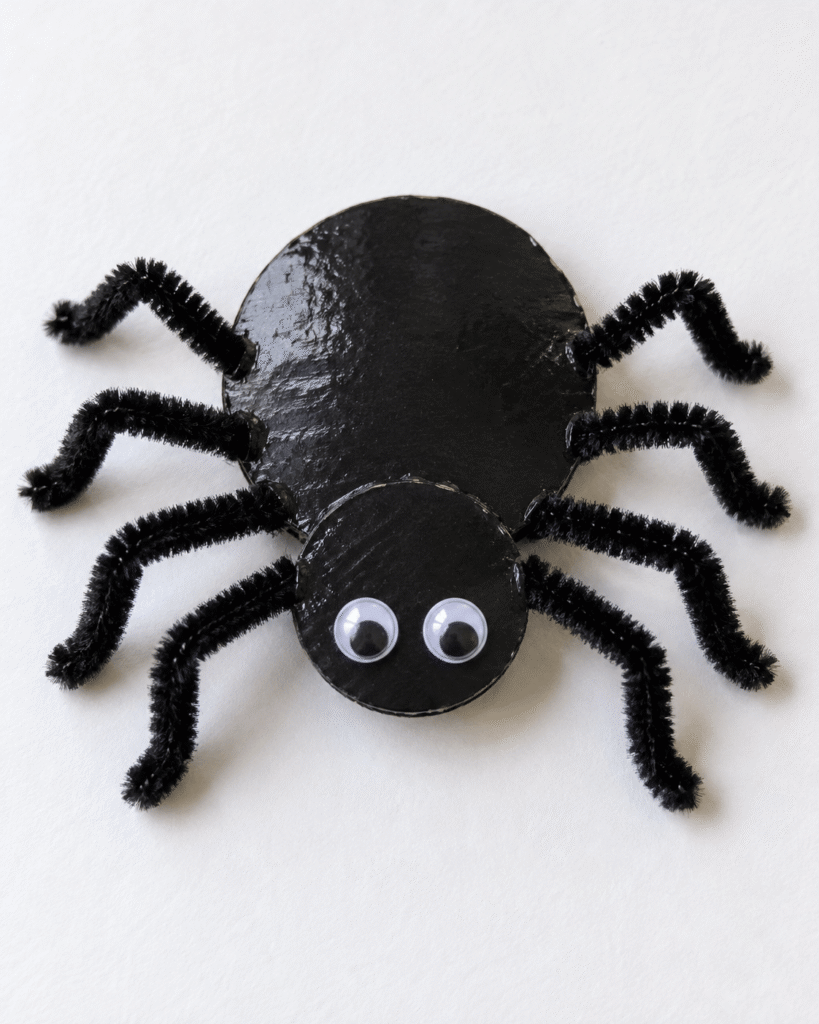
Two black cardboard circles, fuzzy pipe cleaner legs, and googly eyes. It’s quick, it’s cute rather than creepy, and kids love bending the legs into poses.
Most versions glue the legs on top, and they fall off by the next morning. Sandwich them between the two circles instead and the spider survives being played with.
Ages: 4 and up · Skill: Beginner · Mess: Low · Time: 15 minutes
Younger kids: you bend the knees, they stick on the eyes. Older kids: make a whole family and hang them on string from a doorway.
What you need
- 2 cardboard circles (one large for the body, one smaller for the head), painted black
- 4 black pipe cleaners (each one becomes two legs)
- 2 googly eyes
- Craft glue or hot glue
- Gloss Mod Podge or glossy black paint for the shine (optional)
How to make it
- Paint both circles black and let them dry. Add a coat of gloss Mod Podge if you want the shiny look.
- Lay the 4 pipe cleaners across the back of the large circle in a fan, so 4 ends stick out on each side.
- Glue the small circle on top at the front as the head, and glue a cardboard scrap over the pipe cleaners to lock them in.
- Bend each leg up and then down to make a knee.
- Glue the googly eyes onto the head and let everything dry fully.
Tip: Bend all the knees at the same point on each leg. If they’re uneven, the spider tips over on a table.
Safety note: Snip the pipe cleaners only if you have to, and fold any cut ends back over the wire.
4. Sweet Cardboard Mummy Friend

A tube or small box wrapped in white strips, with eyes peeking out of a gap. Little kids love this one because the wrapping is the craft, and there’s no wrong way to do it.
My favorite version skips glue entirely and uses masking tape. Kids tear it, stick it, and wrap until they’re bored, and it gives you a papery, bandaged texture that crepe paper can’t match.
Ages: 3 and up · Skill: Beginner · Mess: Low · Time: 20 minutes
Younger kids: masking tape wrapping, no glue at all. Older kids: a bigger box mummy with arms and a crepe paper trail.
What you need
- 1 cardboard tube or small box
- White crepe paper streamers or gauze (or masking tape)
- Black marker or black paint
- 2 small black paper circles or googly eyes
- Glue stick or craft glue
- Scissors
How to make it
- Paint or color a band around the top third of the tube black. This is what shows through the gap behind the eyes.
- Wrap the white strips around the tube at slight angles, overlapping as you go, and leave a narrow gap across the black band for the face.
- Glue the eyes inside the gap and draw a tiny smile below them.
- Tuck the loose ends under a dab of glue, then add small cardboard tube arms if you like.
Tip: Tear the strips instead of cutting them. Ragged edges look like old bandages, and straight edges look like a gift wrap job.
Safety note: Supervise googly eyes with toddlers, or use paper ones.
5. Playful Frankenstein Box

A green box with jagged black hair, bolts on the sides, and a stitched up grin. A tall cereal box is the right shape, and a tissue box is even better, because the opening becomes a mouth that holds treats or pencils.
The catch is the glossy outside of the box, which won’t hold paint. The fix is a little box surgery, and it’s worth the extra five minutes.
Ages: 4 and up · Skill: Beginner · Mess: Medium · Time: 30 minutes plus drying
Younger kids: they paint the box and stick on precut pieces. Older kids: they can cut the hair and design the face.
What you need
- 1 cardboard box (a cereal box or tissue box)
- Green paint
- Black paper or cardstock
- Googly eyes (or paper circles)
- White paper scraps for teeth
- Cardboard scraps or bottle caps for bolts
- Glue
- Scissors
- Black marker
How to make it
- Gently pull open the glued seam of the box, turn it inside out, and glue the seam back so the plain gray side faces out.
- Paint the box green and let it dry completely. Two coats usually covers it.
- Cut jagged black hair, thick eyebrows, ears, and neck bolts from paper or painted cardboard.
- Glue on the hair, eyes, brows, mouth, and white paper teeth.
- Draw stitches with marker and glue the bolts to each side.
Tip: Cut the hair as one long zigzag strip and fold it over the top edge of the box. It hides the box flaps and looks like a proper flat top.
Safety note: Bottle cap bolts and googly eyes are choking hazards for small kids, so glue them down hard and let them dry overnight.
6. Creepy Cardboard Eyeball

A big white eye with a colored iris, a black pupil, and scratchy red veins, standing on a little cardboard base. It’s the right amount of gross for kids who think pumpkins are boring.
The veins are where it goes right or wrong. Thick red lines look like spaghetti. Thin, branching lines that fade before they reach the iris look properly creepy.
Ages: 4 and up · Skill: Beginner · Mess: Medium · Time: 30 minutes plus drying
Younger kids: they paint the white and the iris, you add the veins. Older kids: they can do the veins with a fine red marker.
What you need
- Thick cardboard circles (trace a dinner plate for a big eye)
- White paint or white paper
- Acrylic paint in green, black, red, and yellow
- A fine red marker for veins (optional)
- Gloss Mod Podge for a wet look (optional)
- Glue and scissors
How to make it
- Cut two cardboard circles and glue them together for thickness. Cut two rectangles for the stand.
- Cover the front with white paint or white paper.
- Paint the iris and let it dry before adding the black pupil on top.
- Draw the red veins from the outer edge inward, branching as they go, and stop them short of the iris.
- Cut a slot halfway up one stand piece and halfway down the other, slide them together into a cross, and glue the eye on top.
Tip: Add one small white dot on the pupil, up and to one side. That single highlight makes the eye look wet and alive.
Safety note: Cutting thick doubled cardboard is an adult job if you’re using a knife.
7. Black Cat Cardboard Cutie

A round head, a tapered body, pointed ears, and a curled tail, all in black with pink ears and white whiskers. The simple shapes make it easy to cut, and a black cat looks good on any shelf.
Two things to know. Black paint over brown cardboard needs two coats. And black construction paper, the obvious shortcut, fades to a dusty purple within a couple of weeks in a sunny window.
Ages: 5 and up · Skill: Beginner · Mess: Medium · Time: 35 minutes plus drying
Younger kids: you cut, they paint and add the face. Older kids: they can cut every piece from cereal box card.
What you need
- Cardboard pieces, painted black (or black poster board)
- Pink and white craft paper
- White paint pen or marker
- Glue
- Scissors
How to make it
- Cut a large circle for the head, a tapered body, two ears, four small feet, and a curled tail.
- Paint every piece black, both sides, and let them dry.
- Add pink inner ears, white eyes, a tiny nose, whiskers, and paw lines with paint pen and paper.
- Glue the head so it overlaps the top of the body, then add the feet and tail.
Tip: Cut the tail as a flat curve rather than trying to bend a strip into a curl. A cut curve keeps its shape, while a bent strip slowly straightens out.
Safety note: No real hazards here beyond scissors. Kid scissors handle cereal box card fine.
8. Colorful Monster Cardboard Friend

A big orange box with horns, wings, googly eyes, and a mouthful of teeth. This is the project for kids who want to make something bigger than they are, and it’s the messiest one on the list.
Cut the mouth all the way open and it’s one of the few Halloween crafts with cardboard that doubles as a party game. Kids toss bean bags or soft balls into the monster’s mouth, and it earns its spot in the living room for the whole month.
Ages: 4 and up · Skill: Beginner · Mess: High · Time: 45 minutes plus drying
Younger kids: they paint the box and stick on spots. Older kids: they can design the monster and cut paper or foam pieces.
What you need
- A cardboard box (any medium shipping box)
- Orange acrylic paint (or any bright color)
- Assorted colored paper or craft foam
- Glue
- Scissors
- Googly eyes (or paper plates for giant eyes)
- Paintbrushes, or a small foam roller
How to make it
- Tape the box closed and turn it so the plain side faces out. Paint it orange and let it dry completely, then add a second coat.
- If it’s becoming a toss game, draw a big mouth on the front and have an adult cut it out with a craft knife.
- Cut horns, wings, feet, teeth, and a mouth outline from colored paper or foam.
- Glue on the eyes, horns, wings, mouth, and teeth to build the face.
- Add spots, stripes, and other details with extra paper or paint.
Tip: A small foam roller paints a big box in a quarter of the time a brush takes, and it doesn’t leave brush streaks. Save the brushes for details.
Safety note: Cutting the mouth out of a taped box is a knife job for an adult. Paint outdoors or over a tarp if you can, because orange paint on a big box will get everywhere.
9. Webbed Spider Wall Hanger

A cardboard web wrapped in white yarn, with a black spider in the middle and a cord to hang it. It looks much more polished than it is, and it’s quiet, low mess crafting for an evening.
The secret is notches. Cut small slits around the edge of the cardboard and the yarn hooks into them, so the spokes stay put without a drop of glue.
Ages: 6 and up · Skill: Beginner · Mess: Low · Time: 30 minutes
Younger kids: they wrap the spokes, you weave the spiral. Older kids: they can do the whole web and add a second smaller spider.
What you need
- Corrugated cardboard (painted black, if you want the web to pop)
- White yarn or thick string
- Black paper or craft foam
- Glue
- Scissors
- Hanging cord
How to make it
- Cut the cardboard into an octagon or a rough circle about 10 inches across.
- Cut 8 small slits evenly spaced around the edge, about half an inch deep.
- Hook the yarn into one slit, run it across the center to the opposite slit, and repeat until every slit is used. These are your spokes.
- Starting at the center, weave a spiral outward by looping the yarn once around each spoke as you go.
- Glue a black paper or foam spider near the center, and tie a hanging cord through two holes at the top.
Tip: Keep a little slack in the spiral. Pulled tight, the yarn drags the spokes together and the web looks pinched.
Safety note: Poke the hanging holes with a pencil or skewer pressed into a ball of play dough behind the cardboard, not your hand.
10. Autumn Pumpkin Garland

Orange cardboard pumpkins with brown stems and green leaves, strung on twine across a mantel or window. It’s the most fall looking piece on the list, and it can stay up through Thanksgiving.
This is where the peeled cardboard trick earns its keep. Peel the top paper off each pumpkin to expose the ribs, run them vertically, and they look like real pumpkin ridges.
Ages: 5 and up · Skill: Beginner · Mess: Medium · Time: 45 minutes plus drying
Younger kids: they paint the pumpkins and thread the twine. Older kids: they can peel and cut the pumpkins themselves.
What you need
- Brown cardboard for pumpkins, painted orange (or orange cardstock)
- Green cardboard or paper for leaves
- Brown cardboard scraps for stems
- Twine or jute string
- Glue
- Scissors
- A hole punch
How to make it
- Cut 7 to 9 pumpkin shapes (enough for about 5 feet of garland) with the cardboard ribs running top to bottom.
- Peel the top paper layer off the pumpkins to expose the ribs, and let them dry.
- Dry brush orange paint over the ribs, leaving brown showing in the grooves.
- Cut stems from brown scraps and leaves from green paper, and glue them on top.
- Punch two holes near the top of each pumpkin and thread the twine through both, spacing the pumpkins evenly.
Tip: Two holes per pumpkin instead of one stops them spinning around to face the wall.
Safety note: No special hazards. Keep the garland away from candles, heaters, and string lights that run hot.
11. Masked Cardboard Halloween Characters

A lineup of wearable masks: a pumpkin, a black cat, a Frankenstein, a monster, each with cutout eyes and bold paper features. Set up a mask station at a party and every kid leaves with their own character.
Use cereal box card, not corrugated. Corrugated masks are heavy, they won’t curve around a face, and they slide down within minutes.
Ages: 5 and up (you cut the eye holes) · Skill: Intermediate · Mess: Medium · Time: 30 minutes per mask
Younger kids: you cut the base and eye holes, they decorate. Older kids: they can design and cut their own character.
What you need
- Cereal box card (or thin corrugated for display only masks)
- Acrylic paint or colored paper
- Black cardstock scraps
- Craft glue
- Scissors, and a craft knife for the eye holes (adults only)
- Elastic cord or ribbon
- Marker or pencil
- A stapler and clear tape
How to make it
- Hold the card up to your child’s face and gently mark where the center of each eye sits.
- Draw the mask shape around those marks, cut it out, and have an adult cut generous eye holes.
- Score three or four light vertical lines across the back so the mask curves around the face.
- Cover the front with paint or paper, then add ears, hair, scars, whiskers, or pumpkin features.
- Staple elastic to each side, and cover the staples on the inside with tape so they don’t scratch.
Tip: Cut the eye holes bigger than you think. A kid who can’t see their feet will push the mask up within two minutes, and then nobody sees the costume.
Safety note: Keep the nose and mouth uncovered, use elastic around the back of the head only, and skip wearing it near traffic if it narrows your kid’s side vision.
12. Elegant Witch Hat Decor

A sleek black witch hat with a wide brim and a purple bow. It’s the most grown up piece on the list, and it looks good on a table well into November.
The cone is the tricky part. Corrugated cardboard cracks when you roll it that tight, so make the cone from poster board or cereal box card, and save the corrugated for the brim.
Ages: 7 and up · Skill: Intermediate · Mess: Low · Time: 40 minutes
Younger kids: they paint and tie the ribbon, you build the hat. Older kids: they can measure and roll the cone with a little help.
What you need
- Corrugated cardboard for the brim
- Poster board or cereal box card for the cone
- Black paper or black paint
- Purple ribbon
- Hot glue or craft glue
- Scissors
- String and a pencil for drawing circles
How to make it
- Tie a pencil to a string about 12 inches long, hold the end at one corner of the poster board, and draw a quarter circle. Cut it out and roll it into a cone.
- Glue the cone’s seam and hold it with clips while it sets.
- Trace the base of the cone onto the brim cardboard, then draw a larger circle around it for the brim edge.
- Cut out the brim. Inside the small circle, cut pie wedge slits from the center to the line, and fold those tabs up.
- Paint or cover both pieces black, slide the cone over the tabs, and glue the tabs to the inside of the cone.
- Tie the purple ribbon around the base and finish with a bow.
Tip: Once the glue is set, gently bend the top third of the cone to one side. A slightly crooked tip looks far more like a witch’s hat than a perfect point.
Safety note: If you use hot glue on the tabs, an adult handles it. The glue pools inside the cone where fingers can’t see it.
13. Witch Cauldron Cardboard Decor
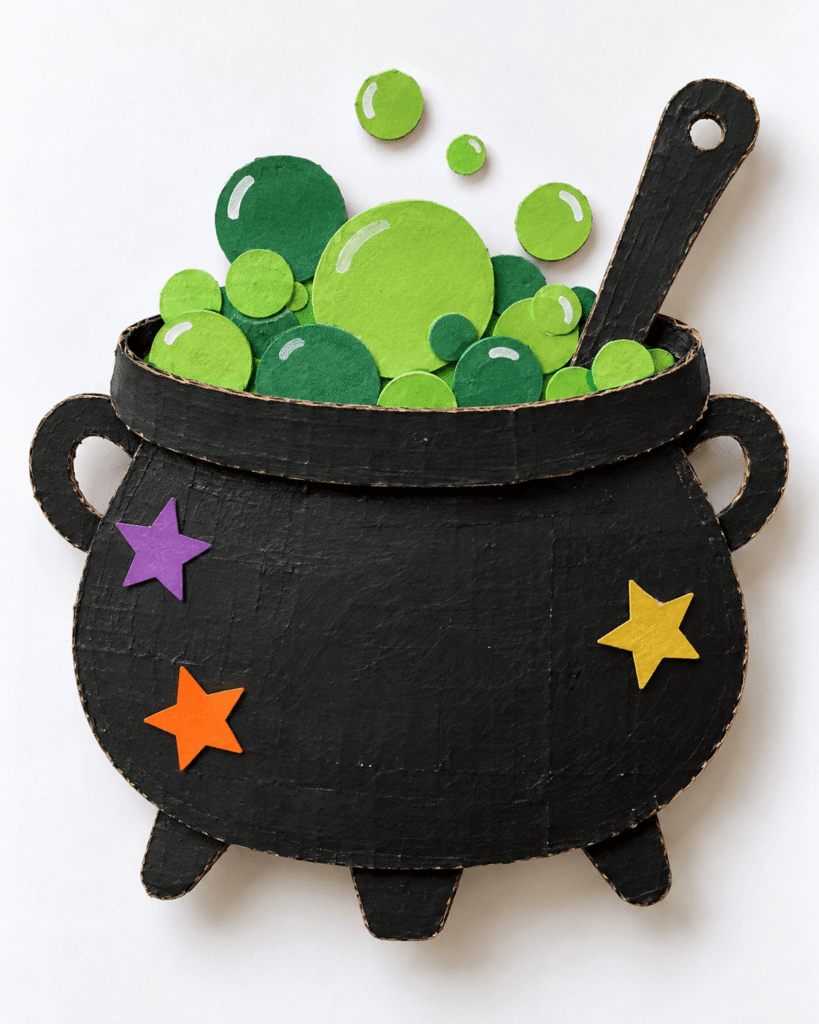
A glossy black cauldron with green bubbles spilling over the rim, a spoon handle sticking out, and a couple of stars. It’s flat, so it works on a wall, a door, or propped on a shelf.
The bubbles make it. Overlapping circles in two or three shades of green, a few rising above the rim, look like they’re actually boiling. All one size and color, they look like polka dots.
Ages: 5 and up · Skill: Intermediate · Mess: Medium · Time: 45 minutes
Younger kids: they cut or punch bubbles and glue them on. Older kids: they can cut the cauldron pieces and the spoon.
What you need
- Cardboard painted black (or black poster board)
- Green paper in two or three shades
- Orange cardstock for a star
- Purple paper for a second star
- Glue stick or craft glue
- Scissors
- A black paper strip or cardboard strip for the spoon handle
- Gloss Mod Podge (optional)
How to make it
- Cut a round cauldron body, a wide rim, two side handles, and three small feet from black cardboard.
- Glue the rim across the top of the body and the handles and feet in place, so the pot looks full and sturdy.
- Trace bottle caps and coins onto green paper for bubbles in different sizes, and glue them along the rim, overlapping.
- Glue the spoon handle so it pokes out of the potion, with the orange star at its tip.
- Add the purple star, then a coat of gloss Mod Podge over the black for shine, and let it dry.
Tip: Glue the bubbles on last, after the gloss coat. Gloss over paper bubbles makes them wrinkle.
Safety note: Low risk. Kid scissors handle the paper pieces, and an adult can cut the cardboard body.
14. Pumpkin Ghost Frame Decor
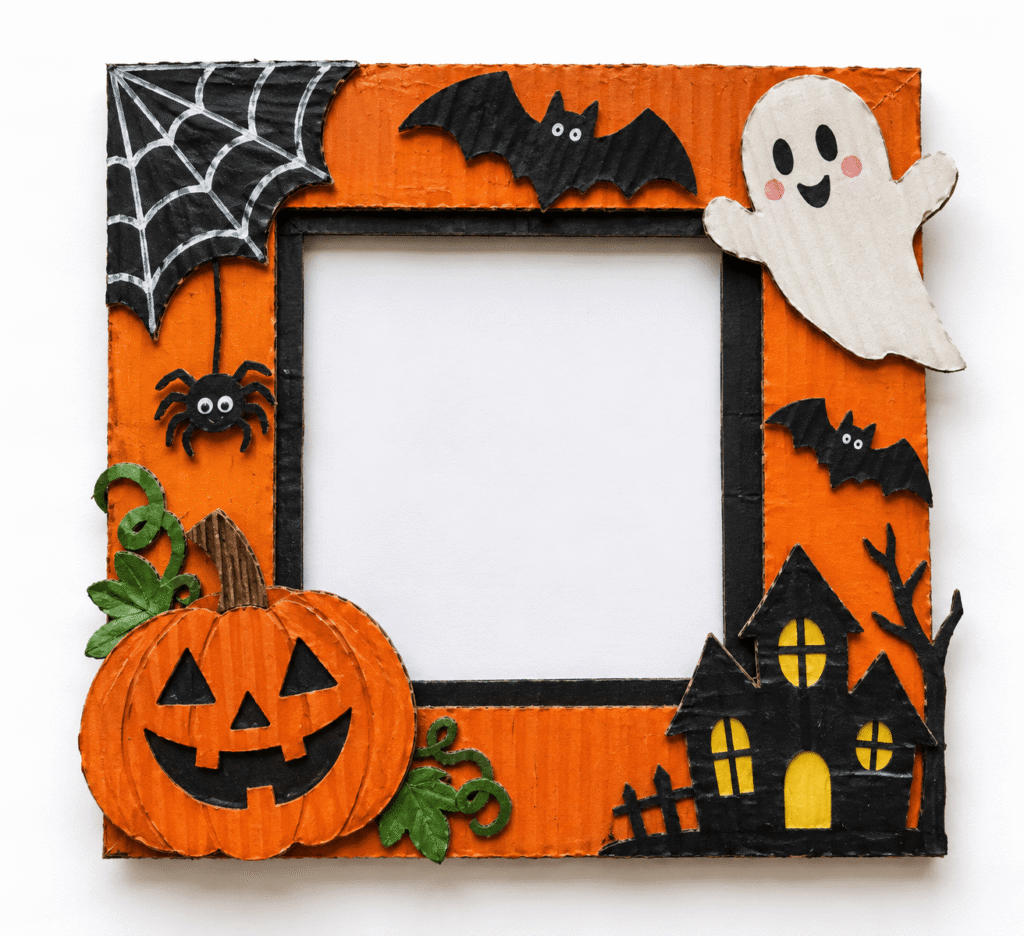
An orange and black cardboard frame with spiderwebs in the corners and little pumpkin, ghost, bat, and haunted house cutouts around the border. Put this year’s costume photo in it and you’ve made a keepsake.
Build it with a slot in the back so you can slide a new photo in every October. It turns a one season craft into a tradition.
Ages: 5 and up · Skill: Beginner · Mess: Medium · Time: 40 minutes
Younger kids: they glue the cutouts around the border. Older kids: they can draw the webs and design the layout.
What you need
- Cardboard base (two pieces, front and back)
- Orange and black paint or paper
- Black marker or paint pen
- Craft glue
- Small paper cutouts of a pumpkin, ghost, bats, and a haunted house
How to make it
- Cut the frame front with a center opening slightly smaller than your photo (a 3.5 by 5.5 inch opening for a 4 by 6 photo).
- Cover the frame in orange, then add black layers along the edges.
- Draw spiderwebs in the corners with marker or paint pen, and add a small spider hanging from one.
- Glue on the pumpkin, ghost, bats, and haunted house cutouts.
- Glue the back piece on along three sides only, leaving the top open as a photo slot, and add a strip of cardboard as an easel stand.
Tip: For the webs, draw 4 or 5 straight lines out from the corner, then connect them with curves that sag slightly toward the corner. Straight connecting lines look like a grid.
Safety note: Cutting the center opening cleanly is a knife job, so an adult does it.
15. Hanging Halloween Cardboard Tree
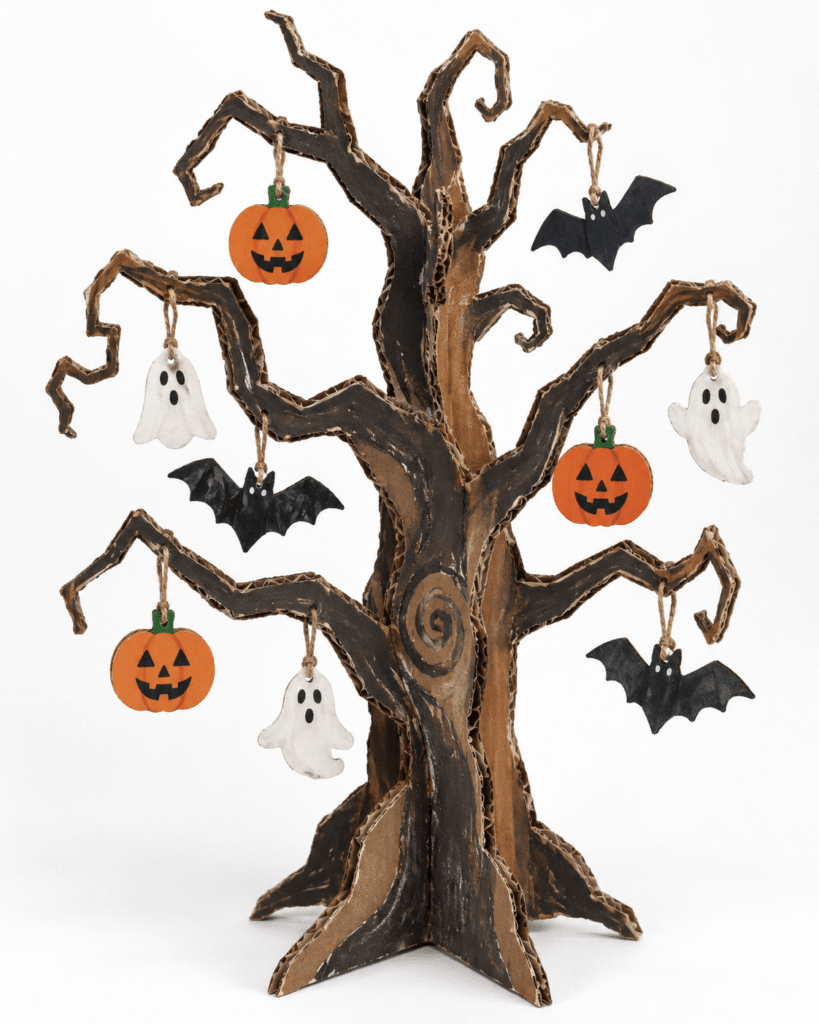
A bare, twisty cardboard tree with paper pumpkins, ghosts, and bats dangling from its branches on twine. It makes a great table centerpiece, and kids can keep adding ornaments all month.
Most versions are flat and need propping up. Cut two identical trees and slot them together, and you get a 3D tree that stands on its own from every angle.
Ages: 6 and up · Skill: Intermediate · Mess: Medium · Time: 1 hour
Younger kids: they make and hang the ornaments, you build the tree. Older kids: they can draw the tree and cut the paper pieces.
What you need
- Sturdy corrugated cardboard (two matching pieces)
- Orange and white paper
- Black paper
- Twine or string
- Scissors, and a craft knife for the trunk (adults only)
- Glue
- A pencil
How to make it
- Draw a tree with a thick trunk and four or five branching arms on cardboard, with the ribs running up and down the trunk. Keep every branch at least an inch wide.
- Cut it out, then trace it onto the second piece and cut that one too.
- Cut a slot from the top of the first tree down to its middle, and from the bottom of the second tree up to its middle. Slide them together into a cross.
- Cut small pumpkins, ghosts, and bats from paper, poke a hole in each, and tie on short loops of twine.
- Hang the ornaments on the branches, and add a dab of glue where any of them slide off.
Tip: Hang the lightest pieces near the branch tips and the heavier ones close to the trunk. Corrugated branches droop over a few days if the weight sits at the ends.
Safety note: The slots need clean, straight cuts through doubled cardboard, so an adult does that part.
16. Cheerful Cardboard Jack-O’-Lantern

A chunky, layered pumpkin with a smiling black paper face and a green stem. The overlapping panels give it real depth, so it looks rounded even though it hangs flat against a wall or stands on an easel.
The detail that makes people look twice is the shading. Paint the middle panel a lighter orange and the outer ones a deeper orange, and the pumpkin looks like it bulges toward you.
Ages: 7 and up · Skill: Intermediate · Mess: Medium · Time: 1 hour plus drying
Younger kids: they paint the panels and stick on the face. Older kids: they can cut the panels from a template.
What you need
- Corrugated cardboard
- Orange acrylic paint, plus a little red or brown to deepen it
- Black paper or cardstock
- Green cardboard or paper
- A short cardboard tube for the stem
- Glue
- Scissors
- Paintbrushes
How to make it
- Make a cereal box template of a tall, rounded segment shape, and trace five panels, with the middle one about an inch wider than the rest.
- Paint the middle panel light orange, the next two medium orange, and the outer two a deeper orange.
- Gently curve each panel over the edge of a table so it bows slightly outward.
- Glue the two medium panels behind the center one, overlapping by about an inch, then the two outer panels behind those. Glue a cardboard circle across the back to hold it all.
- Cover a short tube with green paper or paint and glue it behind the top as the stem, with a paper leaf.
- Cut the eyes, nose, and smile from black paper and glue them across the front panels.
Tip: Run the cardboard ribs top to bottom on every panel. The curve in step 3 only works along the ribs, and across them the panel will crease.
Safety note: If you want it on a porch, keep it under cover or seal it, since the layered panels trap moisture and come apart in damp air.
17. Classic Cardboard Skeleton
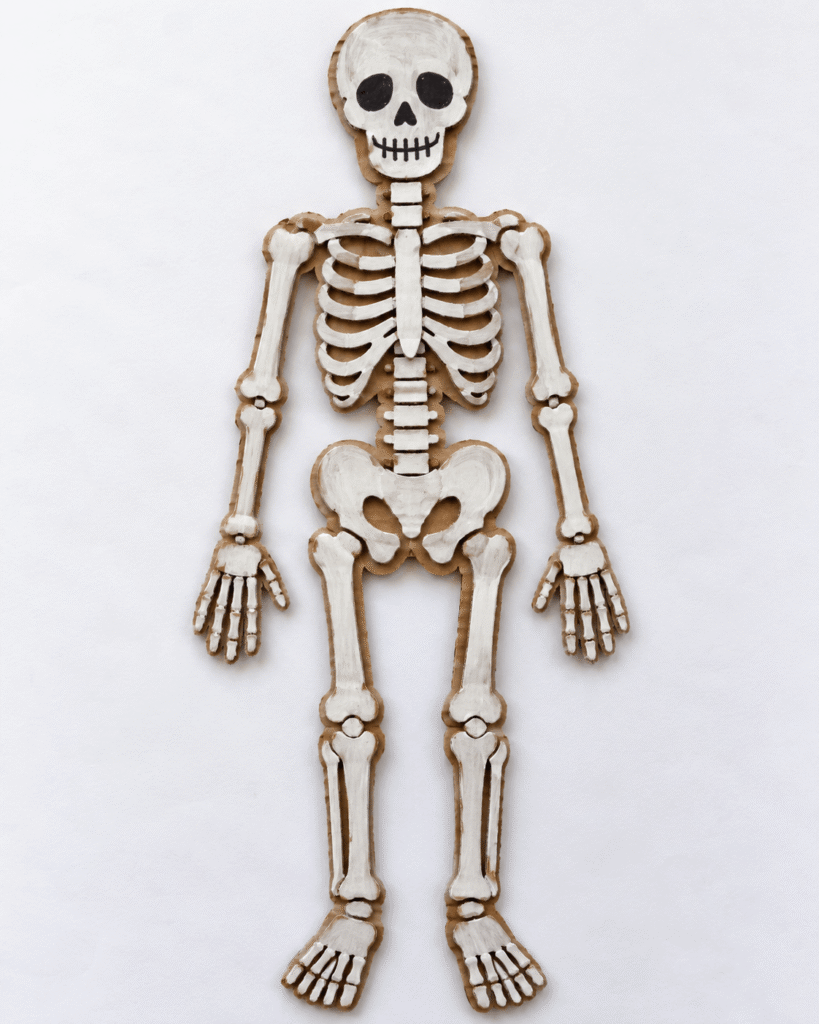
A full white skeleton on brown cardboard, with a skull, rib cage, spine, arms, legs, hands, and feet. Hung on a door, it’s the kind of decoration that makes trick or treaters stop.
The upgrade I always make: brass paper fasteners at the shoulders, elbows, hips, and knees. The skeleton can wave, sit, or dance, and kids will repose it every day.
Ages: 6 and up · Skill: Intermediate · Mess: Medium · Time: 1.5 hours
Younger kids: they paint the bones, you cut and join them. Older kids: they can draw and cut most of the bones themselves.
What you need
- Brown cardboard sheets (two medium shipping boxes make a skeleton about 3 feet tall)
- White craft paint or white paper
- Black marker
- Scissors, and a craft knife for thick pieces (adults only)
- Glue
- Brass paper fasteners (about 8)
How to make it
- Draw the skull, the rib cage as one piece, the spine, the pelvis, two upper arms, two forearms, two thighs, two shins, and the hands and feet.
- Cut out each piece. Give each long bone knobby rounded ends, like a cartoon dog bone.
- Paint every piece white (two coats over brown) or cover it with white paper.
- Glue the skull, rib cage, spine, and pelvis together into the torso.
- Join the arms and legs to the torso and to each other with paper fasteners, then add black marker eyes, nose, and teeth.
Tip: Cut the rib cage as one shape with the gaps cut out, not as separate ribs. Twelve loose ribs is twelve chances for something to fall off.
Safety note: Fold the fastener prongs flat on the back and cover them with tape. They’re sharp, and they’re a choking risk for toddlers.
18. Skeleton Coffin Wall Decor

A tall black coffin with a small white skeleton laid out on the front. It manages to be spooky and stylish at the same time, which is why it works in an entryway long after the kids’ crafts come down.
The coffin shape is easy to get wrong. The widest point should sit about a third of the way down, at the shoulders, not in the middle. Otherwise it reads as a stretched hexagon.
Ages: 8 and up (adult cutting) · Skill: Intermediate · Mess: Medium · Time: 1 hour plus drying
Younger kids: they paint and place the bones. Older kids: they can lay out and glue the whole skeleton.
What you need
- 1 sturdy cardboard box or sheet
- Black acrylic paint
- White craft paint
- Scissors or a craft knife
- Hot glue or craft glue
- Cotton swabs for small bones (optional)
- A strip of cardboard for a raised border (optional)
How to make it
- Draw a center line on the cardboard, mark the shoulders a third of the way down, and draw the coffin shape. Cut it out.
- Paint it black, let it dry fully, and add a second coat.
- Cut or shape small cardboard bones (a skull, ribs, arms, pelvis, legs, and feet) and paint them white.
- Lay the skeleton out on the coffin before gluing anything, then glue it down piece by piece.
- Glue a thin cardboard strip around the edge if you want a raised lid border.
Tip: Cotton swabs make the small arm and leg bones in seconds. Snip them in half, and the cotton tips look like joints.
Safety note: Cutting a large coffin from thick cardboard is a knife job, so an adult does it on a cutting mat with fresh blades.
19. Glowing Cardboard Lantern
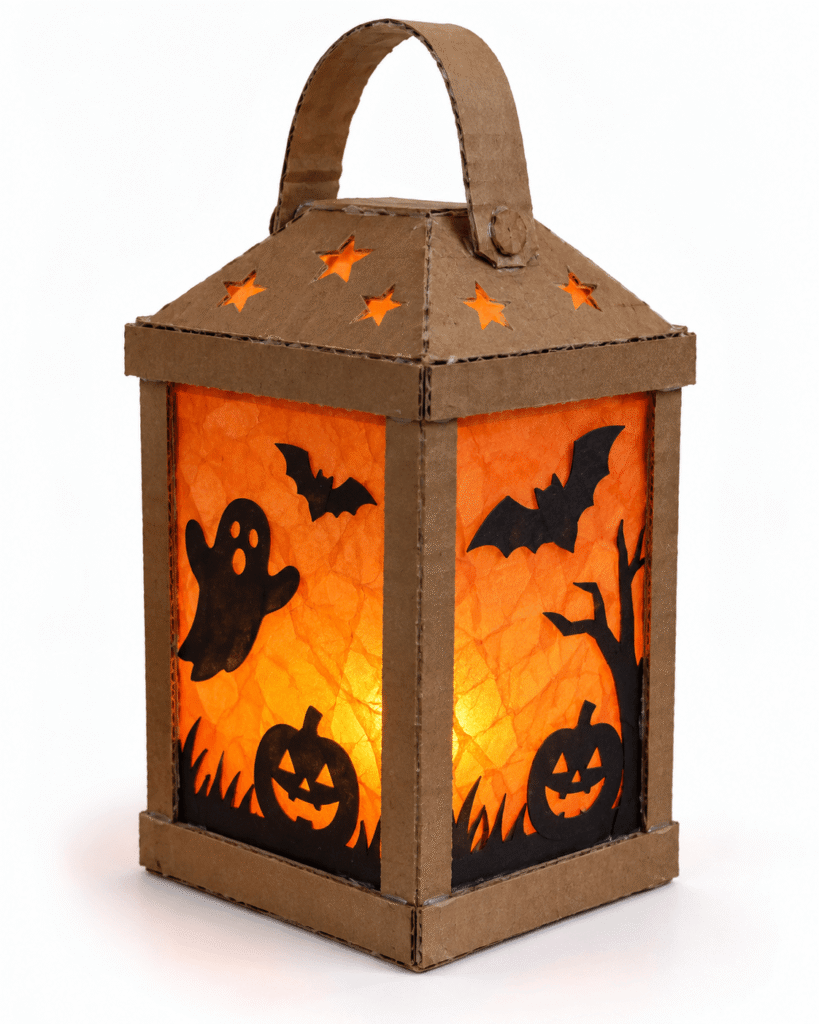
A four sided cardboard lantern with orange tissue windows and black silhouettes of ghosts, bats, pumpkins, and grass. With an LED tea light inside, the silhouettes show up as shadows against a warm orange glow.
It’s one of the most rewarding builds on this list and also one of the fussiest. Window cutting is precise knife work, and tissue paper wrinkles the instant it touches wet glue.
Ages: 8 and up (adult cutting) · Skill: Advanced · Mess: Low · Time: 1.5 hours
Younger kids: they cut silhouettes from black paper. Older kids: they can glue the tissue and assemble the lantern.
What you need
- Brown cardboard sheets or a small cardboard box
- Orange tissue paper
- Black cardstock (plus white and orange for extra details)
- Glue stick or double sided tape
- Scissors and a craft knife
- A strip of cardboard for the handle
- A battery LED tea light
How to make it
- Draw four equal panels side by side on one long strip of cardboard, plus a narrow glue tab at one end. Score the folds between panels.
- Cut a window in each panel, leaving a frame about an inch wide.
- Run glue stick or tape along the inside of each frame and press the tissue onto it. Use two layers of tissue.
- Glue the black silhouettes onto the tissue from the inside so they show as shadows.
- Fold the strip into a box, glue the tab, add a cardboard floor, and glue the handle strip across the top.
- Set an LED tea light inside.
Practical note: One layer of tissue shows the tea light as a bright hot spot in the middle of one panel. Two layers spread the glow evenly across all four windows, so it looks lit from within.
Tip: Glue the frame, never the tissue. Glue on the tissue itself soaks through and leaves wrinkled, dark patches.
Safety note: LED lights only. A real candle inside cardboard and tissue paper is a fire risk.
20. Spooky Cardboard Haunted House
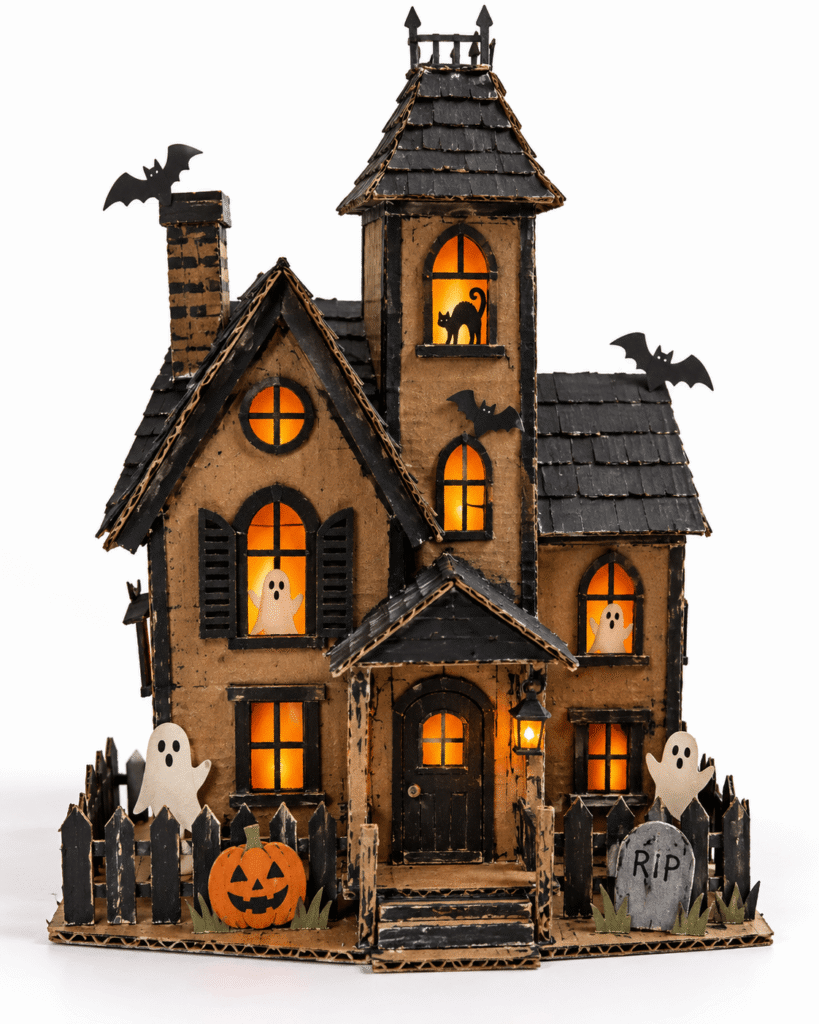
A tall black and brown house with a tower, a porch, a little fence, and orange glowing windows, finished with paper ghosts, bats, a tombstone, and a pumpkin. If you only tackle one big build from these Halloween crafts with cardboard, make it this one.
Be realistic about time. It’s three or four hours of work, and it really needs to be spread over two or three evenings so the glue and paint can dry between stages.
Ages: 8 and up (adult cutting) · Skill: Advanced · Mess: High · Time: 3 to 4 hours over 2 or 3 sessions
Younger kids: they paint walls and make the ghosts and bats. Older kids: they can plan the layout and glue the details.
What you need
- Corrugated cardboard: a medium box for the house, a tall narrow box or liquor box dividers for the tower
- A large flat piece of cardboard for the base
- Black acrylic paint
- Orange tissue paper or orange paper
- White craft paper
- Glue (hot glue for the structure, tacky glue for details)
- Scissors and a craft knife
- Marker or pencil
- Battery LED fairy lights (optional)
How to make it
- Session 1: Sketch the house, tower, porch, and fence. Cut windows and the door while every wall is still flat, then glue the structure together and glue it to the base.
- For the roofs, score a line down the middle of a rectangle and fold it into a peak. Glue the roofs on.
- Session 2: Prime, then paint the roofs, trim, windows, and door black. Let it dry overnight.
- Session 3: Glue orange tissue behind every window from the inside.
- Add paper ghosts, bats, a tombstone, and a small pumpkin around the porch and fence.
- Tuck battery fairy lights inside if you want the windows to glow.
Tip: Glue the tower on a few degrees off straight. A perfectly upright tower looks like a dollhouse, and a slight lean looks haunted.
Safety note: An adult does all the knife work. Use battery lights only, and switch them off when nobody’s in the room.
Common Mistakes With Halloween Cardboard Crafts
Most first tries at Halloween crafts with cardboard go wrong in the same few places. None of them are about skill. They’re about knowing how the material behaves.
- Painting the printed side of the box. Glossy shipping box print repels paint, and it peels off in sheets once dry. Turn the box inside out.
- Skipping the primer. White and orange go muddy over brown cardboard. One coat of white first saves two coats of color.
- Painting only one side. The piece curls by morning. Give the back a quick coat and dry it flat under a book.
- Bending across the ribs. Corrugated cardboard cracks when you fold or curve it the wrong way. Check which way the tunnels run before you cut.
- Handing a 5 year old corrugated cardboard and kid scissors. It’s too thick, their hands get tired, and the edges come out chewed. Give them cereal box card and save the corrugated for you.
- Cutting windows after gluing the walls up. You end up pushing a blade into a box toward your own hand. Cut everything while it’s flat.
- Using a glue stick for anything structural. It’s fine for paper on cardboard. For joints, use tacky glue with a clothespin, or hot glue.
- Leaving pieces on an open porch. One night of dew and cardboard goes soft and wavy. Keep it under cover or seal both sides.
- Starting the big builds the week of Halloween. The lantern and haunted house need overnight drying between stages. Start them at least two weekends ahead.
FAQs
What paint works best on cardboard?
Acrylic craft paint like FolkArt or Apple Barrel, over a coat of white primer, on the plain unprinted side of the box. Washable tempera is fine for young kids, but it can crack and flake on glossy patches.
How do you keep cardboard from warping when you paint it?
Use thin coats, paint both sides, and let the piece dry flat under a heavy book once it’s dry to the touch. Most warping comes from painting only one side.
What’s the easiest way to cut thick cardboard?
A sharp craft knife with snap off blades, a metal ruler, and several light passes on a cutting mat. For kids, a serrated safety cutter like the Canary cardboard cutter cuts corrugated cardboard without an exposed blade.
What are easy Halloween crafts with cardboard for toddlers?
The tube bat, the masking tape mummy, and the painted ghost all work from about age 2 or 3. You do the cutting, they paint and stick, and you swap googly eyes for paper ones for under 3s.
Can you put cardboard Halloween decorations outside?
Only under cover. Dew and rain turn cardboard soft and wavy overnight. Sealing both sides with outdoor Mod Podge helps on a covered porch, but nothing makes cardboard rainproof.
Is it safe to put a candle in a cardboard lantern?
No. Use battery LED tea lights or fairy lights only, since cardboard and tissue paper catch fire easily.
Where To Go From Here
If this is your first round of cardboard crafting, pick one quick project and one bigger one from the comparison table. Make the bat or the ghost tonight while the boxes are still stacked by the door, and start the lantern or haunted house this weekend so it has time to dry.
Read next: If you want a few pumpkins to sit beside the jack o’lantern and the garland, Best Halloween Pumpkin Crafts For Easy Fall Decor uses the same paint and many of the same scraps. And when the cardboard ghosts come down in November, 18 Easy DIY Fun Christmas Footprint Crafts For Festive Holiday is a low cost way to keep the craft table going into December.
One last thing: Before you recycle a single box this month, flatten it and slide it behind the couch. By the end of October you’ll be glad you kept them.
