
The best Easter wood crafts for kids use popsicle sticks, clothespins, craft store wood blocks, and unfinished wooden eggs, because they need only paint, glue, and a few minutes of adult help. Start with the clothespin bunnies, craft stick puppets, and painted eggs, then move up to the garland, wreath, and wood signs. Most take 20 to 60 minutes, and anything that needs a saw or drill is an adult job.
It’s the Friday before Easter, five kids from the street are standing in your driveway asking what they’re making, and all you have is a bag of popsicle sticks, a box of clothespins, and a few scrap boards in the garage.
I built this list for that moment. Every one of these Easter wood crafts starts with cheap wood pieces from the craft aisle, like popsicle sticks, clothespins, wooden eggs, and basic blanks. Anything that needed a full workshop got cut, and the few projects that still need a saw are marked as adult jobs.
You’ll find bunnies, painted eggs, a garland, a wreath, and a puzzle. Some are toys, some are wooden Easter decorations for the mantel, and a few make good gifts for grandparents. Each one lists who can do what, a realistic time, what tends to go wrong on a first try, and a cheaper swap for anything you’d have to buy.
If you want Easter crafts for kids that don’t leave you scrubbing glitter out of the carpet, start at the top. I ordered the list from the easiest popsicle stick Easter crafts to the projects that need an adult with tools. Easter bunny crafts take up half the list, because bunnies are what kids ask for first, but there are carrots, chicks, and eggs too.
Before You Start: What You Need For Easter Wood Crafts
Most Easter wood crafts run on the same small kit. Buy it once and you can make most of the 12 projects below without another store run. If you’re collecting popsicle stick Easter crafts for a group, buy the sticks and clothespins by the bag.
| Staple | Why it earns its spot | Where to find it | Budget swap |
| Popsicle sticks, jumbo craft sticks, spring clothespins, wooden eggs, and wood beads | The base of most projects | Craft stores, dollar stores | Saved popsicle sticks, old clothespins, scrap wood |
| Pre cut wood blocks and blanks | Lets you skip the saw | Craft stores | Ask the hardware store to cut scrap lumber |
| Acrylic craft paint (DecoArt Americana, Apple Barrel) | Covers wood in two thin coats | Craft stores | Leftover wall paint samples |
| Gesso (Liquitex Basics Gesso) | Seals bare wood so colors stay bright | Craft stores, Amazon | A coat of white acrylic paint |
| Tacky glue (Aleene’s Original Tacky Glue) | Holds wood and trims, and is safe for kids to use | Craft stores | Wood glue for stick joints |
| Low temp glue gun | Fast bonds, adults only | Craft stores | Tacky glue and clothespins |
| Sandpaper, 120 and 220 grit | Smooths edges and splinters | Hardware stores | A sanding sponge, or a nail file for tiny pieces |
| Mod Podge or clear spray sealer | Protects the paint | Craft stores | Skip it for indoor pieces |
| Twine, ribbon, buttons, and pom poms | Finishing details | Craft stores | Scraps from the junk drawer |
Practical note: Gesso first. Bare wood drinks paint and raises the grain, so the first coat goes on dull and blotchy. One coat of gesso (or plain white paint) seals it, and every color on top looks brighter.
Glue choice matters more with wood than with paper, so it’s worth a closer look before you shop.
Skill Levels, Ages, And Who Does What
Ages 3 to 5 can handle the Clothespin Easter Bunnies, Craft Stick Chick Puppets, and Popsicle Stick Egg Puzzle, with an adult doing the fine details. Ages 6 to 10 can do most of the stick, bead, and egg projects. The wood block, sign, plaque, and door hanger projects are adult led: you cut and screw, and the kids paint.
Beginner means painting and gluing. These Easter crafts for kids range from 20 minute stick puppets to adult led porch signs. Intermediate means stencils, sanding, and fine paint work. Advanced means cutting boards and building a frame.
Safety, Ventilation, Znd Tools
Some of these projects use real tools, so set them up like a workshop job.
- Cutting, drilling, and screwing: adult only. Wear safety glasses, add hearing protection for power tools, and clamp the wood.
- Sanding: wear a dust mask (an N95 works) and wipe the dust off before you paint.
- Spray sealer and paint: use them outdoors or in a well ventilated space, and follow the label.
- Hot glue: adult only, and low temp.
- Small parts: beads, googly eyes, buttons, and pom poms are small. See the note below.
Practical note: Anything that fits through a toilet paper tube can choke a child under 3. Beads, googly eyes, buttons, and pom poms all fit, so swap in painted dots for the youngest kids.
Pick A Project By Skill, Time, And Who Does What
Here are all 12 at a glance, so you can match a project to the kids and the tools you actually have. Whether you want Easter crafts for kids that finish in an afternoon or wooden Easter decorations for the porch, this table gets you to the right one fast.
| Project | Ages or who paints | Skill | Time | Adult job or gear |
| Clothespin Easter Bunnies | 4 to 10 | Beginner | 25 minutes plus drying | None, or hot glue |
| Craft Stick Chick Puppets | 4 to 8 | Beginner | 30 minutes plus drying | Hot glue |
| Popsicle Stick Egg Puzzle | 3 to 8 | Beginner | 30 minutes plus drying | None |
| Mini Wood Carrot Ornaments | 6 to 10 | Beginner | 30 minutes plus drying | Fold the wire ends |
| Popsicle Stick Easter Basket | 6 to 10 | Beginner | 40 minutes plus drying | Hot glue |
| Painted Wooden Easter Eggs | 4 and up | Beginner | 40 minutes plus drying | Sealer |
| Craft Stick Easter Wreath | 6 to 10 | Intermediate | 60 minutes plus drying | Hot glue, cut the ring |
| Easter Egg Wood Garland | 7 and up | Intermediate | 90 minutes | Drilling, if the eggs aren’t pre drilled |
| Painted Wood Block Bunnies | Kids paint the base, adult paints faces | Intermediate | 75 minutes plus drying | Sanding, cutting blocks |
| Wood Cutout Easter Sign | Kids paint, adult builds | Intermediate | 90 minutes plus drying | Drill, sanding |
| Easter Bunny Wood Plaque | Kids dry brush, adult builds | Intermediate | 75 minutes plus drying | Brad nails, stencil cutting |
| Wooden Bunny Door Hanger | Kids paint, adult builds | Advanced | 2 to 3 hours plus drying | Saw, drill, exterior paint |
This is the table to keep handy. Save this for later, and picking a project on a busy Saturday takes about ten seconds.
1. Clothespin Easter Bunnies
Three Clothespin Bunnies With Pink Ears And Twine Bows
Three white clothespin bunnies stand in a row against a glossy white backdrop. Each has pink painted inner ears, a purple bead nose, drawn whiskers and closed, lashed eyes, tiny black paws, and a baker’s twine bow in blue, red, or green. The open jaws of the clothespin make the ears, and the pinched middle gives the bow a natural place to sit.
These are the best first Easter bunny crafts on the list, because the clothespin does the shaping for you. They clip onto a basket rim, a ribbon, or a curtain, and a kid can make a whole family in one sitting.
The pieces are small, and a bead nose or pom pom tail will vanish under the couch, so buy a few extra. Paint is the other catch. Two thin coats of white cover the wood better than one thick coat, which runs into the clip.
Ages: 4 to 10 (3 year olds with an adult painting). Skill: Beginner. Mess: Medium. Time: 25 minutes, plus drying.
What You Need
- Spring clothespins, 1 per bunny (a dollar store pack, or old ones from the laundry basket)
- White acrylic craft paint, such as DecoArt Americana (or leftover white wall paint)
- Pink paint or a pink marker for the inner ears
- Black fine tip permanent marker, such as a Sharpie (or a toothpick dipped in black paint)
- One bead or small pom pom per bunny for the nose (or a painted purple dot)
- Baker’s twine, about 10 inches per bunny (or yarn or ribbon)
- Tacky glue, or a low temp glue gun for adults
How to Make It
- Paint each clothespin white in two thin coats, letting each dry for about 20 minutes.
- Paint the inside of the two jaws pink for the ears.
- Draw the eyes, whiskers, and paws with the black marker, and glue on the bead nose.
- Tie the twine in a bow around the middle, and glue a small white pom pom to the back for a tail.
Tip: Sketch the face in pencil first. Marker on painted wood doesn’t erase.
Safety: Use painted dots instead of beads for kids under 3, and keep hot glue an adult job.
2. Craft Stick Chick Puppets
A Magenta Bunny And A Yellow Chick, Stick Puppets In Button Coats
A magenta bunny and a yellow chick stand side by side, each one built on a single jumbo craft stick. The bunny wears pink and gold paper ears, googly eyes with drawn lashes, a pink pom pom nose, thin black whiskers, and a gold paper bow tie. The chick has googly eyes, an orange felt beak, yellow feather wings on both sides, a pink felt bow tie, and a small pink comb on top. Three buttons run down the body of each puppet like a coat.
Puppets keep a rainy afternoon interesting, and a stick is light enough for small hands to hold up through a long show. It’s one of the easiest Easter crafts for kids, and these always end up starring in a homemade play.
Paint the stick before you add anything, since paint won’t stick over glue. Wet paint also warps thin sticks, so use two light coats and dry them flat under a book. Feathers shed, so glue them in a thin line.
Ages: 4 to 8. Skill: Beginner. Mess: Medium. Time: 30 minutes, plus drying.
What You Need
- 2 jumbo craft sticks, about 6 inches (or regular popsicle sticks, which are smaller)
- Acrylic or washable paint in magenta and yellow
- Googly eyes, 2 per puppet (or paper circles with a marker dot)
- A pink pom pom, 1/2 inch, and orange felt for the beak (or orange paper)
- Yellow craft feathers (or yellow paper cut into feather shapes)
- 6 buttons, about 1/2 inch (or paper circles)
- Black pipe cleaner pieces for whiskers (or draw them on)
- Tacky glue
How to Make It
- Paint each stick on both sides in thin coats, and dry them flat under a book.
- Glue on the googly eyes and draw the lashes. Add the pom pom nose and whiskers to the bunny, and the felt beak to the chick.
- Glue paper ears to the top of the bunny, a small comb to the chick, and feather wings behind the chick.
- Glue a small bow tie below each face and a column of three buttons down each body.
Tip: Let each kid name their puppet before they start. A puppet with a name gets a longer show.
Safety: Buttons, eyes, and pom poms are small, so use paper circles for kids under 3. Keep hot glue an adult job.
3. Popsicle Stick Egg Puzzle
Hatching Chicks, A Nest, A Carrot, And A Bunny, All Built From Sticks
Four pictures built from sticks sit on a whitewashed wood table. A yellow chick hatches from a white paper eggshell, with googly eyes, an orange felt beak, and feather wings. A nest of crossed brown sticks holds fluffy chicks and a white egg. An orange glitter carrot has a green paper top, and a natural wood bunny wears pink and white ears, whiskers, and a small yellow flower. Each picture is a row of sticks with a design across the front, so any of them could be painted as a puzzle picture.
This is one of the simplest popsicle stick Easter crafts, and it keeps kids busy long after it’s made. Glue is the wrong tool here, since glued sticks can’t be pulled apart. Tape the sticks together on the back with masking tape, paint across the whole row, then peel the tape off.
The first try problem is sticks that shift while you paint. Press them tight together and use two strips of tape.
Ages: 3 to 8. Skill: Beginner. Mess: Medium. Time: 30 minutes, plus 15 minutes to dry.
What You Need
- 6 to 8 jumbo popsicle sticks per puzzle (craft store or dollar store)
- Masking tape or painter’s tape
- Washable paint or acrylic paint, and a brush
- Black marker for details
- Optional: googly eyes, felt, and feathers for a hatching chick picture
How to Make It
- Lay the sticks side by side, touching, and tape them together across the back with two strips of masking tape.
- Flip them over and paint an egg picture across all of them, such as a big egg with a chick inside. Let it dry for about 15 minutes.
- Number the backs lightly in pencil if you want to make it easier for little ones, then peel off the tape.
- Mix the sticks up and have a kid put the picture back together on the table.
Tip: Paint the background first and the small details last. Details look best across seams when the sticks are pressed tight together.
Safety: Skip googly eyes for kids who mouth small things, and draw them on instead.
4. Mini Wood Carrot Ornaments
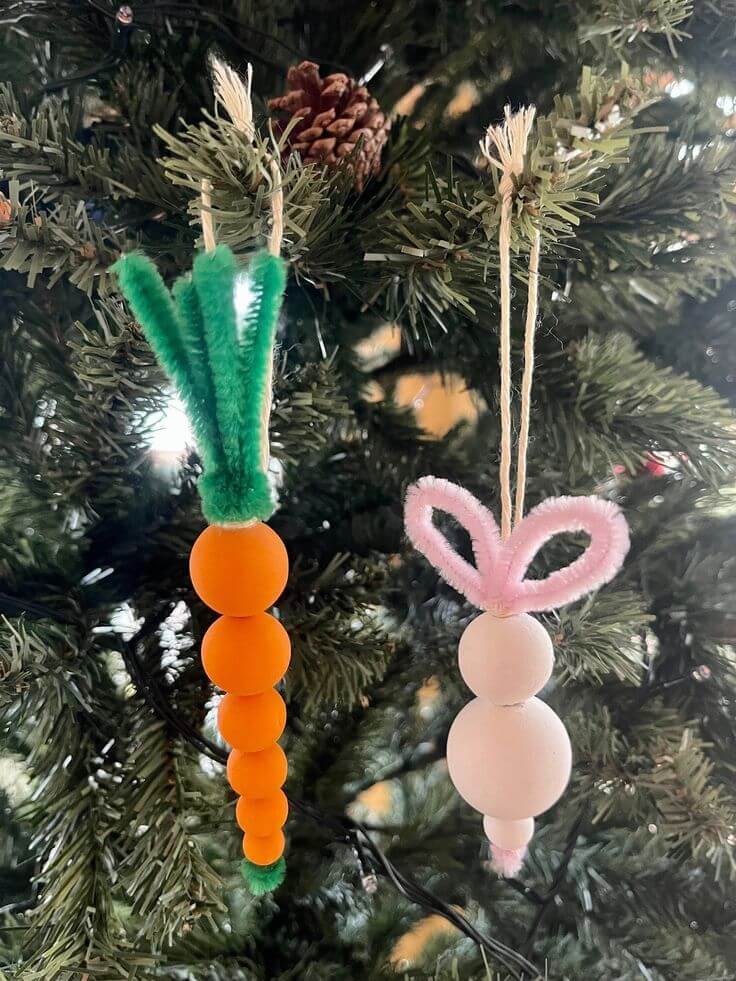
A Bead Carrot And A Pink Bead Bunny Hanging From The Branches
Two bead ornaments hang from evergreen branches strung with white lights. The carrot is six orange painted wood beads that shrink from large at the top to tiny at the bottom, topped with a bunch of green chenille stem leaves and finished with a small green tuft at the tip. Beside it, a bunny is made from three pale pink beads with a pink tuft at the base and two pink chenille loops for floppy ears. Both hang from natural twine loops.
Mini wood carrots look charming on a spring branch, tucked into a basket, or strung along a garland. They’re small, cheap, and a little silly, which is the point.
Painting the beads is where this goes wrong. They roll, stick to the table, and leave fingerprints in the paint. Thread them on a skewer and stand the skewer in a block of foam or a lump of clay while you paint, then slide them off once they’re dry.
Ages: 6 to 10. Skill: Beginner. Mess: Medium. Time: 30 minutes, plus drying.
What You Need
- Wooden beads in graduated sizes, 6 per carrot, from about 1 inch down to 1/4 inch (or air dry clay beads with a toothpick hole)
- Orange acrylic paint
- A green chenille stem for the leaves, and a pink one for bunny ears (or green and pink paper strips)
- Natural twine, about 14 inches per ornament
- Wooden skewers and a foam block for painting
- Tacky glue
How to Make It
- Thread the beads on a skewer, stand it in the foam, and paint two coats of orange. Let them dry fully.
- Cut a 14 inch piece of twine. Fold a green chenille stem in half and twist it around the twine about 4 inches from one end, so the leaves sit at the top of the carrot.
- Thread the beads onto the long end of the twine from largest to smallest, and tie a knot under the last bead.
- Tie the short top end into a loop for hanging, and fan the leaves out.
Tip: Put a dot of glue on the last knot so it can’t slip back through the smallest bead.
Safety: Beads are small, so this is for older kids. Fold over the cut ends of chenille stems, because the wire inside is sharp.
5. Popsicle Stick Easter Basket
A White Picket Fence Basket With Raffia And Sparkle Gems
A round basket made of white painted popsicle sticks stands upright like a picket fence, and the rounded stick tops form a scalloped rim. Natural raffia is tied in a bow around the middle, two glittery oval gems sparkle on the front, and a row of flat green glass stones circles the base. Inside, glittery and patterned eggs in purple, teal, orange, and gold sit with a couple of ribbon bows.
This basket skips the weaving struggle, and it’s one of the better popsicle stick Easter crafts to give as a gift. It looks like a whole afternoon of effort, but it’s about 40 minutes plus drying time.
Sticks glued edge to edge won’t stand up on their own. Build the basket around a container, like a plastic tub, a clean oatmeal canister, or a small bucket. The container sets the size, hides the glue, and keeps every stick straight.
Ages: 6 to 10 (an adult uses the hot glue). Skill: Beginner. Mess: Medium. Time: 40 minutes, plus paint drying.
What You Need
- About 45 to 50 popsicle sticks for a tub about 6 inches across (a bag from the dollar store, or washed sticks you’ve saved)
- A plastic tub or cardboard canister, 3 to 5 inches tall, as the form
- White acrylic paint (or white spray paint used outdoors)
- Tacky glue and clothespins, or a low temp glue gun for adults
- Raffia or ribbon for the bow
- Gems, glass stones, or stickers for decoration (or paper dots)
- A pipe cleaner or ribbon for the handle
How to Make It
- Paint both sides of the sticks white in thin coats, and dry them flat.
- Glue the sticks side by side around the tub, letting them rise about an inch above the rim so the rounded tops make a scalloped edge.
- Tie raffia around the middle in a bow, and glue gems along the front and around the base.
- Poke the ends of a pipe cleaner between sticks on opposite sides and twist to secure the handle.
Tip: Wrap a rubber band around the sticks while the glue sets, so nothing slides.
Safety: Hot glue is an adult job. Gems are small, so use paper dots for the youngest kids, and fold over the pipe cleaner ends.
6. Painted Wooden Easter Eggs
Many Hands, Tiny Brushes, And A Table Full Of Pastel Eggs
Adult and child hands reach in from every side of a dark slate table, each one painting a small pastel egg with a thin brush. The finished eggs wear dots, stripes, and swirls in pink, teal, yellow, and white, and a few are drying in a white egg carton. Pots of blue, green, and yellow paint sit in the middle, with a wicker basket of eggs nestled in green grass on one side and yellow and pink tulips at the corner. No two eggs match, which is exactly the point.
Wooden eggs are a blank canvas, and a quick coat of gesso helps them hold paint better than plastic eggs do. Dot them, stripe them, splatter them. A dozen can look like they came from a dozen different craft boxes.
Bare wood drinks paint, so the first coat looks blotchy. Gesso fixes that. The other problem is holding the egg while you paint. Stick a toothpick into the bottom and push the other end into a foam block, or paint one half at a time and dry it in an egg carton.
Ages: 4 and up. Skill: Beginner. Mess: High. Time: 40 minutes, plus drying.
What You Need
- Unfinished wooden eggs, about 2 inches (a craft store bag, or smooth stones from the yard)
- Gesso, such as Liquitex Basics Gesso (or white acrylic paint)
- Acrylic craft paint in pastel colors
- Small brushes, toothpicks, and cotton swabs for dots
- Painter’s tape for stripes
- An egg carton for drying
- Optional: Mod Podge to seal
How to Make It
- Brush each egg with a coat of gesso and let it dry for about 30 minutes.
- Paint the base colors one half at a time, drying each half in the egg carton.
- Add dots with a toothpick or cotton swab, stripes with painter’s tape or a thin brush, and splatter by flicking a toothbrush.
- Seal with a thin coat of Mod Podge if you want the eggs to last.
Tip: Peel painter’s tape while the paint is still slightly tacky. Waiting until it’s rock hard can lift the paint.
Safety: Acrylic paint doesn’t wash out of clothes, so use aprons. Seal outdoors or in a ventilated room if you use a spray sealer.
7. Craft Stick Easter Wreath
From Bare Sticks To A Brown Ombre Sunburst Wreath
A wreath of craft sticks comes together on a whitewashed table across two stacked pictures. The sticks fan out around an open center in overlapping layers, like the petals of a sunflower, and brown paint is spreading across them. The upper right is already a rich brown while the left side is still pale natural wood. A plate of brown paint, a brush, a bottle of acrylic paint, and a paint smeared paper towel sit around the edges, and by the second photo the brown has blended into a soft ombre from dark to light.
Craft sticks arranged in a ring make a sturdy door decoration, and you can paint them pastel instead of brown. Add a few paper eggs and a ribbon bow. I’d hang this under a covered porch, not out in the rain.
Wood absorbs water, and craft sticks warp when they get wet, so this won’t survive a downpour unless you seal it with an exterior clear spray. A paper plate base is also a problem outdoors, so use a cardboard or plastic ring if the wreath will hang outside.
Ages: 6 to 10. Skill: Intermediate. Mess: Medium. Time: 60 minutes, plus drying.
What You Need
- About 40 natural craft sticks (jumbo or regular)
- A ring base, such as a paper plate with the center cut out (or a cardboard ring, a plastic lid ring, or a foam ring)
- Acrylic paint, such as DecoArt Americana, in brown or pastels
- Paper towels and a paper plate for a palette
- Tacky glue or a low temp glue gun (adults)
- Paper eggs and ribbon for the bow
- Optional: exterior clear spray sealer
How to Make It
- Cut the center out of the plate to leave a ring about 2 inches wide. This is an adult step.
- Glue the sticks around the ring in a sunburst, with one end at the hole and the other fanning outward. Add a second layer over the gaps.
- Brush paint onto the sticks and wipe it with a paper towel so the grain shows, working from dark to light for an ombre. Or paint each stick pastel before you glue.
- Add paper eggs and a ribbon bow, and tape a ribbon loop to the back.
Tip: Paint before gluing for solid colors. Paint after gluing for the wipe off ombre.
Safety: Hot glue is an adult job, and spray sealer goes on outdoors. Keep it dry.
8. Easter Egg Wood Garland
Lettered White Eggs And Chunky Wood Beads On A Dark Table
A garland winds in a loose S across a dark wood table, alternating white painted wooden eggs with natural wood beads in three sizes. Several eggs carry black lettering, with words like hop and bunny partly readable, and a jute tassel hangs from each end. The eggs sit in uneven pairs and singles between clusters of beads, which makes the whole strand look relaxed. A paisley table runner and a whitewashed wooden box sit beside it.
A row of tiny painted wood eggs on twine makes a plain mantel look finished, and the same garland works across a front window. These wooden Easter decorations look store bought when the spacing is perfect, so space the eggs unevenly and let it look relaxed.
Eggs need holes. Buy pre drilled wooden egg beads, because drilling eggs is slow and slippery. If you drill them yourself, an adult clamps the egg between wood scraps and wears safety glasses. Tape the twine tip stiff like a needle for threading.
Ages: 7 and up. Skill: Intermediate (stringing is beginner level, lettering is not). Mess: Medium. Time: 90 minutes.
What You Need
- 8 to 10 pre drilled wooden eggs, about 1 1/2 to 2 inches long
- 20 to 30 natural wood beads in three sizes
- 5 feet of jute twine, plus extra for tassels (or yarn)
- White acrylic paint
- A black paint pen or fine brush, and letter stencils (or printed letters traced with graphite paper)
How to Make It
- Paint the eggs white in two thin coats and let them dry.
- Letter a few eggs with short words like hop, bunny, or spring, and leave the rest plain.
- Tape the end of the twine, then thread beads and eggs in uneven groups, sometimes one bead between eggs and sometimes three.
- Knot both ends, and make a jute tassel for each end by wrapping jute around your hand and tying it off.
Tip: Lay the whole garland out on the table before you thread it, and rearrange until it looks relaxed.
Safety: Beads are small, so keep the garland out of reach of babies. Drilling and clamping are adult jobs.
9. Painted Wood Block Bunnies
Three Block Bunnies With Heart Noses And Burlap Ears
Three white wooden blocks of different sizes sit together on a scalloped galvanized tray, each painted with a bunny face. Big black eyes with lashes, pink heart noses, whiskers, and soft pink cheeks give them a sweet look, and the tallest has a small buck tooth and a twine bow on its front. Burlap ears dry brushed pink inside are tied with jute twine on top of each block. A glass milk bottle and a bright window blur softly behind them.
Wood blocks painted into bunny faces are sturdy little wooden Easter decorations. They survive being knocked off a shelf, which matters more than you’d think, and they’re the most giftable of the Easter bunny crafts here.
Cut ends soak up paint, so end grain needs extra coats. Sand every edge until the block feels smooth, and practice the face on paper first. The kids can paint the base coat and pink cheeks, and an adult can paint the faces.
Who: kids paint the base, an adult paints faces. Skill: Intermediate. Mess: Medium. Time: 75 minutes, plus drying. Gear: dust mask for sanding.
What You Need
- 3 wood blocks, a 2×4 cut to about 3, 4, and 5 inches (or craft store blocks)
- Sandpaper, 120 and 220 grit (or a sanding sponge)
- White paint, such as DecoArt Chalky Finish (or white acrylic)
- Black and pink paint, and a fine brush (or paint pens)
- Burlap scraps and jute twine
- Tacky glue, or a low temp glue gun for adults
- Mod Podge to stiffen the burlap
How to Make It
- Sand all the edges until smooth, then wipe off the dust with a damp cloth.
- Paint the blocks white in two or three thin coats, letting each dry.
- Paint the faces: oval black eyes with a white dot highlight, a pink heart nose, whiskers, and a small mouth. Dry brush pink cheeks.
- Cut two ear shapes from burlap, brush the insides pink, stiffen them with Mod Podge, tie them with twine, and glue them to the top.
Tip: Dip the handle end of a paintbrush in black paint and press it down for perfectly round eyes.
Safety: An adult handles any saw cuts, with safety glasses on. Wear a dust mask when sanding.
10. Wood Cutout Easter Sign
A Three Arrow Sign Pointing To The Bunny Trail, Carrot Patch, And Egg Hunt
Three whitewashed wooden arrows are fixed to a dark brown post at different angles, pointing visitors to Bunny Trail, Carrot Patch, and Egg Hunt in bold black lettering. Each arrow carries a small decoration: a pink patterned bunny cutout with a black pom pom tail, two twine wrapped carrots tied with gingham bows, and painted eggs standing in tufts of green grass. The paint is worn through along the edges, which gives the sign a farmhouse feel.
A wood cutout sign makes a great mantel piece, or a yard sign for the egg hunt. Stencil letters keep things looking sharp without any handwriting skills, and sanding the edges gives it a worn finish. These wooden Easter decorations fit in with most styles already on your shelf.
Stencil letters bleed when paint seeps under the edge. Use a stencil brush or foam pouncer with almost no paint on it, and dab straight down instead of brushing. Buy pre cut arrow blanks so you can skip the saw.
Who: kids paint, an adult builds. Skill: Intermediate. Mess: Medium. Time: 90 minutes, plus drying. Gear: drill, dust mask for sanding.
What You Need
- 3 pre cut wood arrow blanks, about 12 to 16 inches (or arrows cut from a 1×6 board with a jigsaw, which is an adult job)
- A wood post, such as a 1×2 or 2×2 stake about 3 feet long (or a paint stir stick for a mantel version)
- White paint and brown paint (use exterior paint if the sign goes outside)
- Alphabet stencils or vinyl letters (or printed letters traced with graphite paper)
- Black paint, and a stencil brush or foam pouncer
- Fine sandpaper
- Wood screws and a drill (adults)
How to Make It
- Paint the arrows white in two thin coats, let them dry, and lightly sand the edges and corners to distress them.
- Tape the stencil down and dab on black letters with an almost dry pouncer. Peel the stencil while the paint is slightly damp.
- Paint the eggs, carrots, and grass details on the arrows, or glue on cutouts.
- Adult step: pre drill and screw the arrows to the post at angles.
Tip: Dab the pouncer on a paper towel until almost no paint comes off, then dab the letters.
Safety: Drilling and sawing are adult jobs. Wear a dust mask when sanding, and seal outside with a ventilated exterior spray.
11. Easter Bunny Wood Plaque
A Whitewashed Plank Plaque With A Bunny Cut Out Of The Paint
Four vertical planks brushed with streaky white paint let the wood grain show through, and a bunny silhouette is left bare in the middle, with one ear folded over and the other standing tall. The dark grain inside the silhouette stands out against the pale boards, and a fluffy white cotton ball tail sits at the bottom. The whole plaque rests on a small brass easel.
A wood plaque with a bunny silhouette makes a sweet sign for a porch or a kitchen shelf. The trick is that you paint around the bunny instead of painting the bunny. These are the Easter bunny crafts that look handmade in the best way, and you can add a short word like hop or spring underneath.
Paint bleeds under stencil edges. Press the stencil down firmly and brush a thin coat of Mod Podge or your base color along the edge first. Then dry brush the white on, dragging the brush lightly so the grain shows through.
If you use pallet boards for this look, check the stamp. HT means heat treated and is fine for indoor decor. MB means the wood was fumigated with methyl bromide, and I’d skip it. New pine boards from the hardware store are the safe choice.
Stencil tips are worth a closer look if you’re new to signs. [LINK: Easy Stencil Tips for Wood Signs]
Who: kids dry brush and add the tail, an adult builds. Skill: Intermediate. Mess: Medium. Time: 75 minutes, plus drying. Gear: brad nails, craft knife for the stencil.
What You Need
- 4 wood planks, about 3 x 12 inches, or a pre made plank plaque (or paint stir sticks glued to two backer strips)
- 2 backer strips, 1×2, about 10 inches long
- A bunny stencil or vinyl cutout (or a bunny cut from contact paper)
- White paint and a dry brush
- Mod Podge or a clear sealer
- A pom pom or cotton ball for the tail
- Wood glue and brad nails, and tacky glue for the tail
How to Make It
- Adult step: attach the planks to the two backer strips with wood glue and brad nails, or buy a pre made plaque.
- Stick the bunny stencil in the center, press the edges down firmly, and brush a thin coat of Mod Podge along the edge. Let it dry.
- Dry brush white paint over the whole plaque, leaving the grain showing through, then peel the stencil while the paint is slightly tacky.
- Glue on the pom pom tail and set the plaque on a small easel.
Tip: Pull the stencil at a low angle, away from the bunny shape, so the edge stays crisp.
Safety: Nailing and craft knife work are adult jobs. Wear a dust mask when sanding.
12. Wooden Bunny Door Hanger
A Four Foot Board Bunny Waiting On The Porch
A tall white bunny leans against the siding beside a front door, built from three upright boards. The two outer boards rise into long ears with clipped top corners and pink oval centers, while the shorter middle board forms the face, with black oval eyes, a small pink triangle nose, whiskers, and a curved smile. Small nail holes show along the board edges, and a dark doormat sits at its feet.
A wooden bunny at the door greets everyone before they ring the bell. Add a bow at the neck and a coat of paint. It gets more compliments than almost anything on this list, and it’s the biggest of the Easter bunny crafts here.
This is the one project that needs real tools. The shape needs three boards cut to length with angled top corners, two back braces, sanding, and exterior paint. If you don’t have a saw, ask the hardware store to cut the boards, or buy a pre cut bunny blank and hang it by a ribbon. The kids paint the face.
Who: kids paint, an adult builds. Skill: Advanced. Mess: Medium. Time: 2 to 3 hours, plus drying. Gear: saw, drill, safety glasses, hearing protection, dust mask.
What You Need
- 3 boards, 1×6 or fence pickets (or a pre cut bunny blank from a craft store)
- 2 back braces, 1×2 strips about 14 inches long
- Wood screws, 1 1/4 inch
- White exterior paint, plus pink and black paint
- Sandpaper, 120 grit
- Clamps and a drill
- Ribbon for a bow
How to Make It
- Adult step: cut two boards to 48 inches and one board to 30 inches, and cut the top corners of each at an angle.
- Sand every edge. Lay the boards side by side with the short one in the middle and the bottoms flush, then screw two braces across the back.
- Paint the front white in two coats of exterior paint, then paint the pink ear centers, black oval eyes, pink nose, whiskers, and smile.
- Spray with exterior sealer outdoors, and tie a ribbon bow at the neck.
Tip: Trace the bottom of a cup or a small bowl for the eyes, so they come out as matching ovals.
Safety: All cutting, drilling, and screwing are adult jobs. Use clamps, safety glasses, hearing protection, and a dust mask, and spray the sealer outdoors.
Common Mistakes To Avoid With Easter Wood Crafts
Even simple Easter wood crafts go sideways in predictable ways. These are the first timer mistakes I see most, and what to do instead.
- Painting bare wood. The grain drinks the paint and the color looks dull. Use gesso or a coat of white first.
- Painting wet and thick on thin sticks. Craft sticks warp under heavy paint. Use thin coats and dry them flat under a book.
- Gluing a basket without a form. Popsicle sticks won’t stand on their own. Build around a tub or canister.
- Handing kids the hot glue gun. It burns. Give kids tacky glue and clothespins, and keep hot glue an adult job.
- Using the wrong pallet wood. Skip anything stamped MB. HT is fine, and new boards are better.
- Spraying sealer indoors. The fumes build up. Spray outside, and let the piece dry there.
- Giving kids a tool job. Sawing, drilling, and screwing are adult jobs. Give the kids the painting.
Practical note: Let them make it theirs. A crooked bunny face on a clothespin is the one the kid will keep, and fixing it for them usually ends the project.
FAQs
What are the easiest Easter wood crafts for kids?
The Clothespin Easter Bunnies, Craft Stick Chick Puppets, and Popsicle Stick Egg Puzzle are the easiest, because the wood pieces are ready made and only need paint and glue. They suit ages 3 to 8 with an adult nearby.
How do I make Easter bunny crafts from wood without power tools?
Use clothespins, craft sticks, and pre cut blocks or blanks from the craft store. For bigger pieces, ask the hardware store to cut boards to length. That keeps most Easter crafts for kids safe and simple.
What glue works best for popsicle sticks?
Tacky glue, such as Aleene’s Original Tacky Glue, works well for popsicle stick Easter crafts when you hold the joint with a clothespin for a few minutes. Hot glue is faster, but it’s an adult job.
Do you need to seal painted wood?
For indoor pieces, a thin coat of Mod Podge protects the paint. For anything outdoors, use exterior paint and a clear exterior spray, applied outside.
What are good wooden Easter decorations for a mantel?
The Easter Egg Wood Garland, Painted Wood Block Bunnies, Easter Bunny Wood Plaque, and Wood Cutout Easter Sign all work well. Each fits a mantel and suits most styles.
Are Easter wood crafts safe for toddlers?
Not without close supervision. Beads, eyes, buttons, and pom poms are choking hazards under 3, so use painted dots, and keep sanding, sawing, and hot glue an adult job.
Read Next
Look across the list and the pattern is simple. Each project starts with cheap wood pieces, a coat of paint, and one detail that turns it into a bunny, a chick, or an egg. That’s what makes Easter wood crafts work for a group of kids, since everyone leaves with something different. Pick two or three, and you have Easter crafts for kids covered for the whole weekend. If you only have time for three, make the Clothespin Easter Bunnies, the Painted Wooden Easter Eggs, and the Easter Egg Wood Garland. You get a toy, something to paint, and a mantel piece.
If your kids loved the popsicle stick Easter crafts, there are more to try. Popsicle Stick Crafts for Kids.
If you’d like to build up to bigger wooden pieces next, spring signs are the natural step Grab a pack of popsicle sticks, a box of clothespins, and one paint color, and let the kids loose on the driveway. Hang the first bunny where everyone can see it.
