
The best Halloween crafts for teens are things they’ll actually use or wear: painted sneakers, a patched denim jacket, polymer clay charm keychains, beaded charm bracelets, a decorated phone case, and bedroom pieces like a moon and bat wall display or a boho tassel hanging. Most take 30 minutes to 2 hours with craft store basics. Resin, oven baked clay, irons, and craft knives need real ventilation and safety steps, and younger teens should have an adult nearby for those.
Last October my fifteen year old niece and three of her friends took over my craft table for a Saturday. The plan, in their words, was “aesthetic Halloween stuff for our rooms.”
By dinner there were painted sneakers drying on the porch rail, a tray of clay ghosts cooling on parchment paper, and one glitter coffin keychain with a bubble right in the middle that nobody would admit to.
That afternoon is where most of these tips came from. Teen Halloween crafts are different from little kid crafts: they have to look good enough to post, survive a school bag, and feel like something you’d buy. So every project below has an honest skill rating, a real time estimate, what it costs, and what went wrong the first time we tried it.
Updated for Halloween 2026. Charm bracelets, clay keychains, and customized sneakers were what teens asked me about most this fall, so they get the most detail here.
Supplies for Halloween Crafts for Teens (and Cheaper Swaps)
You don’t need a separate kit for every project. Most of these Halloween crafts for teenagers share the same handful of supplies, and a lot of them can come from a thrift store or the back of a closet.
| Supply | What I use | Free or cheaper swap |
| Fabric paint | Tulip Soft fabric paint | Acrylic paint mixed with a fabric medium |
| Paint pens | Posca pens (fine and medium tips) | Fine brushes and acrylic paint |
| Polymer clay | Sculpey III or Fimo Soft | Air dry clay (lighter, but less durable for keychains) |
| Resin | UV resin and a small UV lamp | Glossy Accents dimensional glaze, no lamp needed |
| Stretch cord | 0.7 mm or 1 mm clear or black elastic cord | Embroidery floss for a tie on bracelet |
| Jewelry pliers | Two pairs of chain nose pliers | Clean, small needle nose pliers from the toolbox |
| Charms and findings | Mixed Halloween charm packs, jump rings, keyrings | Charms clipped off an old bracelet |
| Denim jacket, tote, sneakers | Thrift store finds | What’s already in your closet |
| Felt and yarn | Felt sheets and acrylic yarn | Old sweaters and scraps |
| Glue | E6000 for hard surfaces, fabric glue for cloth, low temp hot glue | Tacky glue (slower, but no fumes or burns) |
| Lights | Warm white LED string lights, flameless pillars | Battery fairy lights |
Where to shop: Craft stores for clay, paint, and findings; the dollar store for frames, notebooks, and tea lights; thrift stores for jackets, frames, and canvas sneakers.
One honest note on cost: resin, polymer clay, and jewelry findings add up fast if you buy a starter kit for each. Pick one material and make several projects from it. One block of clay makes a whole batch of keychains, and one charm pack covers two bracelets and a phone case.
Safety Notes: Resin, Clay, Blades, and Heat
Most Halloween crafts for teenagers are as safe as drawing. Four materials are the exception, and they’re worth taking seriously, not because they’re scary, but because the mistakes show up later.
- UV resin and epoxy can cause skin allergies that build up with repeated contact, and once you’re sensitized it can stick for good. Wear nitrile gloves every time, work by an open window, and keep the UV lamp pointed away from your eyes. If you’re under 16, have an adult in the room.
- Polymer clay. It bakes in a normal home oven, but it gives off irritating fumes if it burns. Use an oven thermometer (home ovens often run hot), bake on parchment paper, open a window, and keep clay tools separate from kitchen tools.
- Craft knives. Use a fresh blade, cut on a cutting mat, and keep your other hand behind the blade. A dull blade drags and slips, and that’s when it cuts you.
- Irons and heat setting. Fabric paint and iron on patches need real heat. Use a pressing cloth, never leave the iron face down, and unplug it as soon as you’re done.
- Glue fumes. E6000 is strong but smelly. Use it by an open window and let projects cure somewhere other than your bedroom.
- Anything with vinyl, paper, or glitter on it is display only. Use LED or flameless candles in your room, and never burn a decorated candle.
Younger Vs Older Teens
- Ages 12 to 14: the bracelets, hair clips, notebook cover, scrapbook spread, wall bats, and tote are fully independent projects. Do resin, the oven, and the iron with a parent nearby.
- Ages 15 to 18: everything here, with the same gear: gloves for resin, a thermometer for clay, a pressing cloth for the iron.
Mess level: Low for jewelry, paper, and yarn. Medium for fabric paint and clay (clay smears on light tables). High for glitter and resin, so cover your desk with a silicone mat or an old cutting board.
All 20 Halloween Crafts for Teens at a Glance
Pick by how much time you’ve got and what you want to end up with. For cost, Low means you probably have most of it already, Medium means a craft store trip, and Higher means buying something like a resin kit.
| # | Craft | Skill | Time | Cost | Needs an adult? |
| 1 | Haunted Sneaker Makeover | Intermediate | 2 hr + overnight | Medium | No |
| 2 | Bat Wing Hair Clips | Beginner | 30 min | Low | No |
| 3 | Patchwork Boo Denim Jacket | Intermediate | 2 to 3 hr | Medium | For the iron, if under 14 |
| 4 | Cute Halloween Phone Case | Beginner | 30 min + 24 hr cure | Low | No, but open a window |
| 5 | Spiderweb Pumpkin Tote | Beginner | 1½ hr + heat setting | Low | For the iron, if under 14 |
| 6 | Glitter Coffin Keychain | Intermediate | 45 min (UV) or 2 days (epoxy) | Higher | Yes, if under 16 |
| 7 | Charmy Black Halloween Bracelet | Beginner | 45 min | Low | No |
| 8 | Spooky Clay Charm Keychains | Intermediate | 1½ hr + baking | Medium | For the oven, if under 14 |
| 9 | Pumpkin Charm Beaded Bracelet | Beginner | 20 min | Low | No |
| 10 | Boho Halloween Tassel Wall Hanging | Beginner | 2 hr | Low | No |
| 11 | Moonlit Bat Wall Decor | Beginner | 45 min | Low | No |
| 12 | Haunted Photo Frame Display | Beginner | 1 hr + drying | Low | No |
| 13 | Moonlit Hoop Shadow Scene | Intermediate | 2 to 3 hr | Low | No |
| 14 | Nightmare Notebook Cover | Beginner | 45 min | Low | No |
| 15 | Pumpkin Makeup Brush Holder | Beginner | 1 hr + drying | Low | For cutting, if under 14 |
| 16 | Black Cat Planter Glow | Beginner | 1 hr + drying | Low | No |
| 17 | Spooky Halloween Scrapbook Spread | Beginner | 1 to 2 hr | Low | No |
| 18 | Crocheted Pumpkin Cutie | Intermediate | 1½ to 2 hr | Low | No |
| 19 | Glow-Up Halloween Candles | Beginner | 30 min | Low | No |
| 20 | Creepy Mason Jar Lanterns | Beginner | 45 min + drying | Low | No |
Save this table before your next craft store run. It’s the fastest way to plan a weekend of teen Halloween crafts without buying supplies for projects you won’t get to.
Practical note: If you’re planning a craft night for a group, pick one project from the jewelry section and one from the wall decor section. Jewelry gives everyone something finished in 30 minutes, and the wall pieces fill the rest of the evening.
Things to Wear and Carry
These are the Halloween crafts for teens that leave the house: shoes, a jacket, a bag, a phone case, and hair clips. Anything that gets worn or handled every day needs paint that flexes and glue that holds, so each project tells you which one.
1. Haunted Sneaker Makeover

This was the project my niece’s friends fought over. Black canvas sneakers with little ghosts, webs, pumpkins, and stars, all done with paint and a paint pen. The secret nobody tells you: colors disappear on black canvas unless you paint white underneath them first.
Skill: Intermediate | Time: About 2 hours, plus overnight drying | Cost: Medium
What you need
- 1 pair of black canvas sneakers
- Acrylic paint mixed with a fabric medium (Angelus makes a popular one), or fabric paint
- White paint pen (a fine Posca works well)
- Fine paintbrushes
- Painter’s tape
- A white chalk pencil for sketching
- Optional: an acrylic finisher spray
How to make it
- Take the laces out, wipe the shoes with a damp cloth, and let them dry completely.
- Cover the rubber soles and toe caps with painter’s tape.
- Sketch ghosts, pumpkins, webs, and stars with the chalk pencil.
- Paint a thin white base layer inside every shape that will be a color other than white.
- Fill in the colors in two or three thin coats, letting each one dry.
- Outline details with the white paint pen, let everything dry overnight, and spray a finisher if you’re using one.
What goes wrong: Paint on the flex crease across the toes. Every step bends that spot, and thick paint cracks there within a week. Keep designs on the sides and heel, and mix fabric medium into your acrylic so it stays flexible.
Trade off: painted canvas can’t go in the washing machine. Spot clean with a damp cloth.
2. Bat Wing Hair Clips

These are the fastest win on the list: two felt bat wings glued to a plain snap clip. Make a pair in half an hour, or a whole set to hand out at a party.
Skill: Beginner | Time: About 30 minutes for a pair | Cost: Low
What you need
- Metal snap clips or alligator clips
- Stiff black felt
- Fabric glue or E6000
- Sharp scissors
- Optional: tiny rhinestones or a silver paint pen
How to make it
- Fold the felt in half and draw half a bat wing shape against the fold, with a scalloped bottom edge.
- Cut it out, then cut a second matching piece.
- Glue the two pieces together for a stiffer wing that won’t flop.
- Glue a thin strip of felt around the top bar of the clip, then glue the wings onto that strip.
- Add rhinestones or a few silver lines, and let it dry for a few hours before wearing.
Tip: Wrapping the clip in felt first is what makes it hold. Glue on bare metal pops off the first cold morning. Open and close the clip before the glue sets to make sure the wings don’t block the hinge.
3. Patchwork Boo Denim Jacket
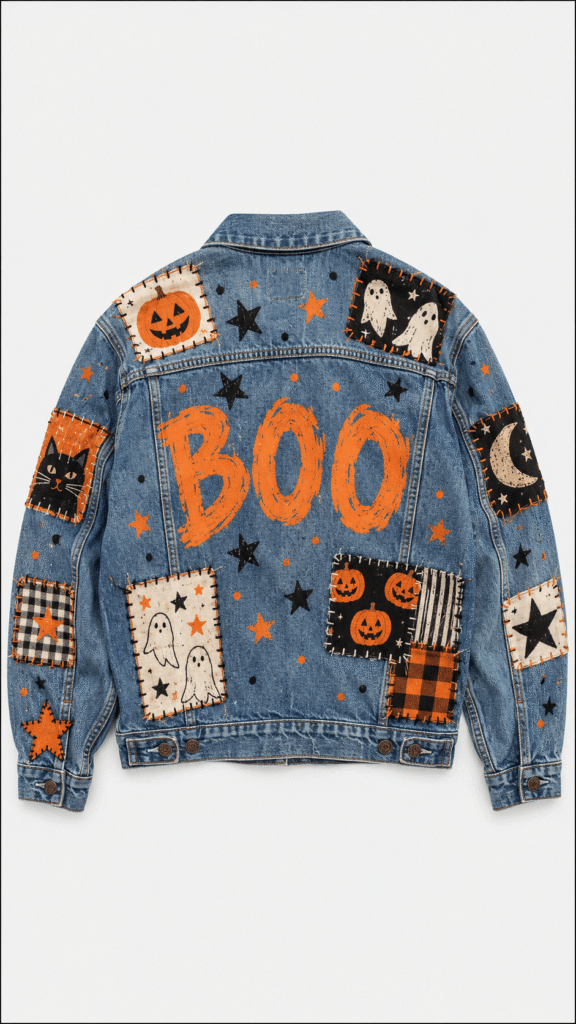
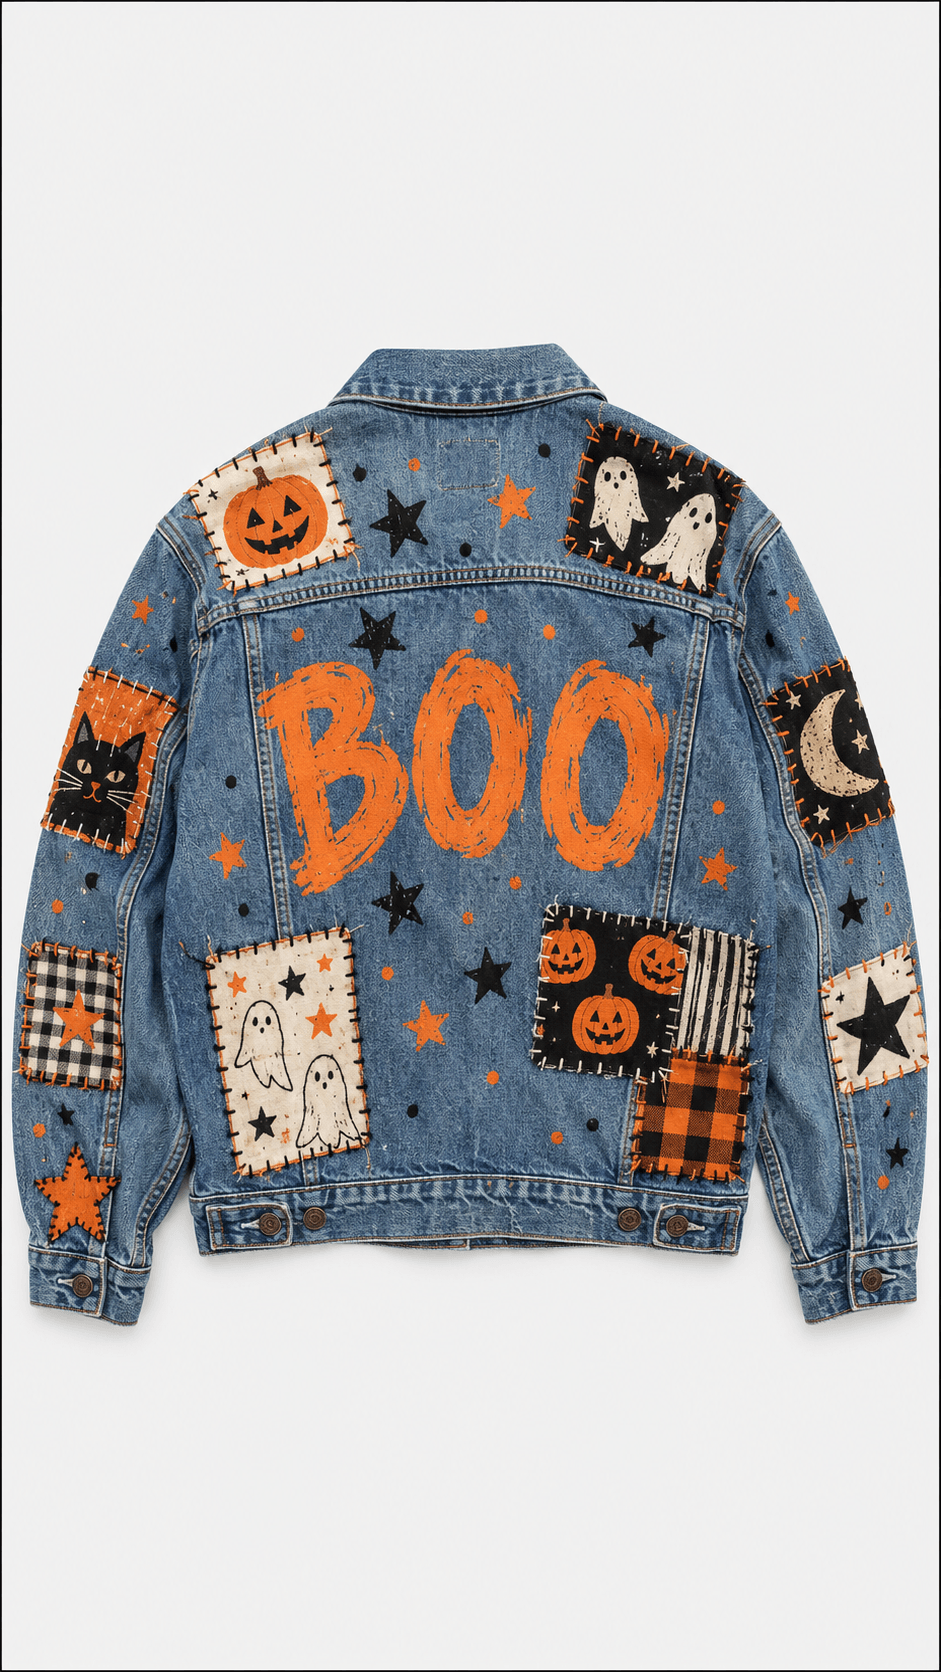
A thrifted denim jacket with iron on patches, painted stars, and a big “BOO” across the back. It’s the most wearable statement piece here, and the one that lasts longest if you add one extra step: stitching.
Skill: Intermediate | Time: 2 to 3 hours | Cost: Medium (most of it is the jacket)
What you need
- 1 denim jacket
- Halloween fabric patches or iron on appliqués
- An iron and a pressing cloth (a thin cotton pillowcase works)
- Needle and embroidery floss
- Freezer paper and a craft knife for the letter stencil
- Black and orange fabric paint or fabric markers
- A piece of cardboard
How to make it
- Lay the jacket flat, arrange the patches, and take a photo so you remember the layout.
- For the “BOO” on the back, cut the letters out of freezer paper, iron it shiny side down onto the jacket, slide cardboard inside, and dab fabric paint into the openings. Peel the paper once the paint is dry to the touch.
- Iron the patches on with the pressing cloth over them, pressing firmly for about 30 seconds without sliding the iron. Flip the jacket and press again from the inside.
- Stitch around the edge of each patch with a simple running stitch in floss.
- Add stars, dots, and small accents with fabric paint, then heat set the paint according to its label once it’s dry.
What goes wrong: Skipping the stitching. Iron on adhesive alone usually starts lifting at the corners after a few washes. Ten minutes of stitching per patch keeps them on for good, and the visible stitches look intentional.
4. Cute Halloween Phone Case

Tiny pumpkins, bats, ghosts, and rhinestones on a clear case. It takes half an hour to decorate and a full day to cure, and that second part is where most people mess up.
Skill: Beginner | Time: 30 minutes, plus 24 to 72 hours to cure | Cost: Low
What you need
- 1 clear phone case (a cheap one, in case you change your mind)
- 1 set of flat back Halloween charms
- E6000 or a similar strong craft adhesive
- Tweezers and a toothpick
- A wax pencil or rhinestone picker (optional, but much easier)
- 1 pack of tiny gems or rhinestones
- Rubbing alcohol
How to make it
- Wipe the back of the case with rubbing alcohol so the glue can grip.
- Lay out the charms and gems on the case before gluing, then take a photo.
- Put a tiny dot of glue on the case with a toothpick and press each piece on with tweezers or the wax pencil.
- Work by an open window, since E6000 fumes are strong.
- Let the case cure for at least a full day before you put your phone in it.
Tip: If you use wireless or magnetic charging, keep the center of the back flat and charm free. Chunky pieces there can stop the charger from connecting.
Trade off: Tall charms snag on pockets and snap off. Keep the chunky ones near the camera bump, where your hand doesn’t slide.
5. Spiderweb Pumpkin Tote

A plain canvas tote with pumpkins, ghosts, stars, and spiderwebs, for school, errands, or as your trick or treat bag. Two steps make the difference between a tote that lasts and one that fades: cardboard inside and heat setting after.
Skill: Beginner | Time: About 1½ hours, plus drying and heat setting | Cost: Low
What you need
- Plain canvas tote bag, washed once with no fabric softener
- Black fabric marker
- Orange and white fabric paint (Tulip Soft fabric paint is easy to brush)
- Paintbrushes
- A stencil or a chalk pencil for sketching
- A piece of cardboard that fits inside the bag
- An iron
How to make it
- Slide the cardboard inside the tote so paint can’t soak through to the back.
- Sketch pumpkins, ghosts, a spiderweb, and stars lightly with the chalk pencil.
- Fill in the pumpkins and ghosts with orange and white paint and let them dry.
- Outline everything with the black fabric marker last, so the lines stay crisp on top of the paint.
- Add small dots, stems, and extra details, then let the tote dry for 24 hours.
- Heat set the design with the iron according to the paint’s label.
What goes wrong: Washing it before heat setting. Unset fabric paint can fade or crack in the first wash.
Jewelry and Keychains
Small, quick, and easy to make in batches, these are the Halloween crafts for teenagers that end up as gifts, party favors, or a few sales at a school craft fair. They’re also where a couple of small techniques (opening a jump ring, tying the right knot) decide whether the piece lasts a week or a year.
6. Glitter Coffin Keychain

A coffin shaped keychain filled with layers of purple, black, and orange glitter, with tiny charms floating inside. It’s the most impressive looking piece in this section and the only one using resin, so read the safety notes first.
Skill: Intermediate | Time: About 45 minutes with UV resin, or 2 days with two part epoxy | Cost: Higher
What you need
- 1 coffin shaped open bezel or a silicone coffin mold
- Purple, black, and orange glitter (chunky glitter reads better than fine)
- UV resin and a small UV lamp, or two part epoxy resin
- Tiny Halloween charm pieces
- Key ring hardware and a jump ring
- Clear packing tape (for an open bezel)
- Nitrile gloves and toothpicks
- No resin? Glossy Accents dimensional glaze works for a shallow fill
How to make it
- Put on gloves and open a window. Stick the open bezel firmly onto a strip of packing tape, sticky side up.
- Add a thin layer of resin and cure it under the lamp for about two minutes. This seals the back.
- Mix a pinch of glitter into a small amount of resin, spread it in a thin layer, and cure. Repeat with each color.
- Place the charms with a toothpick, add a thin layer of clear resin over them, and cure.
- Finish with a final clear layer that domes slightly above the edge, then cure it.
- Peel off the tape, cure the back once more, and attach the jump ring and key ring.
What goes wrong: pouring one thick layer. UV light only cures a few millimeters deep, so a thick pour stays sticky in the middle. That bubble in my niece’s coffin came from stirring too fast, so pop bubbles with a toothpick before each cure.
Trade off: Fine glitter turns the resin cloudy, which looks muddy in a small coffin. Chunky glitter and a few tiny confetti shapes keep it clear and sparkly.
7. Charmy Black Halloween Bracelet

Black faux leather cord, small black beads, and a few dangling Halloween charms. It’s subtle enough to wear past October, which is why it’s the bracelet that got worn the most.
Skill: Beginner | Time: About 45 minutes | Cost: Low
What you need
- Black cord or 2 mm faux leather cord
- Small black beads with holes big enough for the cord
- Halloween charm pendants
- Jump rings (about 6 mm)
- Cord end caps, a lobster clasp, and a chain extender
- Two pairs of jewelry pliers
- Jewelry glue
How to make it
- Measure your wrist and add about half an inch for a comfortable fit, then cut the cord.
- Slide on the black beads and arrange them so the center section looks balanced.
- Open a jump ring, hook on a charm, and close it around the cord between two beads. Repeat for each charm.
- Put a drop of glue inside each cord end cap, push the cord in, and squeeze the cap closed with pliers.
- Attach the clasp to one end and the extender to the other, then test the fit.
Tip: Open jump rings by twisting the two ends sideways, one toward you and one away, with a pair of pliers on each side. Pulling the ends straight apart bends the ring out of round, and charms slip out through the gap.
8. Spooky Clay Charm Keychains

Mini pumpkins, ghosts, and bats in polymer clay, baked hard and hung on gold keychain rings. One block of clay makes enough for a whole friend group.
Skill: Intermediate | Time: About 1½ hours, plus baking | Cost: Medium
What you need
- Polymer clay in orange, white, black, and green (Sculpey III or Fimo Soft)
- Screw eye pins (small metal loops that go into the clay before baking)
- Gold keychain rings and jump rings
- Clay tools, or a toothpick and a ballpoint pen cap
- Parchment paper, a baking tray, and an oven thermometer
- Gloss glaze (Sculpey makes one)
- Baby wipes
How to make it
- Knead each color until it’s soft and warm. Make white pieces first, with clean hands.
- Shape pumpkins (press lines in with a toothpick), ghosts, and bats about the size of a quarter.
- Add faces with tiny balls of black clay pressed flat, and green stems on the pumpkins.
- Push a screw eye pin into the top of each charm.
- Bake on parchment paper at the temperature and time on your clay’s package, checking the oven with the thermometer.
- Once cool, pull out each eye pin, add a drop of glue, and screw it back in. Glaze, then attach the jump rings and keychain rings.
What goes wrong: White clay picks up every speck of lint, dust, and black clay from your fingers. Wipe your hands and tools with a baby wipe before touching white, and always make white pieces before black ones.
Trade off: Drawing faces with a marker after baking is faster, but it rubs off on a keychain that lives in a pocket. Clay faces or glazed marker last much longer.
9. Pumpkin Charm Beaded Bracelet

Orange and black beads on stretch cord with a little pumpkin charm in the middle. The quickest project on this list, and the one I’d hand to anyone who says they’re not crafty. Of all the Halloween crafts for teenagers here, it’s the best one for a big group.
Skill: Beginner | Time: About 20 minutes | Cost: Low
What you need
- 7 mm or 1 mm stretch cord (or embroidery floss for a tie on version)
- Orange and black beads (6 to 8 mm)
- Small Halloween charms and a jump ring
- Scissors and a binder clip
- Jewelry glue with a needle tip
How to make it
- Pull the stretch cord gently a few times to pre stretch it, then cut about 10 inches.
- Clip one end with the binder clip so beads can’t slide off.
- String the beads in a repeating pattern, adding the charm on its jump ring at the center.
- Tie a surgeon’s knot (a square knot with one extra wrap on the first pass) and pull it tight.
- Add a tiny dot of glue to the knot, let it dry, and tuck the knot inside a bead.
What goes wrong: skipping the pre stretch. New cord stretches out on the first day you wear it, and the bracelet ends up loose and gappy.
Bedroom Wall Decor
Walls are where DIY Halloween room decor makes the biggest difference for the least money. All four of these hang without nails, and all four come down in November without peeling paint off the wall, which matters if the wall belongs to your parents or a landlord.
10. Boho Halloween Tassel Wall Hanging

Yarn tassels in black, orange, and cream hanging from a branch, with little felt bats, ghosts, a witch hat, and a pumpkin dangling between them. It’s cozy instead of creepy, and it’s one of the most aesthetic Halloween crafts on this list.
Skill: Beginner | Time: About 2 hours | Cost: Low
What you need
- 1 wooden dowel or a straight branch, about 18 to 24 inches long
- Black, orange, and cream yarn
- Felt pieces for the bat, ghost, witch hat, pumpkin, moon, and house
- Fabric glue or low temp hot glue
- Sharp scissors
- Black cord or twine
- A hardcover book for wrapping tassels
How to make it
- Tie black cord to both ends of the dowel for hanging.
- Cut yarn strands twice as long as you want them to hang. Fold three or four strands in half and attach them to the dowel with a lark’s head knot: put the folded loop over the dowel, pull the tails through the loop, and tighten.
- Fill the dowel with these bundles, mixing colors and lengths.
- Cut and glue the felt shapes, then hang each one on a short thread tied between the yarn bundles.
- Lay the hanging flat, comb the yarn straight with your fingers, and trim the bottom into a V or a gentle curve.
Tip: Wrap yarn around a hardcover book to cut a whole batch of strands the same length at once. Then trim just the very bottom at the end.
What goes wrong: Trimming with dull scissors. They chew the yarn and leave a fuzzy, uneven edge. A strip of painter’s tape across the yarn along your trim line gives you a straight guide and a clean cut.
11. Moonlit Bat Wall Decor

A big crescent moon with a swoop of paper bats flying out of it, and warm string lights around the edge. Cut the moon from cream or pale yellow board, not black, or it disappears against a dark wall. It’s the best value in DIY Halloween room decor: under an hour, and it covers a whole wall.
Skill: Beginner | Time: About 45 minutes | Cost: Low
What you need
- 1 sheet of cream or pale yellow poster board for the moon
- Black cardstock for the bats
- Warm white LED string lights (battery or USB)
- Scissors
- Removable mounting putty (skip double sided tape, which pulls paint off walls)
- A dinner plate and a printed bat template
How to make it
- Trace the dinner plate on the poster board, then trace it again overlapping by about two thirds. Cut out the crescent.
- Cut 10 to 15 bats in three sizes from the black cardstock.
- Fold each bat gently down the middle so the wings lift off the wall.
- Stick the moon up with putty, then arrange the bats flying out of it in a curve, smallest near the moon and largest farthest away.
- Drape the string lights around the moon and plug them in or switch them on.
Tip: Small bats near the moon and bigger ones farther out makes the swarm look like it’s flying toward you. Same size bats look like stickers.
Safety: LED string lights only. They stay cool against paper, while older incandescent strands can get hot enough to scorch it.
12. Haunted Photo Frame Display
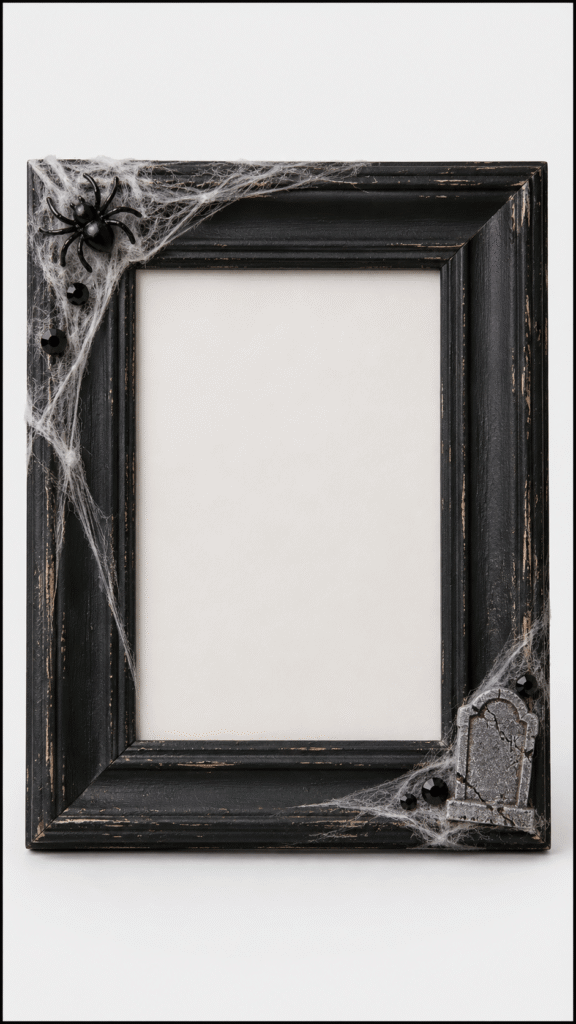
A thrifted frame painted black, with stretched spider web across the corners, a spider, a little foam tombstone, and your best costume photo from last year. It’s the cheapest project in this section, and one of the easiest aesthetic Halloween crafts to pull off.
Skill: Beginner | Time: About 1 hour plus drying | Cost: Low
What you need
- 1 large picture frame (thrift stores always have them)
- Black acrylic or chalk paint
- Fine sandpaper
- Faux spider webbing
- Plastic spider decoration
- Small foam tombstone
- Glue dots and low temp hot glue
- Mini black gems
- A printed photo
How to make it
- Take the glass and backing out of the frame.
- Lightly sand glossy frames so the paint can grip, then paint two coats of black, drying between them.
- Pull a small piece of spider webbing apart until it’s thin and wispy, then stretch it across one or two corners.
- Hot glue the tombstone to a bottom corner and the spider onto the web.
- Add the mini gems with glue dots, then put the glass and photo back in.
What goes wrong: Using webbing straight out of the bag. It looks like a clump of dryer lint. Stretch it until you can almost see through it.
Trade off: Glue dots are fine for gems but too weak for the tombstone. Low temp hot glue holds it and won’t melt the foam the way high temp glue can.
13. Moonlit Hoop Shadow Scene
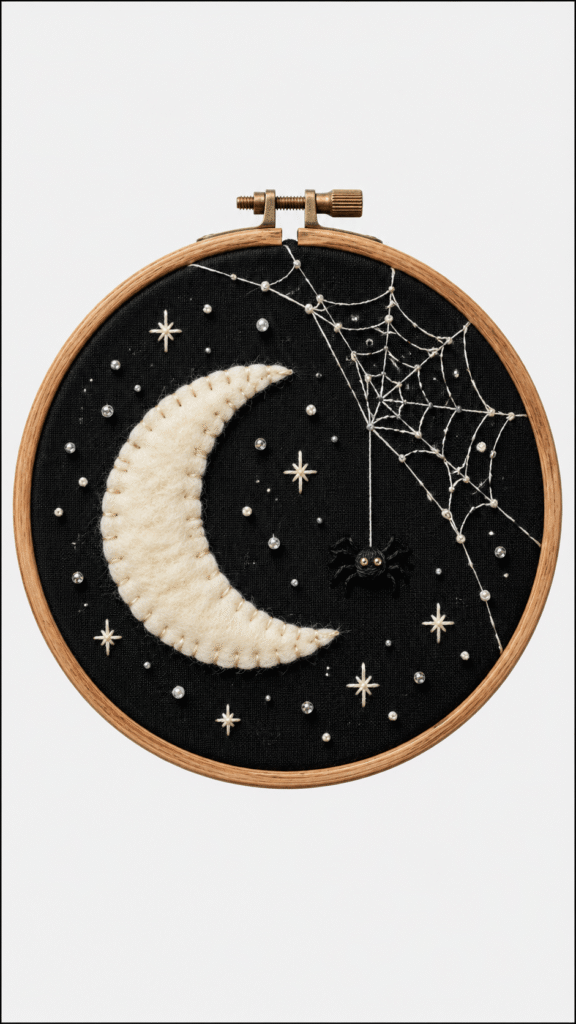
A crescent moon, a fine spider web, and scattered stars stitched on black fabric in an embroidery hoop. If you’ve never embroidered, this is a good first project: three stitches, and none of them hard. It’s the slowest of the teen Halloween crafts here, and the most relaxing.
Skill: Intermediate | Time: 2 to 3 hours | Cost: Low
What you need
- Wooden embroidery hoop (6 to 8 inches)
- Black cotton fabric
- White embroidery floss (DMC is the easiest brand to find)
- Cream felt for the moon
- An embroidery needle
- Small black spider embellishment or a black bead
- White seed beads
- A white chalk pencil
How to make it
- Stretch the fabric drum tight in the hoop with the screw at the top.
- Cut a crescent from cream felt and stitch it on with small straight stitches around the edge.
- Sketch the web with the chalk pencil and stitch it with a backstitch, using two strands of floss.
- Make the stars with French knots: wrap the floss twice around the needle, then go back down right next to where you came up, not in the same hole.
- Sew on the seed beads as extra stars and hang the spider from a thread off the web.
- Trim the fabric on the back to about an inch and glue it to the inside of the hoop.
What goes wrong: French knots that pull straight through the fabric. It happens when you go back down in the exact same hole. Go down a thread or two away and hold the wraps snug with your thumb as you pull.
Desk, Vanity, and School Stuff
These four live where you actually spend time: your desk, your vanity, your school bag. They’re also the teen Halloween crafts that hold up best after October, because they’re useful as well as decorative.
14. Nightmare Notebook Cover

A black spiral notebook with a layered paper skull, bats, and spiderweb corners on the front. It takes 45 minutes and survives a school bag if you add the last step.
Skill: Beginner | Time: About 45 minutes | Cost: Low
What you need
- 1 black spiral notebook
- 1 sheet each of cream, black, and orange cardstock
- Paper scissors (and a craft knife for small details, if you have one)
- Double sided tape or a glue stick
- Black marker
- Clear self adhesive laminating sheets or wide packing tape
How to make it
- Trace a small bowl on cream cardstock, cut out the oval, and stick it to the center of the cover.
- Cut a skull from cream or orange cardstock, with black eyes, nose, and teeth layered on top.
- Cut bats from black cardstock and spiderweb corners from orange, so the webs actually show against the black cover.
- Stick everything down with the skull centered and the webs in the corners, and add small marker details.
- Cover the front with a laminating sheet and trim it to the edges.
What goes wrong: Paper corners peeling after a week of being shoved in and out of a backpack. The laminating sheet is what makes it last the whole semester.
Tip: Double sided tape keeps the layers flat. A wet glue stick can make thin cardstock ripple.
15. Pumpkin Makeup Brush Holder

A craft foam pumpkin painted black, with a pumpkin face, stars, and bats, holding your makeup or art brushes on a vanity. Hiding a small cup inside it is what makes it work.
Skill: Beginner | Time: About 1 hour plus drying | Cost: Low
What you need
- 1 small craft foam pumpkin (Funkins are carvable and easy to find)
- Black acrylic paint
- Orange, white, and purple paint pens or stickers
- Paintbrushes
- A serrated knife or pumpkin carving saw
- A small glass or plastic cup that fits inside the pumpkin
- Hot glue
How to make it
- Trace the rim of the cup on top of the pumpkin and cut the opening with the serrated knife.
- Paint the pumpkin black in two coats. The first coat looks streaky on the smooth foam; the second evens out.
- Draw a pumpkin face, stars, bats, and webs with the paint pens.
- Hot glue the cup into the opening.
- Fill the cup with makeup brushes or art brushes.
What goes wrong: putting brushes straight into the foam. Cut foam sheds tiny crumbs that end up on your brushes, and then on your face. The cup keeps them clean and lets you wash it out.
16. Black Cat Planter Glow

A terra cotta pot painted black with an orange rim, little cats, ghosts, and moons, plus cat and ghost picks on top. The “glow” is glow in the dark paint on the cat’s eyes, so it still looks good after you turn off the light. It’s an easy piece of DIY Halloween room decor that goes back to being a plant pot after October.
Skill: Beginner | Time: About 1 hour plus drying | Cost: Low
What you need
- 1 plain terra cotta pot
- Acrylic paint in black, orange, white, and yellow
- Glow in the dark paint
- Paintbrushes
- Cardstock or foam for the cat and ghost picks, plus bamboo skewers
- Twine or ribbon
- A clear sealer, or a plastic pot to use as a liner
How to make it
- Paint the pot black and the rim orange, and let it dry completely.
- Add cats, ghosts, stars, and moons with white and yellow paint.
- Paint the cats’ eyes with two or three coats of glow paint.
- Cut a cat and a ghost from cardstock, glue them onto skewers, and tie a small bow on each.
- Put your plant (or a faux one) in a plastic liner pot, set it inside, and add the picks.
What goes wrong: Planting straight into a painted terra cotta pot. Clay pulls water through its walls, and the moisture pushes the paint off from behind. A liner pot or a coat of sealer on the inside stops that.
17. Spooky Halloween Scrapbook Spread

A two page spread in black, orange, and kraft with photos from Halloween night, torn paper layers, stickers, and little handwritten notes. It’s the one thing on this list you’ll still have in ten years.
Skill: Beginner | Time: 1 to 2 hours | Cost: Low
What you need
- Black scrapbook album
- Halloween scrapbook papers
- Printed photos
- Paper cutouts and stickers
- Scissors
- Glue or double sided tape, plus foam dots
- Washi tape
- Small label pieces and a fine archival pen (a Sakura Pigma Micron won’t fade or bleed)
How to make it
- Cover the page with dark patterned paper, then add a few torn strips for layers.
- Place your best photo slightly off center as the focal point and trim the edges neatly.
- Build little clusters of pumpkins, ghosts, bats, and stars around it, lifting some with foam dots for depth.
- Write a few lines on the labels: the date, who was there, what everyone dressed as, and one thing that made you laugh.
- Finish with washi tape or small accents around the borders.
Tip: Tear colored cardstock toward you and the white core shows along the edge, which gives a soft, worn look. Tear it away from you for a clean colored edge.
What goes wrong: Skipping the writing. Photos alone feel like a feed. The handwritten notes are what make a scrapbook spread worth keeping.
Cozy Shelf Pieces
The last three are the soft, glowy side of DIY Halloween room decor: a crocheted pumpkin, decorated candles, and painted jar lanterns. Group these aesthetic Halloween crafts on one shelf and the whole room feels done.
18. Crocheted Pumpkin Cutie

A chunky orange pumpkin with a curly green stem and a tiny stitched face. The easiest way to make one isn’t crocheting a ball at all. You crochet a flat ribbed rectangle and gather it into a pumpkin. It’s one of the most giftable Halloween crafts for teenagers who already know a few stitches.
Skill: Intermediate (you need chain and single crochet) | Time: 1½ to 2 hours | Cost: Low
What you need
- Orange worsted weight yarn
- Green yarn
- A 5 mm crochet hook
- Fiberfill stuffing
- Black yarn or felt for the face
- Yarn needle
How to make it
- Chain 21 with orange yarn. Single crochet back along the chain, then keep working rows of single crochet into the back loop only until the piece is about 9 inches long.
- Fold it so the short ends meet and stitch them together into a tube.
- Weave yarn through one open end, pull it tight, and knot it. Stuff the pumpkin until it’s plump, then gather and close the other end.
- Wrap orange yarn from top to bottom through the center five or six times, pulling snug, to make the pumpkin sections.
- Crochet a short green stem. For a curly tendril, chain 15, then work 2 single crochets into each chain, and it twists into a spiral on its own.
- Stitch on a simple face with black yarn and sew the stem and tendril to the top.
Tip: Working into the back loop only is what makes the ridges that look like pumpkin ribs. Regular single crochet gives you a smooth, flat ball.
Trade off: Stuffing too lightly gives a saggy pumpkin, but overstuffing pulls the stitches apart so fiberfill shows through. Stop when it’s firm but still squishes when you press it.
19. Glow-Up Halloween Candles

Pillar candles in orange, white, and purple, with black vinyl jack o’lantern faces, ghosts, bats, moons, and stars. The smart version uses flameless LED pillars with a real wax shell, so they actually light up in your room. Set on a tray, they’re the kind of aesthetic Halloween crafts that look store bought.
Skill: Beginner | Time: About 30 minutes | Cost: Low
What you need
- Flameless LED pillar candles with a real wax finish (or regular pillars for display only)
- Black adhesive vinyl or sticker paper
- A small craft knife or scissors, or a cutting machine like a Cricut
- Transfer tape or tweezers
- Rubbing alcohol and a paper towel
How to make it
- Wipe each candle with a little rubbing alcohol to remove dust and fingerprints so the vinyl sticks.
- Cut out simple shapes: a jack o’lantern face, a ghost, bats, moons, and stars.
- Press each piece onto the candle and smooth the edges firmly with your thumb. Warm hands help the vinyl hug the curve.
- Set them on a tray with a few bats around the base and switch them on.
Safety: Never light a real candle with vinyl or sticker paper on it. The vinyl melts and can catch fire as the flame burns down. Skip the sealer spray too, since it makes a real candle more flammable. If you use real pillars, they’re decorations, not candles.
20. Creepy Mason Jar Lanterns
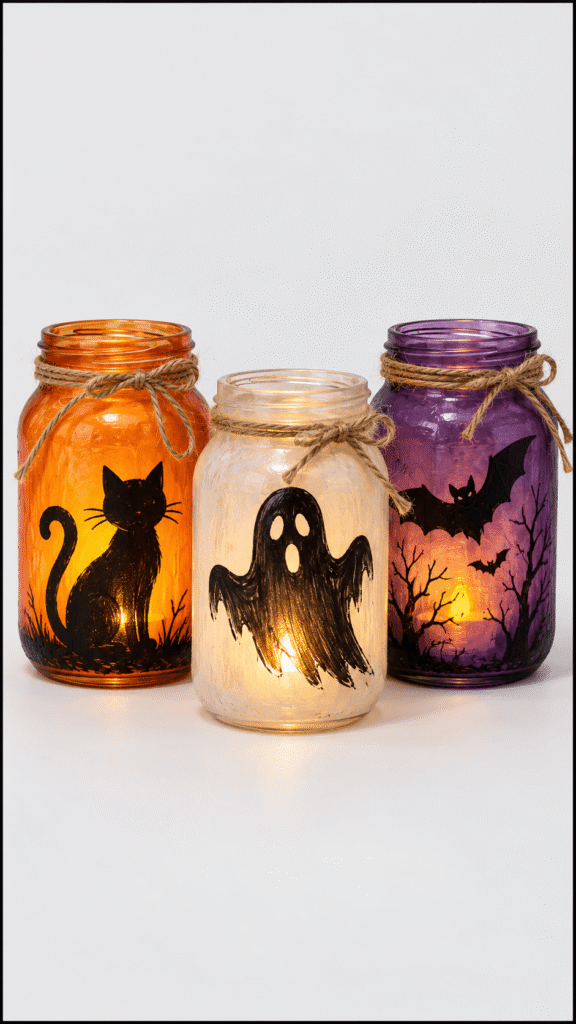
Glowing jars with a black cat, a bat, and a ghost, tied with twine. The catch most people find out too late: two coats of solid paint block the light, and your lantern ends up looking like a painted can.
Skill: Beginner | Time: About 45 minutes plus drying | Cost: Low
What you need
- Clean mason jars
- Paint made for glass, or translucent glass paint in orange, white, and purple
- Black vinyl or paper cutouts
- Twine or jute string
- Battery tea lights
- Rubbing alcohol
How to make it
- Wipe the jars with rubbing alcohol so the paint grips.
- Paint each jar in a Halloween color using thin coats of translucent glass paint, or sponge on regular paint thinly so light can still get through.
- Let it dry completely, then add the black cutouts for the cat, ghost, bat, or tree.
- Tie twine around the jar necks.
- Place a battery tea light inside and switch it on.
What goes wrong: Regular craft acrylic on bare glass scratches off with a fingernail. Glass paint, or a clear sealer over the acrylic, keeps it on.
For masking faces so they glow, frosting jars, and scratching designs through the paint, the full mason jar guide on the site covers every technique. 20 Mason Jar Halloween Crafts With Trendy Spooky Style.
Common Mistakes Teens (and I) Made
Almost every one of these happened at my table that Saturday. None of them are about talent. They’re about one small step that’s easy to skip on the first try.
- Painting colors straight onto black canvas. They vanish. Paint white underneath any color on dark fabric or shoes.
- Painting over flex points. Shoe creases and jacket elbows crack thick paint within days. Keep designs on flat areas and use fabric medium.
- Using the phone case or jewelry before the glue cures. E6000 needs a full day, sometimes more. Half cured glue lets charms shift and fall off.
- One thick layer of UV resin. It stays sticky inside. Build thin layers and cure each one.
- Baking clay without an oven thermometer. Many home ovens run hot, and burnt clay smells awful and gives off fumes. A cheap thermometer fixes it.
- Pulling jump rings apart instead of twisting them. They warp, leave a gap, and your charms slowly escape.
- Washing fabric paint before heat setting it. Unset paint fades or cracks in the first wash.
- Double sided tape on painted walls. It peels paint when it comes off. Removable mounting putty doesn’t.
- Lighting a decorated candle. Vinyl, stickers, and sealer spray all burn. Flameless only.
Practical note: The most aesthetic Halloween crafts aren’t the most complicated ones. They’re the ones with a tight color palette. Pick two or three colors (black, cream, and burnt orange is a classic) and use them across everything, and your whole room ends up looking styled instead of random.
Questions People Ask
What are easy Halloween crafts for teens?
Stretch cord charm bracelets, felt bat wing hair clips, a moon and bat wall display, and a layered paper notebook cover each take under an hour with basic supplies. None of them need resin, an oven, or an iron.
What Halloween crafts can teenagers make to sell?
Small, fast pieces sell best at school craft fairs: polymer clay charm keychains, beaded charm bracelets, and bat wing hair clips. They use cheap materials, take 20 to 45 minutes each, and are easy to make in batches.
Is resin safe for teens to use?
Resin is safe enough for teens with the right precautions: nitrile gloves every time, good ventilation, and keeping the UV lamp away from the eyes. Younger teens should work with an adult in the room, since repeated skin contact can cause lasting allergies.
What temperature do you bake polymer clay charms at?
Follow the package for your brand, since it varies. Sculpey III, for example, bakes at 275°F for about 15 minutes per quarter inch of thickness, and an oven thermometer helps keep it from burning.
How do you keep painted sneakers from cracking?
Mix a fabric medium into acrylic paint or use fabric paint, keep designs off the toe crease, and build up thin coats instead of one thick one. Painted canvas should be spot cleaned rather than machine washed.
What are good DIY Halloween room decor ideas for teens?
A paper moon with flying bats and string lights, a boho yarn tassel hanging, an embroidered moon hoop, and painted jar lanterns all hang or sit without nails. Use removable mounting putty instead of tape so nothing peels the paint.
Where to Go Next
If the wall pieces were your favorite part, there’s a whole guide on the site for decorating the rest of the house, from the front door to the mantel. 20 Halloween Crafts Decorations That Make Decorating Easy.
Got a younger brother or sister who wants to craft alongside you? The kids’ version uses the same table and simpler supplies, so everyone can work at once. 20 Easy Halloween Crafts for Kids to Make at Home and School.
My advice: pick one thing to wear and one thing for your room, and make both this weekend. Teen Halloween crafts that you actually use every day, a bracelet on your wrist or bats over your bed, are the ones that make October feel like yours.
