
The easiest Halloween crafts decorations are garlands (felt, fabric ghost, beaded, and pumpkin), wall pieces like a grapevine pumpkin wreath, a painted ghost sign, and spiderweb hoops, and table displays such as a styled tiered tray, a felt runner, and a pumpkin flower bouquet. Most take 30 minutes to 2 hours with craft store basics: acrylic paint, felt, wired ribbon, twine, and a low temp glue gun. Use flameless candles in anything with leaves, burlap, paper, or fabric, and use floral wire or E6000 instead of hot glue for anything going on a sunny front door.
The week before our Halloween party last year, I had a bare mantel, last year’s flattened wreath on the front door, and four free evenings. I also had a craft closet full of felt scraps, half a spool of buffalo check ribbon, and a bag of wooden pumpkin cutouts I’d bought on clearance in November.
By Friday the mantel had a garland, the door had a new wreath, and the dining table had a runner and a tray I actually liked. None of it took more than an evening. What took time was learning which glue holds what, and that one burlap bow sitting too close to a real candle was a bad idea.
That’s what this guide covers. Each of these DIY Halloween decorations has a skill rating, an honest time estimate, where it works best in the house, and the thing most likely to go wrong the first time.
Updated for Halloween 2026. Most of these pieces are built to come back out next year, so I’ve noted which ones store flat and which ones you’ll want to remake.
Supplies for Halloween Crafts Decorations (and Cheaper Swaps)
Most homemade Halloween decorations pull from the same craft closet, and these 20 are no exception. If you’re starting from scratch, the craft store’s unfinished wood aisle, the felt wall, and the ribbon section cover nearly everything, and the dollar store covers the rest.
| Supply | What I use | Free or cheaper swap |
| Wood shapes | Unfinished wooden pumpkins, plaques, and sign boards from the craft store | Shapes cut from a scrap board, or cereal box cardboard for indoor pieces |
| Paint | Craft acrylic (FolkArt, Apple Barrel) in orange, cream, black, white, and sage | Leftover wall paint samples |
| Felt | Wool blend felt (cuts cleaner and doesn’t pill) | Acrylic craft felt sheets, fine for garlands that stay on a mantel |
| Ribbon | Wired buffalo check and burlap ribbon | Strips of flannel shirt or burlap coffee sacks |
| Twine | Jute twine, black and white baker’s twine | Kitchen string dyed with black coffee or tea |
| Wreath base | Grapevine wreath | Wire hanger bent into a circle and wrapped with branches |
| Faux florals | Craft store stems on sale | Real dried leaves pressed flat in a book for a week |
| Lights | Flameless pillars and LED tea lights with timers | Battery fairy lights |
| Embroidery hoops | Wooden hoops, 8 to 12 inches | Thrift store hoops, which are almost always in a bin somewhere |
| Beads | 16 to 20 mm wood beads | Painted pasta tubes for a rustic look |
Which Glue For Which Material
Glue is where most homemade Halloween decorations fail, usually a week after you hang them.
| Glue | Use it for | Don’t use it for |
| Low temp hot glue | Felt, paper, foam board, ribbon, faux leaves | Anything heavy, anything on a sunny front door, glass that gets cold |
| High temp hot glue | Grapevine wreaths, wood to wood, heavier faux pumpkins | Foam board (it melts the foam core), thin paper |
| E6000 | Glass, metal, rocks, anything outdoors | Quick fixes, since it needs 24 hours to cure and strong ventilation |
| Fabric glue (Aleene’s Fabric Fusion) | Felt runners, fabric ghosts, anything that might get handled | Wood or glass |
| Floral wire | Attaching faux pumpkins and stems to wreaths | Small details |
| Tacky glue | Paper layers, light wood pieces | Anything you need to hold right away |
If you buy one thing, make it a dual temperature glue gun. Half these projects want low heat for felt and foam, and the other half want high heat for wood and grapevine.
Safety and Workspace Notes
None of these projects are dangerous to make. The risks show up after they’re on display, in the form of candles, fireplaces, and heat.
Candles and fire
- Flameless is the default. Burlap, faux leaves, felt, paper, dried florals, and twine all catch easily, and polyester faux leaves melt before they burn.
- If you use a real candle, give it room. The National Fire Protection Association recommends keeping candles at least 12 inches from anything that can burn. In a decorated tray that’s nearly impossible, so put real pillars inside glass hurricanes and take the leaves out of that tray.
- Mantel garlands and working fireplaces. If you light your fireplace, take felt, fabric, and paper garlands down first or hang them well above the opening. Heat rises, and a garland hanging right above the firebox can scorch even without a flame touching it.
- Paper lanterns get battery lights only, and check that the battery cover is secure. Coin batteries are a serious swallowing hazard for kids and pets.
Tools
- Hot glue burns. High temp glue can blister skin in a second. Keep a bowl of cold water on the table and use the low setting for felt, paper, and ribbon.
- Fresh craft knife blades. Foam board and cardstock tear and drag with a dull blade, and dragging is when the knife slips. Cut on a self healing mat in several light passes, not one hard one.
- Carving tools. For the real pumpkin bouquet, a serrated pumpkin saw from a carving kit is safer than a kitchen knife, which can wedge in the flesh and slip out suddenly.
- Spray sealers go outside with a respirator rated for organic vapors. Brush on sealers like Mod Podge are fine indoors with a window open.
Outdoor heat and weather
- Storm doors cook wreaths. A front door behind a glass storm door can get hot enough on a sunny afternoon to soften hot glue, and pumpkins slide right off the grapevine. Use floral wire for anything heavy.
- Craft acrylic isn’t outdoor paint. Porch signs need a clear exterior sealer, or the paint fades and peels within a season.
Practical note: Before you call any piece finished, pick it up by its hanger or its heaviest part and shake it gently. Whatever comes loose in your hand is what would have come loose on the door at 2 a.m.
All 20 Halloween Crafts Decorations at a Glance
Start with the spot you’re decorating, then pick the DIY Halloween decorations that fit the time you have. The last column matters more than it looks: pieces that store flat and come back next year are where your effort pays off.
| # | Project | Skill | Active time | Best spot | Outdoors? | Reuse next year? |
| 1 | Elegant Pumpkin Spider Wreath | Beginner | 1 hr | Front door | Covered door only | Yes |
| 2 | Spiderweb Hoop Wall Art | Intermediate | 2 to 3 hr | Wall or gallery shelf | No | Yes |
| 3 | Rustic Ghost Pumpkin Sign | Intermediate | 2 hr + drying | Porch or entry wall | With exterior sealer | Yes |
| 4 | Black Spiderweb Hoop | Beginner | 45 min | Door or party wall | Covered porch | Yes |
| 5 | Pumpkin Bow Wall Decor | Beginner | 1 hr + drying | Door or entry wall | Covered porch | Yes, swap the bow |
| 6 | Spooky Tiered Tray Charm | Beginner | 30 min | Kitchen counter or coffee table | No | Yes |
| 7 | Pumpkin Runner Table Accent | Intermediate | 1½ to 2 hr | Dining table | No | Yes |
| 8 | Rustic Pumpkin Candle Tray | Beginner | 45 min + drying | Coffee or dining table | No | Yes |
| 9 | Autumn Pumpkin Bouquet | Beginner | 45 min | Porch or entry table | Yes | Only with a craft pumpkin |
| 10 | Beaded Mantel Garland | Beginner | 1 hr | Mantel or open shelf | No | Yes |
| 11 | Felt Halloween Garland | Intermediate | 2 hr | Mantel or doorway | No | Yes |
| 12 | Playful Ghost Garland | Beginner | 1 hr | Window or doorway | No | Yes |
| 13 | Pumpkin Garland Mantel Charm | Beginner | 1 hr (2½ hr if you sew the pumpkins) | Mantel | No | Yes |
| 14 | Glowing Pumpkin Lantern Bag | Beginner | 30 min | Porch steps or party table | Dry nights only | No |
| 15 | Lace Spider Jar Glow | Beginner | 20 min | Shelf or windowsill | No | Yes |
| 16 | Haunted Lantern Jar Glow | Intermediate | 45 min + drying | Porch or table | Covered porch | Yes |
| 17 | Moonlit Haunted House Shadow Box | Intermediate | 2 hr | Shelf or mantel | No | Yes |
| 18 | Painted Halloween Pebbles | Beginner | 1 hr + drying | Trays and vase filler | With sealer | Yes |
| 19 | Spiderweb Bottle Decor | Beginner | 30 min + 2 to 3 days drying | Shelf or mantel | No | Yes |
| 20 | Haunted House Table Scene | Advanced | 3 to 4 hr | Entry table or mantel | No | Yes |
Wall and Door Decor
The front door is the first thing guests see and the place homemade decor takes the most abuse: slams, wind, and afternoon sun. These five DIY Halloween decorations are built to hang, and each one tells you how to keep it hanging.
1. Elegant Pumpkin Spider Wreath

This is the wreath that replaced my flattened one, and it’s still holding together a year later because everything heavy is wired on rather than glued. Orange pumpkins, black leaves, a glossy bow, and a wisp of spider web across one side.
Skill: Beginner | Time: About 1 hour | Best spot: Front door (covered) or above a mantel
What you need
- Grapevine wreath base (18 inches is a good front door size)
- Black wired ribbon for the bow
- Faux orange pumpkins in two or three sizes
- Black floral stems and leaves
- Stretchy spider web mesh
- Plastic spider
- Hot glue (high temp) and green floral wire
How to make it
- Lay the wreath flat and arrange everything on top before attaching anything. A crescent along the lower left third looks more designed than decorations spaced evenly all the way around.
- Wire the pumpkins on first, threading wire around each stem and twisting it tight around the vines at the back.
- Tuck the black stems and leaves into the grapevine around the pumpkins, adding a dab of hot glue where they sit loose.
- Make a bow with four loops of wired ribbon, pinch the center, wrap it with floral wire, and wire it to the top of the wreath.
- Pull a small piece of web mesh thin and stretch it across the open side of the wreath.
- Glue the spider onto the web.
What goes wrong: Spider web mesh straight out of the bag looks like dryer lint. Pull it apart until it’s almost see through, and use far less than you think.
Trade off: Hot glue alone is fine on an inside wall. On a sunny front door, especially behind a glass storm door, it softens, so wire is what keeps the pumpkins on.
2. Spiderweb Hoop Wall Art
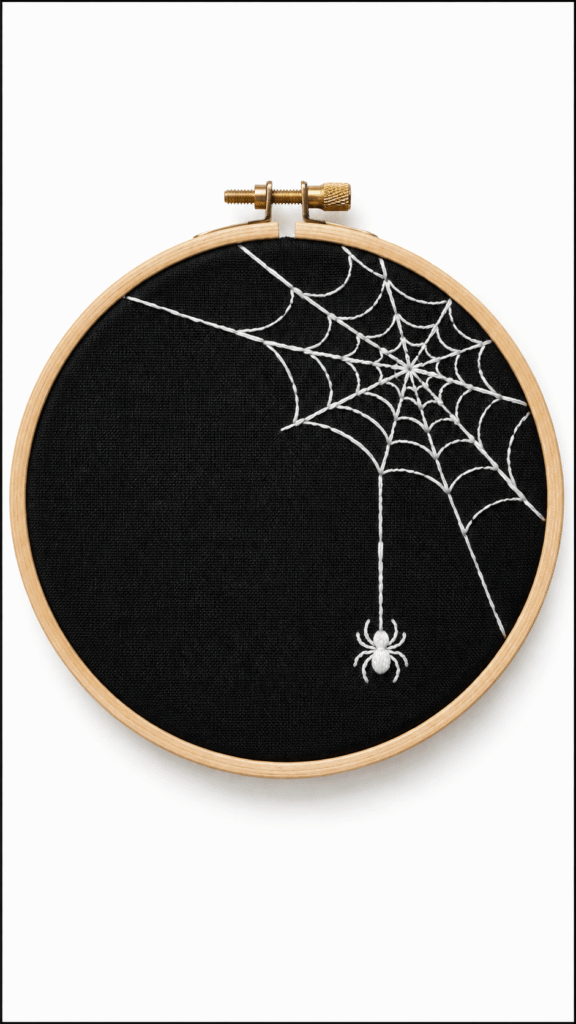
White stitches on black fabric, with a single spider hanging from a long thread. It’s the most polished piece on this list and the only one that’s real embroidery, so give it an evening with a show on.
Skill: Intermediate | Time: 2 to 3 hours | Best spot: A wall, a gallery shelf, or a small entry nook
What you need
- 1 wooden embroidery hoop (8 inches is a good size)
- Black cotton fabric (quilting cotton, not anything stretchy)
- White embroidery floss (DMC Blanc is a crisp, bright white)
- An embroidery needle
- A white chalk pencil
- 1 small white spider embellishment or bead
- A felt circle for the back
How to make it
- Stretch the fabric in the hoop and tighten the screw until it’s drum tight. Put the screw at the top, since that’s where it will hang.
- Sketch the web in the upper corner with the chalk pencil: spokes fanning out from the corner, with curved threads between them.
- Backstitch the spokes using three strands of floss, then backstitch the curved threads.
- Bring one long strand down from the web and stitch the spider onto the end of it.
- Trim the fabric on the back to about an inch, run a gathering stitch around it, pull it snug, and glue the felt circle over it.
Tip: White chalk pencil shows clearly on black fabric and brushes off when you’re done. Regular pencil disappears and a white gel pen won’t wash out.
What goes wrong: The fabric slowly loosens while you stitch, and the web puckers. Check the tension every 20 minutes and tighten the screw.
3. Rustic Ghost Pumpkin Sign
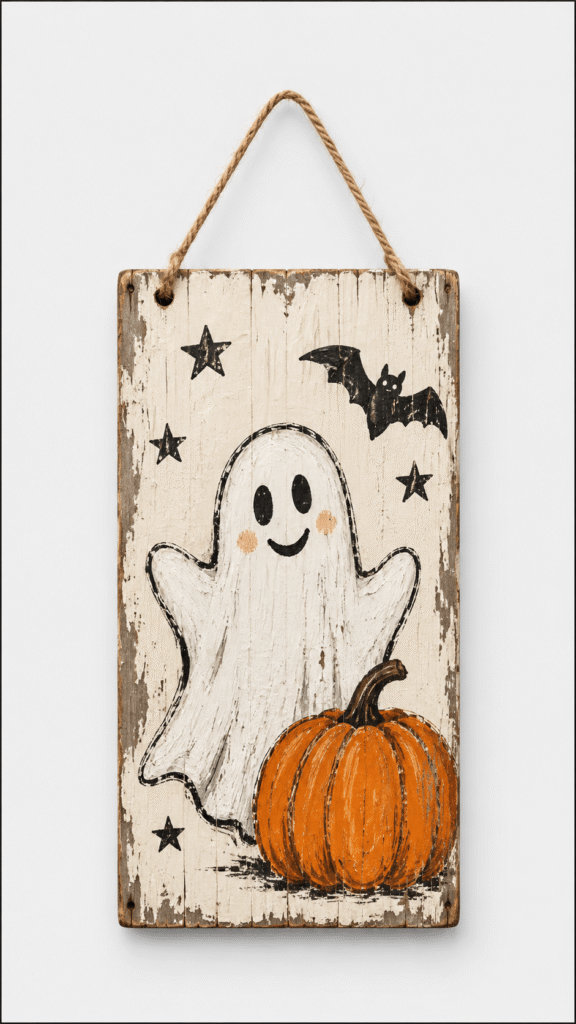
A friendly ghost, a bright pumpkin, a little bat, and a few stars on a weathered board. The worn look is the part that makes it feel rustic, and it’s easier than it looks.
Skill: Intermediate | Time: About 2 hours plus drying between coats | Best spot: A porch wall or entryway
What you need
- A wooden hanging sign board (or a scrap plank about 10 by 16 inches)
- White, orange, and black acrylic paint, plus a little gray or brown for the base
- Paintbrushes, including a dry, stiff one for weathering
- Petroleum jelly or a candle stub
- A printed ghost and pumpkin design and a piece of chalk
- Water based exterior clear coat (for porch use)
- Twine for hanging
How to make it
- Paint the board gray or brown and let it dry.
- Rub petroleum jelly or candle wax along the edges and a few random spots. This is where the paint will chip.
- Paint a cream or white top coat over the whole board. Once dry, rub the waxed spots with a rag or fine sandpaper so the base color shows through.
- Rub chalk over the back of your printed design, lay it on the board, and trace over the lines to transfer it.
- Paint the ghost in two or three coats of white, then the pumpkin, the bat, and the stars. Add the faces in black.
- Seal it, drill two small holes at the top, and tie on the twine.
What goes wrong: Sealing white paint with oil based varnish or spar urethane. It ambers over time and turns your white ghost a dingy yellow. Use a water based clear coat.
Trade off: The chalk transfer is free and works well, but it’s faint. Graphite transfer paper (Saral is a common brand) gives darker lines if your design has fine detail.
4. Black Spiderweb Hoop

A black yarn wrapped hoop with a white web strung across it and a few spiders. It’s quick, it reads clearly from across a room, and it’s the easiest piece on this list to make in a batch for a party wall.
Skill: Beginner | Time: About 45 minutes | Best spot: A door, a party wall, or a covered porch
What you need
- 1 round embroidery hoop (the inner ring is all you need)
- 1 roll of black yarn or cord
- White crochet thread or embroidery floss (sewing thread is too thin to see from a distance)
- A few small plastic spiders
- Low temp hot glue or craft glue
- Twine for hanging
How to make it
- Glue the end of the yarn to the hoop and wrap it tightly, with each wrap snug against the last, until no wood shows. Glue the end.
- Tie four strands of white thread straight across the hoop through the center, like slices of a pie, to make eight spokes. Knot them together where they cross.
- Starting at the center, tie on a long piece of thread and spiral outward. Wrap it once around each spoke as you pass, moving about an inch further out with each round.
- Tie off at the rim, glue on the spiders, and add a twine loop for hanging.
What goes wrong: Spiral thread that just rests on the spokes slides into a tangle in the middle. Wrapping it once around each spoke locks it in place.
5. Pumpkin Bow Wall Decor
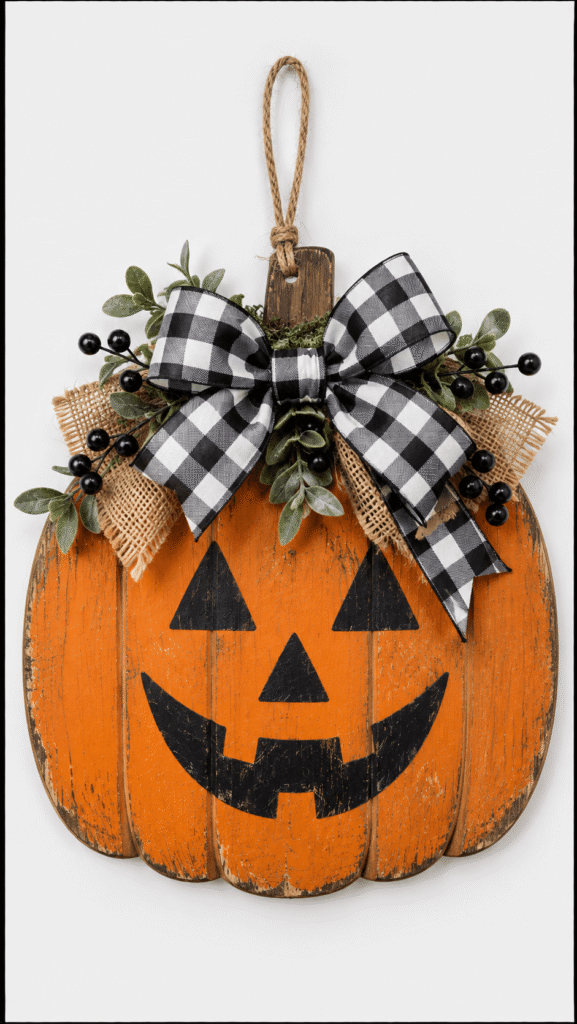
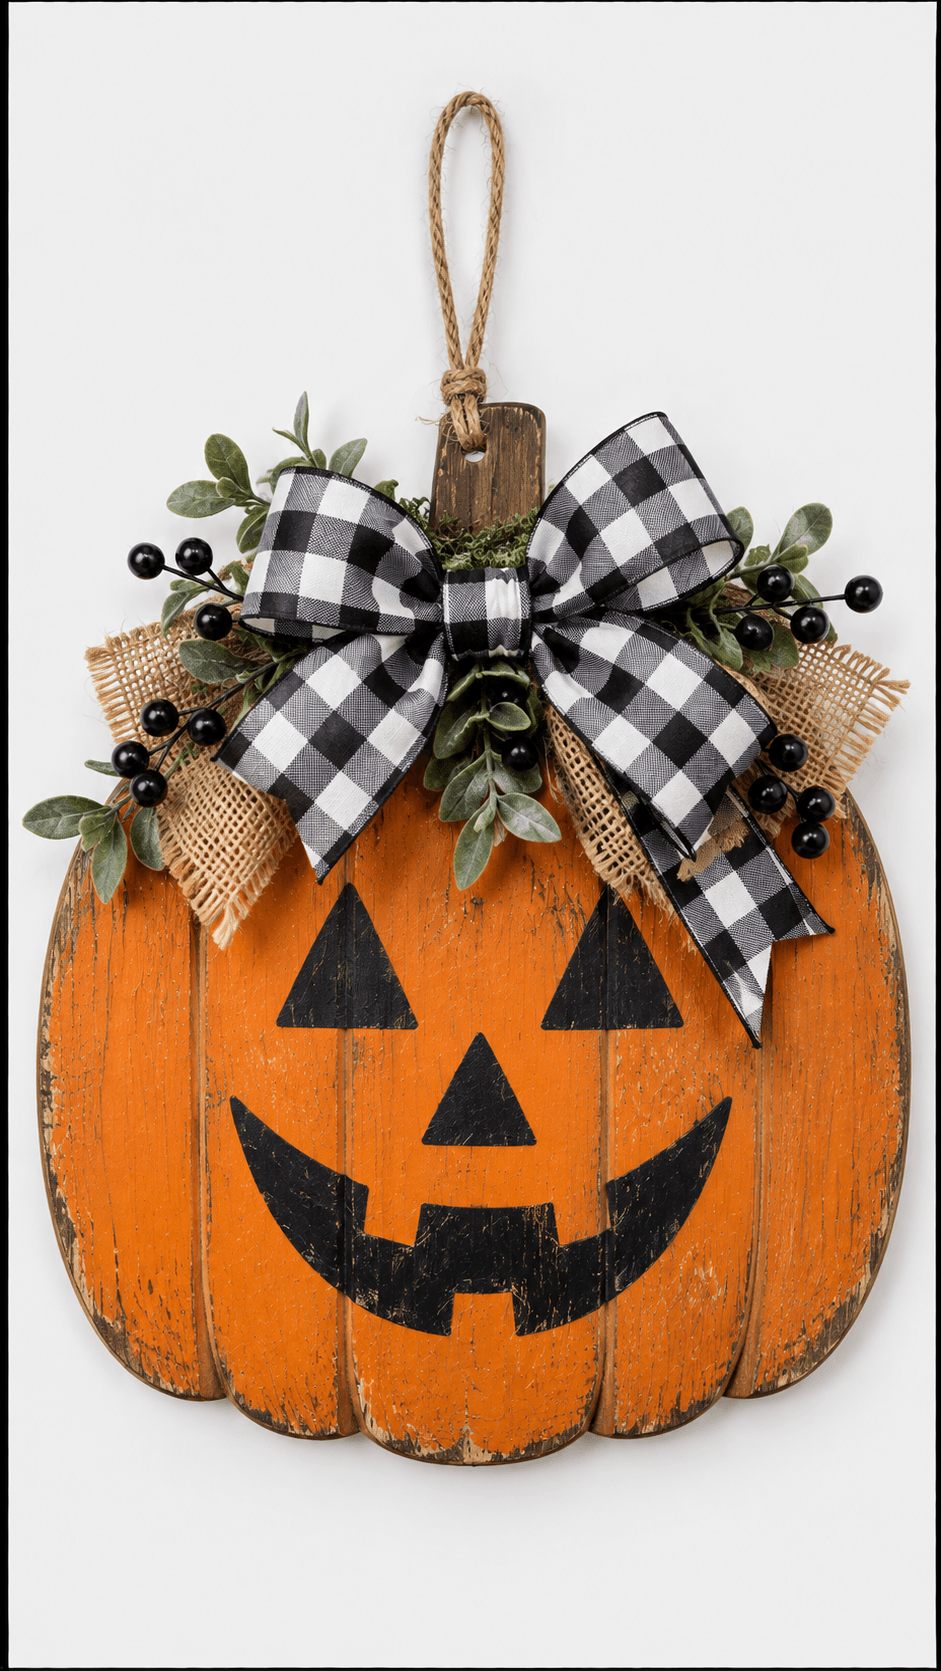
A wooden pumpkin plaque with a jack o’lantern face, a big buffalo check bow, burlap, and a little greenery. Paint both sides orange and only one side with a face, and after October you flip it, swap the bow, and it works through Thanksgiving.
Skill: Beginner | Time: About 1 hour plus drying | Best spot: A door, wall, or entryway
What you need
- 1 unfinished wooden pumpkin plaque
- Orange and black acrylic paint
- Black buffalo check wired ribbon
- Burlap ribbon or fabric
- Twine
- Faux greenery sprigs and black berry picks
- Hot glue gun and glue sticks
- Two small screw eyes and extra twine for hanging
How to make it
- Paint both sides of the plaque orange in two coats, sanding lightly with fine sandpaper between them for a smooth finish.
- Paint a simple jack o’lantern face in black. A paint pen gives cleaner edges than a brush.
- Make a bow from the wired ribbon with four loops, pinch it in the middle, and secure it with floral wire.
- Wrap twine around the center of the bow to hide the wire.
- Glue a layer of burlap, the greenery, and the berry picks at the top of the pumpkin, then glue the bow over them.
- Twist two small screw eyes into the top edge and tie twine between them, so it hangs either side out.
Tip: Wired ribbon is what makes the bow look full. Regular ribbon flops flat within a day.
What goes wrong: Hot gluing a hanger on. It pops off the first time the door slams. Screw eyes in the top edge hold for years, and they let you flip the plaque.
Tablescapes and Trays
Tables get looked at from every side and touched constantly, so Halloween table decor needs to look good at 360 degrees and survive someone setting a drink down next to it. These four do both.
6. Spooky Tiered Tray Charm
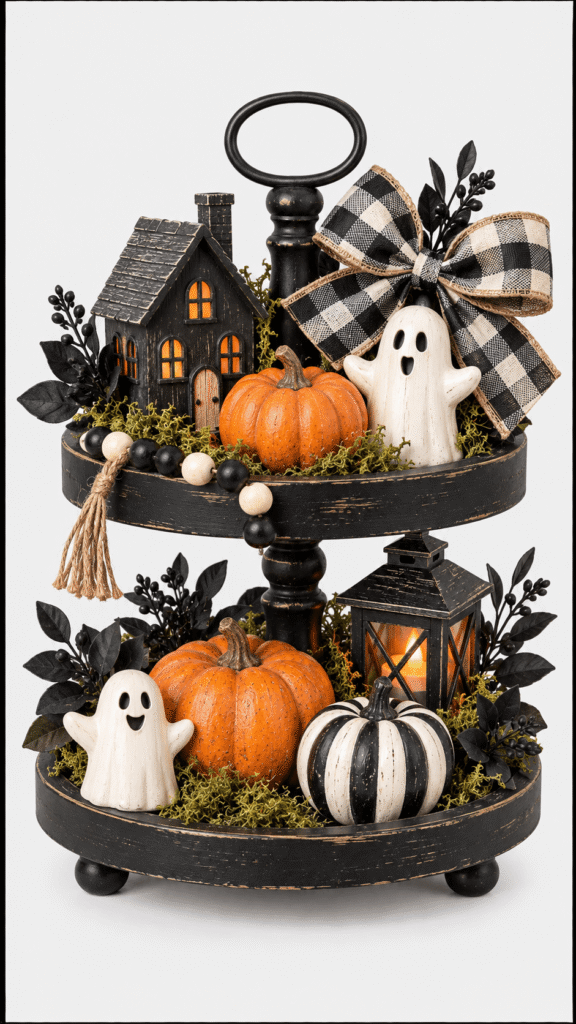
A tiered tray is more styling than crafting, but it’s where a dozen small pieces suddenly look like designed Halloween table decor. The trick is in the order you place things.
Skill: Beginner | Time: About 30 minutes | Best spot: A kitchen island, coffee table, or entry table
What you need
- 1 black tiered tray
- 2 small faux pumpkins
- 2 mini ghost figurines
- 1 small haunted house decoration
- 1 Halloween sign
- 1 black and white striped pumpkin
- 1 buffalo check bow
- 1 strand of bead garland
- 1 little sprig of black foliage
- Decorative moss or filler
How to make it
- Put a thin layer of moss or filler on each tier.
- Place the tallest pieces first, the haunted house on the bottom tier and the sign on the top, toward the back center of each.
- Fill in with pumpkins and ghosts, grouping in threes and varying the heights. A small book or an upside down votive holder hidden under the moss makes a quick riser.
- Drape the bead garland from the top tier down to the bottom so the tiers read as one display.
- Add the foliage and the bow, then turn the tray all the way around and fix whatever looks empty from behind.
Tip: Repeat each color on every tier. If the orange is only on the bottom and the black only on top, it looks like two separate displays stacked up.
Budget swap: Dollar store mini pumpkins painted cream and black look just as good as boutique ones, and a scrap of board with a hand lettered paint pen sign costs nothing.
What goes wrong: Overfilling. Leave a little moss showing on each tier, or it looks like storage instead of styling.
7. Pumpkin Runner Table Accent

An orange felt runner with black borders, a pumpkin face in the middle, and little bats and stars running toward pointed ends. Felt doesn’t fray, so there’s no hemming at all, which makes it the easiest sewn Halloween table decor there is.
Skill: Intermediate | Time: 1½ to 2 hours | Best spot: The dining table
What you need
- Orange felt or fabric for the runner (felt by the yard comes 72 inches wide, so a short length gives you several runners)
- Black felt for borders and shapes
- White thread or fabric glue (Aleene’s Fabric Fusion)
- Scissors and a rotary cutter if you have one
- Pumpkin, bat, and star templates, plus freezer paper
- A small tassel or bead for each tip
How to make it
- Cut the runner about 14 inches wide and your table’s length plus 12 to 24 inches, so it hangs 6 to 12 inches off each end.
- Fold each end in half lengthwise and cut from the corners to the fold to make a point.
- Trace the templates onto the dull side of freezer paper, iron it shiny side down onto the black felt on low heat, and cut around it. Peel the paper off.
- Cut black felt strips for the side borders and stitch or glue them in place.
- Arrange the pumpkin, bats, and stars down the center and attach them.
- Sew a tassel or bead to each point.
Tip: Freezer paper is the secret to clean felt shapes. Scissors glide along the paper edge, and you get crisp bat wings instead of chewed outlines.
Trade off: Fabric glue is twice as fast, but glued shapes peel at the edges after a few weeks of plates sliding over them. A simple running stitch in white thread lasts for years and looks intentionally handmade.
What goes wrong: Setting a hot casserole dish straight on acrylic craft felt. It can melt and leave a shiny scorched patch. Use trivets, or choose wool blend felt.
8. Rustic Pumpkin Candle Tray

Three painted wooden pumpkins, two pillar candles, and a scatter of leaves and berries on a wooden tray. It looks put together with almost no effort, which is why I make one every year as easy Halloween table decor for the coffee table.
Skill: Beginner | Time: About 45 minutes plus drying | Best spot: A coffee table or the center of the dining table
What you need
- 1 wooden tray
- 3 wooden pumpkin cutouts (unfinished, from the craft store)
- Acrylic paint in orange, cream, and sage green
- Burlap ribbon or twine
- 2 flameless pillar candles (the kind with a real wax shell and a timer)
- Artificial fall leaves and berry sprigs
- Hot glue or craft glue
- Paintbrushes, including a dry, stiff one
How to make it
- Paint each pumpkin a different color and let them dry.
- Dry brush a little cream over the orange and sage ones so the wood grain shows through the paint.
- Tie small bows of burlap or twine around each stem.
- Arrange the pumpkins at three different heights in a loose triangle with the candles.
- Tuck leaves and berries into the gaps.
- Glue the pieces down if you want the tray to stay set up all season.
Safety: This tray is full of things that burn. Use flameless pillars. If you really want real flame, put the pillars inside glass hurricanes and take the leaves and burlap out of the tray entirely.
Tip: Flameless pillars with a timer turn on at dusk every day without you remembering. That’s half the reason the tray actually gets lit.
9. Autumn Pumpkin Bouquet

A pumpkin used as a vase, overflowing with orange, burgundy, and gold flowers. Most versions have you carving a face into it, and that one choice decides how long it lasts.
Skill: Beginner | Time: About 45 minutes | Best spot: The porch, the entry table, or the center of the table
What you need
- 1 medium pumpkin (real, or a carvable craft pumpkin like Funkins)
- Faux fall flowers and leaves
- Dry floral foam or a small plastic container that fits inside
- A serrated pumpkin saw, plus a craft knife for the face
- A paint pen (for a face that doesn’t need carving)
- Hot glue or florist picks
- White vinegar and a paper towel
How to make it
- Clean and dry the pumpkin. Cut a circle off the top with the saw and scoop out the seeds and strings.
- Draw the jack o’lantern face on with the paint pen, or carve it if you’re making it during Halloween week.
- Wipe all the cut edges with white vinegar to slow mold.
- Set the container or floral foam inside so the stems have a stable base and never touch the pumpkin flesh.
- Trim the stems to different lengths. Put the tallest in the center, fill around them, and let a few trailing leaves spill over the edge.
- Secure any loose stems with florist picks or a dab of hot glue on the foam.
Trade off: A carved real pumpkin starts to soften within days, especially on a warm porch. A painted face with only the top cut off lasts weeks. A craft pumpkin lasts for years and can be stored with the flowers still in it.
Tip: Green wet foam is for fresh flowers. For faux stems you want dry foam, which is firmer and holds them upright.
Garlands for the Mantel and Doorway
A garland is the fastest way to make a room feel decorated, and it’s the backbone of most Halloween mantel decor. These four range from cute (felt and fabric ghosts) to cozy (beads and fabric pumpkins), and all of them store flat in a shoebox.
If you light your fireplace, read the mantel note in the safety section before you hang any of them.
10. Beaded Mantel Garland
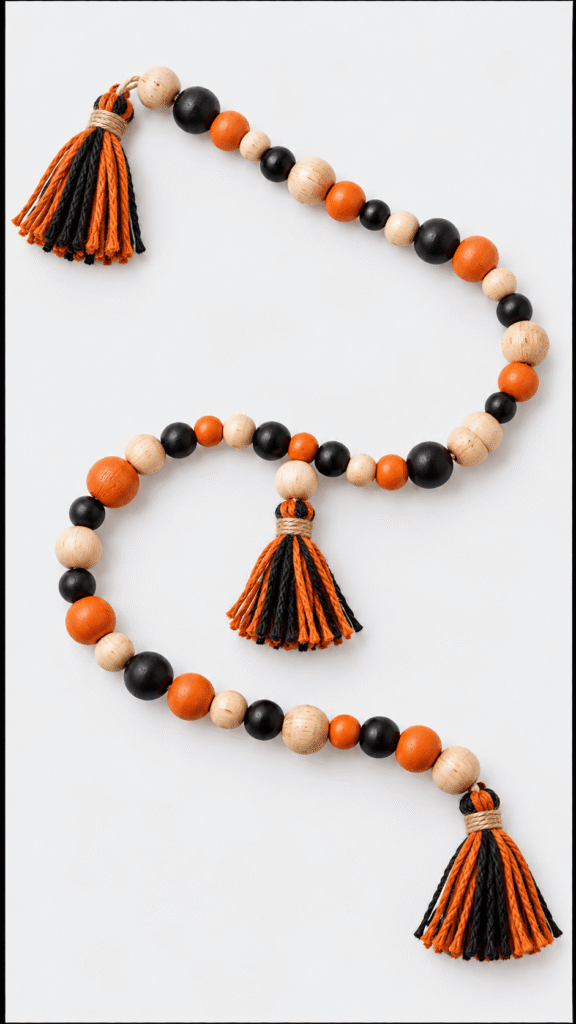
Wood beads in black, orange, and natural, with yarn tassels on the ends. It’s the quietest Halloween mantel decor on this list, and it’s the one that stays up longest because it doesn’t scream Halloween.
Skill: Beginner | Time: About 1 hour, plus drying if you paint your own beads | Best spot: A mantel, open shelf, or tiered tray
What you need
- Wood beads in black, orange, and natural tones (16 to 20 mm)
- 3 mm cotton macrame cord or twine
- Orange and black yarn for tassels
- A piece of cardboard about 4 inches tall
- Scissors and tape
How to make it
- Measure your mantel and add about a third more for the drape.
- Wrap one end of the cord tightly with tape to make a stiff point for threading.
- String the beads in a repeating pattern, such as three natural, one black, one orange.
- For each tassel, wrap yarn about 30 times around the cardboard, tie the loops together at the top, slide it off, and cut the bottom loops. Wrap a short piece of yarn around the neck about half an inch down and knot it.
- Tie a tassel to each end and one at the center for a fuller look.
- Hang it and nudge the beads so the curve sits evenly.
Tip: Painting your own beads? Thread them onto bamboo skewers first and stand the skewers in a block of foam. Painting beads loose fills the holes with paint, and once it dries you can’t thread them.
11. Felt Halloween Garland
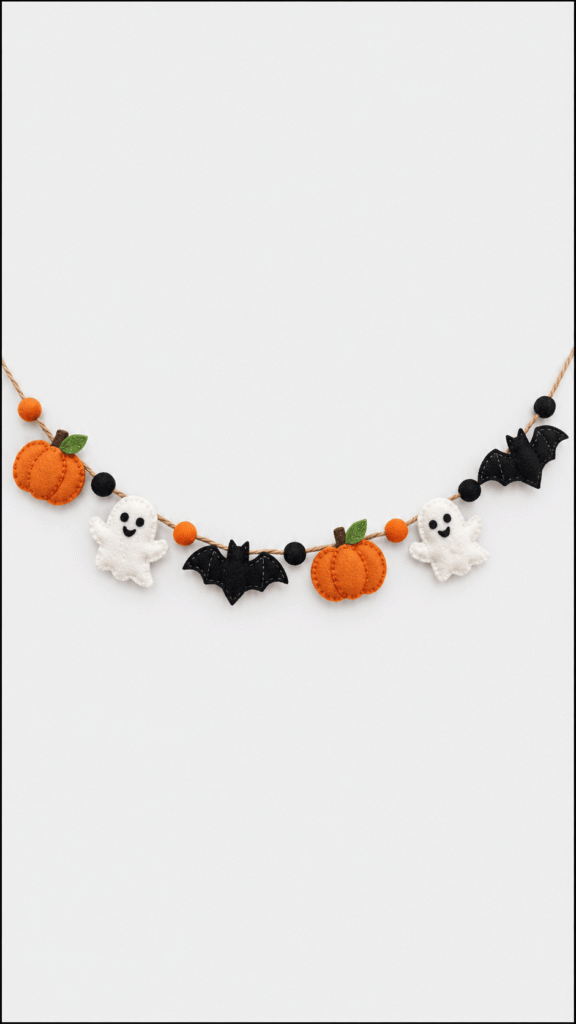
Felt pumpkins, ghosts, and bats strung across twine with pom poms between them. It’s the most colorful garland here and the one that takes the most cutting.
Skill: Intermediate (mostly patience with scissors) | Time: About 2 hours | Best spot: A mantel, doorway, or kitchen window
What you need
- Orange, white, and black felt sheets
- Green felt scraps
- Black and white twine
- Orange and black pom poms
- Needle and thread, or embroidery floss
- Fabric glue or low temp hot glue
- Scissors and freezer paper for templates
How to make it
- Trace pumpkin, ghost, and bat shapes onto freezer paper, iron them onto the felt on low heat, and cut them out.
- Add faces and small details: black felt eyes on the ghosts, green leaves on the pumpkins. A few hand stitches in floss look more finished than glue alone.
- Cut a small felt tab for each shape, fold it over the twine, and glue the ends to the back of the shape.
- Space the shapes evenly, leaving room between each one.
- Tie the pom poms onto the twine between the shapes and hang the garland.
Tip: The folded tab is what keeps each shape facing forward. Shapes glued straight onto the twine spin around and show their backs.
What goes wrong: big beads of hot glue on felt. Glue soaks into the fibers and dries in a hard, shiny lump you can see from the front. Use fabric glue, or the thinnest line of low temp glue.
12. Playful Ghost Garland

Little fabric ghosts with flared skirts and black felt faces, strung along twine. Spray starch is the secret to the shape, and it’s the step that makes them look finished instead of floppy.
Skill: Beginner | Time: About 1 hour | Best spot: A window, doorway, or across the front of a shelf
What you need
- White fabric squares about 6 inches across (muslin or an old cotton sheet)
- Wooden beads or cotton balls for the heads
- White thread or small rubber bands
- Black felt or paper
- Twine or jute cord
- Spray starch
- Fabric glue
- Scissors
How to make it
- Cut the fabric into squares or circles.
- Set a bead or cotton ball in the center of each piece, gather the fabric around it, and tie it tight under the head with thread or a rubber band.
- Spray the skirts with starch, spread them out so they flare, and let them dry upright over a cup or a bottle neck.
- Cut small oval eyes and “oooo” mouths from black felt and glue them on.
- Run a needle and thread through the top of each head and tie the ghosts to the twine.
Tip: Don’t hem the edges. A raw cotton edge frays a little, and the wispy look is exactly what you want on a ghost.
Trade off: Cotton balls are free and light, but wooden beads give the heads a crisper round shape and make the ghosts hang straighter.
13. Pumpkin Garland Mantel Charm
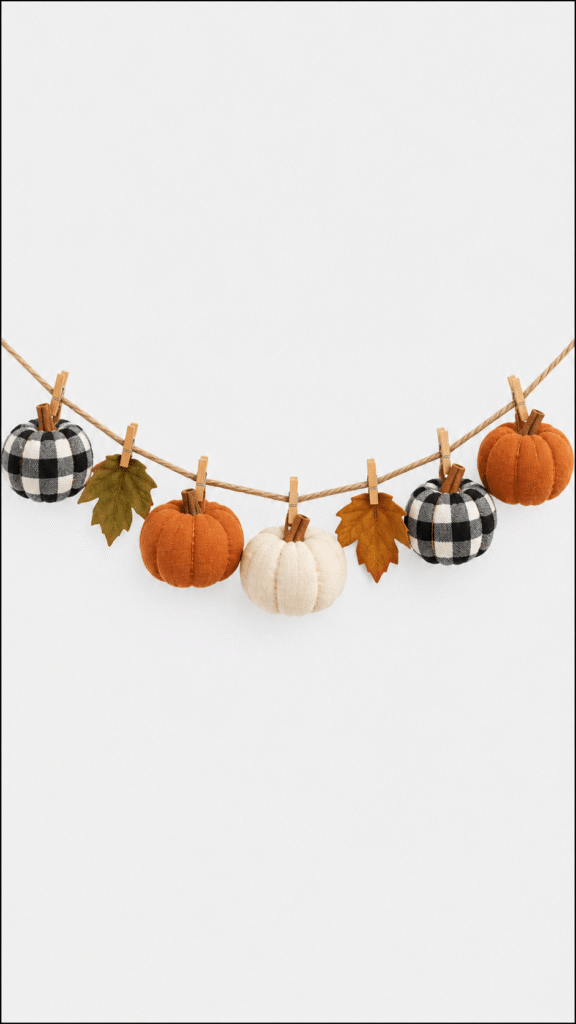
Soft fabric pumpkins in orange, cream, and buffalo check, clipped to twine with leaves tucked between them. It’s warm instead of spooky, and as Halloween mantel decor it carries straight through November.
Skill: Beginner | Time: About 1 hour with store bought pumpkins, about 2½ hours if you sew them | Best spot: The mantel
What you need
- Small fabric pumpkins in orange, cream, and buffalo check (or fabric circles to make your own)
- Polyester fiberfill and a little dry rice (if sewing)
- Strong thread and a needle
- Twine or jute rope
- Mini wooden clothespins
- Artificial leaves and leaf picks
- Cinnamon sticks or small twigs for stems
- Hot glue gun or craft glue
How to make it
- To sew a pumpkin, cut a fabric circle about 8 inches across and run a gathering stitch half an inch from the edge.
- Pull the thread to gather it into a pouch, drop in a spoonful of rice, stuff it with fiberfill, and pull the opening closed. Knot it tight.
- Wrap twine around the pumpkin from top to bottom four or five times to make the ridges, and glue a cinnamon stick stem into the center.
- Cut the twine to fit your mantel, with extra length for the drape.
- Clip the pumpkins on with mini clothespins, spacing them evenly.
- Tuck leaves between the pumpkins and hang the garland securely.
Tip: The spoonful of rice settles at the bottom and makes each pumpkin sit and hang the right way up.
Trade off: Glitter leaf picks look festive, but they shed glitter across the mantel and onto the floor for weeks. Plain faux leaves look nearly as good and stay put.
What goes wrong: Clothespins slide toward the low point of the drape, so all the pumpkins bunch in the middle overnight. A small dot of glue where each clothespin grips the twine holds the spacing.
Lanterns and Things That Glow
Some of the best DIY Halloween decorations are the ones that only come alive after dark. All four of these use battery lights, and the main rule is the same for each one: light has to have somewhere to get out. Black paper glued over a glowing face blocks the glow, so these projects cut the openings instead.
14. Glowing Pumpkin Lantern Bag

An orange paper bag with a jack o’lantern face, a handle, and black bats and a moon around it. Weight the bottom and it becomes a proper luminaria for the porch steps.
Skill: Beginner | Time: About 30 minutes | Best spot: Porch steps, a walkway, or a party table
What you need
- 1 orange paper bag or lantern sleeve
- Black cardstock or craft foam
- Yellow vellum or tissue paper
- Glue or double sided tape
- A craft knife and scissors
- A battery LED tea light
- About 1 inch of sand or dry rice
How to make it
- Fold the top of the bag down about 2 inches to make a stiff cuff around the opening.
- Draw a jack o’lantern face on the front and cut the eyes, nose, and mouth out with the craft knife, with a piece of cardboard inside the bag to cut against.
- Tape a piece of yellow vellum inside the bag behind the face.
- Cut bats and a crescent moon from black cardstock and glue them around the sides.
- Punch a hole on each side of the cuff and tie on a cardstock or twine handle.
- Pour sand or rice into the bottom, nestle the tea light into it, and shape the bag so it glows evenly.
What goes wrong: Gluing a black paper face onto the bag instead of cutting it out. Black paper blocks the light, so at night you see an orange bag with a dark blob. Cut the face out, and it glows.
Trade off: Paper bags are a one season decoration. A damp night softens them, and they’re done after a week or two outside. Make them the day before a party.
15. Lace Spider Jar Glow
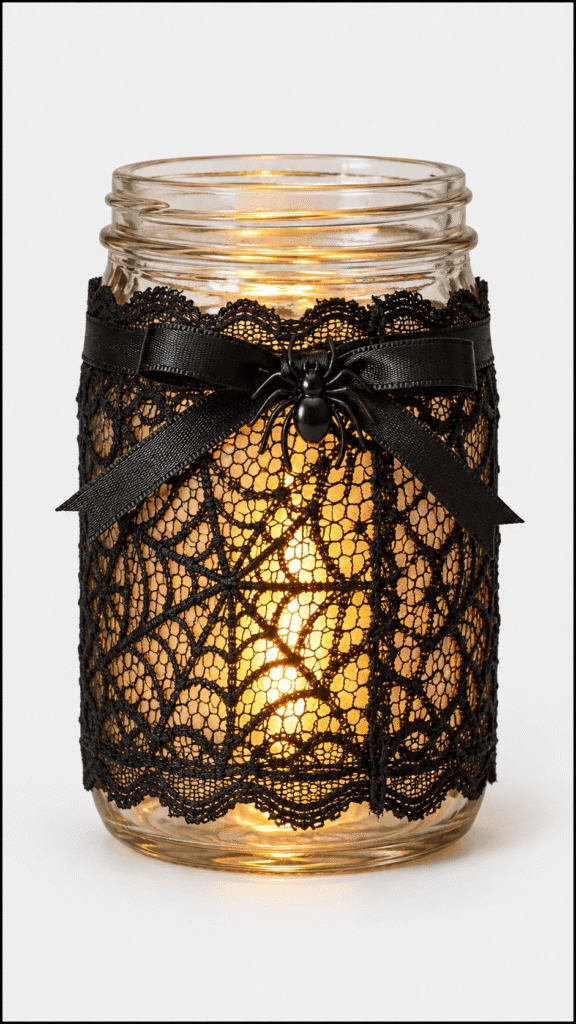
A band of black lace around the middle of a glass jar, a black bow, and one tiny spider. This version sews the lace into a sleeve instead of gluing it to the glass, so you can slide it off and use the jar again.
Skill: Beginner | Time: About 20 minutes | Best spot: A windowsill, shelf, or bathroom counter
What you need
- 1 clear glass jar
- 1 black lace ribbon or fabric strip, 2 to 3 inches wide
- 1 small plastic spider
- 1 amber or warm white LED tea light
- 1 piece of black ribbon
- Black thread and a needle
- Tacky glue
How to make it
- Wrap the lace snugly around the middle of the jar and pin or clip the overlap.
- Slide it off and sew the overlap with a few small stitches in black thread, so you have a tight lace sleeve.
- Slide the sleeve back onto the jar.
- Tie the black ribbon into a bow near the top edge.
- Glue the spider onto the lace with a small dot of tacky glue.
- Drop in the tea light and switch it on.
Tip: Amber LEDs give the soft orange glow. Warm white looks more like candlelight, and cool white makes the jar look like a nightlight.
Trade off: A sewn sleeve takes five more minutes than gluing, but there’s no glue residue on the glass and you can swap lace bands for other holidays. For a fully wrapped lace jar, see the Lace Ribbon Lantern Jar in 20 Mason Jar Halloween Crafts With Trendy Spooky Style.
16. Haunted Lantern Jar Glow

An orange glass jar with a black haunted silhouette, carried by a twisted wire handle. The handle is the part most people get wrong, so it gets the most detail here.
Skill: Intermediate | Time: About 45 minutes plus drying | Best spot: A covered porch, a shelf, or a party table
What you need
- 1 clean glass jar (one with a lip under the threads)
- Translucent orange glass paint (opaque orange blocks the light), plus a little black
- Black vinyl or paper cutouts of houses, bats, trees, or fences
- 1 battery tea light
- About 2 feet of 18 gauge craft wire
- Round nose pliers and wire cutters
How to make it
- Wipe the jar with rubbing alcohol and brush on the translucent orange in thin coats. Let it dry fully.
- Add the black silhouette scene around the lower half of the jar.
- Wrap the wire twice around the neck, just under the lip, and twist it tight so it can’t slide off.
- Twist a small loop on each side of the neck.
- Bend a separate piece of wire into an arch about twice the width of the jar, feed each end through a side loop, and wrap it around itself to lock it.
- Place the tea light inside and switch it on.
What goes wrong: A handle wired only around the glass, without the jar’s lip to catch it. The wire slides up and the jar drops out. Wrapping it under the lip is what holds the weight.
Tip: Want the full rundown on making painted jars glow, from masking to scratching designs through paint? It’s all in 20 Mason Jar Halloween Crafts With Trendy Spooky Style.
17. Moonlit Haunted House Shadow Box
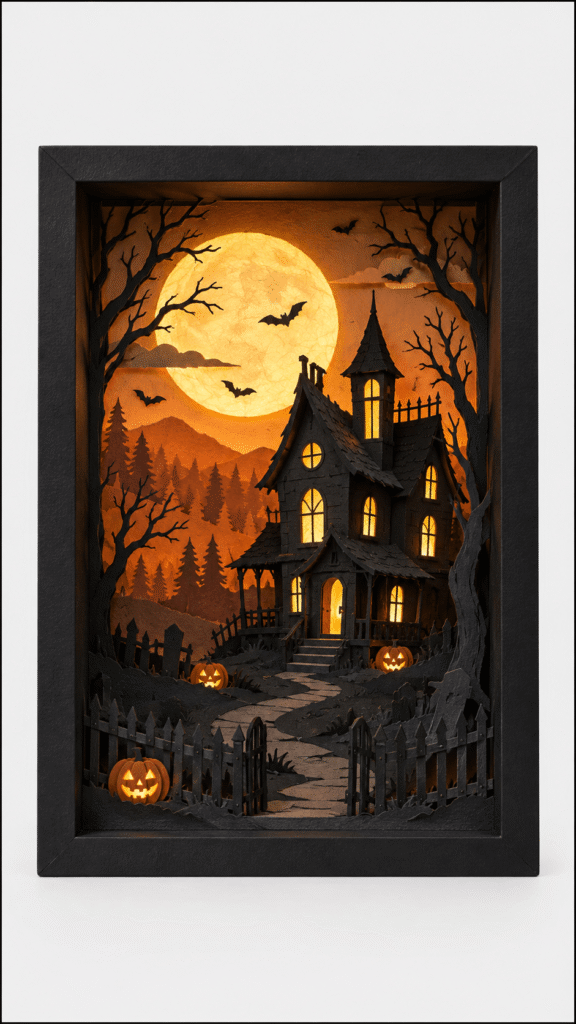
Layers of black and orange paper inside a shadow box frame: a big moon, bare trees, a crooked house with glowing windows, a winding path. Add fairy lights behind the back layer and the moon and windows actually glow. It’s my favorite focal point for Halloween mantel decor.
Skill: Intermediate | Time: About 2 hours | Best spot: A shelf, mantel, or side table
What you need
- 1 black shadow box frame (at least 1½ inches deep)
- Orange cardstock or paper in two shades, plus a little yellow vellum
- Black cardstock or paper
- Scissors and a craft knife
- Craft glue, double sided tape, and foam adhesive dots
- White pencil or chalk for tracing
- Battery fairy lights (optional)
How to make it
- Cut the background to fit the frame from the lighter orange paper, and cut a large moon out of it. Back the moon opening with vellum.
- Trace the house, trees, bats, and fence onto black paper with the white pencil and cut them out. Cut the windows out of the house and back them with yellow vellum.
- Make a middle layer of distant hills and trees from the darker orange paper.
- Glue the layers into the box from back to front, using foam dots between them to space each layer forward.
- Add the path, pumpkins, and small details on the front layer.
- For the glow, tape the fairy lights to the inside back of the frame behind the background before closing it.
Tip: keep the farthest layers lightest and the closest layers darkest and most detailed. That’s how real distance looks, and it’s what makes a flat paper scene feel deep.
What goes wrong: gluing every layer flat. Without foam dots, the scene looks like a printed picture instead of a box you can look into.
Small Shelf Accents
These three homemade Halloween decorations fill the gaps: a bookshelf that needs one more thing, a tray that looks thin, an entry table that needs a focal point. They range from the easiest project on this list to the most involved.
18. Painted Halloween Pebbles
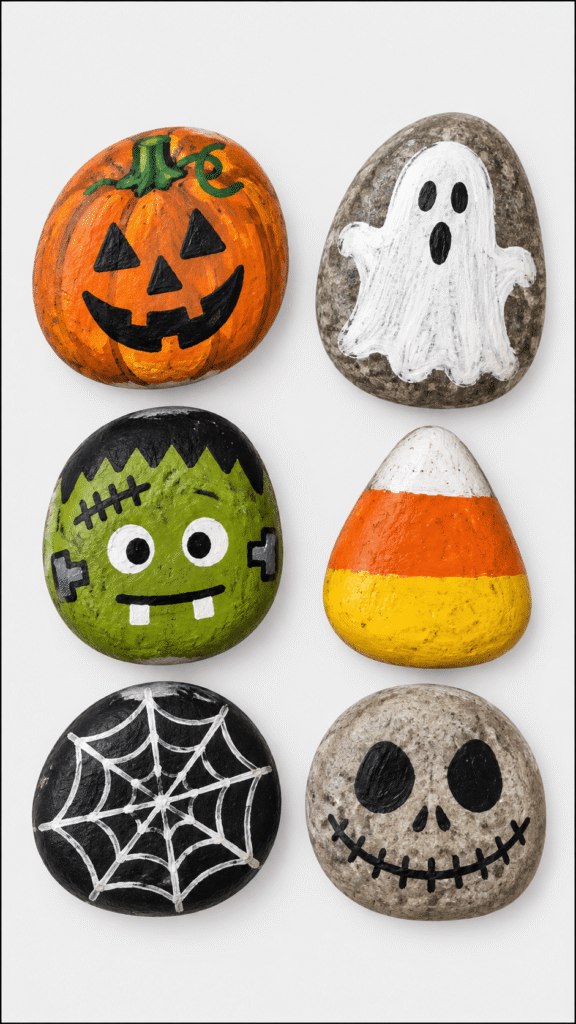
Little painted stones with pumpkins, ghosts, monsters, and candy corn. On their own they’re cute. Poured into a glass hurricane around a flameless pillar, or scattered through a tiered tray, they’re the detail people pick up and look at.
Skill: Beginner | Time: About 1 hour plus 24 hours before sealing | Best spot: Tray filler, vase filler, or a bowl on the coffee table
What you need
- Smooth river stones (a bag from a garden center or the craft store)
- Acrylic paints in Halloween colors
- Fine paintbrushes
- White paint pen or marker (Posca pens give crisp lines on stone)
- Clear sealer (matte spray for a natural look)
How to make it
- Wash the stones in soapy water and let them dry completely.
- Paint a base color on each stone. A white base coat under orange or green makes the color brighter.
- Once dry, add faces and details with the paint pen.
- Let everything dry for a full day.
- Spray a clear sealer outside, in two light coats.
Tip: Dark gray and black stones don’t need a base coat at all. Add a white paint pen ghost face or a spiderweb straight onto the bare stone and it looks great.
What goes wrong: Brushing a sealer like Mod Podge over paint pen lines. The brush can drag the ink and smear your faces. Spray sealers don’t touch the surface, so the lines stay crisp.
19. Spiderweb Bottle Decor

Glass bottles in orange, black, and white with spiderwebs drawn across them, twine at the necks, and tiny spiders. The trick here is painting the inside of the bottle instead of the outside.
Skill: Beginner | Time: About 30 minutes, plus 2 to 3 days for the paint inside to dry | Best spot: A mantel, bookshelf, or bar cart
What you need
- Clean glass bottles (wine, olive oil, or sauce bottles with the labels soaked off)
- Orange, black, and white acrylic paint
- A white paint pen or dimensional paint for the webs
- Black twine or yarn
- Spider stickers or small faux spiders
- An old toothbrush for splatters
- Craft glue
How to make it
- Thin the acrylic with a small splash of water so it pours like cream.
- Pour a few tablespoons into a bottle and slowly rotate it until the whole inside is coated.
- Turn it upside down on a cup lined with paper towel and let the extra drain out for an hour.
- Turn it right side up and leave it uncapped for two or three days until the paint inside is fully dry.
- Draw spiderwebs on the outside with the paint pen. Dip the toothbrush in white paint and flick it at the bottle for tiny splatters.
- Wrap the necks with twine and add a spider.
Tip: Painting the inside leaves the outside glossy, smooth, and impossible to scratch. Paint on the outside of glass chips the first time a bottle clinks against another one.
Trade off: Inside painted bottles can’t hold water, because it softens the paint. Use dried stems or faux branches if you want to add something on top.
20. Haunted House Table Scene

A little haunted house built from foam board, with a dark roof, glowing orange windows, a porch, and a tiny graveyard out front. It’s the most ambitious piece here and the one that gets photographed most.
Skill: Advanced | Time: 3 to 4 hours | Best spot: An entry table or the center of the mantel
What you need
- Black foam board (it skips the painting step) or white foam board plus black paint
- Orange and white paper, plus yellow vellum
- Small cardstock shapes for ghosts, pumpkins, and tombstones
- Low temp hot glue or tacky glue, plus straight pins
- A craft knife with fresh blades, a metal ruler, and a cutting mat
- Marker or paint pen
- A short strand of battery fairy lights (optional)
- A small bare twig for the tree
How to make it
- Sketch the pieces on paper first: front, back, two sides with peaked tops, two roof panels, a chimney, a porch, and a base.
- Cut the window and door openings first, then cut each piece out with several light passes of the craft knife along the metal ruler.
- For clean corners, cut through the top paper and the foam but not the back paper, then fold along the cut.
- Glue orange paper or vellum behind the windows.
- Assemble the walls on the base, then add the roof, chimney, door, and porch. Pin joints in place while the glue sets.
- Add the fence, the twig tree, tombstones, a ghost, and pumpkins around the base. Tuck fairy lights inside the house so the windows glow.
What goes wrong: High temp hot glue. It melts the foam inside the board and leaves a sunken, wobbly joint. Use low temp glue or tacky glue with pins.
Trade off: White foam board painted black takes an extra hour and can warp if the paint goes on wet. Black foam board costs a little more and skips all of that.
Common Mistakes With Homemade Halloween Decorations
Most homemade Halloween decorations don’t fail during the build. They fail on day nine, when a pumpkin slides off the wreath or a garland sags into a U. These are the mistakes behind most of that.
- Using hot glue for everything. It’s perfect for felt, paper, and ribbon. It fails on heavy pumpkins, sunny doors, cold glass, and foam board. Check the glue table near the top.
- Real candles in a tray full of leaves. Flameless pillars look nearly identical now, and they never scorch burlap.
- Gluing black shapes over a lantern’s glowing parts. Black paper blocks light. Cut faces and windows out and back them with vellum.
- Hot gluing a hanger onto the back of a sign or plaque. It pops off when the door slams. Use small screws, nails, or screw eyes.
- Sealing white paint with oil based varnish. It yellows. Use a water based clear coat.
- Painting everything orange and black. A few pieces in cream, sage, and natural wood make the orange and black look intentional instead of loud.
- Spacing garland pieces by eye and walking away. Clothespins and loose shapes slide toward the middle of the drape overnight. A dot of glue fixes the spacing.
- Leaving fabric garlands up over a lit fireplace. Take them down or move them up before the first fire of the season.
- Storing everything in the attic. Attic heat in late summer can soften hot glue, and wreaths and garlands come out in pieces the next fall. Store them in a closet, flat, with tissue between layers.
Practical note: Decorate one zone at a time: the door, then the mantel, then the table. Three finished spots look better than ten half done ones, and if the week gets away from you, the parts people see first are already done.
FAQs
What are the easiest Halloween crafts decorations to make?
A styled tiered tray, a beaded or fabric ghost garland, a black spiderweb hoop, and a lace wrapped jar lantern each take under an hour with basic craft store supplies. None of them need painting skills or special tools.
What glue works best for a Halloween wreath?
Use high temp hot glue for leaves and light pieces on a grapevine wreath, and floral wire for anything heavy like faux pumpkins. Hot glue alone can soften on a sunny door, especially behind a glass storm door.
How do you decorate a mantel for Halloween?
Good Halloween mantel decor starts with one garland and one focal piece like a shadow box or sign, filled in with objects at three different heights. Use flameless candles, and take fabric or paper garlands down before lighting the fireplace.
Can you use real candles with fall decorations?
Only with space around them. The National Fire Protection Association recommends keeping candles at least 12 inches from anything that can burn, so use glass hurricanes and keep leaves, burlap, and paper away, or switch to flameless pillars.
How long does a pumpkin flower arrangement last?
A carved real pumpkin usually starts to soften within a week, faster on a warm porch. With only the top cut off and the face painted on, it lasts several weeks, and a craft foam pumpkin lasts for years.
How do you store DIY Halloween decorations for next year?
Store garlands flat with tissue paper between layers and hang wreaths in a closet or wreath box. Avoid hot attics, where summer heat can soften hot glue and leave pieces loose by the next fall.
Where to Go Next
If the lanterns were your favorite part, 20 Mason Jar Halloween Crafts With Trendy Spooky Style goes much deeper on making painted glass glow, with masking, frosting, and scratch through techniques.
Decorating with kids this year? 20 Easy Halloween Crafts for Kids to Make at Home and School has garlands, ghosts, and window crafts they can make alongside your pieces, so the whole house matches.
My advice: Pick one spot you walk past every day, whether that’s the front door, the mantel, or the kitchen table, and make one piece for it this week. Halloween table decor or a mantel garland you see every morning does more for the season than a dozen projects still in the craft bag on October 30.
