
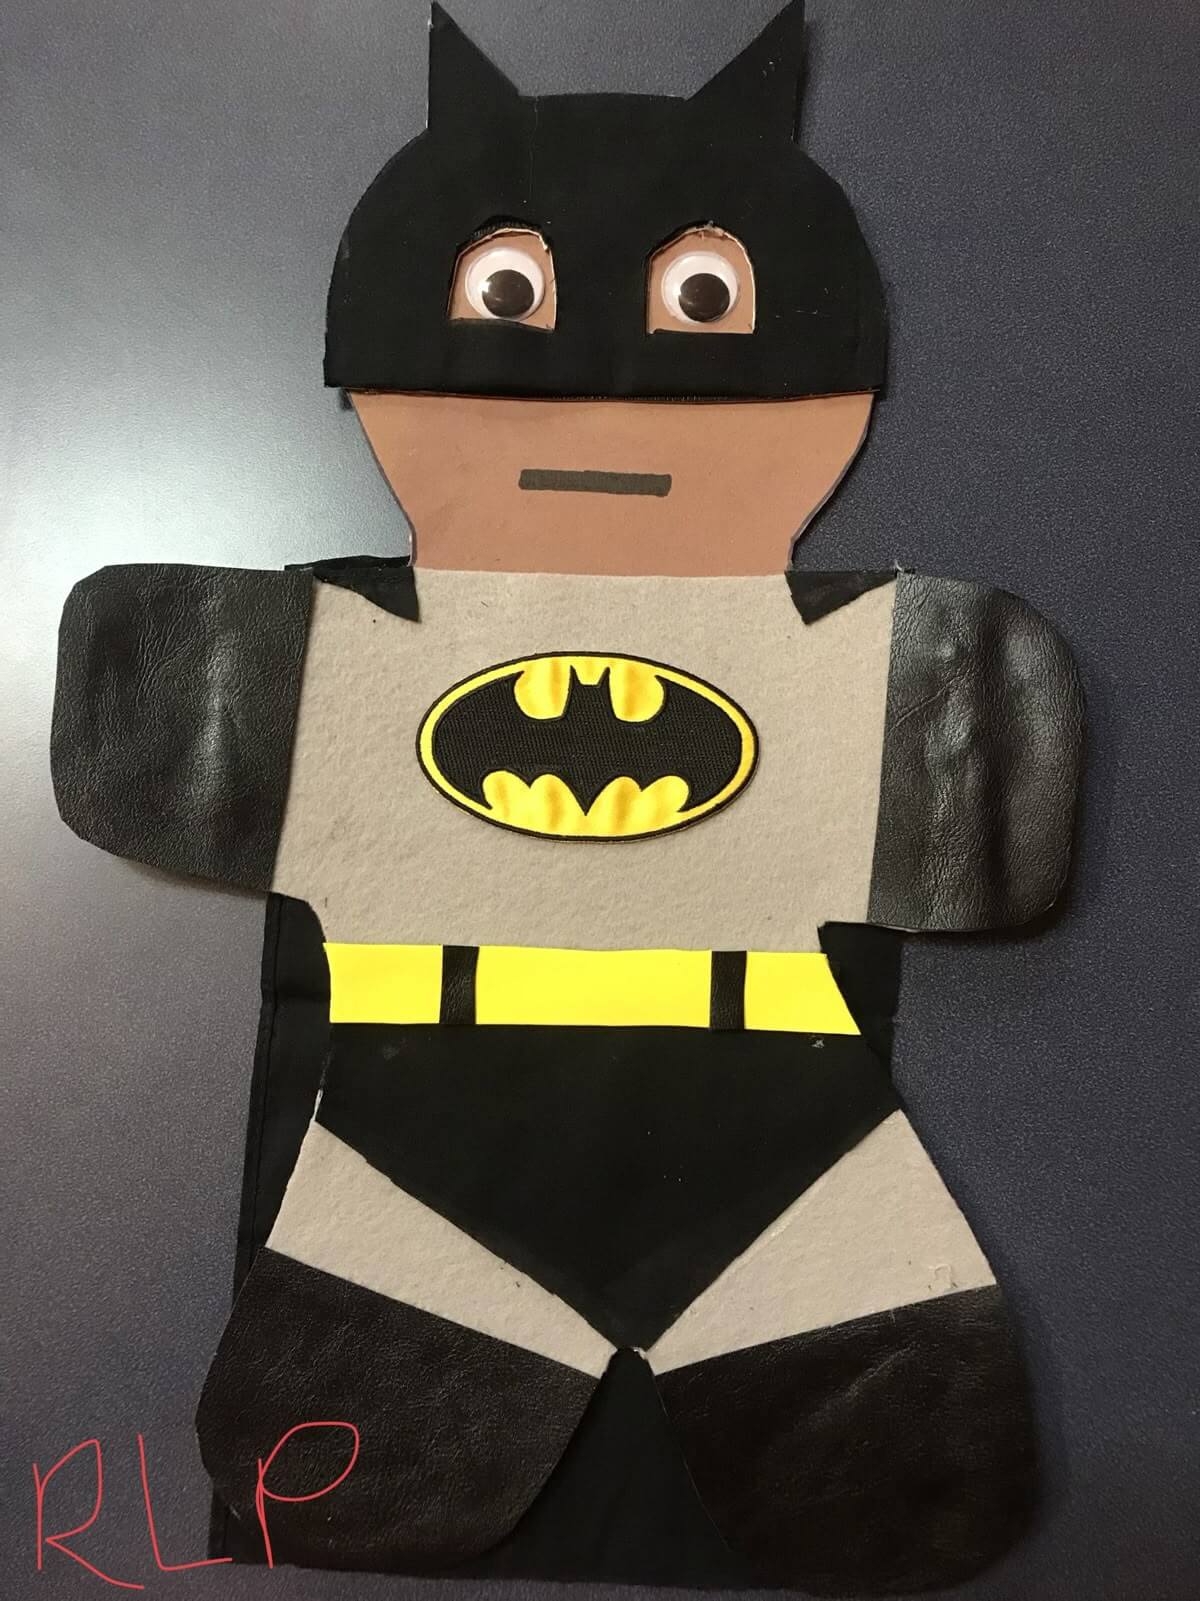
A gingerbread man disguise is a December school project where kids dress up a paper gingerbread man so the fox (or anyone else) won’t recognize him and eat him. Most families start with a printed template on cardstock, then cover it in felt, craft foam, cotton, or fur to turn him into a snowman, a reindeer, a superhero, or a favorite character. Plan on 45 to 90 minutes plus drying time, and use tacky glue rather than a glue stick for anything heavier than paper.
The note came home in a folder on a Monday. One paper gingerbread man, a short letter about the story they’d read in class, and a request: help your child disguise him so he doesn’t get eaten. Due Friday.
We did what everyone does. We waited until Wednesday, then stood in the craft aisle at 6pm arguing about whether a shark counts as a disguise.
These gingerbread in disguise ideas are the ones that actually work on a school night: 18 projects with the real supply list, the steps, and the part that goes wrong the first time. Everything here starts with the same flat template your kid brought home.
Christmas falls on a Friday in 2026, so most classes send this project out in the first two weeks of December and want it back before break. Pick your disguise early and you get a calm evening instead of a frantic one.
What The Gingerbread Man Disguise Project Actually Is
Your kid’s class reads a version of the gingerbread man story, usually The Gingerbread Man Loose in the School by Laura Murray or Gingerbread Baby by Jan Brett. Then everyone goes home with a blank gingerbread man and one job: disguise him.
That’s the whole assignment. Figure out how to disguise a gingerbread man well enough that the fox walks right past him.
Teachers usually ask for it back before winter break, and the finished ones go up on a hallway wall or get presented to the class. The gingerbread in disguise ideas that land best leave something recognizable showing, usually the hands or the feet, so you can still tell who’s hiding under there.
Most schools call this a family project. In practice that means your kid picks the disguise and does what they can, and you handle the scissors work, the hot glue, and the reminder that the glue needs to dry before it goes in a backpack.
How To Print And Prep A Gingerbread Man Disguise
If the school sent one paper template, do this before anyone opens a marker.
- Trace the template onto cardstock or a cereal box and cut a second one. Plain printer paper curls the second wet glue touches it, and it tears off a classroom staple.
- Write your kid’s name on the back now. Once the back is covered in tape and glue tabs, there’s nowhere to put it.
- Lay out the decorations on top of the template before gluing anything. Half the good ideas come from moving pieces around.
- Glue the big background layer first (the suit, the fur, the body color), then the face, then the small details last.
- Let it dry flat for at least an hour. Tacky glue looks dry on top long before it lets go of a felt edge.
- Press the whole thing under a couple of books overnight if the cardstock has started to curl.
Tip: Take a photo of the finished project before it leaves the house. These come home crushed, if they come home at all.
Supplies And Cheap Swaps
Nearly every gingerbread disguise here is built from the same small pile of materials. Buy almost nothing and you’ll still be fine.
| What you need | What I use | Free or low cost swap |
|---|---|---|
| Base | Cardstock or cereal box cardboard | The school’s template glued to a cereal box |
| Felt | Craft store felt sheets | Old fleece, socks, or a worn out shirt |
| Craft foam | Darice or Creatology foam sheets | Construction paper, doubled up |
| Glitter | Adhesive glitter foam sheets | Glitter glue, dried overnight |
| Fur and fluff | Faux fur scraps, marabou trim | Cotton balls, quilt batting, yarn |
| Glue | Aleene’s Original Tacky Glue | Elmer’s white glue plus clothespin clamps |
| Hot glue | Low temp glue gun (adult use) | Tacky glue and patience |
| Eyes | Googly eyes, mixed sizes | White paper circles with a marker dot |
| Small details | Pom poms, jingle bells, buttons, gems | Buttons off old clothes, hole punch dots |
Practical note: Adhesive backed glitter foam is the single best upgrade for these projects. It photographs like loose glitter, it holds a cut edge, and it doesn’t end up in your carpet until March.
Which Gingerbread Man Disguise Fits Your Kid’s Age?
Match the project to your kid’s hands, not just their favorite character.
Ages 4 to 6 (PreK and Kindergarten)
Big single color shapes, precut pieces, glue sticks and tacky glue. The disguise a gingerbread man ideas that work at this age are the ones where you cut and they place and press. Twenty to thirty minutes is a full session.
Good picks: snowman, teddy bear, penguin, Santa.
Ages 6 to 8 (1st and 2nd Grade)
They can cut simple shapes and add their own face details. Let them handle placement while you manage anything small or curved.
Good picks: reindeer, Batman, Pete the Cat, princess, Grinch.
Ages 8 to 10 (3rd Grade and Up)
Layering, fur, fabric, drawn details, and jokes on signs. Your job shifts to the glue gun and keeping the timeline honest.
Good picks: Football player, Goku, the standing Grinch, the glitter reindeer with light strand antlers.
Adapting up or down: For younger kids, precut everything the night before and sort it into a muffin tin. For older kids, hand over the template and let them sketch the disguise on scrap paper first. That sketch is where the best versions come from.
Mess, Safety, And What Survives A Backpack
Every gingerbread disguise here is fine for kids as long as you stay on top of three things: the glue gun, the small parts, and anything edible.
- Glue guns: low temp only, adult run for younger kids. High temp glue melts thin craft foam into a dent, which you cannot undo.
- Small parts: jingle bells, gems, googly eyes, and pom poms are choking hazards for babies and toddlers. Work at a table little siblings can’t reach.
- Fur and feathers: faux fur and marabou shed everywhere. Cut them inside a paper grocery bag and cut only through the backing from the wrong side, never straight across the pile.
- Real candy: plenty of schools have allergy rules that cover food on projects. Ask before you glue a candy cane to anything, and use a paper one if you’re unsure. Food also attracts pests on a classroom wall.
- Mess level: paper and foam are low. Cotton, fur, and feathers are medium. Glitter glue and loose glitter are high, so put down a plastic tablecloth.
- Backpack test: anything standing more than an inch off the surface will snap off. Tape those pieces on last, or send them in a separate bag with tape.
18 Gingerbread Man Disguise Ideas
Here’s every idea side by side so you can match one to the kid, the supplies, and the evening you actually have. These gingerbread in disguise ideas run from twenty minute paper projects to a standing centerpiece.
| Disguise | Best ages | Time | Difficulty | Mess | Main material |
|---|---|---|---|---|---|
| 1. Melted Into a Snowman | 4 and up | 30 to 45 min | Easy | Medium | Cotton batting |
| 2. Caped Crusader in a Bat Mask | 6 and up | 45 to 60 min | Medium | Low | Craft foam |
| 3. Reindeer Landing on a Glitter Snowflake | 5 and up | 45 min | Easy | Low | Craft foam, glitter |
| 4. Penguin With a Candy Cane | 4 and up | 30 to 45 min | Easy | Low | Craft foam |
| 5. Hometown Baseball Player | 7 and up | 60 min | Medium | Low | Felt, marker |
| 6. Red Ranger in a Helmet and Gloves | 6 and up | 60 min | Medium | Low | Felt, pom poms |
| 7. Sparkly Princess With a Tiara | 5 and up | 45 min | Easy | Medium | Glitter foam, gems |
| 8. Groovy Blue Cat | 5 and up | 30 min | Easy | Low | Crayons, pipe cleaners |
| 9. Classic Santa Claus | 4 and up | 45 to 60 min | Easy | Medium | Felt, cotton |
| 10. Cuddly Teddy Bear | 4 and up | 30 to 45 min | Easy | Low | Craft foam |
| 11. Grinch in a Santa Suit | 7 and up | 60 min | Medium | Medium | Faux fur, felt |
| 12. Football Star With a Laundry Bag | 8 and up | 60 to 90 min | Advanced | Low | Paper, colored pencil |
| 13. Furry Red Monster | 6 and up | 45 min | Medium | High | Faux fur |
| 14. Glitter Reindeer With Light Up Antlers | 8 and up | 60 to 90 min | Advanced | Medium | Glitter foam, gems |
| 15. Pizza Loving Ninja Turtle in a Santa Hat | 6 and up | 60 min | Medium | Low | Felt, craft foam |
| 16. Rescue Pup in a Pink Dress | 6 and up | 45 to 60 min | Medium | Low | Felt, tulle |
| 17. Anime Hero With Spiky Hair | 8 and up | 60 to 90 min | Advanced | Low | Felt, cardstock |
| 18. Standing Grinch Centerpiece | 8 and up | 90 min | Advanced | Medium | Felt, marabou |
The 18 Disguises
Every one of the disguise a gingerbread man ideas below lists the main material, the full supply list with swaps, and the steps. Read the time and mess line first, since that’s usually what decides it on a Wednesday night.
1. Melted Into a Snowman
Best for: ages 4 and up · Time: 30 to 45 minutes · Mess: medium (cotton fluff)
The easiest full cover disguise on the list, and the one small kids can do almost alone. The whole body disappears under cotton, which is exactly the point.
Material: Cotton quilt batting or pulled apart cotton balls over the whole template, with felt and paper for the hat, scarf, and face.
What You Need: Cotton batting (swap: cotton balls or white tissue), black card or felt for the top hat, red plaid ribbon for the scarf (swap: a strip of old fabric), orange paper for the carrot nose, brown or black buttons for the face and coat (swap: paper circles), tacky glue, gold ribbon trim for the hat band.
How to Make It:
- Spread tacky glue over one section of the body at a time and press cotton on. Working in sections stops the glue drying ahead of you.
- Pull each piece of cotton apart before you lay it down. Fluffed cotton reads as snow. Tight balls read as cotton balls.
- Cut a top hat that overlaps the top of the head and glue a thin ribbon band across it.
- Cross two lengths of plaid ribbon over the chest and glue the ends behind the arms.
- Add the button eyes, the carrot nose, and a curved row of small buttons for the smile.
- Press small buttons down the middle of the body for the coat.
Tip: Leave the outline of the gingerbread man’s hands and feet just visible under the cotton. Teachers notice when you can still tell what’s underneath.
Trade off: Cotton sheds while you work and the edges fuzz up. Trim the outline with scissors once it’s dry and it looks deliberate.
2. Caped Crusader in a Bat Mask
Best for: ages 6 and up · Time: 45 to 60 minutes · Mess: low
Craft foam is what makes this one look sharp. It cuts clean, it doesn’t curl, and the black against the gray gives you real contrast.
Material: Black and gray craft foam for the cowl, suit, and cape, with a yellow foam belt and chest emblem.
What You Need: Black craft foam (swap: black construction paper, doubled), gray or pale foam for the chest and legs, yellow foam scraps for the belt and emblem, googly eyes, tacky glue, small scissors, a pencil for tracing.
How to Make It:
- Trace the head onto black foam and cut a cowl with two pointed ears, leaving an open oval for the face.
- Cut a gray chest panel and glue it over the middle of the body.
- Cut black shorts, boots, and gloves, then glue them over the hands and feet.
- Cut a yellow belt strip and glue it across the waist, overlapping the black and gray by a few millimeters so there’s no gap.
- Cut a yellow oval and a black bat shape for the chest. Trace a printed bat symbol if freehand isn’t working.
- Glue the googly eyes into the cowl openings and draw a straight mouth line.
Tip: Cut the cowl opening slightly smaller than you think. Foam doesn’t fray, so a snug opening frames the face and hides the cut edge of the template.
Trade off: Hot glue melts thin foam. Tacky glue and ten minutes under a book is the safer choice here.
3. Reindeer Landing on a Glitter Snowflake
Best for: ages 5 and up · Time: about 45 minutes · Mess: low
The snowflake backing turns a flat project into something you can hang, which is why this one usually ends up on a door rather than in a folder.
Material: A large glitter foam snowflake as the backing, with brown foam antlers and hooves for the reindeer.
What You Need: White glitter foam or glitter cardstock cut as a snowflake (swap: white cardboard brushed with glue and white glitter), brown and tan foam or paper, black glitter foam for the hooves, large googly eyes, a red pom pom for the nose, small jingle bells and green gems on a cord for the collar, twine for hanging, tacky glue.
How to Make It:
- Cut the snowflake at least two inches wider than the gingerbread man on every side, or it disappears behind him.
- Glue the body to the center of the snowflake.
- Cut two antlers and glue them behind the head so only the branches show.
- Add a tan oval belly, tan inner ears, and black hooves on the arms and legs.
- Glue on the googly eyes and the red pom pom nose, then draw a smile under it.
- String jingle bells and gems onto a cord and glue it across the neck as a collar.
- Tape a loop of twine to the back for hanging.
Tip: Put the pom pom nose on last and press it for a slow count of thirty. Pom poms are the piece most likely to fall off in a backpack.
Trade off: The jingle bells add weight. Glue the collar cord at three points, not one.
4. Penguin With a Candy Cane
Best for: ages 4 and up · Time: 30 to 45 minutes · Mess: low
Two shapes, two colors, done. The penguin body covers the template almost completely, so it’s a good pick when you’re short on time.
Material: Black and white craft foam for the body and belly, with orange foam for the beak, feet, and wings.
What You Need: Black foam or card (swap: black construction paper), white foam for the belly, orange foam for the beak and feet, googly eyes with lashes (swap: plain googly eyes and drawn lashes), a red hair bow (swap: a folded ribbon), a real or paper candy cane, clear tape, tacky glue.
How to Make It:
- Cut a large black oval that covers the head and body, then glue it down.
- Cut a white oval slightly smaller for the face and a tall white oval for the belly.
- Glue orange mitten shapes over the hands and orange feet over the bottom.
- Add a small orange triangle beak and the googly eyes.
- Glue the bow to the top of the head, off to one side.
- Tape the candy cane to the back of one hand at two points, top and bottom.
Tip: Check your school’s food rules before you attach a real candy cane. A paper one cut from white card with red marker stripes looks nearly the same in a photo.
Trade off: One piece of tape on a candy cane always peels. Two pieces, one near the hook and one near the tip, holds.
5. Hometown Baseball Player
Best for: ages 7 and up · Time: about 60 minutes · Mess: low
Pinstripes are the trick here. A few thin red lines turn a plain white shirt into a real uniform, and it takes about four minutes.
Material: White felt or cardstock for the uniform, with a felt cap and drawn team details.
What You Need: White felt or white cardstock, navy felt for the cap and socks, red fine tip marker (swap: red colored pencil), black marker for the belt, tan paper for the face and arms, red team letters printed or drawn, tacky glue, ruler.
How to Make It:
- Cut a jersey and pants from white felt and glue them over the body, leaving the tan arms and face showing.
- Rule thin red pinstripes down the jersey and pants with a marker and a ruler.
- Cut a navy cap that curves over the top of the head, plus a small brim, and glue on the team logo.
- Draw a black belt across the waist with small square belt loops.
- Cut navy socks and shoes for the bottom of each leg.
- Add the team name across the chest with a red marker, then draw the eyes and a red smile.
Tip: Draw the pinstripes before you glue the jersey down. Felt shifts under a ruler once it’s attached.
Trade off: Marker bleeds and spreads on felt. Test one line on a scrap first, or use cardstock for the jersey and felt only for the cap.
6. Red Ranger in a Helmet and Gloves
Best for: ages 6 and up · Time: about 60 minutes · Mess: low to medium (glitter on the sword)
All felt, almost no cutting skill required, and the helmet does the work. The visor is one black shape with a white stripe across it, and that single stripe is what makes people say “Power Ranger” instead of “red blob”.
Material: Red felt over the whole body, with white felt for the visor stripe, collar, gloves, and boots, plus pom poms for the belt and trim.
What You Need: Red felt (swap: red construction paper), black felt for the visor (swap: black paper), white felt for the collar, gloves, boots, and helmet stripe (swap: white card), small white and red pom poms, gold glitter glue for the buckle, a yellow button or bead for the buckle center, cardboard strip and kitchen foil for the sword, black and gold glitter card for the handle, small green felt holly leaves, tacky glue, clear tape.
How to Make It:
- Trace the whole template onto red felt, cut it out, and glue it down. Every other piece sits on top of this one.
- Cut a wide black visor that covers the middle of the head, then glue a narrow white stripe across it and a small white rectangle underneath as the mouth plate. Two black dots at the top of the helmet finish the shape.
- Cut two white diamonds and glue them as a V collar across the chest, meeting in the middle.
- Cut white gloves that wrap the end of each arm, add a red cuff band across each one, and glue three small red pom poms in a row on the cuffs.
- Cut white boots for the feet with a red band across the top, then glue three white pom poms along each band.
- Draw a light pencil line across the waist and glue white pom poms along it for the belt. Add a gold glitter buckle in the middle with a yellow button pressed into it while the glitter glue is still wet.
- For the sword, cut a blade from cardboard, wrap it in foil, and fold the foil over at the tip rather than pressing it flat. Add a black and gold glitter handle, a red felt guard, and a few pom poms and holly leaves at the base.
- Tape the sword behind one hand, or leave it loose beside the figure for the photo.
Tip: Glue the pom pom belt while the project is lying flat and press each pom pom for a slow count of five. Pom poms roll off a tilted page before tacky glue grabs, and a crooked belt is the first thing your eye lands on.
Trade off: plenty of schools have a no weapons rule that covers a cardboard sword. Ask before it goes in the backpack, and if the answer is no, swap the sword for a foil wrapped candy cane or a shield cut from the same cardboard.
7. Sparkly Princess With a Tiara
Best for: ages 5 and up · Time: about 45 minutes · Mess: medium (glitter)
One of the simplest builds here, because the dress does everything. A rhinestone tiara glued to the head does the rest.
Material: Glitter foam or glitter cardstock for the dress, with adhesive pearls and a craft store tiara.
What You Need: Pale pink or champagne glitter foam (swap: pink card brushed with glitter glue and dried overnight), a small craft tiara or a tiara cut from silver glitter card, adhesive pearls, a gem trim strip for the waist, glitter tape or foam for the shoes, brown marker for hair, googly eyes, tacky glue.
How to Make It:
- Color or cut hair that frames the face and glue it along the sides of the head.
- Cut a bodice and a wide skirt from glitter foam. Cutting them as two pieces makes the waist look real.
- Glue the skirt first, then the bodice overlapping it, then a gem strip across the join.
- Run a line of adhesive pearls down one arm as a sleeve detail and a curve of pearls along the neckline.
- Glue the tiara to the top of the head, pressing for a full minute since it’s heavier than it looks.
- Add glitter strips across the feet for shoes, then the googly eyes and a drawn smile.
Tip: Cut glitter foam with the glitter side up and the scissors moving slowly. Rushing it leaves a chewed edge that no amount of glue hides.
Trade off: A plastic tiara is the heaviest thing on this list. Add a strip of tape across the back of the head as insurance.
8. Groovy Blue Cat
Best for: ages 5 and up · Time: about 30 minutes · Mess: low
The cheapest project here, and honestly one of the most charming. It’s crayon, paper ears, and four buttons, and it takes half an hour.
Material: Crayon coloring straight onto the template, with paper ears and pipe cleaner whiskers.
What You Need: Blue crayons (swap: blue marker, though crayon has better texture), light blue paper for the ears and nose, four mismatched buttons, three black pipe cleaners, a blue pipe cleaner for the tail, tan paper for the eyes, tape, tacky glue.
How to Make It:
- Color the whole body blue with the side of an unwrapped crayon. The side gives even coverage. The tip gives streaks.
- Cut two triangle ears and glue them behind the top of the head, with smaller inner triangles on top.
- Cut two half circle eyes from tan paper and draw heavy lids over them.
- Cut six short pipe cleaner pieces for whiskers. Glue them flat across the cheeks and tape the ends down on the back.
- Glue four different colored buttons down the middle of the chest.
- Bend the blue pipe cleaner into a curved tail and tape it to the back at hip level.
Tip: Have your kid press hard with the crayon around the outline and lighter in the middle. It gives the body a bit of shape without any blending skill.
Trade off: Crayon leaves a waxy surface that glue slides off. Glue the buttons and whiskers onto uncolored spots, or scratch the wax off with a fingernail first.
9. Classic Santa Claus
Best for: ages 4 and up · Time: 45 to 60 minutes · Mess: medium
There’s a reason half the class turns up with this one. It’s quick, it’s obvious, and cotton trim hides every wobbly cut underneath.
Material: Red felt for the suit and hat, cotton or fur trim for the edges, plus a black belt with a gold buckle.
What You Need: Red felt (swap: red construction paper), white cotton batting or chenille trim (swap: cotton balls stretched into strips), black felt or ribbon for the belt, gold card for the buckle, red mittens cut from felt, black boots, googly eyes, a small pom pom for the hat, tacky glue.
How to Make It:
- Cut a red jacket and trousers and glue them over the body, leaving the face clear.
- Cut a red hat that sits over the top of the head and flops to one side.
- Glue white trim along the hat brim, the jacket hem, the cuffs, and down the jacket opening.
- Add a black belt across the middle with a gold square buckle.
- Build the beard from two or three overlapping cotton strips, widest at the bottom, and leave the mouth area clear.
- Glue on red mittens, black boots, googly eyes, and a small white pom pom at the hat tip.
Tip: Build the beard in layers rather than one solid blob. Two overlapping strips look like a beard. One thick pad looks like a cloud.
Trade off: white trim gets grubby fast on a classroom wall. Cotton batting stays cleaner than loose cotton balls because there’s less surface sticking out.
10. Cuddly Teddy Bear
Best for: ages 4 and up · Time: 30 to 45 minutes · Mess: low
A soft, easy disguise with no small parts and very little that can go wrong. The bow tie is what lifts it above a plain brown shape.
Material: Brown craft foam for the body and ears, with a cream belly panel and paw pads.
What You Need: Brown craft foam or felt (swap: a brown paper grocery bag), cream or tan foam for the belly, muzzle, and inner ears, pink foam circles for the cheeks, black foam for the paw pads, a red bow tie cut from foam, googly eyes, black marker, tacky glue.
How to Make It:
- Cut the body from brown foam using the template as a guide and glue it down.
- Cut two round ears and glue them behind the head, with smaller tan circles on top.
- Glue a large cream oval on the belly and a smaller rounded muzzle on the face.
- Add the googly eyes above the muzzle, a black triangle nose, and a curved mouth.
- Glue pink circles on the cheeks and a red bow tie under the chin.
- Cut black ovals for the paw pads with four small toe circles on each foot.
Tip: Cut the toe circles with a hole punch. Freehand circles that small come out as blobs, and there are eight of them.
Trade off: Brown on brown can go flat. Use two different browns for the body and belly, or the whole thing reads as one shape from across a hallway.
11. Grinch in a Santa Suit
Best for: ages 7 and up · Time: about 60 minutes · Mess: medium (fur shedding)
Green fur is what makes this work, and it’s the messiest ten minutes on this list. Worth it.
Material: Green faux fur for the body, with a red felt Santa suit and white chenille trim.
What You Need: Green faux fur scraps (swap: green marabou trim, or green yarn cut short and glued in rows), red felt for the suit, hat, and boots, white chenille stem trim or cotton for the edges, yellow and black marker for the eyes, low temp glue gun, sharp small scissors, a paper bag.
How to Make It:
- Cut the fur from the back side, slicing only through the fabric backing with the tips of your scissors. Never cut straight through the pile.
- Glue fur over the arms, legs, and the top of the head, leaving the face clear.
- Cut a red jacket, trousers, hat, and boots from felt and glue them over the body.
- Glue white trim along every red edge: the hat brim, the cuffs, the jacket hem, and the boot tops.
- Color the face green, then draw the narrow yellow eyes and the long curved smile. The eyes are what make him recognizable, so do them last and take your time.
- Brush the fur outward with your fingers so it doesn’t lie flat against the felt.
Tip: Cut the fur inside a paper grocery bag. You’ll still find green fibers for a week, but you’ll find fewer.
Trade off: Hot glue soaks into fur and can burn fingers through it. Press with the back of a spoon rather than your fingertip.
12. Football Star With a Laundry Bag
Best for: ages 8 and up · Time: 60 to 90 minutes · Mess: low
This one is almost entirely drawn, which makes it the best pick for a kid who’d rather illustrate than glue. The joke on the laundry bag is what everyone remembers.
Material: Paper and colored pencil, with cut paper layers for the helmet, jersey, and cleats.
What You Need: Red and white paper (swap: white paper colored in), colored pencils, black marker, a paper football shape, a white paper laundry sack, a fine pen for lettering, glue stick, tacky glue for the thicker layers.
How to Make It:
- Cut a red jersey and shorts from paper and glue them over the body.
- Draw the number large on the chest with a white or outlined marker, then add white stripes at the sleeves and collar.
- Cut a red helmet that overlaps the top of the head, then draw the face mask bars straight across in black marker.
- Add the team name in small letters across the helmet.
- Cut a brown football with white laces and glue it under one arm.
- Cut a sack shape from white paper, shade the folds with a pencil, and letter your joke on it. Glue it to the opposite hand.
- Finish with black cleats and a drawn beard or hair.
Tip: Draw the face mask bars with a ruler. Freehand bars bend, and the helmet stops reading as a helmet.
Trade off: it’s the longest build here and it’s mostly detail work. Split it over two evenings so nobody rushes the lettering.
13. Furry Red Monster
Best for: ages 6 and up · Time: about 45 minutes · Mess: high (fur everywhere)
Full body fur, one big pair of eyes, an orange nose. It reads instantly from across a hallway, which is half the battle with these projects.
Material: Red faux fur or red pom pom fluff covering the entire template, with oversized googly eyes.
What You Need: Red faux fur (swap: red yarn cut into short pieces, or red feather boa), two extra large googly eyes, an orange pom pom for the nose, black felt or paper for the mouth, tacky glue or a low temp glue gun, a paper bag, a piece of card for a sign.
How to Make It:
- Cut the fur into palm sized pieces from the back, then glue them across the whole body with the pile all facing the same direction.
- Work from the bottom up so each row overlaps the one below, the way roof tiles do. This is what stops bald patches showing.
- Cut an open mouth shape from black felt and glue it in place, pressing the fur back around it.
- Glue the two big googly eyes just above the mouth, close together.
- Press the orange pom pom nose between the eyes.
- Write a line like “You can’t catch me” on a card and mount the whole thing on it.
Tip: Glue the eyes and nose directly onto the cardstock, not onto the fur. Anything glued on top of fur pulls away with the pile.
Trade off: This is the messiest project here and the hardest to keep neat. Trim around the outside edge with scissors once it’s dry to sharpen the shape.
14. Glitter Reindeer With Light Up Antlers
Best for: ages 8 and up · Time: 60 to 90 minutes · Mess: medium
The most detailed version of the reindeer, and the one that gets photographed. A string of paper Christmas lights draped across the antlers does the heavy lifting.
Material: Gold glitter foam for the body, with paper antlers, gem lights, and a red glitter nose.
What You Need: Gold adhesive glitter foam (swap: gold glitter cardstock), brown cardstock for the antlers, black glitter foam for the hooves, large flat backed gems in assorted colors, black thread or thin cord, green paper holly leaves, a red berry cluster, red glitter foam for the nose, large googly eyes, tacky glue.
How to Make It:
- Trace the template onto the gold glitter foam, cut it out, and stick it down.
- Cut two antlers from brown cardstock and glue them behind the head.
- Glue black hooves on the arms and legs and a lighter glitter oval on the belly.
- Cut a wide muzzle and glue it low on the face, then add the red glitter nose and the googly eyes above it.
- Lay the black cord in a loose swag across both antlers and glue it at four or five points.
- Glue a gem below the cord at each glue point so they look like bulbs hanging off a light strand.
- Add holly leaves and berries at the base of one antler.
Tip: Glue the cord down first and the gems second. Trying to place both at once gives you a droopy cord and gems in the wrong spots.
Trade off: Flat backed gems are heavy and they pop off under a fingernail. Use tacky glue rather than a glue stick and let it cure overnight before anyone handles it.
15. Pizza Loving Ninja Turtle in a Santa Hat
Best for: ages 6 and up · Time: about 60 minutes · Mess: low
Green felt, an orange mask, and a Santa hat perched on the side of the head. The mask tails and the pizza are what make it read as a turtle rather than a green gingerbread man, and neither one takes skill, just a bit of patience with small pieces.
Material: Green felt over the whole body, with a tan felt shell panel, orange felt mask and straps, and small felt props for the pizza and nunchucks.
What You Need: Green felt (swap: green construction paper), tan and brown felt for the shell, belt, and nunchuck handles, orange felt for the mask, shoulder straps, and wrist and leg bands, white and black felt for the eyes (swap: googly eyes), a small red felt tongue, red felt and white trim for the Santa hat with a white pom pom, yellow and tan felt plus red dots for the pizza, white glitter foam for the nunchuck chain, red and white striped ribbon for the bow, tacky glue.
How to Make It:
- Trace the template onto green felt, cut it out, and glue it down. This is the layer everything else sits on.
- Cut a tan shell panel shaped like a wide oval and glue it over the belly, then add a brown belt strip across the middle with an initial in the center.
- Cut the mask as one long orange strip. Glue only the part that crosses the face and leave the two tails loose so they lift off the page.
- Glue white felt circles over the mask openings with black dots on top, then a curved black smile and a small red tongue underneath.
- Cut a red Santa hat with a white trim band and glue it on at an angle, tipped toward one side, with a white pom pom at the tip.
- Add orange straps over both shoulders and orange bands at the wrists and just above the feet.
- Tie a small bow from striped ribbon and glue it at the neck by the knot only, so the loops stay open.
- For the pizza, layer a yellow circle on a slightly larger tan circle and dot it with small red pepperoni circles. Glue it to one hand.
- For the nunchucks, cut two brown handles and a chain from white glitter foam, then glue the whole thing behind the raised hand.
Tip: Cut the initial on the belt and the nunchuck chain from craft foam rather than felt. Felt stretches and frays on anything that small, and foam holds a clean edge at half an inch.
Trade off: The nunchucks read as a weapon to some schools. Ask first, and if the answer is no, a second pizza slice or a small wrapped gift fills that hand just as well.
16. Rescue Pup in a Pink Dress
Best for: ages 6 and up · Time: 45 to 60 minutes · Mess: low
A favorite with kids who want a character rather than an animal or a person. The goggles pushed up on the forehead are the detail that makes people recognize it.
Material: Pink felt and tulle for the dress, with tan paper ears and a felt goggle headband.
What You Need: Pink felt for the dress (swap: pink paper), a strip of pink tulle or organza for the skirt overlay (swap: tissue paper), tan paper or felt for the ears and face, darker pink felt for the goggle band, two circles of clear plastic or silver card for the lenses, a small character badge or a drawn tag, googly eyes, tacky glue.
How to Make It:
- Cut two long floppy ears from tan paper and glue them behind the head so they hang past the cheeks.
- Cut a pink dress with short sleeves and glue it over the body.
- Gather a strip of tulle and glue it along the bottom of the dress as a skirt.
- Cut a headband strip in darker pink and glue it across the forehead.
- Glue two circles on the band as goggle lenses, then the googly eyes just below.
- Add a pale collar with a small badge or tag, then a pink tongue under the nose.
Tip: Glue the goggle band across the top of the ears, not under them. On the ears it sits like pushed up goggles. Under them it looks like a headache.
Trade off: Tulle doesn’t take glue well and hot glue melts straight through the mesh. Use tacky glue along a folded top edge and hold it with clothespins.
17. Anime Hero With Spiky Hair
Best for: ages 8 and up · Time: 60 to 90 minutes · Mess: low
The hardest build here, and the one an older kid will actually care about. It’s all in the hair silhouette.
Material: Felt for the gi and background, with cardstock for the spiked hair and face.
What You Need: Orange and blue felt (swap: construction paper), tan cardstock for the face and arms, yellow cardstock for the hair, a yellow felt rectangle for the backing, dark marker for the face, orange card for a four star ball detail, tacky glue, small sharp scissors.
How to Make It:
- Sketch the hair on the yellow cardstock first, then cut the spikes. Long, uneven spikes look right. Short even ones look like a haircut.
- Glue the hair behind the head so it fans out past the shoulders.
- Cut a tan face and glue it over the head, then draw the eyes, brows, and mouth in marker.
- Cut an orange gi top with a wrapped front and a blue undershirt panel. Glue the blue first, the orange over it.
- Add a blue belt across the waist, blue wristbands, and blue boots.
- Cut a small orange circle with red stars and glue it at one wrist.
- Mount the whole figure on a yellow felt rectangle so the hair reads against a flat background.
Tip: Cut the hair as one piece, not as separate spikes. Individual spikes never line up and you’ll be gluing them for an hour.
Trade off: The face is small and the marker is permanent. Draw it on a spare tan circle first, twice, then use the better one.
18. Standing Grinch Centerpiece
Best for: ages 8 and up · Time: about 90 minutes · Mess: medium
The showpiece version. Instead of lying flat in a folder, this one stands up on a mantel with the rest of the Christmas decorations.
Material: Red felt suit with green marabou trim, mounted on a stiff backing so it stands.
What You Need: Red felt for the suit and hat, green marabou trim or feather boa for the arms and legs, white chenille trim, a small gold or yellow buckle cut from card, cereal box cardboard, a toilet paper tube or small stand, green paint or paper for the face, black fine tip marker, low temp glue gun, tacky glue.
How to Make It:
- Glue the template onto cardboard and cut it out so the whole thing is rigid.
- Paint or cover the face and hands green and let it dry fully before anything else goes on.
- Cut a red jacket, trousers, oversized boots, and a Santa hat, then glue them on.
- Glue green marabou along the arms and legs so it fluffs out past the red felt.
- Add white trim to the hat brim, the cuffs, the jacket hem, and the boot tops, then a black belt with a gold buckle.
- Draw the eyes and the wide curved smile last, in fine tip black marker.
- Hot glue a toilet paper tube or a folded cardboard triangle to the back as a stand (adult job).
Tip: Make the boots wider than the template’s feet. Wide boots give it a base, and the whole thing stops tipping forward.
Trade off: Marabou sheds constantly and gets into the glue. Keep a damp paper towel next to you and wipe your fingers between steps.
Common Mistakes To Avoid
Most of the disguise a gingerbread man ideas above go wrong in the same few places, whichever character your kid picks.
- Working straight on the school’s thin paper. It curls under wet glue and tears off a staple. Trace onto cardstock first.
- Using a glue stick on felt, fur, or googly eyes. They all fall off in the backpack. Tacky glue for anything heavier than paper.
- Hot gluing craft foam. A high temp gun melts a dent into thin foam instantly. Low temp gun, or tacky glue.
- Cutting faux fur straight through the pile. You get a bald stripe and a table full of fibers. Cut the backing only, from the wrong side.
- Covering the gingerbread man completely. Leave the hands, feet, or outline visible. The joke is that he’s hiding, not that he’s gone.
- Building something taller than the folder. Antlers, tiaras, and candy canes snap off in transit. Tape them last or send them separately.
- Forgetting the name on the back. Every December a few brilliant projects end up on the wall with no owner.
FAQs
What is the gingerbread man disguise project?
It’s a December school assignment, usually for preschool through second grade, where kids dress up a paper gingerbread man so he won’t be recognized and eaten. Classes normally read a gingerbread man story first, then send the template home as a family project.
How do you disguise a gingerbread man for school?
Trace the template onto cardstock, pick a character, and cover the body with that character’s clothing, fur, or color while leaving the face or hands visible. Glue the biggest background pieces first, then the face, then small details, and let everything dry flat for at least an hour.
What are easy gingerbread man disguise ideas for kindergarten?
The snowman, teddy bear, penguin, and Santa are the easiest, because each one is a few large shapes plus a face. An adult can cut the pieces while the child places and presses them.
What materials do you need for a gingerbread disguise?
Cardstock, felt or craft foam, tacky glue, googly eyes, and markers cover almost every idea on this list. Cotton balls, buttons, ribbon scraps, and pom poms fill in the rest, and most of that is already in the house.
How long does a gingerbread man disguise take?
Most take 30 to 90 minutes of hands on time plus drying. Splitting it over two evenings, building one night and detailing the next, keeps it calm and gives the glue time to set.
Does the project have to be three dimensional?
No. Flat projects photograph well and survive a backpack better. If you want height, add it with one feature (antlers, a hat, a tiara) and tape it on last.
Read Next
If you still have felt scraps and googly eyes on the table, 19 Scandinavian Christmas Crafts in Wood, Felt, and Beads has more felt projects to carry you through December.
And if this is your second disguise project of the school year, Turkey in Disguise Project Ideas works exactly the same way, just with a different bird and a different holiday. It’s also where I’d look first for more disguise a gingerbread man ideas, since almost every turkey costume on that list translates straight across.
