
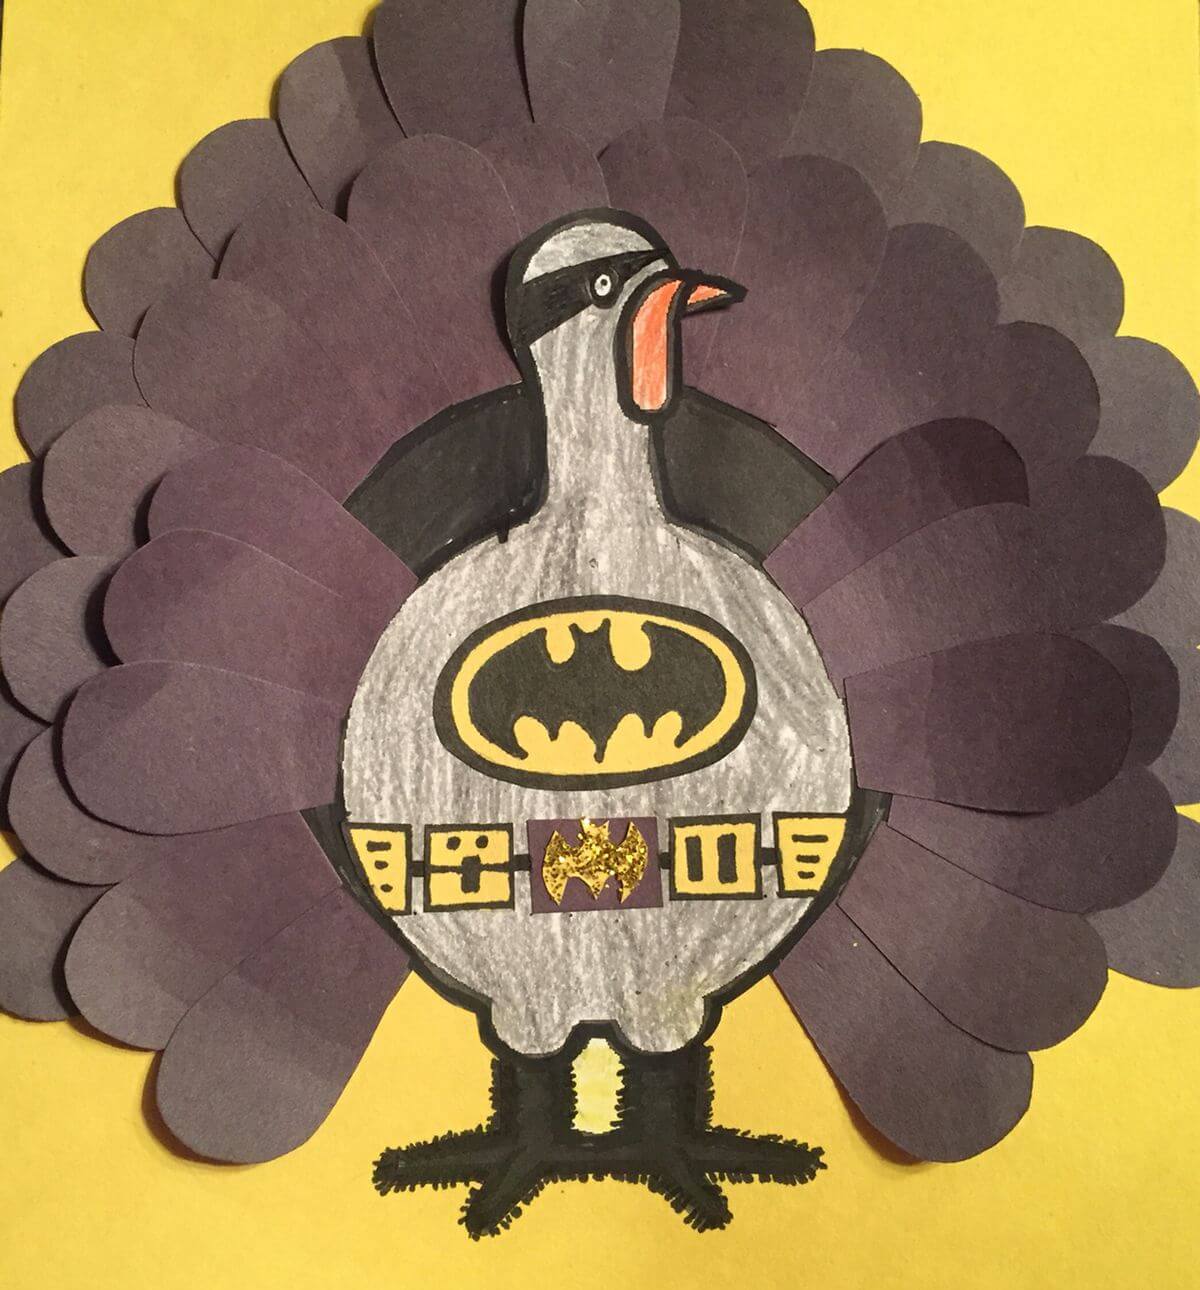
A turkey disguise project is a Thanksgiving school assignment where kids dress up a paper turkey as a person, character, or object so it won’t end up on the dinner table. The easiest ideas use a turkey template traced onto cardstock, construction paper, felt scraps, googly eyes, and tacky glue, and take 30 to 90 minutes. Popular choices for boys and girls include a mail carrier, police officer, Batman, Elsa, a Minion, Pikachu, a scarecrow, and a bucket of popcorn.
The folder came home on a Tuesday. Inside was one paper turkey, a half sheet of instructions, and two words circled in red: due Monday.
By Sunday night, our kitchen table was buried in felt scraps, a glue stick with no cap, and a first grader who had changed her mind three times. (Batman, then a mail carrier, then Batman again.)
If that sounds like your week, this list is for you. Each of these 16 turkey disguise project ideas for boys and girls comes with the main material, a supply list with cheap swaps, and steps you can follow with glue on your fingers.
I’ve also noted the age range, time, and mess level for every idea, so you can match the project to your kid and your evening.All of the disguise the turkey ideas below work on the same paper template, which means you can change your mind on Saturday without starting over.
Thanksgiving falls on Thursday, November 26 this year (2026), so most classes send the template home in early to mid November. Pick your idea now and you get a relaxed weekend instead of a frantic Sunday.
What Is a Turkey Disguise Project?
Most disguise a turkey ideas fall into three groups: a job (mail carrier, police officer), a character (Batman, Elsa, Pikachu), or a food (popcorn, pizza delivery). Pick the group first and the supply list almost writes itself.
The idea is simple. Your child gets a plain paper turkey and one mission: disguise it so nobody recognizes it as a turkey before Thanksgiving dinner.
Many teachers pair the project with the picture book Turkey Trouble by Wendi Silvano, where a turkey tries on disguise after disguise to avoid becoming the main course. The finished turkeys usually go up on a hallway bulletin board, and kids often present theirs to the class.
Most schools call it a family project. In real life, that means your kid picks the idea and does what they can, and a grown up handles the tricky cuts and the hot glue.
The disguises people remember aren’t always the fanciest ones. They’re the ones with a joke, like a mail carrier turkey whose envelopes are addressed to “Turkey Sanctuary,” or a pizza turkey holding a sign that says there’s no turkey here.
Which Turkey Disguise Fits Your Kid’s Age?
Pick by your kid’s hands, not only their interests. The turkey disguise ideas on this list run from 30 minute coloring projects to builds that need a weekend and a grown up, so a four year old who loves Harry Potter will still be happier with a simpler design they can mostly make on their own.
Ages 3 to 5 (PreK and Kindergarten)
You cut, they glue and press. The disguise a turkey ideas that work at this age use big pieces, glue sticks, stickers, and plenty of coloring.
Split the work into two sessions of 15 to 20 minutes, because attention runs out fast at this age.
Good picks: Paw Patrol, Snowman, the paper Peacock (#5), Minion.
Ages 5 to 7 (Kindergarten to 1st Grade)
Most kids this age can cut simple shapes and add their own drawn details. Let them handle the feathers while you take anything curved or tiny.
Good picks: Among Us, Batman, Scarecrow, Pikachu.
Ages 7 to 10 (2nd to 4th Grade)
Older kids can manage fabric, layering, and writing a pun for a sign. Your job shifts to the adult only tools and keeping the timeline on track.
Good picks: Postman, Police Officer, Harry Potter, Domino’s, Elsa, the sparkly Peacock (#15).
For younger kids, precut the pieces the night before and set them out in a muffin tin. For older kids, hand over the template and let them sketch the disguise on scrap paper first. At that age, the planning is half the fun.
Supplies for Any Turkey Disguise (Plus Cheap Swaps)
Almost all of these disguise turkey ideas start from the same basic kit. Here’s what to gather, where to find it, and what to use instead if you’d rather not buy it.
| Supply | Where to Get It | Free or Low Cost Swap |
|---|---|---|
| Turkey template | Sent home by school, or print one | Hand drawn turkey traced around your kid’s hand |
| Cardstock | Craft store, Walmart, Target | Cereal box cardboard |
| Construction paper | Dollar store, school supply aisle | Paper grocery bags, magazine pages, junk mail |
| Felt sheets | Craft store, dollar store | Old shirts, socks, fleece scraps |
| Tacky glue (Aleene’s Original) | Craft store | Elmer’s white school glue (slower to dry) |
| Glue stick | Anywhere | White glue brushed on thin |
| Googly eyes | Dollar store | White paper circles with marker pupils |
| Markers or crayons (Crayola) | Anywhere | Colored pencils you already own |
| Low temp glue gun | Craft store | Tacky glue plus clothespins to clamp |
| Pipe cleaners, pom poms, gems | Dollar store | Buttons from old clothes, hole punch dots |
Aleene’s Original Tacky Glue is the one glue I’d actually buy for this. It grabs felt, googly eyes, and even popcorn, and it dries clear. A glue stick is still fine for paper on paper.
Practical note: Trace the school’s template onto cardstock before you start. Printer paper wrinkles and curls the moment wet glue or felt touches it, and it tears when it gets stapled to a wall.
Safety and Mess Notes
These are kid crafts, so the risks are small. A few still deserve your attention.
- Glue guns: Use a low temp model and keep it an adult job for younger kids. Even low temp glue can blister a fingertip.
- Small parts: Googly eyes, rhinestones, pom poms, buttons, and popcorn are choking hazards for babies and toddlers. Work at a table little siblings can’t reach.
- Sharp bits: Wire from feather picks and cut pipe cleaner ends can scratch. Snip wire yourself with old scissors or wire cutters and fold the ends in.
- Glitter: Glitter cardstock and glitter glue keep the sparkle on the project. Loose glitter ends up on everything you own for a month.
- Mess level: Paper projects are low mess. Cotton balls, raffia, and paint are medium. Glitter glue, feather boas, and popcorn are high, so lay down a plastic tablecloth first.
Practical note: Do all the gluing on a rimmed baking sheet. Felt fuzz, raffia bits, and stray popcorn stay on the tray, and you can carry the whole project to a safe spot to dry overnight.
Turkey Disguise Project Ideas
Every one of the disguise the turkey ideas below lists the main material, the supplies with cheap swaps, and the steps. Read the time and mess line first, because that’s usually what decides it on a school night.
1. Postman Disguise
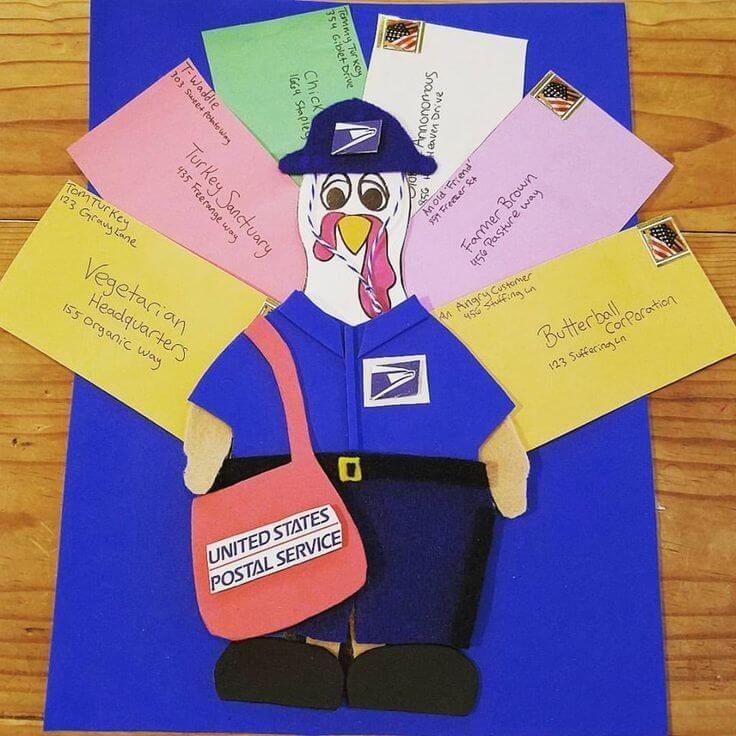
Best for: Ages 6 to 10 · Time: 60 to 90 minutes · Mess: Low
This one wins the joke round every year. The tail feathers are real envelopes, each addressed somewhere a turkey would rather be in November, like Turkey Sanctuary or Vegetarian Headquarters.
Material: Colored envelopes and construction paper do most of the work, with a small piece of felt for the cap. Older kids write the addresses, which quietly doubles as handwriting practice.
What You Need:
- Turkey template traced onto cardstock
- 6 to 8 small colored envelopes (swap: reply envelopes from junk mail, colored with markers)
- Blue, navy, black, red, and tan construction paper
- Blue felt scrap for the cap (swap: blue paper)
- Flag stamp stickers (swap: stamps cut from old mail)
- Small printed mail carrier logo (swap: draw one)
- Glue stick, tacky glue, fine tip marker
How to Make It:
- Write a silly address on each envelope before gluing anything. It’s much easier on a flat table.
- Fan the envelopes behind the turkey body and glue only the bottom inch of each, so they overlap like feathers.
- Cut a blue shirt with a pointed collar, navy shorts, and a black belt strip with a small yellow buckle. Glue them over the body.
- Cut a red shoulder bag and a thin paper strap. Glue the label onto the bag.
- Shape a small felt cap and glue it just above the eyes.
- Add black paper shoes over the feet and tan paper hands at the sleeves.
Tip: Put a stamp in the top right corner of every envelope. That tiny real life detail is what makes the adults laugh.
The writing takes longer than the cutting, so younger kids may need you to write while they dictate.
2. Among Us Disguise
Best for: Ages 5 to 9 · Time: 45 to 60 minutes · Mess: Low
If your kid plays Among Us, they already know the punchline: the turkey is not the impostor. A crewmate is basically a bean with a visor, which makes it one of the easiest character shapes to cut.
Material: Colored cardstock for the crewmate body, plus a light blue or silver piece for the visor. The feathers become a lineup of tiny crewmates.
What You Need:
- Red cardstock, or your kid’s favorite crewmate color
- Light blue cardstock for the visor (swap: kitchen foil glued onto a paper oval)
- Construction paper in 5 or 6 crewmate colors
- Black marker, glue stick
- Paper speech bubble reading “I’m not the impostor”
How to Make It:
- Draw a rounded bean shape slightly bigger than the turkey body and cut it from red cardstock.
- Cut a small rectangle backpack and glue it to one side of the bean.
- Cut an oval visor and glue it over the eyes, leaving the beak and wattle poking out underneath.
- Cut each feather into a mini crewmate in a different color and give each one a tiny visor.
- Outline everything with thick black marker. That bold outline is what makes it look like the game.
- Glue on the speech bubble last.
Tip: Foil on its own crinkles the second glue touches it. Glue it to a paper oval first, then trim.
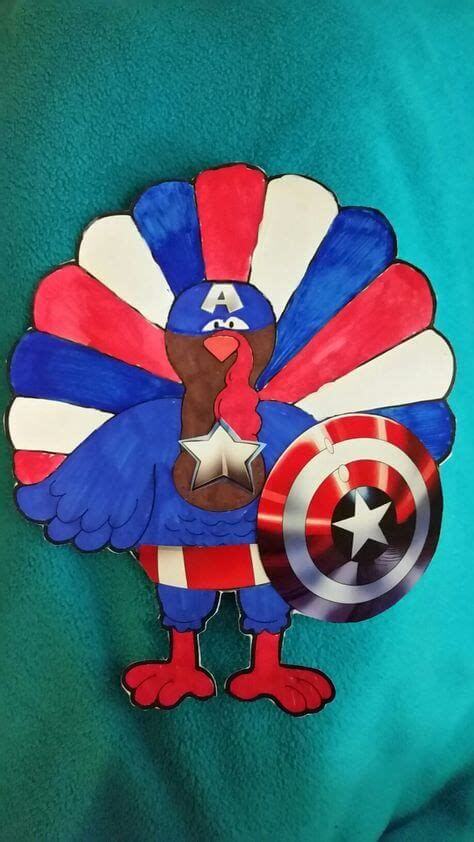
Want a superhero instead? The same striped feather layout in red, white, and blue, plus a round paper shield and a star on the chest, turns this into a Captain America turkey.
3. Disguise A Turkey Police Officer

Best for: Ages 7 to 10 · Time: 60 to 90 minutes · Mess: Medium (feathers shed)
This is the one that makes people stop at the bulletin board. A felt uniform, aviator sunglasses, and a fluffy blue tail give it real texture.
Material: Navy felt for the uniform and a marabou feather boa for the tail. Printed accessories like the badge, hat, and sunglasses keep the cutting manageable.
What You Need:
- Navy felt sheet (swap: an old navy shirt)
- Blue and black marabou feather boa, about 12 inches (swap: crumpled blue tissue paper)
- Printed police hat, sunglasses, and badge (swap: draw them on cardstock)
- Black duct tape or electrical tape for the belt and boots
- Yellow felt scraps for shoulder stripes and a buckle
- Small toy handcuffs (optional) and a twist tie
- Tacky glue, a name tag sticker
How to Make It:
- Trace the body onto felt, cut it out, and glue it on with tacky glue. Press it under a book for 10 minutes.
- Cut the boa into short pieces and glue them in clumps along the tail, with the darker color in the middle.
- Wrap black tape across the waist for a belt and over the feet for boots.
- Glue on the badge, yellow shoulder stripes, buckle, and a name tag with your kid’s last name.
- Add the hat and sunglasses over the eyes.
- Poke a twist tie through the felt at the belt, loop it around the handcuff chain, and twist it closed on the back.
Tip: Marabou sheds everywhere. Cut it inside a paper grocery bag and you’ll catch most of the fluff.
Some schools don’t allow any weapon imagery, even on paper. If you’re not sure, swap the holster and baton for a printed radio and flashlight.
4. Paw Patrol Disguise
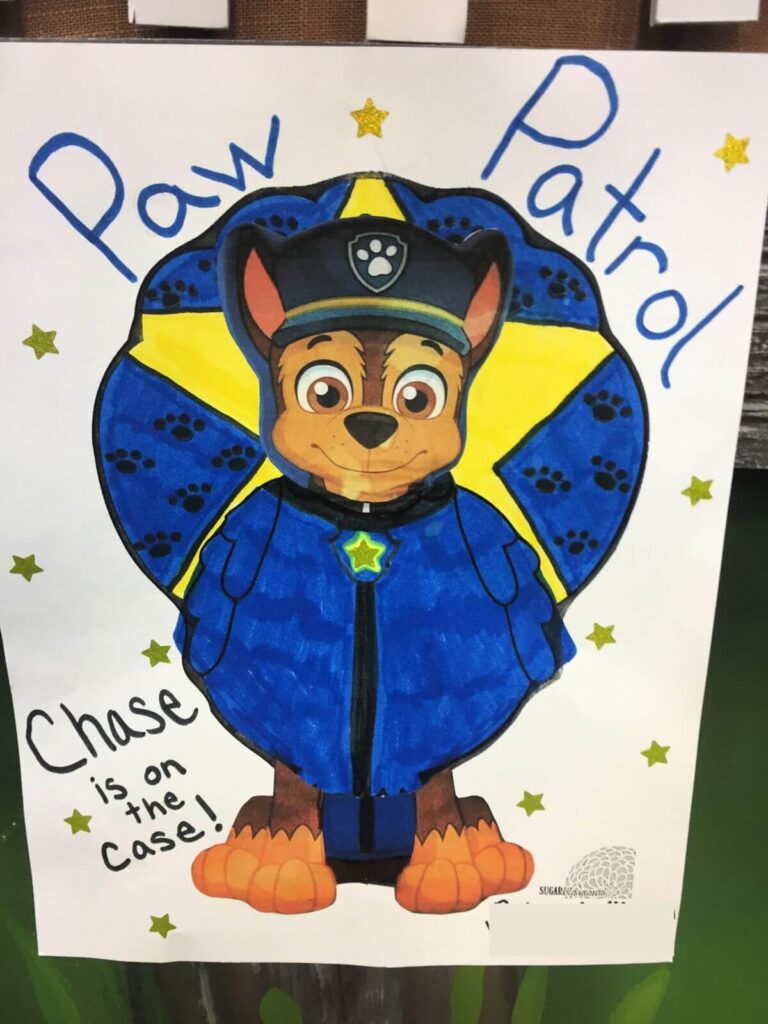
Best for: Ages 3 to 6 · Time: 30 to 45 minutes · Mess: Low
For preschool and kindergarten, this is my top pick. Kids already know the characters, and most of the work is coloring they can do on their own.
Material: A printed or hand drawn pup head (Chase, in the photo) over a colored paper turkey. Markers and glitter star stickers do the rest.
What You Need:
- Printed pup coloring page (swap: draw the face yourself)
- Blue and yellow markers (Crayola broad line markers cover big areas well)
- Black washable paint or an ink pad (swap: black marker dots)
- Glitter foam star stickers
- White cardstock backing, glue stick
How to Make It:
- Cut out the pup head and glue it over the turkey’s head.
- Color the body blue for the uniform and draw a zipper line down the middle.
- Color the feathers blue, with a big yellow star peeking out behind the body.
- Stamp paw prints on each feather: one fingertip dot for the pad and four pencil eraser dots for the toes.
- Stick stars around the page and write a line like “Chase is on the case!”
Tip: Pencil erasers make perfectly sized toe prints, and kids love stamping them. Give the paint 15 minutes before adding stickers.
Big marker areas can look streaky. If that bothers your kid, cut the body from blue construction paper instead.
5. Mickey Mouse Disguise

Best for: Ages 4 to 7 · Time: 45 to 60 minutes · Mess: Low
The clever part here is the tail. Instead of regular feathers, you cut a fan of Mickey’s white gloves, and the whole thing reads from across the hallway. Two black circles on the head do the rest of the work.
Material: White craft foam (or white cardstock) for the glove feathers, with black and red paper for the ears, body, and shorts. Big shapes, few pieces, nothing fiddly.
What You Need:
- 2 to 3 sheets of white craft foam (swap: white cardstock, or the flat rim of paper plates)
- Black construction paper or black foam for the ears, head, wings, and legs
- Red paper or red felt for the shorts
- Yellow paper for the shoes
- Two white buttons (swap: white paper circles)
- Black fine tip marker
- Tacky glue, glue stick, pencil
How to Make It:
- Draw one glove shape on foam (a rounded hand with four fingers and a cuff), cut it out, and trace it for the rest. You need 8 to 10.
- Draw three short black lines on each glove, the way Mickey’s gloves are stitched.
- Fan the gloves behind the turkey in two overlapping rows, gluing the whole cuff of each one down.
- Cover the body with red paper for the shorts and glue two white buttons on the front.
- Cut a black head shape with two round ears on top and glue it over the turkey’s head, leaving the face, beak, and wattle showing.
- Add black wings at the sides, black legs, and two overlapping yellow shoes at the bottom.
Tip: Cut one glove and trace the rest from it. Freehand gloves come out in ten different sizes and the fan ends up lopsided.
Craft foam ignores glue sticks, and it curls up if you glue only one spot. Use tacky glue across the whole cuff and press each glove flat for a minute.
6. Batman Diguise
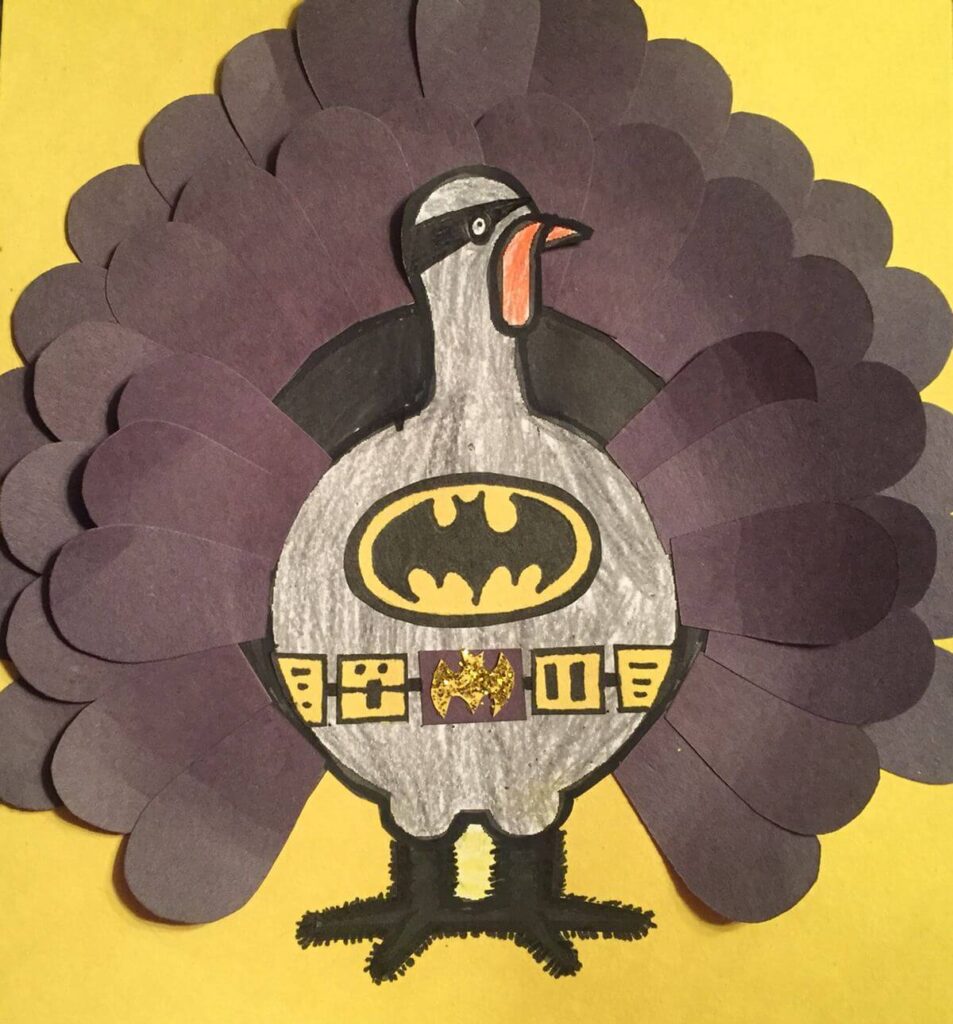
Best for: Ages 5 to 9 · Time: 45 to 60 minutes · Mess: Low
A good pick for kids who like cutting. The layered feathers take patience, but the finished turkey looks far more polished than the effort suggests.
Material: Dark gray or deep purple construction paper for a thick layered tail, colored pencil for the body, and a scrap of glitter cardstock for the belt buckle.
What You Need:
- 2 to 3 sheets of dark gray or deep purple construction paper
- Gray colored pencil (swap: regular pencil shading)
- Black and yellow construction paper
- Gold glitter cardstock scrap (swap: yellow paper and a gold gel pen)
- Black marker, glue stick, yellow background paper
How to Make It:
- Cut about 20 teardrop feathers. Fold the paper in half twice and cut four layers at once to save time.
- Glue a back row of feathers, then a front row tucked between them.
- Color the body gray using the side of the pencil for a soft, textured look.
- Cut a black mask and glue it across the eyes.
- Glue a yellow oval on the chest and a black bat shape on top. Trace a printed bat symbol if freehand isn’t working.
- Add a yellow belt strip with little pouches drawn on and a glitter bat buckle in the center.
- Color the legs black and draw spiky feet.
Tip: Dark construction paper fades quickly near a sunny window. If it’s going on a bright classroom wall, cardstock holds its color longer.
7. Harry Potter Disguise
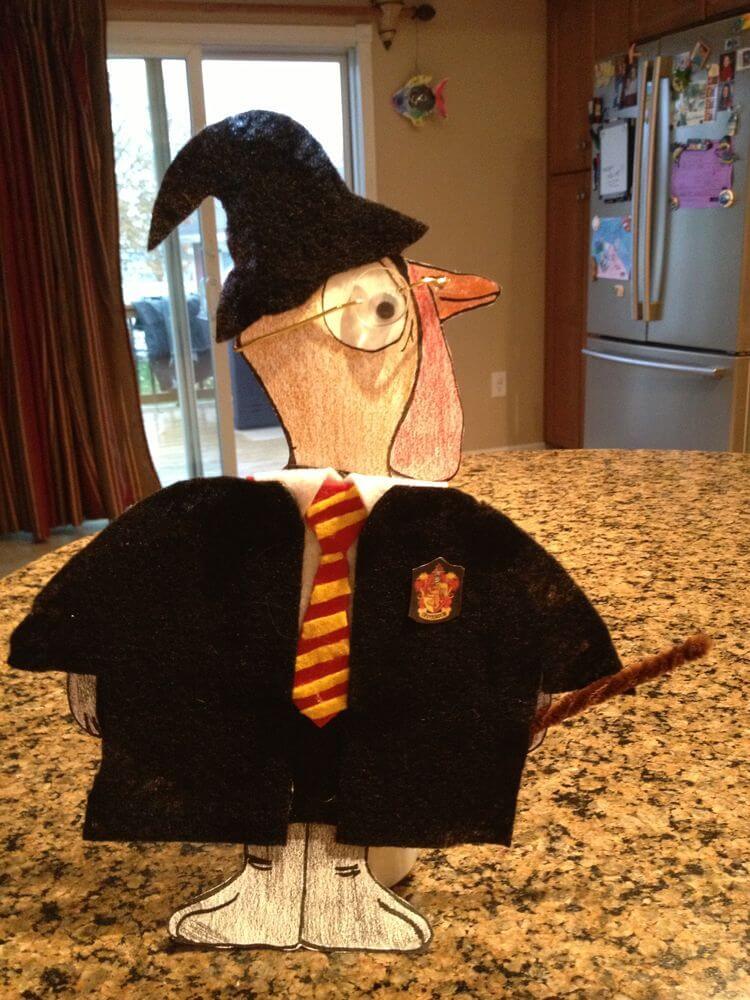
Best for: Ages 7 to 10 · Time: 60 to 90 minutes · Mess: Medium
This one stands up on its own, so it looks almost like a little sculpture. It suits older kids who know the books and want to add the details themselves.
Material: Black felt for the robe and hat, gold craft wire for the glasses, and a brown pipe cleaner wand.
What You Need:
- 2 sheets of black felt (swap: an old black sock or shirt)
- Red and yellow felt or paper for the striped tie
- Printed house crest (swap: draw a small shield)
- Gold craft wire or a gold pipe cleaner
- Brown pipe cleaner
- Large googly eye, red marker for the scar
- Tacky glue, cereal box cardboard, a toilet paper tube for the stand
How to Make It:
- Glue the turkey onto cereal box cardboard and cut it out so it’s stiff enough to stand.
- Cut two robe panels and two sleeves from felt and glue them on, leaving a gap down the middle for the tie.
- Glue thin yellow stripes across a red felt strip, then trim it into a tie shape.
- Wrap gold wire twice around a marker to form two round lenses, then twist a small bridge between them.
- Roll a felt cone for the hat, glue the seam, and bend the tip over slightly.
- Draw a lightning scar, add the crest to the robe, and tuck the wand behind one sleeve.
- Glue the toilet paper tube to the back as a stand (hot glue holds best, adult job).
Tip: Cut the wire with old scissors or wire snips, then press the sharp tips inward so they don’t scratch anyone.
8. Dominos Disguise

Best for: Ages 7 to 10 · Time: 60 to 90 minutes · Mess: Medium
The joke writes itself: no turkey here, only pizza. It’s also a good use for worn out clothes, because the shirt and jeans are real fabric.
Material: Fabric scraps from old clothes, a tiny cardstock pizza box, and printed pictures of a storefront and a pizza.
What You Need:
- Scrap of an old blue shirt
- Scrap of old jeans, cut near a pocket or seam
- Printed storefront, pizza photo, and small logos (swap: draw them)
- Cardstock for the pizza box
- Small pun sign glued to a craft stick
- Tacky glue, scissors that can handle fabric, clothespins
How to Make It:
- Glue the storefront picture behind the turkey as a background circle in place of feathers.
- Cut a shirt shape from the blue fabric and glue it on. Add a small logo on the chest.
- Cut the pants from the jeans so a real seam or pocket edge shows.
- Fold a small square of cardstock into an open box and glue the pizza picture inside.
- Glue the box at the turkey’s side so it looks like it’s carrying it.
- Add a paper cap and glue the sign stick behind the turkey.
Tip: Denim frays and resists regular glue. Tacky glue plus a clothespin clamp for 20 minutes fixes both problems.
Use a craft stick for the sign, not a wooden skewer. Skewer tips are sharp, and this project is riding in a backpack.
9. Santa Claus Disguise
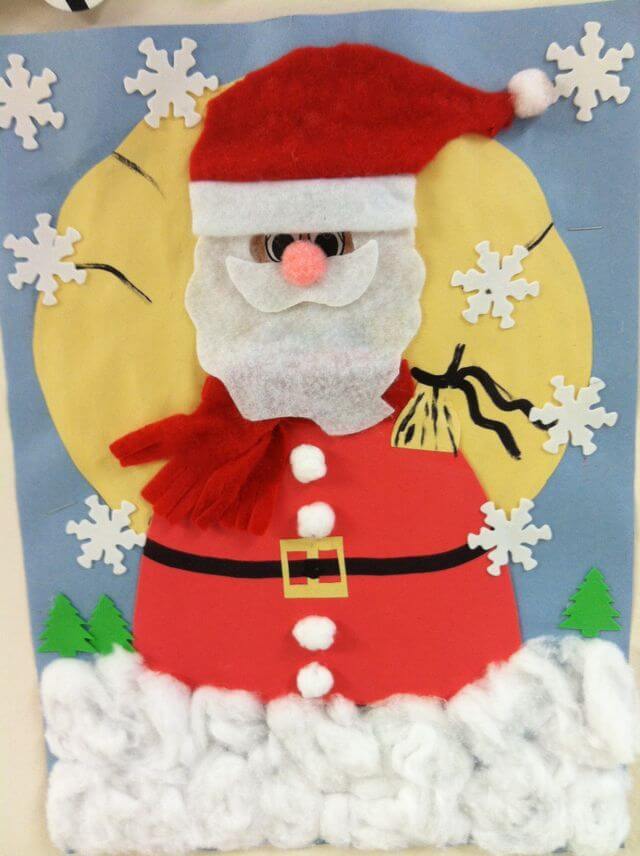
Best for: Ages 3 to 7 · Time: 30 to 45 minutes · Mess: Medium (cotton fluff)
This one is built as a full scene, not just a turkey, which is why it looks so finished. Red felt, a fluffy white beard, and a snowbank of cotton balls cover almost the whole page, and little kids can glue nearly all of it themselves.
Material: Red and white felt for the suit, hat, and beard, cotton balls for the snow, and light blue paper as the night sky background.
What You Need:
- Red felt or red paper for the suit and hat (swap: a piece of an old red shirt)
- White felt or white fleece for the beard and hat trim (swap: white paper with the edges snipped into fluff)
- About 15 cotton balls (swap: white tissue paper pulled apart)
- Light blue paper for the background, yellow paper for the moon
- White pom poms for the buttons and hat tip, one pink or red pom pom for the nose
- Foam snowflake stickers, small green felt or paper trees
- Black paper strip for the belt, yellow or gold paper for the buckle
- Black marker, glue stick, white school glue, tacky glue
How to Make It:
- Glue the turkey onto the blue background and add a big yellow moon circle behind its head.
- Cover the body with red felt for the suit, then glue a black belt strip across the middle with a gold buckle in the center.
- Cut a rounded beard from white felt and glue it under the eyes, leaving the eyes and the pom pom nose showing.
- Cut a hat shape with a wide white trim band, glue it over the head, and add a white pom pom at the tip.
- Squeeze white glue across the bottom of the page and press cotton balls into it as a snowbank.
- Add white pom pom buttons down the front, a red felt scarf with one fringed end, snowflakes in the sky, and small green trees along the snow.
- Draw bare branches in black marker on either side of the moon.
Tip: Pull each cotton ball apart a little before gluing. Fluffed cotton reads as snow. Tight balls just look like cotton balls.
Felt eats glue sticks. Use tacky glue for the suit, hat, and beard, and save the glue stick for paper on paper. The beard is also the piece most kids cut too small, so hold it against the turkey before you commit to the shape.
10. Trump Disguise
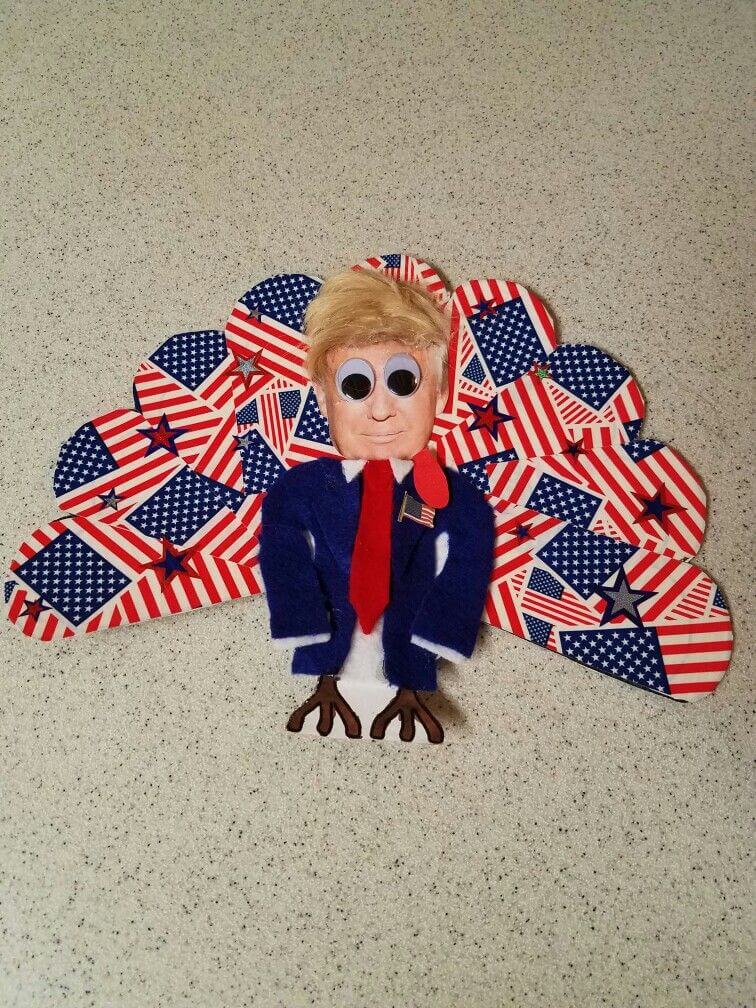
Best for: Ages 6 to 10 · Time: 45 to 60 minutes · Mess: Low
Famous people disguises show up on the bulletin board every year. This one uses a navy suit, a long red tie, and flag print feathers, and the hair is what makes it recognizable.
Material: Flag patterned paper or washi tape for the feathers, navy and red felt for the suit and tie, and yellow yarn or faux fur for the hair.
What You Need:
- Flag print scrapbook paper or flag washi tape (swap: white paper with red marker stripes and blue corners)
- Navy and red felt (swap: construction paper)
- White felt scrap for the shirt collar
- Blond yarn or a small piece of faux fur
- Printed or hand drawn face, googly eyes
- Small flag sticker, tacky glue
How to Make It:
- Cover each feather with flag paper, or run strips of washi tape across them and trim the edges.
- Cut a jacket with pointed lapels from navy felt and glue it on.
- Tuck a white felt collar at the neck and glue a long red felt tie down the center.
- Glue the face over the turkey’s head and add googly eyes.
- Glue the yarn or fur on top and shape it into a swoop.
- Stick the small flag on the lapel as a pin.
Tip: Faux fur sheds a lot when you cut straight across it. Snip only the fabric backing from the back side, and the fibers stay long and neat.
11. Scarecrow Disguise
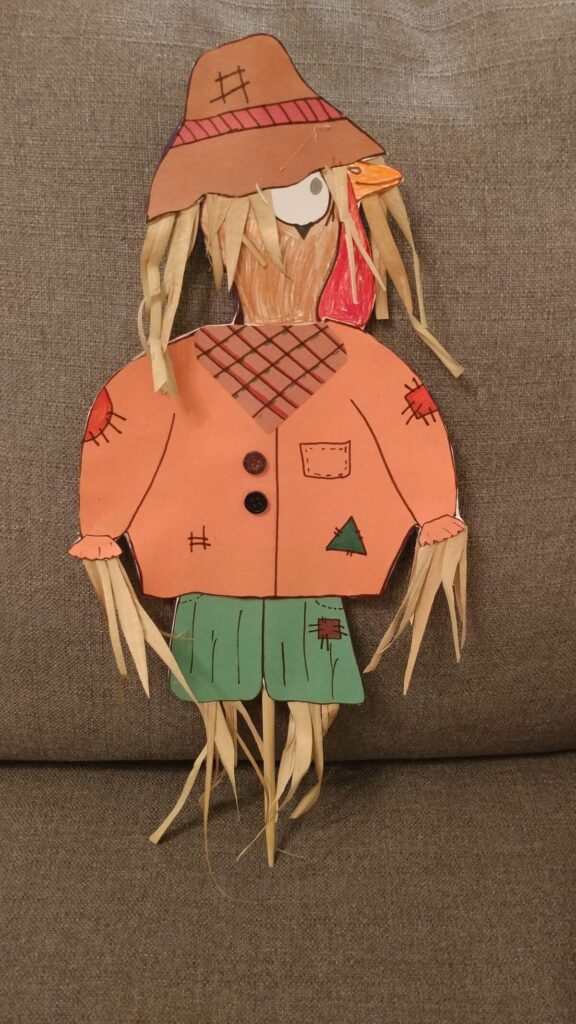
Best for: Ages 5 to 9 · Time: 45 to 60 minutes · Mess: Medium (raffia bits)
It fits the season, and a scarecrow standing in a field is exactly where a smart turkey would hide. The straw details are what sell it.
Material: Construction paper for the patched shirt, pants, and hat, with raffia or dried corn husks for the straw.
What You Need:
- Orange, green, brown, and red construction paper
- Natural raffia (swap: thin strips torn from a brown paper grocery bag)
- Two buttons (swap: drawn buttons)
- Black and red fine tip markers
- Craft stick or thin wooden dowel for the post
- Glue stick, tacky glue
How to Make It:
- Cut a shirt from orange paper and glue it over the body. Draw a pocket and stitch lines.
- Glue on small patches in other colors and draw little X stitches around them.
- Draw a plaid pattern on red paper with crisscross lines, cut a triangle bandana, and glue it at the neck.
- Cut green pants and a floppy brown hat with a colored band.
- Glue raffia under the hat brim, at each sleeve cuff, and at the bottom of the pant legs.
- Glue on two buttons and tape the stick to the back so it pokes out below like a post.
Tip: If you use real dried corn husks, soak them in warm water for a few minutes first. Dry husks crack the moment you bend them.
12. Pikachu Disguise
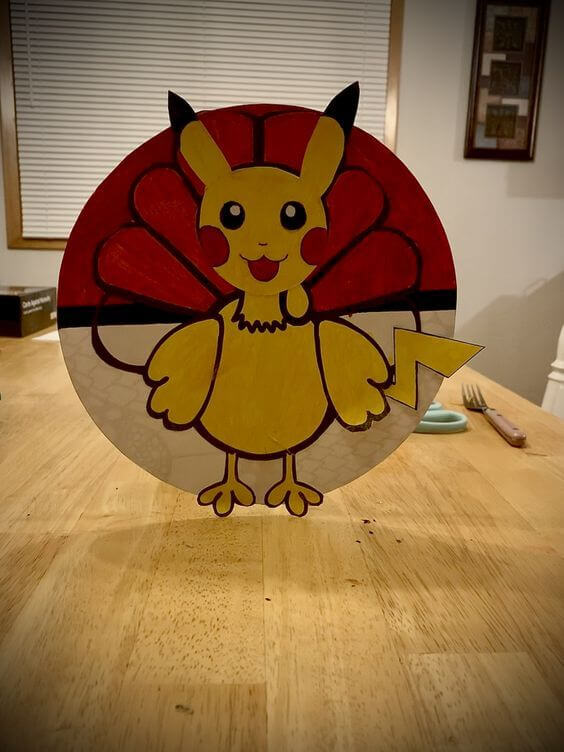
Best for: Ages 6 to 10 · Time: About 1 hour, plus paint drying · Mess: Medium (paint)
The Poké Ball background is what makes this one stand out. It’s built on cardboard, so it survives the backpack better than most.
Material: A cardboard circle painted like a Poké Ball, with yellow cardstock for the Pikachu body.
What You Need:
- Cardboard circle about 10 inches across (trace a dinner plate onto a shipping box or cereal box)
- Red, white, and black tempera or acrylic paint (swap: markers or paper)
- Yellow cardstock
- Black paper for ear tips, red paper for cheeks (swap: red dot stickers)
- Dark brown or maroon marker for outlines
- Glue stick, paintbrush
How to Make It:
- Paint the top half of the circle red and the bottom half white. Let it dry.
- Paint a thick black band across the middle, then draw the feather shapes in darker red on the top half.
- Cut the Pikachu body from yellow cardstock, following the turkey shape and adding tall ears.
- Glue black tips on the ears and red circles on the cheeks. Draw the eyes and a small open mouth.
- Cut a zigzag tail and glue it sticking out from one side.
- Outline every piece with the brown marker, then glue the body onto the circle.
Tip: Cardboard warps when only one side gets wet paint. Brush a quick coat on the back too, or press it under books once it’s dry.
Paint needs about half an hour between coats, so plan this one across two short sessions. A brown outline also looks softer than black, closer to the cartoon style.
13. Mininon Disguise
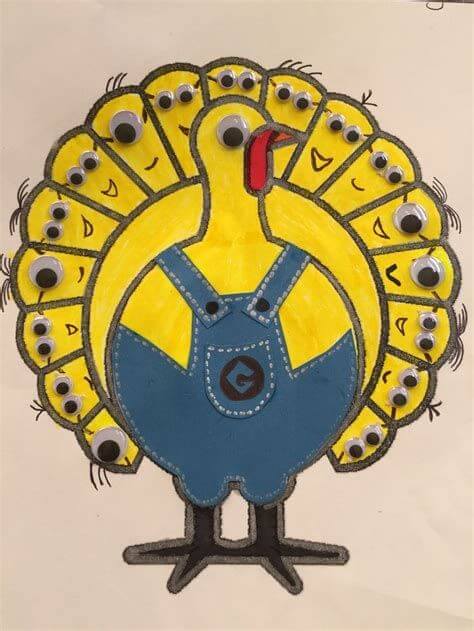
Best for: Ages 4 to 8 · Time: About 45 minutes · Mess: Low
Every feather becomes its own little Minion, which kids find hilarious. Googly eyes are the star here, so buy more than you think you’ll need.
Material: Yellow paper or yellow marker, blue cardstock overalls, and a big pack of mixed size googly eyes.
What You Need:
- Yellow construction paper or a yellow marker
- Blue cardstock for the overalls
- About 30 mixed size googly eyes (swap: white paper circles with black marker pupils)
- White gel pen or white paint pen
- Black marker, black paper for shoes
- Tacky glue
How to Make It:
- Color or cover the body and every feather in yellow.
- Glue one or two googly eyes near the top of each feather and draw a black goggle strap across.
- Draw a different mouth on each feather: smiling, surprised, sideways.
- Add three or four hair strands above a few of the feathers.
- Cut overalls with straps and a front pocket from blue cardstock. Draw small stitch marks around the edges with the white gel pen.
- Add a round black logo on the pocket, two black button dots, one big googly eye on the turkey’s face, and black shoes.
Tip: Skip self adhesive googly eyes. They pop off the first time the paper bends in a backpack, while tacky glue keeps them put.
14. Elsa Disguise
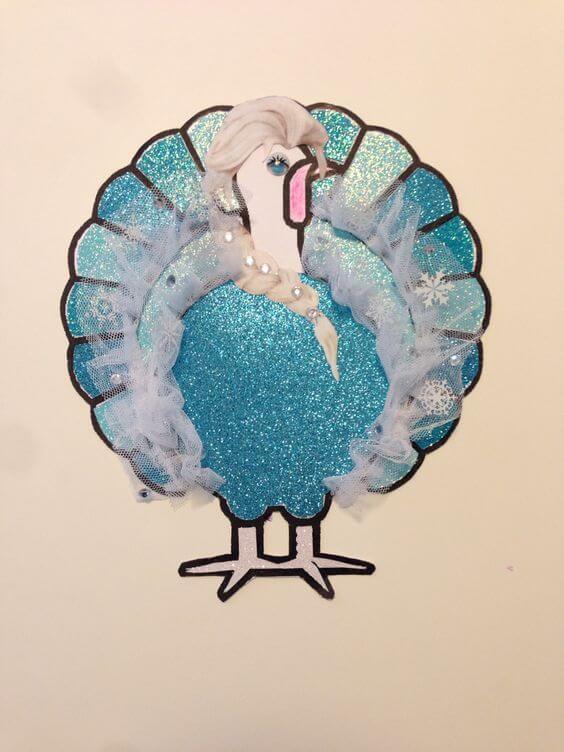
Best for: Ages 5 to 9 · Time: About 1 hour · Mess: Medium (tulle, gems)
The sparkliest idea on this list without any loose glitter. Glitter cardstock and a tulle ruffle give it that icy, wintry look.
Material: Blue glitter cardstock for the body and feathers, white tulle for a ruffled edge, and a white braid.
What You Need:
- 2 sheets of blue glitter cardstock (swap: blue paper with a thin layer of glitter glue)
- About 1 foot of white tulle (swap: white tissue paper, scrunched)
- White or platinum yarn for the braid (swap: Crayola Model Magic rolled and shaped into a braid)
- Adhesive rhinestones
- Snowflake stickers or a snowflake paper punch
- Low temp glue gun (adult use) or tacky glue
How to Make It:
- Cut the body and feathers from glitter cardstock and glue them onto the template.
- Braid three strands of yarn, knot both ends, and glue the braid over one shoulder.
- Gather the tulle into loose folds and glue it in a ruffle along the inner edge of the feathers.
- Add rhinestones along the ruffle and snowflakes on the feathers.
- Draw long eyelashes and color the feet white with a touch of sparkle.
Tip: Hot glue goes straight through the holes in tulle. Press it down with a craft stick, never your fingertips.
Glitter cardstock is stiff and hard for small hands to cut. Cut the big pieces yourself and let your kid handle the braid and decorations.
15. Peacock Disguise
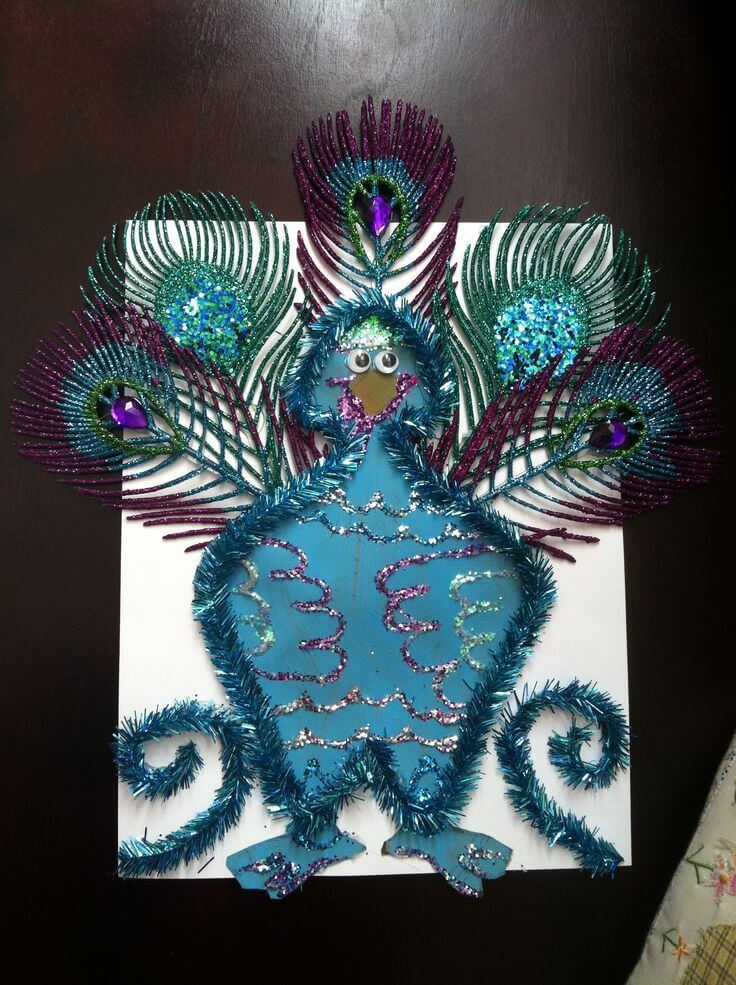
Best for: Ages 7 to 10 with adult help · Time: About 90 minutes, plus overnight drying · Mess: High (glitter glue)
This is the showstopper version, and the one other parents will ask you about. Glittered feather picks and tinsel stems give it real height and shine.
Material: Glittered plastic peacock feather picks from the floral aisle, tinsel stems for outlines, and glitter glue for the body swirls.
What You Need:
- 5 glittered peacock feather picks (swap: the paper feathers from #5)
- 4 to 6 blue tinsel stems (swap: regular blue pipe cleaners)
- Blue cardstock for the body, white posterboard for the backing
- Glitter glue in pink, silver, and green
- Large acrylic gems, googly eyes, brown paper beak
- Wire snips (adult use), tacky glue or a low temp glue gun
How to Make It:
- Cut the body from blue cardstock and draw swirls and wavy lines on it with glitter glue. Let it dry flat overnight.
- Snip the wire stems off the feather picks (adult job) and arrange them in a fan on the posterboard.
- Glue the feathers down, then glue the body on top.
- Run a line of tacky glue around the body and press tinsel stems into it as an outline.
- Curl two tinsel stems into spirals and glue them at the base.
- Glue gems into the feather eye spots, then add googly eyes, the beak, and a glitter crest.
Tip: Glitter glue looks dry on top long before it’s dry underneath. Poke a hidden spot before you stack or tilt anything.
Posterboard isn’t optional here. Feather picks are heavy enough to rip thin cardstock right off a staple.
16. Popcorn Disguise
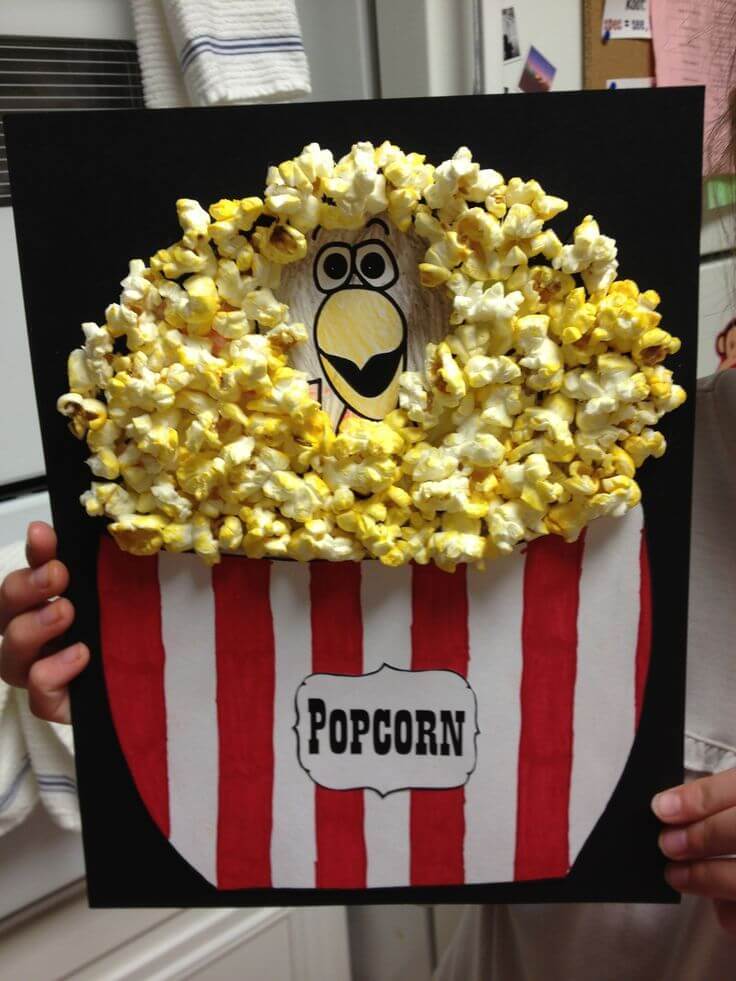
Best for: Ages 5 to 10 · Time: About 45 minutes, plus 1 to 2 hours drying · Mess: High
Real popcorn, real texture, and a turkey peeking out of the bucket. Kids love this one partly because they get to eat the leftovers.
Material: Real popcorn on a black posterboard background, with a red and white striped paper bucket.
What You Need:
- A bowl of plain air popped popcorn (swap for a no food version: yellow and white tissue paper balls)
- Black posterboard (swap: a flattened cereal box painted black)
- White paper and a red marker for the bucket stripes
- Printed “POPCORN” label (swap: hand lettering)
- A full bottle of tacky glue
How to Make It:
- Glue the turkey head in the upper middle of the posterboard.
- Cut a bucket shape from white paper, draw thick red stripes, and glue it over the turkey’s body.
- Add the label to the front of the bucket.
- Work in small sections: spread tacky glue around the head, then press popcorn into it.
- Fill the gaps with smaller pieces, leaving the face uncovered.
- Leave it flat for at least an hour before moving it.
Tip: Use plain popcorn only. Buttered or movie theater style popcorn leaves grease spots that soak through the paper.
Popcorn is a choking hazard for toddlers, so keep the project and the snack bowl away from little siblings. Real food also goes stale and can attract pests, so plan to toss it once the display comes down.
Turkey Disguise Ideas Compared at a Glance
Here are all 16 disguise turkey ideas side by side, so you can match one to the time and patience you actually have tonight.
| Disguise | Best Ages | Time | Difficulty | Mess | Main Material |
|---|---|---|---|---|---|
| Postman | 6 to 10 | 60 to 90 min | Medium | Low | Envelopes, paper |
| Among Us | 5 to 9 | 45 to 60 min | Easy | Low | Cardstock |
| Police Officer | 7 to 10 | 60 to 90 min | Medium | Medium | Felt, feather boa |
| Paw Patrol | 3 to 6 | 30 to 45 min | Easy | Low | Printout, markers |
| Micky Mouse | 4 to 7 | 45 min | Easy | Low | Construction paper |
| Batman | 5 to 9 | 45 to 60 min | Medium | Low | Construction paper |
| Harry Potter | 7 to 10 | 60 to 90 min | Advanced | Medium | Felt, craft wire |
| Domino’s | 7 to 10 | 60 to 90 min | Medium | Medium | Fabric scraps |
| Santa Claus | 3 to 7 | 30 to 45 min | Easy | Medium | Cotton balls, felt |
| Trump | 6 to 10 | 45 to 60 min | Medium | Low | Felt, flag paper |
| Scarecrow | 5 to 9 | 45 to 60 min | Medium | Medium | Paper, raffia |
| Pikachu | 6 to 10 | 60 min plus drying | Medium | Medium | Cardboard, paint |
| Minion | 4 to 8 | 45 min | Easy | Low | Paper, googly eyes |
| Elsa | 5 to 9 | 60 min | Medium | Medium | Glitter cardstock, tulle |
| Peacock (sparkly) | 7 to 10 | 90 min plus overnight | Advanced | High | Feather picks, tinsel |
| Popcorn | 5 to 10 | 45 min plus drying | Easy | High | Real popcorn |
Common Mistakes to Avoid
- Using a glue stick for everything. Glue sticks hold paper to paper. Felt, fabric, googly eyes, and gems will fall off before the backpack reaches school.
- Starting the night before. Tacky glue needs about an hour to set, and thick glitter glue can take all night. Build on day one and add the details on day two.
- Hiding the turkey completely. It’s funnier when you can still spot the beak, wattle, or feet. Most of the ideas above leave the face showing on purpose.
- Making it too heavy for the wall. Popcorn, feather picks, and cardboard stands pull away from staples. Use posterboard or cardboard backing, and ask the teacher how the turkeys will be displayed.
- Letting the grown up take over. Teachers can tell. Give your kid the visible parts, like coloring, placing pieces, and writing the sign, even when the lines wobble.
- Forgetting the name. Write your kid’s name on the back before any glue goes on. Once the back is covered in tape and stands, there’s nowhere left to write it.
FAQs
What is the turkey disguise project?
It’s a Thanksgiving assignment, usually for preschool through early elementary, where kids disguise a paper turkey as someone or something else so it won’t get eaten. Many classes pair it with the picture book Turkey Trouble by Wendi Silvano.
How do you disguise a turkey for a school project?
Trace the turkey template onto cardstock, pick a character or job, and cover the body with that character’s clothes and the feathers with matching colors or shapes. Keep the beak or feet visible, and use tacky glue for anything heavier than paper.
What are easy turkey disguise ideas for kindergarten?
Paw Patrol, a snowman, a simple paper peacock, and a Minion are the easiest, because they rely on coloring, stickers, and big glued pieces. An adult can handle the cutting while the child decorates.
What materials do you need for a turkey disguise?
A turkey template, cardstock, construction paper, felt or fabric scraps, a glue stick, tacky glue, markers, and googly eyes cover nearly every idea. Extras like envelopes, buttons, and cotton balls are probably already in your house.
How long does a turkey disguise project take?
Most take 30 to 90 minutes of hands on time, plus drying time for glue or paint. Splitting the work across two evenings keeps it calm.
What are the best turkey disguise ideas for boys and girls?
The best idea is whatever your kid is into right now, whether that’s superheroes, video games, a favorite job, or a movie character. Every disguise on this list works for boys and girls.
Read Next
If these turkey disguise ideas left you with felt, googly eyes, and construction paper spread across the table, Easy Thanksgiving Crafts for Kids has more projects that use the same supplies for the rest of November.
And if you’re already planning next year’s fall decorating, Best Halloween Pumpkin Crafts For Easy Fall Decor is worth saving now.
Pick the disguise tonight, trace the template onto cardstock, and set the supplies out on a baking sheet. Tomorrow, your kid only has to sit down and start gluing. And write the name on the back first, because every November at least one great turkey ends up on the wall with no owner.