
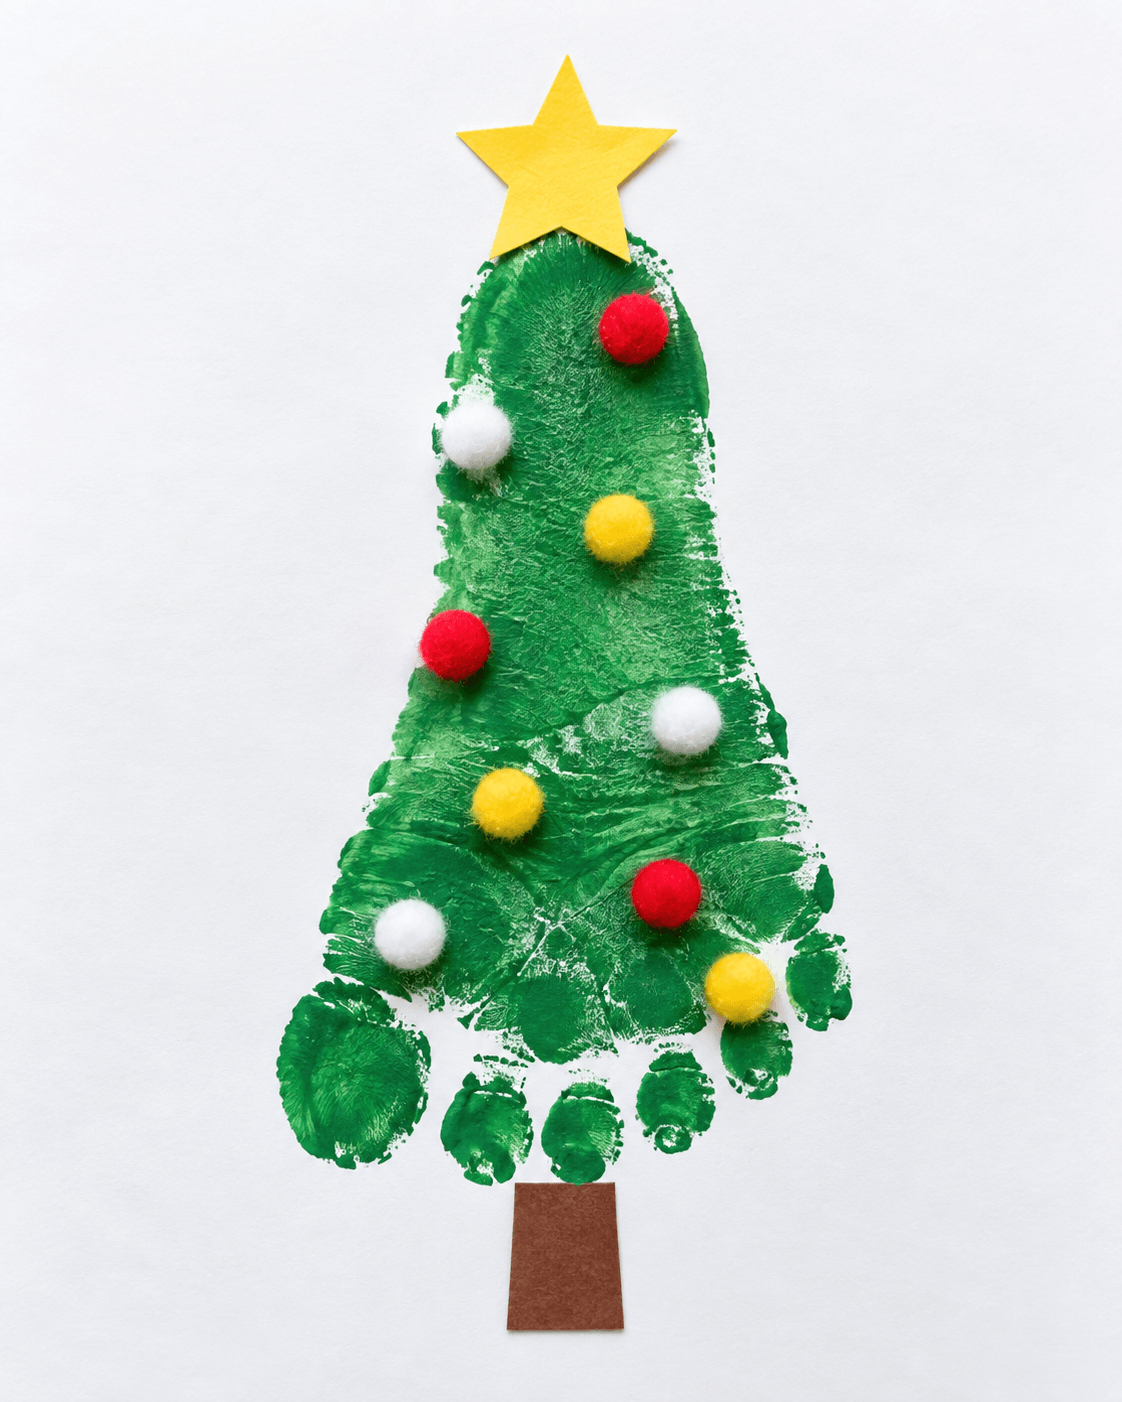
Christmas footprint crafts turn a child’s painted footprint into a holiday character or decoration, like a reindeer, snowman, Santa, penguin, or Christmas tree, using washable paint, cardstock, and a few paper or felt details. The easiest starting points are the Christmas tree, the polar bear, and the reindeer portrait, which each need one print, about 15 minutes of hands on time, and 20 to 30 minutes of drying. For a clean print, brush a thin coat of washable, nontoxic paint onto the foot and press the cardstock onto the foot instead of pressing the foot onto the paper.
It’s the second week of December. The kitchen floor is covered in newspaper, the baby is trying to eat the paintbrush, and you’ve got three smudged green blobs on the table. Print number four comes out clean. You turn it upside down, add a yellow star, and that’s the card Grandma still has on her fridge years later.
That’s the honest version of most Christmas crafts with footprints. They’re messy for ten minutes, they need a bit of timing, and they become the keepsakes people actually keep, because the foot in that print will never be that small again.
I’ve put these 18 ideas together around what works at a real kitchen table: which projects suit a baby and which suit a six year old, what each one costs you in mess and time, a cheap swap for every supply, and the printing method that fixes most smudged toes. If you’re starting a footprint craft Christmas tradition this year, look at the comparison table first and pick two.
Planning for Christmas 2026? Do the printing in the first week of December. That leaves time for drying, signing, and getting cards to grandparents before the mail backs up.
How To Pick Christmas Footprint Crafts By Age, Mess, And Time
Your kid’s age decides more than anything else. Most footprint Christmas crafts work for any age, but a baby needs a project built around one print, and a seven year old will want to cut, glue, and design the face themselves.
Here’s how I’d match projects to ages:
- Under 12 months: One print, and you do everything after that. The tree, polar bear, and reindeer portrait are the easiest wins. Print when the baby is fed and calm, not right before a nap.
- 1 to 3 years: One or two prints. Toddlers can press precut paper pieces onto glue you’ve already put down. You handle googly eyes, bells, buttons, and pom poms, and the finished piece lives out of reach.
- 3 to 5 years: They can glue, dot snow with a cotton swab, and color in details. Expect wobbly hats. That’s the charm.
- 5 to 8 years: They can cut simple shapes with kid scissors and trace their own foot. Their print is long by now, so use full letter size cardstock instead of a folded card.
- 8 and up: They can print their own feet sitting on a chair and handle the multi print projects like the wreath and button tree.
| Project | Best ages | Mess | Hands on time | Works best as |
| Christmas Tree Footprint Craft | 6 months+ | Low | 15 min | Card |
| Polar Bear Footprint Figure | 6 months+ | Medium | 15 min | Card or wall art |
| Reindeer Footprint Portrait | 6 months+ | Low | 20 min | Card or framed print |
| Snowman Footprint Card | 6 months+ | Medium | 20 min | Card |
| Gingerbread-Style Footprint Figure | 1 year+ | Medium | 20 min | Card or gift tag |
| Blue Footprint Winter Scene | 2 years+ | Medium | 25 min | Wall art |
| Santa-Hat Penguin Footprint Craft | 1 year+ | High | 25 min | Card |
| Elf Footprint Paper Craft | 1 year+ | Medium | 30 min | Card or display |
| Footprint Wreath Circle | 3 years+ | High | 40 min (or two sessions) | Wall art or door sign |
| Snowman Footprint Ornament | 1 year+ | Medium | 25 min | Ornament |
| Antlered Footprint Reindeer | 1 year+ | Low | 20 min | Framed board |
| Holiday Stocking Footprint Ornament | 1 year+ | Medium | 25 min | Ornament |
| Santa Boot Print Figure | 1 year+ | Medium | 30 min | Card or ornament |
| Button-Decorated Footprint Tree | 3 years+ | High | 40 min | Wall art |
| Red-Hatted Yarn Beard Footprint | 2 years+ | Medium | 30 min | Wood plaque or shelf decor |
| Reindeer Footprint Pair | 6 months+ | Medium | 30 min | Sibling keepsake |
| Santa Footprint Beard Ornament | 1 year+ | Medium | 30 min | Ornament |
| Haloed Footprint Angel Ornament | Any age (traced, no paint) | Low | 30 min | Ornament |
Supplies For Christmas Footprint Crafts (Plus Free Swaps)
Most Christmas crafts with footprints run on the same small kit: washable paint, cardstock, a foam brush, glue, and a handful of scraps. One trip to a dollar store usually covers it. Dollar Tree tends to stock googly eyes, pom poms, felt, glue, foam brushes, and cardstock packs, and Michaels or Walmart fill any gaps.
The one thing I won’t swap is cardstock. A Christmas craft footprint on cardstock dries flat. The same print on regular printer paper buckles within a minute, and every gluing step after that fights the wrinkles.
| Supply | Where to get it | Free or cheap swap |
| Washable kids’ paint (Crayola Washable Kids’ Paint or similar) | Walmart, Target, Michaels, dollar stores | Skip paint and trace the foot onto colored paper, then cut it out |
| Cardstock (65 to 110 lb) | Craft stores, office supply aisles | The blank side of a cereal box or a cut up paper grocery bag |
| 1 inch foam brush | Dollar store multipacks | A clean makeup sponge or folded paper towel |
| Tacky glue (Aleene’s Original Tacky Glue) | Craft stores, Walmart | White school glue, held in place for 30 seconds |
| Googly eyes | Dollar stores | Black marker dots or hole punched black paper circles |
| Pom poms | Dollar stores | Hole punched paper circles or tiny balls of crumpled tissue paper |
| Felt sheets | Craft stores | Scraps from an old sweater, fleece, or flannel shirt |
| Ribbon (plaid, red, green) | Gift wrap aisles, dollar stores | Strips cut from leftover gift wrap or saved bows |
| Cotton batting or faux fur trim | Fabric stores | Cotton balls pulled apart thin |
| Buttons | Craft store button bags | Spares from old shirts, or paper dots |
| Jingle bells | Dollar stores, craft stores | Yellow paper circles or candy wrapper foil |
| White yarn | Any yarn aisle | Thin strips of white tissue paper, curled with a pencil |
| Gold tinsel pipe cleaner | Craft stores | Candy wrapper foil twisted into a ring |
| Foam sheets | Craft stores | Cereal box cardboard |
| Twine | Hardware stores, kitchen drawers | Bakery string or plain kitchen string |
| Small wooden bead | Craft stores | A brown pom pom or a rolled ball of brown paper |
| Wood panel or wood slice | Craft stores | A square cut from a shipping box |
| White paint marker (Uni POSCA or similar) | Craft and office stores | A white gel pen or white colored pencil |
| Mod Podge (to seal ornaments) | Craft stores | Clear packing tape over the front |
You’ll also want baby wipes, a damp towel, a scrap sheet for test prints, and a pencil for writing names on the back. Twigs are free from the backyard.
Safety And Mess Setup Before The Socks Come Off
With footprint Christmas crafts, the safety list is short but it matters: paint that’s meant for skin, nothing swallowable near kids under three, and an adult on anything sharp or hot.
Paint on skin
- Use paint labeled washable, and look for the AP Seal from the Art and Creative Materials Institute on the bottle. It means a toxicologist has reviewed the formula for safety, including use by children.
- Skip acrylic craft paint for printing. It isn’t made for skin and it’s much harder to get off.
- Wash the foot within a few minutes using warm soapy water. Baby wipes alone tend to leave a tint between the toes.
- If your child has eczema or sensitive skin, dab a little paint on the ankle the day before and check for redness.
Small Parts
Googly eyes, pom poms, buttons, beads, and jingle bells are all choking risks for kids under three. A common rule of thumb: if it fits through a toilet paper tube, keep it away from little ones. Glue those pieces on yourself, let the glue dry overnight, and display the finished craft out of reach, or use the paper swaps from the supplies table.
Scissors And Glue
Kids get kid scissors. Tacky glue handles every project on this list, so you don’t need a hot glue gun. If you do use one, keep it on your side of the table.
Mess Level Snd Setup
Expect paint on the table, the towel, and probably you. Cover the table with newspaper or a dollar store plastic tablecloth, and put wipes, a damp towel, and your paper within arm’s reach before the paint comes out.
For babies, a high chair works well because the feet dangle where you can reach them. Toddlers do better sitting on a low chair with the paper on the floor. Two adults make everything easier: one holds the kid, one handles the paper.
Practical note: Do the printing right before bath time. Cleanup becomes the bath, and you’re not chasing a painted foot across the carpet.
How To Get A Clean Footprint Every Time
Every Christmas craft footprint on this list starts the same way, so learn this once and use it for all 18 Christmas crafts with footprints below. The print is what makes or breaks any footprint craft Christmas card. The paper bits are easy to redo. The print isn’t.
- Write the name and date on the back first. Use pencil, and do it now. After the paint goes on, you’ll forget.
- Plan which way is up. For a tree or snowman, the toes go at the bottom. For a reindeer, they go at the top. Leave about 2 inches of space above the print for antlers, hats, or a star.
- Do a test print on scrap paper. The first print almost always carries too much paint.
- Brush, don’t dip. Use a foam brush to paint a thin, even coat from heel to toes. Dipping the foot in a tray pools paint between the toes, and you get blobs instead of toe prints.
- Bring the paper to the foot. Hold the cardstock on a clipboard or hardcover book, press it to the heel, and rock it toward the toes in one smooth motion.
- Lift straight off. Peel the paper away without sliding it.
- Wipe the foot immediately, before it lands on the carpet.
- Let it dry flat for 20 to 30 minutes before you glue anything on top. Paper pieces glued onto wet paint slide around and leave smears.
Practical note: Press the paper to the foot, not the foot to the paper. A wriggly baby can’t smear a print they aren’t pushing against, and you stay in control of the pressure.
Tip: Babies often curl their toes the instant something touches the sole. It’s a normal reflex. Lay your thumb gently across the top of the toes to keep them flat, then press fast.
Older kids should sit on a chair and press their foot down onto paper on the floor. Standing puts their weight on the outer edge of the foot, they wobble, and the arch smears.
1. Christmas Tree Footprint Craft
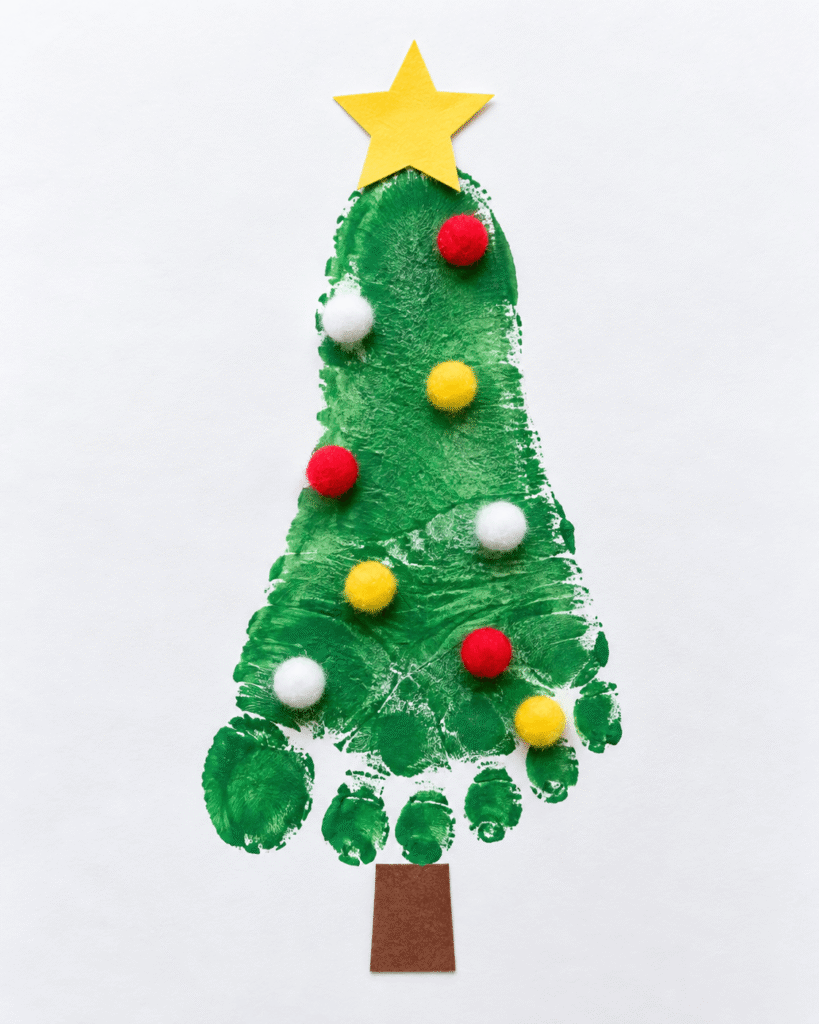
This is the one I’d start with. Print a green foot with the toes at the bottom and the heel at the top, and the shape does the work: the toes spread out like low branches and the heel narrows into a point.
If you only make one of these Christmas footprint crafts, make this one. The trade off is the pom poms. They’re a choking risk until they’re glued down hard, so for babies, use paper dots instead.
Ages: 6 months and up · Mess: Low · Time: 15 minutes plus drying
Younger kids: swap the pom poms for hole punched paper circles. Older kids: let them cut the star and place the ornaments.
What You Need
- Green paint
- Yellow paper or foam star (or one cut from a cereal box and colored yellow)
- Red pom poms
- White pom poms
- Yellow pom poms
- Brown paper (a strip of paper bag works)
- White paper or cardstock
- Glue (tacky glue holds pom poms best)
How to Make It
- Stamp a green footprint on white paper in a narrow vertical placement, toes pointing down so the wide part sits at the base.
- Glue a yellow star above the heel and a brown trunk below the toes.
- Attach red, white, and yellow pom poms across the footprint as ornaments.
Tip: White pom poms nearly vanish wherever the green paint is thin. Put them on the darkest parts of the print.
Safety note: A glue stick won’t hold pom poms. Use tacky glue, let it dry overnight, and keep the finished tree away from toddlers.
2. Polar Bear Footprint Figure
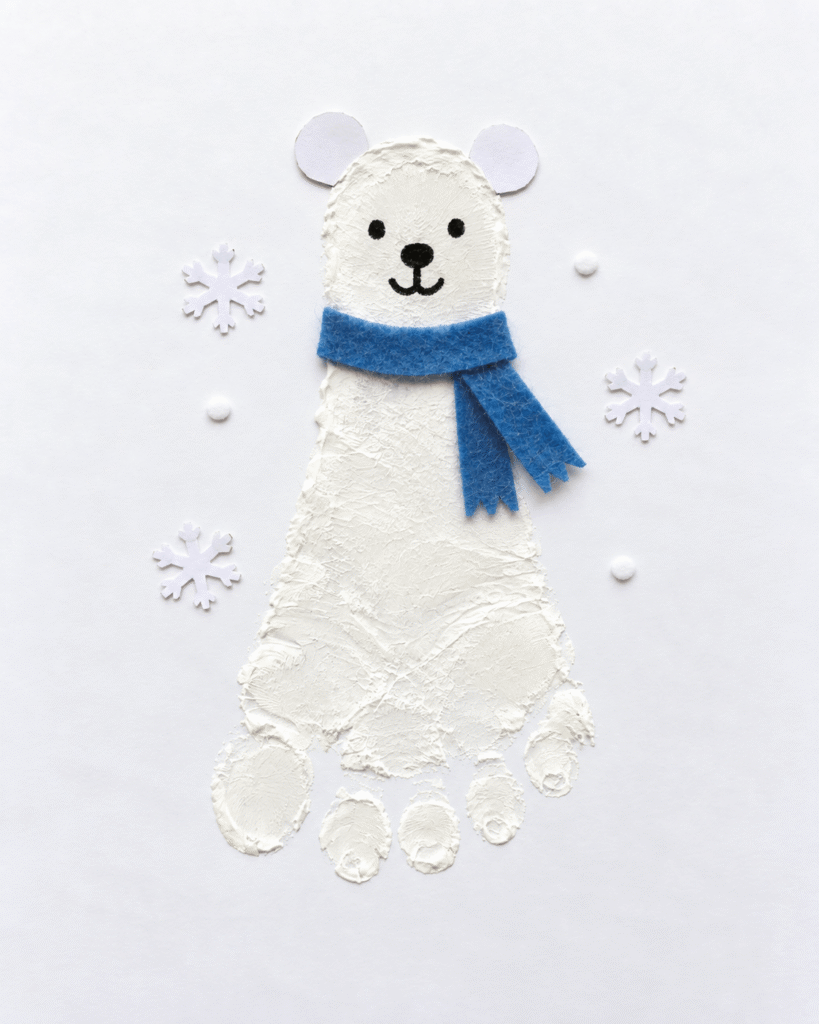
White paint on blue paper gives you the strongest contrast on this whole list, and the polar bear makes the most of it. The heel becomes the head, round paper ears sit on either side, and a scarf marks the neck.
White is also the trickiest paint to print. It’s more translucent than other colors, so a thin coat looks streaky. Brush on a slightly heavier coat than usual and expect a longer dry.
Ages: 6 months and up · Mess: Medium · Time: 15 minutes plus drying
Younger kids: draw snowflakes with a white crayon instead of gluing cutouts. Older kids: fold and cut their own paper snowflakes.
What You Need
- White paint
- Blue paper background (navy or royal blue gives the best contrast)
- Blue felt or paper strip (pick a lighter blue or red so it stands out)
- Black marker
- White paper circles for ears
- Snowflake cutouts (fold and cut your own from printer paper)
- Small pom poms (or white paint dots made with a cotton swab)
How to Make It
- Stamp a white footprint on blue paper with the heel at the top, then glue white circle ears on each side of the heel.
- Draw the face with black marker once the paint is completely dry.
- Wrap a blue felt or paper strip across the neck area as a scarf.
- Place snowflake cutouts and pom poms around the figure, keeping them clear of the face.
Tip: Marker on damp white paint bleeds gray. Wait until the print is bone dry before drawing the face.
Safety note: Keep pom poms and small cutouts away from toddlers.
3. Reindeer Footprint Portrait

A brown footprint with the toes pointing up makes a long reindeer face. The heel becomes the muzzle where the red nose sits, and branching paper antlers go above the toes.
The plaid bow tie is what makes it look finished. It’s also one of the most forgiving projects here, because a smudged edge just reads as fur.
Ages: 6 months and up · Mess: Low · Time: 20 minutes plus drying
Younger kids: you glue the eyes and nose, they press on the antlers. Older kids: trace their own hands on brown paper and cut them out as antlers.
What You Need
- Brown paint
- White paper
- Googly eyes (or black marker dots)
- Red pom pom (or a red paper circle)
- Brown paper (a paper grocery bag works)
- Plaid ribbon or fabric
- Black marker
- Glue
How to Make It
- Stamp a brown footprint on white paper with the toes at the top, leaving room above for antlers.
- Glue brown paper antlers and small ears above the toes.
- Add googly eyes in the middle of the print and a red pom pom nose on the heel.
- Glue a small plaid bow tie just below the heel and add marker details like eyebrows.
Tip: Set the eyes closer together than feels right. Wide set eyes on a narrow footprint make the reindeer look startled.
Safety note: Supervise googly eyes and pom poms closely, and stick to washable paint on skin.
4. Snowman Footprint Card
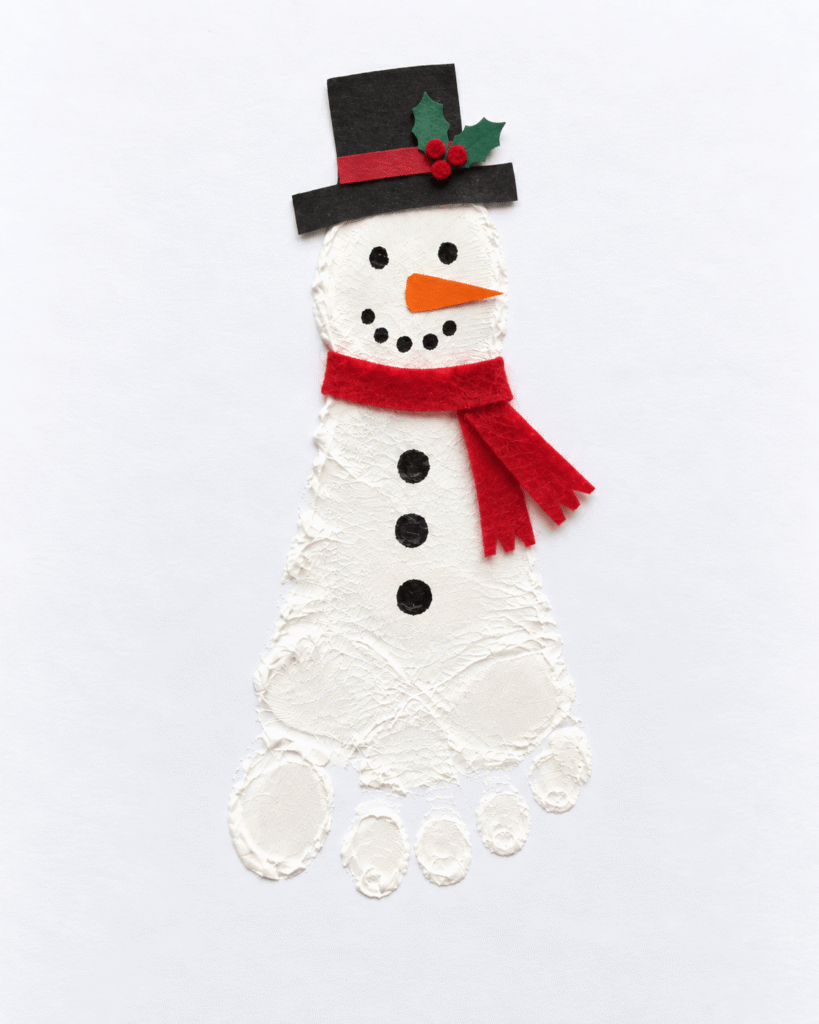
Heel up for the head, toes down for the round base, and you’ve got a snowman with a top hat and scarf. It’s the card most people picture when they hear Christmas crafts with footprints, and it’s a classic for good reason.
One fix to the usual instructions: don’t print white on white. The snowman disappears. Use light blue, gray, or kraft cardstock, or trace around the dry print with a silver marker so the shape shows.
Ages: 6 months and up · Mess: Medium · Time: 20 minutes plus drying
Younger kids: you cut the hat and scarf, they stick them on. Older kids: decorate the background and write the card message.
What You Need
- White paint
- Black paint
- Orange paper or marker
- Red fabric or paper strip
- Black paper
- Small holly cutout (green paper leaves with red marker berries)
- White paper background (light blue or kraft cardstock shows the print better)
- Glue
How to Make It
- Make a white footprint on your card with the heel at the top as the head.
- Cut and glue on a black hat, red scarf, and orange carrot nose.
- Paint the eyes, mouth, and buttons with black paint.
- Add a small holly accent to the hat band.
Tip: Dip the back end of a paintbrush in black paint for eyes and buttons. You get even, round dots, which a marker struggles with on bumpy dried paint.
Safety note: Use child safe scissors, and skip tiny decorations if a baby or toddler will handle the card.
5. Gingerbread-Style Footprint Figure

A brown footprint with white icing details turns into a gingerbread cookie. With the toes at the top, the toe row reads as the top of the head, the ball of the foot becomes the face, and the heel becomes the body.
The white details are where it comes alive, and also where it goes wrong. Thick white paint from a brush looks like a smear. A white paint marker gives you thin, even icing lines. It also makes a sweet footprint craft Christmas gift tag: print on kraft cardstock, trim, and punch a hole for ribbon.
Ages: 1 year and up · Mess: Medium · Time: 20 minutes plus drying
Younger kids: you draw the icing, they place the bow. Older kids: let them do the icing squiggles themselves with a paint marker.
What You Need
- Brown paint
- White paint (or a white paint marker for icing lines)
- Red ribbon or paper bow
- Small buttons or paper dots
- Pink paint or marker
- Black marker
- Paper or cardstock
How to Make It
- Paint one footprint on cardstock with brown paint, toes at the top, so the toes form the head, the middle of the foot forms the face, and the heel forms the body.
- Once dry, add white icing trim around the edge, white buttons down the body, and two short legs below the heel.
- Attach a red bow under the face, then add pink cheeks and black eyes and a smile.
Tip: For raised icing that looks almost real, use white Tulip Puffy Dimensional Fabric Paint and let it dry overnight before you stand the card up.
Safety note: Use nontoxic paint on skin, glue buttons on yourself, and cover the table, since brown paint shows every smudge.
6. Blue Footprint Winter Scene

This one flips the idea around. The big blue footprint isn’t a character. It’s the winter sky, with snow falling over a tiny snowman and tree at the bottom.
It’s the most storybook project here, and the one where patience matters most. Add the snow dots before the blue is fully dry and they turn pale blue and smear.
Ages: 2 years and up · Mess: Medium · Time: 25 minutes plus drying
Younger kids: you make the snowman and tree, they dot the snow. Older kids: add a moon, stars, or a whole row of trees.
What You Need
- Blue paint
- White paper
- White paint
- Green paper
- Black paper
- Red paper
- Gray paper (or a strip of paper bag)
- Glue
- Cotton swabs for snow dots
How to Make It
- Print a large blue footprint on white paper and let it dry completely.
- Dot white snow over the print with a cotton swab dipped in white paint.
- Cut a small tree, snowman parts, and a gray ground strip from colored paper, then glue them near the bottom of the print.
- Finish the snowman with black and red paper details.
Tip: Cotton swab dots look like snow. Pencil eraser dots look like polka dots. Mix both sizes for depth.
Safety note: Use washable paint, and press each glued layer flat so little fingers can’t peel it up.
7. Santa-Hat Penguin Footprint Craft
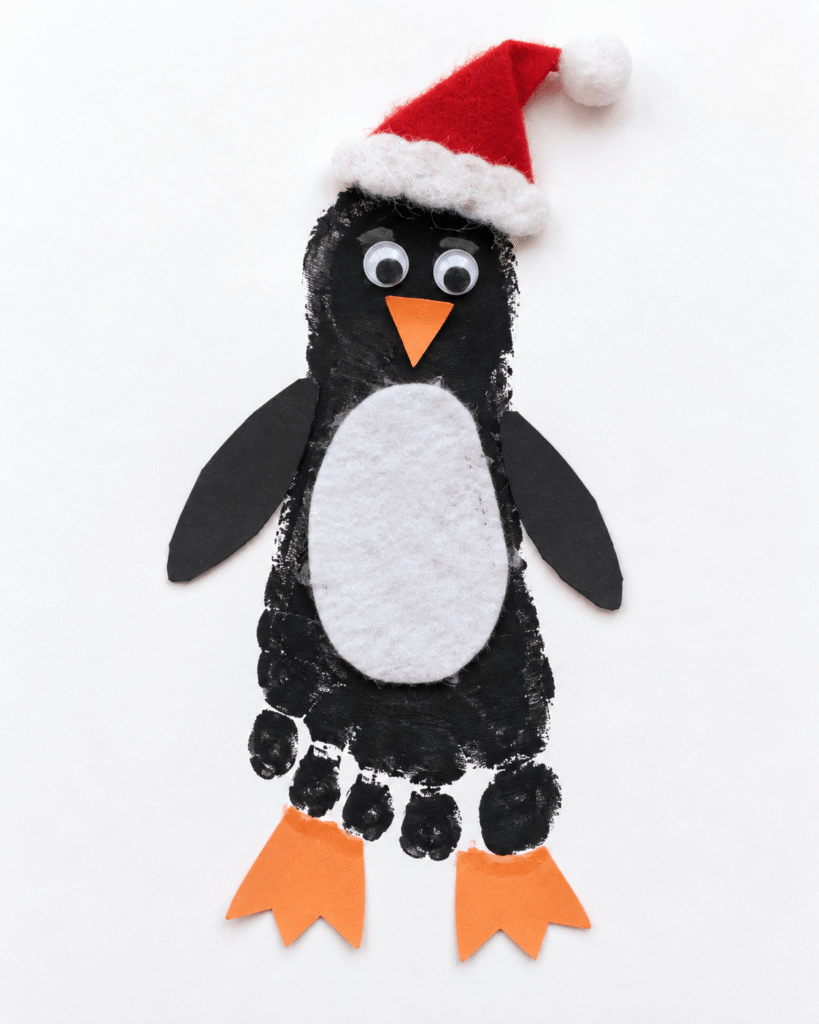
A black footprint becomes a penguin, and a tiny Santa hat makes it Christmas. The heel at the top is the head, a white oval belly covers the middle, and orange feet sit just below the toes.
Black is the messiest color on this list. It shows every stray fingerprint on white paper and it’s the one most likely to leave a gray shadow on skin, so have the wipes open before the brush comes out.
Ages: 1 year and up · Mess: High · Time: 25 minutes plus drying
Younger kids: use white paper circles with marker pupils instead of googly eyes. Older kids: let them cut the flippers, beak, and hat.
What You Need
- Black paint
- White paper or foam sheet
- Orange paper
- Red felt or paper
- White cotton or felt trim (cotton balls pulled thin work)
- Googly eyes (or paper circles)
- Black paper scraps for flippers
- Glue
- Scissors
How to Make It
- Paint a footprint shape in black on white paper, heel at the top, and let the toe marks show at the bottom.
- Glue a white oval belly over the middle, then add googly eyes near the heel, an orange beak, and orange feet just below the toes.
- Add black paper flippers on each side and finish with a red hat trimmed in white cotton or felt.
Tip: Cut the belly oval a little smaller than the print. If it covers the edges, you lose the footprint and end up with a paper penguin.
Safety note: Use nontoxic paint and glue, and keep googly eyes away from very young kids.
8. Elf Footprint Paper Craft

Of all the footprint Christmas crafts here, this one has the most parts: a striped hat, felt trim, pointed ears, a collar, and jingle bells. The green print is the elf’s body, and the heel at the top becomes the face.
The extra cutting pays off, because it’s the most character driven piece on the list. The trade off is the bells. Babies love the jingle, and they’re also a choking hazard, so you glue them on and the finished elf stays on a shelf.
Ages: 1 year and up (you do the cutting) · Mess: Medium · Time: 30 minutes plus drying
Younger kids: precut every piece and let them press the hat and collar into place. Older kids: let them design the hat stripes and draw the face.
What You Need
- Green paint
- White paper
- Red paper
- Green felt (or a fleece scrap)
- Tan paper (a paper bag works)
- Black marker
- Gold bells (or yellow paper circles)
- Glue
How to Make It
- Print a green foot onto white paper with the heel at the top to form the body and face area.
- Cut red and white hat pieces, green felt trim, tan ears, and a red collar, then glue them onto the footprint.
- Draw the face on the heel and attach gold bells to the hat tip and collar.
Tip: Bells are round and heavy for their size, so they roll off before the glue grabs. Use tacky glue and hold each one for a full minute.
Safety note: Use nontoxic paint for the print, and keep the bells well away from young children.
9. Footprint Wreath Circle

Several green prints arranged in a ring make a wreath, with a red bow at the top and holly berries around the edge. It’s the prettiest finished piece on the list, and the hardest to pull off with a small kid.
The problem is the number of prints. You need six to eight, and most toddlers are done after three. Each Christmas craft footprint in the ring also needs a few minutes to set before the next one goes beside it, or the edges merge into one green blob. Split it across two sessions, or print a few real ones and fill the gaps with traced feet cut from green paper.
Ages: 3 years and up · Mess: High · Time: 40 minutes or two sessions
Younger kids: do it over two days and let them make the berries with a red fingertip. Older kids: they can print their own feet all the way around.
What You Need
- Green paint
- Red ribbon bow
- Green paper holly leaves
- Red pom poms or paper berries
- Paper or cardstock (a 12 by 12 inch scrapbook sheet gives you room)
- A dinner plate and pencil for the guide circle
How to Make It
- Trace lightly around a dinner plate in pencil to mark the circle.
- Stamp green footprints around the line with the heels pointing toward the center.
- Add smaller green dots around the outside edge with a fingertip.
- Glue a red bow at the top and attach holly leaves with red berries at intervals around the wreath.
Tip: Turn the paper for each print instead of moving the child. Their foot stays in one comfortable position, and every print points neatly toward the center.
Safety note: Use child safe glue, and skip pom pom berries if a baby or toddler will be near the finished wreath.
10. Snowman Footprint Ornament
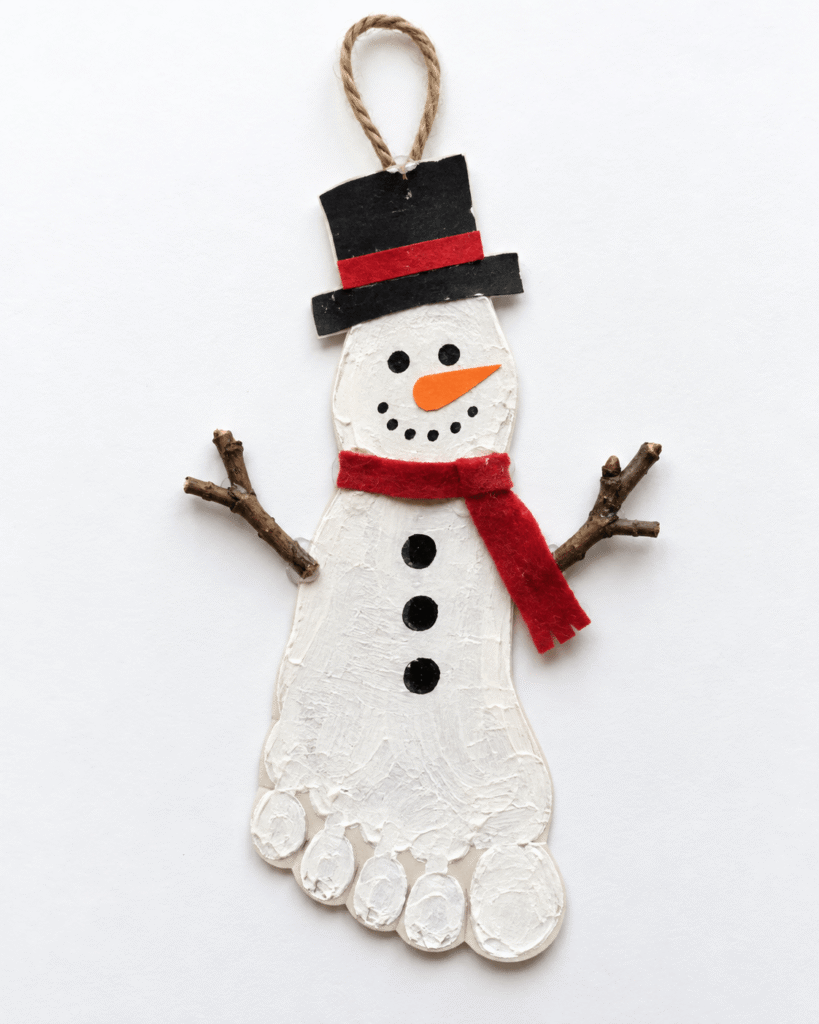
Same snowman idea as the card, built sturdy enough to hang. The toes sit at the bottom, the heel becomes the head, twig arms poke out the sides, and a twine loop goes on top. Since you cut this one out, white on white isn’t a problem.
Ornaments get packed, unpacked, and handled for years, so build this one tougher than a card. If you only make one footprint craft Christmas ornament to keep, make it this one and back it with cardboard.
Ages: 1 year and up · Mess: Medium · Time: 25 minutes plus drying
Younger kids: you attach the twigs. Older kids: send them outside to find two matching twigs and let them pick the hat band color.
What You Need
- White paint
- Black paint or marker
- Orange paint or paper
- Small twigs (from the yard)
- Twine (or kitchen string)
- Paper or cardstock
- Red paper strip
- Cereal box cardboard for backing (optional but worth it)
- Mod Podge to seal the front (optional)
How to Make It
- Stamp a white footprint on cardstock with the toes at the bottom so the heel becomes the head.
- Once dry, glue it to cereal box cardboard and cut around the shape.
- Add a black hat, eyes, and buttons, plus an orange nose.
- Glue twig arms to the back so they stick out on each side.
- Punch a hole at the top, thread a twine loop, and finish the hat band with a red paper strip.
Tip: Put a small piece of clear tape over the spot before punching the hanging hole. Without it, cardstock tends to tear at the hole the first time someone hangs it.
Safety note: Snap twig ends clean and trim any sharp points, and use a strong glue for anything that will hang.
11. Antlered Footprint Reindeer

A single brown print sits centered on a white board, with broad tan antlers, button eyes, a red pom pom nose, and a green plaid scarf. The toe marks stay visible at the top, just under the antlers.
This is a display piece more than a card. On foam board or a small canvas panel, it can stand on a shelf all season. Buttons look calmer than googly eyes next to the plaid, which gives it a more grown up, farmhouse feel.
Ages: 1 year and up · Mess: Low · Time: 20 minutes plus drying
Younger kids: you glue the buttons and nose. Older kids: they can cut the antlers from a template you draw.
What You Need
- Brown footprint base or paint
- Tan antler cutouts (kraft paper or cereal box)
- Two black buttons (or black paper circles)
- Red pom pom
- Green plaid ribbon or fabric strip
- White background board (foam board, or cereal box covered in white paper)
How to Make It
- Paint the foot brown and print it centered on the white board, toes at the top.
- Glue antler cutouts above the toes, then add button eyes and a red pom pom nose near the heel.
- Glue the plaid ribbon as a scarf below the face, keeping the toes exposed.
Tip: Plaid ribbon frays fast at the cut ends. A thin line of glue or clear nail polish along each cut stops it.
Safety note: Supervise buttons and small pom poms, and use a low mess adhesive on the ribbon so glue doesn’t soak through.
12. Holiday Stocking Footprint Ornament

A red footprint already looks a lot like a stocking. Add a fluffy white cuff across the heel end, a green ribbon loop, and a few felt stars, and you’ve got an ornament.
The white outline is the clever part. Instead of cutting tight around five tiny toes, cut about a quarter inch outside the print. That white border becomes your outline, and you skip the fiddliest cutting on the list.
Ages: 1 year and up · Mess: Medium · Time: 25 minutes plus drying
Younger kids: use foam star stickers instead of glued felt. Older kids: they can cut the felt stars and trees themselves.
What You Need
- Footprint or stocking shaped base (cardstock)
- Red paint
- White fluffy trim material (cotton balls pulled thin work)
- Green ribbon loop
- Small felt stars and tree shapes (or foam stickers)
- White outline paint or marker
How to Make It
- Paint the foot red and print it on cardstock, then cut around it leaving a thin white border, or add a white outline with a paint marker.
- Glue white fluffy trim across the heel end as the cuff and attach a green ribbon loop above it.
- Glue on small felt stars and tree shapes to finish the ornament look.
Tip: Glue the ribbon loop to the back, tucked under the cuff, not to the front. It holds better and hides the glue.
Safety note: Give the loop a firm tug before hanging, and use kid scissors for the felt.
13. Santa Boot Print Figure
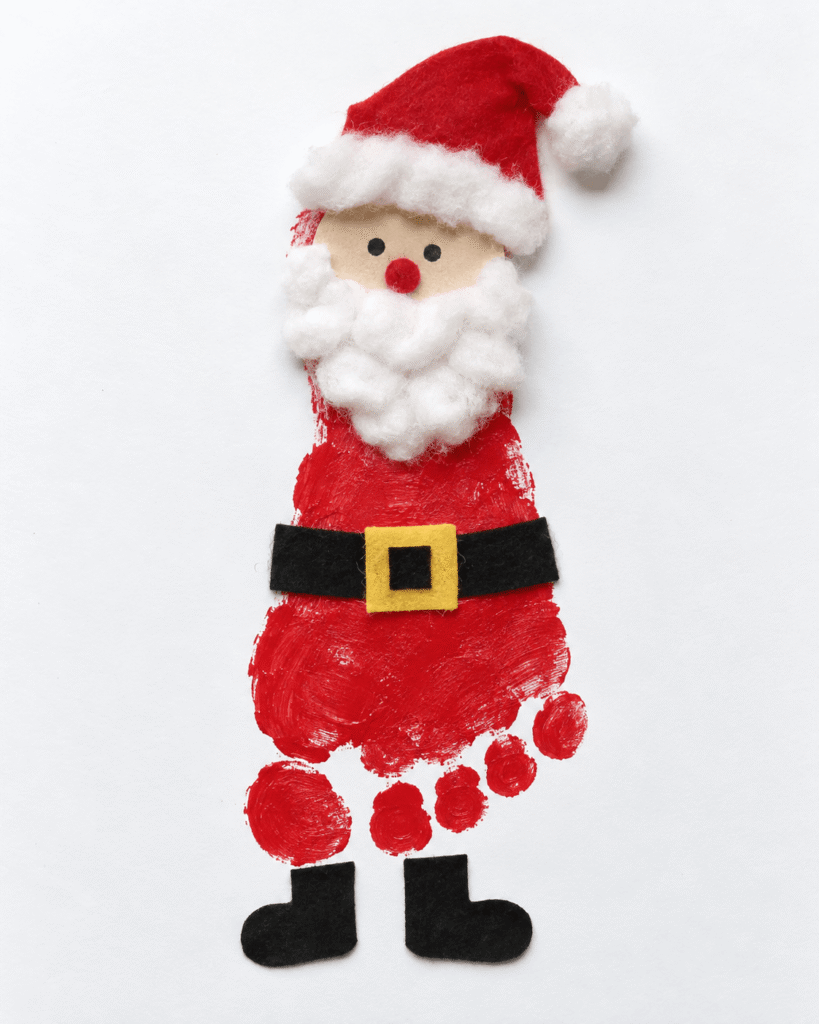
A red footprint becomes a full Santa: face and beard at the heel, a black belt across the middle, boots at the bottom, and the toe circles still showing near the base.
The belt does most of the work. Once it’s on, people stop seeing a foot and start seeing a coat. The trade off is layers. This one has more glued pieces than most, and fluffy trim sheds if you don’t press it down well.
Ages: 1 year and up · Mess: Medium · Time: 30 minutes plus drying
Younger kids: you place the beard, they press on the belt. Older kids: they can cut the boots and buckle.
What You Need
- Footprint base or boot shaped cutout
- Red paint
- White cotton or pom pom trim
- Black paper or felt belt and boots
- Yellow square buckle piece (a square of yellow sticky note works)
- Tan paper face area
How to Make It
- Paint the foot red, print it with the heel at the top, and add red toe circles near the lower edge if the toes printed faintly.
- Attach a tan face, a white fluffy beard, and a red hat with white trim at the top.
- Finish with a black belt, a yellow buckle, and black boots at the bottom.
Tip: Set the belt about a third of the way up from the toes, not dead center. It gives Santa a longer coat and a more natural shape.
Safety note: Keep glue off skin and away from eyes, and trim fuzzy materials neatly so they don’t shed onto little hands.
14. Button-Decorated Footprint Tree
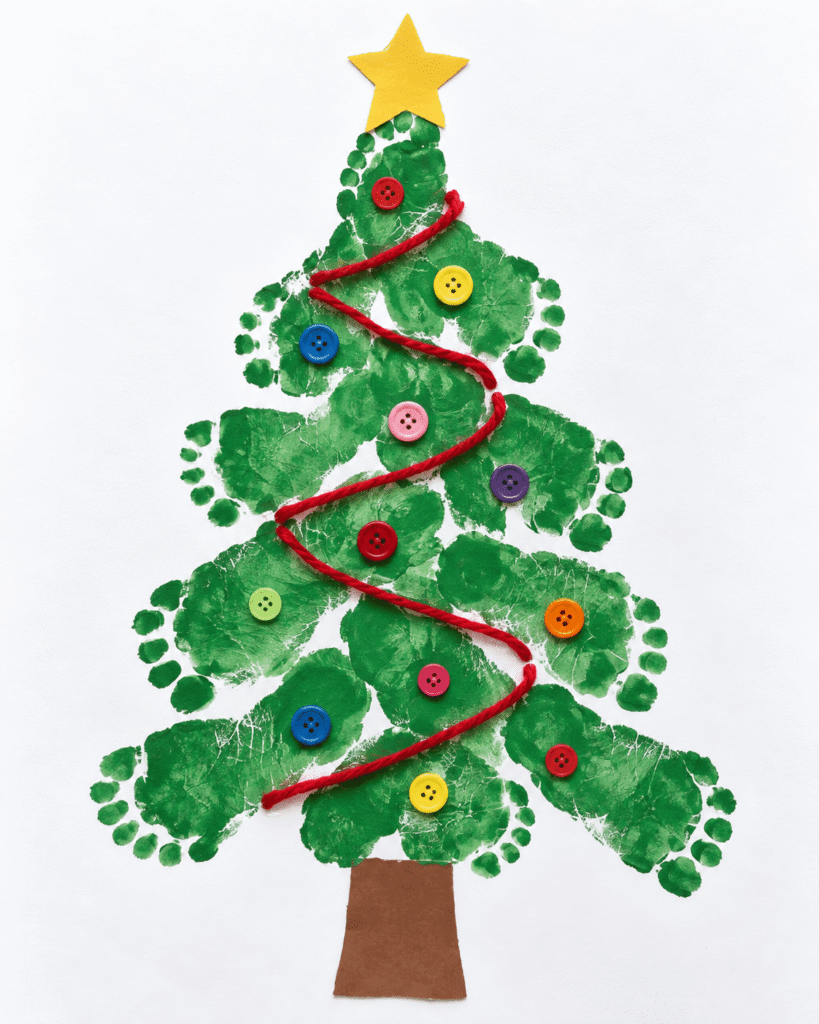
Stacked green prints build a tree in tiers, with a brown trunk, a yellow star, a red yarn garland, and buttons for ornaments. It looks layered and full in a way the single print tree can’t.
This is one of the Christmas crafts with footprints that looks best framed, but it shares the wreath’s timing problem. Print the bottom row first and work upward, letting each row dry about ten minutes, or the overlaps smear.
Ages: 3 years and up · Mess: High · Time: 40 minutes plus drying
Younger kids: keep it to two or three prints, one from each foot. Older kids: they can do every row and wrap the garland themselves.
What You Need
- Green paint
- Brown paint or paper trunk
- Yellow star cutout
- Red yarn
- Assorted buttons (or paper dots)
- Paper or cardstock
- Clear tape for the yarn ends
How to Make It
- Stamp a bottom row of green footprints with the toes pointing down, then add rows above that overlap slightly, leaving a small gap at the base for the trunk.
- Add a brown trunk and place a yellow star at the top.
- Wrap red yarn diagonally across the tree and tape the ends to the back.
- Glue buttons across the footprints as ornaments.
Tip: Mix left and right feet. They angle in opposite directions, which gives each tier a natural spread instead of a stiff stack.
Safety note: Keep small buttons away from young children, and tape the yarn ends firmly so they don’t unravel.
15. Red-Hatted Yarn Beard Footprint

This one is a Scandinavian style gnome. A brown footprint forms the body, a tall red felt hat sits on top, a wooden bead makes the nose, and layered white yarn becomes a big, soft beard.
On a wood panel it looks like something from a holiday market. Raw wood soaks up washable paint, though, so the print can come out faint. Brush on a coat of Mod Podge or white gesso first, let it dry, then print.
Ages: 2 years and up · Mess: Medium · Time: 30 minutes plus drying
Younger kids: they place yarn strands onto glue you’ve spread. Older kids: they can cut and layer the whole beard.
What You Need
- Brown paint
- Red felt
- White yarn
- Small wooden bead (or a brown pom pom)
- White pom pom
- Glue
- Scissors
- Paper or wood panel
How to Make It
- Paint a brown footprint shape on paper or a wood panel and keep the toe marks visible.
- Cut a red pointed hat from felt and glue the white pom pom at the tip.
- Glue the hat above the footprint, add the wooden bead as a nose, and attach layered white yarn strands as the beard.
Tip: Cut the yarn in uneven lengths and glue the longest strands first, shorter ones on top. Even lengths make the beard look like a mop.
Safety note: Trim yarn ends carefully, and supervise the wooden bead closely with small kids.
16. Reindeer Footprint Pair
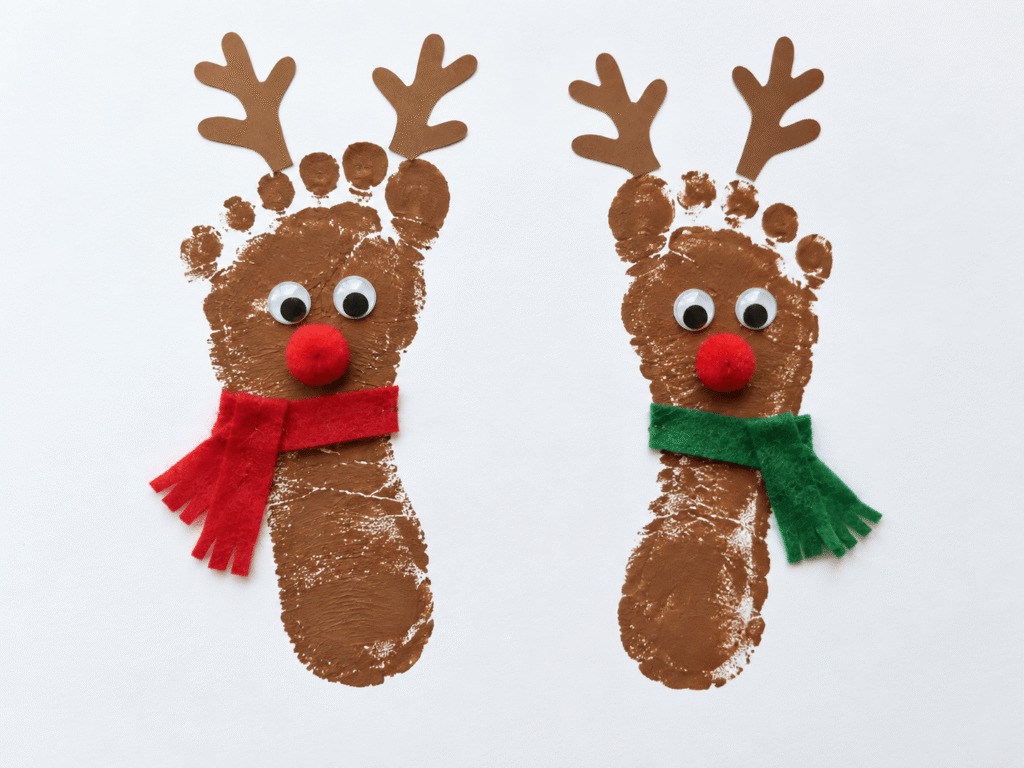
Two footprint reindeer side by side make a matching set, each with antlers, a red nose, and a scarf. Use a left foot and a right foot, and the pair mirrors itself naturally.
This is my favorite sibling project. Print one reindeer from each kid, give them different scarf colors, and you get a record of their size difference that year. It’s the footprint craft Christmas keepsake I’d repeat every year. The trade off is wrangling two kids in one session, so print one, clean up, then print the next.
Ages: 6 months and up · Mess: Medium · Time: 30 minutes plus drying
Younger kids: one print each, and you handle the rest. Older kids: an older sibling can decorate both reindeer.
What You Need
- Two footprint bases or prints
- Brown paint
- Brown antler cutouts
- Googly eyes (or marker dots)
- Red pom poms
- Felt scarves in red and green
How to Make It
- Paint two footprint shapes brown, toes at the top, and let the heel area serve as each reindeer face.
- Glue on antler cutouts above the toes, then add googly eyes and red pom pom noses.
- Wrap felt scarves around the neck area and arrange the pair on a light background.
Tip: Write each child’s name under their reindeer on the front. In five years, nobody will remember whose was whose.
Safety note: Avoid small loose parts for young children, and stick to child safe glue and washable paint.
17. Santa Footprint Beard Ornament

Here the footprint becomes Santa’s head and hat: a red pointed hat over the toes, a tan face across the middle, and a big cotton beard filling the bottom half. Pine sprigs and berries around it make a nice frame for photos.
The beard is the whole show, and it’s where most first tries go wrong. Whole cotton balls glued on look like lumps. Pull each one apart until it’s thin and wispy, then layer two or three.
Ages: 1 year and up · Mess: Medium · Time: 30 minutes plus drying
Younger kids: they press stretched cotton onto glue you’ve spread. Older kids: they can roll and glue the paper cone hat.
What You Need
- Bare footprint cutout or painted footprint base
- Red paper cone hat
- Cotton batting or faux fur trim (cotton balls pulled thin)
- Tan paint or paper face area
- Black and red pom poms or paper circles
- White paint
How to Make It
- Paint or cover the footprint base red, toes at the top, and add a few white highlights on the toes.
- Attach a tan face area across the middle, black eyes, a red nose, and a cotton beard below the face.
- Add the red hat with white trim over the toes, then dab white paint into the beard for texture.
Tip: Glue the finished piece to cereal box cardboard before hanging it. The cotton adds weight, and plain cardstock curls under it.
Safety note: Use nontoxic paint on skin, and glue small pieces down securely if kids will handle the ornament.
18. Haloed Footprint Angel Ornament

The last of these Christmas footprint crafts is the only one with no paint at all. You trace the foot, cut it from white paper or a foam sheet, and turn it into a small angel with a fabric dress, wings, and a gold tinsel halo.
That makes it the best pick for kids who hate the feel of paint, and for classroom or party crafting where cleanup isn’t an option. The trade off is more cutting, so it’s an adult job for little ones.
Ages: Any age (traced, no paint) · Mess: Low · Time: 30 minutes
Younger kids: trace while they stand on the paper, and you do all the cutting. Older kids: they can trace their own foot and dress the angel.
What You Need
- White paper or foam sheet
- Cream fabric scrap (an old pillowcase works)
- Thin twine
- Gold tinsel pipe cleaner (or candy wrapper foil)
- Black marker
- Pink blush or paint
- Scissors
How to Make It
- Trace the foot onto white paper or foam sheet, then cut out the footprint base, a rounded head, and two wings.
- Add closed eyes and a smile with black marker, and pink cheeks with blush or paint.
- Attach the wings to the sides, drape the cream fabric as a dress, and tie it with twine.
- Shape the gold tinsel into a halo above the head.
Tip: Trace with the child standing, not sitting. A standing foot spreads flat and gives you a truer outline. Hold the pencil straight up, not angled in.
Safety note: Pipe cleaners have a sharp wire core. Fold each cut end back on itself, and keep twine and halo scraps away from young kids.
Footprint Holiday Crafts That Bring Each Festive Character To Life
Every print on this list turns into a character the moment you add one detail: antlers, a hat, a scarf. That’s why footprint Christmas crafts work at any skill level. The foot gives you the shape for free, and a few cut pieces tell people what it is.
What you do with the finished piece matters just as much. Here’s how to make each format last.
Cards
Print on a flat sheet of cardstock, let it dry, then score and fold. Keep the print away from the fold line, because dried paint cracks when it bends.
If you’re mailing footprint craft Christmas cards, keep them flat. Lumpy envelopes with pom poms, buttons, or bells can trigger the USPS nonmachinable surcharge. Mail the paper versions and hand deliver the 3D ones.
Ornaments
Back every ornament with cereal box cardboard and seal the front with two thin coats of Mod Podge. Dab the first coat on instead of brushing back and forth. Washable paint can rewet under a water based sealer, and brushing drags red into white.
Gifts for grandparents
A dollar store frame turns any of these into a gift. Write the child’s name and age along the bottom edge of the print, where it shows through the frame window.
Practical note: Paint the foot once and print twice. The second print is usually a little lighter, but it’s the one you can give away while the best one stays home.
Storing them
Once everything is fully dry, stack pieces flat with a sheet of parchment paper between each one. In a warm attic or a damp basement, dried paint can stick to whatever sits on top of it.
Common Mistakes With Your First Christmas Craft Footprint
Most Christmas crafts with footprints go wrong in the first two minutes, before any paper gets cut. These are the ones I see over and over.
- Loading too much paint. This is the number one way to ruin a Christmas craft footprint. The toes fill in and the print looks like a mitten. Thin coat, test print, every time.
- Picking the wrong moment. A hungry or overtired kid gives you one attempt, maybe. Print after a meal or a nap.
- Printing white on white. Snowmen and polar bears vanish on plain white paper. Use colored or kraft cardstock.
- Gluing onto wet paint. Paper pieces slide and drag color with them. Give the print its full 20 to 30 minutes.
- Using a glue stick for 3D pieces. Pom poms, bells, and buttons will be on the floor by New Year’s. Use tacky glue.
- Cutting tight around the toes. One slip and you’ve snipped off a toe. Leave a narrow border.
- Forgetting room for antlers and hats. A print centered on the page leaves no space above it. Place it low.
- Skipping the name and year. You’ll think you’ll remember. By the second or third kid, you won’t.
FAQs
What paint is safe for baby footprint crafts?
Use washable, nontoxic kids’ paint that carries the AP Seal from the Art and Creative Materials Institute, such as Crayola Washable Kids’ Paint. Skip acrylic craft paint, and wash the foot with warm soapy water within a few minutes of printing.
How do you get a clear footprint from a baby who won’t stay still?
Brush a thin coat of paint on with a foam brush, then press the cardstock onto the foot instead of pressing the foot onto the paper. A second adult holding the baby makes it far easier.
What age is best for footprint Christmas crafts?
You can do them from the newborn stage, but 6 months to 3 years is the easiest window: feet fit a card nicely and kids still let you paint them. Kids 5 and up can trace, cut, and decorate their own.
How long does footprint paint take to dry?
A thin coat of washable paint on cardstock is usually dry to the touch in 20 to 30 minutes. White, black, and heavier coats take longer, so wait before gluing anything on top.
How do you make a footprint ornament last?
Glue it to cereal box cardboard, seal the front with two thin coats of Mod Podge (dab the first coat so the paint doesn’t smear), and store it flat with parchment paper on top.
Can you make footprint Christmas crafts without paint?
Yes. Trace the foot onto colored paper or a foam sheet and cut it out, like the Haloed Footprint Angel Ornament above. It’s the best option for kids who dislike paint and for classrooms or parties.
Where To Go From Here
If this is your first year, pick one card from the top of the comparison table and one ornament. Do the card this weekend while the paint is out, and save the ornament for early December.
Read next: If the paint is already on the table, 17 Thanksgiving Handprint Crafts uses the exact same setup with hands, so you can get both done in one messy session. And if Halloween is still ahead of you, Best Halloween Pumpkin Crafts For Easy Fall Decor uses most of the same supplies and gives you a practice run before December.
One last thing before you start: open the wipes and lay out the towel before you open the paint. Once the brush touches a foot, you won’t have a free hand.
