
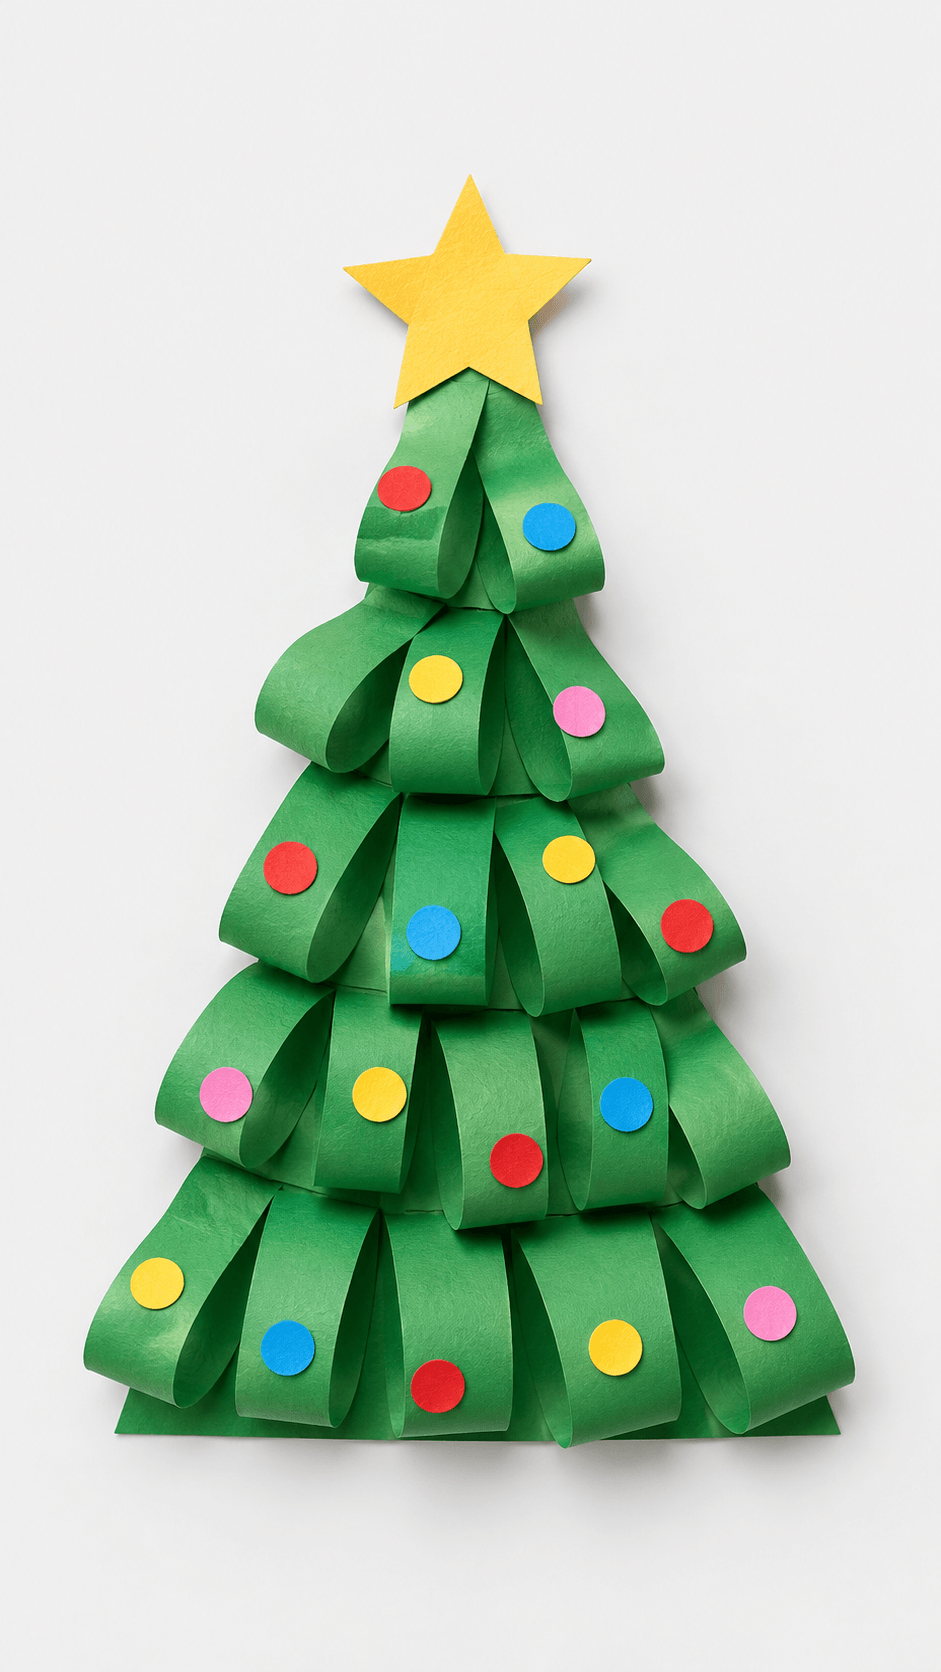
The best preschool Christmas crafts use big, simple shapes, washable materials, and four steps or fewer, so a 3 to 5 year old can do most of the work alone. Stamped wrapping paper, tissue paper collage, and pom pom cookies are the easiest places to start, and most projects take 15 to 30 minutes of hands on time. Keep an adult close for scissors, yarn, and any piece small enough to fit through a toilet paper tube.
The glue stick is uncapped, a pom pom is floating in the dog’s water bowl, and your three year old has just announced that the Christmas tree should be blue. If that’s your December afternoon, you’re in the right place.
I put this list together for the stage where kids can glue, tear, stamp, and thread, but still need you within arm’s reach. Every one of these preschool Christmas crafts is built around a single clear shape, like a tree, a star, or a mitten, so a small maker can finish it and still recognize what they made.
That matters. Kids stick with a project when it looks like the thing it’s supposed to be.
You’ll find easy Christmas crafts for kids that take ten minutes and a few that need a calm hour. Each project lists a realistic time, a mess rating, what tends to go wrong on a first try, and a cheaper swap for anything you’d have to buy.
If you’re collecting Christmas crafts for preschoolers to work through all month, go down the list in order. I ordered it from the lowest mess and effort toward lacing, felt, and weaving, which need steadier hands.
Before You Start: What You Need For Preschool Christmas Crafts
Most preschool Christmas crafts run on the same small kit. Buy it once and you can make most of this list without another store run.
| Staple | Why it earns its spot | Where to find it | Budget swap |
| Washable school glue (Elmer’s) | Holds paper and washes out of clothes | Grocery and dollar stores | Flour and water paste, about equal parts |
| Tacky glue (Aleene’s Original Tacky Glue) | Grabs felt, buttons, and pom poms that school glue lets slide | Craft stores, Amazon | Double sided tape or glue dots for light pieces |
| Blunt tip kids scissors (Fiskars) | Safe snipping for paper | Craft and big box stores | You cut the shapes ahead of time |
| Washable paint (Crayola) | Stamping and painting that cleans up | Craft and big box stores | Washable markers |
| Construction paper and cardstock | Trees, bulbs, tags, and cards | Dollar stores | Cereal boxes, junk mail, brown paper bags |
| Felt sheets | Soft shapes that hold glue well | Craft stores | Fleece scraps |
| Yarn and twine | Lacing, wrapping, and hanging | Craft stores | Shoelaces and kitchen string |
| Pom poms, buttons, googly eyes | Color and texture | Craft stores | Paper circles and cotton balls |
Practical note: If you only buy one upgrade, make it tacky glue. White school glue is fine for paper, but it slides off felt, buttons, and pom poms, and a kid who watches the third pom pom roll off the tree will usually quit.
Glue choice changes how most of these projects turn out, so it’s worth a closer look before you shop.
How I Rate Mess and Supervision
Low mess means dry materials like paper and glue sticks. Medium means liquid glue and lots of small pieces. High means paint or wet clay.
For supervision, Nearby means you’re in the room. Close means you’re within arm’s reach, which is where I stay for scissors, yarn, and anything small.
Ages and Small Parts
Ages 3 to 5 is the sweet spot for Christmas crafts for preschoolers, and this list is built around it. With a 2 year old, you cut and they stick, stamp, and tear. With a 5 or 6 year old, hand over the scissors and let them plan the colors.
Practical note: Anything that fits through a toilet paper tube can choke a child under 3. Plenty of 3 year olds still mouth things when they’re tired, so check every bead, button, and pom pom against that tube.
For those kids, I swap in bigger pieces or paper circles. I save beads and buttons for kids who reliably keep supplies out of their mouths.
Cover the table with a dollar store plastic tablecloth or a flattened cardboard box before you start, and keep wipes within reach. Skip loose glitter entirely. It travels to places you won’t find until January.
Pick A Project By Age, Mess Level, And Time
Here are all 20 at a glance, so you can match a project to the kid and the afternoon you actually have. Whether you’re after Christmas paper crafts or felt Christmas crafts, this table gets you to the right project fast.
| Project | Ages | Mess | Hands on time | Adult help |
| Stamped Star Wrapping Paper | 2 to 5 | Medium | 20 minutes plus drying | Nearby |
| Tissue paper candle collage | 3 to 6 | Low | 20 minutes | Nearby |
| Pom-pom decorated holiday cookies | 3 to 5 | Medium | 30 minutes | Close |
| Paper Strip Christmas Tree | 3 to 5 | Low | 25 minutes | Nearby |
| Button-Decorated Felt Tree | 4 to 6 | Medium | 30 minutes | Close |
| Candy Cane Bead Wand | 3 to 5 | Low | 15 minutes | Close |
| Paper tube gift scrolls | 3 to 6 | Low | 25 minutes | Nearby |
| Colorful Bulb Garland Banner | 3 to 6 | Low | 30 minutes | Nearby |
| Accordion paper Christmas tree card | 4 to 6 | Low | 30 minutes | Nearby |
| Painted Ornament Cookie Shapes | 3 to 6 | High | 40 minutes over two sessions | Nearby |
| Kraft Tag Holiday Ornaments | 3 to 6 | Medium | 30 minutes | Close |
| Cotton-Trim Village Collage | 3 to 6 | Medium | 30 minutes | Nearby |
| Paper garland star display | 3 to 6 | Low | 30 to 40 minutes | Nearby |
| Wrapped Yarn Gift Box | 4 to 6 | Low | 30 minutes | Nearby |
| Ribbon Strip Paper Ornament | 4 to 6 | Low | 30 minutes | Close |
| Felt Snowy Cottage Scene | 4 to 6 | Medium | 40 minutes | Nearby |
| Laced Felt Tree Board | 4 to 6 | Low | 40 minutes | Nearby |
| Ribbon Woven Holiday Plaque | 4 to 6 | Low | 30 minutes plus adult prep | Close |
| Felt Envelope Gift Pouch | 5 to 6 | Low | 45 minutes | Close |
| Laced Mitten Snowflake Ornament | 4 to 6 | Low | 35 minutes | Close |
This is the table to keep handy. Save this for later, and picking a project on a rainy Saturday takes about ten seconds.
1. Stamped Star Wrapping Paper

This is the one I’d start with. A roll of kraft paper, a few colors of washable paint, and a foam star turn plain brown paper into wrapping paper a grandparent will actually save. There’s no wrong way to stamp, which makes it the best pick for your youngest maker, and it’s one of the easiest Christmas crafts for kids who aren’t ready to cut.
The trade off is paint. Kraft paper soaks up wet paint fast, so heavy handed stampers end up with blobs instead of stars. A thin layer of paint on the stamp prints cleaner than a thick one.
Ages: 2 to 5. Mess: Medium. Time: 20 minutes, plus about an hour to dry.
What You Need
- Kraft paper (a roll from the dollar store, or a flattened brown grocery bag)
- Foam star stamps (or a potato cut into a star by an adult)
- Washable paint in red, green, and gold (skip the gold, or add gold crayon stars once the paint is dry)
- Paper plates for the paint (or reused takeout lids)
How to Make It
- Tape the paper to the table so it can’t slide, and squeeze a little paint onto each plate.
- Press a star into the paint, blot it once on a scrap, then stamp it onto the paper.
- Fill the gaps with dots from a fingertip or the eraser end of a pencil.
- Let the sheet dry flat for about an hour before you wrap anything.
Tip: Give each color its own stamp. By the third round, a shared stamp turns red and green into muddy brown stars.
Safety: Use washable paint only, and keep a damp towel within reach.
2. Tissue Paper Candle Collage

Tissue collage is the most forgiving project on this list. A tall red candle, a yellow flame, and a few holly leaves make one of the classic Christmas paper crafts, and nobody has to cut a neat edge.
Here’s what only tissue paper teaches you: it bleeds. Some tissue paper releases dye when it gets wet, so brushing watery glue over red tissue on white paper can leave a pink halo. A glue stick avoids that.
Ages: 3 to 6. Mess: Low. Time: 20 minutes.
What You Need
- Construction paper for the base (or the plain side of a cereal box)
- Red, yellow, and green tissue paper (or scraps from old gift bags)
- Glue stick
- Scissors (or just torn pieces)
How to Make It
- Draw or cut a tall candle body, a small flame, two or three holly leaves, and a few berry circles from paper. A 5 year old can draw their own outline.
- Tear the tissue paper into small pieces. Tearing is half the fun, and it’s good hand practice.
- Glue stick the candle body, then press red tissue on, overlapping the pieces.
- Add the yellow flame, then place the holly leaves and berries at the base.
Tip: Let kids tear instead of cut. Torn edges look soft, and nobody has to be careful.
Safety: Display it away from real candles and fireplaces. A battery powered tea light next to it looks great and carries no risk.
3. Pom-pom Decorated Holiday Cookies
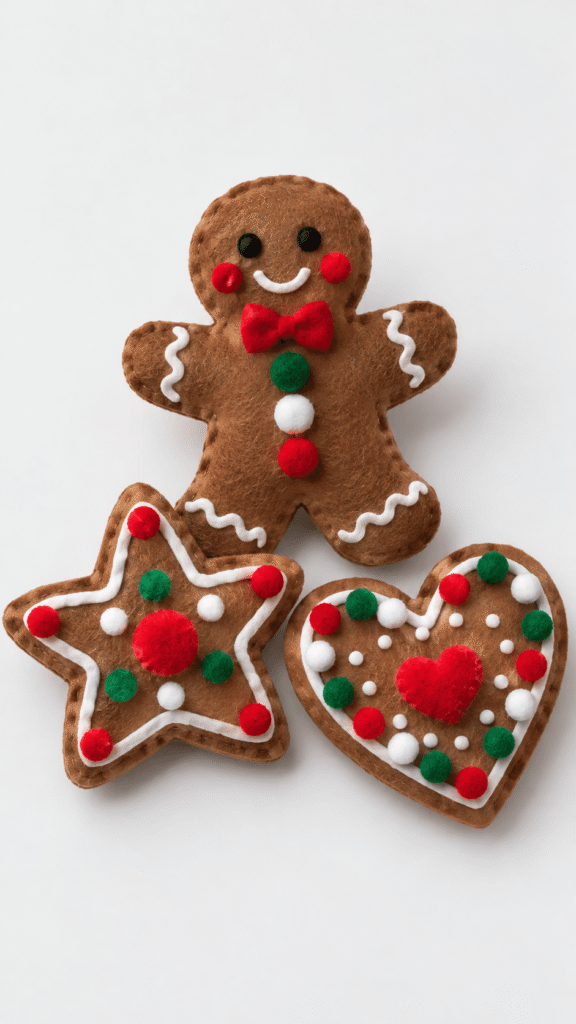
Pom pom cookies are what happens when a kid who loves sorting meets a craft. A gingerbread person, a star, and a heart, covered in soft pom poms and little foam sprinkles, look like a cookie plate nobody can eat. They’re also the easiest of the felt Christmas crafts here, because the felt is just a covering and you don’t need to cut it neatly.
You need tacky glue. White school glue won’t hold pom poms for more than a minute, and kids notice. The shapes also need about 20 minutes flat to set, which feels like forever at this age.
Ages: 3 to 5. Mess: Medium. Time: 30 minutes, plus 20 minutes to set.
What You Need
- Cookie shaped cutouts (trace a cookie cutter onto a cereal box, or use craft foam)
- Felt in brown, red, and green (or pieces of a brown paper bag)
- Pom poms at least 1 inch wide (or scrunched tissue paper balls)
- Small foam or paper shapes for buttons and faces (or paper circles)
- Tacky glue
How to Make It
- Trace a cookie cutter onto cardboard or foam and cut out the shapes. The gingerbread person’s thin arms snap, so make them chunky.
- Cut felt a little bigger than each shape, glue it on, and fold the edges to the back.
- Press on pom poms and foam bits as buttons, eyes, and icing dots.
- Lay the cookies flat to set for 20 minutes.
Tip: Put the pom poms in a muffin tin, one color per cup, so nothing rolls off the table.
Safety: Pom poms smaller than 1 inch are choking hazards for children under 3, so keep an adult close.
4. Paper Strip Christmas Tree
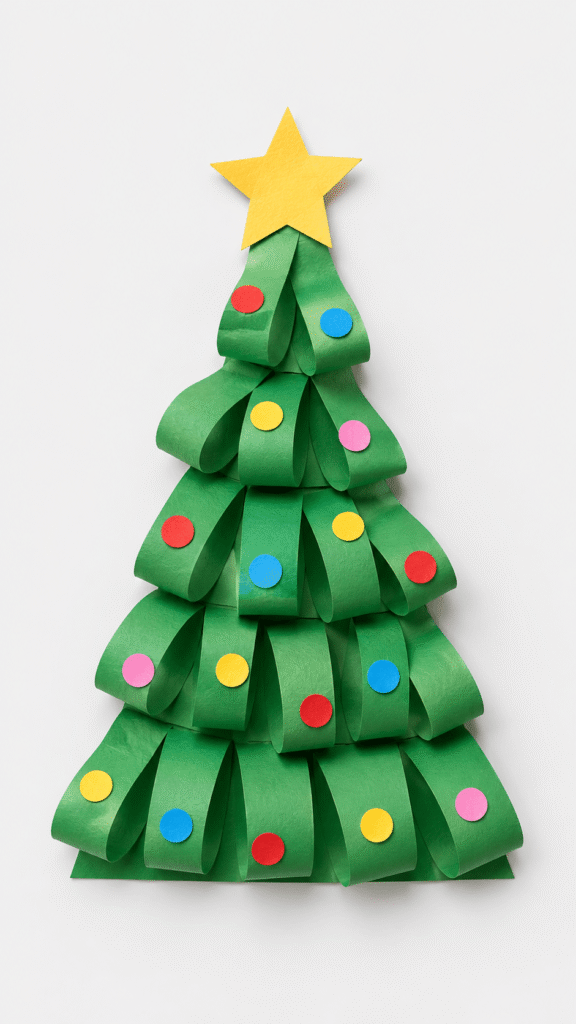
This tree stands off the page, and kids notice. Flat green paper becomes a tree with real depth and shadow, and it reads as a tree from across the room even when every strip is crooked. It’s a good pick if you want Christmas paper crafts that look more impressive than they are.
Liquid glue holds paper strips better than a glue stick, so expect slightly sticky fingers. Glue both ends of every strip, or the loops pop open as they dry.
Ages: 3 to 5. Mess: Low. Time: 25 minutes.
What You Need
- Green construction paper (or green pages from a magazine)
- Gold star cutout (or a star cut from yellow paper)
- Colored paper dots (stickers, or paper circles from a hole punch)
- School glue
- Scissors
How to Make It
- Fold a sheet of green paper in half, draw half a tree along the fold, and cut. Open it up and you have a tree with a center crease.
- Cut green strips about 1 inch wide and 4 inches long.
- Curl each strip into a loop and glue both ends to the tree, working in rows from the bottom up.
- Glue the star on top and press on the colored dots.
Safety: Use child safe scissors, and use stickers instead of loose dots if your child still mouths small things.
5. Button-Decorated Felt Tree

A green felt tree with rows of buttons is a classic for a reason. It’s also sorting practice in disguise, and kids who resist anything that feels like learning will line up reds and blues without being asked. Of all the felt Christmas crafts on this list, it’s the one I’d hand a 4 year old first.
Buttons are small, so this one is for kids who keep things out of their mouths. For everyone else, use big wooden buttons or paper circles. School glue also lets buttons pop off by morning, while tacky glue stays put.
Ages: 4 to 6. Mess: Medium. Time: 30 minutes, plus an hour to set.
What You Need
- Green felt sheet (or green cardstock)
- Yellow felt star (or a star cut from a yellow sticky note)
- Brown cardstock for the trunk (or a scrap of paper bag)
- Assorted colorful buttons (a thrifted button bag, or paper circles)
- Tacky glue
How to Make It
- Cut a triangle tree from the felt. Use fabric scissors for this. Kids scissors tend to fold felt instead of cutting it, so it’s an adult step.
- Glue the trunk at the bottom and the star at the top.
- Put a few small dots of tacky glue on the tree, then let your child press buttons into them. Work in horizontal rows, one color per row.
- Lay it flat for an hour before you hang it.
Tip: Dot the glue yourself and let them place the buttons. Squeezing out a big puddle of glue is where this project usually goes sideways.
Safety: Supervise buttons and glue closely. Small buttons are a choking hazard.
6. Candy Cane Bead Wand
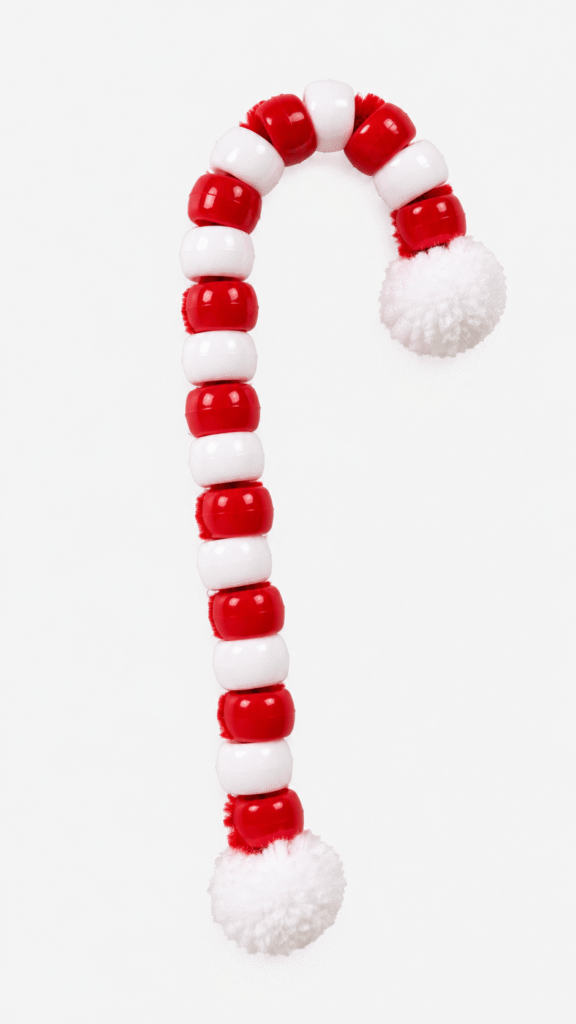
This is more a fine motor workout than a craft, and kids never notice. Red and white beads on a pipe cleaner, bent into a candy cane curve with fluffy tips, is quick, bright, and oddly absorbing.
Bead size is everything. Tiny pony beads are hard for small fingers and a choking risk, so use jumbo beads about 1 inch wide. If your child still mouths things, skip this one and make the Paper Strip Christmas Tree instead.
Ages: 3 to 5. Mess: Low. Time: 15 minutes.
What You Need
- Red and white jumbo beads, about 1 inch (or penne pasta painted red and white and dried overnight)
- A chenille stem, also called a pipe cleaner (the dollar store version works fine)
- Two fluffy pom poms, about 1 inch (or two cotton balls)
- Tacky glue
How to Make It
- Fold one end of the pipe cleaner over twice to make a stopper, so the beads can’t slide off and no wire tip is exposed.
- Thread on beads, alternating red and white, until you have about 2 inches of stem left.
- Fold that last inch over to lock the beads in, then bend the whole thing into a candy cane hook.
- Glue a pom pom over each folded end to cover the wire.
Safety: Beads are a choking hazard and wire ends can scratch, so fold and cover every tip.
7. Paper Tube Gift Scrolls

Start saving toilet paper tubes in November. Wrapped in patterned paper and tied at both ends with twine, three tubes in a row look like oversized wrapped candies, and they work as a mantel decoration or a table centerpiece. They’re cheap Christmas paper crafts that use up what’s already in your recycling bin.
The seam is the hard part. Glue stick peels on a curved tube, so use double sided tape or a thin line of tacky glue.
Ages: 3 to 6. Mess: Low. Time: 25 minutes.
What You Need
- Cardboard tubes (toilet paper rolls, or paper towel rolls cut in half), free
- Decorative wrapping paper (leftover scraps, or plain paper your child decorates with stickers and markers)
- Twine or yarn, about 10 inches per tube (or kitchen string)
- Foam star cutouts (or stars cut from cardstock)
- Double sided tape or tacky glue
How to Make It
- Cut the paper as wide as the tube plus 1 inch, and about 2 inches longer than the tube so it sticks out of both ends. This is an adult step.
- Roll the paper around the tube and seal the seam.
- Pinch each end together and tie twine around it, like a wrapped candy.
- Stick a star on the middle.
Tip: Let your child decorate the plain paper first, then wrap it. It feels more like theirs.
Safety: Trim the twine tails short and use blunt scissors for the trimming.
8. Colorful Bulb Garland Banner
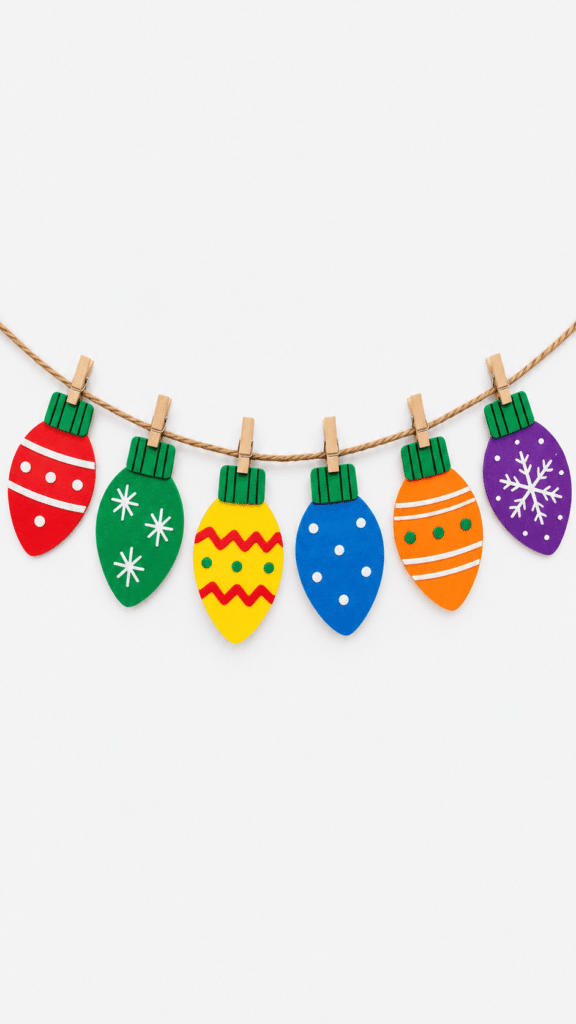
Six oversized bulbs clipped along a rope make a banner big enough to see from the couch. Kids like this one because they make the same shape six times and every bulb comes out different. It’s also one of the better Christmas crafts for preschoolers who want to make something for the whole room.
Thin paper droops on a rope. Cardstock or craft foam holds its shape, while plain construction paper curls.
Ages: 3 to 6. Mess: Low. Time: 30 minutes.
What You Need
- Cardstock or craft foam in six bright colors (or cereal box cardboard covered in colored paper)
- Rope or twine, about 6 feet (or yarn)
- 6 clothespins (or tape)
- Green paper for the caps (or any scrap)
- Scissors
How to Make It
- Draw one bulb on cardboard to use as a template, trace it six times, and cut. Preschoolers can trace. Adults usually do the cutting.
- Cut small green caps and glue one onto the neck of each bulb.
- Decorate with stripes, stickers, or dots.
- Tape the rope across a window or wall, then clip the bulbs on with clothespins.
Tip: Tape the rope up before you clip anything on, so the weight of six bulbs doesn’t pull it down while you work.
Safety: Hang the rope high enough that a child can’t pull it down or get tangled in it. Clothespins can pinch small fingers.
9. Accordion Paper Christmas Tree Card
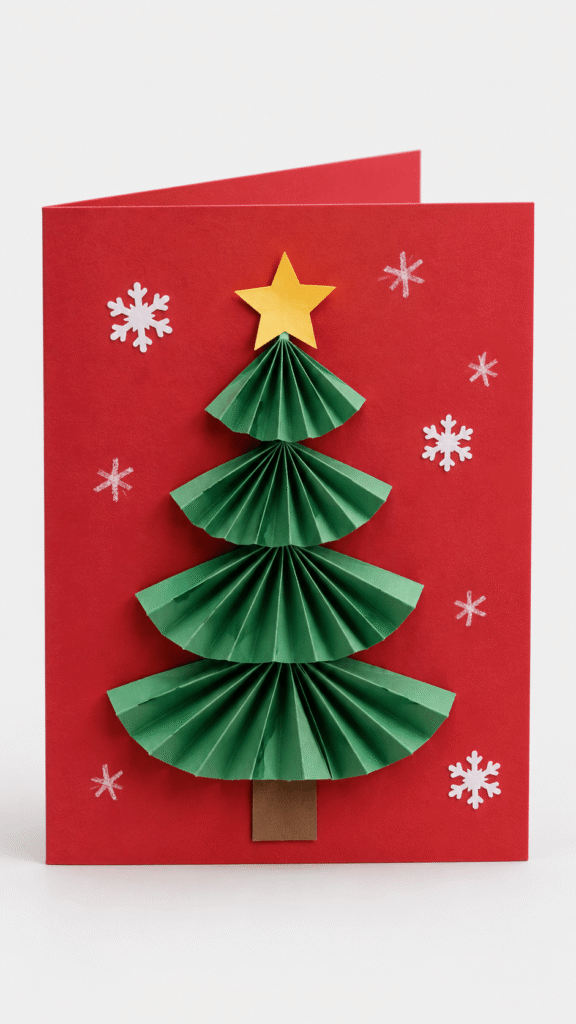
The accordion fold is the whole trick here. Fold strips of green paper back and forth, pinch them into fans, stack them on a red card, and you have a tree with real branches. It’s one of the Christmas paper crafts that doubles as a handmade card, which is useful when grandparents are involved.
Four year olds can fold, but the creases come out uneven. That’s fine. Uneven pleats look more like branches. For 3 year olds, you pleat the strips and they do the gluing.
Ages: 4 to 6. Mess: Low. Time: 30 minutes.
What You Need
- Red cardstock folded in half (or red construction paper)
- Green paper (construction paper, or green magazine pages)
- Yellow star cutout (or a yellow sticky note cut into a star)
- Brown paper rectangle (or a paper bag scrap)
- Snowflake and star stickers (or white crayon snowflakes)
- Glue
How to Make It
- Cut four green strips about 1 1/2 inches wide, in different lengths: roughly 8, 6, 4, and 3 inches.
- Fold each strip back and forth in narrow pleats, pinch the middle, and glue the pinch onto the card to make a fan. Start with the longest at the bottom and stack upward.
- Add the brown trunk at the base and the star at the top.
- Fill in with stickers or crayon snowflakes.
Tip: Fold one strip yourself first. Kids copy a sample better than they follow directions.
Safety: Press folds flat with a thumb to avoid paper cuts, and use child safe scissors for any cutting.
10. Painted Ornament Cookie Shapes

This is the only project here that needs two sessions, and it earns them. Clay or dough shapes dry overnight, then kids paint them in solid colors and add white swirls and dots that look like icing. Hang them with ribbon and they’ll still be around next December.
Clay is the slow, fragile step. Shapes thinner than 1/4 inch crack or warp as they dry, so roll thicker than feels right.
If you’d rather skip store bought clay and go the salt dough route, I cover the recipe and fixes separately.
Ages: 3 to 6. Mess: High. Time: 20 minutes shaping, 24 to 48 hours drying, 20 minutes painting.
What You Need
- Air dry clay such as Crayola Air Dry Clay (or salt dough: 2 cups flour, 1 cup salt, and about 3/4 to 1 cup water)
- Tree, heart, and star cookie cutters (or a paper template traced with a butter knife, which is an adult job)
- A drinking straw to punch the hanging holes
- Paint (Crayola washable paint cleans up easily, while acrylic lasts longer but stains clothes)
- White puffy paint (or white paint and a cotton swab)
- Paintbrush
- Ribbon or yarn for hanging
How to Make It
- Roll the clay or dough about 1/4 inch thick, cut your shapes, and punch a hole near the top of each with a straw.
- Dry for 24 to 48 hours, flipping once after the first day. Salt dough can bake at 250 F (120 C) for 2 to 3 hours instead, until hard.
- Paint each shape a solid color and let it dry.
- Add swirls and dots with white puffy paint, thread ribbon through the hole, and hang.
Tip: Once the paint is dry, an adult can brush on a coat of Mod Podge to seal it. It keeps the paint from chipping.
Safety: Clay and salt dough are not food, so don’t let little ones taste them. Salt dough is very salty and harmful to dogs in quantity, so keep finished ornaments out of reach of pets. Protect your table from paint.
11. Kraft Tag Holiday Ornaments
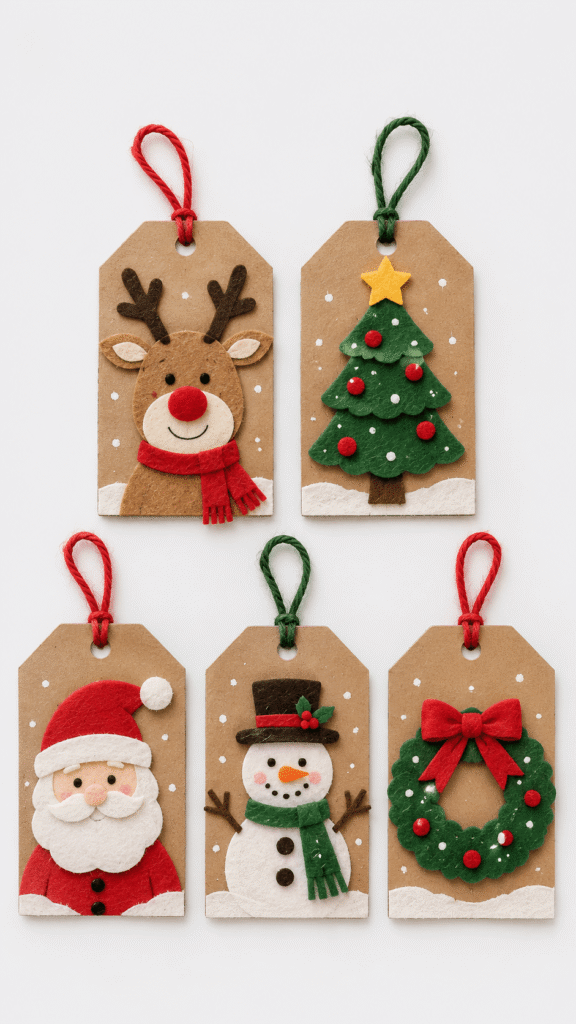
Kraft gift tags are a forgiving canvas for preschoolers, because brown paper makes a crooked felt hat look charming. A reindeer, tree, Santa, snowman, and wreath make a matched set. These are felt Christmas crafts in miniature, so scraps work fine.
This project has the most small parts: eyes, felt bits, paint dots. Everything shifts while the glue dries, so plan on 30 minutes and expect to nudge pieces back into place.
Ages: 3 to 6. Mess: Medium. Time: 30 minutes, plus drying.
What You Need
- Kraft paper tags (or rectangles cut from a paper bag with the corners snipped and a hole punched)
- Felt scraps in red, green, white, and brown (or colored paper)
- Googly eyes (or eyes drawn with a marker)
- Yarn or cord for the loops (or kitchen string)
- White washable paint (or a white crayon)
- Tacky glue
How to Make It
- Cut simple felt shapes: a red hat and white beard for Santa, a green triangle for the tree, a white circle for the snowman, antlers for the reindeer, and a green ring for the wreath. Adults usually cut these for kids under 5.
- Glue the felt onto each tag, then add eyes and white paint dots for snow.
- Let the tags dry flat for 30 minutes.
- Thread yarn through the hole and knot it for hanging.
Tip: Pick one character per child per session. Making all five in one go is where attention and glue both run out.
Safety: Supervise glue use. Draw the eyes with a marker instead of using googly eyes for kids who mouth things.
12. Cotton-Trim Village Collage
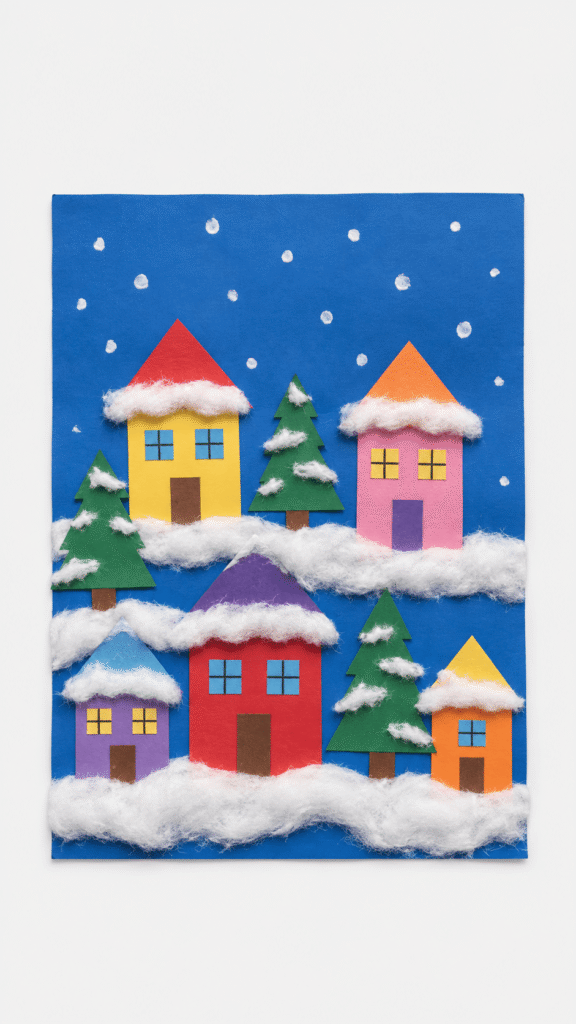
A cluster of paper houses on a blue sky, with cotton ball snow along every roofline, is the project here where kids will happily sit for 30 minutes. It’s one of the easy Christmas crafts for kids who like building a scene more than making an object.
Cotton balls are fluffy and everywhere. Stretch each one into a thin strip before you glue it, and you get a roofline instead of a lump.
Ages: 3 to 6. Mess: Medium. Time: 30 minutes.
What You Need
- Colored paper or cardstock (scrap paper, or pages from old magazines)
- Blue construction paper or cardstock for the sky (or a cereal box painted blue)
- Cotton balls (or white tissue paper torn small)
- Glue stick for the paper and school glue for the cotton
- Scissors
How to Make It
- Cut house shapes from colored paper: a square body and a triangle roof for each. Add small squares for windows and doors, and a few green triangle trees.
- Arrange everything on the blue paper before you glue anything, so you can move pieces around.
- Glue down the houses, then stretch cotton balls thin and press them along the roofs and the ground.
- Add white paper dots or white paint fingerprints for falling snow.
Tip: Let them lay it all out first and glue second. Kids change their minds about where the red house goes at least twice.
Safety: Keep scissors with an adult when toddlers are around, and use nontoxic glue.
13. Paper Garland Star Display
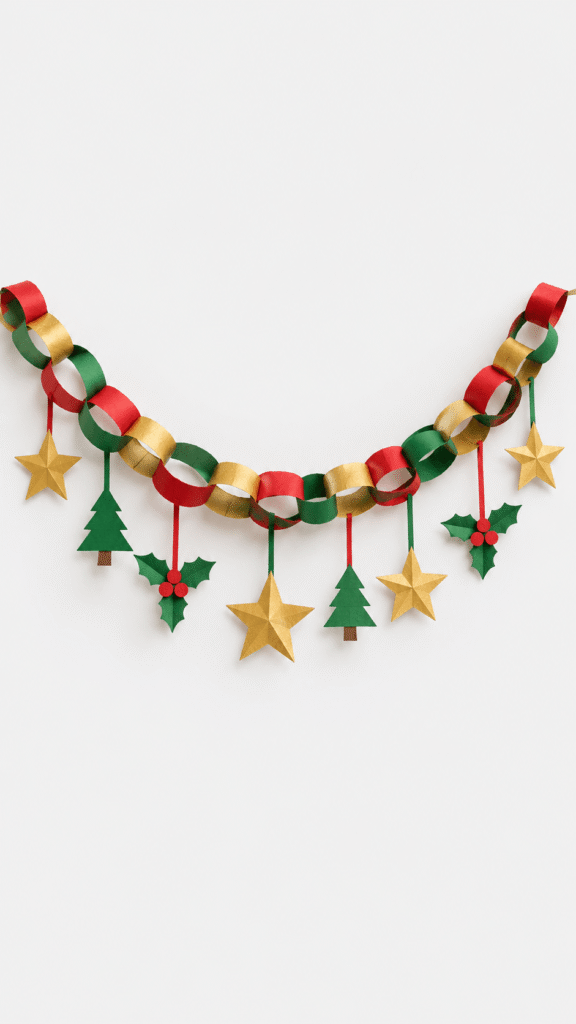
A looped paper chain draped across a wall, with stars hanging below, covers a lot of space for very little money. Pick this one when more than one child is involved, since everyone can make links. It’s also the easiest of the Christmas paper crafts to scale up for a class or a party.
Chains pull apart if the glue isn’t dry, and they get heavy. Hold each glued link for 10 seconds, and tape the chain to the wall every foot or so.
Once your kids get the hang of loops, there are plenty of ways to change up the pattern. [LINK: Paper Chain Ideas for Kids]
Ages: 3 to 6. Mess: Low. Time: 30 to 40 minutes.
What You Need
- Colored paper strips in red, green, and gold, about 1 inch by 8 inches (cut from construction paper, junk mail, or old wrapping paper)
- Painter’s tape or string for hanging (painter’s tape is gentler on walls)
- Star cutouts (or stars from cereal box cardboard covered in gold paper)
- Paper tree and holly cutouts
- Glue stick, or a stapler for adults
How to Make It
- Glue the first strip into a ring. Thread the next strip through it before you close it, and keep going until the chain is long enough.
- Tape one end high on the wall and the other lower for a diagonal, adding tape every foot.
- Hang the stars below the chain with short strips of tape or string.
- Fill the gaps with paper trees and holly.
Tip: Preschoolers are great at threading strips through rings. Keep the staples for adults.
Safety: Staplers are an adult tool. Keep decorations well away from candles, fireplaces, and heaters.
14. Wrapped Yarn Gift Box

Wrap yarn around a square base and it turns into a gift box with a red felt bow. Wrapping is repetitive and calming, and kids pick it up fast, so this is a good one for ages 4 and up.
Yarn slips off the corners, and that’s where most first tries go wrong. Snip a small notch in the middle of each side of the cardboard so the yarn has something to catch on.
Ages: 4 to 6. Mess: Low. Time: 30 minutes.
What You Need
- Square cardboard or foam base, about 5 inches wide (cut from a cereal box, or foam board from the dollar store)
- Green yarn or twine (or any green string)
- Red yarn or twine
- Red felt for the bow (or red paper)
- Tacky glue and scissors
How to Make It
- Snip a notch in the middle of each side of the base. Tape the end of the green yarn to the back, then wrap it around the square until the front is covered. Tape the end to the back.
- Wrap red yarn across the center in both directions, like gift ribbon, taping the ends on the back.
- Cut red felt into two bow loops and two tails, then glue them at the center.
Tip: Start and end every length of yarn on the back so the front stays neat.
Safety: Cut loose yarn ends short, and keep long lengths away from small children’s necks.
15. Ribbon Strip Paper Ornament
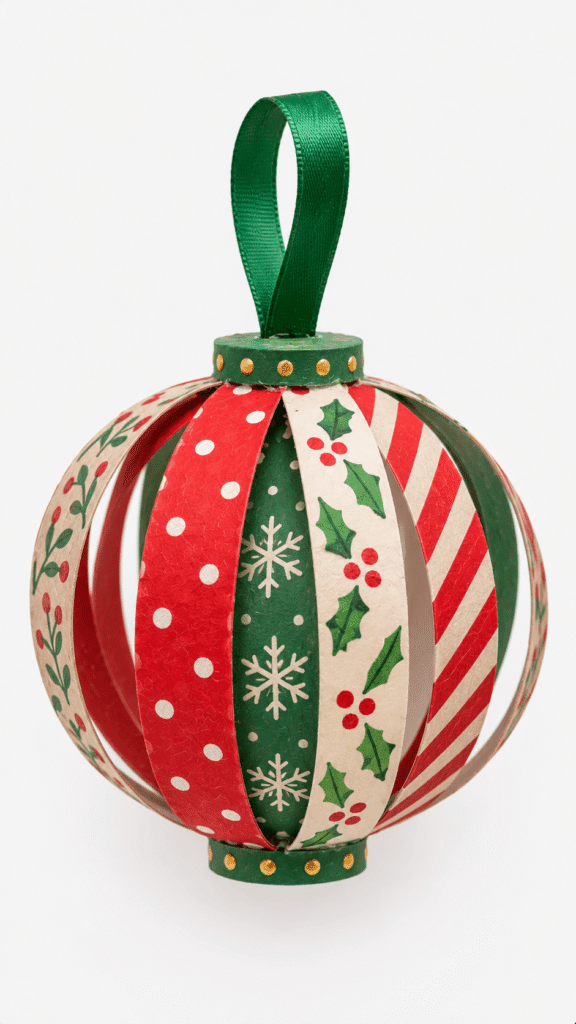
Curved paper strips glued between two small circles make a round ornament with a cage like shape. It looks harder than it is, but it needs patience, so most 3 year olds will want you holding the strips.
Glue slips when the strips bend. Hold each strip for about 10 seconds, or have an adult staple it. Your first one will probably come out lopsided, and that tells you whether to cut the next strips longer or shorter.
Ages: 4 to 6. Mess: Low. Time: 30 minutes.
What You Need
- Colored paper strips or ribbon (patterned scrapbook paper, gift wrap, or magazine pages)
- Two cardstock circles about 1 1/2 inches wide (trace a bottle cap or the bottom of a small cup)
- A green ribbon loop for hanging (or a loop of yarn)
- Tacky glue, or a stapler for adults
- Scissors
How to Make It
- Cut 8 strips about 6 inches long and 1/2 inch wide. Mark 8 evenly spaced spots around the edge of each circle, like a clock face.
- Glue one end of each strip to the bottom circle at the marks, and let it grip for a couple of minutes.
- Bring the other ends up and glue them to the top circle. The strips will bow out into a rounded shape.
- Glue the ribbon loop to the top.
Tip: A clothespin on each glued strip holds it while the glue sets.
Safety: Use child safe scissors, and let the glue set fully before you hang the ornament.
16. Felt Snowy Cottage Scene
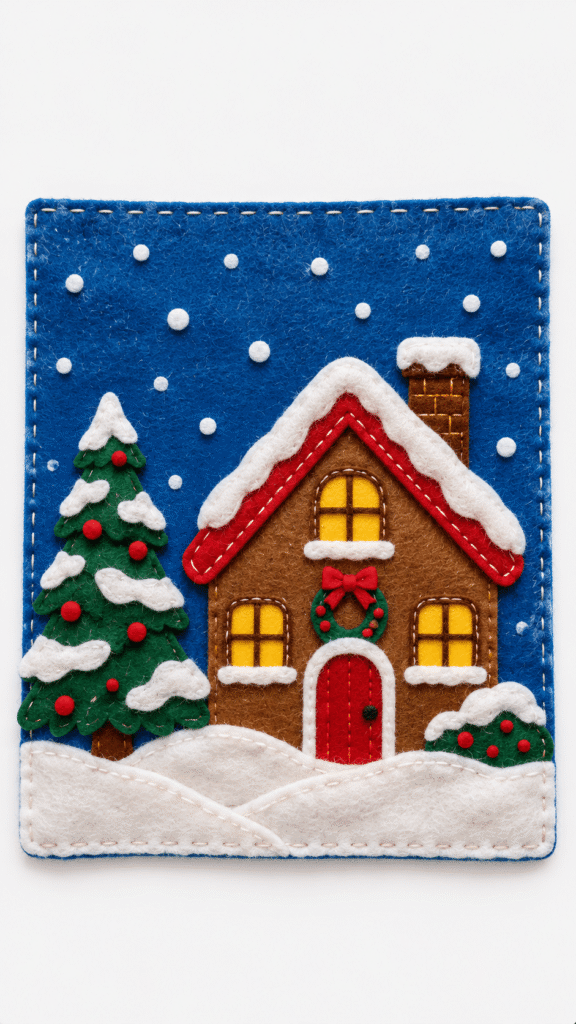
A blue felt board with a brown cottage, a red roof, a green tree, and white snowdrifts looks like a picture book page. It’s one of the felt Christmas crafts that grows with the kid. A 3 year old glues big pieces, and a 6 year old adds windows and chimney smoke.
Layered felt is fussy. Each layer needs time to grip, and pieces slide if kids press and drag. Use small dots of glue, not smears.
Ages: 4 to 6 (3 with precut pieces). Mess: Medium. Time: 40 minutes.
What You Need
- Blue felt sheet or blue cardstock for the base (or blue construction paper)
- Felt in red, brown, green, white, and yellow (or colored paper)
- Tacky glue
- Scissors
- White paint dots or white paper circles (or a cotton swab dipped in white paint)
How to Make It
- Cut felt pieces for the roof, house, door, windows, tree, and snowdrifts. Adults cut for kids under 5.
- Lay everything out on the blue base before you glue, like a puzzle.
- Glue from the back to the front: house first, then roof, then door and windows, then tree and drifts.
- Dot white paint across the sky for snow and let it dry flat.
Tip: Take a photo of the layout before you pick anything up. Pieces shift when kids lift them one at a time.
Safety: Supervise cutting and gluing, and skip tiny loose circles for young children.
17. Laced Felt Tree Board

Lacing is hand strength and coordination practice disguised as decorating, the kind of practice kids use later for writing. It also ends up looking like a tree, with yarn zigzagging across a green triangle and a star on top.
Felt is optional here, and that’s the catch. Felt stretches, so the holes turn oval and tear. Foam or heavy cardstock laces better. If you want the felt Christmas crafts version, glue the felt onto cardboard first to stiffen it.
Yarn frays at the tip and won’t go through the holes. Wrap a piece of tape around the end like the tip of a shoelace. That fixes more frustration than any other trick on this list.
Ages: 4 to 6 (3 with big holes). Mess: Low. Time: 40 minutes.
What You Need
- Green foam sheet or heavy cardstock cut into a tree about 10 inches tall (or a cereal box covered in green paper)
- Yellow star cutout and brown trunk piece (scraps are fine)
- Colored yarn, about 2 feet per piece (or shoelaces, which already have stiff tips)
- Hole punch
- Tape
How to Make It
- Cut a big triangle tree and glue on the trunk and star.
- An adult punches holes in rows down both sides of the tree, about 1 inch apart.
- Wrap tape around the yarn tip. Knot the other end at the first hole, then lace back and forth in a zigzag.
- Knot the end on the back and hang the tree on a wall.
Tip: Punch about 5 holes per side to start. Fewer holes means a finished tree in one sitting.
Safety: An adult handles the hole punch. Watch for yarn tangles, and keep long lengths away from necks.
18. Ribbon Woven Holiday Plaque
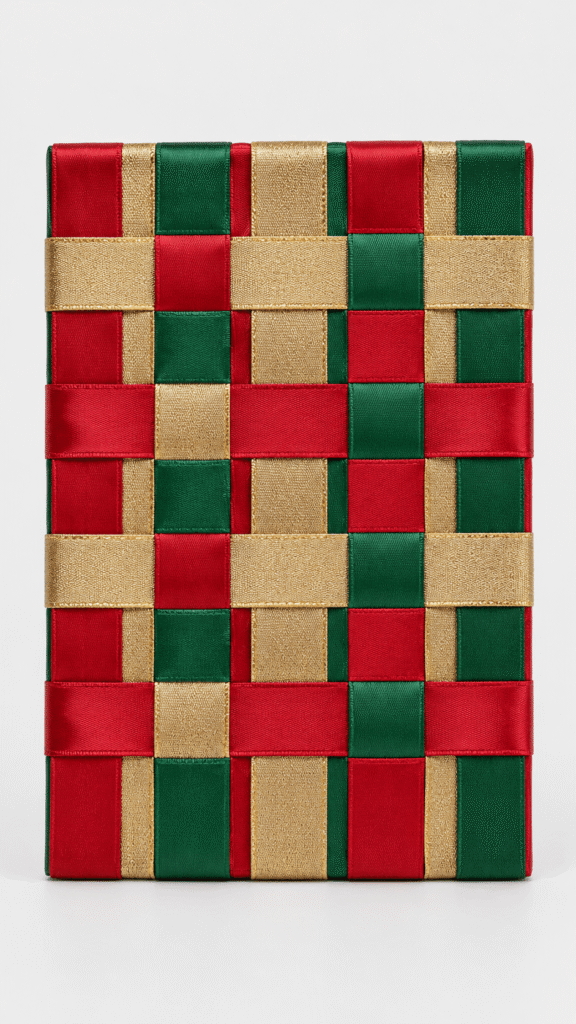
Weaving red, green, and gold ribbon over and under turns a plain rectangle into a woven holiday sign. It’s the strongest gift for grandparents on this list, but it needs adult prep, so it works best for ages 5 and up with a little help.
The usual first try problem is the craft knife. Don’t try to cut slots in a wood plaque, because the knife won’t go through. Use thick cardboard for the slot method. For a real wood plaque, skip the slots, wrap the vertical ribbons around the top and bottom edges, and weave across.
Ages: 4 to 6. Mess: Low. Time: 10 minutes of adult prep, 30 minutes of weaving.
What You Need
- Thick cardboard or chipboard, about 6 x 8 inches (a cereal box doubled up), or a flat wood plaque from a craft store
- Red, green, and gold ribbon, about 3/8 inch wide (or strips of wrapping paper or fabric)
- Craft knife and cutting mat, or a slot punch (adult tools)
- Tacky glue or tape
How to Make It
- Adult step: cut 5 slots near the top edge and 5 matching slots near the bottom edge of the cardboard, lined up in pairs.
- Feed a ribbon up through each top slot from the back, run it down the front, and push it through the matching bottom slot. Alternate colors and tape the ends on the back.
- Weave 5 horizontal ribbons over and under the vertical ones, flipping the pattern with every row.
- Wrap the ends around the sides, glue them flat at the back, and trim.
Safety: The craft knife is adult only, and always used on a cutting mat. Keep ribbon tails short for little ones.
19. Felt Envelope Gift Pouch
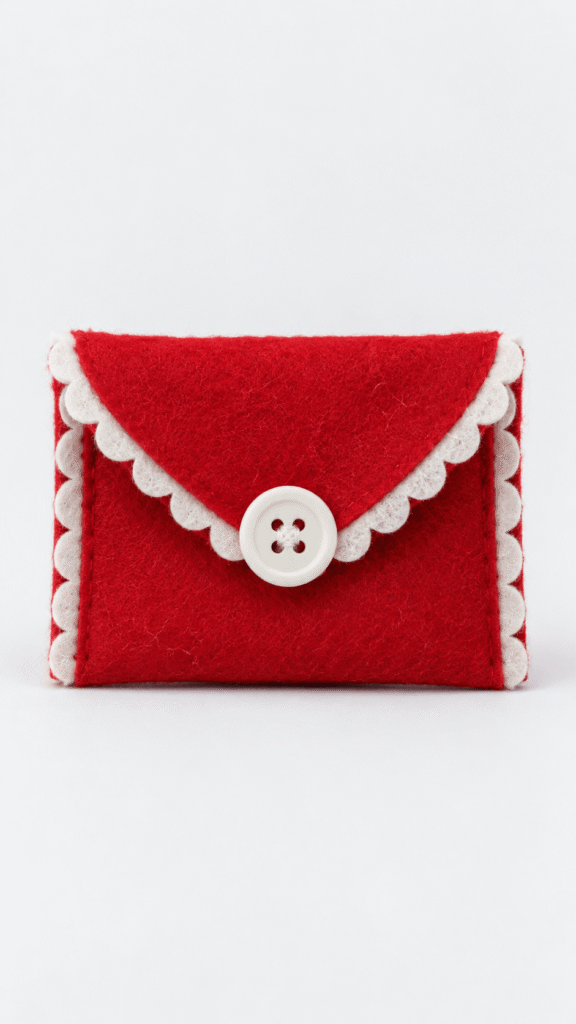
A red felt pouch with white scalloped trim and a button closure holds a small gift, a treat, or a handwritten note. Of all the felt Christmas crafts here, it’s the one most likely to get used again next year. It’s a folding and gluing project, and any real stitching belongs to an adult.
Fabric glue needs time to dry, and kids will want to open the pouch early. Clothespins on the side seams keep everything closed while it sets. For little ones, skip a real button closure and use a self adhesive hook and loop dot under a decorative button.
Ages: 5 to 6 (younger with an adult folding). Mess: Low. Time: 45 minutes.
What You Need
- Red felt, one 9 x 12 inch sheet (or a fleece scrap)
- White felt for the trim (or white paper)
- A large white button (or a white paper circle)
- Fabric glue, or thread and a needle for adults
- Self adhesive hook and loop dot (optional)
How to Make It
- Cut a red felt rectangle about 6 x 9 inches. Fold the bottom third up to make a pocket and glue the side edges closed with fabric glue.
- Fold the top flap down and cut its edge into a point or a curve.
- Cut a strip of white felt with scalloped edges (trace a bottle cap to mark the curves) and glue it along the flap and sides.
- Glue the button at the point of the flap and stick a hook and loop dot underneath to close it.
Tip: Clip the side seams with clothespins while the glue sets.
Safety: Felt is hard on kids scissors, so an adult should cut it. Loose buttons are a choking hazard for children under 3.
20. Laced Mitten Snowflake Ornament
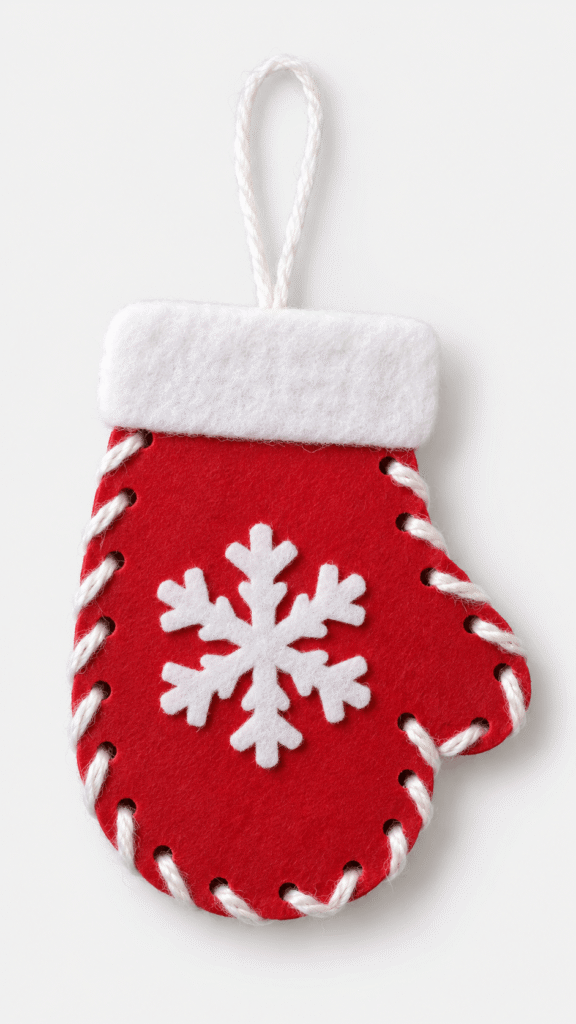
A red mitten with a white yarn border, a white felt snowflake on the palm, and a fuzzy cuff is the most polished ornament on this list. The lacing is real sewing practice without a sharp needle.
Needle sewing is for older kids. Most preschoolers do better with yarn that has a taped tip, threaded through holes an adult punched. Mark the holes in pencil first so your child can lace around the whole edge without losing the pattern.
Ages: 4 to 6. Mess: Low. Time: 35 minutes.
What You Need
- A red mitten cutout from cardstock or felt (trace a paper template)
- White yarn or cord, about 3 feet (or a white shoelace, or kitchen string)
- White felt snowflake (or a paper snowflake) and a strip of white felt for the cuff (or a strip of white paper)
- Hole punch
- Glue
How to Make It
- Trace a mitten onto red cardstock or felt and cut it out. Mark holes about 1/2 inch apart around the edge, leaving the cuff end open, and have an adult punch them.
- Wrap tape around the yarn tip and tie the other end through the first hole. Lace in and out around the edge, then tie off at the back.
- Glue the snowflake to the palm and the cuff strip at the wrist.
- Tape a yarn loop to the back at the top for hanging.
Safety: An adult handles the hole punch and any needle. Keep string ends short and tucked in.
Common Mistakes To Avoid With Preschool Christmas Crafts
Even easy Christmas crafts for kids go sideways in predictable ways. These are the first timer mistakes I see most, and what to do instead.
- Using school glue on felt, buttons, and pom poms. It slides off, kids get frustrated, and the project ends early. Tacky glue fixes it, and that matters most for felt Christmas crafts.
- Planning a 45 minute session for a 3 year old. Most are done in 15 to 20 minutes. Set a finish line, like stopping after the star goes on, and save the rest for tomorrow.
- Setting out every supply at once. A table with a dozen choices makes a small child freeze, then grab everything.
- Skipping drying time. Clay ornaments need a day or two, and glued felt needs at least an hour. Hang them early and they sag or fall apart.
- Cutting skinny shapes. Thin gingerbread arms and narrow candy cane tips break. Chunky shapes survive preschoolers.
Practical note: Aim for finished, not perfect. A crooked tree your child made and hangs proudly beats a neat one you fixed for them. Fix one thing at most.
FAQs
What are the easiest Christmas crafts for preschoolers to make?
Stamped Star Wrapping Paper, Tissue paper candle collage, and Pom-pom decorated holiday cookies are the easiest, because they mostly involve stamping, tearing, and pressing things down. Cut any shapes ahead of time and most 3 year olds can do the rest with you nearby.
How long does a preschool Christmas craft take?
Plan on 15 to 30 minutes of hands on time for most Christmas crafts for preschoolers aged 3 to 5. Split longer projects, like clay ornaments and felt scenes, into two sessions.
Are beads, buttons, and pom poms safe for preschoolers?
Only if your child reliably keeps things out of their mouth. If a piece fits through a toilet paper tube, it’s a choking risk for children under 3, so use larger pieces or paper circles instead.
What’s the best glue for felt, buttons, and pom poms?
Tacky glue, such as Aleene’s Original Tacky Glue. It grips where white school glue slides, though you’ll need to hold pieces for about 20 seconds and let projects set flat.
How do I keep Christmas crafts from taking over the house?
Cover the table with a plastic tablecloth, use washable paint, and skip loose glitter. Keep wipes and a damp towel within reach before you start.
Which easy Christmas crafts for kids don’t need scissors?
Stamped Star Wrapping Paper and Tissue paper candle collage need no cutting at all, since kids stamp and tear. Gluing precut shapes, like the Colorful Bulb Garland Banner, works well too.
Festive Shapes And Textures That Keep Little Makers Engaged
Look across the whole list and the pattern is simple. Each project has one clear shape, like a tree, a star, or a mitten, plus one texture to touch, like yarn, buttons, felt, or tissue paper. Bright color sits against a plain base such as kraft paper or card.
That’s what keeps a small maker working. It’s the formula behind Christmas crafts for preschoolers that actually get finished, and it’s the one to copy when you invent your own.
If you only have time for three preschool Christmas crafts this week, pick one quick one, one that makes a gift, and one for the tree: Tissue paper candle collage, Stamped Star Wrapping Paper, and Painted Ornament Cookie Shapes cover all three.
If your child took to the felt projects, set aside an afternoon for a second batch with a different theme.
If you’d like more easy Christmas crafts for kids that hang on the tree, there are plenty of ornaments small hands can make.
Start with one of the easy Christmas crafts for kids from the top of the list, cut the shapes tonight, and set out four supplies tomorrow. Let the first one come out crooked, and hang it where everyone can see it anyway.
