
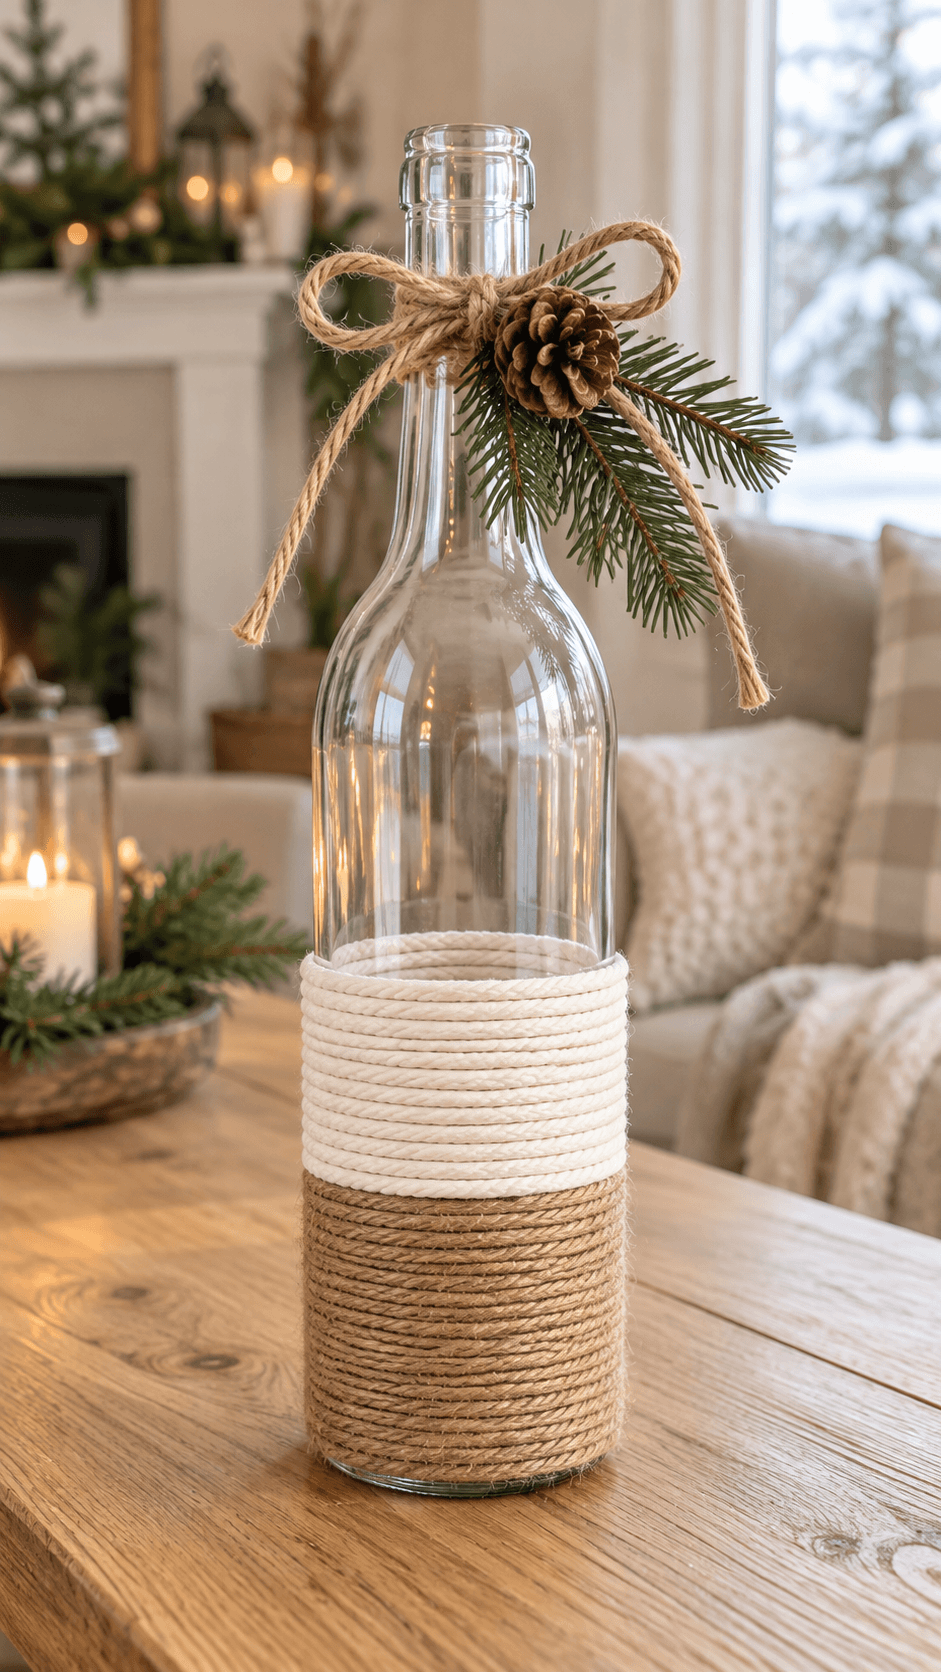
The easiest DIY winter bottle crafts start with a clean glass bottle and one simple finish, like a twine wrap, a knit sleeve, or battery lights. Most take 20 to 60 minutes and cost very little if you reuse bottles from your recycling bin. Painted projects take longer because paint needs time to dry and seal, so save those for your second or third bottle.
It’s the second week of December, there are six empty wine bottles by the back door, and your mantel still looks like it did in October. If that’s your house, this list is for you.
I put these DIY winter bottle crafts together for people who already own a glue gun and want winter bottle decor that looks collected, not crafty. Some projects are a 20 minute wrap. A few need patience, painter’s tape, and a steady hand.
Each one lists a skill level, a realistic time, what tends to go wrong on a first try, and a cheaper swap for anything you’d have to buy. If you’re new to glass bottle crafts, start at the top and work down. I ordered the list from easiest to hardest, with wraps and lights first, character bottles in the middle, and hand painted scenes last.
Before You Start: What You Need For DIY Winter Bottle Crafts
Most DIY winter bottle crafts run on the same short supply list. Buy it once and most of the 20 projects below won’t need another store run.
| Staple | Why it earns its spot | Where to find it | Budget swap |
| Glass bottles (750 ml wine bottles, sparkling water bottles, milk bottles) | The base for every project | Your recycling bin, thrift stores | Ask friends and neighbors, free |
| Low temp glue gun | Holds twine, yarn, and felt without burning through | Craft stores, Amazon | Tacky glue (Aleene’s) and patience |
| E6000 craft adhesive | Grips fabric, foam, and wood to glass | Craft and hardware stores | Fabric glue for light pieces |
| Mod Podge (matte) | Decoupage, sealing, and the Epsom salt frost | Craft stores | Equal parts white school glue and water |
| Chalky finish paint (DecoArt Chalky Finish) | A matte, milk glass look on glass | Craft stores | Craft acrylic from the dollar store |
| Fine tip paint pens | Snowflakes and small details | Craft stores | A fine brush and acrylic paint |
| LED battery string lights, copper wire | A cool glow inside glass | Craft stores, Amazon | Dollar store LED battery lights |
| Twine, yarn, felt, and fabric scraps | Wraps, scarves, and hats | Craft stores | Thrifted sweaters and old flannel shirts |
| Faux evergreens, pinecones, and twigs | The top of nearly every bottle | Craft stores | Branches and cones from your yard (bake the cones first) |
Practical note: Paint that looks perfect on glass the first day can scratch off with a fingernail a week later. Clean the glass with rubbing alcohol first, paint in thin coats, and seal painted glass bottles with a clear spray sealer such as Mod Podge Clear Acrylic Sealer.
Label glue is the number one reason paint peels, so it’s worth a closer look before you start.
Bottle Prep
Glass bottle crafts all begin the same way, with a clean bottle. Soak it in hot soapy water for about 30 minutes, peel the label, and rub off leftover adhesive with Goo Gone or a paste of cooking oil and baking soda. Finish with a wipe of rubbing alcohol so paint and glue can grip.
Most wine bottle crafts on this list work with a standard 750 ml wine bottle. The opening is narrow, roughly three quarters of an inch inside, so anything you plan to put inside the bottle has to pass through that gap. Projects with scenes or pom poms inside work better with wide mouth bottles like milk bottles or swing top bottles.
Check the rim for chips before you decorate. A chipped bottle can cut you, so recycle it.
Skill Levels And Time
Beginner means wrapping, tying, gluing, and filling. Intermediate means cutting fabric to fit, masking with tape, or painting solid colors. Advanced means freehand painting on curved glass.
Times assume the bottle is already clean. Where a project needs drying time, I say so.
Safety And Ventilation
These are adult projects with real fumes, heat, and glass, so set up the workspace before you start.
- Spray paint and frost spray: work outdoors or in a garage with the door open, and wear nitrile gloves and a half mask respirator with organic vapor cartridges (3M makes common ones). Keep cans away from heat.
- E6000: use it in a ventilated room and follow the label.
- Glue guns: even low temp guns burn. Silicone finger protectors cost a few dollars.
- Lights: LED battery lights only inside closed glass. Keep the battery pack reachable, and keep button batteries away from kids and pets.
- Flame: no real candles near dried evergreens, cotton, yarn, or pom poms.
Practical note: Skip plug in incandescent light strings inside bottles, and never put a real candle in a bottle with cotton, pom poms, or dried greenery around it. LED battery lights stay cool and are all you need for the glow.
Pick A Project By Skill Level, Time, And Gear
Here are all 20 at a glance, so you can match a project to the evening you actually have. Whether you want rustic or bright winter bottle decor, this table gets you to the right bottle fast. With wine bottle crafts, skill level mostly comes down to whether paint is involved.
| Project | Skill | Time | Gear or hazard |
| Twine-Wrapped Neutral Bottle | Beginner | 30 minutes | Low temp glue gun |
| String-Wrapped Bottle Tree | Beginner | 45 minutes | Low temp glue gun |
| Cable-knit bottle winter vase | Beginner | 20 minutes | Fabric glue |
| Glowing Frost Bottle Lantern | Beginner | 30 minutes plus drying | Frost spray needs ventilation |
| Twine-Topped Pinecone Light Bottle | Beginner | 20 minutes plus pinecone prep | LED battery lights |
| Frosted Branch Bottle Centerpiece | Beginner | 15 minutes | Sand for weight |
| Ribbon-Lit Pom Bottle | Beginner | 20 minutes | LED battery lights |
| Pom-Pom Snowfall Bottle | Beginner | 30 minutes | Tacky glue |
| Buffalo Plaid Greenery Bottle | Beginner | 30 minutes | Low temp glue gun |
| Rustic Sweater-Wrapped Holiday Bottles | Beginner | 60 minutes for three | Glue near glass edges |
| Blue Paper Bottle Snow Sculpture | Beginner to intermediate | 45 minutes plus overnight drying | Sticky hands, no fumes |
| Snow Globe Bottle Scene | Intermediate | 40 minutes | Long tweezers, wide mouth bottle |
| Polar Bear Sweater Bottle | Intermediate | 45 minutes | E6000 ventilation |
| Snowman Bottle Scarf Craft | Intermediate | 45 minutes plus drying | Paint ventilation |
| Yarn-Bearded Holiday Bottle Gnome | Intermediate | 45 minutes | Low temp glue gun |
| Penguin-Themed Painted Bottle | Intermediate | 60 minutes plus overnight drying | Painter’s tape and paint |
| Snowflake Milk Bottles | Intermediate | 60 minutes plus drying | Paint and stencils |
| Midnight Snowflake Bottle Vase | Intermediate | 60 minutes plus drying | Spray paint ventilation |
| Blue Winter Bird Bottle | Advanced | 90 minutes plus drying | Fine brush work |
| Mountain Landscape Bottle | Advanced | 90 minutes plus drying | Fine brush work |
Keep this table handy. Save this for later, and you can pick a bottle project in about ten seconds when the bottles start piling up.
1. Twine-Wrapped Neutral Bottle
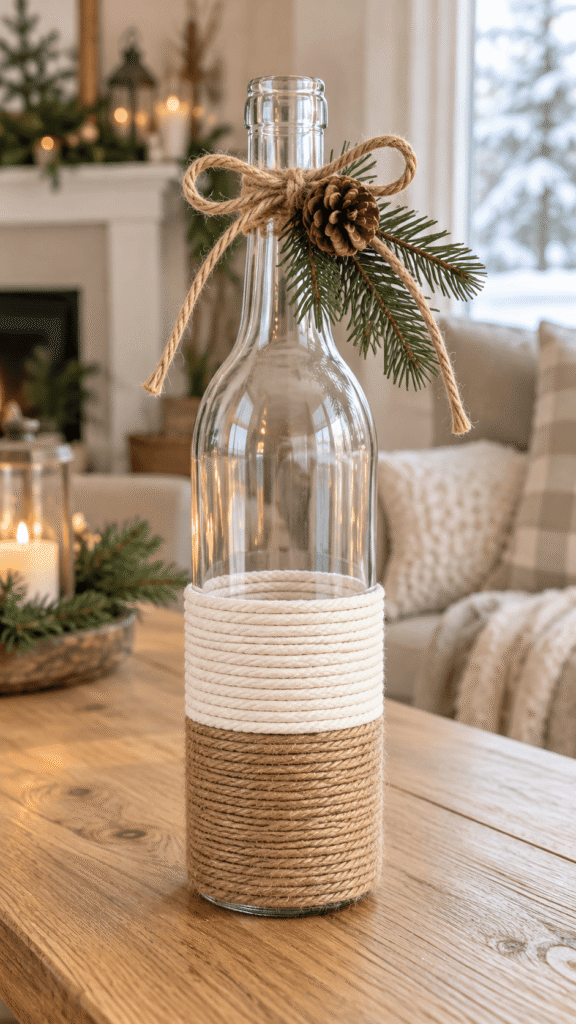
This is the bottle I’d start with. Natural twine, white cord, a pinecone, and a sprig turn a recycling bin bottle into winter bottle decor that goes with everything. The upper glass stays clear, which keeps it light on a crowded shelf.
Wrapping is slow, not hard. What goes wrong is the end of the wrap. Twine unravels the moment you let go, so hide the tail under the last turn and add a dot of glue.
Skill: Beginner. Time: 30 minutes. Gear: Low temp glue gun.
What You Need
- Clear glass bottle, cleaned and label free (from your recycling bin)
- Natural jute twine (or kitchen string)
- White cotton cord (or white yarn, or a white shoelace)
- One small pinecone (foraged, and baked first)
- Evergreen sprig (a faux stem from the dollar store, or a fresh cutting)
- Low temp glue gun and sticks (or tacky glue)
How to Make It
- Put a thin line of glue at the base of the bottle and press the end of the twine into it.
- Wrap upward with each turn touching the last, until you’re about a quarter of the way up. Tuck the end under the last turn and glue it down.
- Start the white cord over that join and wrap to the halfway line, then glue the end the same way.
- Tie a twine bow around the neck, glue on the pinecone, and tuck in the sprig.
Tip: Hide every join under the next turn. Visible knots are what make a wrap look rushed.
Safety: Keep a bowl of cold water close for glue burns, and handle pinecones by the base to avoid sharp scale tips.
2. String-Wrapped Bottle Tree
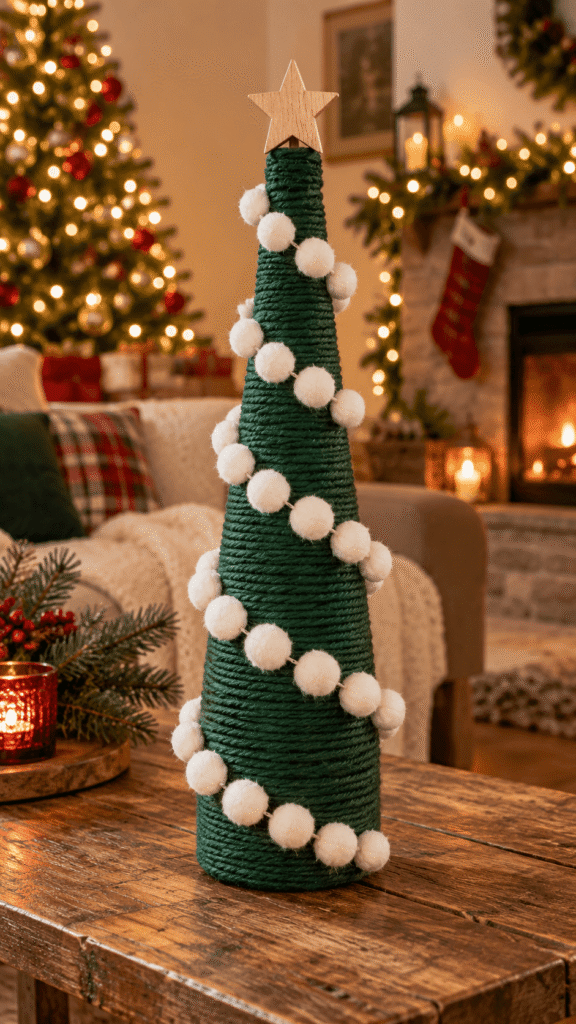
A tall bottle wrapped in dark green yarn reads as a tabletop tree, with white pom poms standing in for snow. It’s one of the fastest ways to get a tree shape with no painting at all.
The trouble is the shoulder. Yarn slides down the sloped part of the bottle, so use tape or glue dots there. Pick chunky yarn too, or you’ll be wrapping for an hour.
Skill: Beginner. Time: 45 minutes. Gear: Low temp glue gun.
What You Need
- Glass bottle (a wine bottle works well, since the shoulder tapers like a tree)
- Dark green chunky yarn (or any green yarn, doubled)
- White pom poms, about 1/2 to 1 inch (or cotton balls)
- Wooden star (or a star cut from cardboard and painted)
- A cork that fits the neck (a wine cork is free)
- Low temp glue gun and sticks
How to Make It
- Glue the end of the yarn at the base and wrap tightly upward. Add a dab of glue every few turns.
- At the shoulder, press strips of double sided tape or a few glue dots onto the glass before you wrap over them, so the yarn can’t slip.
- Glue the star to the top of the cork, then press the cork into the neck.
- Glue the pom poms in a loose spiral from the bottom to the top.
Safety: Keep glue off the bottle opening so the cork seats cleanly, and check that the star is centered and secure before you set it down.
3. Cable-knit bottle Winter Vase

A cream cable knit sleeve makes a bottle look like it’s wearing a sweater, and two wooden buttons finish the front. Evergreen sprigs and pinecones in the neck make this one of the simplest wine bottle crafts for a first try.
Knit unravels where you cut it. Take the sleeve from a thrifted sweater, put the ribbed cuff at the neck end, and seal the raw edge with Fray Check or fold it under and glue it. Faux stems keep the knit dry, while fresh stems need water and a spill can stain the sleeve.
Skill: Beginner. Time: 20 minutes. Gear: Fabric glue.
What You Need
- Clear glass bottle
- Cream cable knit sleeve (cut from a thrifted sweater, or buy a knit bottle cozy)
- Two wooden buttons (or any buttons you already have)
- Evergreen branches (faux, or a few fresh cuttings)
- Small pinecones (foraged and baked)
- Fabric glue or Fray Check
How to Make It
- Cut a sweater sleeve a little taller than the bottle, with the ribbed cuff at the neck end. Seal the raw edge with Fray Check or fold it under and glue it.
- Slide the sleeve over the bottle. If it’s loose, pin a seam up the back and glue or sew it.
- Glue the two buttons to the front.
- Fill the neck with evergreen and pinecones, trimming the stem ends so they sit securely.
Tip: Pour a cup of sand into the bottom first, so tall stems don’t tip the bottle.
Safety: Keep greenery away from open flame, and trim stems so nothing jams in the neck.
4. Glowing Frost Bottle Lantern
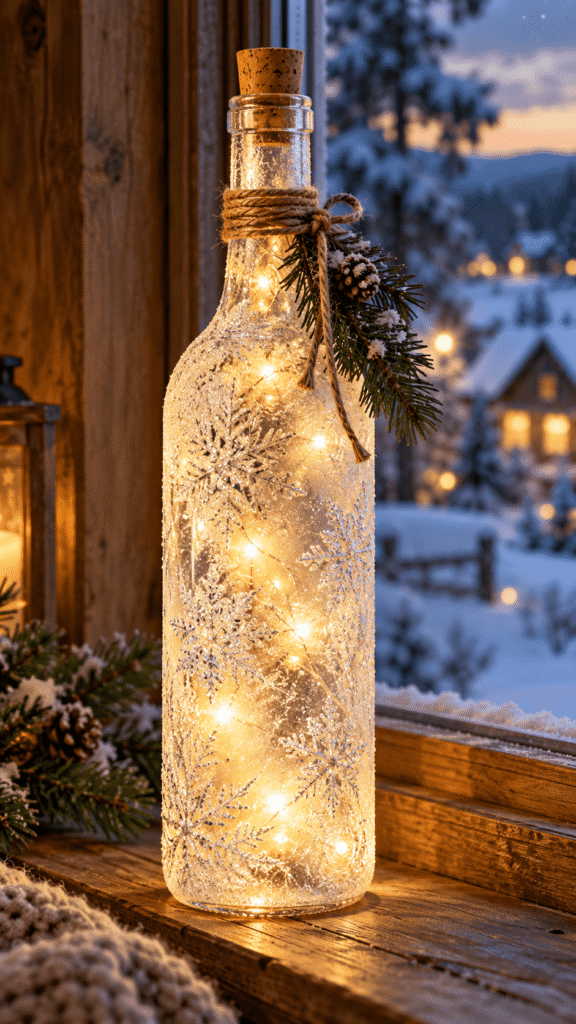
A clear bottle full of warm fairy lights glows softly, and a frosted outside makes the light look diffused and wintry. Of all the wine bottle crafts with lights, this one looks the most expensive for the least work.
There are two ways to frost. Spray is fast but needs ventilation, and heavy coats run, so use thin ones. Mod Podge dabbed on with a sponge and dusted with Epsom salt has fewer fumes and sparkles more, but it’s slower.
If you’d rather skip the spray can, the salt method has its own walkthrough. [LINK: Epsom Salt Frosted Glass Tutorial]
Skill: Beginner. Time: 30 minutes, plus drying. Gear: Respirator and gloves for the spray.
What You Need
- Clear glass bottle
- LED battery fairy lights, copper wire (or a cork topper light set that holds the battery pack)
- Frosted glass spray (or Mod Podge matte and Epsom salt)
- Twine
- Small evergreen sprig
How to Make It
- Coat the outside in thin passes of frost spray, letting each coat dry. Or dab on Mod Podge and sprinkle with Epsom salt. Let it dry fully.
- Feed the lights in through the neck and leave the battery pack outside, tucked under the twine.
- Tie twine around the neck and tuck the sprig into the knot.
Tip: Test the lights before you frost the bottle. A dead string inside frosted glass is a pain to fix.
Safety: Spray outdoors or in a garage with the door open, with gloves and an organic vapor respirator. Use LED lights only, and keep the battery pack reachable.
5. Twine-Topped Pinecone Light Bottle

A tall clear bottle filled with small pinecones and warm lights glows like a lantern, with a burlap strip and a twine bow at the neck. The lit pinecones are the whole show.
Pinecones need prep. Wild cones carry bugs and sap, so bake them on a foil lined tray at 200 F (95 C) for 30 to 60 minutes, and stay nearby since sap can drip. Small cones, about 1 to 2 inches, fit through the neck. Big ones won’t.
The baking step matters more than it sounds, so it has its own post. [LINK: How to Bake Pinecones for Crafts]
Skill: Beginner. Time: 20 minutes, plus pinecone prep. Gear: LED battery lights.
What You Need
- Tall clear glass bottle
- Small pinecones, 1 to 2 inches (foraged and baked, or a bag from the craft store)
- Battery LED string lights, copper wire
- Cream burlap strip (or a scrap of linen)
- Twine
How to Make It
- Drop in a layer of pinecones, then feed in some lights, layering cones and lights as you go.
- Leave the battery pack outside the neck, and keep the last inch of the neck uncluttered so you can pull the lights out later.
- Wrap the neck with burlap to hide the cord and battery pack, then tie a twine bow over it.
Tip: Burlap sheds. Fold the cut edge under or seal it with a thin line of glue.
Safety: Use LED lights only, don’t overfill the neck, and keep the battery pack accessible.
6. Frosted Branch Bottle Centerpiece
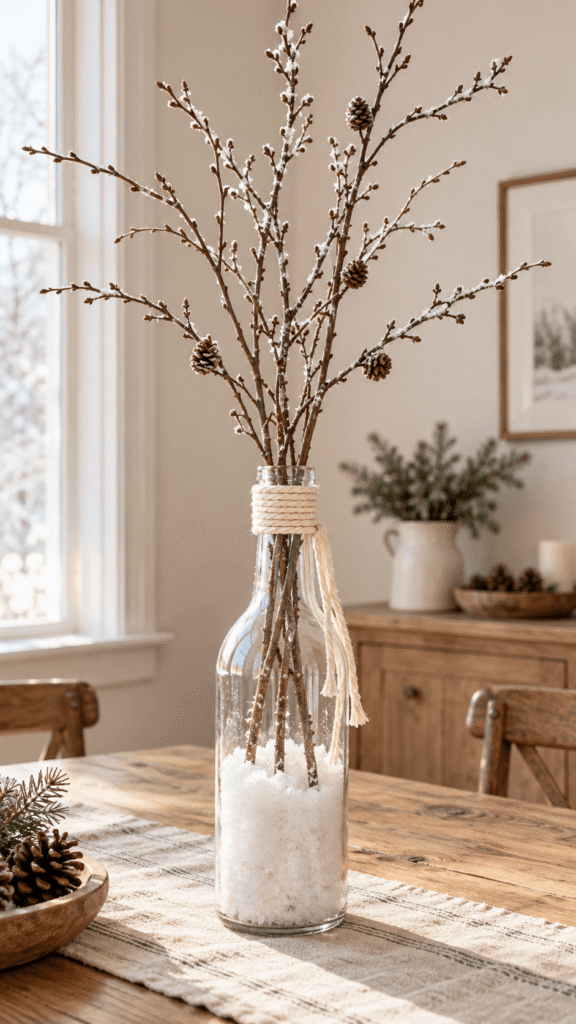
A bottle partly filled with white faux snow and topped with bare branches makes a quiet centerpiece, with thick cream twine around the neck and one long tail hanging down. It’s a good pick among wine bottle crafts for a dinner table, because it keeps sightlines open across the table if you trim the branches short.
Faux snow is light, so branches tip the bottle. Pour in a cup of sand first, then the snow on top. A paper funnel keeps the snow off the rim.
Skill: Beginner. Time: 15 minutes. Gear: None.
What You Need
- Clear glass bottle
- Artificial branches (or bare twigs from the yard, brushed clean)
- Cream chunky twine (or yarn)
- White faux snow or granular filler (or Epsom salt)
- Sand or aquarium gravel for weight (or uncooked rice)
How to Make It
- Use a paper funnel to pour about a cup of sand into the bottle, then fill the bottom third with faux snow.
- Trim the branches so the longest is about 1 1/2 times the bottle height, and push them into the neck.
- Wrap thick twine around the neck, glue the end, and leave one loose tail.
Safety: Keep branches trimmed to fit securely, and check that the base is stable before you walk away.
7. Ribbon-Lit Pom Bottle
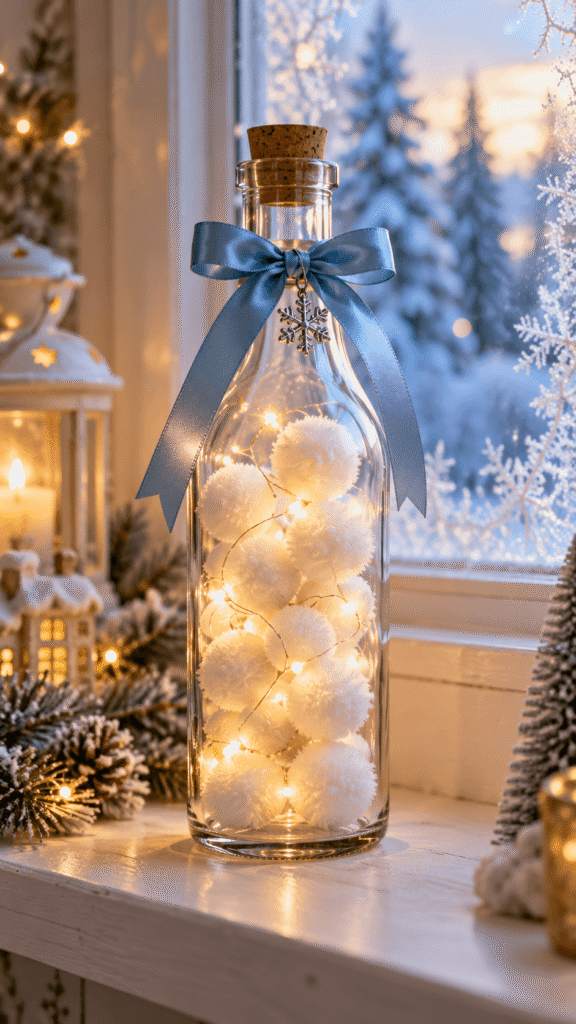
Warm string lights and large white pom poms inside a clear bottle make a glowing centerpiece, with a blue ribbon and a small snowflake charm at the neck. The light does most of the work, so the rest can stay simple.
The trouble is the neck. Big pom poms jam in the opening, so squeeze each one and push it through with a chopstick, or use a wide mouth bottle. Fill from the bottom up and weave the lights between the pom poms as you go.
Skill: Beginner. Time: 20 minutes. Gear: LED battery lights.
What You Need
- Clear glass bottle (wide mouth if you can find one)
- Warm white LED string lights, battery powered
- White pom poms, 1 to 2 inches (or cotton balls)
- Blue ribbon (or a strip of blue fabric)
- Small snowflake charm (or a snowflake button)
- A chopstick
How to Make It
- Feed in a few pom poms, then some lights, alternating until the bottle is about two thirds full. Use the chopstick to nudge them past the neck.
- Arrange the lights so they show through the glass, with the battery pack outside the neck.
- Tie the ribbon around the neck to hide the cord, and hang the charm from the knot.
Safety: Use LED lights only, keep any real flame well away from the yarn pom poms, and keep the battery pack reachable.
8. Pom-Pom Snowfall Bottle
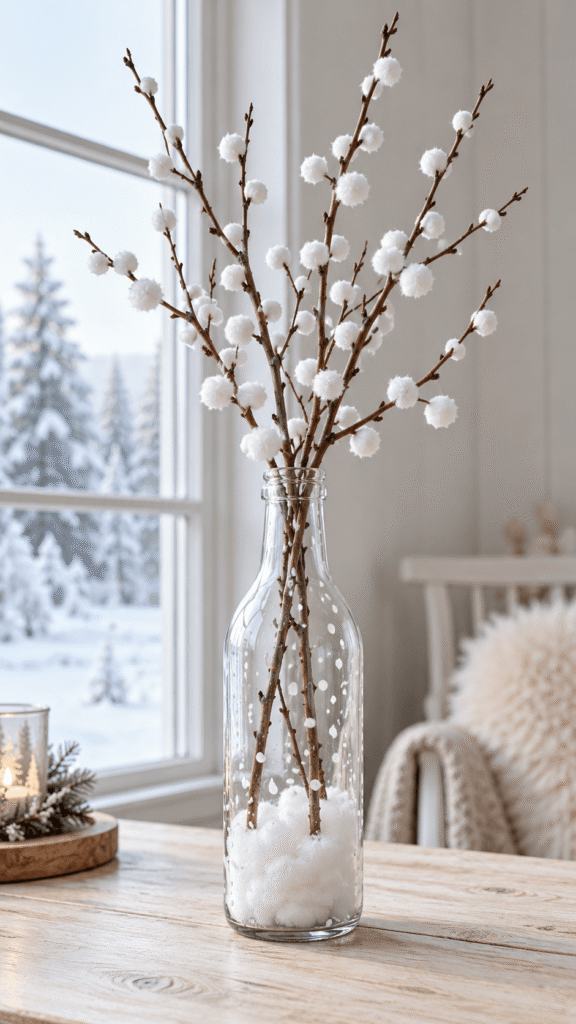
Thin branches dotted with white pom poms look like they’re carrying snow, and a few white dots on the glass plus cotton at the base add to the effect. It looks airy, and it takes very little time.
Do the gluing before the branches go in. The neck is too narrow to work through, so glue the pom poms on first, let the glue set, then slide the bunch in. Painting dots on the outside of the glass is also much easier than painting the inside.
Skill: Beginner. Time: 30 minutes. Gear: Tacky glue and a paint pen.
What You Need
- Clear glass bottle
- Thin branches, about 1 1/2 times the bottle height (twigs from the yard, or faux)
- White pom poms, 1/2 to 1 inch (or cotton balls)
- White paint pen (or craft paint and a cotton swab)
- Cotton batting or faux snow for the base (or cotton balls pulled apart)
- Sand for weight
- Tacky glue
How to Make It
- Glue pom poms along the branches and let them set for 30 minutes.
- Pour a cup of sand into the bottle, then add a layer of cotton batting or faux snow on top.
- Dot white paint on the outside of the glass for falling snow, and let it dry.
- Slide the branch bunch into the neck and fan it out.
Tip: Put the glue on the pom pom, not the branch. It leaves fewer glue strings.
Safety: Let the glue dry fully before you move the bottle, and use the sand so it doesn’t tip.
9. Buffalo Plaid Greenery Bottle
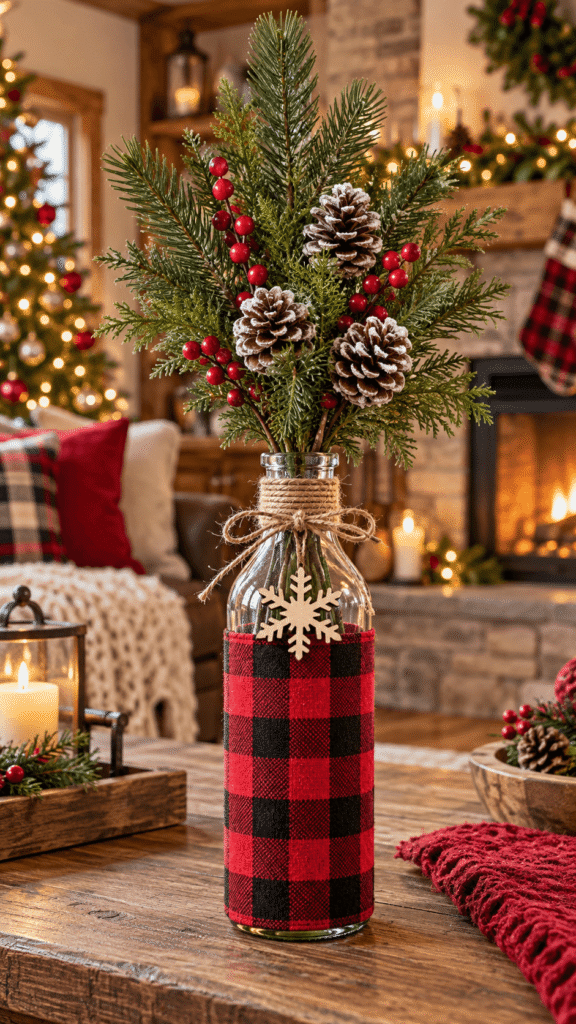
Red and black plaid gives a plain bottle a bold base, with twine at the neck and a wooden snowflake charm in front. Evergreen stems and frosted pinecones on top make a lively, uneven crown.
Plaid shows every crooked cut. Cut along a plaid line so the pattern stays straight when you wrap, and line up the black bands with the base of the bottle. Hot glue on fabric works, but E6000 or Mod Podge holds longer.
Skill: Beginner. Time: 30 minutes. Gear: E6000 or a low temp glue gun.
What You Need
- Clear glass bottle
- Red and black plaid fabric (or a flannel shirt scrap)
- Twine
- Wooden snowflake ornament (or a paper snowflake)
- Faux evergreen stems
- Small frosted pinecones (or pinecones dabbed with glue and Epsom salt)
- Mod Podge or E6000
How to Make It
- Iron the fabric, then cut a rectangle that wraps the lower two thirds of the bottle with a 1/2 inch overlap, cutting along a plaid line.
- Brush Mod Podge on the glass, wrap the fabric, and fold the overlap under at the back.
- Tie twine around the neck and glue on the snowflake.
- Arrange the evergreen stems and pinecones in the opening, trimming them to fit.
Safety: Faux pine stems and pinecone scales are sharp, so handle them carefully and make sure the greenery sits stable in the neck.
10. Rustic Sweater-Wrapped Holiday Bottles
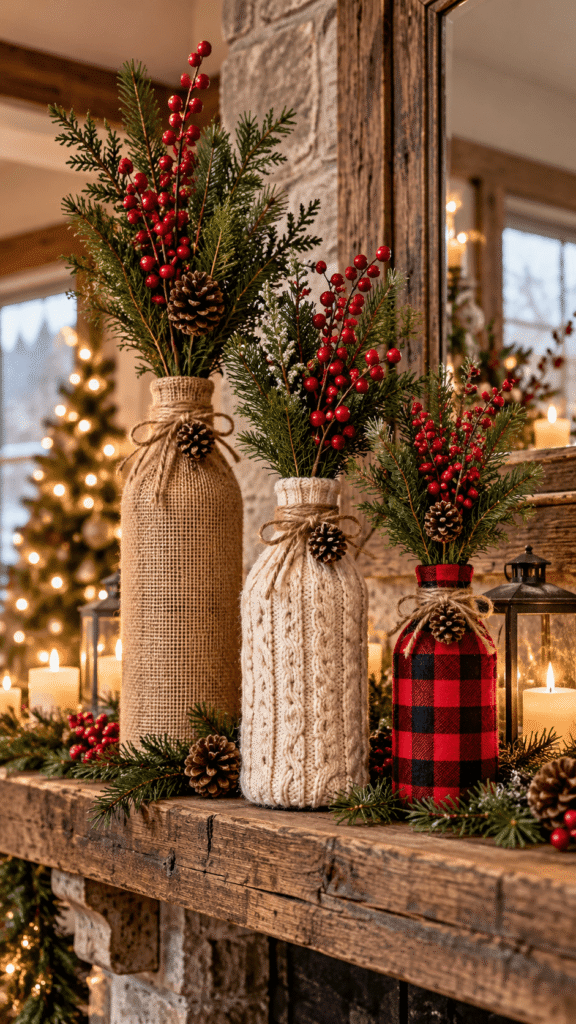
Three bottles in burlap, cable knit, and plaid read as a collected trio on a wooden mantel. Odd numbers look natural, and the different textures keep the group from looking like a matched set.
Burlap sheds and its cut edge frays, so fold the edge under or seal it with Fray Check. Mix the pattern scale too, with a big plaid, a small knit, and plain burlap. Use stems of different lengths so the three bottles aren’t the same height.
Skill: Beginner. Time: 60 minutes for three bottles. Gear: Fabric glue or E6000.
What You Need
- Three glass bottles, ideally different heights
- Burlap, cable knit fabric, and plaid fabric (or thrifted sweaters and flannel scraps)
- Twine
- Pinecones, evergreen sprigs, and red berry stems
- Fabric glue or E6000, plus Fray Check
How to Make It
- Wrap each bottle in a different fabric, gluing the seam at the back and folding the raw edges under.
- Tie twine around each neck and glue on a pinecone.
- Push evergreen sprigs and berry stems into the necks, using the tallest stems on the bottle with the plainest wrap.
Safety: Keep glue off the rim and your skin, and secure the stems so the bottles don’t tip.
11. Blue Paper Bottle Snow Sculpture
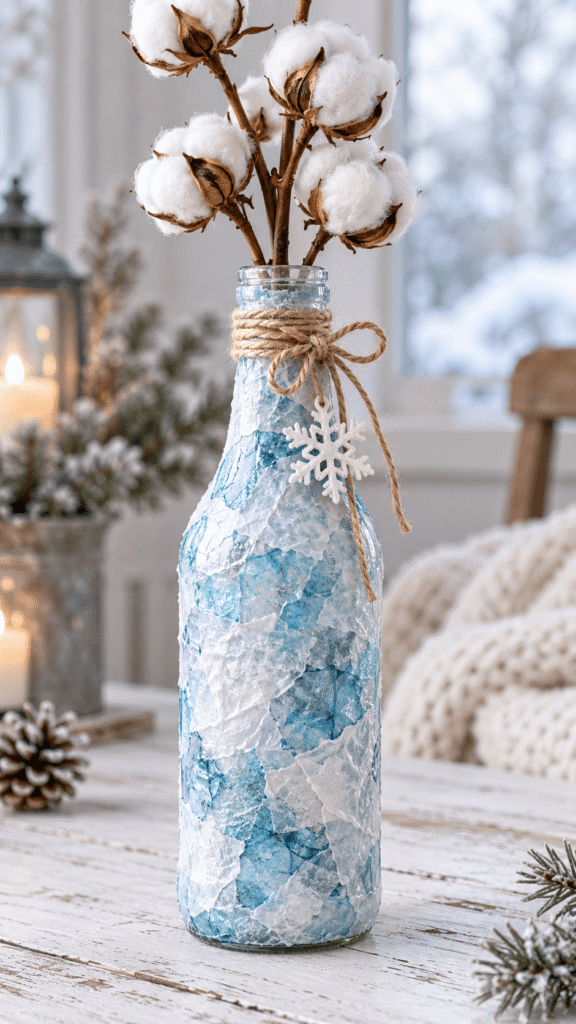
Torn blue and white paper layered onto a bottle makes a frosty, textured surface, and a snowflake ornament and cotton stems finish it. The wrinkles in the paper are the texture, so don’t smooth them out.
Here’s the first try problem: tissue bleeds. Dark blue tissue releases dye when it gets wet and can stain your hands and the white paper. Test a scrap first, or use blue scrapbook paper or paper napkins peeled down to the printed layer.
Skill: Beginner to intermediate. Time: 45 minutes, plus overnight drying. Gear: Mod Podge and a foam brush.
What You Need
- Clear glass bottle
- Blue and white tissue paper (or paper napkins, or torn scrapbook paper)
- Mod Podge matte and a foam brush
- Snowflake ornament (or a paper snowflake)
- Twine
- Cotton stems or faux seed branches
How to Make It
- Brush a patch of Mod Podge onto the bottle, lay a torn piece over it, and brush over the top. Overlap the pieces and alternate blue and white.
- Cover the whole bottle, brush on a final coat, and let it dry overnight.
- Wrap the neck with twine and hang the ornament.
- Insert the cotton stems.
Safety: Use lightweight stems, and add a cup of sand to the bottom if the bottle tips.
12. Snow Globe Bottle Scene
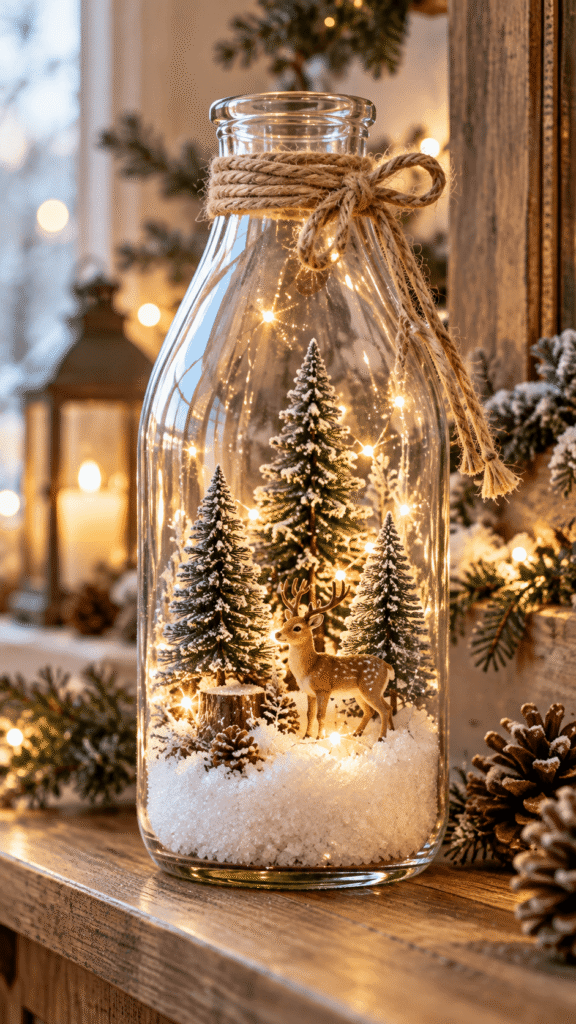
A clear bottle holds mini evergreens and a small deer on a bed of snow, with a twine bow at the neck. It’s one of the fiddlier glass bottle crafts, but it has the most detail of anything on this list.
The catch is the opening. Figurines won’t fit through a standard wine bottle neck, so use a wide mouth bottle or milk bottle, and place each piece with long tweezers. Fill the bottom with snow first so the pieces sink in a little and stay upright.
If you’d rather use a jar than a bottle, the same scene is easier to build. [LINK: Mason Jar Snow Globe Ideas]
Skill: Intermediate. Time: 40 minutes. Gear: Long tweezers and a wide mouth bottle.
What You Need
- Wide mouth glass bottle or milk bottle
- Miniature evergreens (model train trees, small faux trees, or trees cut from green felt and glued to toothpicks)
- Small deer figurine (or any small plastic animal)
- White faux snow or cotton batting (or Epsom salt)
- Twine
- Long tweezers and clear craft glue
How to Make It
- Use a paper funnel to add a layer of faux snow or batting to the base.
- Dab clear glue on the base of each tree and the deer. Place them with tweezers and press each into the snow until it holds. Start with the tallest tree at the back and work forward.
- Tie twine around the neck in a bow.
- Let the glue set before you move the bottle.
Safety: Keep tiny pieces away from kids and pets, and make sure the bottle sits stable.
13. Polar Bear Sweater Bottle
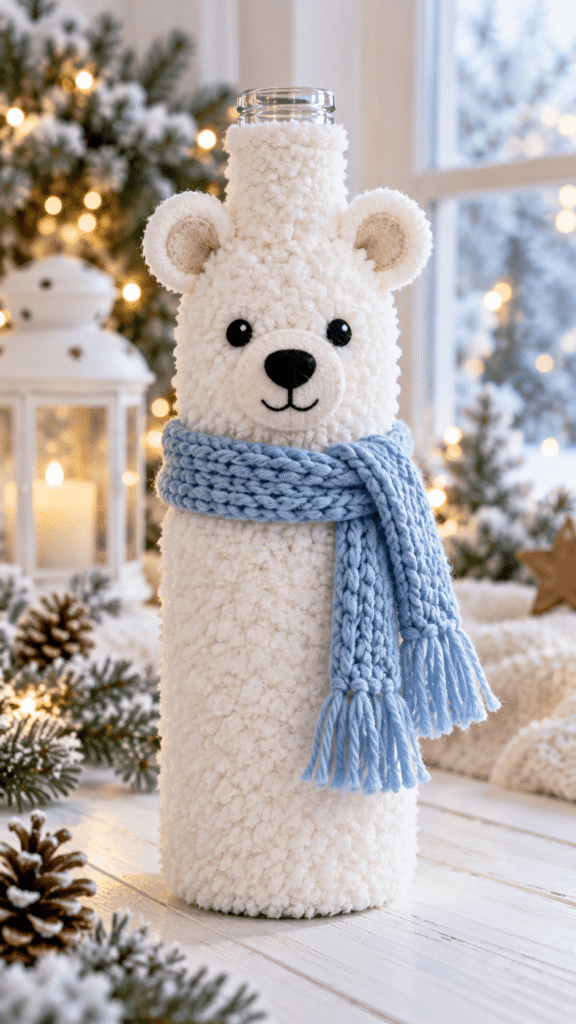
A white fuzzy bottle with rounded ears, black felt eyes and nose, and a blue yarn scarf is the cutest character on this list. Keep the face simple and it reads from across the room.
Fuzz is the problem. White paint won’t make a bottle fuzzy, so slip a piece of white sherpa fabric or a cut white fuzzy sock over it. For the ears, glue two felt circles together with a scrap of cardboard between them so they stay upright, then attach them with E6000 and tape them in place while they cure.
Skill: Intermediate. Time: 45 minutes. Gear: E6000 and ventilation.
What You Need
- White or clear glass bottle
- White sherpa fabric (or a white fuzzy sock with the toe cut off)
- Black felt for the eyes and nose, and white felt for the ears
- Blue yarn for the scarf (or a strip of blue knit fabric)
- E6000 and a cardboard scrap
- Painter’s tape
How to Make It
- Wrap the bottle in sherpa, or pull the sock over it. Glue the seam at the back and tuck the top edge in.
- Make two ears by gluing felt circles over cardboard scraps, fold them slightly, and glue them to the top of the bottle. Hold them with painter’s tape for an hour.
- Glue on the eyes and nose.
- Tie the yarn scarf around the neck and let the ends hang.
Safety: Use E6000 in a ventilated room, and keep the scarf loose so it doesn’t block the bottle opening if you add stems.
14. Snowman Bottle Scarf Craft

A tall white bottle with black button eyes and an orange carrot nose reads as a snowman right away, and a plaid scarf adds warmth. The matte finish keeps it soft.
Painted glass bottles show every streak. White paint over glass goes on patchy, so use two or three thin coats of matte white, letting each dry, instead of one thick coat. Roll the orange foam into a cone and glue the seam. It makes a much better nose than a flat triangle.
Skill: Intermediate. Time: 45 minutes, plus drying. Gear: Spray paint ventilation, or a brush and chalky finish paint.
What You Need
- Clear or white glass bottle
- White matte paint (DecoArt Chalky Finish, or white spray paint labeled for glass)
- Orange craft foam (or orange felt)
- Black buttons for the eyes and coal (or black felt dots)
- Plaid scarf fabric strip (or a flannel scrap with frayed edges)
- E6000
How to Make It
- Clean the bottle and paint it white in thin coats, letting each coat dry. Let it cure overnight.
- Roll the orange foam into a small cone and glue the seam. Glue it on as the nose, with the eyes above and a column of buttons down the front.
- Wrap the scarf strip around the neck, tie it, and glue a dot at the back so it doesn’t slide.
Safety: Spray outdoors with a respirator and gloves, or brush on paint in a ventilated room. Use E6000 with ventilation too.
15. Yarn-Bearded Holiday Bottle Gnome
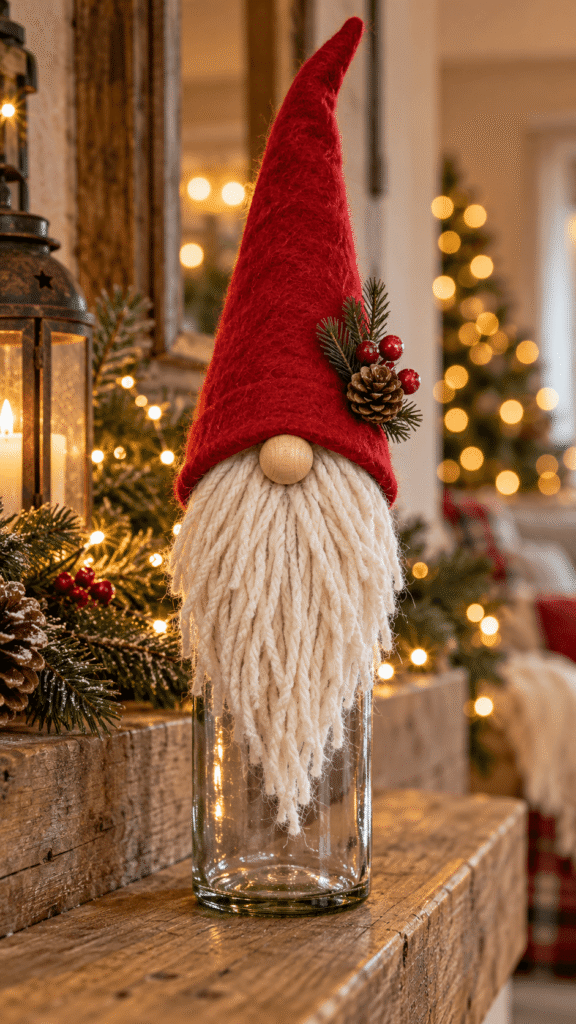
A red felt hat covers the top of the bottle, a long cream beard hangs below it, and a wooden bead nose peeks out under the brim. A pinecone and berry sprig add rustic charm, and the visible glass at the base keeps it from looking heavy.
The beard is where first tries go thin. Glue a line across the bottle, press the folds of yarn lengths into it, and build the beard in rows from the bottom up. Trim at the end, not before. For the hat, put a cardstock cone under the felt so it doesn’t flop.
Skill: Intermediate. Time: 45 minutes. Gear: Low temp glue gun.
What You Need
- Clear glass bottle
- Red felt (or fabric) and cardstock for the hat cone
- Cream chunky yarn (or unraveled cotton rope)
- Wooden bead nose, about 1 inch (or a pom pom)
- Small pinecone and faux berries
- Twine and a low temp glue gun
How to Make It
- Cut the yarn into 8 inch lengths and fold each in half. Glue the folds in rows across the middle of the bottle, working from the bottom of the beard up.
- Glue the wooden bead nose just above the top row of beard.
- Roll a cardstock cone that fits the neck, cover it with felt, glue the seam, and slide it on as the hat.
- Tie twine around the hat and glue the pinecone and berries to the side.
Safety: Trim yarn ends carefully, and press small decorations down firmly while the glue sets.
16. Penguin-Themed Painted Bottle

A black body, a white belly panel, an orange beak, big eyes, and a light blue scarf make a cheerful penguin. The belly is what makes it read as a penguin, so it’s worth getting right.
White over black needs three or four coats, so paint the belly oval white first and let it dry fully (overnight is safer). Then mask its edge with painter’s tape and paint the rest black. Peel the tape slowly, at an angle, once the black is dry to the touch.
This is one of the painted glass bottles where patience pays off, since rushed tape peels the white right off.
Skill: Intermediate. Time: 60 minutes, plus overnight drying. Gear: Painter’s tape and ventilation if you spray.
What You Need
- Glass bottle
- Black and white paint (chalky finish, or spray labeled for glass)
- Orange craft foam (or felt)
- Black felt for the flippers
- Light blue felt (or a strip of blue fabric)
- Large googly eyes, about 1 inch (or paper circles)
- E6000 or craft glue
How to Make It
- Paint a white belly oval on the front in two or three thin coats and let it dry overnight.
- Tape around the oval and paint the rest of the bottle black. Peel the tape once the paint is dry to the touch.
- Cut two flipper shapes from black felt and glue them to the sides, angled slightly out.
- Glue on the eyes and an orange foam beak, then cut a felt scarf and glue it around the neck.
Safety: Use craft glue in a ventilated room, and keep small parts away from pets.
17. Snowflake Milk Bottles
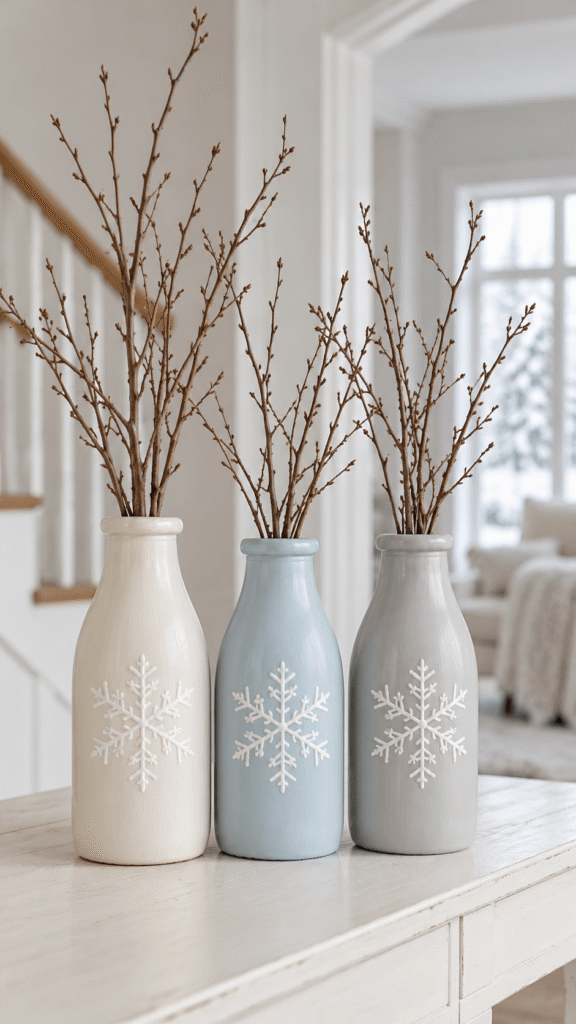
Three bottles in cream, pale blue, and gray, each with a centered white snowflake, make a calm trio of winter bottle decor. Tall bare twigs add height without crowding the arrangement.
Matte paint on wide bottles is easy. Stencils on curved glass are not. A stencil lifts at the edges and paint bleeds under it, so tape it flat with low tack tape and dab with a sponge instead of brushing. A white paint pen is the beginner option, and it’s what I’d use on painted glass bottles with small details.
Skill: Intermediate. Time: 60 minutes, plus drying. Gear: A sponge dabber, and a stencil or paint pen.
What You Need
- Three glass bottles, wide neck milk bottle style (or wine bottles)
- Chalky finish paint in cream, pale blue, and gray (or craft acrylic)
- White paint pen (or a snowflake stencil with a sponge dabber)
- Bare twigs (foraged, or faux)
- Sand for weight, and a clear spray sealer
How to Make It
- Paint each bottle in one soft color, using thin coats and letting each coat dry before the next.
- Add a centered white snowflake with a stencil and sponge, or a paint pen.
- Seal if you like, then add a cup of sand to each bottle and set in the twigs.
Safety: Let the paint cure fully before you handle the bottles, and use the sand so the tall twigs don’t tip them.
18. Midnight Snowflake Bottle Vase
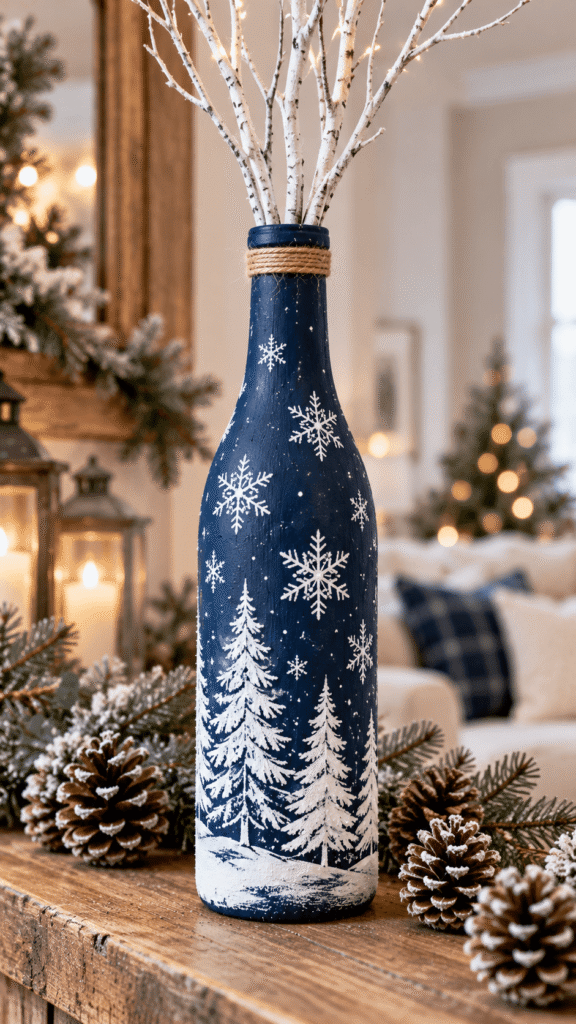
Deep navy or black glass with white snowflakes and trees on the lower half gives a dramatic contrast. White twigs and pinecones finish it as a clean winter centerpiece.
Dark spray paint shows every drip. Use two or three light coats, shake the can well, and keep it moving. On painted glass bottles this dark, a white paint pen is easier to control than white paint, and removable vinyl decals give crisper snowflakes than a brush.
Skill: Intermediate. Time: 60 minutes, plus drying. Gear: Spray paint outdoors and a respirator.
What You Need
- Dark glass bottle (or a clear bottle painted navy)
- Navy or black paint (spray labeled for glass, or chalky finish)
- White acrylic paint (or a white paint pen)
- Snowflake stencil or vinyl decal (or freehand with a paint pen)
- White paint for the twigs (white spray paint or craft paint)
- Pinecones
How to Make It
- Paint the bottle navy or black in thin coats and let it dry.
- Add white winter trees and snowflakes to the lower half with a stencil, decal, or paint pen.
- Paint the twigs white and let them dry fully.
- Add a cup of sand, set in the twigs, and group the bottle with pinecones.
Safety: Spray outdoors with gloves and an organic vapor respirator. Use sturdy twigs, and let everything dry before you handle it.
19. Blue Winter Bird Bottle

A matte blue gray bottle with a white bird on a branch and scattered speckles feels peaceful and lightly illustrated. Twine, a pinecone, an evergreen sprig, and a white berry stem layer natural detail on top.
For the speckles, flick white paint off a stiff toothbrush, and cover everything nearby first. For the bird, print a small silhouette, tape it inside the glass facing out, and trace it on the outside. This is advanced mostly because small curved shapes take a steady hand.
Of all the painted glass bottles here, this one shows brush marks the most, so thin the paint slightly and use a size 0 or 1 brush.
Skill: Advanced. Time: 90 minutes, plus drying. Gear: Fine brush and an old toothbrush.
What You Need
- Glass bottle
- Blue gray paint (chalky finish, or mix blue, gray, and white acrylic)
- White acrylic paint and a white paint pen
- Fine paintbrush, size 0 or 1
- Twine, a pinecone, an evergreen sprig, and a white berry stem
How to Make It
- Paint the bottle blue gray in thin coats and let it dry fully.
- Flick white speckles on with a toothbrush and let them dry.
- Tape a printed bird and branch inside the glass and trace it on the outside with a fine brush or paint pen.
- Wrap twine around the neck, tie on the pinecone, and add the sprig and berry stem.
Safety: Let the paint cure before you handle the bottle, and keep decorative stems away from open flame.
20. Mountain Landscape Bottle

Gray and white peaks with dark tree silhouettes along the bottom look like a tiny framed winter landscape. Bare branches above the opening carry the outdoor theme up and make the bottle taller.
Paint on the outside, in layers from far to near: pale distant peaks first, darker middle peaks next, black trees last. Dab with a sponge for soft snow caps. Painted glass bottles with scenes show every brush mark, so use thin paint and dab instead of dragging.
Skill: Advanced. Time: 90 minutes, plus drying. Gear: Fine brushes and a sponge.
What You Need
- Clear glass bottle
- Gray, white, and black paint (acrylic or chalky finish)
- A small flat brush and a fine liner brush (or a paint pen for the trees)
- A small piece of sponge
- Bare branches and sand for weight
- Clear spray sealer
How to Make It
- Sketch the mountain line on the outside of the glass with a dry erase marker. It wipes off if you change your mind.
- Paint the pale far peaks first and let them dry. Add the darker middle peaks, then dab white snow caps with the sponge.
- Add dark tree silhouettes along the bottom with black paint and the liner brush.
- Let it dry completely and seal it, then add a cup of sand and the bare branches.
Safety: Work on a protected surface, and handle the bottle carefully after decorating.
Common Mistakes To Avoid With DIY Winter Bottle Crafts
The mistakes that ruin glass bottle crafts are mostly prep mistakes. These are the first timer ones I see most, and what to do instead.
- Skipping the label glue. Leftover adhesive makes paint bead up and peel. Use Goo Gone or oil and baking soda, then wipe with rubbing alcohol.
- Painting thick. One heavy coat drips and runs. Two or three thin coats look better and dry faster.
- Washing painted bottles. These are display pieces, not drinkware. Dust them with a dry cloth.
- Using hot glue for everything. It holds twine and yarn fine, but it peels off smooth glass under tension. Use E6000 or Mod Podge for fabric, foam, and wood.
- Overstuffing the neck with lights. You’ll need to change the batteries eventually, so leave the last inch of the neck clear.
- Picking a narrow neck for a scene. Figurines and big pom poms need a wide mouth bottle.
Practical note: Weight first, decorate second. Tall stems tip a bottle faster than you’d expect, so pour a cup of sand, rice, or aquarium gravel into the bottom before you add branches.
FAQs
What are the easiest DIY winter bottle crafts for beginners?
The Twine-Wrapped Neutral Bottle, the Cable-knit bottle winter vase, and the Frosted Branch Bottle Centerpiece are the easiest. They need only wrapping, gluing, and filling, and none of them involve paint. Start there before you try anything painted.
What kind of paint works on glass bottles?
Chalky finish paint and craft acrylic both stick to clean glass for display pieces, and a clear spray sealer cuts down on scratching. Painted glass bottles aren’t food safe or dishwasher safe, so keep them for decor.
How do you get labels off glass bottles for crafts?
Soak the bottle in hot soapy water for about 30 minutes, then peel the label. Remove leftover glue with Goo Gone or a paste of cooking oil and baking soda, and wipe with rubbing alcohol.
Are fairy lights safe inside a glass bottle?
Battery powered LED lights run cool, so they’re fine inside closed glass. Skip plug in incandescent strings, keep the battery pack reachable, and keep button batteries away from kids and pets.
What’s the best glue for glass bottle crafts?
E6000 grips fabric, foam, and wood to glass best, and it needs ventilation while it cures. Low temp hot glue is fine for twine and yarn, but it can peel off smooth glass under tension.
What bottles work best for winter bottle decor?
Standard 750 ml wine bottles are the easiest for most wine bottle crafts, since they’re free and the shoulder is a good shape for wrapping. Use wide mouth bottles like milk bottles when you want to put scenes or large pom poms inside.
Winter Bottle Craft Ideas For A Handmade Seasonal Display
Use the list like a menu, not a to do list. One wrapped bottle, one lit bottle, and one painted bottle on a mantel cover texture, glow, and color, and that mix is what makes winter bottle decor look collected.
If you only have time for three DIY winter bottle crafts, make the Twine-Wrapped Neutral Bottle, the Glowing Frost Bottle Lantern, and the Snowflake Milk Bottles. Those three give you texture, light, and a hand painted detail without a huge supply run.
If you like the wrapped looks, there are plenty more ways to use fabric and twine on glass. Mason Jar Winter Crafts.
If you want to keep going with the natural materials, pinecones are the next step.
Pull three bottles out of the recycling this week, peel the labels tonight, and start with a wrap. Your first one is the one you learn on, and it will still look good on a shelf.
