

The easiest recycled Christmas crafts are the ones built from what’s already in your recycling bin, like egg cartons, wine corks, jars, bottle caps, and cardboard. Most take 20 minutes to 2 hours with scissors and a hot glue gun, and the beginner projects need no special tools. Clean and dry your materials first, then pick two or three projects that share a kraft, green, red, and gold palette.
It’s a Saturday in late October, and your recycling bin is full of what looks like trash: egg cartons, wine corks, a pasta sauce jar, a pile of bottle caps. Don’t haul it out yet. That bin is the start of a handmade Christmas.
These 20 recycled Christmas crafts turn that pile into ornaments, a pierced tin lantern, a tiny village, and a cardboard fireplace. Each one has a skill rating, a realistic time, and the safety gear that actually matters, since a few of them involve hot glue, a craft knife, or a hammer. Think of them as upcycled Christmas decorations you can finish a few at a time.
Christmas lands on a Friday this year, and it’s about ten weeks away. That’s enough time to save materials, make a couple of pieces each weekend, and have the glue gun unplugged well before December 25.
How To Choose Recycled Christmas Crafts By Skill, Time, and Mess
I rate every project the same way, so you can pick without reading all 20.
- Beginner: Cutting, gluing, and wrapping. Scissors and a glue gun are the only tools. A bad first try still looks handmade in a good way.
- Intermediate: Needs a craft knife, a hammer, paint on plastic, or careful fitting. Plan on an evening, and expect to redo one piece.
Nothing here is advanced. The Twine Wrapped Candle Tin and the Mini Paper Village Display are where first timers slow down, so save those for your second weekend.
Mess ratings work like this. Low is paper and glue, and a wiped table is enough. Medium means paint, decoupage, or water, so cover the table. High means spray paint, which belongs outdoors. Time includes cutting and gluing but not drying, and painted pieces need an hour or two.
Rustic Christmas crafts are forgiving, because wonky edges and uneven paint read as character. If you want recycled Christmas ornaments, start with the cork reindeer, the gift box, or the ribbon bell. Most Christmas crafts from recycled materials come down to prep, not skill, since clean, dry, flat materials are half the project.
Kids can help with tearing tissue paper, wrapping tassels, and painting egg carton cups. The glue gun, craft knife, hammer, and spray paint are adult jobs.
Practical note: Start saving materials now, and wash and dry everything before it goes in a box. A sticky bottle cap or a jar with leftover label glue will fight you at every step.
Safety and Workspace Notes Before You Start
Christmas crafts from recycled materials come with their own hazards: cut metal, sharp plastic, hot glue, and fumes. None of it is hard to manage, but set up before you start, not after the first blister.
- Hot glue: Use a low temp gun for plastic, foam, and fabric, and a high temp gun for cork, wood, metal, and stacked cardboard. Even low temp glue can blister skin, so keep a bowl of cold water nearby or wear silicone finger tips.
- Craft knife: Cut on a self healing mat or scrap cardboard, use a fresh blade (dull blades slip), cut away from your body, and make several light passes instead of one hard push.
- Tin cans and punched metal: Use a safe edge can opener that cuts the lid off the side, so the rim stays smooth. Wear safety glasses when you hammer, and file or sand the burrs inside every punched hole.
- Spray paint and sealers: Spray outdoors or in a garage with the door open. If you spray indoors, you need a respirator with organic vapor cartridges, not a paper dust mask.
- Glass jars: Skip any jar with a chip or crack, and work over a towel so a drop doesn’t turn into a floor full of glass.
- Pinecones and greens: Outdoor pinecones can carry bugs and sap. Bake them on a foil lined sheet at 200 degrees Fahrenheit for about 30 minutes, stay in the kitchen while they bake, and don’t use that sheet for food afterward.
- Egg cartons: Use pulp cartons, never foam, because hot glue melts foam. Toss any carton with egg residue and wash your hands after handling.
- Small parts: Beads, pompoms, buttons, and jingle bells are choking hazards for toddlers and pets. Hang finished ornaments high on the tree.
Practical note: Real candles and these crafts do not mix. Paper flames, tissue paper, cotton batting, and twine all burn fast. Battery LED tea lights give you the same glow with no risk.
I keep one corner of the garage for spray paint and sanding so the house stays clean.
Supplies, Where To Find Them, and Free Swaps
The recycled part costs nothing. Cardboard, egg cartons, jars, tin cans, and bottle caps come from your bin, and wine corks are usually free at restaurants and wine shops if you ask. Sweaters, socks, and plaid scraps come from thrift stores or your own rag bag. Upcycled Christmas decorations get a lot cheaper when the only things you buy are glue, paint, and a few accents.
Here are the items you’ll likely buy, with a free or low cost swap for each.
| Supply | Where to buy | Free or low cost swap |
| Hot glue gun and sticks | Walmart, Michaels, Hobby Lobby, dollar store | Aleene’s Original Tacky Glue with clothespins to hold pieces while they set |
| Acrylic paint | Walmart, Michaels (Apple Barrel is cheap and reliable) | Leftover wall paint from a sample pot |
| Twine | Dollar store, Walmart | Yarn scraps, or strips of brown paper bag twisted into cord |
| Pompoms | Dollar store, Michaels | Balled up tissue paper or buttons from an old shirt |
| Felt | Walmart, Hobby Lobby | Scraps of fleece or an old T shirt |
| Faux pine sprigs | Dollar store, Michaels | Trimmings from the bottom of a real Christmas tree |
| LED tea lights | Dollar store, Walmart | Last year’s battery string lights tucked into the jar or tin |
| Ribbon | Dollar store, Michaels | Strips of fabric, or ribbon saved from last year’s gifts |
| Beads and buttons | Dollar store, Michaels | Buttons cut off thrifted clothes, or beads from broken jewelry |
| Craft sticks | Dollar store, Michaels | Strips cut from a cereal box |
| Gold star toppers | Dollar store, Michaels | A star cut from cardboard and wrapped in gold candy foil or gift wrap |
Practical note: Hot glue is the right glue for about half of this list and the wrong glue for the rest. Use tacky glue for paper and tissue, hot glue for cork, cardboard stacks, and wood, and fabric glue for fabric.
I keep a bin of saved materials sorted by type, and it saves an hour every season
Recycled Christmas Crafts At A Glance
The projects below show up in a mixed order, so use this table as your index. It’s sorted from easiest to hardest, and each name jumps to its section.
| Craft | Skill | Hands on time | Main recycled material | Key tool |
| Cork Reindeer Head Ornament | Beginner | 20 minutes | Wine cork | Glue gun |
| Wrapped Gift Box Ornament | Beginner | 25 minutes | Small cardboard box | Scissors |
| Cork Bottlebrush Christmas Tree | Beginner | 30 minutes | Wine corks | Glue gun |
| Paper Angel Cone Figure | Beginner | 30 minutes | Paper cup | Scissors |
| Ribbon Bell Ornament | Beginner | 30 minutes plus drying | Paper cup | Paintbrush |
| Tissue Paper Jar Lantern | Beginner | 30 minutes plus 2 hours drying | Glass jar | Foam brush |
| Bottle Cap Christmas Tree | Beginner | 45 minutes | Bottle caps | Glue gun |
| Drum Style Holiday Canister | Beginner | 45 minutes | Oatmeal canister | Glue gun |
| Painted Wooden Snowflake Frame | Beginner | 45 minutes plus drying | Craft sticks | Paintbrush |
| Egg Carton Wreath Ring | Beginner | 1 hour plus drying | Pulp egg cartons | Glue gun |
| Patchwork Tassel Garland | Beginner | 1.5 hours | Fabric scraps | Scissors |
| Magazine Roll Christmas Tree | Beginner | 2 hours | Old magazines | Glue gun |
| Wrapped Cardboard Star Ornament | Intermediate | 45 minutes | Corrugated cardboard | Craft knife |
| Cable-Knit Stocking Ornament | Intermediate | 45 minutes | Knit sock or sweater | Fabric glue |
| Painted Lid Snowman Figure | Intermediate | 45 minutes plus drying | Plastic lids | Spray paint |
| Hanging Snowflake Bottle Ornament | Intermediate | 1 hour | Clear plastic bottles | Scissors, sandpaper |
| Snowflake Sleigh Gift Carrier | Intermediate | 1 hour | Cardboard box | Glue gun |
| Cardboard Hearth Mantel Display | Intermediate | 2 hours | Shipping box | Craft knife |
| Mini Paper Village Display | Intermediate | 2 hours | Cereal boxes | Craft knife |
| Twine Wrapped Candle Tin | Intermediate | 45 minutes plus overnight freeze | Steel food can | Hammer, nail |
If you’re planning a few weekends of crafting, save this page to your Christmas board on Pinterest so the table and supply list are easy to find when you’re sorting your recycling bin.
The 20 Recycled Christmas Crafts
Each project lists its skill level, time, mess, and the gear that matters. Pick the ones that match your evening, not the ones that photograph best.
1. Tissue Paper Jar Lantern
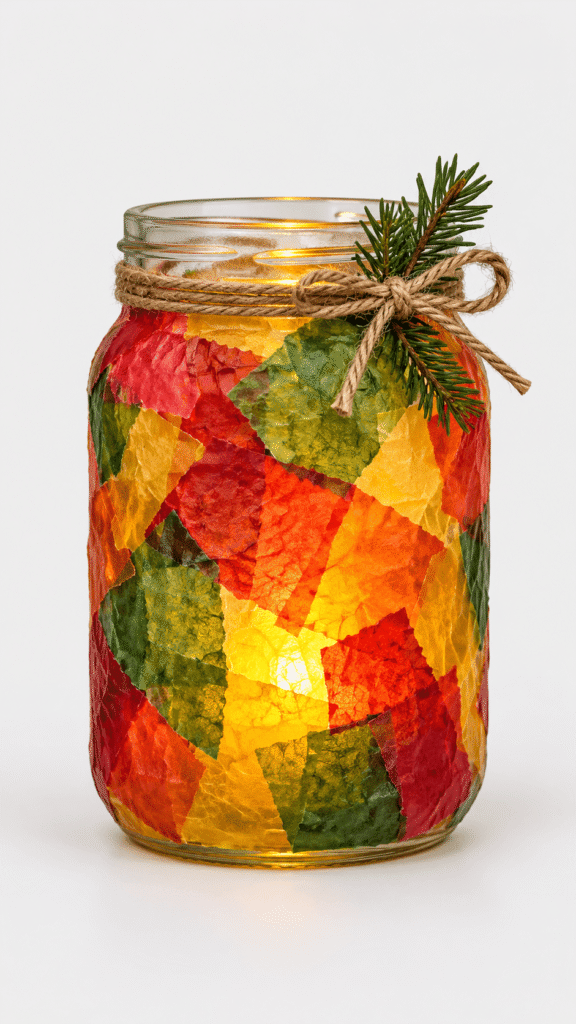
This is the easiest way to get a stained glass look without any glass work. Torn tissue paper and a coat of decoupage glue glow beautifully around a battery tea light. The catch is wrinkles, since wet tissue stretches and puckers, so work in thin coats.
Skill: Beginner. Time: 30 minutes, plus about 2 hours to dry. Mess: Medium. Gear: foam brush, LED tea light.
What You Need
- A clean glass jar with the label soaked off (a pasta sauce or pickle jar)
- Tissue paper scraps in red, green, yellow, and orange (from gift bags, or any thin wrapping paper)
- Mod Podge Gloss (or white glue thinned with water, about 2 parts glue to 1 part water)
- A foam brush
- Twine and a small evergreen sprig
- A battery tea light
How to Make It
- Brush a thin coat of Mod Podge onto one small section of the jar.
- Press torn tissue pieces on and smooth out wrinkles with your finger, working from the center outward. Overlap the edges slightly so the colors blend.
- Brush a thin coat over the top and repeat until the jar is covered. Let it dry fully, at least 2 hours.
- Wrap twine around the neck and tie a bow with the evergreen sprig tucked in.
- Drop in a battery tea light.
Tip: Cheap red tissue paper bleeds dye when it gets wet. Test a scrap on white paper first, or put the red pieces on last.
2. Cork Reindeer Head Ornament
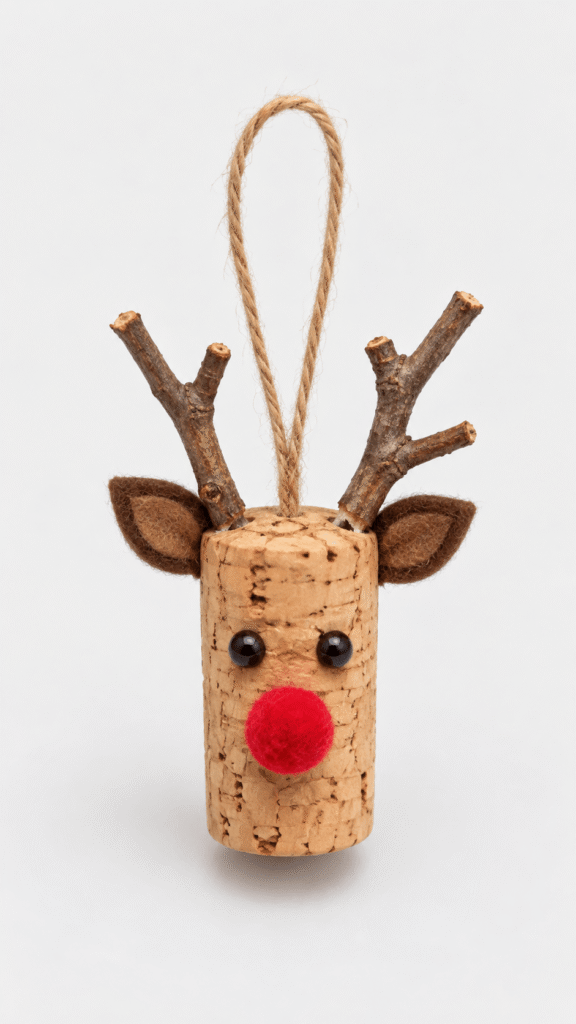
Of all the rustic Christmas crafts in this guide, this is the one I’d make by the dozen. A wine cork is soft enough to poke antlers into with no drilling, and it holds hot glue well. It also makes quick recycled Christmas ornaments that work as gift toppers.
Skill: Beginner. Time: 20 minutes. Mess: Low. Gear: hot glue gun, pruning shears or strong scissors for the twigs.
What You Need
- 1 natural wine cork (synthetic plastic corks are slick and glue poorly)
- 2 small forked twigs, about 2 to 3 inches long, from your yard
- Brown or tan felt scraps (or a piece of an old sweater)
- 2 small beads for eyes (or dots from a black marker)
- 1 red pompom for the nose (or a red button)
- Hot glue and a short piece of twine
How to Make It
- Poke two starter holes in the top of the cork with an awl, a nail, or a skewer.
- Dip the twig ends in hot glue and push them into the holes. Hold for 10 seconds.
- Cut two small felt ears and glue them just below the antlers.
- Glue on the bead eyes and the red pompom nose on the side of the cork.
- Glue a twine loop to the back, between the antlers.
Tip: Trim the twig ends flat with pruning shears so they don’t splinter into your fingers.
3. Painted Lid Snowman Figure

Two white lids make a snowman that’s more about the face and scarf than the body. The trade off is paint, since acrylic slides right off slick plastic lids. You either prime them or start with lids that are already white.
Skill: Intermediate (painting plastic). Time: 45 minutes, plus about 1 hour to dry. Mess: Medium. Gear: spray paint outdoors, hot glue gun.
What You Need
- Two round lids, one slightly smaller (plastic coffee can or tub lids work)
- White spray paint made for plastic, such as Krylon Fusion (or lids that are already white)
- Fine sandpaper
- An orange foam or paper scrap for the nose
- A black marker or black paper dots
- A red felt or fabric strip for the scarf
- Hot glue
How to Make It
- Sand glossy lids lightly, wipe them clean, and spray outdoors in two thin coats. Let them dry.
- Glue the smaller lid on top of the larger one and hold until it sets.
- Add black dots for the eyes and mouth, and glue on a small orange triangle for the nose.
- Wrap the felt strip around the join as a scarf and glue it behind. Snip the ends into fringe.
- Glue a small cardboard stand to the back so he can sit on a shelf.
Tip: Spray paint drips and bubbles when it goes on thick. Two thin coats beat one heavy one every time.
4. Magazine Roll Christmas Tree

Rolled magazine pages look like a woven tree from across the room, and the materials cost nothing. The trade off is time. You need about 40 rolls, and rolling is repetitive, so put something on in the background.
Skill: Beginner. Time: 2 hours. Mess: Low. Gear: hot glue gun, bamboo skewer.
What You Need
- 4 to 5 old glossy magazines or catalogs
- A bamboo skewer or thin dowel for rolling
- A cardboard triangle for the backing, about 12 inches tall (cut from a box)
- A wood slice or cardboard base
- Small pompoms in mixed colors (or buttons)
- A gold star topper (or a star cut from gold gift wrap)
- Hot glue
How to Make It
- Cut magazine pages into long triangles about 2 inches wide at the base.
- Roll each one tightly from the wide end around the skewer, dab glue on the point, and slide the skewer out.
- Sort the tubes into short, medium, and long. You want about 40 in total.
- Glue the tubes onto the cardboard triangle in overlapping rows, with the shortest at the top and the longest at the bottom.
- Glue a pompom into some of the tube openings, then glue the tree onto the base and add the star.
Tip: White tacky glue soaks into paper and lets tubes slip. Hot glue grabs right away.
5. Patchwork Tassel Garland

Fabric scraps turn into a garland with no glue at all. Frayed edges are the look, so don’t fuss over clean cuts. The trade off is time, since a six foot garland needs about 20 tassels.
Skill: Beginner. Time: 1.5 hours. Mess: Low. Gear: scissors, a piece of cardboard.
What You Need
- Fabric scraps in plaid, red, cream, green, and dotted prints (old shirts, flannel sheets, or thrifted fabric)
- About 6 feet of twine or thin rope
- Wood beads with holes big enough for your twine
- A 4 inch piece of cardboard as a winding guide
- Scissors
How to Make It
- Cut or tear fabric into strips about 1 inch wide and 10 inches long.
- Wrap 6 to 8 strips around the cardboard, then slide a short strip under the top loop and tie it tight.
- Slide the bundle off, cut the bottom loops, and tie another strip around the upper third to form the tassel head.
- Tie the tassels onto the rope about 4 inches apart with double knots, and thread a wood bead between a few of them.
- Give each knot a firm tug, then hang the garland from two hooks.
Tip: Tear woven cotton along the grain instead of cutting it. You get straight strips with a natural frayed edge.
6. Twine Wrapped Candle Tin

A pierced tin lantern is the piece on this list that people walk up and touch. It’s also where first timers dent the can or cut a finger. Freeze the can full of water first, so the metal can’t buckle under the nail. This one earns its place among upcycled Christmas decorations.
Skill: Intermediate. Time: 45 minutes, plus an overnight freeze. Mess: Medium (water). Gear: hammer, nail or awl, safety glasses, folded towel.
What You Need
- 1 clean steel food can (a soup or tomato can), label removed
- Water and freezer space
- A hammer and a large nail or an awl
- A star template drawn or printed on paper
- Twine
- A small faux pine sprig and a pinecone
- A battery tea light
- Hot glue, safety glasses, and a folded towel
How to Make It
- Open the can with a safe edge can opener if you have one, so the rim has no sharp cut edge. File or sand any burrs.
- Fill the can with water and freeze it overnight. The ice keeps the walls from denting.
- Tape the star template around the can and set the can on a folded towel. Put on safety glasses.
- Tap the nail through the metal along the star outlines, with the dots about a quarter inch apart. Rotate the can as you go.
- Let the ice melt in the sink, dry the can, and file or sand the burrs inside every hole.
- Wrap twine around the rim, glue on the pine sprig and pinecone, and drop in a battery tea light.
Tip: Punch from the outside in, so the burrs end up on the inside where you can file them.
7. Wrapped Gift Box Ornament
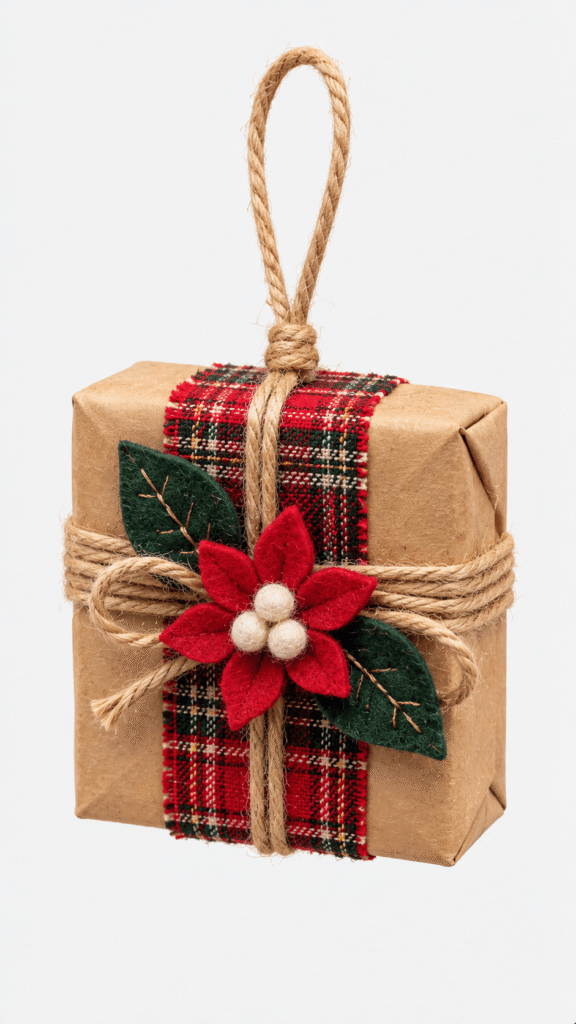
A tiny kraft wrapped box with a felt flower is the easiest of the recycled Christmas ornaments here, and it looks more expensive than it is. The trade off is bulk. Thick paper layers lump up and make the corners tear, so keep everything thin.
Skill: Beginner. Time: 25 minutes. Mess: Low. Gear: scissors, double sided tape.
What You Need
- A small cardboard box, about 3 inches (a tea or jewelry box)
- Kraft paper (cut from a grocery bag)
- A plaid fabric scrap
- Twine
- Felt scraps for a flower and two leaves
- Double sided tape (hot glue lumps show through paper)
How to Make It
- Wrap the box in kraft paper like a real gift, folding the corners flat and sealing seams with double sided tape.
- Lay a plaid fabric strip across the center and tape the ends underneath.
- Cross twine around the box in the opposite direction and tie it off on top.
- Cut a felt flower and two leaves and glue them over the knot.
- Glue a twine loop on top for hanging.
8. Egg Carton Wreath Ring
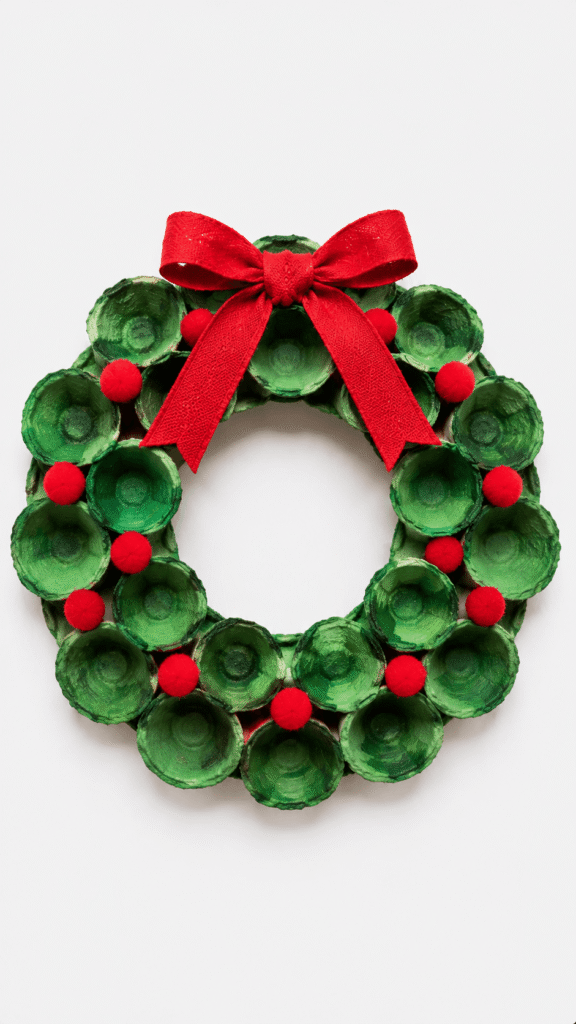
Egg carton cups look like painted pinecone scales once they’re green, and a ring of them reads as a full wreath from across the room. Most tutorials skip the base ring, and without one the cups flop. Add it.
Skill: Beginner. Time: 1 hour, plus 1 to 2 hours to dry. Mess: Medium (paint). Gear: hot glue gun, brush.
What You Need
- 2 to 3 pulp egg cartons (never foam, since hot glue melts it)
- A cardboard ring base about 10 inches across with a 4 inch hole (cut from a shipping box)
- Deep green acrylic paint, such as Apple Barrel (or leftover wall paint)
- Red pompoms (or red buttons)
- About 24 inches of red ribbon (or a fabric strip)
- Hot glue
How to Make It
- Cut the cups apart and trim the edges into points if you like a petal look.
- Paint the cups green inside and out. Pulp soaks up paint, so plan on two coats and an hour of drying.
- Cut the cardboard ring, then glue the cups onto it in an overlapping outer row, followed by an inner row.
- Glue red pompoms where the cups meet.
- Tie the ribbon into a bow, glue it at the top, and add a ribbon loop on the back.
9. Hanging Snowflake Bottle Ornament

Clear plastic turns into frosted looking petals with a paint marker, and it’s one of the lightest recycled Christmas ornaments on this list. Cutting plastic is the sticking point, because of sharp edges, cracked petals, and glue that warps thin plastic. Go slow.
Skill: Intermediate. Time: 1 hour. Mess: Low. Gear: sharp scissors, low temp glue gun, fine sandpaper.
What You Need
- 2 clear plastic bottles, the soft kind used for soda or water (stiff, cloudy plastic cracks)
- Blue and white paint markers, such as Posca
- Ribbon (or twine)
- Scissors and a hole punch
- Low temp hot glue
- Fine sandpaper or a nail file
How to Make It
- Wash the bottles and cut off the smooth middle section, discarding the top and bottom.
- Cut six petal shapes about 2 inches long with rounded tips and narrow bases.
- Smooth every cut edge with sandpaper or a nail file.
- Draw snowflake lines and dots on the outside of each petal and let the paint dry for 15 minutes.
- Arrange the petals in a circle with the tips outward and glue the narrow ends together at the center.
- Punch a hole near the top of one petal and thread the ribbon through.
Tip: Start each cut with the tip of the scissors. Never stab a craft knife into a bottle.
10. Cardboard Hearth Mantel Display

This is the biggest project on the list and the best use of a shipping box. You get a tiny fireplace with its own mantel shelf. The trade off is the cutting, since corrugated cardboard dulls a blade fast and a dull blade slips.
Skill: Intermediate. Time: 2 hours. Mess: Low to medium. Gear: craft knife, cutting mat, metal ruler.
What You Need
- A sturdy cardboard box, about 12 inches wide (a shipping or boot box)
- Brick pattern paper (or brown craft paper with brick lines drawn on in black marker)
- Orange and yellow paper for the flame
- Small twigs or rolled strips of brown paper for the logs
- Pine sprigs and a few pinecones for the mantel
- A battery flickering LED tea light
- Hot glue, craft knife, and a metal ruler
How to Make It
- Cut a fireplace opening in the front of the box with a craft knife against the ruler, making several light passes.
- Cover the box in brick paper and fold the paper around the opening edges.
- Cut flame shapes from orange and yellow paper, layer them inside the opening, and glue twig logs across the bottom.
- Tuck a battery flicker light behind the flames.
- Cut a mantel shelf slightly wider than the box, glue it on top, and arrange the pine sprigs and pinecones.
Tip: Bake outdoor pinecones first (see the safety notes). Sap on a cardboard mantel is a sticky mess.
11. Cork Bottlebrush Christmas Tree

Wine corks stack into a tiny tree with a bottlebrush look. Natural corks are the key, since hot glue grabs them in seconds while plastic corks slide apart. You need about 15, and a restaurant or wine shop will often hand you a bag if you ask.
Skill: Beginner. Time: 30 minutes. Mess: Low. Gear: hot glue gun.
What You Need
- 15 natural wine corks
- A star cut from cardboard and wrapped in gold foil (or a store bought star)
- Small red pompoms
- A cork or wood slice for the base (or a cardboard circle)
- Hot glue (high temp bonds best)
How to Make It
- Lay out the corks on a flat tray lined with parchment paper in rows of 5, 4, 3, 2, and 1.
- Glue each row’s corks together side by side, then stack the rows into a triangle with a dab of glue at each contact point.
- Glue the star onto the top cork.
- Glue the tree onto the base.
- Add a few red pompoms between the corks as ornaments.
Tip: Corks roll. The parchment keeps glue from sticking to the tray, and the finished tree peels right off.
12. Paper Angel Cone Figure
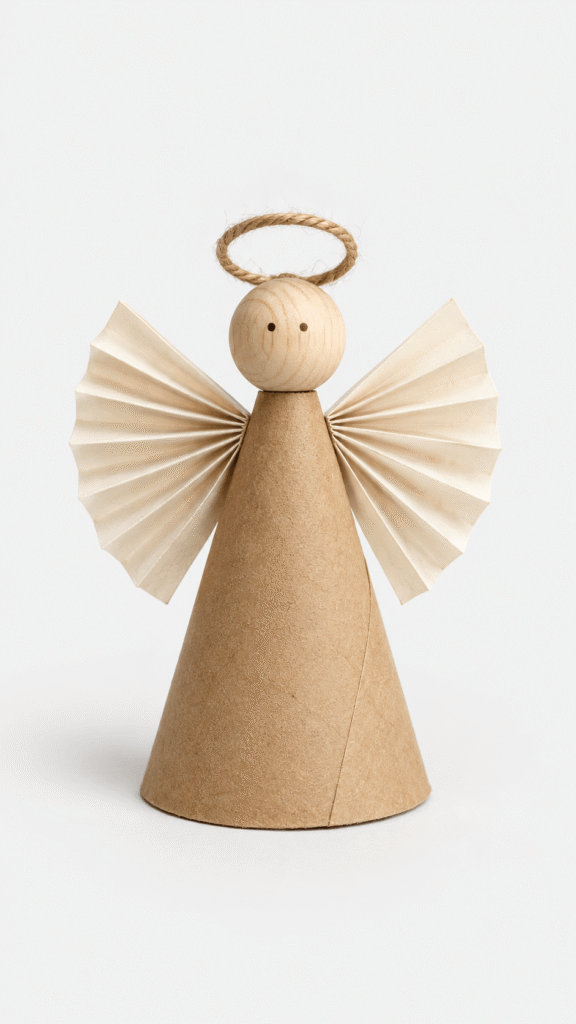
A paper cone and a wooden bead make a quiet angel that works as a shelf piece or a small tree topper. It’s quick and gentle on beginners. The weak point is the wings, which flop unless the fan folds are crisp.
Skill: Beginner. Time: 30 minutes. Mess: Low. Gear: scissors, tacky or hot glue.
What You Need
- A paper cone (a cone shaped paper cup, or a cone you roll from a brown paper bag)
- A 1 inch wooden bead or ball for the head
- 2 strips of cream paper, about 3 by 8 inches (from a paper bag or old book pages)
- A loop of twine for the halo
- A fine tip marker
- Tacky glue or hot glue
How to Make It
- Glue the wooden bead onto the narrow top of the cone and draw a simple face with two dots.
- Fold each paper strip back and forth into an accordion, pinch it in the middle, and fan out the ends.
- Glue the pinched centers to the back of the cone, one slightly higher than the other.
- Glue the twine loop above the head as a halo.
Tip: Press each fold flat with the back of a spoon so the wings hold their shape.
13. Drum Style Holiday Canister
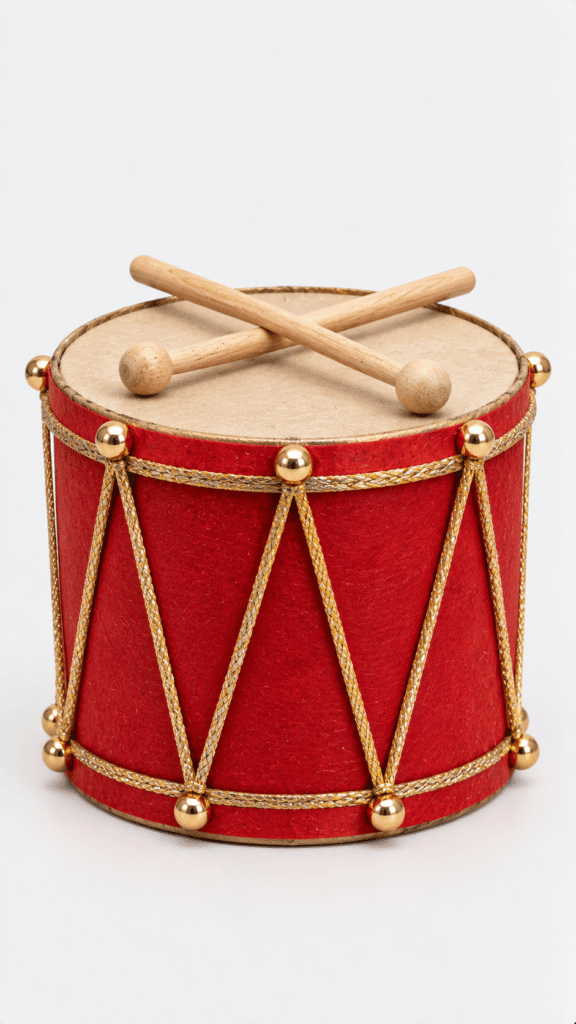
An empty oatmeal canister becomes a toy drum with gold cord lacing and two sticks laid across the top. It works as a treat holder or a mantel piece. The trade off is the cord, which wanders unless you mark the zigzag points first.
Skill: Beginner. Time: 45 minutes. Mess: Low. Gear: hot glue gun, scissors.
What You Need
- A cylindrical canister with a lid (an oatmeal canister such as Quaker, or a coffee can)
- Red paper or felt
- Beige paper or fabric for the lid
- About 3 feet of gold cord (or gold ribbon)
- Small gold beads or buttons
- 2 wooden sticks, such as chopsticks or quarter inch dowels
- Hot glue and tacky glue
How to Make It
- Cover the canister in red paper (tacky glue) or felt (hot glue). Trim it neatly at the top and bottom.
- Cover the lid with the beige paper or fabric.
- Mark zigzag points every 1.5 inches along the top and bottom edges in pencil.
- Glue the gold cord in crisscross lines between the points, with a bead where the cord meets the rim.
- Sand the stick ends smooth, then cross the sticks over the lid and glue them down.
14. Wrapped Cardboard Star Ornament

Corrugated cardboard is the best material for rustic Christmas crafts, because the exposed layers look aged without any effort. It’s also stubborn to cut. Draw a template, use a craft knife, and you’ll get clean points.
Skill: Intermediate. Time: 45 minutes. Mess: Low. Gear: craft knife, cutting mat, metal ruler.
What You Need
- Corrugated cardboard from a shipping box
- A five point star template, about 5 inches wide
- Twine, red yarn, and green yarn
- A small faux pine sprig, plus small beads or berries (or buttons)
- Hot glue
How to Make It
- Trace the star onto the cardboard and cut it out with a craft knife along a metal ruler, in several light passes.
- Glue a twine loop to the back at the top.
- Wrap the star with red and green yarn in crisscrossing lines, gluing the ends on the back.
- Glue the pine sprig and a few beads at the center.
Tip: Leave a thin ring of bare cardboard showing around the edge. That raw border is the whole rustic look.
15. Cable-Knit Stocking Ornament

A thrifted cream sock or sweater sleeve turns into a stocking with a plaid cuff. Knit fabric unravels the second you cut it, and that’s what goes wrong most often. Seal the cut edge or sew it.
Skill: Intermediate. Time: 45 minutes. Mess: Low. Gear: sharp scissors, fabric glue.
What You Need
- A cream knit sock or a sleeve cut from a thrifted sweater
- A red and black plaid scrap for the cuff
- 3 small buttons
- Dark gray felt for the heel and toe patches
- Twine for the hanging loop
- Aleene’s Fabric Fusion or hot glue (or a needle and thread)
- Fray Check, optional
How to Make It
- Cut two matching stocking shapes from the knit, about 5 inches tall, cutting through both layers at once.
- Dab Fray Check along the cut edges and let it dry.
- Glue the two pieces together around the edges, leaving the top open.
- Glue gray felt patches on the heel and toe of the front piece.
- Wrap the top edge with plaid fabric as a cuff and glue it inside.
- Glue three buttons down the front and a twine loop on the back of the cuff.
Tip: Keep fabric ornaments well away from candles and fireplace flames.
16. Bottle Cap Christmas Tree

Bottle caps stack into a tree with real texture, and I’d call this the most satisfying beginner project here. The trade off is prep. Caps need washing and drying, and glue won’t hold on a sticky one. Count on about 30 caps.
Skill: Beginner. Time: 45 minutes. Mess: Low. Gear: hot glue gun.
What You Need
- About 30 green plastic bottle caps (milk, juice, or sparkling water caps)
- A cardboard cone about 8 inches tall, rolled from a cereal box and taped (or a foam cone from a craft store)
- A 2 inch section of cardboard tube for the trunk
- 15 small red beads (or red buttons)
- A glitter star topper (or a cut star)
- Hot glue
How to Make It
- Wash and dry the caps. Roll and tape the cone, then glue it on top of the tube trunk.
- Glue a ring of caps around the bottom of the cone with the ridged side facing out, since that gives the most texture.
- Work upward in rings with fewer caps each time, overlapping slightly so no cardboard shows.
- Glue red beads into a few of the gaps between caps.
- Glue the star on top.
Tip: Keep the beads high on the tree if you have toddlers or pets around.
17. Mini Paper Village Display

A tiny village is the project that fills a shelf. It’s also the one where small cuts add up. Plan on an evening, and make one house first to check your template.
Skill: Intermediate. Time: 2 hours. Mess: Low. Gear: craft knife, cutting mat, scissors.
What You Need
- Cardstock or thin cardboard, such as cereal boxes (flip the plain side out)
- Colored paper for roofs, windows, and doors
- Cotton batting or faux snow (or white felt scraps)
- Small faux pine trees (or trees cut from green paper)
- A few small pinecones
- Tacky glue
How to Make It
- Draw a house template on cardstock: a rectangle with a peaked top and tabs for gluing. Cut one out as your pattern and trace the rest.
- Score the fold lines with a ballpoint pen that has run dry, fold, and glue the tabs.
- Add colored paper roofs, windows, and doors, and vary the roof colors.
- Arrange the houses on a tray or board.
- Pull cotton batting thin, glue it down as snow, and tuck in trees and pinecones.
Tip: Cotton batting burns fast. Light this village with LEDs only.
18. Ribbon Bell Ornament

A small paper cup flipped upside down is already bell shaped. Gold paint, a ribbon bow, and a jingle bell finish it. The trade off is the gold, since metallic acrylic streaks on paper. Two thin coats fix it.
Skill: Beginner. Time: 30 minutes, plus about 1 hour to dry. Mess: Low to medium. Gear: paintbrush, glue.
What You Need
- A small paper cup (the 3 ounce bathroom size)
- Metallic gold acrylic paint (or gold wrapping paper glued on)
- About 12 inches each of red and green ribbon (wired ribbon holds a bow shape best)
- A small gold jingle bell
- Glitter tape (or a line of gold paint)
- Tacky glue or hot glue
How to Make It
- Paint the cup gold in two thin coats, or wrap it in gold paper. Add glitter tape around the rim.
- Poke one small hole in the center of the cup base. Thread a ribbon loop through it and knot it inside.
- Tie the jingle bell onto the same knot so it hangs just below the rim.
- Tie the red and green ribbon into a bow and glue it on top, over the loop.
19. Painted Wooden Snowflake Frame

A snowflake built from craft sticks looks like weathered wood once it’s dry brushed white. It’s easy to build and easy to get crooked, because a six point snowflake needs angles 60 degrees apart. Use a paper template.
Skill: Beginner. Time: 45 minutes, plus drying. Mess: Medium. Gear: brush, fine sandpaper.
What You Need
- 6 jumbo craft sticks (or 12 regular ones)
- White acrylic paint, plus a little light gray paint or a gray paint pen
- Aleene’s Original Tacky Glue (or hot glue)
- A paper template with three lines crossing at 60 degrees
- Wax paper
- Fine sandpaper
- An old stiff brush for dry brushing
How to Make It
- Draw or print three lines crossing at the center, 60 degrees apart, and cover the template with wax paper so glue won’t stick.
- Lay three sticks along the lines so they cross at the center, and glue them where they overlap. Add short sticks across each arm for detail.
- Let the glue set for 30 minutes, then sand any rough edges.
- Dry brush thin white paint over the frame, wiping most of the paint off the brush first so the wood grain shows through.
- Add light gray dots along each arm and display it upright.
20. Snowflake Sleigh Gift Carrier

A small kraft sleigh makes a tabletop centerpiece and a way to hand over small gifts, like gift cards or candy. The trade off is the curved front, which takes a few tries. Make a paper pattern first.
Skill: Intermediate. Time: 1 hour. Mess: Low. Gear: scissors or craft knife, hot glue gun.
What You Need
- Heavy cardboard, about 10 by 14 inches (a cereal or shipping box)
- 4 to 6 wooden craft sticks for runners and supports
- Twine for the pull cords
- A white paint marker, such as Posca
- Wrapping paper scraps and small boxes for the gifts
- Hot glue
How to Make It
- Make a paper pattern for the sleigh: a long rectangle for the base, two side pieces with a curled front, and a back piece. Test fold it, then trace it on cardboard.
- Cut the pieces and hot glue the edges together, holding each seam until it sets.
- Glue two craft sticks underneath as runners, and a few short sticks as side supports.
- Draw snowflakes and dots on the sides in pencil, then trace over them with the white paint marker.
- Add twine pull cords and fill the sleigh with small wrapped boxes.
Simple Recycled Christmas Ideas For A Festive Handmade Look
Pick three or four projects and let one palette tie them together: kraft brown, deep green, red, and a little gold. That’s what lets a cork tree, a tassel garland, and a tin lantern sit on the same shelf without fighting.
Mix textures, not colors. Put one soft piece (the tassels or the stocking) next to one rough piece (the cardboard star or the hearth), one shiny piece (the bell or the canister), and one that glows (the jar lantern or the tin). Rustic Christmas crafts look best when at least one piece catches the light.
Here are three groupings that work:
- Mantel: Mini Paper Village Display, Cork Bottlebrush Christmas Tree, Tissue Paper Jar Lantern, and Patchwork Tassel Garland.
- Tree: Cork Reindeer Head Ornament, Wrapped Gift Box Ornament, Ribbon Bell Ornament, Hanging Snowflake Bottle Ornament, and Wrapped Cardboard Star Ornament.
- Gifts: Snowflake Sleigh Gift Carrier and Drum Style Holiday Canister, with a Wrapped Gift Box Ornament tied on as a tag.
Upcycled Christmas decorations hold up best when you match weight to placement. Heavy pieces like the cork tree and the tin lantern belong on a mantel or table, not on thin tree branches.
Common Mistakes First Timers Make
Most first timers trip on the same few things with Christmas crafts from recycled materials. Here are the ones that cost people the most time.
- Using foam egg cartons with hot glue. The glue melts the foam into a crater. Use pulp cartons only.
- Painting plastic lids with plain acrylic. It beads up and flakes off. Sand lightly and use a spray made for plastic.
- Skipping the wash. A sticky bottle cap or a jar with leftover label glue won’t hold anything. Soak and scrub first.
- Punching a tin can without freezing it. The can dents and the stars warp. Freeze it full of water overnight.
- Putting a real candle in a tin or tissue jar. Tissue, twine, and paper burn. Use LED tea lights.
- Gluing thin plastic bottle petals with a high temp gun. The plastic warps. Use low temp glue.
- Cutting knit fabric without sealing the edge. It unravels while you work. Dab on Fray Check or sew it.
- Hanging heavy recycled Christmas ornaments on thin branches. Hang cork and wood pieces close to the trunk.
FAQs
What are the easiest recycled Christmas ornaments to make?
The cork reindeer, the wrapped gift box, and the ribbon bell take 20 to 30 minutes each and need only scissors, glue, and things from your recycling bin. None of them need special tools, so they’re a good place to start.
What materials work best for Christmas crafts from recycled materials?
Cardboard, wine corks, glass jars, paper cups, and fabric scraps are sturdy, clean, and easy to glue. Foam and thin, flimsy plastic are harder to work with, so skip them when you can.
What glue should I use on recycled materials?
Hot glue works on cork, wood, metal, and stacked cardboard. Tacky glue is better for paper and tissue, fabric glue for fabric, and low temp hot glue for thin plastic.
Can I use a real candle in a tin or jar lantern?
No. Tissue paper, twine, and paper decorations burn fast, and glass can crack from heat. A battery LED tea light gives you the same glow without the risk.
How do I make rustic Christmas crafts look polished?
Pick one palette, like kraft, green, red, and gold, and keep your glue lines neat. Sharp blades, thin glue, and two coats of paint do more than fancy materials.
How do I clean bottle caps and jars before crafting?
Soak them in hot soapy water and scrub. For stubborn label glue, rub on a paste of cooking oil and baking soda, let it sit, and wipe it off.
Pick One and Start Saving
Pick one beginner project and start the prep tonight. Wash the caps, soak the labels off the jars, and stack the egg cartons next to the glue gun. The best recycled Christmas crafts are the ones that get finished before December, and a few upcycled Christmas decorations on a shelf will make you want to start the next one. Make one this weekend, then decide if you want all twenty.
