
The best Halloween crafts for toddlers use big, simple shapes, washable nontoxic paint, and about 10 to 20 minutes of hands on time, with an adult doing every cut. Start with a handprint monster, a cotton ball ghost, or a paper cat, since none of them need any skill and each one finishes in a single sitting. For kids under three, swap googly eyes and small pompoms for stickers or drawn faces.
It’s a rainy Tuesday afternoon. You’ve set out black paper, white glue, and a bag of cotton balls, and your toddler has already tried the glue stick as lip balm.
That’s the honest picture of Halloween crafts for toddlers. The ghost you planned will come out lumpy, paint will land on a sleeve, and your kid will hold up the finished thing like a trophy. It’s still a good afternoon.
These 20 projects are built for that reality. Each one has a mess rating, a realistic time, and a note on what to prep ahead, because easy Halloween crafts for toddlers only stay easy when the cutting happens before your kid sits down.
Halloween falls on a Saturday this year, so two short craft sessions this week is enough to fill a shelf, a fridge door, and a mantel by the 31st.
How To Choose Halloween Crafts For Toddlers By Age, Mess, and Time
Every project here is beginner level for you. What changes is how old your toddler is and how much prep you’re willing to do ahead. Here’s how I’d sort it.
- 12 to 24 months: Stamping, smearing, tearing, and sticker placing. Stick to the handprint and footprint projects and the cotton ball ghost, and draw faces on with a marker instead of gluing on small pieces.
- 2 to 3 years: This is the sweet spot for toddler Halloween crafts. They can dab a glue stick, press cotton balls, lace yarn with help, and stick down pieces you’ve already cut. Most of this list works as Halloween crafts for 2 year olds, as long as you handle every cut.
- 3 to 4 years: They can snip paper, follow two steps in a row, and decide where the eyes go. Hand them the monster mask, the witch, or the haunted house and let them run it.
Mess ratings in this guide mean the following. Low is a wipe of the table. Medium is glue or paint on hands and maybe a shirt change. High is paint on a body part and a bath afterward.
Plan on 10 to 20 minutes of real toddler time per craft, with drying on its own timer. Most kids check out sooner than you expect, so finish the last steps yourself and call it done. Toddler crafts go better when the project matches the age, not the photo you saw online.
Practical note: Prep is the whole game. Cut every shape, punch every hole, and tape the paper down before your toddler sits at the table. Ten minutes of prep buys you about fifteen calm ones.
Safety and Mess Notes Before You Start
Every craft here needs an adult within arm’s reach. Toddlers put things in their mouths, and Halloween supplies are full of tiny, tempting parts. Even easy Halloween crafts for toddlers need that supervision.
Practical note: If a piece fits through a toilet paper tube, treat it as a choking risk for kids under three. That covers googly eyes, small pompoms, sequins, confetti, and loose feathers.
- Hand out small pieces one at a time, and stay at the table while they’re in use.
- Nontoxic does not mean edible. Washable paint and glue are made to be safe on skin. They are not food.
- Keep string short and out of reach. Yarn, twine, and garland string can wrap around a neck. Keep strands short, hang garland above reach, and never hang it over a crib or bed.
- Skip magnets, brass fasteners, and glass. Swallowed magnets can cause serious injury, and a glass jar on a hard floor is a bad idea. Use tape to display finished art.
- You handle scissors and anything sharp. That includes pipe cleaner ends, which poke. Fold the tips over before your toddler touches them.
- Set up a mess kit first. An old T shirt, a vinyl tablecloth or flattened paper bag, baby wipes within reach, and painter’s tape (ScotchBlue works well) to hold paper down make every one of these toddler crafts easier to clean up.
After painting, wash hands and arms right away. Washable paint usually comes out of clothes if you rinse it before it dries.
I keep a mess kit in one bin so setup takes two minutes.
Supplies, Where To Buy Them, and Free Swaps
Most toddler Halloween crafts only need paper, glue, and a few add ons, and most of it comes from a dollar store, Walmart, Target, Michaels, Hobby Lobby, or Amazon. For Halloween crafts for 2 year olds, buy the big versions of everything, like jumbo pompoms and fat craft sticks. Here are the items that come up most, with a free or cheap swap for each.
| Supply | Where to buy | Free or low cost swap |
| Black construction paper or cardstock | Dollar store, Walmart, Michaels | Paint a flattened cereal box black, or color white paper black with a marker |
| White cardstock | Walmart, Michaels | Printer paper glued onto a cereal box |
| Googly eyes | Dollar store, Hobby Lobby, Amazon | Paper circles with a dot of marker in the middle |
| Pompoms | Dollar store, Michaels | A wad of tissue paper or a cotton ball |
| Washable paint | Walmart, Target (Crayola Washable Kids Paint) | Plain yogurt stirred with a few drops of food coloring |
| Glue | Walmart, Target (Elmer’s Washable School Glue, Aleene’s Original Tacky Glue) | A glue stick, for paper projects only |
| Craft sticks | Dollar store, Michaels | Strips cut from a cereal box |
| White yarn | Dollar store, Walmart | Strips torn from an old white T shirt |
| Pipe cleaners | Dollar store, Michaels | Twisted strips of paper |
| Paper plates and cups | Grocery store | A cardboard circle cut from a box, or a clean yogurt cup |
Practical note: A glue stick holds paper and almost nothing else. Pompoms, craft sticks, feathers, and yarn need tacky glue, such as Aleene’s Original Tacky Glue.
Most toddler crafts need only a small bin of basics, and you can reuse it all season.
Halloween Crafts For Toddlers At A Glance
The projects below show up in a mixed order, so use this table as your index. It’s sorted from least messy to most messy, and each name jumps to its section.
| Craft | Mess | Hands on time | What you prep | Best ages |
| Candy Corn Paper Treat | Low | 10 minutes | Cut the shapes | 18 months to 4 |
| Cute Paper Cat Cutout | Low | 10 minutes | Cut every piece | 2 to 4 |
| Classic Paper Skeleton Craft | Low | 15 to 20 minutes | Cut the bones | 2 to 4 |
| Charming Paper Vampire | Low | 15 minutes | Cut cape, face, collar | 2 to 4 |
| Playful Paper Tube Bat | Low | 15 minutes | Cut wings and ears | 2 to 4 |
| Paper Owl Trick-Or-Treat Buddy | Low | 20 minutes | Cut circles and wings | 2 to 4 |
| Fluffy Black Spider Craft | Low | 15 minutes | Thread the legs | 2 to 4 |
| Cheerful Halloween Mantel Garland | Low | 30 minutes | Cut shapes, hang it | 2 to 4 |
| Spooky Paper Plate Spider Web | Low | 20 minutes | Punch holes | 2.5 to 4 |
| Rustic Paper Broom Friend | Low | 20 minutes | Cut fringe, tie twine | 3 to 4 |
| Mini Haunted House Decor | Low | 25 minutes plus 1 hour drying | Most of the building | 3 to 4 |
| Cotton Ball Halloween Ghost | Medium | 15 minutes plus drying | Cut the ghost | 18 months to 4 |
| Cozy Yarn Mummy Jar | Medium | 20 minutes | Tape a spiral on the jar | 2.5 to 4 |
| Colorful Monster Cup Buddies | Medium | 20 minutes plus drying | Cut faces and arms | 2 to 4 |
| Purple Paper Monster Mask | Medium | 20 minutes plus drying | Cut eye holes | 2.5 to 4 |
| Sparkly Witch Potion Bottle | Medium | 20 minutes | Seal the cap | 2 to 4 |
| Paper Bag Witch Friend | Medium | 25 to 30 minutes | Cut the hat and face pieces | 3 to 4 |
| Footprint Ghost Keepsake | High | 15 minutes plus drying | Tape paper down, set up wipes | 12 months to 3 |
| Bold Handprint Bat Friends | High | 15 minutes plus drying | Tape paper down, smock up | 18 months to 3 |
| Fuzzy Monster Handprints | High | 20 minutes plus drying | Tape paper down, set out paint | 18 months to 3 |
If you’re planning a craft afternoon this week, save this page to your Halloween board on Pinterest so the table and supply list are easy to find at the store.
The 20 Halloween Crafts For Toddlers
Each project lists its mess level, hands on time, and what you do ahead of time. Toddler Halloween crafts go best when the project fits your kid’s mood that day, not when it photographs best.
1. Footprint Ghost Keepsake
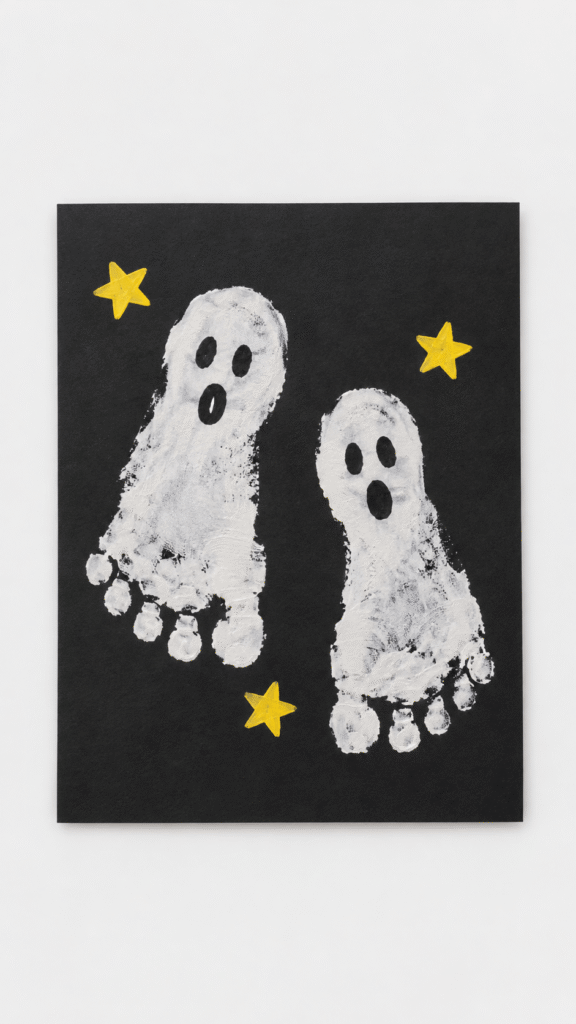
Two white footprints on black paper turn into ghosts with almost no skill from either of you. Of all the toddler Halloween crafts here, this is the one you’ll want to pull out again next fall. The catch is the wiggle, so set up near a sink or a bath.
Mess: High. Time: 15 minutes, plus about 30 to dry. You prep: Tape the paper down, lay out a towel, open the wipes. Best for: 12 months to 3 years.
What you need
- Black cardstock or thick paper (a flattened cereal box painted black works)
- White nontoxic paint, such as Crayola Washable Kids Paint
- A sponge brush or regular paintbrush
- Yellow paint or star stickers
- White chalk, or a white paint pen that only you use
- A frame or backing board (a dollar store frame or a sheet of cardboard)
How to make it
- Tape the black paper to the floor or table with painter’s tape so it can’t slide.
- Paint the bottom of one foot with a thick, even coat of white. Thin coats turn gray on black paper.
- Press the foot down flat, hold for a second, and lift straight up. Repeat with the other foot. The heel becomes the ghost’s head and the toes make a bumpy hem.
- Wash the foot right away and let the prints dry.
- Draw eyes and smiles with chalk or the paint pen, then add stars with stickers or yellow paint dabs.
- Write Happy Halloween on the paper and put it in the frame.
Tip: Write the year and your toddler’s age on the back in pencil. You think you’ll remember, and you won’t.
2. Cute Paper Cat Cutout

A black cat is the easiest face on this list, which makes it a good pick for Halloween crafts for 2 year olds who lose interest fast. You cut the shapes ahead of time, and your toddler does the sticking.
Mess: Low. Time: 10 minutes. You prep: Cut every piece. Best for: 2 to 4 years.
What you need
- Black construction paper
- Pink paper scraps (or white paper colored pink with a crayon)
- Googly eyes (or yellow paper circles with a marker dot)
- A white gel pen or chalk pencil for whiskers, used by you
- Glue stick
- Scissors (yours)
How to make it
- Cut a large triangle for the body, a round head, and a curly tail strip from black paper.
- Cut two tall ears, a tiny nose, and inner ear pieces from the pink paper. Draw the whiskers yourself.
- Hand your toddler the head and let them glue on the eyes, nose, and ears wherever they land.
- Attach the head, body, and tail, then draw a tiny smile.
Tip: Give pieces one at a time. A full pile of pieces becomes a throwing game.
3. Sparkly Witch Potion Bottle

This one looks the best on a shelf and needs the most care. A sealed bottle of purple sparkles is a hit with toddlers, but it’s a closed container with loose bits inside, so it’s a display piece, not a toy for kids under two.
Mess: Medium (food coloring and glitter). Time: 20 minutes. You prep: Seal the cap at the end. Best for: 2 to 4 years, with close supervision.
What you need
- A clear plastic bottle (a small water bottle with the label peeled off)
- Water, purple food coloring, and a spoonful of glitter glue (or purple glitter paint thinned with water)
- Green and gold star confetti, or stars cut from craft foam (foam holds up in water, paper turns to mush)
- A witch label sticker (or a paper label held on with tape)
- Twine or ribbon, kept short
- A black bottle cap (or color any cap with a black marker)
How to make it
- Fill the bottle about two thirds with water. Let your toddler squeeze in a few drops of purple food coloring over a tray, since it stains hands and shirts.
- Stir in a spoonful of glitter glue, then add a small handful of confetti.
- Screw the cap on tight, then run a ring of hot glue around the seam (you do this) or wrap it in strong tape. Toddlers can open almost anything.
- Hold it upside down over the sink for a minute to check for leaks.
- Tie a short length of twine around the neck and press on the witch label.
Tip: Label it Not For Drinking. A purple bottle looks a lot like juice to a toddler.
4. Candy Corn Paper Treat

If you want easy Halloween crafts for toddlers with the least prep, start here. Three colors, three pieces, and nothing to wait on but a glue stick.
Mess: Low. Time: 10 minutes. You prep: Cut the shapes. Best for: 18 months to 4 years.
What you need
- White cardstock (or printer paper glued onto a cereal box)
- Orange construction paper
- Yellow construction paper
- Glue stick
- Scissors (yours)
How to make it
- Cut a rounded triangle from white cardstock, then cut an orange band and a yellow band to match.
- Show your toddler where the orange goes and let them rub the glue stick across the back.
- Press the orange band across the center, then glue the yellow band along the bottom.
- Press everything flat under a heavy book for a few minutes.
Tip: Let your toddler tear the bands instead of cutting. Torn edges look wonky in a good way, and tearing is a skill toddlers already have.
5. Colorful Monster Cup Buddies

Paper cups are a toddler’s favorite canvas because they fit in two hands and don’t tear. The trade off is dry time, since a painted cup stays tacky longer than painted paper.
Mess: Medium. Time: 20 minutes, plus about 30 to dry. You prep: Cut mouths, teeth, and arms. Best for: 2 to 4 years.
What you need
- 3 small paper cups (white dollar store cups, or clean ones you’ve saved)
- Washable paint or colored paper in green, purple, and orange
- Googly eyes (or paper circles)
- Black paper for mouths and teeth
- Black and purple pipe cleaners (or twisted strips of paper)
- Glue stick and tacky glue
- Scissors (yours)
How to make it
- Paint each cup one bold color, or wrap it in colored paper. Set the painted cups upside down to dry.
- Cut mouths, teeth, and little arms from black paper. Fold the sharp ends of the pipe cleaners over before your toddler touches them.
- Glue on the eyes, mouth, and teeth. Use tacky glue for the googly eyes.
- Poke two small holes in the base of each cup with a pencil and thread a pipe cleaner through for hair. Glue alone won’t hold it.
- Let the monsters dry completely before you line them up.
6. Cozy Yarn Mummy Jar

Wrapping is a skill toddlers pick up fast, and it’s good practice for small hands. Skip glass for this one. Use a plastic jar or a cardboard tube, because a slippery glass jar on a hard floor ends badly.
Mess: Medium (sticky tape and yarn fuzz). Time: 20 minutes. You prep: Stick a spiral of double sided tape around the jar. Best for: 2.5 to 4 years.
What you need
- A clean plastic jar or a cardboard tube (an empty peanut butter jar or a paper towel roll)
- White yarn (or strips torn from an old white T shirt)
- Googly eyes (or paper eyes)
- Double sided tape (or white glue brushed on in small sections)
How to make it
- Wrap a spiral of double sided tape around the jar, leaving a gap about two fingers wide near the top for the face. The tape is the glue, so there’s nothing to wait on.
- Tape the yarn end near the bottom and let your toddler wind it around and around. Messy wrapping is the whole look.
- Stop at the gap, then tuck the yarn end under the last wrap.
- Press on the googly eyes with a dot of tacky glue and trim any loose ends.
Tip: Cut the yarn into pieces about the length of your arm so it stays easy to handle.
7. Bold Handprint Bat Friends

Handprint bats are the craft that convinces non crafty parents they can do this. The wings are the hands, so there’s nothing to cut and nothing to get wrong. Handprints work well for Halloween crafts for 2 year olds who won’t sit still, since the whole thing takes a few minutes. Black paint is the catch, because it shows on everything.
Mess: High. Time: 15 minutes, plus about 30 to dry. You prep: Tape the paper down, put a smock on your toddler. Best for: 18 months to 3 years.
What you need
- 1 sheet of white cardstock
- Black nontoxic paint, such as Crayola Washable Kids Paint
- A small paintbrush or sponge
- Googly eyes (or white paper circles with a marker dot)
- White paper scraps for ears and fangs
- Elmer’s Washable School Glue
How to make it
- Tape the cardstock down with the long edge across.
- Dab black paint onto one hand with a sponge. A sponge gives a thinner coat than a brush, and thin coats keep the fingers from blobbing.
- Press that hand on one side of the page with the fingers spread for a wing, then repeat with the other hand on the opposite side. Wash hands right away.
- Paint a small round head and body between the wings. Finish this part yourself if your toddler is done.
- Once the paint is dry, glue on the eyes and cut ears and fangs from white paper.
Tip: If your toddler won’t touch paint, trace their hand on black paper, cut it out, and glue it down. You get the same bat with no paint.
8. Paper Bag Witch Friend
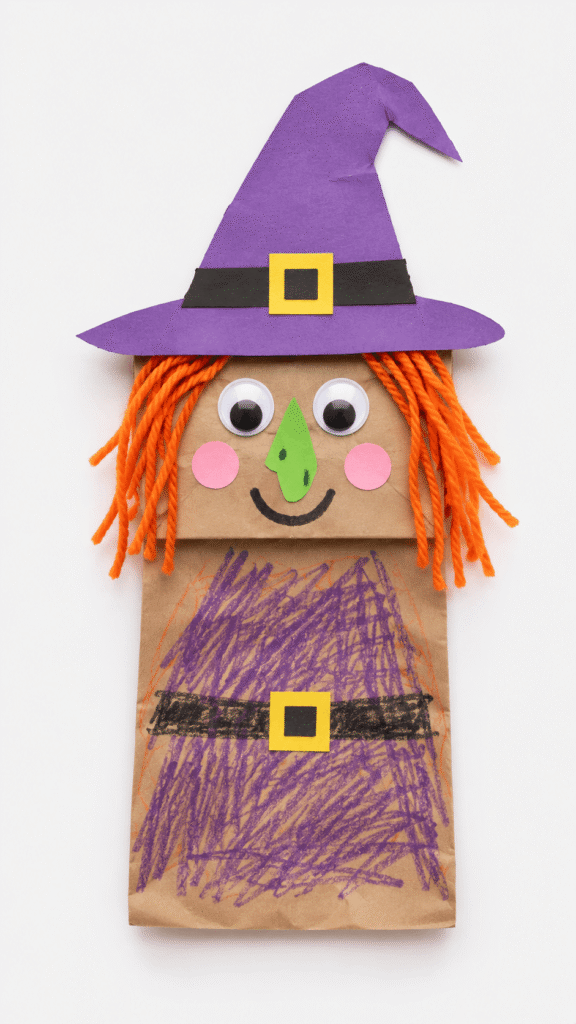
This is the biggest project on the list: a lunch bag puppet with a hat, hair, and a face. Toddlers love playing with it more than decorating it, so make the pieces ahead and let them decorate in short bursts.
Mess: Medium. Time: 25 to 30 minutes. You prep: Cut the hat pieces, nose, and cheeks. Best for: 3 to 4 years (younger kids can glue the face parts).
What you need
- A brown paper lunch bag
- Purple construction paper (or white paper colored purple with a crayon)
- Black and yellow paper for the hat band and buckle
- Orange yarn, or orange paper strips if your toddler still mouths things
- Googly eyes (or paper circles)
- Pink and green paper circles for cheeks and nose
- Glue stick and tacky glue
- Scissors (yours)
How to make it
- Lay the bag flat with the folded flap on top. The flap is the head and the bag below it is the body. Let your toddler scribble on the body with crayons for a dress.
- Cut a wide purple hat brim and a tall pointed hat, then add a black band and a yellow buckle.
- Glue on the eyes, nose, cheeks, and a smiling mouth.
- Glue orange yarn strands, cut about 6 inches long, under the edge of the flap for hair.
- Glue the hat on top, over the hair.
Tip: Put the face pieces in a cup and let your toddler pick which goes where. Their witch will have a nose on her forehead, and that’s fine.
9. Fluffy Black Spider Craft

A pompom spider takes five minutes and looks like you tried harder than you did. The one real decision is pompom size. Use a jumbo one, 2 inches or bigger, since small pompoms are a choking risk.
Mess: Low. Time: 15 minutes, plus about 20 to dry. You prep: Thread the pipe cleaner legs. Best for: 2 to 4 years.
What you need
- 1 jumbo black pompom
- 4 black pipe cleaners (or twisted strips of black paper)
- Googly eyes (or white paper dots)
- Aleene’s Original Tacky Glue
How to make it
- Push each pipe cleaner through the center of the pompom so it sticks out both sides. That gives you two legs per pipe cleaner, eight in total, and nothing to fall off.
- Spread the legs out evenly around the pompom.
- Let your toddler bend each leg in the middle to make a knee, then fold the very tip over so it doesn’t poke.
- Glue on the googly eyes and let everything dry.
Tip: Bending pipe cleaners is a small hand job toddlers actually like. Give them that part.
10. Classic Paper Skeleton Craft
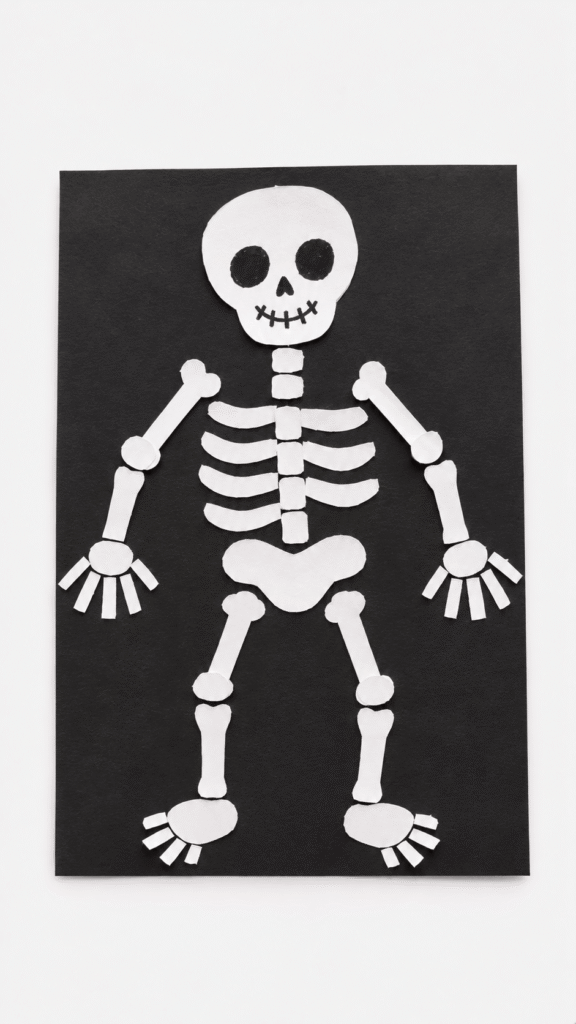
White paper on black looks dramatic on a wall, and the high contrast helps toddlers see what they’re doing. It has more pieces than anything else here, so for small kids I’d treat it as a two sitting project.
Mess: Low. Time: 15 to 20 minutes. You prep: Cut the skull and bones. Best for: 2 to 4 years.
What you need
- Black cardstock or poster board (or a cereal box painted black)
- White paper strips (printer paper works)
- Glue stick
- A black marker
- Scissors (yours)
How to make it
- Cut a skull, rib pieces, arm and leg bones, hands, and feet from white paper. Keep the bones about a finger wide so little hands can grip them.
- Glue the skull near the top of the black background, then add the spine and ribs below it.
- Let your toddler place the arms, hands, legs, and feet wherever they want.
- Draw the eyes and nose yourself, then press everything flat.
Tip: Toddlers are better at tearing than cutting. Let them tear white paper into bones. Wonky bones look better anyway.
11. Cheerful Halloween Mantel Garland

A garland uses up scrap paper and lets the whole family add a piece. It’s also the one craft here with a string, so where you hang it matters. Keep it above toddler reach and take it down if your kid starts tugging.
Mess: Low. Time: 30 minutes. You prep: Cut the shapes and hang the string. Best for: 2 to 4 years.
What you need
- Black and white paper or cardstock
- Orange, purple, and yellow paper circles
- String or twine (hung by you, above reach)
- Clear tape (stronger than a glue stick for string) and a glue stick for the paper layers
- A black marker
- Scissors (yours)
- Command hooks or painter’s tape for hanging
How to make it
- Cut out ghost, bat, spider, and circle shapes. Leave a flap about an inch tall at the top of each one to fold over the string.
- Let your toddler glue circles on for eyes and spots, and scribble faces with a marker. Add spider legs yourself with marker or paper strips.
- Lay the string flat on the table, fold each flap over it, and tape it down.
- Hang the garland high across a mantel or wall using Command hooks.
12. Cotton Ball Halloween Ghost

Among easy Halloween crafts for toddlers, this is the most forgiving one. It’s soft, hard to get wrong, and it looks like a ghost even when it’s lumpy. The catch is that glue and cotton fuzz end up everywhere, so work over a tray.
Mess: Medium (sticky). Time: 15 minutes, plus about 30 to dry. You prep: Cut the ghost shape. Best for: 18 months to 4 years.
What you need
- White cotton balls (or wadded white tissue paper)
- Cardboard or thick paper (a cereal box works)
- White glue, such as Elmer’s Washable School Glue
- Black paper circles or googly eyes
- Scissors (yours)
How to make it
- Cut a ghost shape with a rounded top and a wavy bottom from cardboard.
- Spread glue over one section at a time. A whole ghost covered in wet glue dries before your toddler gets to it.
- Pull each cotton ball in half before pressing it on. A whole cotton ball sits on a tiny patch of glue and falls off, and the thin wisps stick.
- Press the cotton all over until the ghost looks fluffy.
- Add black eyes near the top and let the glue dry flat.
Tip: Put the glue in a shallow lid and let your toddler dab the cotton in it like a stamp. It’s less sticky for everyone.
13. Purple Paper Monster Mask

A paper plate mask is great until it goes over a face, and plenty of toddlers refuse that part. Put it on a stick so they can hold it up and put it down, and skip elastic or string loops, which can tangle around a neck.
Mess: Medium (paint). Time: 20 minutes, plus about 30 to dry. You prep: Cut the eye holes. Best for: 2.5 to 4 years.
What you need
- 1 paper plate (or a cardboard circle cut from a box)
- Purple washable paint (or purple crayon scribbles)
- Black and orange construction paper
- White paper for teeth
- A few jumbo pompoms (or paper dots)
- Glue stick and tacky glue
- A craft stick or paint stirrer for a handle, plus tape
- Scissors (yours)
How to make it
- Paint the plate purple and let it dry.
- Cut two eye holes (you do this), then cut ears, eyebrows, a nose, and teeth from the colored paper.
- Glue on the ears, eyebrows, nose, and teeth. Use tacky glue for the pompoms.
- Tape a craft stick to the bottom edge so it works as a handle.
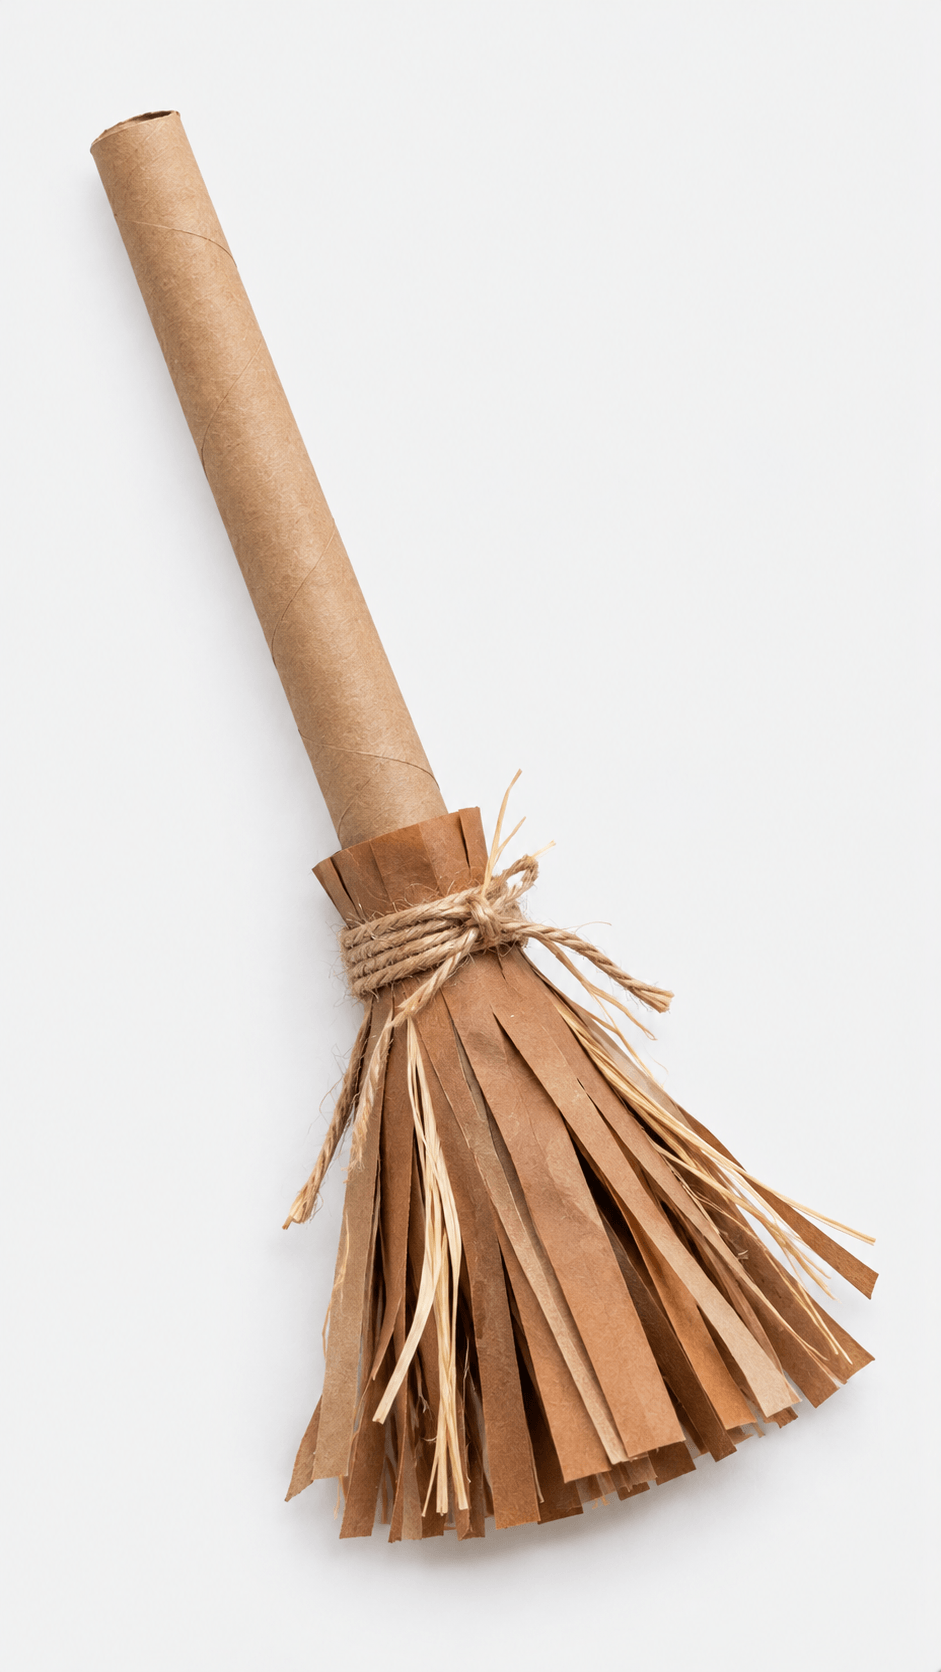
14. Rustic Paper Broom Friend

A paper broom looks sweet next to a pumpkin or a pile of storybooks. It has a few more steps than most because of the fringe, but there’s very little mess.
Mess: Low. Time: 20 minutes. You prep: Cut the fringe and tie the twine. Best for: 3 to 4 years (younger kids can glue the fringe on).
What you need
- Brown construction paper or cardstock (a brown grocery bag works)
- 1 paper towel tube for the handle
- Natural twine, tied by you
- Straw or raffia (optional)
- Tacky glue
- Scissors (yours)
How to make it
- Cut a strip of brown paper about 4 inches tall and long enough to wrap around the tube. Cut narrow fringe along one long edge, leaving about an inch uncut.
- Spread tacky glue on the lower end of the tube.
- Wrap the strip around the tube with the uncut edge on the glue and the fringe hanging past the end of the tube. Hold it for a minute.
- Tie twine around the top of the bristles (you do this) and trim the ends short.
- Tuck a few strands of straw or raffia in if you want a rougher look.
Tip: Raffia sheds and gets everywhere, and it can end up in a toddler’s mouth. Skip it for kids who mouth things.
15. Mini Haunted House Decor

This is the one where you do most of the building. Toddlers can place stickers and glue on fences and bats, but craft stick joints need patience and slow drying glue. Go in knowing that, and let your toddler own the decorating.
Mess: Low. Time: 25 minutes, plus about an hour to dry. You prep: Most of the building. Best for: 3 to 4 years.
What you need
- Black craft sticks (or plain ones colored black with a marker)
- Cardstock or a cereal box front for the base
- Orange paper for the glowing windows
- White paper
- Tacky glue, since a glue stick won’t hold wood
- Small black paper bats
- Scissors (yours)
How to make it
- Glue the craft sticks side by side onto a cardboard base to form the house, then add a cardstock triangle for the roof. Gluing to a base instead of stick to stick keeps the house from falling apart.
- Cut small windows into a piece of black paper (you do this), glue orange paper behind them so they glow through, then glue it over the front of the house.
- Cut out a door, a fence, ghosts, and bats from white and black paper.
- Let your toddler glue on the decorations, then let everything dry completely and flat.
16. Spooky Paper Plate Spider Web

A web on a plate is a lacing activity in disguise, which is why toddlers stick with it longer than most crafts. The finished web will look like a tangle. A tangle is still a web.
Mess: Low. Time: 20 minutes. You prep: Punch the holes. Best for: 2.5 to 4 years.
What you need
- 1 black paper plate (or a white plate colored black with marker or paint)
- White yarn
- A hole punch (yours)
- 1 small black paper circle for the spider body (or a jumbo pompom)
- 2 googly eyes
- Glue stick and a dot of tacky glue
- Scissors (yours)
How to make it
- Punch holes evenly around the rim, about 10 to 12 of them.
- Cut a piece of yarn about as long as your toddler’s arm. Wrap tape around one end like a shoelace tip, and tie the other end to the first hole.
- Let your toddler lace the yarn back and forth across the plate through any holes they like.
- Tie off the end on the back and trim any loose yarn.
- Glue on the black circle for the spider body and add the googly eyes.
Tip: The taped yarn tip is what makes this work. Without it, the frayed end is hard for small fingers to push through a hole.
17. Paper Owl Trick-Or-Treat Buddy
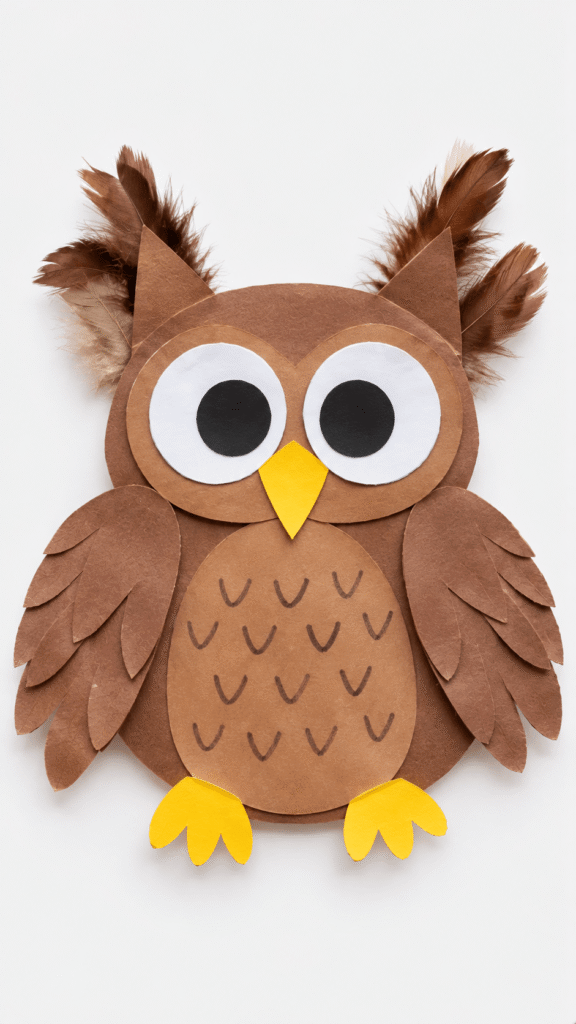
An owl has a lot of layers, but each layer is one big shape, so toddlers do well with it. Feathers are the hard part, since they float away and stick to everything.
Mess: Low. Time: 20 minutes. You prep: Cut the circles, wings, and beak. Best for: 2 to 4 years.
What you need
- Brown construction paper
- White and black paper circles for the eyes
- Yellow paper for the beak and feet
- Feathers or feather trim (or fringed strips of brown paper)
- Glue stick and tacky glue
- A brown marker
- Blunt tip scissors, such as Fiskars kids scissors
How to make it
- Cut a round owl body, two wings, two ears, a beak, and two feet.
- Glue the body pieces together, then layer the big white eye circles and the black circles on top.
- Put tacky glue in a few thick spots behind the head, press the feathers into it, and hold for 10 seconds.
- Draw small feather marks on the belly with the brown marker and let the owl dry.
Tip: Feathers slide off a glue stick every time. Use tacky glue.
18. Charming Paper Vampire
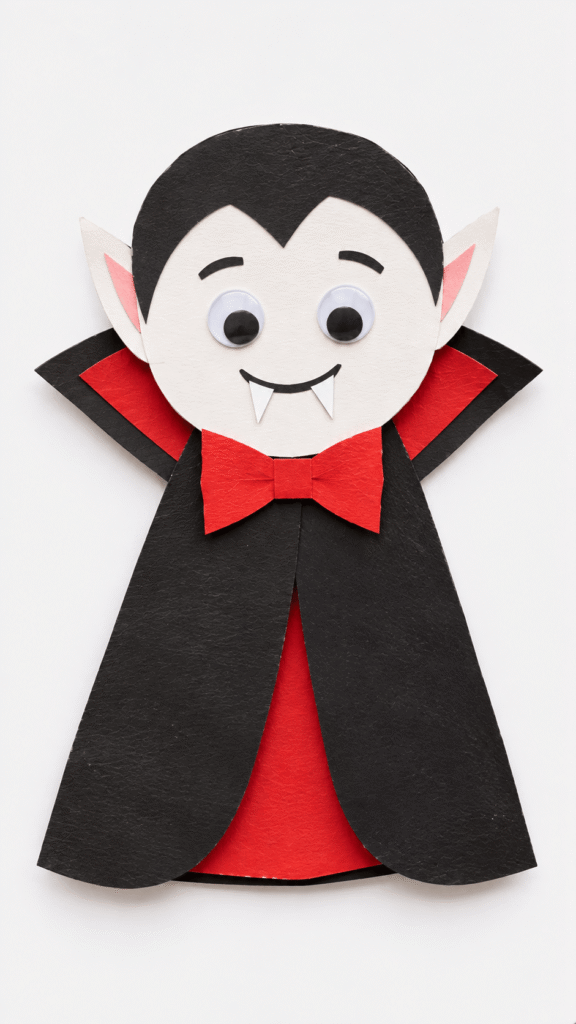
A vampire is mostly a black cape and a round white face, and a red bow tie does the rest. It hangs well on a door and survives a toddler hug better than the 3D crafts.
Mess: Low. Time: 15 minutes. You prep: Cut the cape, face, and collar. Best for: 2 to 4 years.
What you need
- Black construction paper
- White cardstock
- Googly eyes (or white paper circles with a marker dot)
- Red paper (or a short piece of ribbon)
- Glue stick and tacky glue
- A black marker
- Scissors (yours)
How to make it
- Cut a large black cape and a round white face.
- Add black hair across the top of the face, pointed ears on the sides, and a small collar piece below.
- Glue on the eyes, then draw a smile with tiny fangs.
- Glue the face onto the cape, add a red bow tie, and hang the vampire with painter’s tape.
19. Playful Paper Tube Bat

A toilet paper tube makes a standing bat your toddler can hold and fly around the room. The wings are where it goes wrong, since flat wings taped to a round tube droop and slide off.
Mess: Low. Time: 15 minutes. You prep: Cut the wings and ears. Best for: 2 to 4 years.
What you need
- 1 paper tube, painted black or wrapped in black paper
- Black construction paper
- Googly eyes (or white paper circles)
- A white marker or gel pen, used by you
- Tacky glue or tape
- Scissors (yours)
How to make it
- If the tube isn’t black, wrap it in black paper with a glue stick.
- Cut two bat wings and two pointy ears from black paper.
- Attach the ears to the top of the tube and the wings to each side.
- Glue on the googly eyes, then draw a small smile and tiny fangs with the white marker.
Tip: Fold a small tab on the edge of each wing and glue the tab to the tube. A flat edge slides off, and a tab holds.
20. Fuzzy Monster Handprints

Handprint monsters are loud, colorful, and the quickest way to get something fridge worthy. They’re also where five paint colors turn brown fast, so pick one or two and keep it simple.
Mess: High. Time: 20 minutes, plus about 30 to dry. You prep: Tape the paper down, set out the paint. Best for: 18 months to 3 years.
What you need
- White cardstock
- Washable nontoxic paint in one or two colors from green, orange, purple, red, and blue
- A paintbrush or sponge
- Googly eyes (or paper circles)
- Jumbo pompoms or soft craft fluff for the fuzzy tufts
- Black paper for mouths and teeth
- Glue stick and tacky glue
- Painter’s tape for hanging it on the wall or fridge
How to make it
- Tape the cardstock down. Sponge one color of paint onto your toddler’s palm and fingers.
- Press the hand onto the paper to make the monster body, with the fingers as arms or spikes. Wash hands right away.
- Let the print dry completely. Googly eyes slide around on wet paint.
- Glue on the googly eyes, a pompom tuft, and a black paper mouth with tiny teeth.
- Add horns, spots, or other silly details with a marker, then tape the finished monster up.
Skip magnets and brass fasteners for display. Magnets are a swallowing hazard, and fasteners poke.
Common Mistakes First Timers Make
Most first timers hit the same few snags with toddler Halloween crafts. Here are the ones that trip people up most.
- Not taping the paper down. The paper slides under a pressing hand and the print smears. Painter’s tape on the corners fixes it.
- Using a glue stick for everything. It holds paper. Pompoms, craft sticks, feathers, and yarn fall off, so switch to tacky glue.
- Gluing on googly eyes while the paint is wet. They slide right off the handprint and leave a streak. Wait until the paint is dry to the touch.
- Putting out every piece at once. A full pile turns into a throwing game. Hand over one piece at a time.
- Painting too thin or too thick. Thin white paint on black paper turns gray, and thick paint on a hand turns into a blob. Go thick for white on black, and thin and sponged for hands.
- Leaving string in reach. Garland string and yarn belong above or away from toddlers, and never in cribs or beds.
- Expecting it to match the photo. Toddler crafts come out wonky. Hang it anyway, because your kid will point at it every day.
FAQs
What are good Halloween crafts for 2 year olds?
Handprint and footprint art, the cotton ball ghost, candy corn paper strips, and the paper plate spider web all work well for 2 year olds. You do the cutting and hole punching, and your toddler does the dabbing, pressing, and lacing. Use stickers or drawn faces instead of googly eyes for kids who still mouth things.
What is the least messy Halloween craft for a toddler?
The paper cat, candy corn, and skeleton need only paper and a glue stick, which makes them easy Halloween crafts for toddlers who hate sticky hands. If paint is the worry, trace your toddler’s hand on black paper and cut it out for the bat.
Are googly eyes safe for toddlers?
Not for kids who still put things in their mouths, since googly eyes are small enough to choke on. For kids under three, use stickers, paper circles, or drawn eyes, and stay within arm’s reach with older kids.
How long should a toddler craft session last?
Plan on 10 to 20 minutes of actual crafting. Most toddlers lose interest before you finish, so cut ahead of time and treat drying as a separate step.
What if my toddler won’t touch paint?
Skip the handprints and try the paper projects, or let them paint with a brush on a paper plate first. Some kids dislike wet hands, so keep a baby wipe within reach.
How do I stop my toddler from eating the supplies?
Stay within arm’s reach, hand out small pieces one at a time, and pick washable nontoxic paint and glue. Nontoxic doesn’t mean edible, so if you think your toddler swallowed something they shouldn’t have, call your local poison control or doctor.
Read Next
If your toddler loved the paint, there’s a whole batch of messy ideas waiting for a rainy afternoon. Easy Handprint Art Ideas For Toddlers.
If you want more toddler crafts for the rest of fall, the same supplies stretch to leaf season and Thanksgiving. Easy Fall Crafts For Toddlers.
