
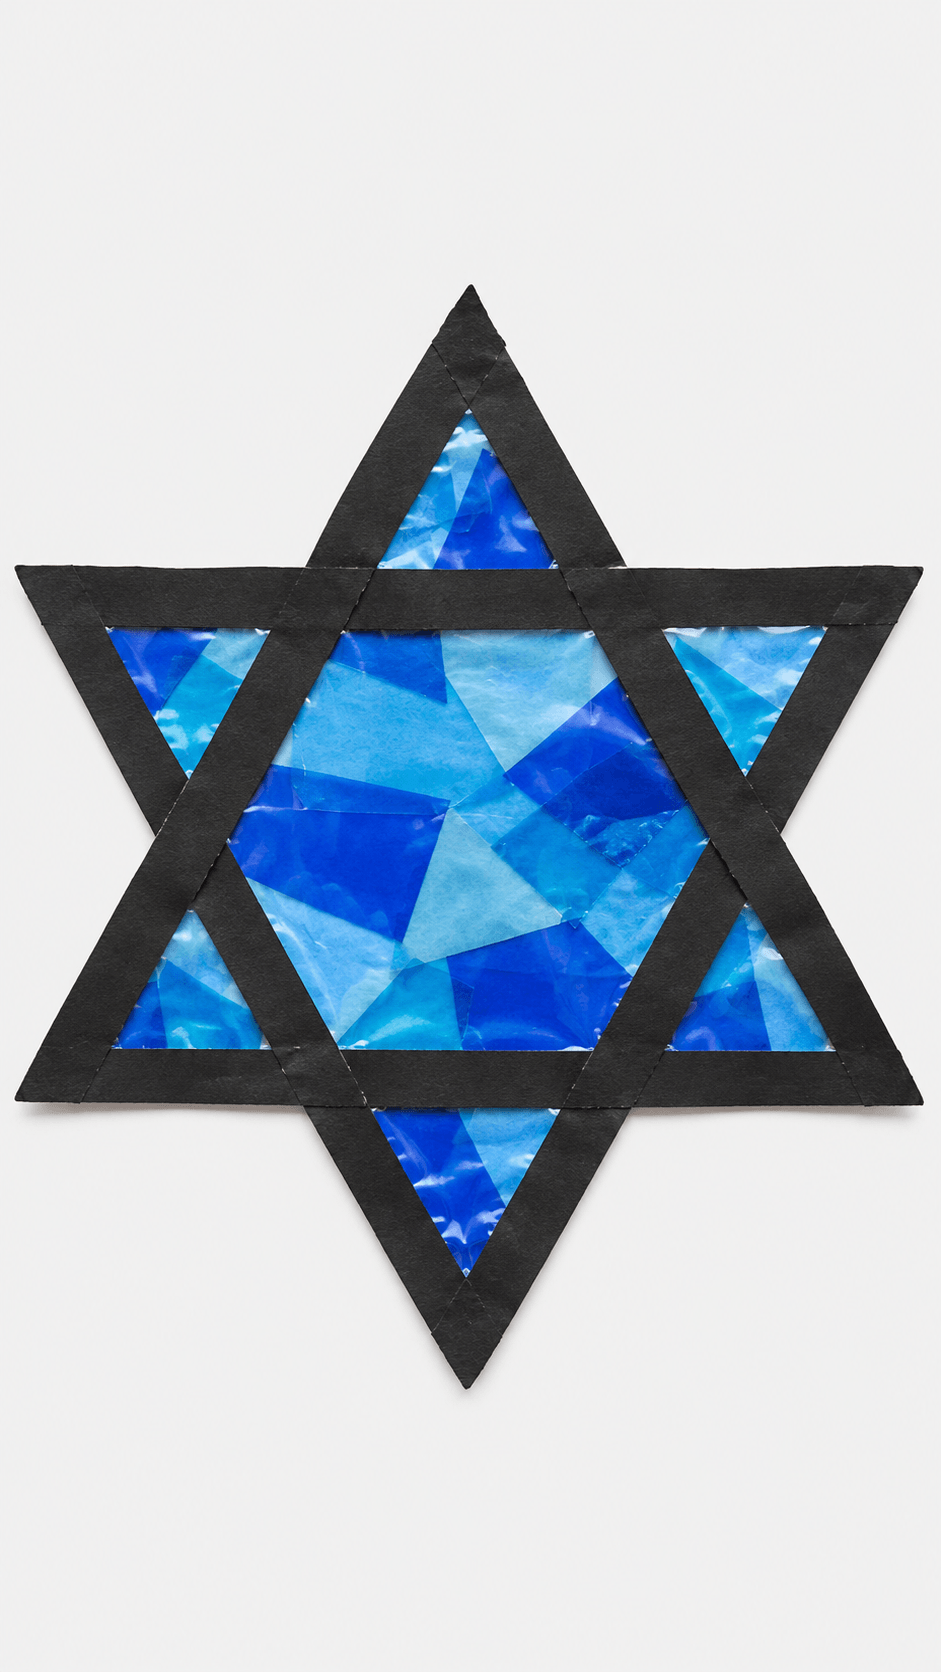
The best Hanukkah crafts for toddlers are peel, press, and tear projects like a handprint menorah card, a contact paper suncatcher, and a felt menorah board, with an adult doing every cut. Plan on 10 to 20 minutes of hands on time per craft, use washable nontoxic supplies, and skip beads, sequins, and loose glitter for kids who still mouth things. A menorah has nine spots, eight for the nights plus the shamash, the helper candle, so the menorah crafts here include all nine.
It’s late afternoon, the latke grater is out, and your toddler has just discovered that stickers peel off. All of them. They’re now on the dog.
That’s the honest picture of Hanukkah crafts for toddlers. The menorah you planned comes out lopsided, paint ends up on a sleeve, and your kid holds the finished thing up like a trophy anyway.
These 16 easy Hanukkah crafts (you’ll also see the holiday spelled Chanukah) are built for that. Each one has a mess rating, a realistic time, and a note on what to cut ahead, and most lean on peeling, pressing, and tearing, which are the skills toddlers actually have. They work for Jewish families, classrooms, and friends learning about the holiday.
Hanukkah 2026 begins at sundown on Friday, December 4, and ends at nightfall on Saturday, December 12. That’s about six weeks away, so one craft a weekend is plenty.
How To Choose Hanukkah Crafts For Toddlers By Age, Mess, and Time
A quick note on the menorah crafts for toddlers in this list. A Hanukkah menorah has nine branches: eight for the eight nights, plus the shamash, the helper candle used to light the others. That’s why most of these projects have nine spots.
Every project here is beginner level for you. What changes is your toddler’s age and how much you cut ahead.
- 12 to 24 months: Peeling stickers, tearing paper, pressing sticky surfaces, and stamping. Stick to the cupcake liner menorah, the contact paper projects, and the felt board. You do all the cutting, and you skip anything with small parts.
- 2 to 3 years: The sweet spot for toddler Hanukkah crafts. They can use a glue stick, paint with a foam brush, thread paper chain links, and place pieces you’ve cut. This is also where most of the easy Hanukkah crafts on this list land.
- 3 to 4 years: They can pinch clothespins, wrap pipe cleaners with help, and press pasta into glue lines. Hand over the clothespin menorah, the craft stick star, and the pasta menorah.
Mess ratings mean this. Low is a wiped table. Medium is paint or glue on hands and maybe a shirt change. Plan on 10 to 20 minutes of real toddler time per craft, with drying on its own timer. Most kids check out sooner than you expect, so finish the last step yourself and call it done.
The felt board and the shaker bottle are really Hanukkah activities for toddlers that happen to involve making something first. They get used for days afterward, which is rare for a craft.
Practical note: Toddlers do best with sticky, not wet. Contact paper, stickers, and glue sticks give instant feedback, so the result looks like what they meant. Liquid glue and paint reward patience they don’t have yet.
Safety and Mess Notes Before You Start
Every craft here needs an adult within arm’s reach, because toddlers put things in their mouths and holiday supplies are full of tiny, shiny, tempting parts. Even toddler Hanukkah crafts that look simple need that supervision.
Practical note: The menorah crafts here are decorations, never candle holders. Keep real candles on a real menorah, out of reach, and let your toddler light the felt or tissue paper flames instead.
- Small parts: If a piece fits through a toilet paper tube, treat it as a choking risk for kids under three. That covers beads, sequins, foam stickers, small pompoms, cellophane scraps, and short pasta.
- Glitter: Skip loose glitter. It gets into eyes and mouths and into the carpet for weeks. Use glitter glue instead.
- Salt dough: It isn’t food, and a lot of salt is harmful if eaten, for toddlers and for pets. Keep it out of reach of both while it dries.
- String and ribbon: Banner and garland string can wrap around a neck. Keep strands short, hang them high, and never over a crib or bed.
- Sharp things: You handle scissors, the hole punch, and craft knives. Fold the ends of pipe cleaners over before your toddler touches them.
- Paint: Use washable paint labeled nontoxic, and wash hands and arms right after.
- Set up a mess kit first: An old T shirt, a vinyl tablecloth or flattened paper bag, baby wipes within reach, and painter’s tape to hold paper down make every one of these toddler crafts easier to clean up.
I keep a mess kit in one bin so setup takes two minutes. [LINK: How To Set Up A Mess Free Craft Station For Toddlers]
Supplies, Where To Buy Them, and Free Swaps
Most toddler Hanukkah crafts need paper, glue, and one or two add ons, and most of it is a dollar store, Walmart, Target, Michaels, or Amazon run. Here are the items that come up most, with a free or cheap swap for each.
| Supply | Where to buy | Free or low cost swap |
| Blue construction paper or cardstock | Dollar store, Walmart, Michaels | White paper painted blue, or a cereal box covered in blue paper |
| Clear contact paper | Walmart, Target, Amazon (Con-Tact is a common brand) | Clear packing tape laid sticky side up and taped down at the corners |
| Washable paint | Walmart, Target (Crayola Washable Kids Paint) | Plain yogurt stirred with a few drops of blue food coloring |
| Glue sticks and school glue | Walmart, Target (Elmer’s) | A glue stick for paper projects only |
| Tacky glue | Walmart, Michaels (Aleene’s Original Tacky Glue) | Skip the project that needs it, or have an adult use a glue gun |
| Blue and yellow tissue paper | Dollar store, Michaels | Torn magazine pages in blue and yellow, or gift bag tissue you saved |
| Felt | Walmart, Michaels | Fleece or flannel scraps from an old shirt |
| Foam stickers | Dollar store, Michaels | Stickers saved from junk mail, or paper shapes with a glue stick |
| Chenille stems | Dollar store, Michaels | Twisted strips of blue and silver paper |
| Cupcake liners | Grocery store, dollar store | Coffee filters colored blue with a washable marker |
Practical note: A glue stick holds paper and not much else. Pasta, craft sticks, and pompoms need tacky glue. Liquid school glue is for tissue paper and sticky decorating, in small amounts.
I keep one plastic bin of basics for the whole year, and it costs a few dollars to build.
Hanukkah Crafts For Toddlers At A Glance
The projects below show up in a mixed order, and the numbers in their headings stay as originally written, so use this table as your index. Seven of the 16 are menorah crafts for toddlers, and the rest are dreidels, stars, and decorations. It’s sorted from least messy to most messy, and each name jumps to its section.
| Craft | Mess | Hands on time | What you prep | Best ages |
| Cupcake Liner Menorah | Low | 10 minutes | Fold liners, draw stems | 18 months to 4 |
| Handprint Menorah Card | Low | 15 minutes | Cut flames, fold card | 2 to 4 |
| Stained Glass Star of David | Low | 15 minutes | Cut the frame | 18 months to 4 |
| Tissue Paper Suncatcher Menorah | Low | 20 minutes | Cut the frame | 18 months to 4 |
| Felt Menorah Play Board | Low | 25 minutes to make | Cut every felt piece | 18 months to 4 |
| Foam Sticker Dreidel Banner | Low | 20 minutes | Cut flags, punch holes | 2 to 4 |
| Paper Chain Hanukkah Garland | Low | 20 minutes | Cut the strips | 2.5 to 4 |
| Chenille Stem Dreidels | Low | 15 minutes | Make the coils | 3 to 4 |
| Clothespin Menorah | Low | 20 minutes | Cut flames, build the stand | 3 to 4 |
| Foil-Wrapped Menorah | Low | 20 minutes | Gather tubes, cut base | 2 to 4 |
| Paper Plate Dreidel | Medium | 15 minutes plus drying | Cut the plate, cut letters | 2 to 4 |
| Craft Stick Star of David | Medium | 20 minutes plus drying | Glue the triangles | 3 to 4 |
| Cardboard Tube Candles | Medium | 20 minutes plus drying | Gather tubes, lay down cloth | 2 to 4 |
| Pasta Menorah Construction | Medium | 15 minutes plus overnight | Draw outline, squeeze glue | 3 to 4 |
| Hanukkah Sensory Shaker Bottle | Medium | 15 minutes | Seal the cap | 2 to 4 |
| Salt Dough Dreidel Ornaments | Medium | 20 minutes plus baking | Bake and cool | 2.5 to 4 |
If you’re planning a few craft weekends before the first night, save this page to your Hanukkah board on Pinterest so the table and supply list are easy to find at the store.
The 16 Hanukkah Crafts For Toddlers
Each project lists its mess level, hands on time, and what you prep ahead. Toddler Hanukkah crafts work best when the project fits your kid’s mood that day, not when it photographs best.
1. Cupcake Liner Menorah

This is the fastest of the easy Hanukkah crafts here, and it only stays mess free if you use a glue stick. Liquid glue turns the liners soggy and they won’t hold their ridges.
Mess: Low. Time: 10 minutes. You prep: Fold the liners and draw the candle stems. Best for: 18 months to 4 years.
Supplies Needed
- 3 standard blue cupcake liners and 9 mini blue liners (or coffee filters colored blue with a washable marker)
- Yellow tissue paper (or yellow paper scraps)
- A large sheet of white paper
- A glue stick
- A marker
How to Make It
- Fold the three large blue liners in half and glue them in a row along the bottom of the paper for the base.
- Fold the nine mini liners in half and glue them in a row higher up, as the candle holders. Make the center one a little higher for the shamash.
- Draw a straight line from each mini liner down to the base with a marker.
- Let your toddler crumple small bits of yellow tissue paper and stick them above each mini liner as flames.
Tip: Press hard on the glue stick, since the liners curl up at the edges as they dry.
2. Paper Plate Dreidel
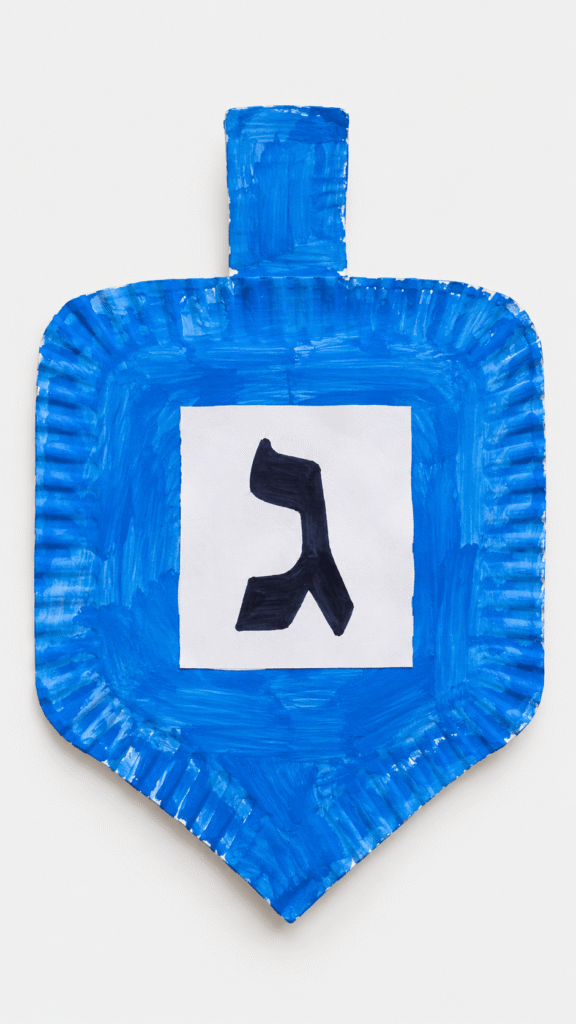
A sturdy paper plate takes heavy handed gluing and painting much better than plain paper. The trade off is drying time, since a thick coat of paint on a plate stays damp for a while.
Mess: Medium. Time: 15 minutes, plus about 30 to 60 to dry. You prep: Cut the plate and the letters. Best for: 2 to 4 years.
Supplies Needed
- White paper plates (or a cardboard circle cut from a box)
- Blue washable paint, such as Crayola Washable Kids Paint
- A foam brush or thick paintbrush
- Paper Hebrew letters, pre cut or drawn with a thick marker on paper squares: Nun, Gimel, Hay, and Shin
- A glue stick
How to Make It
- Cut a paper plate into a dreidel shape: a wide square body with a triangle point at the bottom.
- Let your toddler paint the whole surface blue with the foam brush.
- Wait for the paint to dry completely.
- Show your toddler how to glue one of the paper letters in the center of the dreidel.
Tip: Outside Israel the four letters are Nun, Gimel, Hay, and Shin. In Israel the last one is Pey. Print the letters large so they’re easy for small hands to place.
3. Foam Sticker Dreidel Banner

Peeling a sticker off its backing is a real skill for toddlers, and it keeps them focused longer than almost anything else on this list. The catch is that foam stickers are small parts, so this one is for kids who no longer mouth things.
Mess: Low. Time: 20 minutes. You prep: Cut the flags and punch the holes. Best for: 2 to 4 years.
Supplies Needed
- A piece of blue ribbon or yarn, about 4 feet
- Thick paper triangles (cut from a cereal box)
- Hanukkah themed foam stickers: stars, dreidels, letters (or stickers saved from junk mail)
- A hole punch
How to Make It
- Cut large triangles from sturdy paper to be the banner flags.
- Punch two holes at the top edge of every triangle.
- Give your toddler a sheet of foam stickers and let them decorate the front of each flag however they like.
- Weave the ribbon through the holes to string the flags together, then hang the banner high, out of reach.
Tip: Stickers stay put better on cardboard than on thin paper, so use cereal box triangles.
4. Foil-Wrapped Menorah
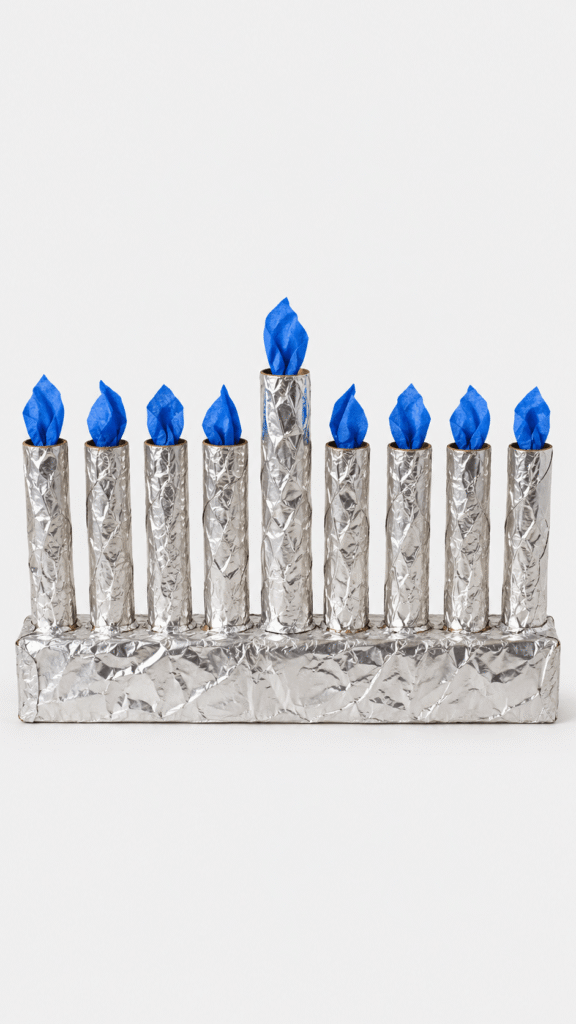
Kids love anything shiny, and scrunching foil around a tube feels like magic to them. Among menorah crafts for toddlers, this one is the sturdiest centerpiece for their own little table. Only the base needs glue time, and tacky glue grabs in a few minutes.
Mess: Low. Time: 20 minutes. You prep: Save 9 tubes for a few weeks and cut the base. Best for: 2 to 4 years.
Supplies Needed
- 8 empty toilet paper tubes and 1 paper towel tube cut in half (for the taller center shamash)
- Aluminum foil
- Blue tissue paper
- A sturdy piece of cardboard for the base, about 4 by 14 inches
- Tacky glue
How to Make It
- Tear off large sheets of foil and let your toddler scrunch and wrap them around each tube. Tuck the foil edges inside the ends so there’s nothing sharp.
- Glue the nine silver tubes in a straight line onto the cardboard base, with the taller half paper towel tube in the center.
- Scrunch small pieces of blue tissue paper into flames.
- Let your toddler drop one blue tissue flame into the top of each tube.
Tip: Give this to a toddler who needs to stay busy while you cook. The crinkling is half the appeal.
5. Stained Glass Star of David
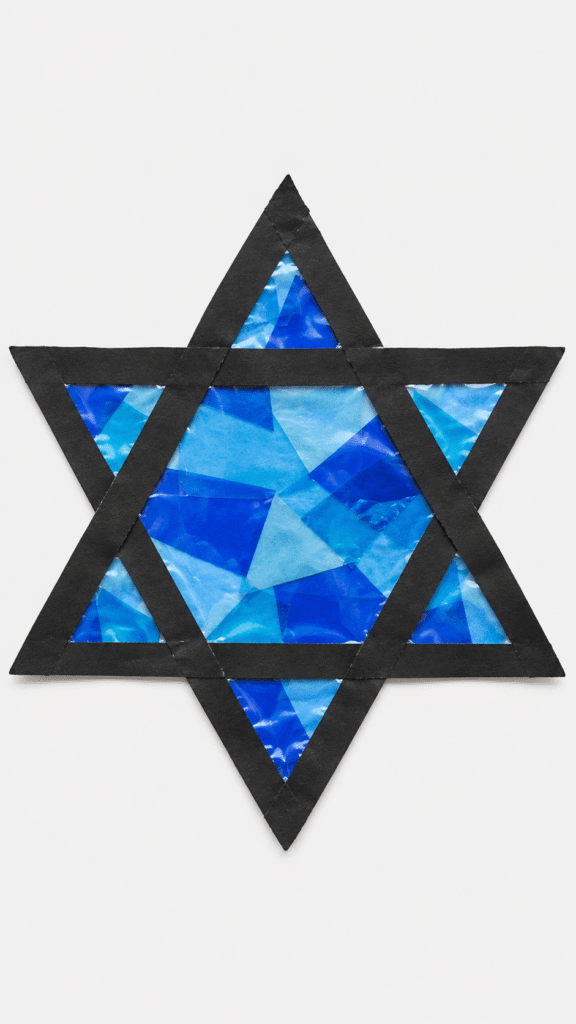
Pressing pieces onto sticky paper is satisfying for busy toddlers, and it skips the frustration of keeping wet pieces in place. The result looks good no matter how messy the placement is. The trade off is that you need a craft knife or sharp scissors to cut the frame.
Mess: Low (sticky). Time: 15 minutes. You prep: Cut the frame. Best for: 18 months to 4 years.
Supplies Needed
- Black cardstock
- Clear contact paper (or clear packing tape, sticky side up)
- Cellophane sheets in several shades of blue (or blue tissue paper)
- Scissors or a craft knife, for you
- Painter’s tape
How to Make It
- Draw a star on the cardstock by overlapping two triangles. Cut out a thick Star of David outline, leaving the middle empty.
- Peel the backing off a square of clear contact paper and lay it sticky side up on the table. Tape the corners down.
- Press the black star frame flat onto the sticky surface.
- Hand your toddler small squares of blue cellophane and let them cover all the sticky areas inside the star.
- Seal the back with a second piece of contact paper, trim around the star, and tape it to a window.
Tip: Taping the corners down is the step people skip. Without it the contact paper curls up and sticks to your toddler’s sleeve.
6. Handprint Menorah Card

Paint is a hit with toddlers, but tracing is the cleaner option, and it still makes a keepsake for grandparents. It also works as a fridge decoration. You need your toddler to hold still for about ten seconds, which is the hard part.
Mess: Low. Time: 15 minutes. You prep: Cut the flames and fold the card. Best for: 2 to 4 years.
Supplies Needed
- Blue construction paper or cardstock
- Yellow paper for the flames (or yellow tissue)
- A white crayon or silver gel pen for tracing (pencil barely shows on blue)
- A glue stick
- Scissors, for you
How to Make It
- Fold a piece of blue paper in half to make the card.
- Trace your toddler’s hand twice on a second sheet, with the thumbs overlapping in the center. Eight fingers and one shared thumb give you nine candles, with the thumb as the shamash.
- Cut out the handprint shape and let your toddler glue it to the front of the card.
- Have your toddler stick nine pre cut yellow paper flames on the fingertips.
Tip: Trace on white paper and glue the cutout onto the blue card if you want the lines to show clearly.
7. Paper Chain Hanukkah Garland
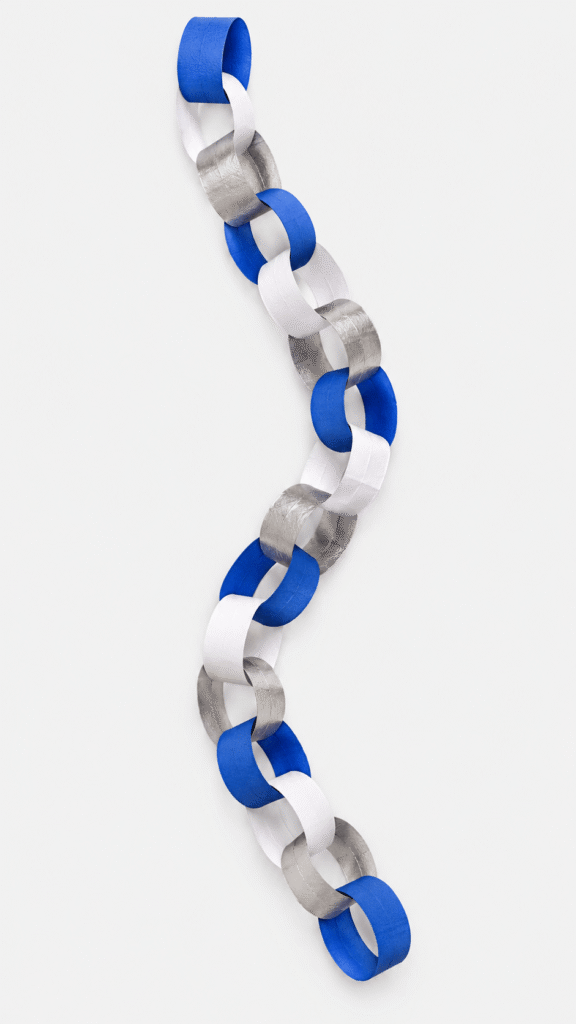
Paper chains need almost no prep, and the repetition is soothing and predictable for toddlers. The trade off is that threading a loop through another loop is hard for kids under about two and a half, so give the youngest ones a pre made loop to hold.
Mess: Low. Time: 20 minutes. You prep: Cut the strips. Best for: 2.5 to 4 years.
Supplies Needed
- Blue, white, and silver construction paper (or silver wrapping paper)
- Scissors, for you
- Clear tape or glue sticks
- A stapler, for you, if tape fails
How to Make It
- Cut the paper into wide strips, about 1.5 inches by 8 inches, that are easy for toddlers to hold.
- Bend the first strip into a circle and tape or glue the ends together.
- Have your toddler thread the next strip through the first loop before you seal it.
- Keep looping blue, white, and silver strips until the garland is long enough to hang.
Tip: Use tape instead of a glue stick. Tape holds right away, so the chain doesn’t fall apart while your toddler waits.
8. Hanukkah Sensory Shaker Bottle

Sometimes you just need something that keeps them occupied while you start dinner. Shiny, slow moving glitter holds a toddler’s attention, and this is one of the most useful Hanukkah activities for toddlers on the list. It’s a display and shaking piece, not a toy for under two.
Mess: Medium (glitter and food coloring). Time: 15 minutes. You prep: Seal the cap at the end. Best for: 2 to 4 years, supervised.
Supplies Needed
- A small, clean plastic water bottle with a tight lid
- Clear school glue, such as Elmer’s Clear School Glue, or clear hair gel
- Warm water and blue food coloring
- Fine silver glitter, plus a few large plastic dreidels or foam shapes
- Hot glue or strong tape, for you
How to Make It
- Squeeze clear glue or hair gel into the bottle until it’s about one third full.
- Add warm water almost to the top and a few drops of blue food coloring, leaving an inch of air.
- Let your toddler drop in a handful of glitter and a few dreidels.
- Screw the cap on as tight as you can, then run a ring of hot glue around the seam, or wrap it in strong tape.
- Hold the bottle upside down over the sink for a minute to check for leaks, then hand it over.
Tip: Baby oil and water don’t mix and won’t slow the glitter down. Glue or hair gel does.
9. Tissue Paper Suncatcher Menorah
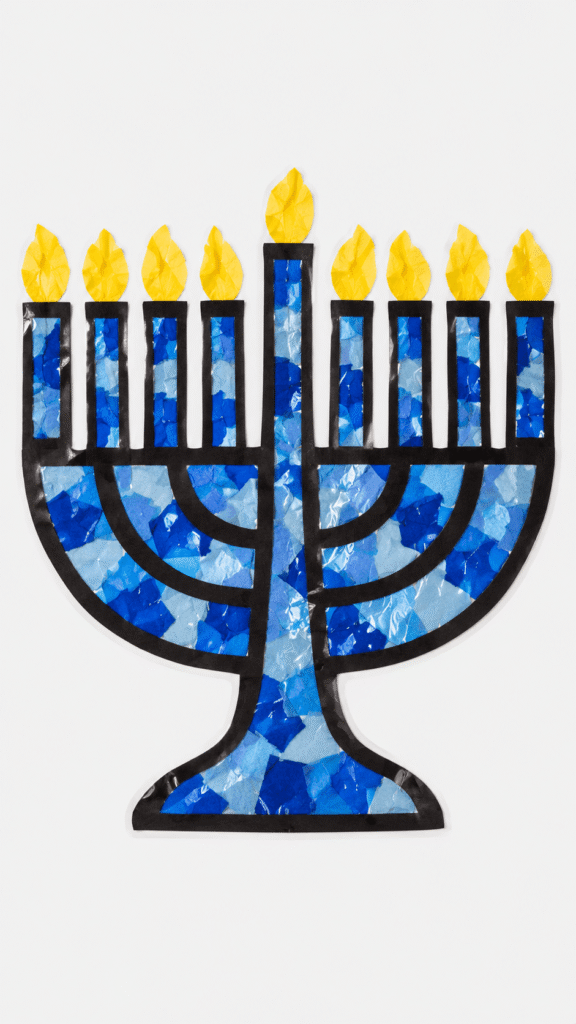
Window decorations catch the winter light, and tearing tissue paper is great practice for the pincer grasp. From a distance the finished piece looks like real stained glass. It’s one of the better menorah crafts for toddlers who don’t want to get messy.
Mess: Low (sticky). Time: 20 minutes. You prep: Cut the black frame. Best for: 18 months to 4 years.
Supplies Needed
- Clear contact paper (or clear packing tape, sticky side up)
- Blue and yellow tissue paper
- Black construction paper
- Masking tape
How to Make It
- Cut a menorah shape out of the black paper with nine candles, leaving the inside empty like a frame.
- Tape a piece of contact paper to the table sticky side up, then press the black frame onto it.
- Let your toddler tear the tissue paper into small pieces and stick them all over the exposed sticky center.
- Seal the back with a second piece of contact paper and cut around the outside edges before you hang it up.
Tip: Tear a pile of tissue pieces into a bowl before your toddler sits down, so they can start sticking right away.
10. Pasta Menorah Construction

Raiding the pantry for dry noodles makes a good afternoon project. Different shapes let kids experiment with texture without any wet paint. The trade off is that dry pasta is a choking hazard, so this one is for kids who no longer mouth things, and you stay within arm’s reach.
Mess: Medium. Time: 15 minutes, plus overnight to dry. You prep: Draw the outline and squeeze the glue lines. Best for: 3 to 4 years.
Supplies Needed
- Assorted dry pasta (rigatoni, penne, bowtie, macaroni)
- A piece of thick cardstock or cardboard
- Aleene’s Original Tacky Glue (liquid school glue is too weak for pasta)
- A marker
- Gold or blue washable paint, optional
How to Make It
- Draw a basic menorah outline on the cardstock with nine candles, as a guide.
- Squeeze lines of thick glue over the marker lines. This is your job, since toddlers squeeze out puddles.
- Let your toddler drop and press the dry pasta pieces onto the glue.
- Let it dry flat overnight so the pasta doesn’t slide off, then paint it if you like.
Tip: Big pasta shapes like rigatoni are easier for toddler fingers and a lot less of a swallowing risk than macaroni.
11. Chenille Stem Dreidels
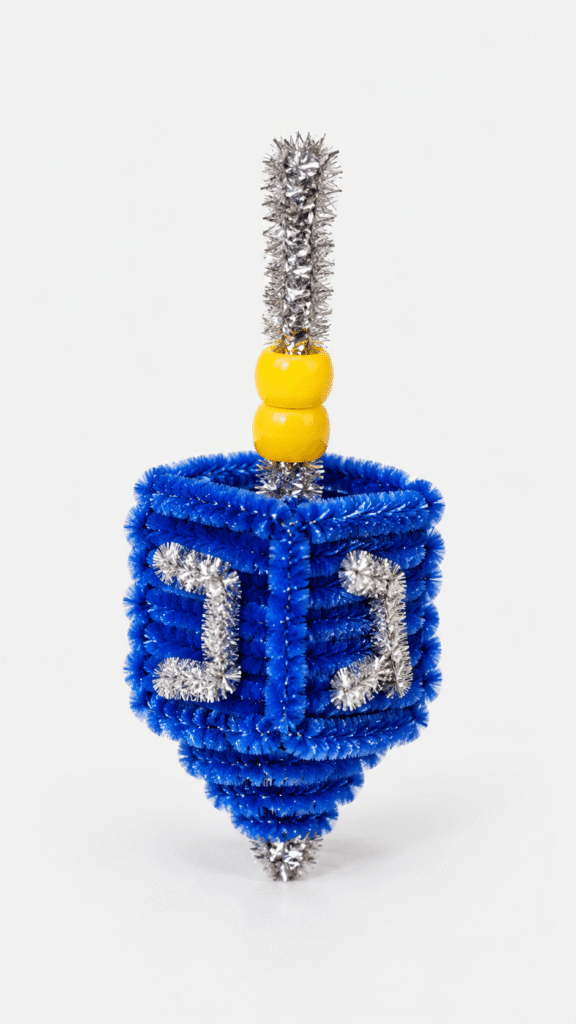
Wrapping flexible pipe cleaners keeps tiny fingers busy and works on coordination. They’re gentle on hands and easy to reshape after a mistake. They work well as table scatter at a holiday dinner, but don’t expect them to spin like a real dreidel.
Mess: Low. Time: 15 minutes. You prep: Make the coils. Best for: 3 to 4 years (younger kids can bend and unbend).
Supplies Needed
- Blue and silver chenille stems
- A thick marker or a wooden dowel
- Small yellow beads, optional (skip these for kids under three)
How to Make It
- Have your toddler hold the marker while you help wrap a blue chenille stem around it into a tight coil.
- Slide the coil off the marker gently so it keeps its shape.
- Thread a straight silver chenille stem down through the center of the coil.
- Bend the bottom of the silver wire into a small point, and leave the top straight as the handle. Fold the cut ends over so they don’t poke.
Tip: Toddlers can’t wrap a coil tightly yet. Do the wrapping yourself and give them the bending and the beads.
12. Craft Stick Star of David
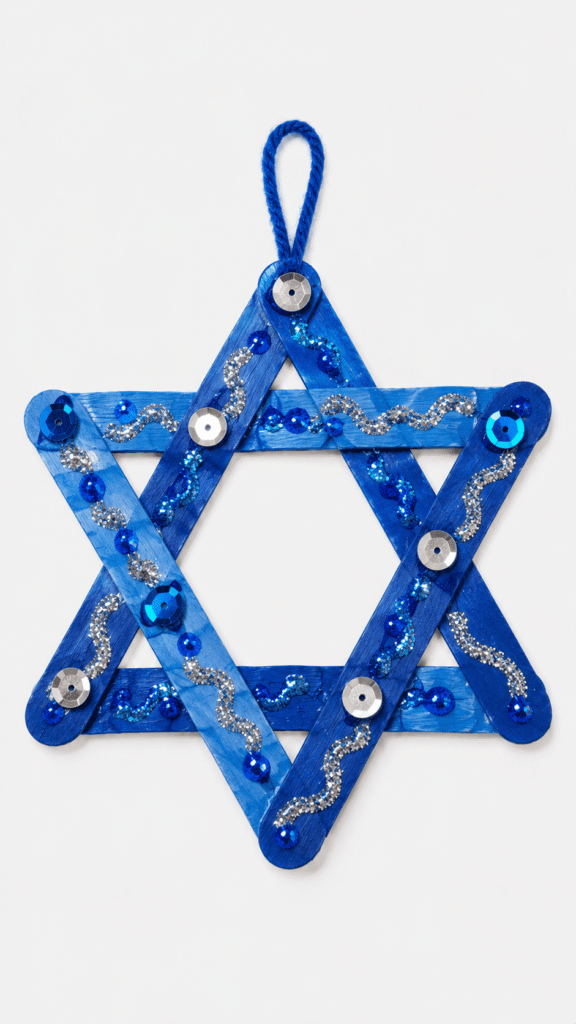
If you have popsicle sticks around, this one is quick to set up, and toddlers like pressing sticky things together. The trade off is that wet glue slides on wood, so you build the triangles first and let your toddler do the decorating.
Mess: Medium. Time: 20 minutes, plus about an hour to dry. You prep: Glue the two triangles ahead. Best for: 3 to 4 years.
Supplies Needed
- 6 jumbo craft sticks (painted blue, or natural)
- Tacky glue for the joints, and liquid school glue for decorating
- Glitter glue (or fine glitter, if you can face the mess)
- A few small sequins, optional (small parts, so skip them for mouthers)
- A short loop of string for hanging
How to Make It
- Glue three craft sticks into a triangle, and repeat for a second triangle. Let them dry for 30 minutes.
- Help your child lay one triangle upside down over the other to make a six pointed star, and glue them together at the points.
- Coat the top of the star with a thin layer of glue.
- Let your toddler squeeze glitter glue onto the surface, or sprinkle sequins onto the glue.
- Let it dry flat, then tape on a loop of string.
Tip: Skip the loose glitter and use glitter glue. You get most of the sparkle with far less cleanup.
13. Cardboard Tube Candles
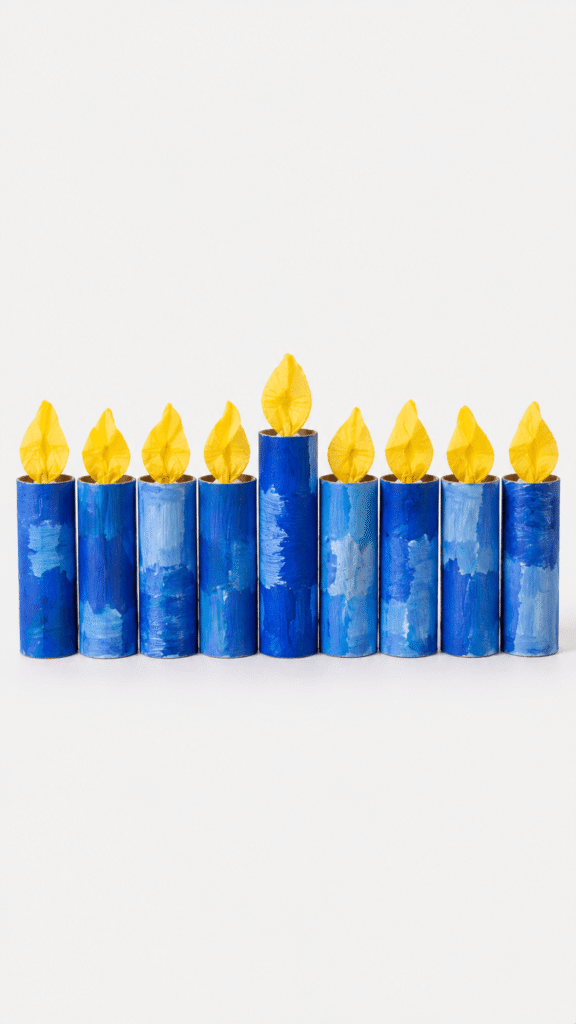
Saving toilet paper rolls pays off when you need a sturdy 3D craft base. Painting a 3D object teaches brush control and spatial awareness. The trade off is dry time, so paint them first and glue on the flames later.
Mess: Medium. Time: 20 minutes, plus about an hour to dry. You prep: Gather nine tubes and lay down a drop cloth. Best for: 2 to 4 years.
Supplies Needed
- 9 toilet paper rolls, one for each candle
- Blue washable paint
- Yellow tissue paper
- A thick brush or foam brush
- Tacky glue
How to Make It
- Lay down a drop cloth and let your toddler paint the outside of each tube blue.
- Stand the tubes upright on a paper plate and let the paint dry.
- Take a square of yellow tissue paper, pinch the middle, and pull it up into a flame shape.
- Put glue on the inside rim of a dry tube and push the bottom of the tissue flame into it.
Tip: Stand the tubes on a paper plate so your toddler can paint them while they’re upright. Holding a tube and painting it at the same time is hard at this age.
14. Felt Menorah Play Board

For families who want something interactive, this no sew board doubles as a nightly activity. Your toddler can light the candles every evening without any real flame. It’s the one on this list that gets used the longest, and one of the best Hanukkah activities for toddlers during the eight nights.
Mess: Low. Time: 25 minutes to make. You prep: Cut every felt piece. Best for: 18 months to 4 years.
Supplies Needed
- A large stiff piece of black felt, or black felt glued over a piece of cardboard
- Blue, white, and yellow felt sheets (or fleece scraps)
- Fabric scissors, for you
- Adhesive Velcro dots, optional
How to Make It
- Cut a menorah base from the blue felt, plus nine white rectangles for candles and nine yellow flames.
- Stick the rough side of a Velcro dot to the back of each candle and flame if the board will hang upright. Felt grips felt on a flat table without it.
- Press the blue menorah base onto the bottom of the black felt board.
- Let your toddler place the candles and flames on the board each evening.
Tip: To follow the custom, add one candle a night, placing the new one to the left of the earlier ones. Then light the newest candle first, and work toward the right.
15. Salt Dough Dreidel Ornaments
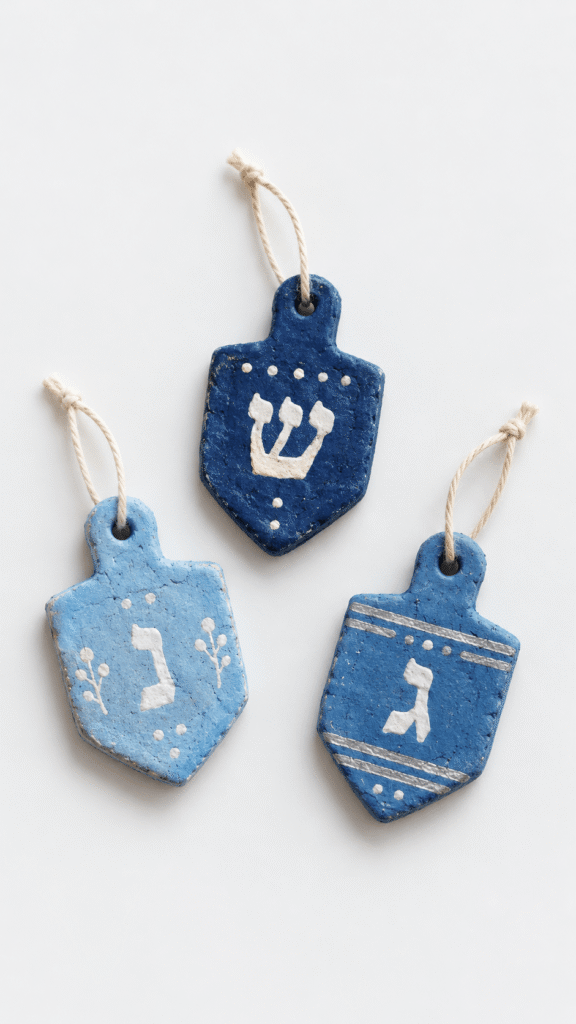
A quick batch of kitchen dough makes lasting keepsakes without buying clay, and rolling it works like playdough. The trade off is oven time, plus you handle the oven and the cooling. Salt dough is not food, so keep it away from toddlers who taste things and from pets.
Mess: Medium. Time: 20 minutes, plus about 2 hours to bake. You prep: Bake and cool them. Best for: 2.5 to 4 years.
Supplies Needed
- 1 cup flour, 1/2 cup salt, and 1/2 cup water
- A dreidel shaped cookie cutter (or a paper template and a butter knife)
- A plastic straw
- Blue washable paint
- String
How to Make It
- Mix the flour, salt, and water in a bowl until you have a firm dough, then let your toddler help roll it flat, about a quarter inch thick.
- Help them press the dreidel cutter into the dough.
- Poke a hole near the top of each dreidel with the straw. Make it a bit larger than you think you need, since the dough shrinks as it bakes.
- Bake at 200 degrees Fahrenheit (90 degrees Celsius) for about two hours, until hard. Let them cool completely.
- Let your toddler paint them blue, let the paint dry, then thread the string.
16. Clothespin Menorah
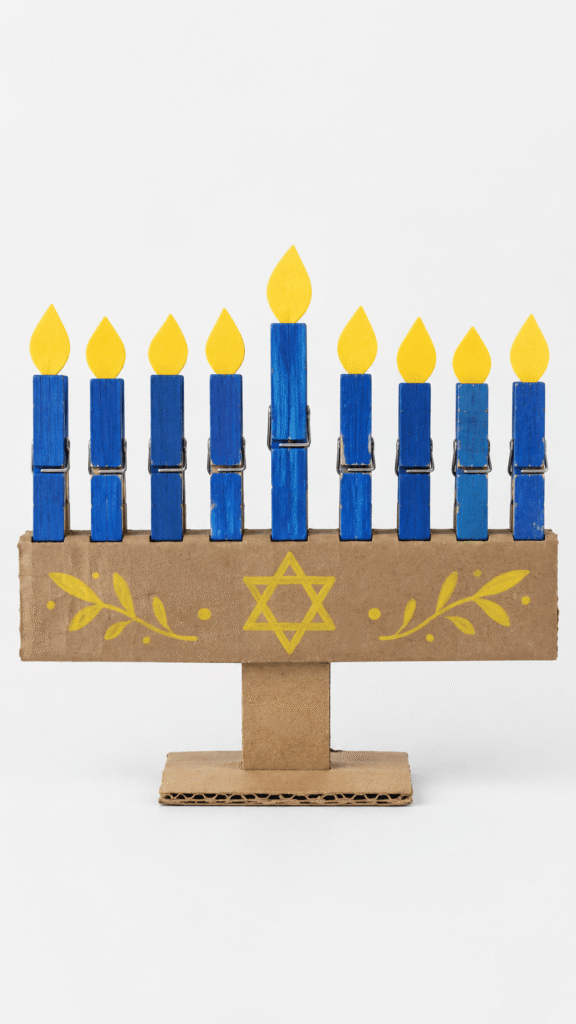
Pinching and clipping wooden clothespins builds hand strength for early writers, and the set up is cheap enough to do at the last minute. The trade off is strength, since a spring clothespin takes more squeeze than most 2 year olds have.
Mess: Low. Time: 20 minutes. You prep: Cut the flames and build the stand. Best for: 3 to 4 years.
Supplies Needed
- 9 wooden spring clothespins
- A long strip of thick cardboard, about 3 by 20 inches, plus a second piece for a stand
- Blue and yellow markers
- Yellow craft foam (or yellow paper)
- Tacky glue
How to Make It
- Let your toddler color all nine clothespins with the blue marker.
- Cut nine small flame shapes from the yellow foam and glue one to the top end of each clothespin.
- Use the yellow marker to decorate the cardboard strip, then tape it upright to the second piece of cardboard so it stands on its own.
- Show your child how to squeeze the clothespins and clip them in a row along the top edge of the strip.
Tip: Start with hand over hand help. If squeezing is too hard, let your toddler push the clothespins onto the strip while you hold it open.
Common Mistakes First Timers Make
Most first timers hit the same few snags with toddler Hanukkah crafts. Here are the ones that come up most.
- Cutting while your toddler waits. Cut everything before they sit down. Once you start cutting at the table, the attention is gone.
- Using a glue stick on pasta or craft sticks. It holds paper and not much else. Switch to tacky glue.
- Skipping the tape on contact paper. Without taped corners it curls up and sticks to sleeves. Tape it down first.
- Forgetting the ninth spot. A menorah has eight candles plus the shamash. Count to nine before you cut.
- Using liquid glue on cupcake liners. They go soggy and lose their ridges. Use a glue stick.
- Sealing the shaker bottle with just the screw cap. Toddlers open almost anything. Add hot glue or strong tape.
- Putting real candles near a craft menorah. Paper, foil, felt, and cardboard all burn. Keep real candles on a real menorah, out of reach.
- Using loose glitter. It travels for weeks. Use glitter glue.
- Expecting the dreidel to spin. The chenille stem version is for the table, not for spinning.
FAQs
How many candles are on a menorah, and why do these crafts have nine?
A Hanukkah menorah has nine branches: eight for the eight nights and one for the shamash, the helper candle used to light the others. The menorah crafts for toddlers here use nine spots so they match a real one.
Are these projects safe for children who still put things in their mouths?
If your child still mouths things, stick to the felt board, the handprint card, the cupcake liner menorah, and the contact paper projects with big pieces. Skip pasta, beads, sequins, foam stickers, and cellophane scraps, and stay within arm’s reach, since none of these crafts are edible, including the salt dough.
What are easy Hanukkah crafts for a 2 year old?
The handprint menorah card, the cupcake liner menorah, the contact paper suncatcher, and the felt menorah board all work well. You do the cutting, and your toddler peels, presses, and sticks.
What type of glue is best for toddler crafts?
A glue stick is easiest for toddlers, because they can see where it goes and it dries clear. Use tacky glue for pasta, craft sticks, and pompoms, and keep liquid school glue for tissue paper and other light decorating in small amounts.
Can I use real candles in a craft menorah?
No. These crafts are made of paper, foil, felt, and cardboard, and none of them are safe near a flame. Let your toddler light the felt or tissue paper flames, and keep real candles on a real menorah, out of reach.
What are some Hanukkah activities for toddlers besides crafts?
Singing holiday songs, reading a picture book about Hanukkah, spinning a large dreidel together, and playing with the felt menorah board are all easy Hanukkah activities for toddlers with no cutting or gluing. Do them each evening alongside the real candle lighting.
