
Halloween egg carton crafts for kids work best when you treat the carton as the stand and the egg as the character: cut the pulp carton into single cups for bases, then paint or draw monster faces onto hard-boiled eggs, empty blown-out shells, or plastic eggs. Hard-boiled eggs give you the best painting surface but are display-only and need to be thrown out after two hours at room temperature (USDA guidance for perishable food), so use blown-out shells or plastic eggs for anything you want to keep or hang. Most of the fifteen crafts below take 10 to 30 minutes, cost close to nothing, and work for ages 3 and up with an adult doing the cutting.
It was the second week of October and my daughter came home with a note about a class party. Something homemade, obviously. Due Thursday.
We had no craft kit, no pumpkins left at the store worth buying, and a half-empty egg carton on the counter. So we boiled six eggs, cut the carton into cups, and by the time the water had cooled we had a row of small green Frankensteins sitting on grey paper necks.
The whole thing took 25 minutes. Two of the eggs cracked. One kid painted her hands instead of the egg.
That is the honest version of this craft, and it is why I wrote this differently from most egg carton roundups. Almost every list online paints the carton and stops there. The egg is the part kids actually care about, and it is also the part with real rules attached, because a boiled egg is food and a Sharpied egg is not.
So this list covers all fifteen ideas, but it also tells you which ones you can keep until next year, which ones go in the trash by bedtime, and which one you can eat.
What You Need For Halloween Egg Carton Crafts
You almost certainly have most of this. The only things I would actually spend money on are tacky glue and one decent paint pen, and even those have workarounds.
The short version: Two egg cartons, a dozen white eggs, black and orange craft paint, a black fine-tip marker, tacky glue, and scissors you do not mind gumming up.
Every Item, With A Cheaper Or Free Swap
| What the craft calls for | Where to get it | Free or cheap swap |
|---|---|---|
| Molded pulp egg cartons | Free, you already have them. A neighbor, a preschool, or a farm stand will give you a stack if you need twelve | Nothing needed. Ask for cartons on a local buy-nothing group and you will have ten by Friday |
| White eggs (12) | Grocery store. Buy 14 if you need 12, you will crack some | Plastic Easter eggs from the spring clearance bin, wooden eggs, or ping pong balls (age 4 and up only, see safety) |
| Acrylic craft paint (Apple Barrel, FolkArt) | Craft store, about a dollar a bottle | Washable tempera or poster paint you already own. Covers worse, washes out of clothes, which matters under age 5 |
| Paint pen (Posca PC-3M) | Art or craft store, the one genuinely nice-to-have | Sharpie fine point, or a toothpick dipped in paint for tiny details |
| Tacky glue (Aleene’s Original) | Craft store or Walmart | Low-temp hot glue (adult only), double-sided foam tape, or a pea of poster putty |
| Googly eyes | Dollar store, huge bag | Hole-punch dots from white paper with a marker pupil, 1/4 inch coding dots, or two blobs of white paint dotted with black |
| Small plastic spiders | Dollar store, Halloween aisle | Spider shapes cut from a black trash bag, or four bent pipe cleaner legs on a paper body |
| Black craft paper for wings | Craft store | A cereal box painted black. Stiffer than craft paper and free |
| Fishing line for hanging | Hardware or craft store | Sewing thread or dental floss. Floss is stronger and easier for kids to knot |
| Pipe cleaners | Dollar store | A strip of black paper curled around a pencil |
| Food coloring (Wilton gel) | Baking aisle | Beet juice from a can of beets, which stains beautifully and is genuinely food safe |
| Table cover | Dollar store plastic tablecloth, $1.25 | Cut-open paper grocery bags or two days of newspaper |
| Dry leaves for the owls | Your yard, free | Also free. Just press them first, see craft 15 |
Practical note: the single best free supply in this whole project is the pointed post between the egg cups. Everybody cuts those off and throws them away. Snipped out and trimmed, they are instant bat wings, witch hats, tombstones, cauldron feet, and tree bark. I get more use out of the posts than the cups.
Prep Your Cartons And Eggs First (this is the part that gets skipped)
Fifteen minutes of prep before you call the kids over is the difference between a craft and a cleanup. Here is what I have learned the annoying way.
Not All Egg Cartons Behave The Same
Molded pulp (the grey or brown papery ones) are the only kind worth using. They cut cleanly, they take paint, and they hold a shape. If you have a choice, save these.
Foam cartons are a trap. Acrylic paint beads up and then scrapes off with a fingernail, and spray paint dissolves polystyrene on contact. If foam is all you have, skip paint entirely and glue on paper instead.
Clear plastic cartons peel. Painted acrylic lifts off in sheets once dry. Wipe them with rubbing alcohol first and use a paint pen, or use them unpainted as little display domes.
Painting Pulp Cartons: Plan On Three Coats Of Black
Pulp drinks paint. One coat of black looks like patchy grey, which is the number one reason these crafts look worse than the photo online. Two coats is passable. Three is what you actually want for black.
Do not thin the paint with water. Wet pulp goes soft and wavy, and once it warps it stays warped. Load a stiff brush and dab rather than stroke.
Let each coat dry 20 to 30 minutes or the next one lifts and pills. That is 90 minutes of drying for a black carton, which is why I paint the cartons the night before and let the kids do eggs only.
Tip: The carton lid makes a free paint palette, and it goes in the trash when you are done. Do not wash a paint palette in October.
Cutting The Carton
Cut down through the middle of a cup wall first, then across the base. If you cut across first, the cups crush.
Kitchen scissors handle pulp fine, they just get gummy. A craft knife along the hinge gives you a much cleaner lid removal, and that is an adult-only job on a cutting mat, not a kid job.
Pre-cut everything before the kids sit down. A four year old waiting for you to cut a cup will start painting the table.
Three Ways To Prep The Eggs, And What Each One Costs You
| Egg version | How long | Can you keep it | Best for |
|---|---|---|---|
| Hard-boiled, shell on | 15 min plus cooling | No. Display for 2 hours, then bin it | The best paint and marker surface, and the cheapest |
| Blown-out empty shell | About 10 min per egg, adult job | Yes, for years in a box | Anything you want to hang or store, crafts 1, 4, 10, 12, 15 |
| Plastic or wooden egg | Zero | Yes | Toddlers, hanging crafts, anything that will get dropped |
Hard boiling for crafts: Cover the eggs with cold water, bring to a boil, take the pan off the heat, cover it, and leave for 10 to 12 minutes. Then straight into an ice bath.
The ice bath is not optional for crafts. It stops the grey-green ring and it firms the shell so it survives being grabbed by a five year old. Boil 14 if you need 12.
Emptying a shell without wrecking it: Pierce a small hole in the narrow end and a slightly bigger one (about a quarter inch) in the fat end with a pushpin. Break the yolk inside with a straightened paperclip. Then push air through the small hole with a bulb baster or a plastic medicine syringe.
Never blow it out with your mouth. Salmonella can be on the shell as well as inside the egg, which is exactly what your lips would be touching. A one dollar baster solves it.
Rinse the empty shell with hot soapy water, drain it, and leave it upside down on a paper towel overnight. It will be bone dry and weigh almost nothing by morning.
Using cracked shells from baking (crafts 2 and 13): Rinse them out, then either boil them a few minutes or bake them dry on a sheet at 250F for about 20 minutes. Raw shell residue is the one part of this craft I do not hand a kid without cleaning first, and everyone washes hands after either way.
The Thing Nobody Tells You About Painting A Cold Egg
An egg straight from the fridge sweats within about two minutes. Marker beads up on the damp shell, smears sideways, and stays smeary. Paint slides.
Let the eggs sit on the counter 15 to 20 minutes, then wipe each one with a paper towel before you hand it over.
If you want paint to really grab, wipe the shell with a little white vinegar first. It cuts the oily bloom on the shell, the same reason vinegar is in every egg dye recipe.
Brown eggs mute everything. If brown is what you have, one coat of white craft paint turns them back into a canvas, at the cost of another 20 minutes of drying.
Practical note: put a spare carton on the table as a drying rack, one egg per cup. Painted eggs left on a flat surface roll, and a rolled egg has a bald streak down one side.
If you are reading this at 9pm with a note due tomorrow and the eggs are still raw, save this for later and start with the boiling in the morning. It is the one step you cannot rush.
Safety Rules That Actually Matter With Real Eggs
The original version of this idea list skipped this entirely, and with real eggs that is the one thing you cannot skip. None of it is complicated.
Decorate it or eat it, never both. Once an egg has acrylic paint, Sharpie, tape, or glue on it, it is a decoration. An intact shell is a decent barrier, but craft ink is not food safe and I do not serve eggs that have been drawn on. Craft 14 is the only edible one in this list, and it uses food coloring only.
Two hours out, then it goes in the bin. USDA guidance for perishable food is a two hour limit at room temperature. A boiled egg centerpiece that sat on the table through dinner is not a snack later, no matter how good it looks. Plan on it being trash or compost by bedtime.
A week in the fridge, shell on. If you want to boil ahead, hard-boiled eggs keep about a week refrigerated per USDA guidance. Boil Sunday, craft Wednesday, that works fine.
Wash hands after handling shells and cartons. Salmonella can live on the outside of the shell, and pulp cartons are porous enough that you cannot really sanitize one. Skip any carton that had a leaked or broken egg in it, and wash up afterward the same as you would after cracking eggs for pancakes.
Small parts, under age 3. Googly eyes, small silver beads, plastic spiders, cut pipe cleaner tips, and broken eggshell pieces all fail the toilet paper tube test, which is the home version of the CPSC small parts rule. Under 3, use sticker eyes or painted-on eyes and skip crafts 2, 4, 10 and 13.
Ping pong balls are a good swap, but not for toddlers. They pass the small parts cylinder on size, but a 40mm ball is exactly mouth-sized for a two year old. Age 4 and up.
Broken eggshell edges are genuinely sharp. They will not do damage, but they will nick a finger, and the crafts that use jagged halves are not a preschool activity. I put an age 5 floor on those.
Hot glue is an adult tool here. A standard gun runs around 380F at the tip and these crafts put it right next to small hands holding a slippery curved object. A low-temp gun (around 250F) with a 7 year old under supervision is fine. Younger than that, use tacky glue and wait.
Nothing boiled gets hung up. A boiled egg is heavy, it is food, and it will eventually come down. Hanging crafts use plastic eggs or blown shells only, on a Command hook or a light fixture, never on a moving ceiling fan. Keep hanging line short and out of reach of babies and toddlers.
Mess reality check. Acrylic craft paint is permanent on clothes once dry. Washable tempera and washable markers are the right call under age 5 even though the coverage is worse. Food coloring stains hands for a day, and it stains grout and porous countertops, so mix it in a disposable cup on a covered surface.
Pick A Halloween Egg Carton Craft In 30 Seconds
All fifteen, sorted so you can find one that fits the time you actually have. “Keepable” is the column most roundups will not give you.
| # | Craft | Egg type | Real ages | Time | Mess | Keepable | Scare level |
|---|---|---|---|---|---|---|---|
| 1 | Vampire Eggs in Coffin Cartons | Boiled or blown shell | 5+ | 15 min | Low | Only if blown shell | Spooky |
| 2 | Eggshell Spider Nests | Rinsed cracked shells | 5+ | 20 min | Low | Yes | Creepy |
| 3 | Mummy Wrapped Eggs | Plastic (best) or boiled | 2+ | 10 min | Very low | Yes with plastic | Friendly |
| 4 | Frankenstein Head Stands | Boiled or blown shell | 4+ | 15 min plus drying | Medium | Only if blown shell | Spooky |
| 5 | Mini Egg Pumpkin Patch | 12 boiled or plastic | 3+ | 30 min plus drying | Medium | Only if plastic | Friendly |
| 6 | Ghostly Egg Choir | Boiled | 3+ | 10 min | Very low | No | Friendly |
| 7 | Alien Egg Spaceships | Plastic | 3+ | 20 min | Medium | Yes | Not scary |
| 8 | Creepy Eyeball Cartons | 12 boiled | 6+ | 20 min | Low | No | Gross |
| 9 | Witch Cauldron Bubbles | Small plastic | 4+ | 10 min | Medium | Yes | Friendly |
| 10 | Hanging Bat Eggs | Plastic or blown shell | 7+ | 30 min | Medium | Yes | Spooky |
| 11 | Skeleton Skull Row | 12 boiled | 5+ | 15 min | Very low | No | Spooky |
| 12 | Black Cat Baskets | Plastic or blown shell | 5+ | 25 min | Medium | Yes | Not scary |
| 13 | Monster Egg Hatchery | Cracked shell halves | 5+ | 20 min | Medium | Yes | Fun creepy |
| 14 | Zombie Brain Eggs | Boiled, edible | 8+ to make, 4+ to eat | 20 min plus overnight | Medium | Eat same day | Gross |
| 15 | Autumn Night Owls | Boiled or blown shell | 4+ | 25 min plus leaf pressing | Low | Only if blown shell | Not scary |
Two honest notes on this table. The title says spooky, and crafts 7, 12 and 15 are not remotely spooky, which is deliberate: they are the ones to reach for with a three year old who does not want monsters in the house. And nine of the fifteen are display-only if you use boiled eggs, so if the goal is decorations you keep, go straight to the blown shell method above or buy a bag of plastic eggs.
The 15 Halloween egg carton crafts
I have kept these in the order you probably want to browse them, but if you are short on time here is the routing I would give a friend.
Ten minutes and one kid: Start with 3, 6 or 9.
A whole afternoon with an older kid: 10, 13 or 14.
A toddler who does not want anything scary: 3, 7 or 15.
Something to keep in a box for next October: 2, 7, 10, 12 or 13.
1. Vampire Eggs in Coffin Cartons
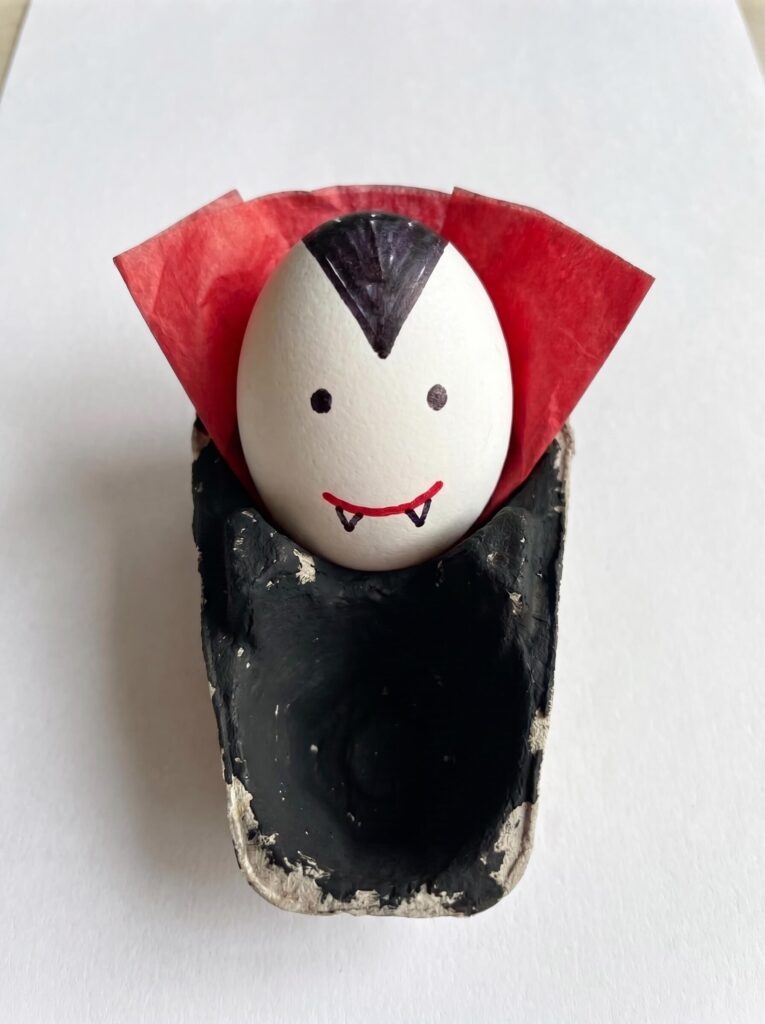
The widow’s peak is the entire craft. Two straight lines meeting in a point at the top of the shell reads as Dracula even when a six year old draws it badly.
The mistake is drawing the face too low. The fat end of the egg is the jaw, so the eyes belong in the middle third, not near the bottom.
Ages 5+ · Time 15 min · Mess low · Supervision check in every few minutes · Egg boiled for tonight, blown shell to keep
You’ll need: One carton cup painted black, a white egg at room temperature, black and red markers, a scrap of red tissue paper.
Cheap swap: Red tissue paper is the only bought item, and a torn piece of a red paper napkin does the same job.
Make it:
- Paint a single cup black the night before. Three coats, and yes it needs three.
- Snip the two top corners off the cup at an angle so the rim reads as a coffin instead of a box.
- Draw the hairline first: two straight lines from the sides meeting in a point at the top. Then two eyes, then two small fangs under a red mouth.
- Fold a square of red tissue into a small collar, tuck it behind the egg, and set the egg in the coffin.
What goes wrong the first time: Red marker over black that is still wet turns muddy pink and bleeds. Do the black, count to thirty, then the red.
Skip it if: Your kid is under 4 and squeezes things. A boiled egg cracks in a fist.
2. Eggshell Spider Nests
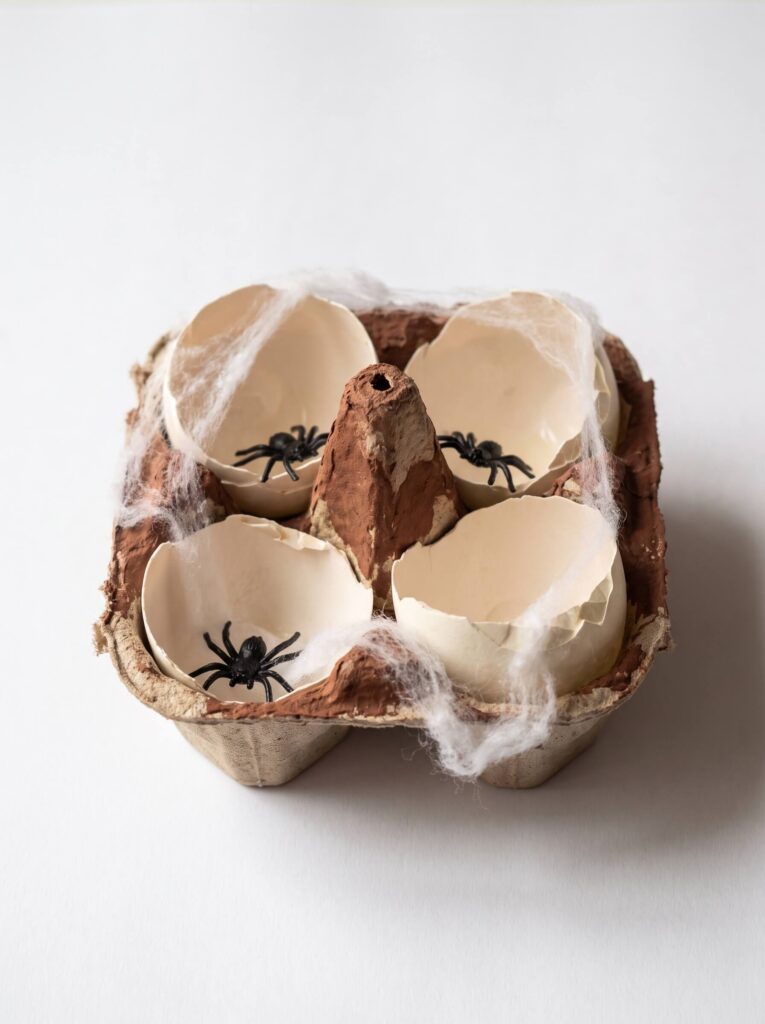
This only looks like a nest if the shell is torn rather than cut. Press your thumb into the side of an empty shell to make a jagged crater, and it suddenly looks like something came out of it.
The free upgrade is a pulled-apart cotton ball. Nothing else reads as web that convincingly, and you already have some.
Ages 5+ · Time 20 min · Mess low · Supervision check in every few minutes · Egg rinsed and dried cracked shells
You’ll need: Cracked shells (rinsed and baked or boiled first, see prep), a cup painted brown, a cotton ball, three or four small plastic spiders, tacky glue.
Cheap swap: Cut spiders from a black trash bag, or bend four short pipe cleaner legs onto a paper body.
Make it:
- Paint the cup brown, two coats. Muddy brown beats neat brown here.
- Press a thumb into the side of the shell to open a jagged crater.
- Glue the spiders to the inside of the shell first, half in and half out.
- Pull a cotton ball into wisps and tuck it over the legs and around the rim.
Tip: Half-hidden spiders read as many spiders. Fully visible ones read as toys sitting in a cup.
What goes wrong the first time: Kids glue spiders on top of the cotton, so it looks like a nest of toys instead of a nest with something in it. Spiders first, web second.
Skip it if: The kid is under 5. Broken shell edges are sharp and the spiders fail the toilet paper tube test.
3. Mummy Wrapped Eggs
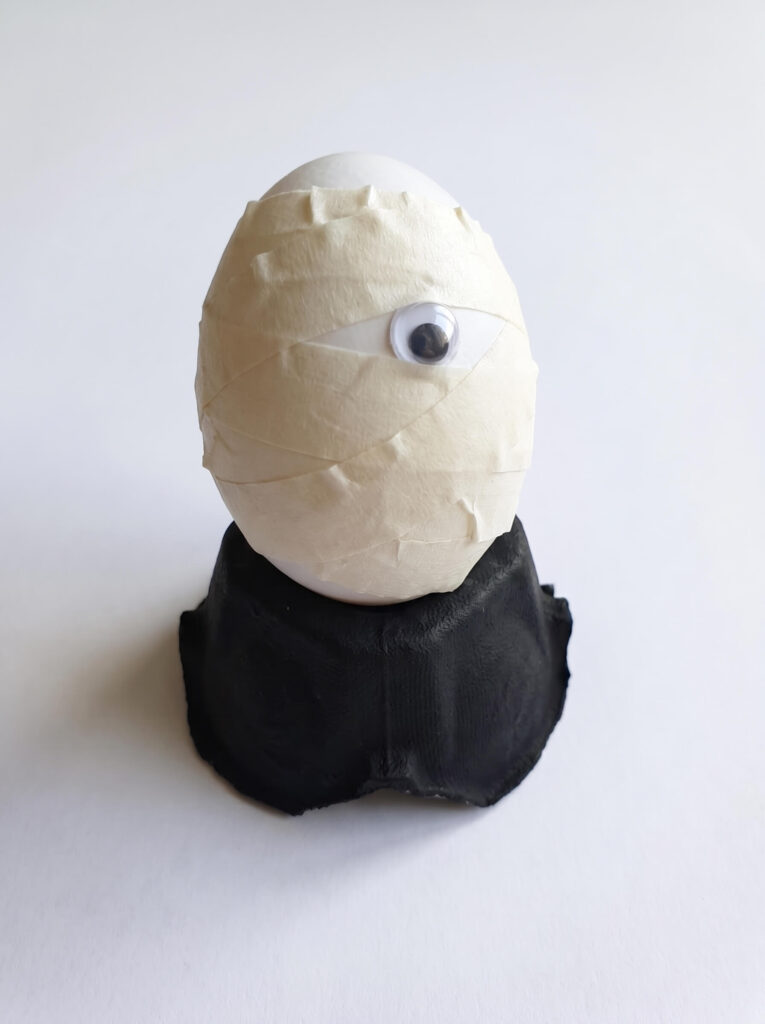
This is the youngest-friendly craft in the list and the one that buys you the most quiet time. It is also the one with the single best prep trick.
Pre-tear about 30 strips of tape, roughly three inches each, and stick them along the edge of the table. Left to their own devices, a toddler pulls a three foot strip and welds it to itself and their arm.
Leave one eye uncovered. A fully wrapped egg is a white blob. One visible eye is what makes it a mummy.
Ages 2+ · Time 10 min · Mess very low · Supervision arm’s reach under 3 · Egg plastic for toddlers, boiled for older kids
You’ll need: A plastic egg, white masking tape, one googly eye, a cup painted black as a stand.
Cheap swap: Medical tape from the first aid box works and is softer to tear. Painter’s tape leaves no residue but it is blue.
Make it:
- Pre-tear the strips and line them along the table edge.
- Wrap at crossing angles, leaving one small gap for the eye.
- Press a googly eye into the gap with a dot of tacky glue.
- Turn a painted cup upside down as a stand and sit the mummy on top.
What goes wrong the first time: Wrapping a boiled egg and then wanting the egg back. Masking tape lifts the shell membrane with it, so plan on that egg being decor only.
Skip it if: Your kid hates sticky hands. Tape on fingers is the whole activity, and for some sensory-sensitive kids that is a hard no rather than a mild dislike.
4. Frankenstein Head Stands
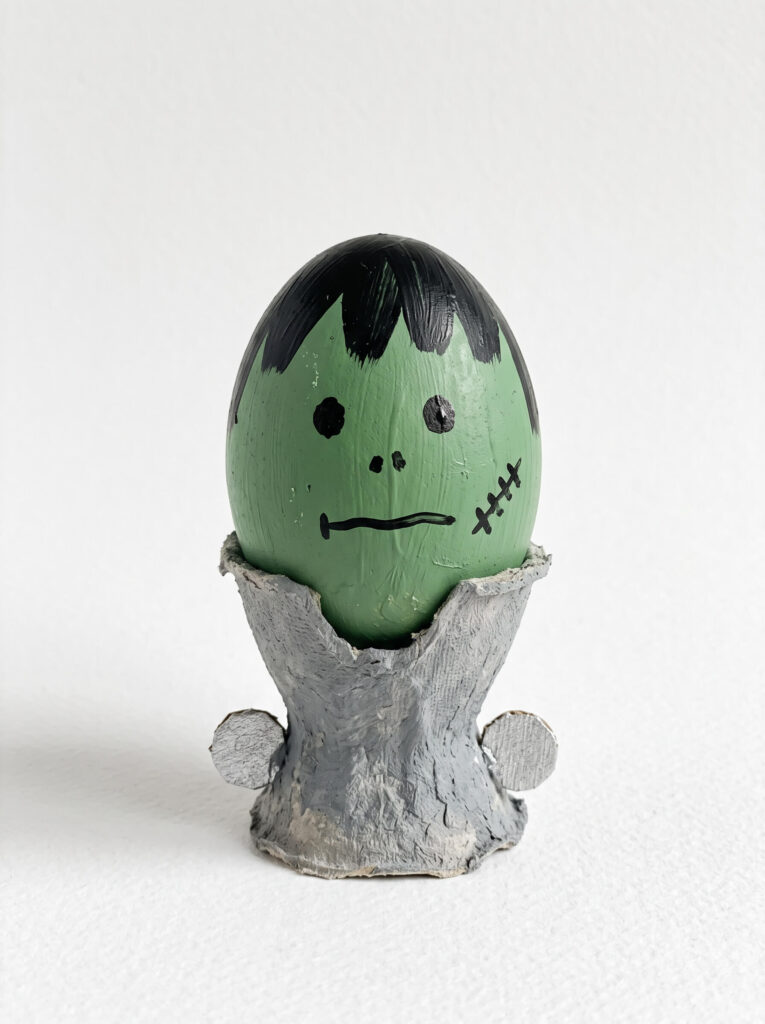
Neon green is the wrong green. It reads as a pea. Mix a drop of black into your green, or use a sap or olive green, and the shell suddenly looks like the monster instead of produce.
Hair sits lower than people draw it, covering the top third of the egg with a straight fringe line. A wavy scribble at the very top looks like a bad haircut, which is a different craft.
Ages 4+ · Time 15 min of work, 40 min including drying · Mess medium · Supervision check in every few minutes · Egg boiled, or blown shell to keep
You’ll need: Green craft paint, a cup painted grey, a black paint pen or fine marker, two small circles cut from the carton lid, silver paint.
Cheap swap: The original version of this craft uses silver beads for the bolts. Cardboard circles from the lid cost nothing and are not a choking hazard, which matters if a younger sibling is at the table.
Make it:
- Paint the egg green in two thin coats, 20 minutes apart.
- Paint a cup grey for the neck, and cut two quarter-inch circles from the lid.
- Paint the circles silver and glue one to each side of the cup.
- Draw the fringe, two eyes, a flat mouth, and two or three stitch marks with the black pen.
What goes wrong the first time: One thick coat of green on a shell that was not fully dry. It cracks into flakes as it dries and lifts off in patches. Two thin coats, dry shell.
Skip it if: You need to be finished in fifteen minutes. The paint drying is the real timeline here.
5. Mini Egg Pumpkin Patch
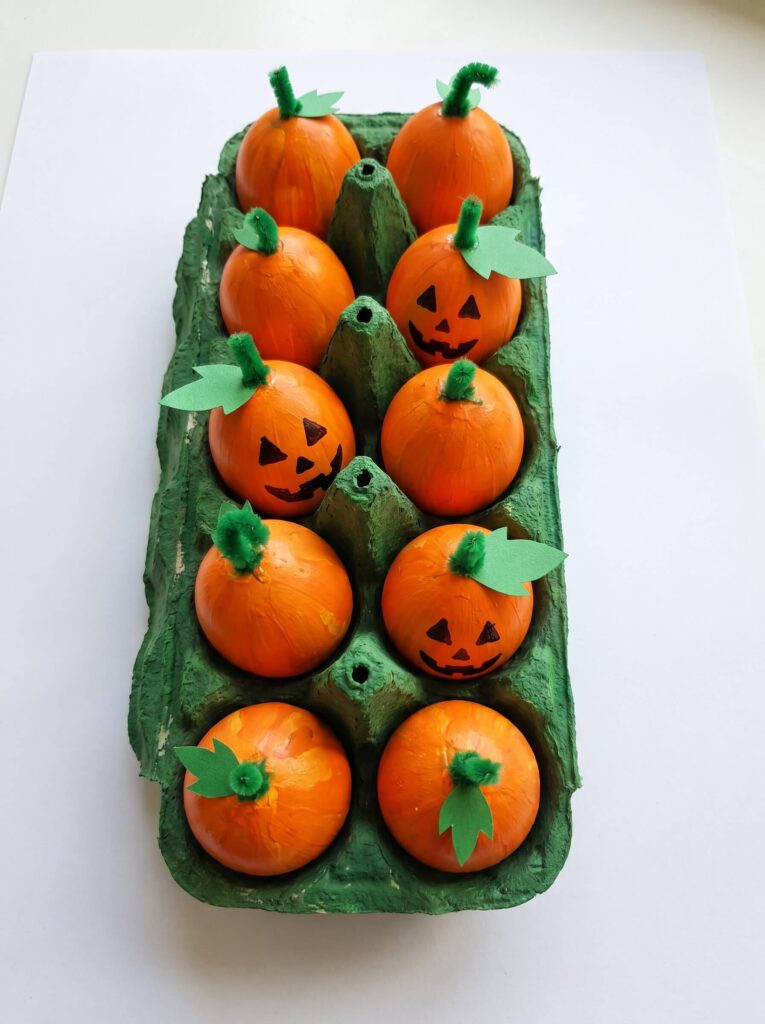
Paint the outside of the carton green while it is closed, then open it. The inside cups stay natural grey pulp, which reads as dirt and saves you painting twelve cup interiors that nobody will see.
Only give faces to three or four of the twelve. A patch of plain pumpkins with a few carved ones looks like a patch. Twelve grinning faces looks like a novelty tray.
The stem is the detail that makes it read as pumpkin instead of orange egg. A half inch of green pipe cleaner or a small paper leaf taped on top does it.
Ages 3+ · Time 30 min of work, plus 40 min drying · Mess medium · Supervision check in every few minutes · Egg 12 boiled, or plastic to keep
You’ll need: A dozen eggs, orange paint (most of a small bottle, it is more than you expect), green paint, a black marker, green pipe cleaners.
Cheap swap: Skip orange paint entirely and use orange plastic eggs from the Easter clearance bag. Zero drying time, and you can box them up in November.
Make it:
- Paint the closed carton green, two coats, and leave it to dry.
- Paint the eggs orange, two coats. One coat over white looks like sherbet.
- Dry them one per cup in a spare carton, never in the green one, or the wet paint glues egg to carton.
- Draw faces on three or four, add stems, and settle them into the cups.
What goes wrong the first time: Painting the eggs while they sit in the carton you just painted. Both come out with fingerprints and the eggs stick.
Skip it if: You have exactly thirty minutes. This one needs drying time you cannot skip.
Once the patch is up, the same crowd tends to want a pumpkin project next: [INTERNAL LINK: Best Halloween Pumpkin Crafts For Easy Fall Decor] has the no-carve versions that pair with this on the same table.
6. Ghostly Egg Choir
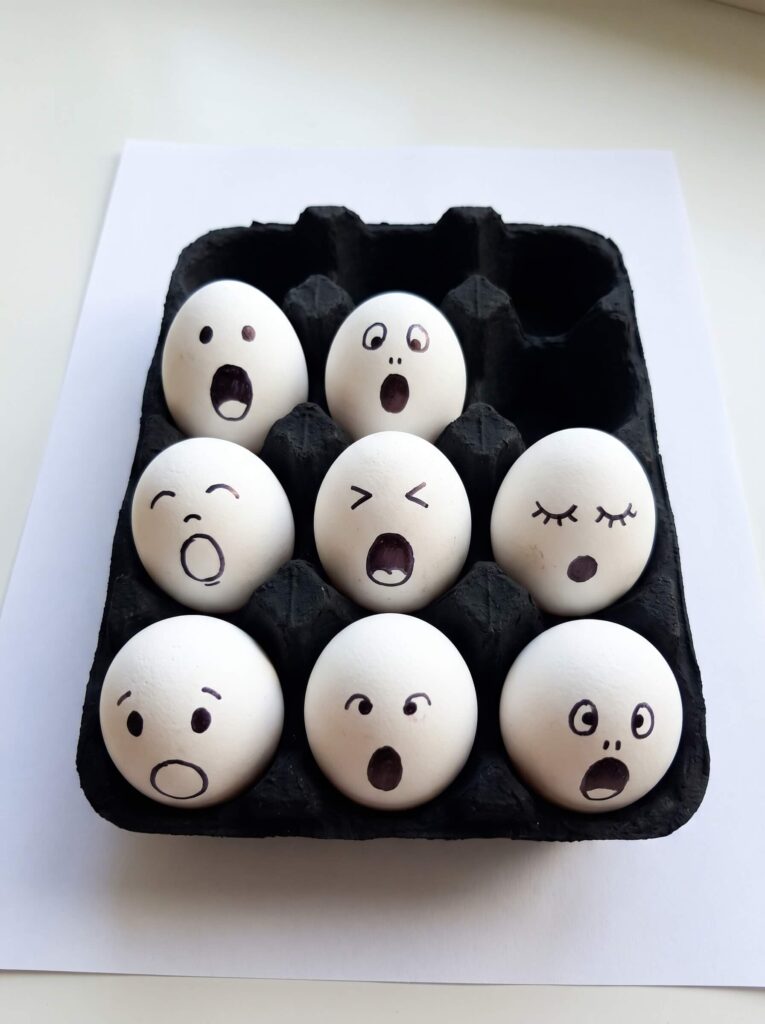
The easiest craft here and the one that photographs best. There is no paint on the eggs at all, just two dots and an O.
Vary the mouths. One wide O, one small o, one wobbly oval, and it reads as a choir mid-note. Identical mouths look like a printing error.
Leave the eyes off one of them and it looks like the ghost singing with its eyes shut, which is the one people always point at.
Ages 3+ · Time 10 min · Mess very low · Supervision check in occasionally · Egg boiled, display only
You’ll need: White eggs at room temperature, a black marker, a carton painted black.
Cheap swap: Nothing to buy. If you have no black paint, line them up on a dark placemat or a folded black t-shirt instead.
Make it:
- Bring the eggs to room temperature and wipe each one dry.
- Draw two dots for eyes and one open mouth, a different shape on each egg.
- Paint the carton black, or use any dark surface you already own.
- Group them tight together on a windowsill so they overlap slightly.
What goes wrong the first time: Marker on a cold egg. The shell sweats, the ink beads, and you get grey smears that do not wipe off. Room temperature, dry wipe, then draw.
Skip it if: You want to keep it. These are boiled eggs and they are done after two hours out.
7. Alien Egg Spaceships
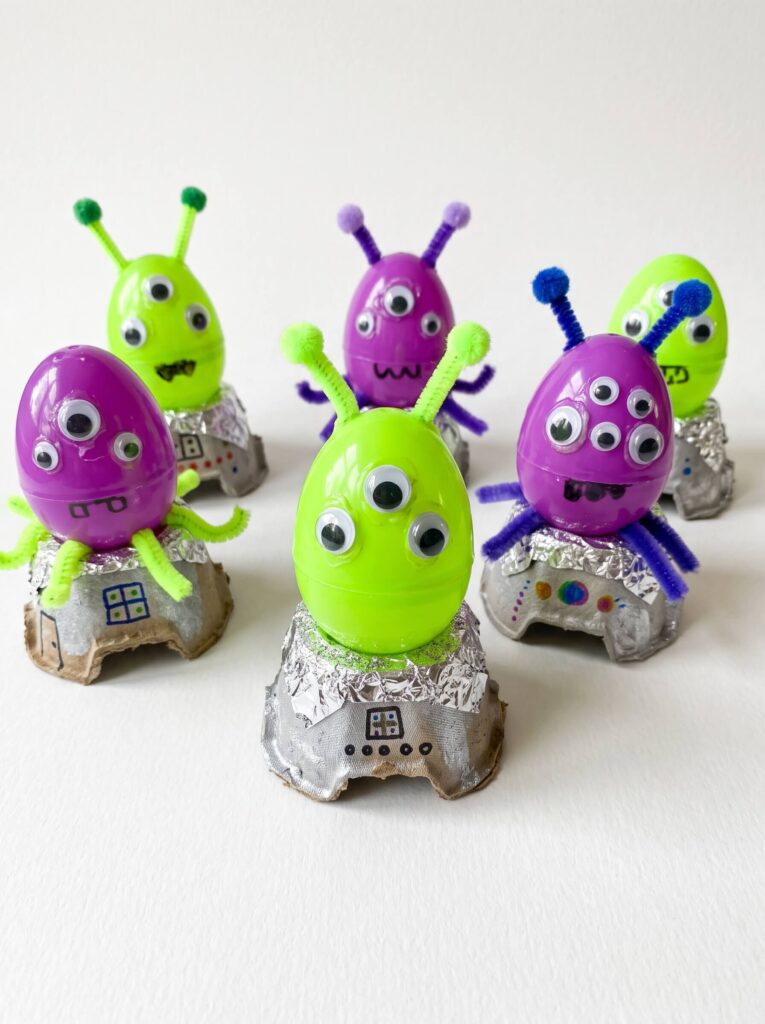
Silver acrylic on pulp cardboard looks like grey mud, every time. Wrap the upside-down cup in aluminum foil instead. It takes twenty seconds and it actually looks like metal.
Put the googly eyes on short pipe cleaner stalks rather than flat on the shell. Three eyes on stalks beats a dozen glued flat.
Ages 3+ (4+ with the stalks) · Time 20 min · Mess medium · Supervision check in every few minutes · Egg plastic
You’ll need: Plastic eggs, neon green or purple paint, foil, googly eyes, short pipe cleaner pieces, foam tape or a low-temp glue gun.
Cheap swap: You can skip the paint by using the brightest plastic eggs in the bag as they are. Foil is the only other component and every kitchen has it.
Make it:
- Wrap a cup in foil and tuck the edges up inside so nothing sharp shows.
- Paint the plastic egg, or use it as it comes.
- Glue a googly eye to the end of each short pipe cleaner, then attach the stalks.
- Sit the egg on the foil dome. Foam tape underneath keeps it from rolling off.
What goes wrong the first time: Tacky glue on a shiny plastic egg. It never really bonds and the eyes drop off an hour later. Double-sided foam tape or low-temp hot glue is the fix.
Skip it if: The kid is under 3. Googly eyes and cut pipe cleaner tips are exactly the wrong size.
8. Creepy Eyeball Cartons
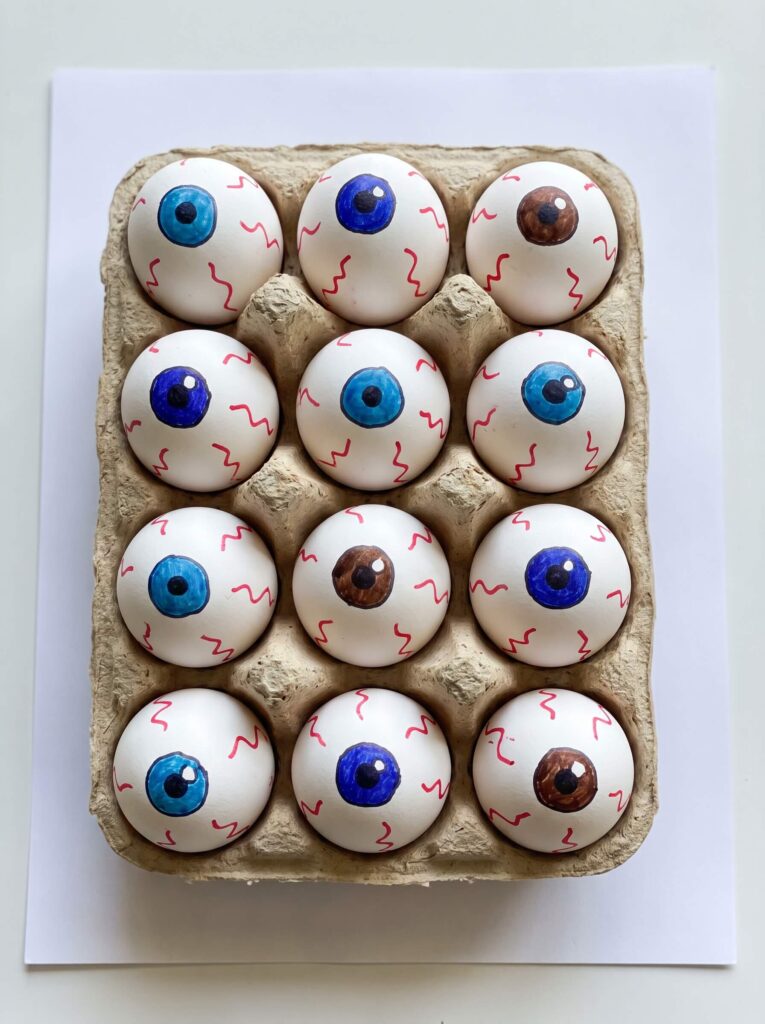
The veins sell it, and everyone overdoes them. Three or four short squiggles coming in from the edge is plenty. A full spiderweb of red looks like a scribble.
Draw the iris slightly off center and it looks like the eye is watching you. Then make the pupil smaller than feels right. A big pupil reads as cartoon; a small one is what makes people put the tray down.
Ages 6+ · Time 20 min for a dozen · Mess low · Supervision check in occasionally · Egg 12 boiled, display only
You’ll need: A dozen white eggs, a blue or brown marker, a black marker, a red fine-tip marker, a carton.
Cheap swap: Nothing to buy at all. This is the cheapest craft in the list and it needs no paint or drying time.
Make it:
- Room temperature eggs, wiped dry.
- Draw the iris circle off center, then let it dry for a minute.
- Add a small black pupil inside it.
- Add three or four short red veins in the white area only, then set them all in a plain carton.
What goes wrong the first time: Red over blue that has not dried gives you a muddy purple bruise. Wait a minute between colors.
Skip it if: You have a kid who genuinely gets creeped out. There is a reason this one is 6+, and mine asked me to put the tray away at bedtime.
9. Witch Cauldron Bubbles
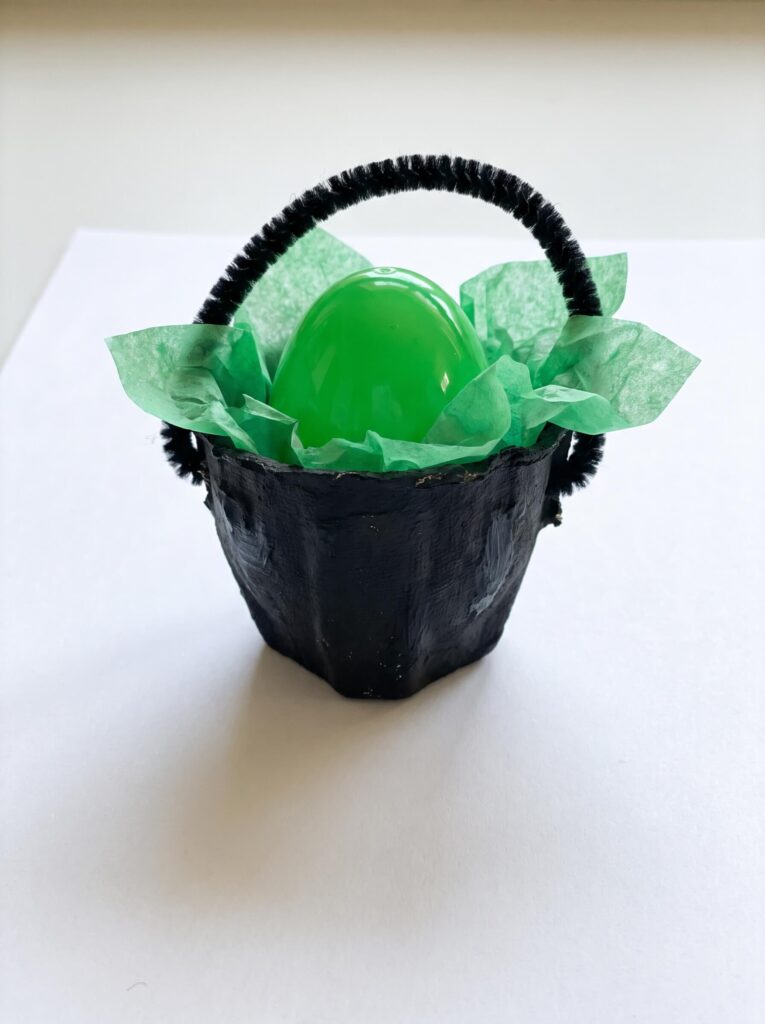
A green egg sitting in a black cup looks like a green egg sitting in a black cup. What fixes it is one scrunched square of green tissue paper stuffed around the base of the egg, so it reads as bubbling over the rim.
The handle in most versions of this craft is a paper strip glued across the top, and it gets knocked off within the hour. Poke two pinholes with a pushpin and thread a black pipe cleaner through instead, twisting the ends underneath.
Ages 4+ · Time 10 min · Mess medium · Supervision adult does the pinholes · Egg small plastic
You’ll need: A cup painted black, a small plastic egg painted green, green tissue paper, a black pipe cleaner, a pushpin.
Cheap swap: A strip cut from a black plastic bag, twisted tight, makes a handle that holds as well as a pipe cleaner.
Make it:
- Paint the cup black, three coats, ideally the night before.
- Paint the plastic egg green and let it dry.
- Adult pokes two pinholes opposite each other near the rim, then threads and twists the pipe cleaner.
- Stuff scrunched tissue around the egg so it sits proud of the rim like it is boiling over.
What goes wrong the first time: A glued-on flat handle. It lasts about an hour with kids in the room.
Skip it if: Nothing much. This is the ten minute craft for a short attention span, and the one I reach for when someone is nearly done being patient.
10. Hanging Bat Eggs
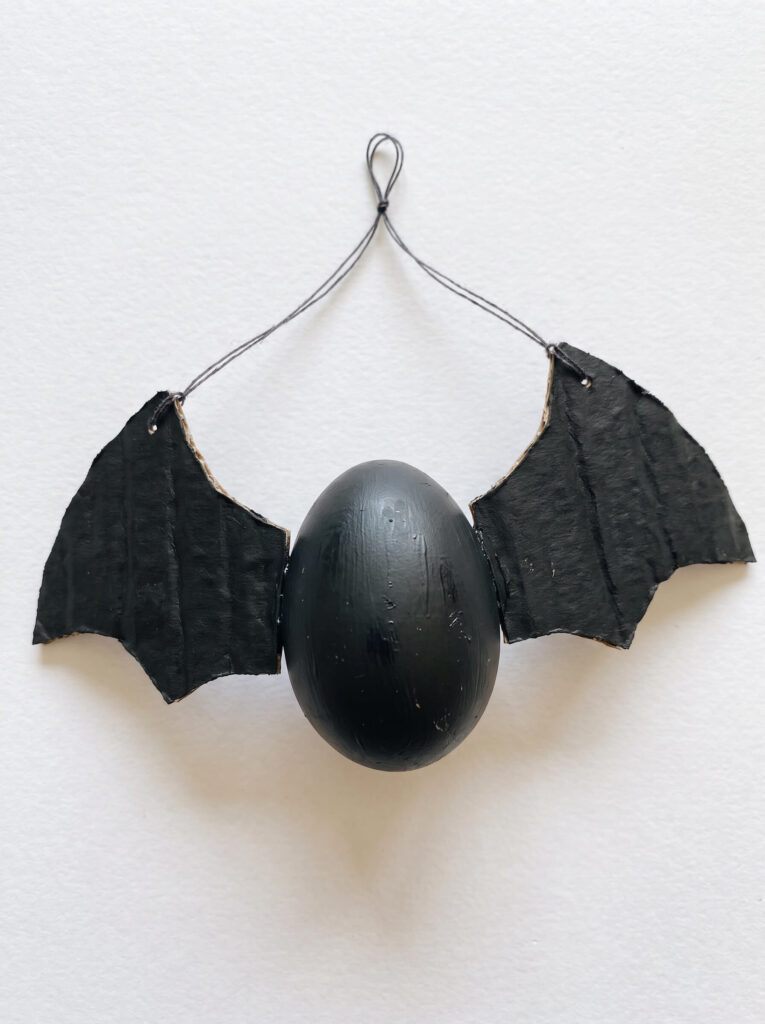
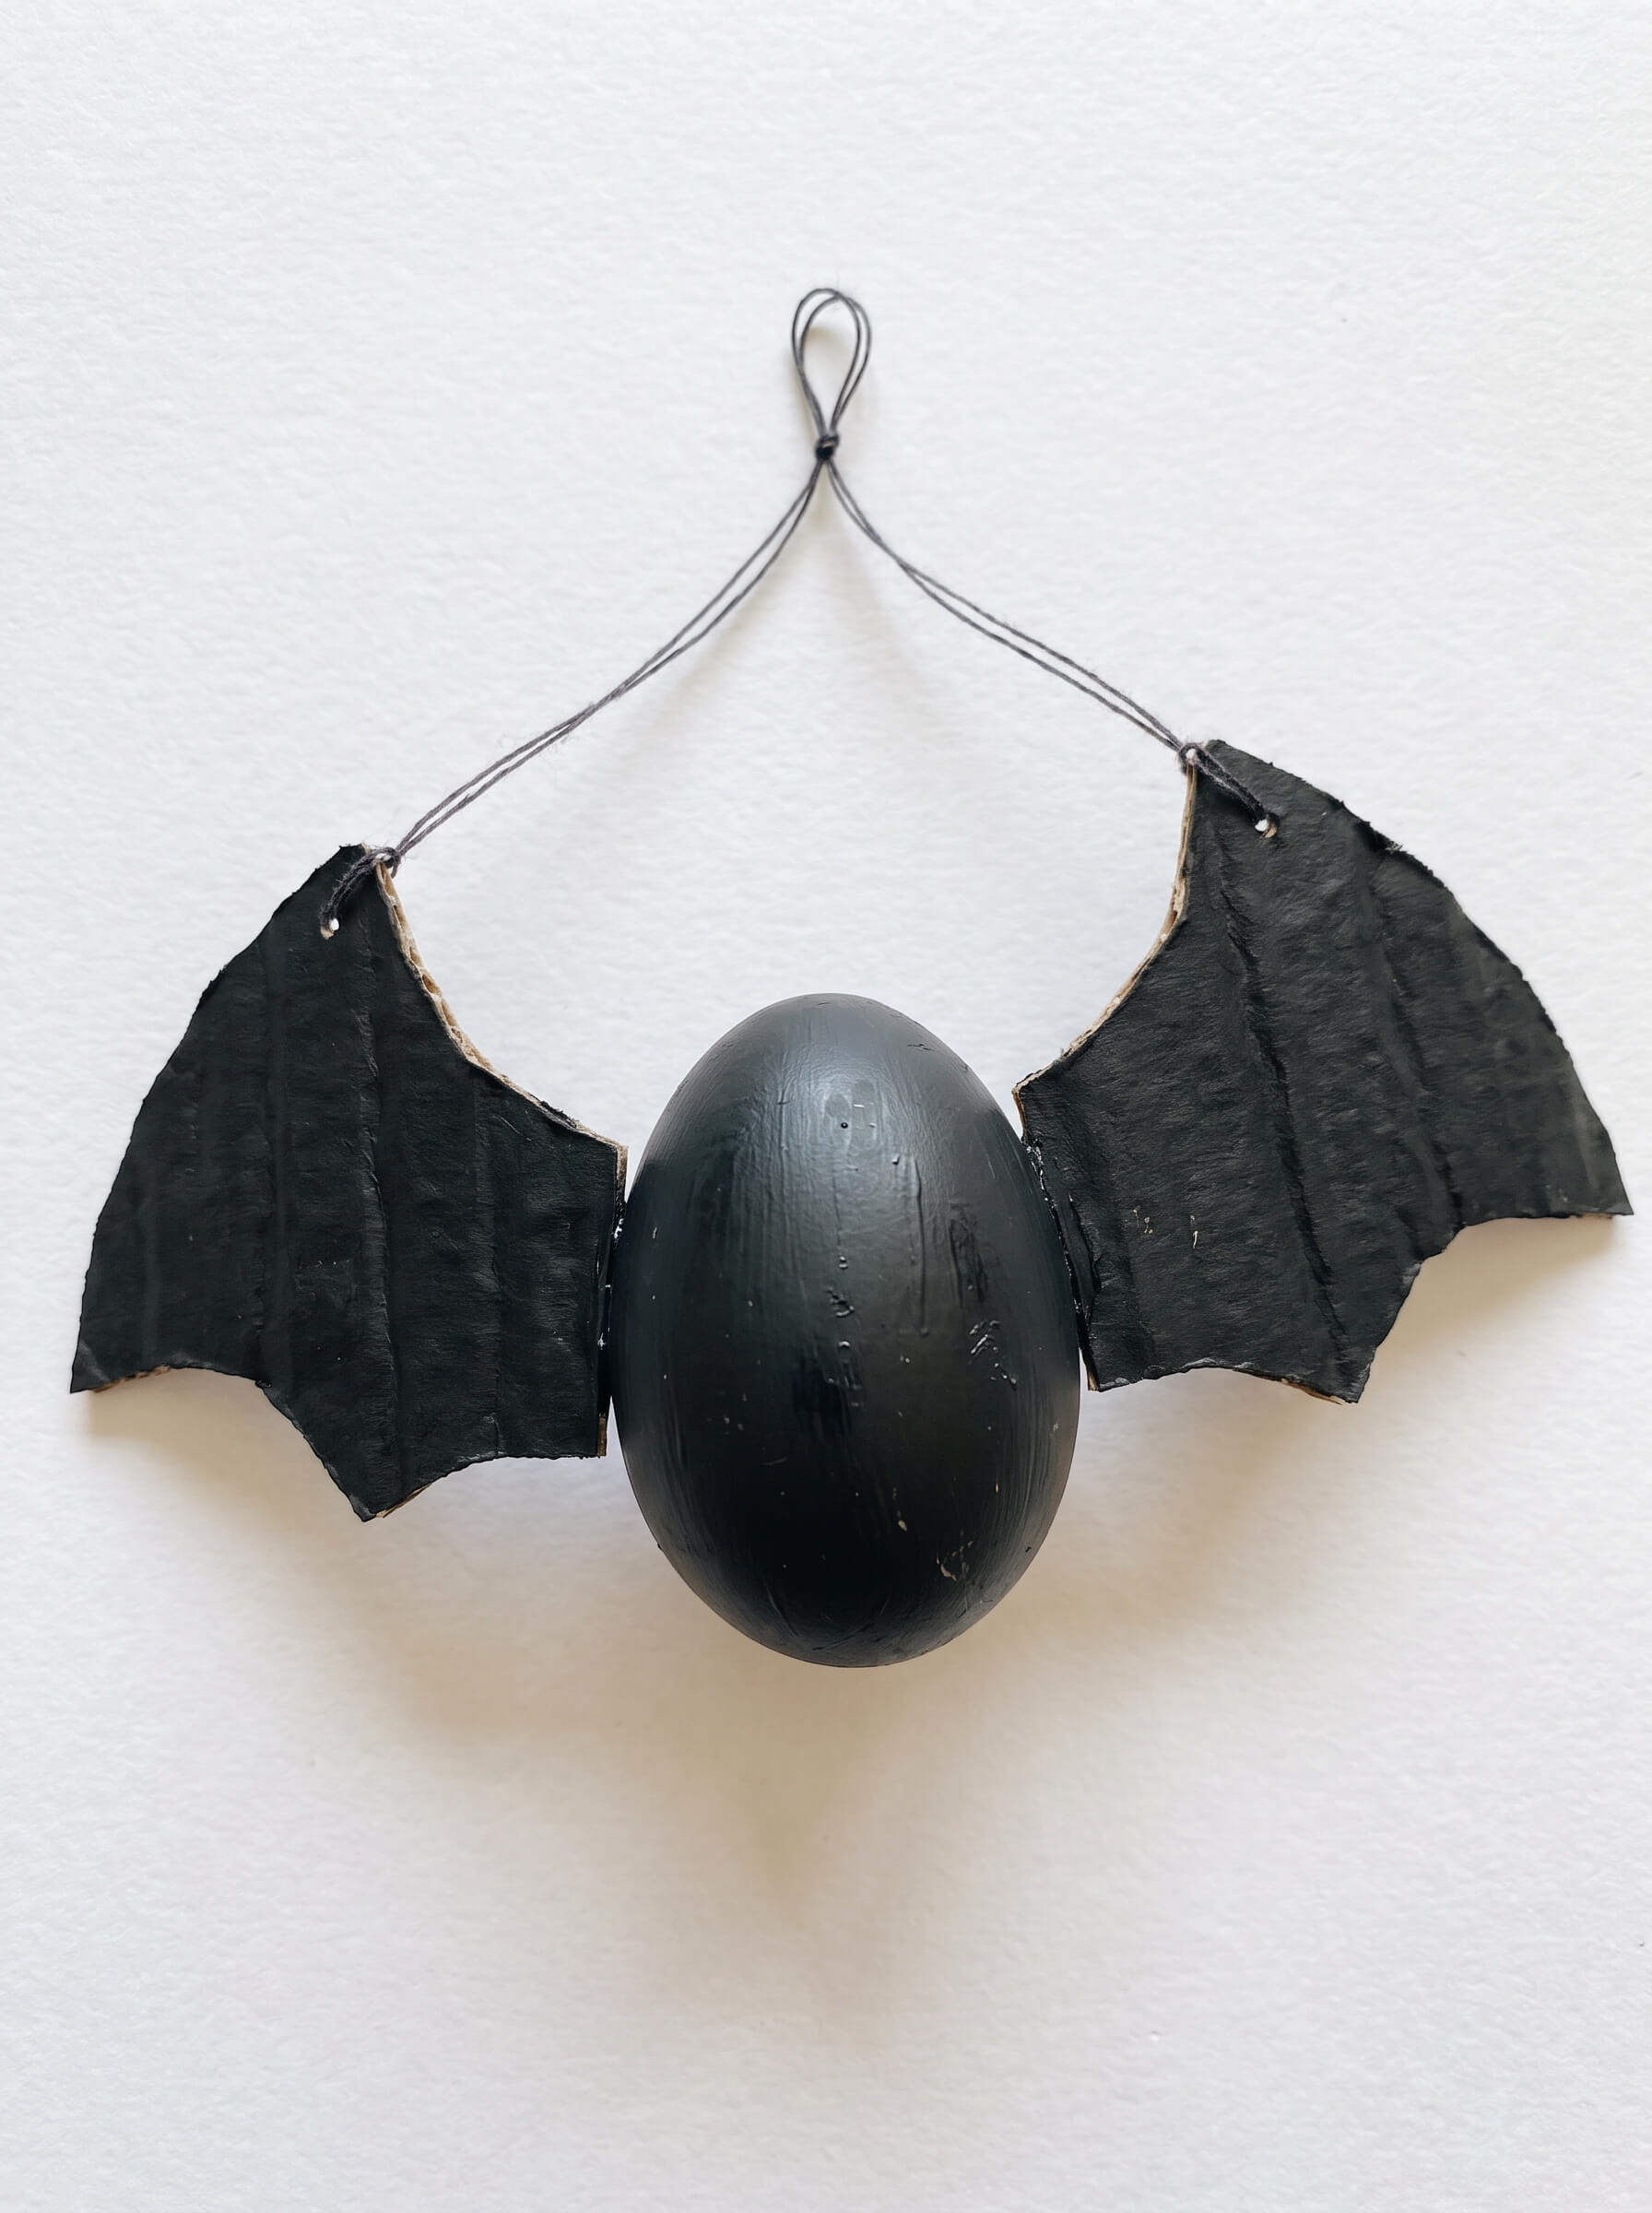
Skip the craft paper wings. Snip out one of the pointed posts from between the cups, cut it in half lengthwise, and you have two wings with natural ridges running through them that look like wing bones. It is the best thing you can do with a part of the carton you were about to throw out.
The other fix is the string. One thread means the bat spins and slowly untwists all evening. Two threads in a V, tied to the top of each wing, holds it steady and facing forward.
Ages 7+ · Time 30 min · Mess medium · Supervision adult on the glue gun · Egg plastic or blown shell only
You’ll need: A plastic egg or empty blown shell, black paint, a carton post, dental floss or thread, a low-temp glue gun, a Command hook.
Cheap swap: Floss instead of fishing line, and a cereal box cut into wings if your carton posts are already in the recycling.
Make it:
- Snip a pointed post out of the carton and slice it in half lengthwise.
- Paint the halves and the egg black, two coats, and let them dry fully.
- Adult hot-glues a wing to each side of the egg, holding each one for a full thirty seconds.
- Knot a length of floss to each wing tip, join them above the bat, and hang from a hook.
What goes wrong the first time: Letting go of the wing after five seconds. Hot glue on plastic needs the full thirty or the wing slides down while it sets.
Skip it if: The only hanging spot in the room is a ceiling fan, or the child is under 7. Boiled eggs never get hung, they are heavy and they are food.
11. Skeleton Skull Row
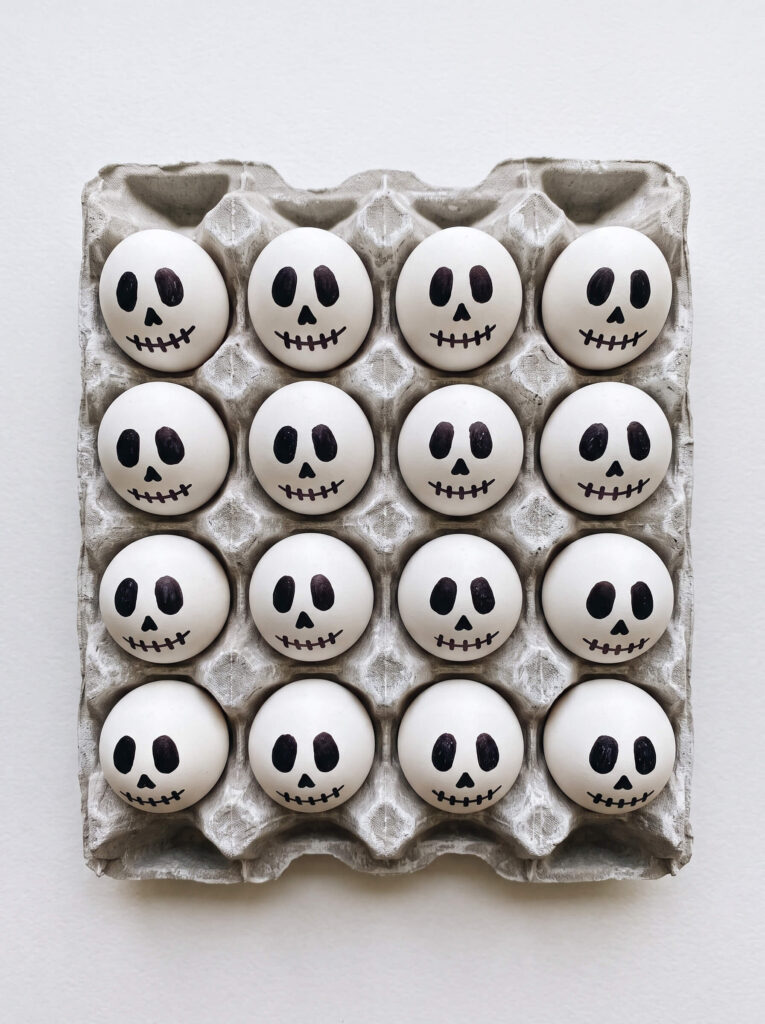
A skull needs a jaw, not a stitched mouth. Draw the eye sockets as tall ovals rather than circles, add a small triangle nose, then a horizontal line with five or six short vertical teeth marks across it.
Circles read as ghosts. Tall ovals read as skulls. That one change is the whole difference between this craft and craft 6.
For the tray, skip grey paint. Dry-brush white over the natural grey pulp instead: load almost no paint on the brush and drag it lightly so it catches only the ridges. One pass, no drying wait, and it looks like weathered stone.
Ages 5+ · Time 15 min · Mess very low · Supervision check in occasionally · Egg 12 boiled, display only
You’ll need: A dozen white eggs, a black fine marker, white paint and a dry brush, a carton.
Cheap swap: No paint at all. Bare pulp cartons are already a bone-adjacent grey and honestly look fine.
Make it:
- Dry-brush white across the carton ridges, one light pass.
- Draw two tall ovals on each egg, spaced fairly wide.
- Add a small triangle nose below and between them.
- Draw one horizontal mouth line with short vertical teeth crossing it.
Tip: Four marks per egg is the whole face. Every extra line makes it look less like bone.
What goes wrong the first time: Over-detailing. First-timers shade the sockets, add cheekbones, and end up with a face rather than a skull.
Skip it if: You want a centerpiece that survives dinner. Two hours out and these are done.
12. Black Cat Baskets
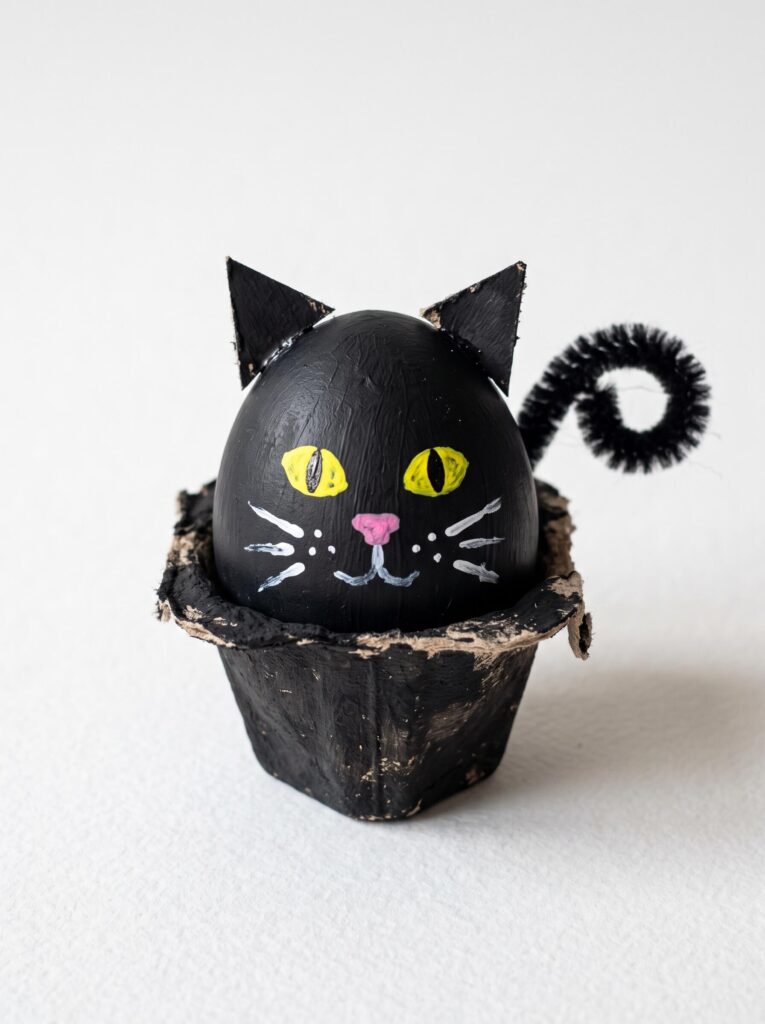
The reason a black egg reads as a black egg and not a cat is ears. Cut two small triangles from a carton post, paint them black, and glue them to the top of the shell. That single step is missing from most versions of this craft.
Whiskers are the other trap. White string frays and curls away from the shell within a day. A white paint pen holds forever and takes four seconds.
Ages 5+ · Time 25 min · Mess medium · Supervision check in every few minutes · Egg plastic or blown shell to keep, boiled for tonight
You’ll need: Black paint, an egg, two triangles cut from a carton post, a white paint pen, a yellow marker, a black pipe cleaner for the tail.
Cheap swap: A black plastic egg skips the paint step and the fingerprints entirely, and the Easter clearance bag usually has a few.
Make it:
- Paint the egg black, two coats, and do not touch it while it is wet.
- Paint the cup black too, and poke a pipe cleaner through the back for a curled tail.
- Glue the two triangle ears to the top of the egg.
- Add yellow eyes with a marker and three whiskers a side with the white pen.
What goes wrong the first time: Fingerprints. Black acrylic shows every single one, and they end up on the shell, the tablecloth and someone’s forehead.
Skip it if: The kid is under 5. This one needs more precision than the others and the ears are fiddly.
13. Monster Egg Hatchery
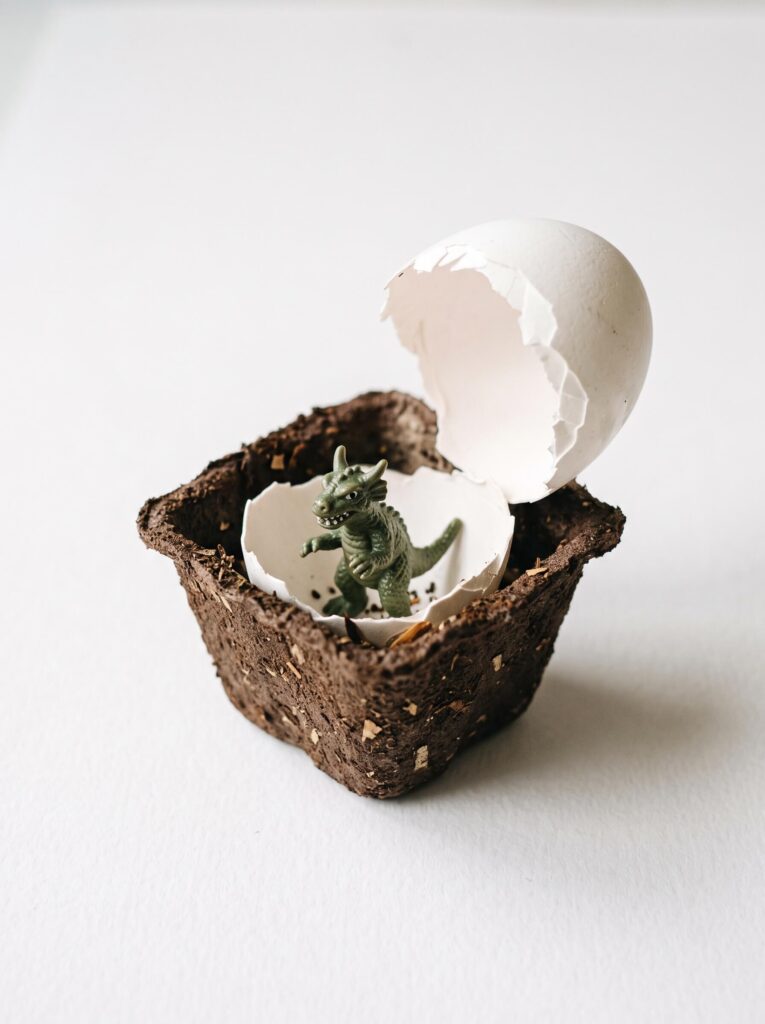
Use both halves. Set the bottom half in the cup and lean the top half against it at an angle, like a lid that has just been pushed off. One half on its own reads as a broken egg. Two halves read as something that hatched.
For the dirt, sprinkle dried-out coffee grounds or crumbled dry leaves into the brown paint while it is still wet. Paint alone cannot give you that texture. Just make sure the grounds are fully dry first, because damp ones will go moldy in the cup within a week.
Ages 5+ · Time 20 min · Mess medium · Supervision check in every few minutes · Egg cracked shell halves, rinsed and dried
You’ll need: Cracked shells prepped as described above, brown paint, dried coffee grounds, tacky glue, small plastic dinosaurs or monsters you already own.
Cheap swap: The toys are the point and you already have them in a bin somewhere. Crumbled dry leaves work as well as coffee grounds and cost nothing.
Make it:
- Paint the inside and rim of the cup brown, then sprinkle coffee grounds into the wet paint.
- Glue the plastic creature to the base of the cup first and let it set.
- Set the bottom shell half around it, working the shell down over the toy.
- Lean the top half against the side so it looks lifted rather than dropped.
What goes wrong the first time: Pressing the toy down into the shell after the shell is in place. The shell shatters into little tiles. Toy first, shell second, every time.
Skip it if: Under 5. Sharp shell edges plus small plastic toys is the wrong combination for a preschooler.
14. Zombie Brain Eggs
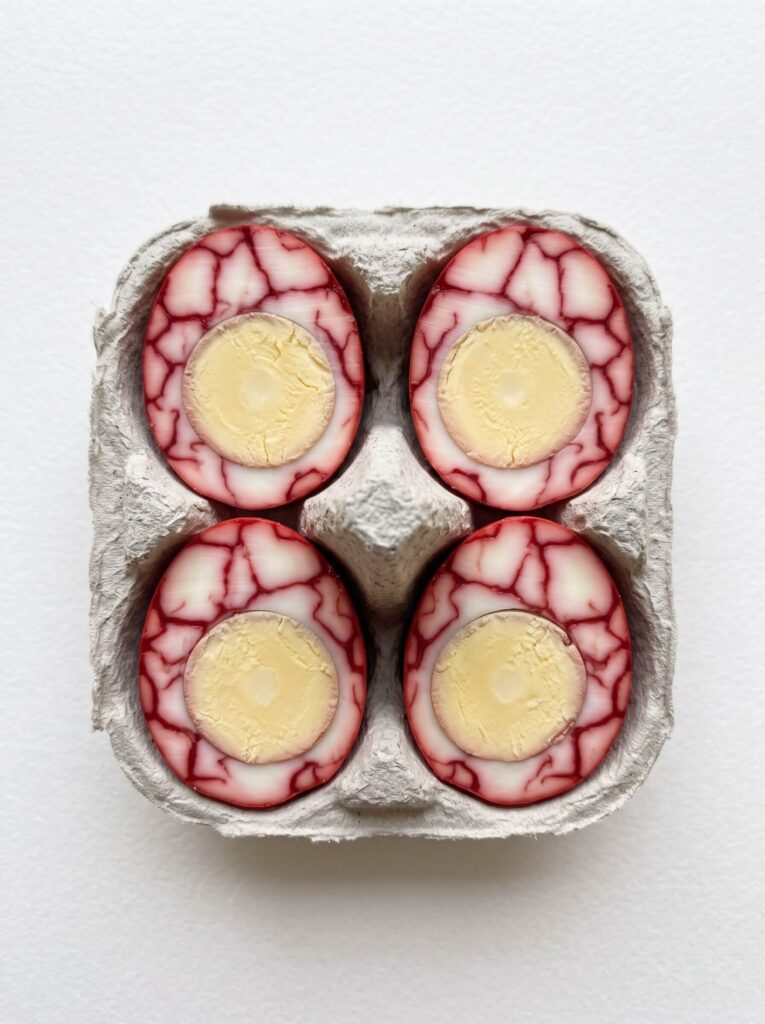
This is the craft people remember, and the original method will not work. Thirty seconds in dye gives you a plain pink egg. What you actually want is the marbled egg technique, and it needs time in the fridge.
Roll the boiled egg gently on the counter so the whole shell crazes into a mosaic of hairline cracks. Do not smash it. The shell should stay on. Then soak the unpeeled egg in cold water, food coloring and a tablespoon of vinegar, in the fridge, for at least four hours. Overnight is better.
The dye creeps into the cracks and marbles the white underneath while the yolk stays yellow. That contrast is exactly why a halved one looks like a brain.
Ages 8+ to make, 4+ to eat · Time 20 min of work plus overnight in the fridge · Mess medium, dye stains hands · Supervision adult boils and handles the dye · Egg boiled, food coloring only
You’ll need: Hard-boiled eggs, red food coloring (Wilton gel goes further than liquid), white vinegar, a disposable cup or glass bowl, a clean cut carton to serve in.
Cheap swap: The juice from a can of beets marbles beautifully and is food safe as it comes.
Make it:
- Boil and cool the eggs, then roll each one gently until the shell is crazed all over.
- Mix cold water, plenty of red coloring and a tablespoon of vinegar in a disposable cup.
- Soak the unpeeled eggs in the fridge, four hours minimum, overnight for real depth.
- Peel, halve a couple to show the marbling, and serve in clean cut carton cups within two hours of leaving the fridge.
Tip: A few drops of blue in the red gets you a darker, more vein-like tone. Red alone comes out crimson-pink, which is more strawberry than zombie.
Practical note: Eggs that have been in the fridge for about a week peel cleanest. Very fresh eggs tear and take chunks of white with the shell, which ruins the marbling you just waited all night for. Buy the eggs for this one early in the week.
What goes wrong the first time: Cracking too hard, so the shell falls away in the bowl and the whole egg dyes solid pink. You want hairline cracks, not fragments.
Skip it if: There is an egg allergy in the room. Egg is one of the top nine allergens in the US, so if this is going to a class party it needs a label, and check with the teacher first.
15. Autumn Night Owls
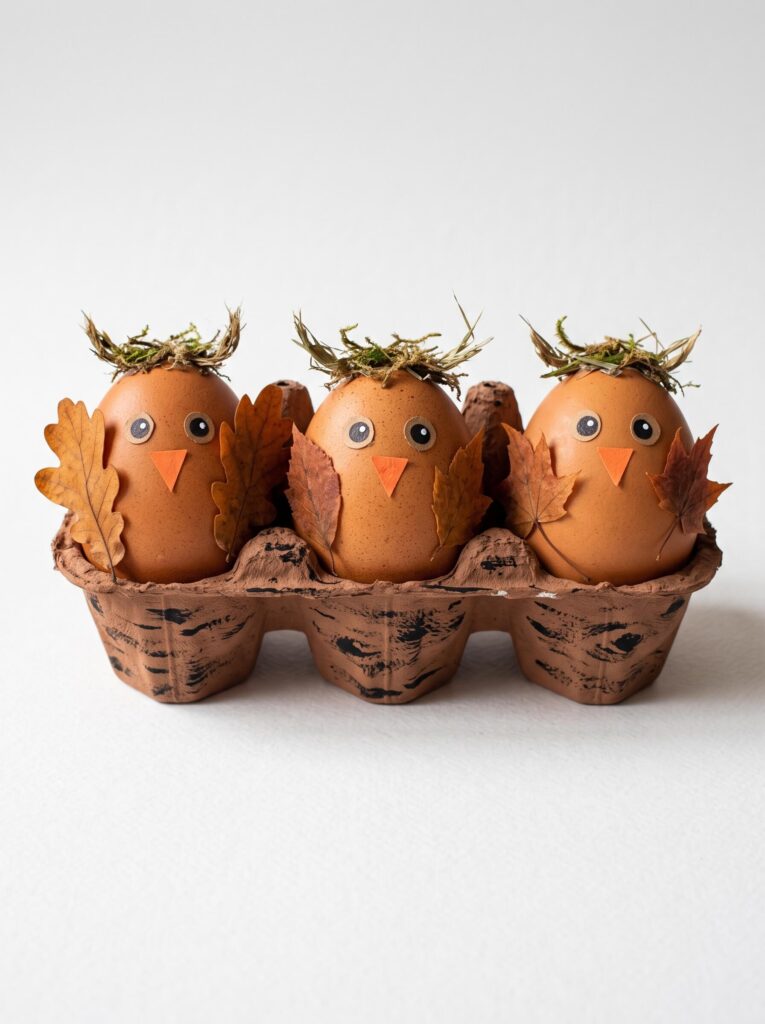
Press the leaves first. Fresh leaves off the lawn curl and go brittle within a day, so the wings crumble by morning. Twenty four hours between paper towels under a stack of books fixes it, or thirty seconds with an iron on low between two pieces of parchment.
For the face, put the eyes closer together than feels natural, with the beak triangle overlapping between them. Wide-set eyes read as a generic bird. Close-set with an overlapping beak reads as an owl immediately.
Ages 4+ · Time 25 min, plus 24 hours to press the leaves · Mess low · Supervision adult picks or checks the leaves · Egg boiled, or blown shell to keep
You’ll need: Brown paint or brown dye, pressed leaves, a row of three cups left attached, black and white paint or markers, tacky glue.
Cheap swap: Brown paper feathers cut from a grocery bag if there are no dry leaves, which is what you will end up doing if it has been raining all week.
Make it:
- Press the leaves the day before.
- Paint or dye the eggs a warm brown and let them dry in a spare carton.
- Paint the attached row of three cups brown, then dry-brush black along the ridges for bark.
- Glue a leaf to each side, then add two circle eyes and an overlapping triangle beak.
What goes wrong the first time: Gluing a flat leaf onto a curved shell. It only touches in the middle and peels off within the hour. Put glue on the center of the leaf only, hold for a full minute, or snip the stem and glue the stem to the shell so the leaf fans out.
Skip it if: You are sending kids out to gather leaves unsupervised. Poison ivy has turned red by October and still carries urushiol, which stays active on dead plants, so an adult picks or checks the pile.
Common Mistakes To Avoid
Every one of these is a mistake I have actually made at this table.
Painting eggs straight from the fridge. They sweat in about two minutes and every marker line smears sideways. Fifteen minutes on the counter and a dry wipe first.
One coat of black on a pulp carton. It looks like patchy grey and it is the main reason a finished craft does not match the photo you were copying. Three coats for black, two for everything else.
Using school glue on a curved shell. Elmer’s slides right off an egg. Tacky glue grabs in about a minute, and for shiny plastic eggs you need foam tape or a low-temp glue gun instead.
Boiling exactly twelve eggs. You will lose one or two to cracks in the pan or in a small fist. Boil fourteen.
Spray painting a foam carton. The propellant dissolves polystyrene, so you get a sagging melted mess in about four seconds. Foam cartons only get paper and markers.
Rushing the brain eggs. Thirty minutes in dye gets you a pale pink egg and a disappointed kid. It is an overnight craft or it is not that craft.
Letting the eggs dry in the carton you just painted. Wet paint bonds the two together and both come out marked. Dry the eggs in a spare carton, one per cup.
Serving the decorated eggs at snack time. Once there is marker or acrylic on the shell it is a decoration, and after two hours on the table it is trash regardless. Craft 14 is the only one that goes on a plate.
Read Next
If this list worked and you want the rest of the table covered, these two are the natural follow-ons.
Best Halloween Pumpkin Crafts For Easy Fall Decor is where I would go straight after craft 5, because the same paints are already open and the no-carve pumpkin ideas scale up to a whole table without another grocery run.
FAQs
Can you use real eggs for Halloween crafts?
Yes, and hard-boiled eggs give you a better painting surface than plastic ones. The catch is that a boiled egg is perishable, so USDA guidance puts a two hour limit on it at room temperature, and anything you want to keep should use a blown-out empty shell or a plastic egg instead.
How do you empty an egg without breaking the shell?
Pierce a small hole in the narrow end and a quarter inch hole in the fat end with a pushpin, break the yolk with a straightened paperclip, then push air through the small hole with a bulb baster or a plastic syringe. Never blow it out by mouth, since salmonella can be present on the shell itself.
Can you eat the eggs after decorating them?
Only if the only thing you put on them was food coloring, and only if they have been refrigerated and are served within two hours of coming out. Acrylic paint, permanent marker, glue and tape are not food safe, so those eggs are decorations.
How long do egg carton crafts last?
The carton part lasts for years if you keep it dry, and blown shells or plastic eggs will box up and come out again next October. Anything built on a boiled egg is a same-evening decoration.
What kind of paint sticks to eggshells?
Regular acrylic craft paint works well in two thin coats, and it grabs much better if you wipe the shell with a little white vinegar first to cut the natural oily bloom. A paint pen like a Posca PC-3M is easier than a brush on a curved surface, especially for kids.
What can I make with egg cartons for Halloween without any eggs? Plenty. The cups alone become bats, spiders and pumpkins, and the pointed posts between the cups make the best bat wings, witch hats and tombstones in the whole carton. Crafts 2, 9, 10 and 13 above all work with no real eggs involved.