
It was 10:15 on a Tuesday, the third wet morning that week, and the room had gone sour. Two children were fighting over the same plastic dinosaur. One was lying under the book corner, refusing to say why. I opened the back door, and within four minutes the same three were crouched over a puddle, arguing happily about whether it was deep enough to float a leaf.
I spend a lot of time outside with little ones, at home and with groups, and these 12 outdoor nursery activities have become my go to list for days when indoor walls start feeling too close. Fresh air changes everything for curious toddlers and preschoolers. They move more, notice more, and settle into play that actually sticks.
Below, every activity has what most lists leave out: the real age range, how long it takes including setup and cleanup, how messy it gets, how close you need to stay, and the thing that goes wrong the first time you try it.
I’m updating this in early autumn, which is the easiest outdoor season with this age group: puddles, leaf litter, busy bird feeders, and no burning hot slides. I’ve flagged where the season changes the plan, especially for the planting ideas.
Quick answer: The best outdoor nursery activities for toddlers and preschoolers are a nature scavenger hunt, a mud kitchen, sand and water play, chalk games, a mini obstacle course, and puddle jumping. Most cost nothing beyond items you already own, suit ages 2 to 5, and hold attention for 20 to 40 minutes. Water play needs an adult within arm’s reach at all times, and anything with small natural parts like pebbles and acorns needs close supervision for children under 3.
Why These 12 Outdoor Nursery Activities Made My List
I picked these because they work in real gardens, parks, and nursery yards without fancy gear. Most use sticks, mud, water, or chalk.
I tested them with groups of two to five year olds and watched what held attention longest. Sensory play, movement, and simple nature observation ranked highest. I left out anything that needed constant adult direction or an expensive kit.
These twelve keep children engaged while quietly building motor skills, language, and a feel for the outdoors. Every one of them has a free version, because a nursery budget and a household budget both have limits.
Scan this before you pick one. Times include setup, play, and tidying up.
| Activity | Best ages | Total time | Mess | Supervision |
|---|---|---|---|---|
| Nature Scavenger Hunt | 2 to 5 | 25 to 40 min | Low | Close under 3 (everything goes in mouths) |
| Mud Kitchen Adventures | 18 months to 5 | 45 to 75 min | High | Close under 2, then check ins |
| Sand and Water Play | 1 to 5 | 30 to 50 min | Medium | Arm’s reach for water, always |
| Bug Hotel | 3 to 5 (2 with help) | 45 min, then weeks of checking | Low | Close while building |
| Growing Vegetables and Flowers | 2 to 5 | 30 min, then 5 min a day | Medium | Close while planting |
| Birdwatching with Simple Feeders | 2 to 5 | 20 min to set up, 5 to 15 min watching | Medium, then none | Close while filling |
| Puddle Jumping | 15 months to 5 | 40 to 60 min with kit | High (wet) | Close |
| Mini Obstacle Courses | 18 months to 5 | 35 to 50 min | Low | Close |
| Chalk Games and Drawing | 18 months to 5 | 25 to 45 min | Low | Check in (constant near a driveway) |
| Leaf Printing and Nature Art | 2 to 5 | 40 to 55 min | Medium to high | Close |
| Outdoor Storytime | 18 months to 5 | 20 to 30 min | None | Light |
| Sensory Nature Walks | 18 months to 5 | 30 to 45 min | Low | Close |
Two things that apply to nearly everything on this list, so I’ll say them once rather than twelve times.
Sun, even on grey days. Sunscreen goes on about 15 minutes before you go out, and a stick formula is far easier on a wriggling face than a lotion. Add a hat and some shade. The American Academy of Pediatrics advises keeping babies under 6 months out of direct sun altogether.
Plants, berries, and fungi. Nothing unknown goes in a mouth, a pocket, or a mud pie. If you’re in a new space, walk it first and pull anything you can’t identify out of reach. In much of the US, poison ivy is the one to learn: leaves of three, let it be.
Best Outdoor Nursery Activities
1. Nature Scavenger Hunt
I hand out a short list of three or four things: a smooth stone, something yellow, a feather, a leaf bigger than a hand. Then I step back. Kids scatter. They crouch, pick up, hold items to the light, and argue gently over whether a stick counts as “interesting.”
Observation skills grow fast here. I once watched a quiet three year old fill a whole bag with bark pieces because the list said “something rough.” She sorted them later by size, and that focus stayed with her for the rest of the morning.
Lists that work, by age
| Age | What the list looks like | How many items |
|---|---|---|
| 2 to 3 | Pictures or colors you drew yourself, one per card | 3 |
| 3 to 4 | Simple pictures plus a word, sorted by texture or color | 4 to 5 |
| 4 to 5 | Words they can decode, or riddles (“something that crunches”) | 6 to 8 |
Keep it short for under threes or they wander off halfway. Older preschoolers handle longer lists and start inventing their own categories, which is when it gets good.
Tip: Draw the list yourself instead of printing one. A wobbly hand drawn feather takes two minutes and means children who can’t read yet are fully in the game.
Safety, specific to this one
- Feathers from the ground can carry mites and bacteria. In a group, I collect with a stick or a bag rather than bare hands, and everyone washes afterward. Some nurseries have a straight no feathers rule, which is fair.
- Pebbles, acorns, and seed pods are choking size for under threes. For that age, put collecting bags in adult hands.
- No berries and no mushrooms on any list, ever. Plenty of both are toxic, and a “collect something red” instruction is an invitation.
Paper bags or a dollar store bucket work for collecting, and an egg carton is the free swap that beats both. One compartment per item turns the whole thing into a sorting tray afterward.
It runs about 5 minutes to write the list, 15 to 30 minutes of hunting, and 5 minutes to sort what came back. Mess is low. Stay close with under threes, and check in every few minutes with four and five year olds.
The first time out, at least one child brings back nothing because they got absorbed in a single ant. Let them. A hunt that turns into ten minutes of watching one insect is a better outcome than a completed list.
Simple lists win every time.
2. Mud Kitchen Adventures
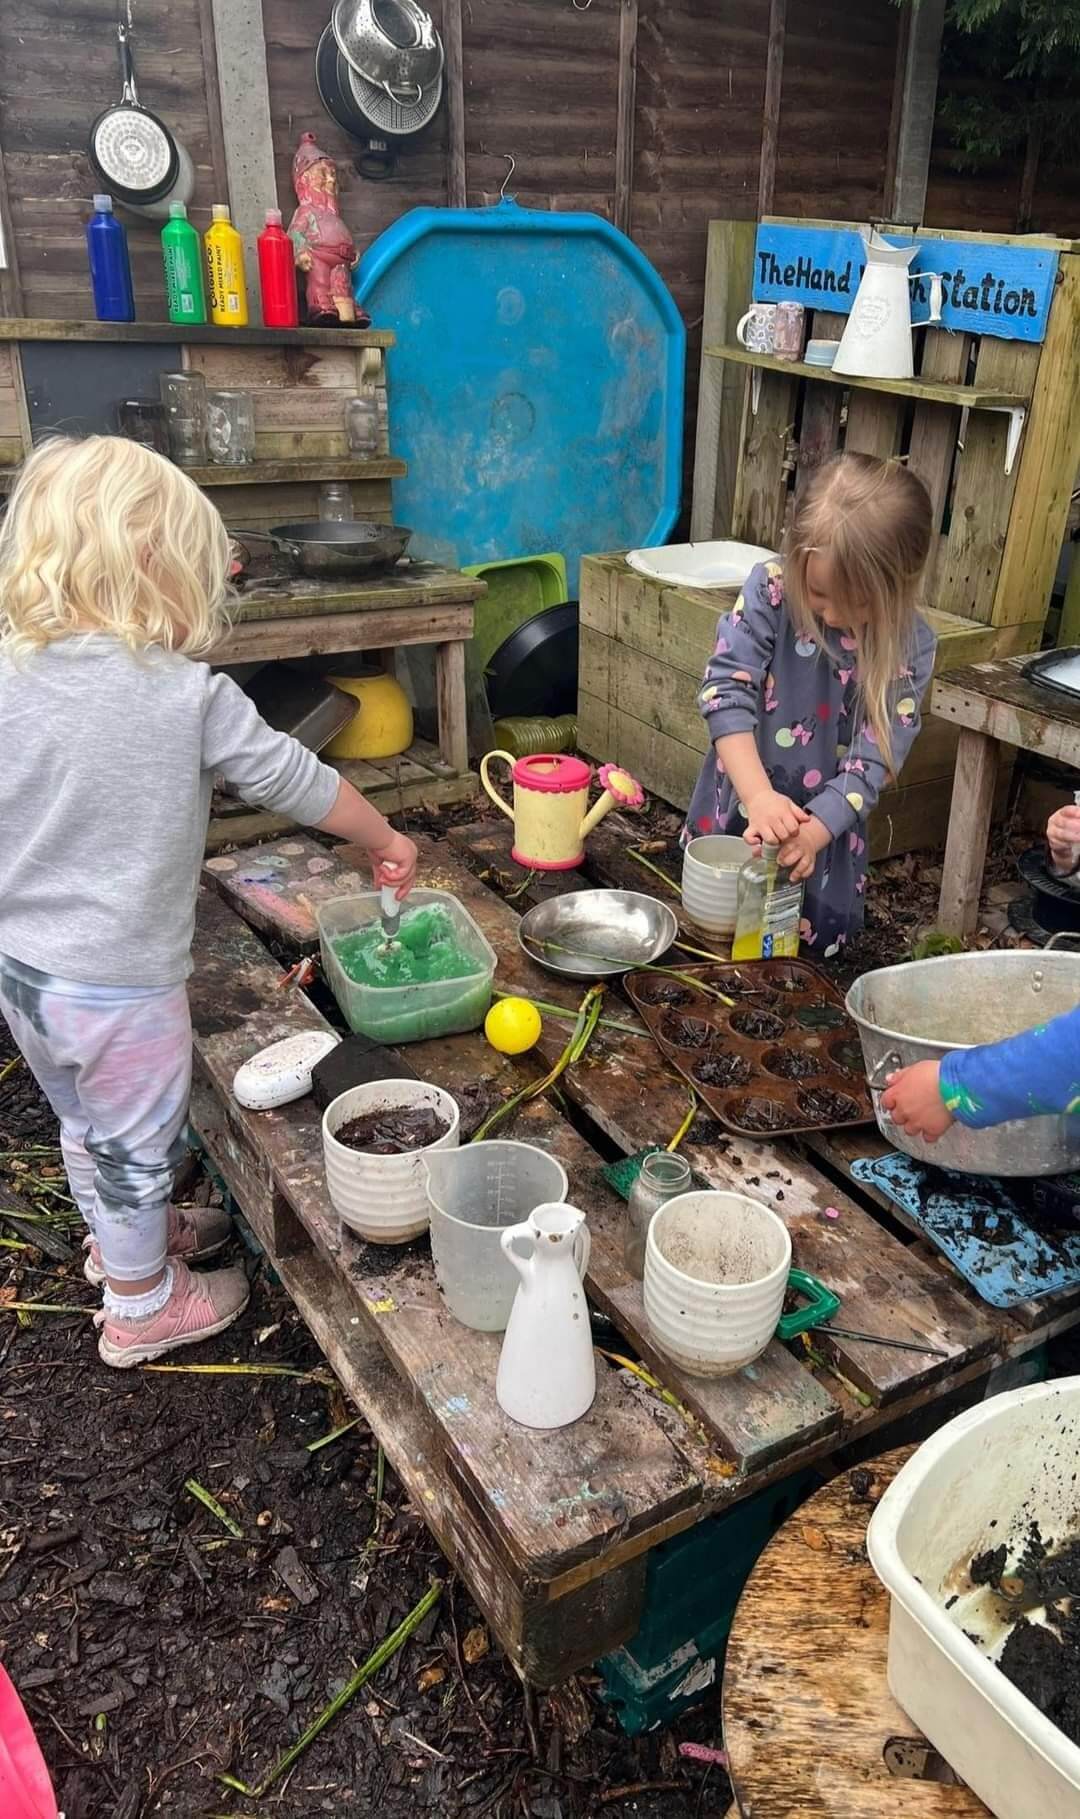
I set up a corner with old pots, wooden spoons, a few containers, and a patch of dirt that can take water. Kids mix, pour, decorate “cakes” with leaves and pebbles, and run imaginary cafés for half an hour straight.
Sensory and social play collide in the best way here. I remember one afternoon when two four year olds spent twenty minutes negotiating the price of mud soup. Words like sticky, pour, and share came out naturally because the play demanded them.
Kit list, with the free version
| What I use | Where it comes from | Free swap |
|---|---|---|
| Pots, pans, a muffin tin | Thrift store, Dollar Tree | Kitchen castoffs, yogurt pots |
| Wooden spoons, a whisk, a sieve | Dollar Tree | The rejects from your utensil drawer |
| A low counter | Secondhand play kitchen | A board across two crates, or an upturned box |
| Water | A jug or small watering can | A bucket and a cup |
| Toppings | The garden | Leaves, petals, grass, twigs |
Practical note: Your mud is only as safe as the ground it came from. Avoid anywhere pets or neighborhood cats use, beds that were fertilized or sprayed, and bagged potting mix with fertilizer beads mixed in. Nearly every child tastes the mud pie at least once, so use soil you’d shrug at, and wash hands with soap afterward. Hand sanitizer does very little on visibly dirty hands.
Setting it up
- Rake the patch first for glass, sharp stones, and litter.
- Set the counter at about waist height for the children using it.
- If you build from a wooden pallet, look for the HT stamp (heat treated), avoid any stamped MB, and sand the splinters off. That part is an adult job.
- Mix a starter batch in a bucket, roughly the thickness of brownie batter.
- Put out two of every popular item. There is always one utensil everyone wants (in my experience, the whisk), and one whisk means a dispute.
The trade off is clear. You will have muddy clothes and shoes. I keep a towel and a change of clothes ready, plus a bucket of clean water or a hose for a rinse before anyone goes back inside. Old clothes, a puddle suit, and boots make this painless. Brands like Muddy Puddles and Oakiwear do toddler sizes, and secondhand suits turn up constantly.
For stained clothes: let the mud dry completely and brush off as much as you can before it touches water, then pretreat with liquid detergent and wash cold. Hot water sets the stain.
Ages 18 months to 5 and up. For under twos, one bowl, one spoon, a small tray of mud, and you sitting right there, because that’s the age that eats it. For four and five year olds, add a chalk menu board and recipes (two scoops of dirt, one cup of water), and let them take your order.
Budget 10 minutes to set up the first time and 5 after that, 30 to 45 minutes of play, and 15 minutes of cleanup for children, pots, and clothes. Mess is high. In a group, three or four children per kitchen with a bowl each is about the limit before it turns into a scramble.
Sensory sensitive children often hate this at first. Start them with dry soil, a big spoon, and a sieve, or let them wear gloves. Some come round in a week. Some never do, and that’s a fine outcome too.
Mud kitchens turn dirt into stories.
3. Sand and Water Play
Practical note: The CDC reports that drowning is the leading cause of death for children ages 1 to 4, and it happens fast and silently, even in very shallow water. Stay within arm’s reach the whole time. Tip the tub out the moment you finish, every time, including when you’re only stepping away for a towel.
A sandpit or a large tub of water plus cups, funnels, and scoops keeps a group busy longer than almost anything else I’ve tried. Pouring, scooping, building, and watching water drain teach early science without a single worksheet.
I once left a group with a few kitchen utensils and came back to an elaborate system of rivers and dams they’d engineered themselves.
What goes in
- The container: a dollar store dish tub, an under bed storage box, or a builder’s tray. A proper water table is nice, not necessary.
- Pourers: cups, a jug, a funnel, a measuring cup. Free swaps: yogurt pots, a clean squeeze bottle, a colander.
- Squeezers: sponges for everyone, and a turkey baster for the four and five year olds, which is excellent for hand strength.
- A free rain maker: a plastic bottle with holes in the base. Poking the holes is an adult job.
Getting the sand right. Buy bags labelled play sand (Quikrete and Sakrete both sell it in hardware stores). It’s washed and finer than builder’s sand, which is coarser and dirtier. Cover the pit every single time you finish, because an uncovered sandpit becomes a cat toilet overnight. A fitted lid, a tarp weighed down with bricks, or a storage box with a lid all work. Rake through it before play anyway.
Two rules I set on the first day: sand stays low, and if it goes in someone’s eyes, we rinse with clean water and don’t rub.
Wet sand holds shape and dry sand pours, so put out both if you can. On hot days, damp sand is also cooler to sit in.
Getting home clean: sprinkle cornstarch on sandy hands and legs. It absorbs the moisture and the sand brushes straight off. Shake out shoes before anyone gets in a car.
Ages 1 to 5. Under 18 months, a shallow tray, one big scoop, and you beside them. Four and five year olds like a buried dinosaur dig (big figures only, nothing small for mixed age groups), tracing letters in wet sand, and sink or float predictions.
Setup is about 10 minutes, play runs 20 to 40, and packing away takes 10. Mess is medium, and wet clothes are guaranteed, so have a towel and spare clothes out before you start. In a group, use fresh water for each rotation, since shared water gets grim quickly and children do drink it.
Water also gets cold faster than children notice. Chattering teeth or blue lips means you’re finished, whatever they say.
This one earns its place through pure staying power.
4. Building a Bug Hotel
I gather sticks, leaves, cardboard tubes, and pinecones with the kids and stack them into a simple structure in a quiet corner. Then we wait and check back over days and weeks.
Autumn is a good time to build one, since plenty of insects are hunting for shelter before the cold sets in.
How we build it
- Pick a quiet spot, partly sunny, against a wall or fence.
- Raise it off the wet ground on a couple of bricks.
- Fill the frame (a small wooden crate, a stack of bricks with gaps, or a plastic bottle with both ends removed by an adult and the cut edges taped).
- Pack it tight with sticks, bark, dry leaves, pinecones, straw, hollow stems, and cardboard tubes. Cardboard goes soggy, so tuck it deep in the middle.
- Add a roof: bark, an old tile, or a flat board.
- Check every few days with eyes and a magnifier, never fingers.
Curiosity about living things grows without lectures. Children return to the hotel, peer inside, and report new visitors. One group I worked with named every beetle they spotted and kept a running tally on a stick with chalk marks.
Safety: Bees, wasps, and spiders like these spots too, so hands stay out, always. Wash hands after building. When you lift a log or stone to look for bugs nearby, lift the far edge first so it opens away from faces.
Everything here is free. A dollar store magnifying glass is the only thing worth buying, and even that is optional.
Ages 3 to 5, and two year olds happily poke sticks in with help. Gathering takes about 20 minutes, building 20 to 30, tidying 5, and then weeks of checking. Mess is low. Stay close during building and during every check.
It takes patience. Results aren’t instant, and some hotels stay quiet for a long while. For children who can’t stand waiting, pair each check with a two minute bug hunt under a nearby log so there’s always something to find.
Bug hotels turn waiting into discovery.
5. Growing Vegetables and Flowers
I give each child a small pot or a corner of a raised bed, a few seeds, and a child sized watering can. We plant together, then check daily for shoots.
Responsibility and life cycles become real when the first green tip appears. I still remember a little girl who refused to leave the garden until she’d watered “her” bean every single day for a week. The pride when it sprouted was pure.
What to plant, and what to watch for
| Plant | Why children like it | Watch out for |
|---|---|---|
| Radishes | Ready in about a month, and pulling them up is the best bit | They’ll pull early “to check,” so sow extra |
| Snap peas | They eat them straight off the plant | Needs something to climb |
| Sunflowers | Taller than the children, ideal for measuring | Seeds are a choking hazard for under threes |
| Cress or grass seed | Sprouts within days, indoors or on a step | Almost none, which is why it’s the best autumn pick |
| Nasturtiums | Bright, tough, and the flowers are edible | Only eat flowers you planted yourself |
Three safety points parents rarely hear:
- Big seeds are choking size for under threes. Keep the packet in your hand and pass them out one at a time.
- Seeds with a bright pink or blue coating are treated with fungicide. Keep those away from mouths entirely and wash hands afterward.
- Many bagged potting mixes contain slow release fertilizer beads, the little white or yellow balls that look exactly like sprinkles to a toddler. Choose a mix without added fertilizer for children’s pots.
Also worth knowing: foxglove, lily of the valley, oleander, and daffodil bulbs are all toxic if eaten, and they turn up in ordinary gardens. If you don’t know what’s already growing in your space, ask a local garden center before the children start digging.
Tip: Tape a photo of the grown vegetable to a craft stick as the plant label. Children who can’t read yet know exactly which pot is theirs, and the arguments stop.
A toddler trowel, gloves, and a watering can cost very little at Dollar Tree. Free swaps: a big kitchen spoon, yogurt pots with drainage holes (adult pokes them), egg cartons as seed starters, and a cup instead of a can. Give them a cup rather than a full can, or the first pot gets drowned within a minute.
Ages 2 to 5. Two year olds manage one pot, big seeds, and a daily water. Four and five year olds can measure growth weekly, keep a drawing journal, or count peas in a pod.
Planting day takes about 30 minutes, then roughly 5 minutes a day. Mess is medium at planting time. Stay close while seeds and soil are out, then supervision is light. Everyone washes hands after handling soil.
Weather slows things down, and some seeds fail. I treat that as part of the lesson rather than a failure. If you have children who need fast results, radishes and cress are your friends.
Watching something grow changes how kids see the ground under their feet.
6. Birdwatching with Simple Feeders
I hang a basic feeder or scatter seed on a clear tray and sit with the children at a distance. We watch who arrives, count visits, and sometimes sketch what we see.
Patience and close looking develop here. Birds come and go on their own schedule, and children learn to stay still and quiet if they want a better view. One quiet morning a group spotted three different birds and spent the next ten minutes comparing colors and sizes with no prompting from me.
Make a pinecone feeder in 15 minutes
- Tie string tightly around the top of a big open pinecone. Adults do the knot.
- Spread it with a nut free spread like SunButter, or plain vegetable shortening.
- Roll it in birdseed on a paper plate.
- Hang it where the children can see it and not reach it.
Allergies and hygiene, both non negotiable. Peanut butter is the classic recipe and a hard no in any nut free setting. Check the birdseed label too, since some mixes contain peanuts. And the CDC recommends washing hands after handling bird feeders and birdbaths, because wild birds can carry Salmonella. Children taste birdseed, so watch the rolling step closely.
Where to hang it: either within about 3 feet of a window or more than 30 feet away. Those two distances cut down on birds striking the glass. Somewhere visible from a window means you can watch on days nobody wants to go out.
Feeders need topping up regularly, and squirrels sometimes steal the show entirely. Still worth the small effort. Give the tray a rinse every week or two, since a dirty feeder spreads disease between birds.
Free props beat bought ones here. Toilet roll binoculars work far better than they should, and a picture tally chart with three common birds drawn on it lets a three year old “record data.” The free Merlin Bird ID app from the Cornell Lab names a bird from a photo or its song, which feels like magic to a four year old.
Ages 2 to 5 for making the feeder, and under twos are happy watching from a window on your lap. It takes 15 minutes to make, 5 minutes to sweep up spilled seed, then watching sessions of 5 to 15 minutes whenever you like. Mess is medium while making and none while watching. Stay close during assembly, light supervision after.
A new feeder can sit untouched for days while the birds find it. Say that out loud beforehand, or children decide the birds don’t like them.
Birds turn ordinary mornings into tiny events.
7. Rainy Day Adventures and Puddle Jumping
I send kids out in proper waterproofs and let them jump, splash, catch raindrops in buckets, and watch how the ground changes. Rain isn’t a reason to cancel outdoor time. It’s the activity.
Sensory play and resilience arrive together. The sound, the cold splash, the way mud forms underfoot, all of it registers differently than dry play. I’ve seen reluctant children turn into puddle experts after one good session.
The kit, and the free version
- Boots: Western Chief and Bogs both do toddler sizes, and secondhand pairs are everywhere. Free swap: old sneakers you’ve written off, with dry socks waiting.
- Waterproof layer: a puddle suit if you do this weekly. Free swap: old clothes and a guaranteed full change afterward.
- Thick socks: the single most important item on the list.
- A towel and dry clothes waiting by the door, not upstairs.
The mistake I made for a whole winter: tucking rain pants inside the boots. Every splash runs down the leg and fills the boot on the first jump. Pants go over the boots.
Rules before anyone jumps
- Poke the puddle with a stick first. Some are deeper than they look, and some hide glass or a pothole.
- No puddles near roads, parking areas, or storm drains. Water moving toward a drain can knock a small child off their feet.
- Thunder or lightning anywhere nearby means indoors, no negotiation.
- Red hands or chattering teeth means finished, even mid protest.
Ages: new walkers (around 15 months) up to 5 and beyond. Young toddlers do better stomping in shallow puddles holding your hand. Four and five year olds like measuring depth with a stick, floating leaf boats, biggest splash contests, and drawing a chalk ring around a puddle to see how much it shrinks by lunchtime.
Be honest about the time: 10 minutes getting kit on, 15 to 30 minutes of jumping, 15 minutes peeling off wet layers. Mess is high and entirely wet. Supervision is close, mainly for depth, roads, and drains.
The caveat really is clothing. Wet socks end the fun fast.
Rain becomes the invitation instead of the obstacle.
8. Mini Obstacle Courses
I use cones, hoops, cushions, or just chalked lines and natural logs to make a short course. Crawl under, jump over, balance along, step through. Children run it, then redesign it.
One preschooler who usually hung back on climbing tackled every section once she’d helped build the course herself. Ownership changed everything, so hand over the design as early as you can.
The same five stations at two levels
| Station | Toddler version (18 months to 3) | Preschool version (3 to 5) |
|---|---|---|
| Crawl | Through a big cardboard box | Under a blanket over two chairs |
| Balance | Along a chalk line | Along a plank laid flat on grass |
| Step | In and out of a hoop on the ground | Hop hoop to hoop, feet together |
| Climb | Over a folded blanket | Over two stacked cushions |
| Throw | Drop a ball into a bucket | Beanbag into a basket from a line |
Hoops and pool noodles are cheap at the dollar store. Free swaps: a garden hose laid out as a wiggly balance line, a laundry basket as the target, a delivery box as a tunnel, rolled towels as logs to step over.
Keeping it safe: build on grass rather than paving, keep everything below knee height for under threes, and check cushions and logs for dew before anyone climbs, because wet surfaces are slick.
Setup runs about 10 minutes, play 15 to 30, and packing away 10. Mess is low. Supervision is close at the balance and climbing stations.
Skip timers with under fours. Racing a clock at that age mostly produces tears. In a group, send children through one at a time with a few seconds between them, or they pile up at the crawl station and someone gets kicked.
Courses need adjusting for different ages and abilities, and every station should be one the child can actually finish. Frustration ends the activity faster than boredom ever does. Cautious children do best watching an adult crawl through the box first, then going through holding your hand.
Movement feels better when kids help invent the path.
9. Chalk Games and Drawing
I hand out chunky chalk and let children draw roads, hopscotch grids, shapes, numbers, or entire imaginary worlds on pavement or a wall. Rain cleans the slate for next time.
The temporary nature removes the pressure. Children try bigger ideas because nothing lasts. I watched a group invent a chalk town complete with traffic rules, then spend an hour enforcing them with total seriousness.
Games to layer on top of the drawing
- Jump to the blue circle, then the red one, then the biggest one.
- Walk the chalk line without falling off. Make it wiggly for older children.
- Drive toy cars along the roads they drew.
- Lie down and get traced, then swap. Expect seven fingers and excellent hair.
Tip: Dip the chalk in a cup of water first. The color comes out bright and creamy, and most of the dust disappears, which matters if you’ve got a child who coughs at dust.
If you use a driveway: park a car across the entrance or set out a cone, and tell every adult in the house that children are out there. A small child sitting on the ground is invisible from a driver’s seat. This is the only genuinely dangerous thing about chalk.
Crayola Washable Sidewalk Chalk in the chunky size suits small fists and snaps less than thin sticks. Dollar store chalk is fine too. Broken pieces shorter than a finger joint are choking size for under threes, so bin them.
The free swap is water painting: a cup of water and an old decorating brush. It marks dark on concrete and dries in minutes, and it’s the right version for under twos who still taste everything.
Ages 18 months to 5. Under twos need chunky chalk or water only. Four and five year olds draw shapes, their name, numbered hopscotch grids, and whole towns.
Setup is 2 minutes, play runs 20 to 40, and cleanup is a hose or nothing at all. Mess is low, though wet chalk marks light clothing more than dry.
Chalk works best on dry days and hard surfaces, and it disappears fast in enthusiastic hands, so stock up on colors.
Chalk turns the ground into a canvas that forgives mistakes.
10. Leaf Printing and Nature Art
We collect leaves of different shapes, paint one side, and press them onto paper. Sometimes we make collages with petals, twigs, and stones right on the ground for temporary art.
Children notice veins and edges they’d walked past a hundred times. One afternoon a child pressed the same leaf three times in different colors and declared it a family. That kind of storytelling sticks.
The detail that makes or breaks it: paint the underside of the leaf, where the veins stand out, and use a thin coat. A thick coat squishes into a blob with no detail at all, which is exactly what happens on most first attempts. Press with a clean sheet of paper on top and roll a hand over it rather than pushing straight down.
What you need
| Item | Free or cheaper swap |
|---|---|
| Washable paint (Crayola Washable Kids Paint) | Mud slip, or berry free natural dyes |
| Paper | Grocery bags cut flat, newspaper, old wallpaper |
| Brushes or sponges | Fingers, or a folded cloth for dabbing |
| A tray to work on | A baking sheet or a large box lid |
| Leaves | The ground, free, in unlimited supply |
Use paint labelled washable and non toxic. Crayola’s kids’ paints carry the AP seal, which matters with a group who will inevitably paint an arm. Some craft paints aren’t safe for skin contact, so check before you hand them over.
Collect fallen leaves only, and skip anything shiny and three leafed, since poison ivy leaves cause a rash even when the plant is dead. Thick, flat, fresh fallen leaves print best. Dry crumbly ones fall apart in your hand.
Wind steals light paper and light leaves, so weigh the corners with stones and pick a calmer day. Work on a tray if you can, and this is one to do in old clothes.
Ages 2 to 5. Two year olds are happiest just dabbing paint and pressing, with no interest in the result. Four and five year olds can make a repeating pattern, a printed card, or a full nature collage with petals and seeds (bigger pieces only if there are under threes nearby).
Collecting takes about 15 minutes, printing 20 to 30, and cleanup 10, including hands. Mess is medium to high, entirely paint based. Stay close, mainly to keep brushes out of mouths and paint off the good clothes.
Nature supplies the materials. Kids supply the ideas.
11. Outdoor Storytime
I take a favorite picture book outside, find a shady spot or a blanket under a tree, and read. Sometimes we act out parts with sticks and leaves as props.
Language and calm focus improve when the setting changes. Birds, wind, and distant sounds become part of the story atmosphere. Children settle differently outdoors, and I’ve finished entire books with groups who fidget constantly indoors.
The practical trick nobody mentions: sit with the sun behind the children and in front of you. The other way round, everyone squints at the page and the wriggling starts within a minute. Have them face into a hedge, a fence, or the quiet end of the garden so there’s nothing more interesting behind you.
What to bring
- A picture board book, because pages blow around in the slightest breeze.
- A blanket or a couple of towels. A cheap tarp underneath keeps damp ground out.
- Optional props: sticks, leaves, stones. Free and always to hand.
Choose shorter or familiar books on breezy days, and take a book you already know well, so you can keep reading while a child wanders off and comes back.
Ages 18 months to 5. Under twos manage about 5 minutes, and that counts. Four and five year olds can act out scenes, hunt for a prop for each character, or retell the story to you afterward.
It takes 5 minutes to set up, 15 to 20 minutes of reading, and 5 to pack up. There’s no mess. Supervision is light.
Weather and noise interrupt, sometimes constantly. A leaf blower two gardens over ends a session, so I keep a second activity in my back pocket rather than fighting it. This one also won’t suit a child who’s still running on full energy. Put it after the obstacle course, never before.
Stories feel bigger when the sky is the ceiling.
12. Sensory Nature Walks
We walk slowly and stop often. What do you hear? What can you smell? What does this bark feel like? Bare feet on grass when it’s safe. Eyes closed for a moment to listen harder.
Sensory awareness and vocabulary expand because the world provides the prompts. Children describe textures and sounds they’d skip past at normal walking speed. One group spent five full minutes just listening to leaves after I asked them to close their eyes.
Prompts that actually get answers
- Find something rough and something smooth. Which do you like holding?
- Close your eyes. How many different sounds can you count?
- Smell this leaf. Does it smell like anything in the kitchen?
- Walk like the quietest animal you can think of.
- Find the coldest thing you can touch.
Tip: Set the distance at about 20 steps of path and plan on 30 minutes. Sensory walks are slow by design, and the pressure to reach a destination is what ruins them.
Safety before you set off
- Walk the route first, scanning for glass, sharp sticks, dog mess, and wasp nests.
- For bare feet, check the grass with your own hand first. Bare feet only on ground you’ve checked, never on unknown grass or near a path.
- Do a tick check afterward if you’ve been in long grass or woodland: hairline, behind the ears, behind the knees, and the waistband.
- Nothing goes in mouths, and everyone washes hands at the end.
Everything here is free. A magnifying glass and a blindfold are nice extras, and a bag for treasures is optional (an egg carton again, if you want the sorting).
Ages 18 months to 5. Toddlers do best with one prompt at a time and a very short route. Four and five year olds can lead the walk, collect for a texture chart, or make a sound map by drawing what they hear.
It’s 5 minutes of route checking, 20 to 30 minutes of walking, and 5 minutes of hand washing. Mess is low. Supervision is close throughout.
Some children find this boring within two minutes, and that’s a real outcome, not a failure. Give them a job: chief listener, path leader, or the one carrying the collection bag.
Slow walks teach kids to notice what is already there.
How to Choose Among These Outdoor Nursery Activities
I match the activity to the energy in the room and the weather outside.
| Right now it’s | Reach for |
|---|---|
| High energy, dry | Obstacle course, chalk games |
| High energy, wet | Puddle jumping, mud kitchen |
| Quiet and settled | Outdoor storytime, birdwatching, bug hotel check |
| Hot and bright | Sand and water in the shade |
| Mixed ages together | Scavenger hunt, mud kitchen, sand and water |
| Everyone frazzled, including you | Sensory nature walk |
Common mistakes I still catch myself making: over planning the materials, expecting every child to love the same thing, and giving up too soon when the first five minutes look chaotic. Most of these need a settling period. Let that happen.
A few more first timer mistakes worth naming, because I made all of them:
- Telling them not to get dirty while handing them a mud kitchen. Designate outside clothes and drop it.
- Leaving a water tub full “for later.” It’s the most dangerous thing on this list and takes four seconds to tip out.
- Doing sunscreen at the door, when they’re already halfway out. Put it on before shoes.
- Buying the big kit first. Try every idea with tubs, boxes, and old pots for a few weeks, then buy only what they actually keep returning to.
- Fixing their work. Straightening the bug hotel or repositioning the leaf print takes the project away from them, every time.
Keep materials where you can grab them. My “go outside” box by the door holds chunky chalk, a decorating brush for water painting, old cups and a sieve, a magnifying glass, a stick of sunscreen, and a spare set of clothes in a bag. Setup time is the real barrier to getting out, and that box removes most of it.
If I had to pick only three for a brand new outdoor space, I’d start with a mud kitchen corner, a simple sand or water setup, and regular scavenger hunts. Those three cover sensory, motor, social, and observation skills with almost no ongoing cost. The rest build out from there once the children show you what they reach for most.
Rotate seasonally. Leaves and seeds change. Rain becomes a feature instead of a problem. Birds visit feeders more in winter. The list stays useful all year because the outdoors keeps offering new versions of the same invitations.
Frequently Asked Questions
What is the best outdoor nursery activity for beginners?
Start with a short nature scavenger hunt or simple chalk drawing. Both need almost no setup and let you watch how the children respond before you commit to anything bigger.
How do I keep 12 outdoor nursery activities fresh for the same group of children?
Change one small element each time. New list items for the scavenger hunt, different seeds for planting, or a rearranged obstacle course. Children notice the variation and treat it as new.
Do these activities work in small outdoor spaces?
Yes. Most adapt to a courtyard, a small garden, or a paved area with a few tubs and a planter. Focus on portable versions like water play in containers, leaf printing on a tray, and chalk games.
What should I watch out for with safety?
Stay within arm’s reach of any water, however shallow, and tip containers out immediately afterward. Then scan for sharp objects, check plants for anything toxic, keep small natural parts away from under threes, and wash hands with soap after mud, sand, soil, and bird feeders.
How often should outdoor nursery activities happen?
Daily when you can. The WHO recommends that children ages 1 to 4 spend at least 180 minutes a day being physically active, and outdoor play is the easiest way to get a big share of it. Even twenty to thirty minutes of focused outdoor time counts, and consistency matters more than perfect conditions.
Read next: On days when the weather really does win, 10+ Indoor Physical Activities for Kids That Burn Energy Fast keeps the same children moving indoors. And since autumn walks fill everyone’s pockets with leaves, sticks, and conkers anyway, is where all that collecting ends up.
I keep returning to these twelve because they deliver what little children actually need: space to move, materials that respond, and time to notice the world without rushing. The learning sneaks in while they’re busy being kids.
Pick one for tomorrow morning, put whatever it needs by the back door tonight, and let the first five minutes look messier than you’d like.
SEO Notes
[EDITOR: remove this section before publishing]
Optimised title (SEO title tag): 12 Outdoor Nursery Activities Toddlers and Preschoolers Love
(The on page H1 and every H2 and FAQ heading are kept exactly as your original, so the primary keyword sits in the H1, the quick answer, the first 100 words, two existing H2s, and the body copy rather than in added headings. The title tag runs 58 characters.)