

The best bottle cap crafts for wall art are tightly packed mosaics (hearts, sunflowers, rainbows, animals) glued edge to edge on wood or doubled cardboard, plus quick wins like photo magnets, cap flower garlands, and mirror borders. Plan on roughly 100 to 120 caps per square foot, use E6000 or screws for anything heavy or outdoors, and keep hot glue for light indoor pieces. Most of the 20 projects below take one afternoon plus an overnight cure, and only three require putting holes in caps.
There’s a coffee can on the shelf above my workbench that rattles every time the garage door goes up. It’s been filling with bottle caps for about four years: root beer caps from a neighbor who homebrews, blue water bottle caps from my nephew’s soccer games, and a handful of gold caps I talked a wedding bartender into saving.
Every project in this roundup came out of a can like that. Some took a Saturday afternoon. The heart panel took three weekends, because I kept running out of red.
Below you’ll find 20 bottle cap crafts with real cap counts, the glue I’d actually use for each, what kids can help with, and what tends to go wrong the first time. Each one has a skill and time rating, because a fridge magnet and a drilled drawer cabinet are not the same kind of weekend.
It’s October as I update this for 2026, so I’ve added a bonus pumpkin panel near the end for anyone looking for Halloween crafts with cardboard that use up a cap stash instead of another trip to the craft store.
Before You Start: Caps, Glue, and What Actually Holds
Two things decide whether bottle cap art lasts: what kind of caps you’re using and what’s holding them down. Get those right and the design part is the fun bit.
Metal Crown Caps Vs Plastic Screw Caps
Metal crown caps (beer, glass bottle soda) are about 1¼ inches across with 21 crimped teeth around the rim. Every standard crown cap has 21, and once a cap has been pried off and bent, those teeth are sharp. They also rust outdoors unless you seal them.
Plastic screw caps (water, milk, juice, plastic soda bottles) have no sharp edges and never rust. The catch is that most are polyethylene or polypropylene, plastics that a lot of glues barely grip.
Don’t mix the two in one mosaic unless you mean to. They’re close in size but not the same height, and the difference shows up as a bumpy surface the moment light hits the panel from the side.
Where To Get Caps (Free First)
- Bars and breweries. Ask them to save a bucket for a week. Most will, and you’ll get more caps than you can use.
- Homebrewers and neighbors. A quick post in a neighborhood group usually turns up someone with a jar.
- Your own recycling. Milk jugs give you blue, red, and green. Juice bottles cover orange and yellow. Water bottles are mostly blue and white.
- Bought new. Homebrew supply shops sell blank crown caps in solid colors, usually under $10 for a bag of 144. Worth it when you need 40 identical yellows for a sunflower.
Wash every cap before it goes near a project. I soak mine for 20 minutes in hot water with a squirt of dish soap and a splash of white vinegar, scrub with an old toothbrush, then dry them upside down on a towel overnight. Beer caps stored damp smell sour within a week and start rusting under the liner.
Supplies And Cheaper Swaps
| Item | What I use | Free or low cost swap |
| Backing board | Cedar fence picket, a few dollars at a home improvement store | Pallet wood stamped HT (skip anything stamped MB), or two layers of corrugated cardboard |
| Sorting | Old 12 cup muffin tin | Egg cartons |
| Flattening bent caps | Rubber mallet | A block of scrap wood and any hammer |
| Paint for plastic caps | Krylon Fusion spray (bonds to plastic) | Acrylic paint over caps scuffed with 120 grit sandpaper |
| Outdoor sealer | Krylon UV Resistant Clear | Skip it for indoor pieces |
| Hanging | D rings and picture wire | Twine looped through two screws |
| Hand protection | Nitrile gloves plus thin work gloves | Old dish gloves |
Which Glue For Which Job
| Adhesive | Best for | Set time | Watch out for |
| High temp hot glue | Light indoor pieces, plastic caps, quick layouts | Under a minute | Lets go in a hot car or a cold window; leaves strings everywhere |
| E6000 | Metal caps on wood, glass, mirrors | Grabs in hours, full cure in 24 to 72 hours | Strong solvent fumes, so ventilate and glove up |
| Aleene’s Original Tacky Glue | Cardboard backings, projects with kids | Overnight | Indoor only; caps slide if the board stands up before it grabs |
| Loctite PL Premium construction adhesive | Fence and garden pieces | Give it a full day before hanging | Messy and close to impossible to undo |
| Screw through the cap center | Outdoor wood panels | Instant | Needs a hole; use stainless or galvanized screws or you get rust streaks |
One more thing on plastic caps: scuff the back of each one with 120 grit sandpaper before gluing. It takes ten seconds a cap and the bond is noticeably stronger.
Practical note: If a piece is going outside, don’t trust glue alone. A small stainless screw through the center of each cap is what keeps a fence piece intact through a windy winter. I learned that by picking half a dragonfly wing out of my lawn.
Safety, Mess, And Who Can Help
Most of these projects are low risk, but bottle caps aren’t a toddler craft by default. Sharp metal rims, solvent glues, and drilling all show up somewhere in this list, so here’s what matters for this medium specifically.
For the adult doing the tool work
- Solvent glues. E6000 and construction adhesive give off strong fumes. Work outside or next to an open window with a fan pushing air out, wear nitrile gloves, and let finished pieces cure in the garage, not a bedroom.
- Holes in caps. Never hold a cap with your fingers while drilling. A cap that catches the bit spins like a tiny saw blade. Clamp it or grip it with pliers on a scrap block, dimple the center with a nail first so the bit doesn’t skate, and wear safety glasses for the metal flecks.
- Hot glue. High temp guns are hot enough to blister skin. Keep a bowl of cold water on the table and use a low temp gun for anyone under 12.
- Crimped edges. Wear thin work gloves when flattening or sorting bent metal caps. A nail file takes the burr off any cap that will be handled a lot.
- Spray sealers and paint. Spray outdoors only. If you seal a lot of pieces, an organic vapor respirator is worth the money.
- No real candles near caps. Plastic softens and wood scorches faster than you’d expect. Battery tea lights only.
If kids are helping
- Under 3: Skip it. Caps are right around the size that counts as a choking hazard.
- Ages 4 to 7: Sorting colors and pressing plastic caps into tacky glue on a cardboard shape you’ve drawn. The rainbow, balloon board, and pumpkin are built for this.
- Ages 8 to 12: Low temp glue gun with you sitting next to them. Garlands, magnets, bouquets, and most panels.
- Teens: Nearly everything, including E6000 outside with gloves. Show them the drilling setup once before they try it.
One specific warning on magnets: small, strong neodymium magnets can cause serious internal injuries if a child swallows more than one. Keep loose magnets in a closed jar and glue them in completely.
Mess level: low to medium. The mess is mostly glue strings and the one cap that rolls under the fridge. A flattened box under your work area and a muffin tin for sorting keep it contained.
All 20 Bottle Cap Crafts at a Glance
Pick by skill, time, and how many caps are sitting in your can right now. Cap counts assume standard 1¼ inch caps and include no spares, so add about 20 percent.
| # | Project | Skill | Active time | Caps needed | Kids can help? |
| 1 | Blue crescent cap wall panel | Intermediate | 2 hrs + overnight cure | About 60 | Teens |
| 2 | Bottle Cap Fish Wall Art | Beginner | 1.5 hrs + overnight cure | About 70 | Ages 8+ |
| 3 | Sunflower Bottle-Cap Relief Panel | Beginner | 1.5 hrs | About 55 | Ages 6+ |
| 4 | Rainbow Cap Arch Cloud Wall | Beginner | 2 hrs + overnight dry | About 110 | Ages 4+ |
| 5 | Heart-shaped bottle cap wall art | Intermediate | 3 to 4 hrs | About 110 | Ages 8+ |
| 6 | Bottle-Cap Dragonfly Wall Art | Intermediate | 3 hrs | About 80 | Adults (outdoor mounting) |
| 7 | Green cap tree plaque | Beginner | 1.5 hrs | About 50 | Ages 6+ |
| 8 | Butterfly Cap Wall Art | Intermediate | 2.5 hrs | About 80 | Ages 8+ |
| 9 | Colorful Balloon Cap Board | Beginner | 1 hr | 12 to 15 | Ages 4+ |
| 10 | Colorful Hanging Cap Strands | Intermediate | 3 hrs | About 60 | Teens |
| 11 | Bottle-Cap Mirror Border | Beginner | 1.5 hrs + 24 hr cure | 33 to 70 | Adults (glass, E6000) |
| 12 | Bottle Cap Garland Flowers | Beginner | 2 hrs | About 42 | Ages 8+ |
| 13 | Colorful flower wreath ring | Beginner | 2 hrs + paint dry | About 70 | Ages 8+ |
| 14 | Bottle cap wind chime | Intermediate | 2.5 hrs | About 36 | Teens |
| 15 | Photo Magnets on Fridge | Beginner | 1 hr for 12 | 1 per magnet | Ages 8+ (adult handles magnets) |
| 16 | Bottle-Cap Mushroom Garden | Beginner | 1.5 hrs | 5 to 7 | Ages 6+ |
| 17 | Vintage Cap Drawer Cabinet | Intermediate | 2 hrs + overnight cure | 1 per drawer | Adults (drilling) |
| 18 | Bottle Cap Flower Bouquet | Beginner | 1.5 hrs | About 35 | Ages 8+ |
| 19 | Cap Flower Candle Trays | Beginner | 1 hr per tray | About 20 per tray | Ages 8+ |
| 20 | Bottle Cap Pumpkin on Cardboard | Beginner | 1 hr + overnight dry | About 45 | Ages 4+ |
Bottle Cap Wall Art: Mosaics and Panels
These nine pieces are flat panels that hang on a wall. They all follow the same logic: draw the shape, dry fit every cap, photograph the layout, then glue.
1. Blue Crescent Cap Wall Panel
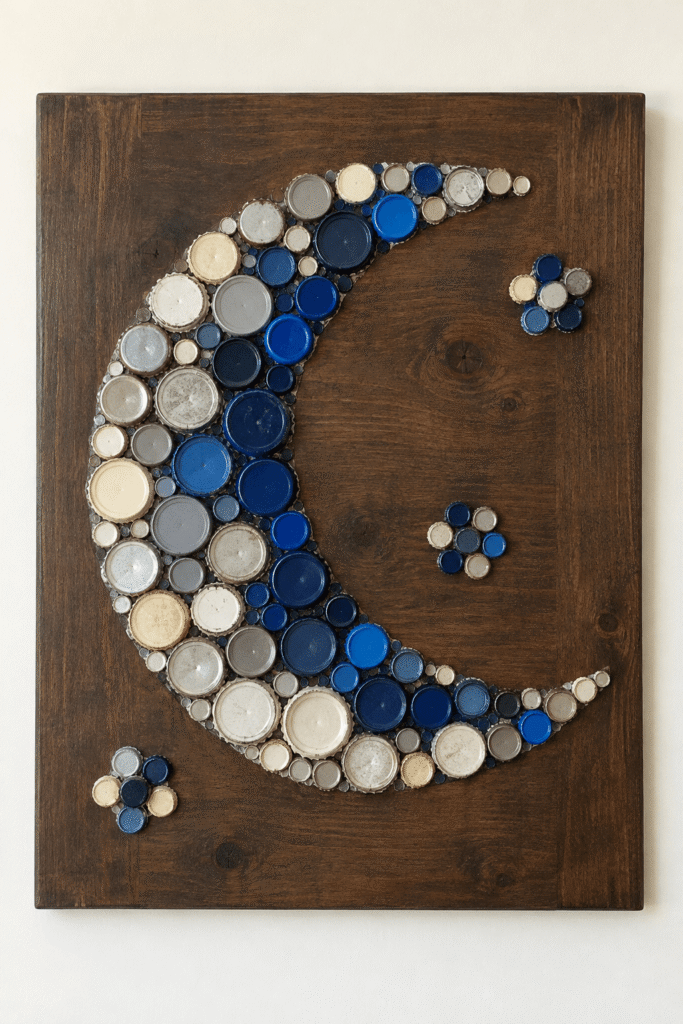
This crescent gets more comments than anything else in my hallway, mostly because a moon is such an unexpected shape for bottle caps. Blue, cream, gray, and silver caps fill the curve, and small flower clusters around the outside keep it from looking like one heavy blue banana.
The dark wood background does a lot of the work. I tried a test version on pale pine and the silver caps nearly disappeared.
Skill: Intermediate | Time: about 2 hours plus an overnight cure | Caps: around 60 for a 14 inch crescent
What You Need
- Dark wooden panel (any scrap board plus a few dollars of dark walnut stain)
- Assorted bottle caps in blue, cream, gray, and silver
- Small round caps for accent clusters (water bottle caps work since they run slightly smaller)
- Strong adhesive (E6000 for metal caps)
- Chalk or a white charcoal pencil
How to Make It
- Trace a dinner plate on the board, then trace a salad plate overlapping it. The crescent is the part of the big circle the small one doesn’t cover.
- Arrange caps along the crescent outline first, outer curve before inner curve.
- Fill the crescent with layered caps of mixed sizes and colors, keeping the darkest blues along the inner curve so it reads as shadow.
- Add a few tiny cap flowers outside the curve: one center cap with five or six small caps around it.
- Photograph the dry layout, then glue section by section and let it cure flat.
What goes wrong on a first try: The tips. Two full size caps can’t make a sharp point, so I finish each tip with one smaller water bottle cap. From across the room it reads as a point. Handle metal rims carefully during layout and press every cap once more before hanging.
2. Bottle Cap Fish Wall Art

A fish shaped frame does the hard part for you. The outline is already there, so you’re only filling a shape, which makes this one of the easiest bottle cap crafts to get right on the first attempt.
Cool blues and greens make the body feel watery, and a single red cap near the head becomes the eye. That one red cap is what people notice first.
Skill: Beginner | Time: 1.5 hours plus an overnight cure | Caps: about 70 for a 24 inch fish
What You Need
- Bottle caps in cool colors
- Wood frame cut in a fish shape (I cut mine from ¼ inch plywood with a jigsaw and edged it with thin trim; doubled cardboard works for a kid’s room)
- Red cap for the eye
- Glue (hot glue for plastic caps indoors, E6000 for metal)
- 120 grit sandpaper
How to Make It
- Sand the frame edges, especially the tail point, which loves to splinter.
- Start filling at the head and work toward the tail. The tail is where caps won’t quite fit, and squeezing them there is less noticeable.
- Place the red eye cap near the head, leaving a sliver of space around it so it stands apart.
- Glue everything, then let it cure flat overnight before it ever hangs vertically.
Tip: Shift each row by half a cap, like bricks. Straight grid rows leave square gaps that look like missing teeth.
3. Sunflower Bottle-Cap Relief Panel

This is the project I’d hand to anyone new to bottle cap art. A sunflower forgives everything. If one petal cap sits crooked, it just looks like a real petal.
The trick I figured out on my first one: round caps pack naturally in rings of six. One cap in the middle, six around it, then twelve around those gives you a tidy 19 cap center every single time.
Skill: Beginner | Time: about 1.5 hours | Caps: about 55 (19 dark, 18 to 24 yellow, 10 to 12 green)
What You Need
- Yellow bottle caps (orange soda and lemon soda caps, or plastic caps sprayed with Krylon Fusion)
- Dark brown or black bottle caps (root beer and stout caps are ideal)
- Green bottle caps (lemon lime soda and some milk jug caps)
- Wood plank backing (a fence picket is the right width)
- Adhesive for caps (E6000)
How to Make It
- Build the dark center in rings: 1 cap, then 6, then 12.
- Surround the center with a ring of yellow petal caps. For more depth, glue a second partial ring of yellows tucked slightly under the first so the petals overlap.
- Add green caps below in two short diagonal lines for leaves, with a straight line between them for the stem.
- Glue every cap firmly and let it cure flat. Check that your adhesive is rated for wood, and keep fingertips off sharp metal rims.
Where it goes wrong: Running out of one color halfway around. Count your yellows before you start. A sunflower with three random orange petals looks like a mistake, but one with yellow and orange mixed evenly all the way around looks planned.
4. Rainbow Cap Arch Cloud Wall

A rainbow is the easiest bottle cap wall art to read from across a room, because the color bands do all the work. White yarn clouds at each end soften the hard round edges.
This is also the one I’d pick if kids are helping. I drew the arcs on cardboard and my niece pressed caps into tacky glue one band at a time.
Skill: Beginner | Time: 2 hours plus overnight drying | Caps: about 110 for a 20 inch arch with six bands
What You Need
- Bottle caps in rainbow colors (purple is always the hardest to find, so plan on painting a few)
- White yarn or roving for clouds (cotton balls work as a free swap)
- Cardboard or wall backing: two layers of corrugated cardboard glued with the ridges running crosswise. It’s the same trick I use for Halloween crafts with cardboard, because a single layer bows within a week under this many caps.
- Glue (Aleene’s Tacky Glue for plastic caps on cardboard, hot glue for metal)
- String and a pencil for drawing arcs
How to Make It
- Tie the string to the pencil, hold the other end at the bottom center of the board, and draw six arcs about 1¼ inches apart.
- Lay out the caps in curved color bands, starting with the outer red band.
- Glue one band at a time and give each about 10 minutes before starting the next, so elbows don’t nudge it.
- Glue loops of white yarn or roving into a puffy pile at both ends for clouds.
- Hang with a sawtooth hanger glued and taped to the back, or a secure hook for heavier metal cap versions. Keep loose small parts away from young children.
Practical note: Draw the arcs before you sort a single cap. A rainbow with wandering bands looks off no matter how good the colors are, and a string compass takes two minutes.
5. Heart-shaped bottle Cap Wall Art
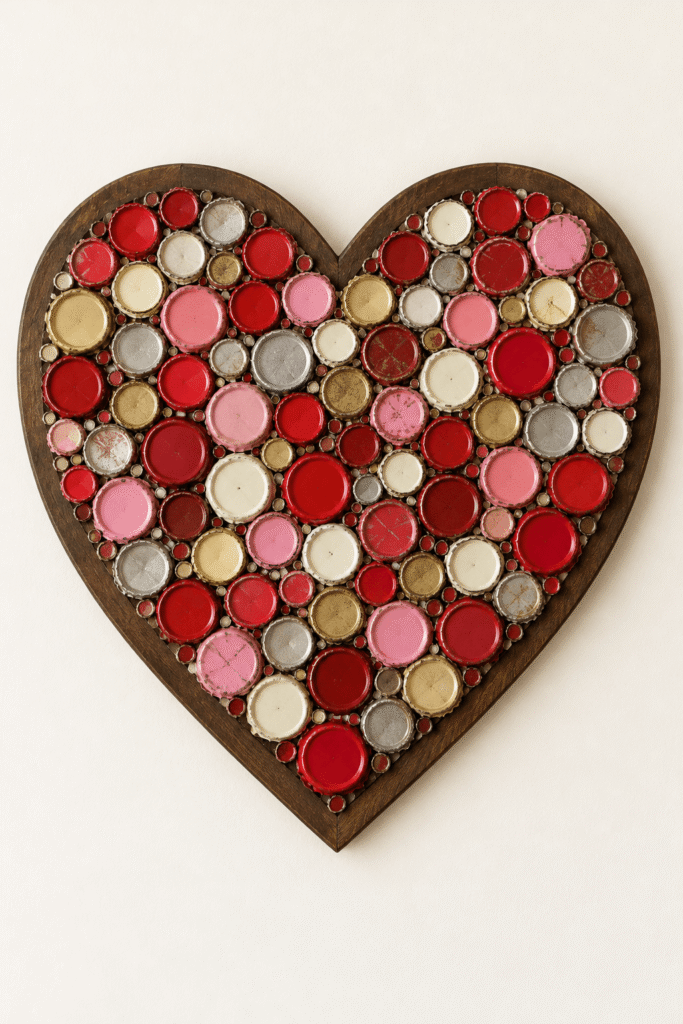
My heart panel was the first piece of bottle cap art I ever finished. It took three weekends and about 110 caps in red, pink, white, silver, and gold, packed so tight you can barely see the wood.
The dark wooden border is what makes it look finished. Without one, the edge caps look like they’re about to slide off the shape.
Skill: Intermediate (the edges take patience) | Time: 3 to 4 hours plus an overnight cure | Caps: about 110 for a 16 inch heart
What You Need
- Heart shaped wooden frame or board (cut from plywood, or a ready cut craft store heart)
- Assorted bottle caps in red, pink, white, silver, and gold tones
- Strong adhesive (E6000)
- Dark stain or thin trim for the border
- D rings and picture wire
How to Make It
- Start in the center of the heart and work outward. The edges are where caps won’t fit perfectly, and that’s where you want to do your improvising.
- Fill the heart in a tight mosaic, mixing tones so two of the same color rarely touch.
- Glue caps edge to edge until the surface looks full. Fill leftover slivers at the border with smaller water bottle caps.
- Hang it with D rings and wire rather than a single sawtooth. A hundred metal caps plus a board is heavier than it looks.
Trade off: Mixing colors takes far longer than blocking them. Sorting into a muffin tin before I started saved me about an hour on my second heart.
6. Bottle-Cap Dragonfly Wall Art
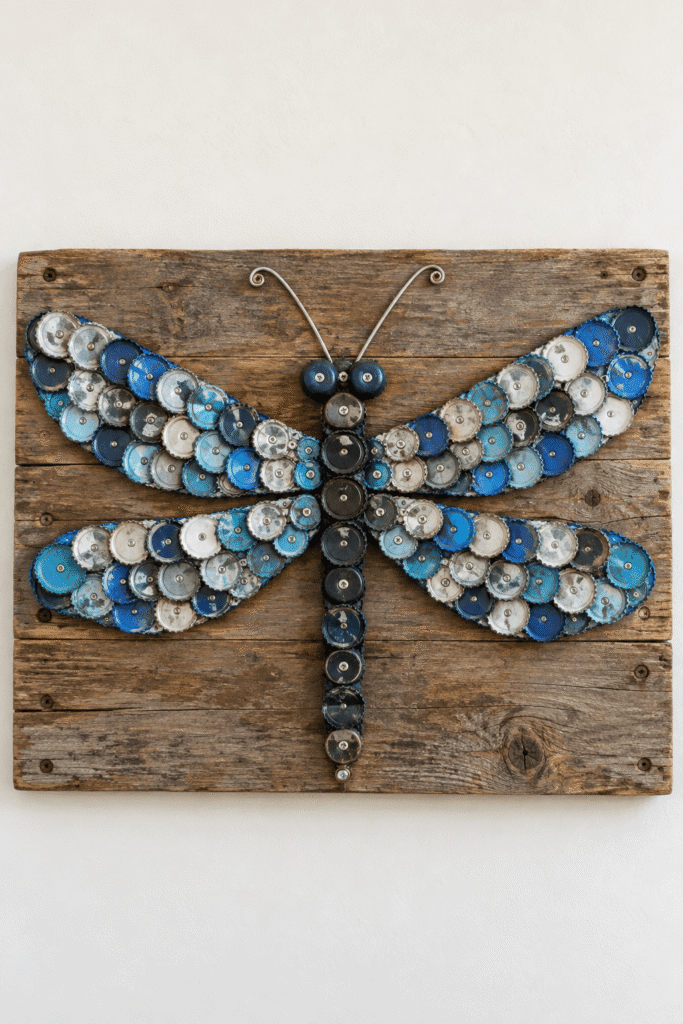
This one lives on my back fence, and it’s the reason I stopped trusting glue outdoors. Version one lost half a wing in the first big storm of the season.
Blue, white, and dark caps form four long wings on weathered wood, with a narrow body column down the middle and wire antennae on top. The rounded cap edges give the wings a layered, almost scaly texture that looks great in low evening light.
Skill: Intermediate | Time: about 3 hours, plus sealing two days ahead | Caps: around 80 for a 30 inch wingspan
What You Need
- Assorted bottle caps in blue, white, and dark tones
- Wood board or fence panel
- Stainless steel #6 pan head screws, ½ inch long, one per cap (galvanized roofing nails are the cheaper swap)
- Hammer and a thick nail, or a drill with a ⅛ inch bit
- Thin wire for antennae (14 gauge aluminum craft wire bends by hand and never rusts)
- Krylon UV Resistant Clear spray
How to Make It
- Two days ahead, spray the metal caps front and back with clear sealer. The liner side rusts first, so don’t skip it.
- With the board flat, arrange caps into a centered body and four wings.
- Punch or drill a hole through each cap center on a scrap block, holding the cap with pliers, then screw it down. Do the body first so the wings stay symmetrical.
- Attach the wire antennae at the top with two small screws or wire staples.
- Mount the board to the fence with exterior screws at all four corners so wind can’t lever it off.
Wear gloves while punching holes, since the crimped rims cut.
Trade off: Bright plastic caps fade noticeably after a summer or two in full sun. Metal caps hold their color longer but will rust around the screw unless the screw is stainless.
7. Green Cap Tree Plaque
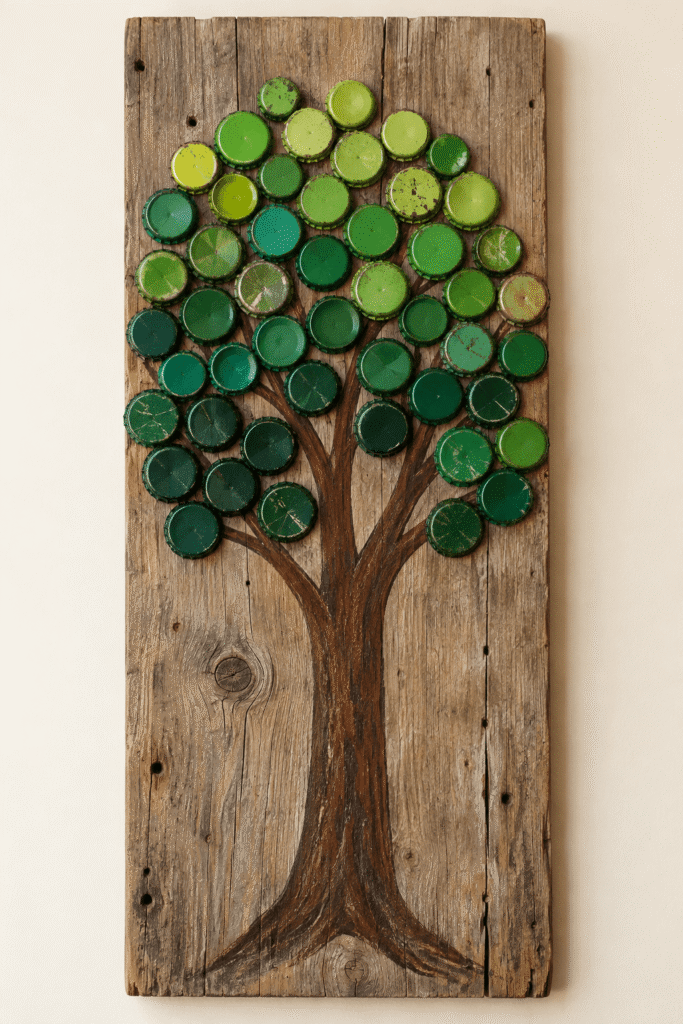
If your household goes through a lot of lemon lime soda or green capped milk jugs, this is your project. Light green, dark green, and teal caps form a round canopy above a simple painted trunk.
It’s one of the fastest pieces in this roundup, and a weathered board does half the decorating for you.
Skill: Beginner | Time: 1.5 hours plus paint drying | Caps: about 50
What You Need
- Weathered wooden plank board (reclaimed pallet wood is perfect if the stamp says HT, which means heat treated)
- Assorted green bottle caps
- Brown paint or stain for the trunk (leftover acrylic or a brown paint pen)
- Strong adhesive
How to Make It
- Sand any rough board edges so nobody picks up a splinter while hanging it.
- Paint the trunk and three or four branches with a ½ inch brush. End the branches where the canopy will sit so the caps cover the tips.
- Glue green caps above the branches in a rounded canopy, with the darkest greens along the bottom edge for shadow.
- Fill gaps with mixed greens until the crown looks full. A few caps poking past the outline look more like leaves than a perfect circle does.
Paint and stain fumes are mild but real, so keep a window open.
Kid version: Paint the trunk yourself first, then kids 6 and up can handle all the gluing with tacky glue.
8. Butterfly Cap Wall Art

Symmetry is the whole point here, which is exactly what makes it trickier than it looks. Mirrored rainbow wings sit inside a rustic wooden frame with a wood toned body down the middle and a blue outer edge defining each wing.
My method: lay out one wing completely, take a photo, then copy it cap for cap on the other side.
Skill: Intermediate | Time: about 2.5 hours | Caps: around 80
What You Need
- Wood frame (a thrifted picture frame with the glass removed and a board glued into the back works well)
- Bottle caps
- Wooden butterfly body piece (a jumbo craft stick or a short length of dowel)
- Adhesive
- Thin wire for antennae
How to Make It
- Glue the wooden body piece in the exact center of the frame. Measure from both sides.
- Outline each wing with blue caps first, mirroring them across the body.
- Fill each wing inside the outline, matching colors on both sides as you go.
- Glue the caps and antennae in place and let everything dry flat overnight.
Tip: Turn the frame upside down halfway through. A lopsided wing hides from you at one angle and jumps out at another.
Check cap edges before kids handle it, and supervise anyone young around the small parts.
9. Colorful Balloon Cap Board

The smallest project here, and the one I make for kids’ birthdays. Twelve to fifteen bright caps float near the top of a plain board, each with a string dropping to a tied bunch at the bottom.
It takes about an hour, and kids from four up can do almost all of it themselves.
Skill: Beginner | Time: about 1 hour | Caps: 12 to 15
What You Need
- Multicolored bottle caps (plastic, so there are no sharp edges for small hands)
- Wood board (or two cereal box panels glued together for a free version)
- Colored string or embroidery floss, about 30 inches total
- Adhesive (Aleene’s Tacky Glue for kids; hot glue for anything you do)
How to Make It
- Arrange the caps in a loose balloon cluster near the top, letting a few overlap.
- Glue one string end to the board under each cap position, then glue the cap down on top of it.
- Gather the strings into a tied bunch about two thirds of the way down and add a tiny bow.
- Glue the bunch flat so the strings can’t tangle.
Trade off: Embroidery floss frays when kids handle it. A dot of glue on each cut end stops that. I also write the birthday kid’s name and age along the bottom in paint pen, which makes it a keepsake instead of just decor.
Hanging Projects: Garlands, Chimes, and Strands
These pieces move, and that changes the rules. You’re no longer gluing caps to a flat surface. You’re trusting knots, holes, and whatever the piece hangs from.
10. Colorful Hanging Cap Strands

Five parallel strands of linked caps hang from a curved driftwood branch. It’s orderly enough to look intentional and loose enough to still feel handmade.
Be honest with yourself about time on this one. Every cap needs two holes, and I’d set aside a full evening just for holes.
Skill: Intermediate | Time: about 3 hours | Caps: about 60 (five strands of 12)
What You Need
- Bottle caps
- Small jump rings or chain links (7mm jump rings are about right)
- Driftwood branch or similar wood hanger
- Twine
- Hook or nail, plus a wall anchor if you’re going into drywall
- A ¹⁄₁₆ inch drill bit, or a nail and hammer
- Two pairs of flat nose pliers
How to Make It
- Punch or drill a hole near the top and bottom edge of each cap, working on a scrap block with the cap held in pliers.
- Link the caps into long vertical strands, opening and closing each jump ring with two pairs of pliers so it stays round.
- Tie each strand to the wood hanger with twine, spaced about 2 inches apart.
- Hang the branch from a hook or nail.
Tip: No drill? Sandwich a length of twine between two caps glued face to face with E6000. You get a strand that looks finished from both sides, with no holes at all.
File the burr off every punched hole with a nail file. Those little points snag sleeves and fingers.
11. Bottle-Cap Mirror Border

A plain round mirror from a discount store becomes a statement piece with a single ring of caps. Mine hangs on a dark green wall, and the mixed colors look even better there than they would against white.
Measure before you collect: a 12 inch mirror takes about 33 caps for one ring and around 70 for two.
Skill: Beginner | Time: 1.5 hours plus a 24 hour cure | Caps: 33 to 70
What You Need
- Round mirror (one with a wide flat frame is easiest)
- Bottle caps
- Strong adhesive: E6000, not hot glue, which lets go of glass and metal in a cold room
- Rubbing alcohol and a rag
How to Make It
- Clean the mirror edge or frame with rubbing alcohol, and sort the caps by color and size.
- Dry fit the whole ring before gluing anything. The last few caps almost always need squeezing or spreading.
- Glue every third cap first to lock in the spacing, then fill the gaps.
- Let the adhesive cure flat for a full day before you hang it.
Work with a window open while using E6000, and wear gloves near the glass edge.
12. Bottle Cap Garland Flowers

Strung across a window, this garland catches afternoon light and each cap flower glows around its edge. Yellow centers tie the repeated flowers together.
Each flower is seven caps: one yellow center and six petals around it. Six around one is the only arrangement where round caps sit snug with no gaps, so the flowers look tidy without any fiddling.
Skill: Beginner | Time: about 2 hours | Caps: about 42 for six flowers
What You Need
- Mixed color bottle caps (plastic keeps it light)
- Green floral wire or twine (18 gauge floral wire holds its curve)
- Yellow center caps
- Glue (hot glue works well on plastic)
- A 3 inch circle of felt or cardboard for the back of each flower
How to Make It
- Build each flower on its felt circle: center cap first, then six petals around it.
- Once they’re set, fix the flowers to the wire about 8 inches apart with hot glue and a wrap of floral tape.
- Hang from two small hooks, leaving a gentle drape in the middle.
Trade off: Metal caps make this garland heavy enough that the wire sags. Stick with plastic. Check both hanging points before display, and keep it out of reach of small children in case a cap works loose.
13. Colorful Flower Wreath Ring
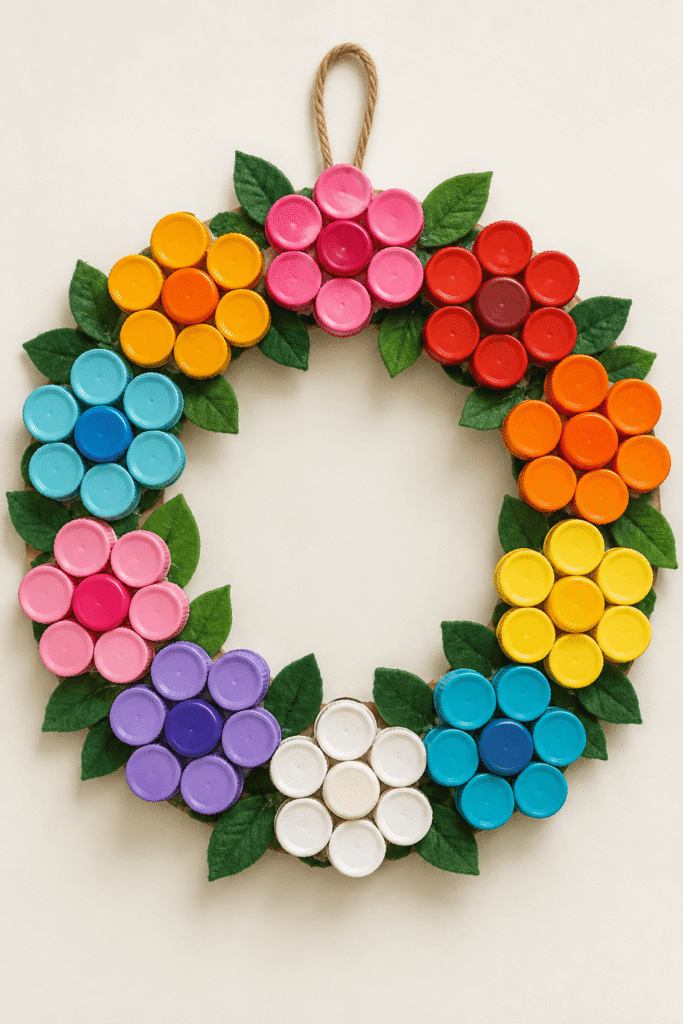
This wreath uses the same seven cap flowers as the garland, set around a round base with green leaves between them. A rope loop at the top keeps it centered on the door.
I paint plastic caps for this one so the colors match exactly, which makes it look more polished than a mixed cap version.
Skill: Beginner | Time: 2 hours plus paint drying | Caps: about 70 (ten flowers)
What You Need
- Round wreath base (a 14 inch foam ring, or two cardboard rings cut from pizza boxes and glued together)
- Bottle caps painted in flower colors (Krylon Fusion bonds to plastic without primer)
- Green leaf cutouts or faux leaves (green felt or an old plastic folder cut into leaves)
- Twine or rope for hanging
- Strong adhesive
How to Make It
- Attach the rope loop to the base first, so you can hang it and check the balance as you work.
- Glue flowers at the 12, 3, 6, and 9 o’clock positions, then fill in between them.
- Tuck green leaves between the blossoms to finish the ring.
Use nontoxic paint if kids are helping, and test the hanging loop with a firm tug before it goes on the door.
Trade off: A door in full sun fades painted caps by the end of one summer. Covered porches only, or hang it inside the entryway.
14. Bottle Cap Wind Chime

Fair warning: bottle caps don’t chime. They clink and rattle. The small bells at the bottom are what make this sound like a wind chime, while the caps bring color and a dry, cheerful clatter.
Caps, wooden beads, and bells hang at different lengths from a round lid or hoop, so the strands swing at slightly different speeds.
Skill: Intermediate | Time: about 2.5 hours | Caps: about 36 (six strands of six)
What You Need
- Round metal lid or hoop (a 6 inch embroidery hoop, or a coffee can lid with holes punched around the edge)
- Bottle caps in mixed colors and weathered finishes
- Wooden beads (sealed, or they swell and crack outdoors)
- Small bells
- Strong cord or twine (waxed cord or fishing line outlasts jute outside)
- Nail and hammer, or a drill
How to Make It
- Punch a hole through the center of each cap from the inside out, so the sharp burr faces the back.
- Thread caps, beads, and bells onto separate cords, with a knot or bead under each cap to hold its spot.
- Tie the cords to the ring at varied lengths, longest in the middle.
- Hang from a covered porch or patio.
Double knot every tie and add a dab of glue to each knot. Hang it where swinging strands won’t hit anyone’s face or bang against a door.
Useful Pieces and Tabletop Projects
These are the recycled bottle cap ideas people actually touch every day, which means they need to be a bit sturdier than wall art.
15. Photo Magnets on Fridge
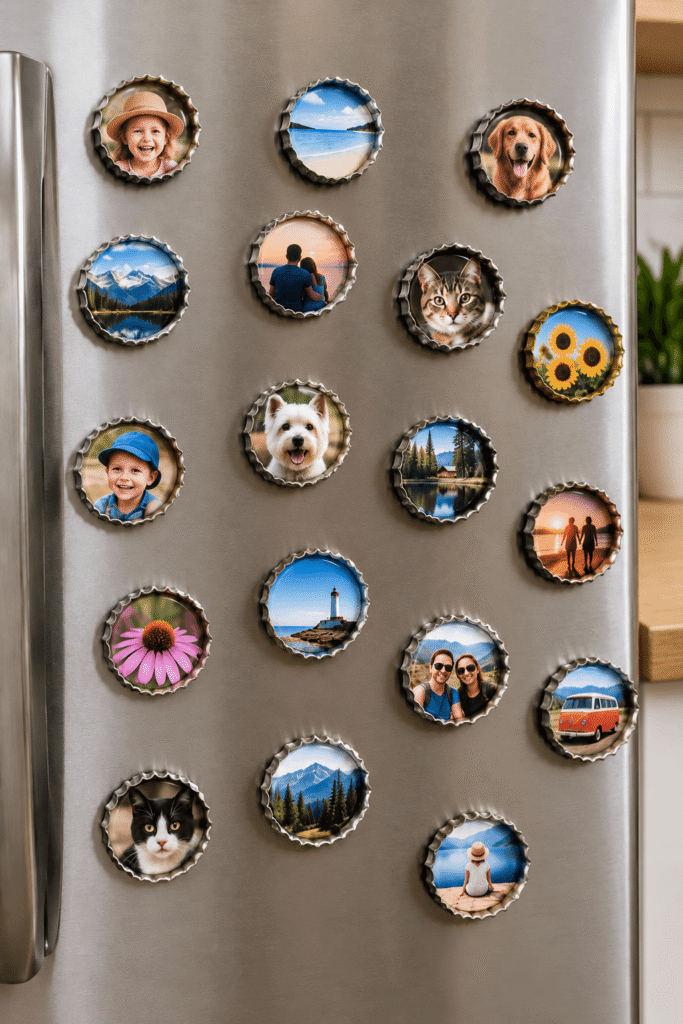
Bottle cap photo magnets are the gateway project. I made a set of twelve with family photos as a holiday gift, and now every relative asks me for refills.
The round frame unifies everything, so faces, pets, landscapes, and flowers all look like they belong together on a stainless fridge.
Skill: Beginner | Time: about 1 hour for 12, plus drying | Caps: 1 per magnet
What You Need
- Bottle caps (unbent caps from a homebrew shop look cleanest)
- Small printed photos, sized so several fit on one page
- A 1 inch circle punch (Fiskars makes a reliable one) or small scissors
- Magnet discs (ceramic magnets are cheaper; neodymium hold much better)
- Glue
- Mod Podge Dimensional Magic, or 1 inch clear epoxy dome stickers
How to Make It
- Punch out your photos. A 1 inch circle is the standard bottle cap image size, so it drops right into the cap.
- Glue each photo inside its cap with a thin layer of glue, pressing out any air.
- Fill each cap to the rim with Dimensional Magic, pop surface bubbles with a pin, and let them dry flat overnight. Or press an epoxy dome on top instead.
- Glue a magnet to the back of each cap with E6000.
Where it goes wrong: Regular Mod Podge stays slightly tacky in a humid kitchen, and the photos start to curl. Dimensional Magic or epoxy domes stay hard and clear.
Keep the finished magnets above toddler height and away from phones and bank cards.
16. Bottle-Cap Mushroom Garden

Red, orange, and brown caps become mushroom tops on twig stems, set in moss on a wood slice. Mine sits on my desk, and it’s the one project here that uses fewer caps than you have fingers.
Different stem heights are what make it look like a tiny forest floor instead of a craft.
Skill: Beginner | Time: about 1.5 hours | Caps: 5 to 7
What You Need
- Bottle caps (red with white dots is the classic toadstool look)
- Small twigs or sticks (from your yard, baked at 200°F for about 30 minutes to drive out bugs; stay nearby while they bake)
- Wood slice base
- Moss (preserved reindeer moss from a craft store, or real moss dried flat for a week)
- Small decorative pine cones
- Adhesive (hot glue)
- White paint or paint pen (a white Posca pen dots cleanly onto metal)
How to Make It
- Dot the caps with white paint pen and let them dry. Seal with a clear spray if the piece will be handled often.
- Hot glue a twig into the underside of each cap.
- Cut stems to three heights (roughly 2, 3, and 4 inches), then glue them upright on the wood slice.
- Cover the base with moss and tuck pine cones around the mushrooms.
Tip: Mushrooms all at the same height look like a row of thumbtacks. Group them in twos and threes at uneven heights. Trim any sharp twig ends while you’re at it.
17. Vintage Cap Drawer Cabinet

This is the most useful project in the whole list, and the only one where drilling is unavoidable. A small wooden drawer organizer gets a bottle cap pull on every drawer, centered so the grid looks tidy.
The vintage look comes from the caps. Old soda brands, or anything with a bold graphic, look great repeated across a grid.
Skill: Intermediate | Time: about 2 hours plus an overnight cure | Caps: 1 per drawer, plus a couple of spares
What You Need
- Small wooden drawer box or organizer (thrift stores have these all the time)
- Decorative bottle caps
- Drawer knobs or short bolts (1¼ inch round wooden knobs match a cap’s size almost exactly)
- Drill for knob holes
- Adhesive or hardware washers (E6000)
- A clamp and a scrap of wood
How to Make It
- Mark the center of each drawer front with a ruler. Measure twice; an off center pull shows immediately in a grid.
- Drill centered holes for the knob screws, with scrap wood clamped behind the drawer front to stop the back from splintering.
- Glue a cap onto the face of each wooden knob with E6000 and let them cure overnight.
- Screw the knobs into the drawers.
Trade off: A cap screwed flat onto a drawer is too shallow to grip. Mounting it on a knob, or on a short bolt with a nut as a spacer, gives your fingers something to hold. Wear eye protection when drilling, and file any cap edge your fingers will touch.
18. Bottle Cap Flower Bouquet

Five cap flowers on wire stems stand in a clear jar, in red, blue, yellow, white, and purple, each with a contrasting center. It’s a bouquet that never needs water, which honestly is the only kind I keep alive.
Skill: Beginner | Time: about 1.5 hours | Caps: about 35
What You Need
- Bottle caps in mixed colors
- Green floral wire (16 or 18 gauge; the thicker it is, the straighter it stands)
- Clear glass jar (a pasta sauce jar with the label soaked off)
- Hot glue
- Clear glass marbles or dried beans to weight the jar
How to Make It
- Glue six matching caps around one contrasting center on a small cardboard circle for each bloom.
- Glue a wire stem to the back of each flower and wrap the joint with floral tape.
- Cut the stems to different lengths, set them in the jar, and fill the jar with marbles so they stand upright.
Trade off: Cap flowers are top heavy. Without the marbles, the jar tips the first time someone brushes past it. Watch sharp metal edges, and have an adult run the hot glue gun.
19. Cap Flower Candle Trays

Round wood slices, a ring of cap petals, and a light in the middle. Each tray gets its own color mix, so a set of three looks coordinated without matching.
Use battery tea lights only. A real flame sits close enough to soften plastic caps, and I scorched a wood slice learning that.
Skill: Beginner | Time: about 1 hour per tray | Caps: about 20 per 7 inch tray
What You Need
- Wood slices, about 7 inches across
- Assorted painted bottle caps
- Small battery tea lights
- Adhesive
How to Make It
- Set a tea light in the center of the slice and trace around it.
- Glue a ring of seven petal caps around the traced circle.
- Add a ring of green caps near the outer edge; about 13 fit on a 7 inch slice.
- Leave the tea light loose so you can swap batteries.
Tip: Make three at once. Mixing and matching colors across a set is easier when they’re all on the table together.
20. Bonus for October: Bottle Cap Pumpkin on Cardboard

Most Halloween crafts with cardboard look tired by November 1, with soft corners and peeling paint. This one uses caps for the whole visible surface, so the cardboard is just a hidden skeleton, and indoors it lasts for years.
I made the first one after realizing a third of my cap can was orange juice and orange soda caps with nowhere to go.
Skill: Beginner | Time: about 1 hour plus overnight drying | Caps: about 45 for a 12 inch pumpkin | Kids: ages 4 and up with tacky glue
What You Need
- Corrugated cardboard from a shipping box (free), enough for two layers
- Orange caps (juice and orange soda caps, or plastic caps sprayed with Krylon Fusion)
- Black caps for the face (or six to eight white caps painted black)
- Two or three green caps for the stem
- Aleene’s Original Tacky Glue (with kids) or hot glue (adults)
- Ribbon for hanging
How to Make It
- Draw a pumpkin about 12 inches wide, cut two copies, and glue them together with the ridges running crosswise so the shape won’t curl.
- Lay out the face first: three black caps for each triangle eye, one for the nose, and five or six in a curve for the mouth.
- Fill the rest of the pumpkin with orange caps, working outward from the face.
- Stack the green caps at the top for a stem.
- Poke two holes near the top with a pencil, thread the ribbon through, and hang it indoors.
Tip: Want your caps back after Halloween? Use glue dots instead of glue. They hold fine on cardboard indoors and peel off cleanly in November.
If you’re putting together Halloween crafts with cardboard for a classroom or a party table, cut the pumpkin shapes ahead of time and let the kids do the cap filling. That’s the part they enjoy, and it keeps scissors out of small hands.
Ways To Style Bottle Cap Crafts Around The Home
Bottle cap crafts look best when the shape reads instantly: a centered sunflower, a bold heart, a framed butterfly with a crisp outline. Busy walls fight that, so give each piece some plain space around it, at least 6 to 8 inches between pieces in a group.
Light them from the side. Caps are three dimensional, and a lamp or window at an angle makes every rim cast a small shadow. Flat overhead light turns the same piece into something that looks like a printed poster.
Group by theme or visual effect so the upcycled look stays cohesive instead of random:
- Floral set: sunflower panel, wreath, bouquet, and candle trays in an entry or kitchen
- Animal forms: dragonfly, fish, and butterfly down a hallway or up a stair wall
- Rainbow and kids’ room: rainbow arch, balloon board, and the flower garland across the window
- Evening corner: crescent panel and mushroom garden on a shelf below it
Repetition is your friend. Garlands, mirror borders, drawer pulls, and hanging strands all rely on the same round shape repeating, which creates rhythm even when the colors are loud.
One small trick that pulls a mixed group together: use the same stain on every backing board. The caps can be wildly different and the set still looks planned.
And swap seasonally. The pumpkin goes up in October, and the floral pieces come back out in spring. Rotating keeps cap art from fading into the background of a room you see every day.
Common Mistakes First Timers Make
I’ve made every one of these at least once. Most cost a weekend, and one cost me a dragonfly wing.
- Gluing before the whole design is laid out. Dry fit every cap, photograph it, then glue. Moving a cap after E6000 grabs leaves a smear you can’t hide.
- Mixing metal and plastic caps in one mosaic. The height difference makes the surface look lumpy in side light.
- Skipping the wash. Unwashed beer caps smell sour and rust from the inside of the liner, even indoors.
- Using hot glue on glass, metal frames, or anything outdoors. It lets go with temperature swings, usually a few weeks after you’ve stopped checking.
- Backing a big mosaic with one layer of cardboard. It bows within days. Double it with the ridges crossed, or use wood.
- Drilling caps freehand. Dimple with a nail first, clamp or use pliers, and wear safety glasses. A spinning cap will cut you.
- Collecting the exact number of caps you need. Count, then add 20 percent. You’ll want options when one color looks off next to another.
- Sealing photo magnets with regular Mod Podge. It stays tacky in kitchen humidity. Use Dimensional Magic or epoxy domes.
- Hanging a heavy panel on one nail. Metal cap panels get heavy quickly. Use D rings, picture wire, and a proper wall anchor.
Practical note: the fastest way to judge a layout is to look at the photo on your phone, not the board itself. A lopsided wing or a wandering color band that you can’t see standing over it jumps right out on a screen.
FAQs
How many bottle caps do I need for wall art?
Packed tight, plan on roughly 100 metal crown caps or about 120 plastic caps per square foot. A 16 inch heart takes around 110 caps. Add 20 percent extra so you have color choices.
What glue works best for bottle cap crafts?
E6000 is the best all round choice for metal caps on wood, glass, or mirrors indoors. For outdoor pieces, screw each cap down or use construction adhesive, and save high temp hot glue for light indoor projects with plastic caps.
How do you put a hole in a bottle cap?
Set the cap on scrap wood, hold it with pliers, and tap a nail through the center. You can also drill it with a ¹⁄₁₆ or ⅛ inch bit after dimpling it with a nail. Wear safety glasses either way.
Can bottle cap art go outside?
Yes, if you screw the caps down with stainless screws and seal metal caps front and back with a UV resistant clear coat. Expect bright plastic caps to fade within a summer or two of direct sun.
Where can I get bottle caps for free?
Ask local bars, breweries, and homebrewers to save them for you, and raid your own recycling. Milk jugs, juice bottles, and water bottles cover most plastic cap colors.
Can I use bottle caps for Halloween crafts with cardboard?
Yes. Glue orange, black, and green caps onto a doubled cardboard pumpkin or bat shape with tacky glue for an indoor decoration kids can help make. Cross the cardboard layers so the shape doesn’t curl.
Where to Go Next
If the rainbow or the pumpkin got you thinking about cardboard as a backing, our roundup of Halloween crafts with cardboard has more ideas you can make this month from what’s already in your recycling bin.
My honest advice: Don’t wait until you’ve saved the “right” caps. Pick the balloon board or the sunflower, use whatever’s in the can, and glue the first one this weekend. You’ll learn more from one finished panel than from a year of collecting, and you’ll know exactly which colors to start saving for the next one.
