

Halloween popsicle stick crafts turn a cheap tub of craft sticks into spooky decor like bats, ghosts, pumpkins, and a full haunted house, using paint, paper scraps, and googly eyes. Most of the 20 projects below take 15 to 60 minutes, and they work as popsicle stick crafts for kids from about age 3 when an adult handles the hot glue and any cutting.
The glue stick is dried out, the googly eyes are somewhere under the couch, and your kid just remembered the class Halloween party is on Friday. You do have a tub of craft sticks you bought months ago for some other project. That’s enough to start.
I put together 20 Halloween popsicle stick crafts, from a 15 minute bat to a haunted house you’ll want a slow afternoon for. Each one has a supply list with a cheaper swap, steps you can follow with glue on your fingers, and the thing that usually goes wrong the first time.
Halloween 2026 falls on a Saturday, so school parties will likely land on Friday the 30th. Most of the beginner projects fit into one after school hour, which helps if that’s your situation.
Whether you want popsicle stick crafts for kids to make mostly on their own or decor you’ll leave on the mantel until November, you’ll find something here.
Pick Your Project: Skill Level, Time, and Mess
Standard craft sticks are about 4.5 inches long. Jumbo sticks run about 6 inches and are wider, so the same project comes out noticeably bigger. If you only buy one tub, jumbo sticks are easier for small hands and make bolder decor. Standard sticks make smaller, shelf sized pieces.
Here is how I rate the projects:
- Beginner: glue, paint, and paper. Kid scissors are enough.
- Intermediate: more pieces, smaller details, or some waiting between steps.
- Advanced: lots of small parts or pinned joints. It takes patience, not special talent.
Times are hands on time, and drying is extra. For mess, Low means glue and paper, Medium means paint on a covered table, and High means several paint colors and a lot of wet brushes.
| Project | Skill | Time | Mess | Best ages |
|---|---|---|---|---|
| Midnight Bat Popsicle Stick | Beginner | 15 min | Low | 3 and up |
| Mummy Popsicle Stick Friend | Beginner | 15 min | Low | 3 and up |
| Bright Pumpkin Face Decor | Beginner | 20 min | Low | 4 and up |
| Playful Monster Popsicle Faces | Beginner | 25 min | Low | 4 and up |
| Candy Corn Popsicle Pal | Beginner | 30 min plus drying | Medium | 5 and up |
| Ghostly Popsicle Stick Sign | Beginner | 30 min plus drying | Medium | 5 and up |
| Black Cat Popsicle Stick Craft | Beginner | 30 min | Low | 5 and up |
| Cheerful Frankenstein Fence | Beginner | 30 min plus drying | Medium | 5 and up |
| Witchy Popsicle Stick Broom | Intermediate | 25 min | Low | 6 and up |
| Spiderweb Popsicle Stick Decor | Intermediate | 30 to 40 min | Low | 7 and up |
| Vampire Popsicle Stick Friend | Intermediate | 40 min | Low | 6 and up |
| Witch Hat Popsicle Stick Charm | Intermediate | 40 min | Medium | 7 and up |
| Spooky Frame With Halloween Icons | Intermediate | 40 min plus drying | Medium | 6 and up |
| Creepy Eyeball Wall Art | Intermediate | 40 min plus drying | Medium | 7 and up |
| Popsicle Stick Halloween Garland | Intermediate | 60 to 90 min | Medium | 6 and up |
| Gothic Skeleton Plaque | Intermediate | 45 min plus drying | Medium | 8 and up |
| Moonlit Pumpkin Patch Sign | Intermediate | 60 min | Medium | 7 and up |
| Playful Popsicle Stick Skeleton | Advanced | 45 to 60 min | Low | 8 and up |
| Spooky Popsicle Stick Haunted House | Advanced | 60 to 75 min plus drying | Medium | 8 and up |
| Moonlit Haunted Tree | Advanced | 60 min plus drying | High | 8 and up |
Save this post to your Halloween or craft board before you head out, because the table above and the supply list below are the parts you’ll want in your hand in the craft aisle.
Adapting by age
- Ages 3 to 4: Pre cut everything and let them glue, press on eyes, and wrap. Stick to the bat, mummy, and pumpkin. Skip small parts if they still put things in their mouths.
- Ages 5 to 7: They can paint, tear, and glue on their own. You cut anything sturdy and run the glue gun.
- Ages 8 and up: They can handle scissors, pinned joints with pre made holes, and multi piece projects. Hand them the haunted house.
Supplies And Cheaper Swaps
Almost every project here comes from one short shopping list: a 100 or 200 count tub of craft sticks, a few bottles of acrylic paint, tacky glue, cardstock or foam sheets, googly eyes, and scissors. Craft stores like Michaels and Hobby Lobby carry all of it, and so do Walmart, dollar stores, and Amazon. The Halloween aisle is where the plastic spiders live.
| Item | Where I’d buy it | Budget swap |
|---|---|---|
| Craft sticks (standard and jumbo) | Craft store, Walmart, Amazon | Sticks saved from ice pops, washed in warm soapy water and dried fully |
| Acrylic paint (Apple Barrel or FolkArt) | Craft store, Walmart | Crayola Washable Kids’ Paint or tempera (it rubs off more easily), or markers for small areas |
| Tacky glue (Aleene’s Original Tacky Glue) | Craft store, Walmart | Elmer’s white glue plus clothespins or binder clips to hold joints |
| Low temp mini glue gun | Craft store, Amazon | Tacky glue and patience |
| Cardstock or foam sheets | Craft store, dollar store | Construction paper, cereal box cardboard, a black paper bag |
| Googly eyes | Dollar store, craft store | Paper circles with a marker dot, or hole punch dots |
| Ribbon and twine | Dollar store, craft store | Yarn, a shoelace, strips of old fabric |
| White gauze or cheesecloth | Pharmacy, grocery store | Strips torn from an old white tee |
| Brass fasteners (brads) | Office supply aisle | Skip the moving joints and glue the limbs in place |
| Pipe cleaners | Dollar store | A paper strip curled around a pencil |
| Plastic spiders | Halloween aisle | Spiders cut from black paper |
| Wax paper or parchment | Kitchen drawer | A cut open grocery bag |
Practical note: Thin sticks curl when only one face gets wet paint. Paint both sides in thin coats when you can, then dry the sticks flat under something light, like a paperback.
Aleene’s tacky glue is my default for anything a kid touches. It grabs paper faster than basic school glue and it can’t burn anyone. If you want to compare glues before you buy, we’ve covered that too. [LINK: Best Glue for Kids’ Crafts]
Safety, Mess, and Supervision for Popsicle Stick Crafts for Kids
Most Halloween popsicle stick crafts are low risk, but a few steps need an adult.
Hot glue: Use a low temp mini gun, which runs around 250°F compared with about 380°F for a high temp gun. Low temp can still blister skin, so I keep the glue gun as a grown up job for kids under about 8.
Cutting: Craft sticks splinter under kid scissors. Sturdy scissors or garden snips work better, and that’s an adult job.
Small parts: Googly eyes, beads, plastic spiders, and brads are choking hazards for toddlers and anyone who still mouths things. Use drawn or paper details for those kids. If you want ideas that skip small parts entirely, there’s a separate list. [LINK: Toddler Halloween Crafts]
Brads: The prongs are sharp. Fold them flat and cover them with a piece of tape on the back.
Paint: Look for the AP seal on paint and markers. Acrylic won’t wash out of clothes once it dries, so use smocks or old shirts, or use washable paint with younger kids.
Flames and pets: Keep finished pieces away from candles and real flames in jack o’lanterns. LED tealights are a safer swap. If you have a cat, hang yarn and twine decor out of reach, because cats chew string.
Practical note: Cover the table with wax paper or parchment before you start. Glue and paint peel off it, and your craft won’t weld itself to the table.
Easy Halloween Popsicle Stick Crafts for Beginners and Little Hands
These eight use whole sticks, simple paper cuts, and basic paint. They’re the Halloween popsicle stick crafts I’d hand to a five year old without much worry. If you’re setting up popsicle stick crafts for kids at a party table, start here.
1. Midnight Bat Popsicle Stick
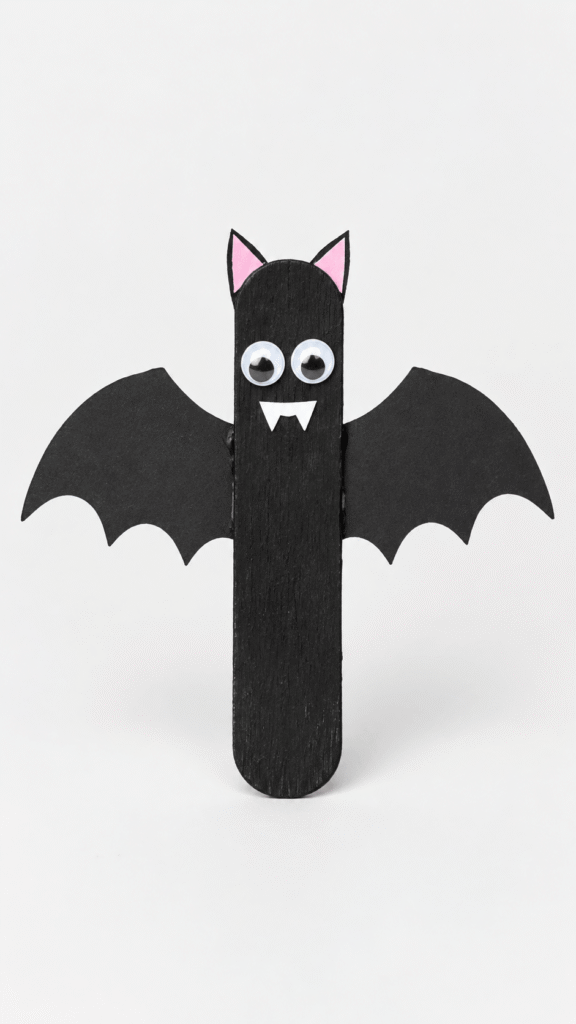
A single jumbo stick with paper wings is the fastest project on this list, and a good first test of how a kid handles paint. Pink ears and tiny fangs keep it on the cute side of spooky.
Skill: Beginner. Time: 15 minutes plus drying. Mess: Low. Ages: 3 and up (younger kids stick on the eyes, older kids cut their own wings).
You need
- 1 jumbo popsicle stick (a standard stick makes a mini bat)
- Black craft paint (or a black marker, which skips the drying wait)
- Black cardstock (or a cereal box painted black)
- Pink paper scraps (or white paper colored with a pink marker)
- 2 googly eyes (or paper circles with a marker dot)
- A scrap of white paper for the mouth
- White craft glue (tacky glue grips paper better)
How to make it
- Paint the stick black and let it dry. Thin coats take about 20 minutes.
- Fold the cardstock in half and cut one wing shape through both layers so the wings match. Cut two tiny ears from the pink paper.
- Glue the wings to the back of the stick so they poke out on both sides, then glue on the ears and googly eyes.
- Cut a small white mouth with two fangs, glue it on, and let everything set flat.
Tip: Scallop the bottom edge of each wing with three small curves. It reads as a bat from across the room.
What tends to go wrong: Thin paper wings droop. Cardstock or cereal box cardboard holds its shape.
2. Mummy Popsicle Stick Friend
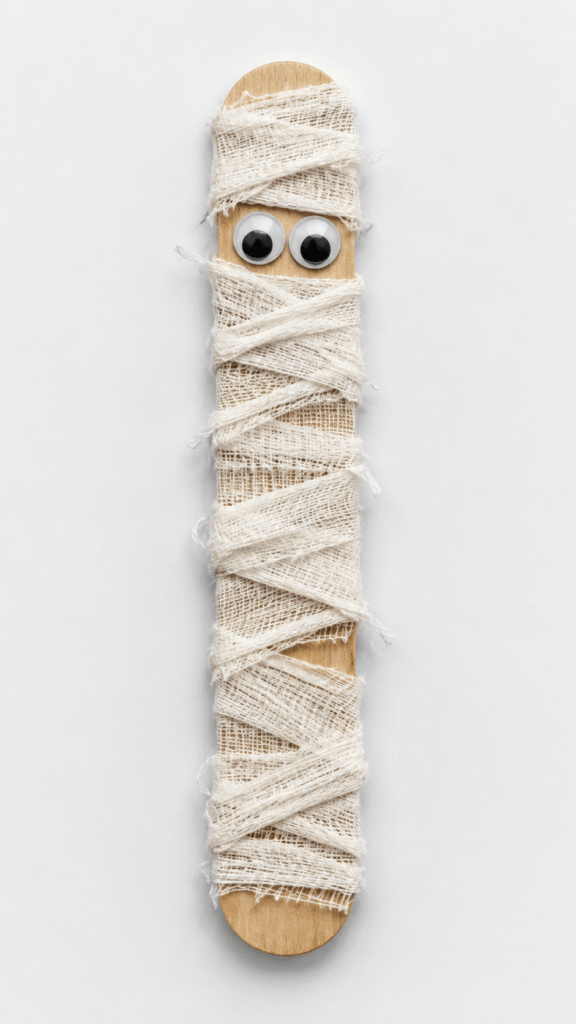
A large stick wrapped in white gauze is about as close to a no skill craft as it gets. The frayed edges of the gauze do the work of making it look like a mummy.
Skill: Beginner. Time: 15 minutes. Mess: Low. Ages: 3 and up (a younger kid wraps while an adult dabs on glue).
You need
- 1 large popsicle stick
- White gauze or cheesecloth (or strips torn from an old white tee)
- 2 googly eyes (or paper circles)
- Craft glue
How to make it
- Tear the gauze into strips about an inch wide. Torn edges fray, which is exactly what you want.
- Dab glue at the bottom of the stick and wrap upward in overlapping layers, crossing diagonally now and then so it looks messy on purpose.
- Leave a small gap near the top for the face, then tuck the end of the strip behind the stick and glue it down.
- Glue the googly eyes into the gap.
Tip: Soak the gauze strips in cooled strong tea and let them dry before wrapping. They turn a soft tan that looks aged. Paint the stick black first if you want the gap to look deep and dark.
What tends to go wrong: Lines of wet glue soak through thin gauze and leave shiny patches. Use small dots instead.
3. Bright Pumpkin Face Decor
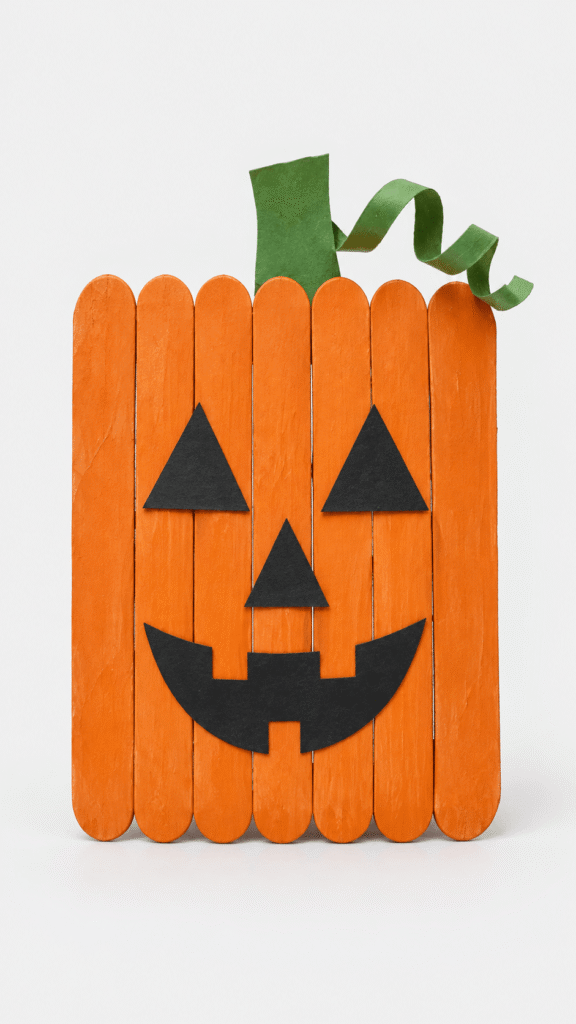
Eight orange sticks and a few paper scraps make a pumpkin that works as a door sign or a table accent. It’s quick and hard to mess up.
Skill: Beginner. Time: 20 minutes. Mess: Low. Ages: 4 and up.
You need
- 8 orange craft sticks (or plain sticks painted orange)
- 2 extra sticks for the back
- Black paper or foam sheet (or black construction paper)
- Green paper (or green construction paper)
- Craft glue
How to make it
- Lay the 8 orange sticks side by side with edges touching. Glue the 2 extra sticks across the back, one near the top and one near the bottom, so the pumpkin holds together.
- Cut triangle eyes, a triangle nose, and a smiling mouth from the black paper.
- Glue the face onto the orange base.
- Cut a short stem and a long strip from the green paper, curl the strip around a pencil for a vine, and glue both to the top.
What tends to go wrong: Glue along the edges alone won’t hold. The sticks pop apart the moment someone picks it up, so don’t skip the back sticks.
4. Playful Monster Popsicle Faces

Each monster gets its own personality, from silly and friendly to a little bit spooky. Make all three in one sitting.
Skill: Beginner. Time: 25 minutes for all three. Mess: Low. Ages: 4 and up.
You need
- Green, purple, and orange popsicle sticks (about 5 per face, plus 1 extra stick per face for the back)
- Black cardstock (or construction paper)
- Googly eyes (or paper circles)
- White paper for teeth
- Black marker
- Craft glue
How to make it
- Glue the sticks side by side into three rectangle faces, with a back stick across each one. Let them dry.
- Cut jagged hair, horns, and small arms from the black cardstock.
- Add googly eyes, paper teeth, and a smile drawn with the marker.
- Glue on the hair, horns, arms, and any extra spots.
Tip: Give each monster a different number of eyes. One, two, and three eyes make the set look intentional.
What tends to go wrong: Teeth glued in a straight row look like a fence. Cut them as one zigzag strip and glue it just behind the mouth line.
5. Candy Corn Popsicle Pal
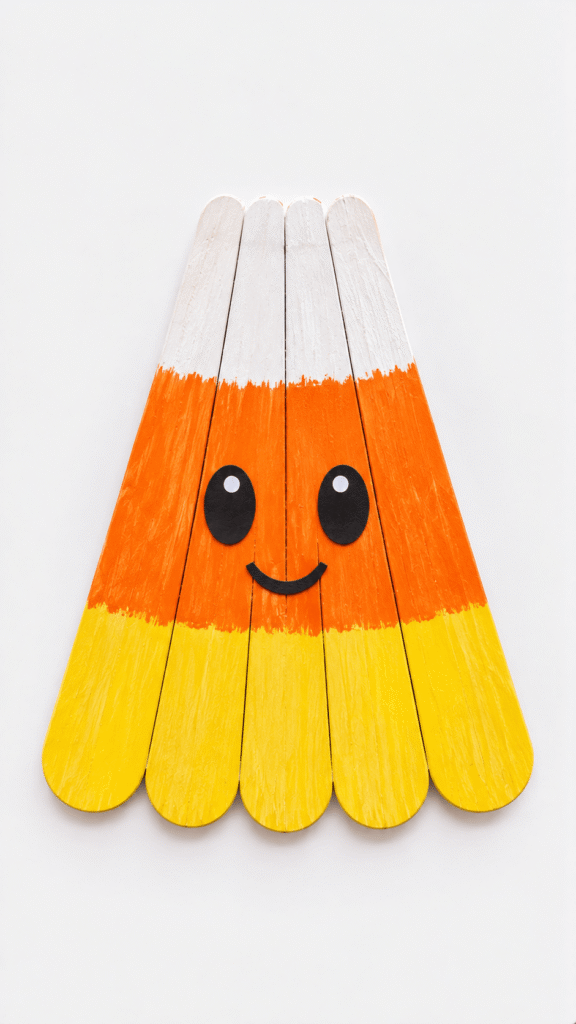
A candy corn face is bright and friendly, and it looks great lined up on a shelf with a few friends. The fan shape takes a little patience, but the painting is easy.
Skill: Beginner. Time: 30 minutes plus drying. Mess: Medium. Ages: 5 and up.
You need
- 6 popsicle sticks, plus 1 extra for the back
- Acrylic paint in white, orange, and yellow (or washable tempera, or markers)
- Black paint (or a black marker)
- A white paint pen (or a small dot of white paint)
How to make it
- On wax paper, fan the 6 sticks so the tips overlap at the top and spread wide at the bottom, like a hand of cards. Glue where they overlap, then glue the extra stick across the back near the bottom to lock the fan open.
- Paint the top third white, the middle orange, and the bottom yellow. Let each band dry before painting the one next to it so the lines stay crisp.
- Add two black oval eyes and a smile on the orange section.
- Dot a tiny white highlight in each eye and let it dry.
What tends to go wrong: The fan wants to spring open while the glue is wet. Rest a paperback on it, over the wax paper, for 20 minutes.
6. Ghostly Popsicle Stick Sign
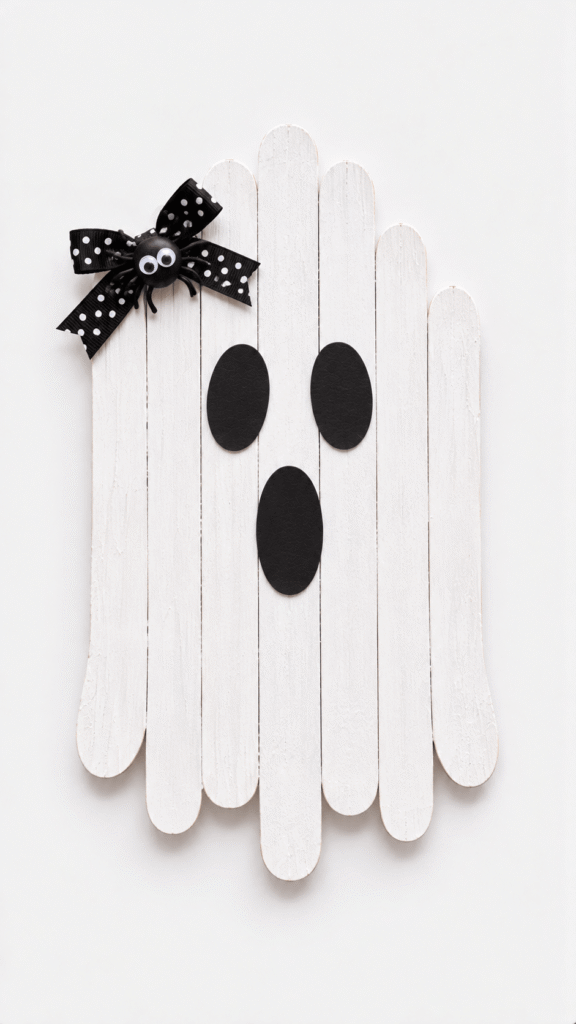
A white ghost with a little bow is simple, sweet, and easy to hang on a door or wall. The wavy hem is what turns a rectangle into a ghost.
Skill: Beginner. Time: 30 minutes plus drying between coats. Mess: Medium. Ages: 5 and up.
You need
- 8 to 10 plain popsicle sticks, plus 2 extra for the back
- White acrylic paint (or washable white paint)
- Black cardstock or foam paper (or black construction paper)
- Black ribbon with a spiderweb print (or plain black ribbon, or a strip of black paper tied in a bow)
- 1 small plastic spider (or a paper spider)
- Craft glue
How to make it
- Line up the sticks side by side. Raise the middle sticks about half an inch to round the head, and slide alternating sticks at the bottom up and down by half an inch for a wavy hem. Glue the 2 back sticks across to lock the shape.
- Paint the front white and let it dry fully, then add a second coat.
- Cut three black ovals for the eyes and mouth and glue them on.
- Tie a small bow, glue it to the top corner, and add the spider.
What tends to go wrong: The first coat of white on bare wood looks gray and patchy. That’s normal. Plan on two coats and let the first dry completely.
7. Black Cat Popsicle Stick Craft
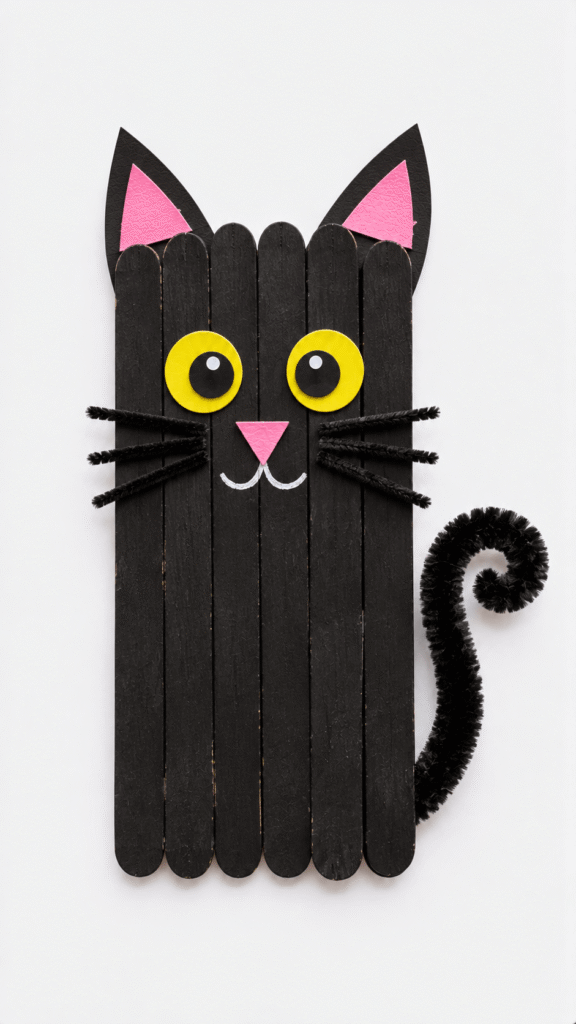
Pointy ears, bright eyes, and a curly tail make this one the star of a Halloween shelf. It’s a good use of paper scraps.
Skill: Beginner. Time: 30 minutes. Mess: Low. Ages: 5 and up.
You need
- 6 to 8 black craft sticks (or plain sticks painted black), plus 1 extra for the back
- Pink paper or foam (or white paper colored with a pink marker)
- Yellow and black paper circles
- Thin black paper strips for whiskers
- White marker or paint pen
- 1 black pipe cleaner (or a paper strip curled around a pencil)
- Craft glue and scissors
How to make it
- Glue the sticks side by side into a tall cat body, with the extra stick across the back.
- Cut two pointed ears and two smaller pink inner ears. Glue the pink pieces onto the black ears, then glue the ears behind the top edge so they poke up.
- Glue on yellow circles for eyes with black circle pupils, a small pink nose, and the whiskers. Draw the mouth with the white pen.
- Curl the pipe cleaner around a pencil and glue it to the back or side for the tail.
Tip: Black paper whiskers only show where they stick out past the edge of the cat. Let them extend on both sides, or draw them with the white paint pen.
What tends to go wrong: The ears flop forward if you glue them to the front. Glue them to the back of the top stick.
8. Cheerful Frankenstein Fence
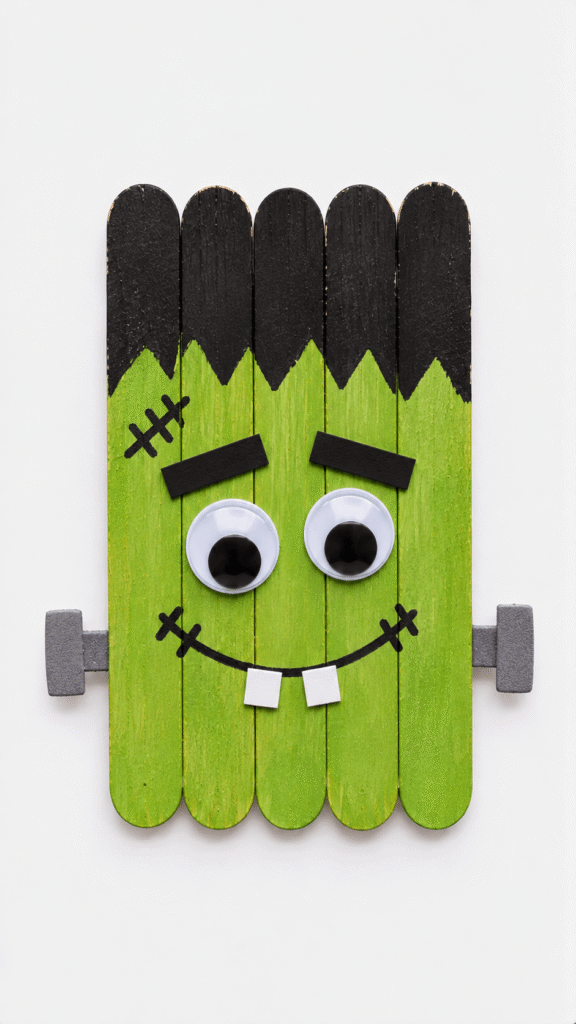
A bright green Frankenstein makes a friendly wall accent or shelf decoration. The vertical sticks read like a little picket fence, which is where the name comes from.
Skill: Beginner. Time: 30 minutes plus drying. Mess: Medium. Ages: 5 and up.
You need
- 5 wooden popsicle sticks (jumbo for a bigger face), plus 1 or 2 extra for the back
- Green acrylic paint
- Black acrylic paint
- Googly eyes (or paper circles)
- Small foam or paper scraps
- Craft glue
How to make it
- Glue the 5 sticks side by side with the extra stick or two across the back. Let the base dry.
- Paint the lower two thirds green. Once the green is fully dry, paint the top third black for hair.
- Add googly eyes, eyebrows, a smile, and little teeth pieces.
- Glue a small side piece on each side near the bottom, like neck bolts.
What tends to go wrong: If the black touches wet green, the hairline turns muddy. Wait until the green is dry first.
Intermediate Projects With More Pieces and Small Details
These take more pieces, a steadier hand, or a little waiting. Kids 6 and up can manage most of them with help. For younger kids, you do the cutting and they do the decorating.
9. Witchy Popsicle Stick Broom
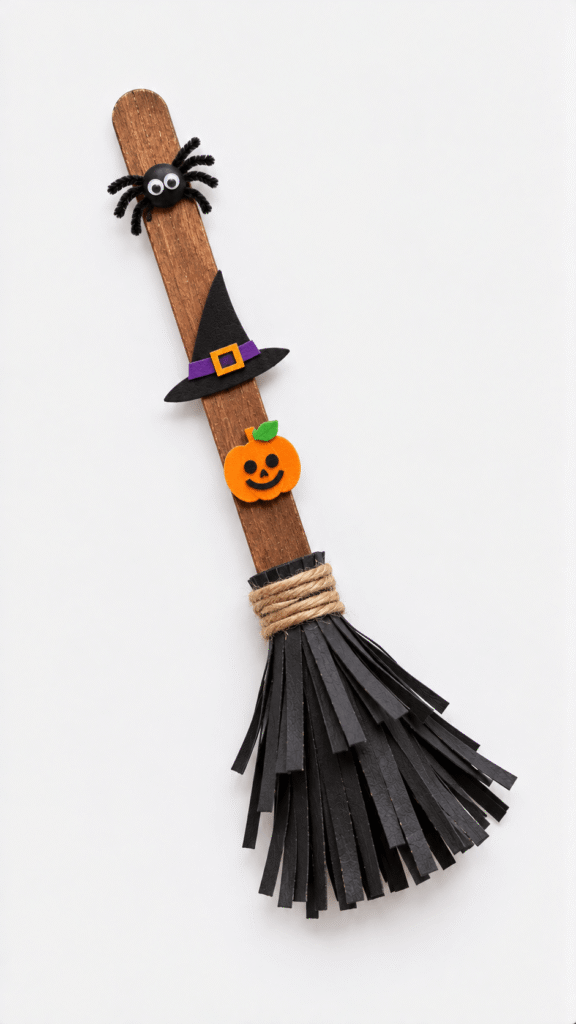
A little witch’s broom with a pumpkin face is small, quick, and cute on a bookshelf or hanging from a doorknob.
Skill: Intermediate (small parts). Time: 25 minutes. Mess: Low. Ages: 6 and up.
You need
- 1 popsicle stick painted brown (or a brown marker, or just a plain stick)
- 2 black paper strips
- 1 orange pumpkin bead (or an orange pom pom with a marker face)
- 1 mini witch hat (or a cone rolled from black paper)
- Twine
- 1 black spider embellishment (or a paper spider)
- Craft glue
How to make it
- Snip fringe along one long edge of each black strip, about two thirds of the way in. Glue one strip to the front and one to the back at the bottom of the stick so the fringe hangs off like bristles.
- Wrap twine twice around the stick where the bristles meet the handle, tie it, and leave two small loops, one of which can be a hanger.
- Glue the pumpkin bead and the mini witch hat near the center of the stick.
- Glue the spider near the top.
What tends to go wrong: Paper bristles fold over when you use a wet line of glue. Use a dot of tacky glue instead.
10. Spiderweb Popsicle Stick Decor
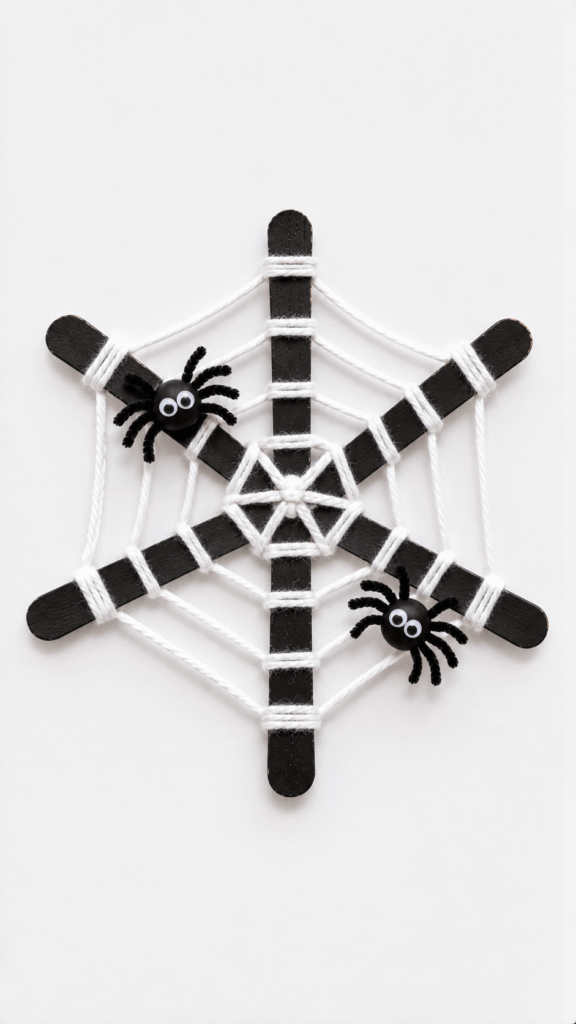
Yarn wrapped around black sticks makes a real looking web. It’s the most meditative project here once you get the rhythm.
Skill: Intermediate. Time: 30 to 40 minutes. Mess: Low. Ages: 7 and up (younger kids can add the spiders).
You need
- 3 popsicle sticks painted black (jumbo for a bigger web)
- White yarn (or cotton string)
- 2 small plastic spiders (or paper spiders)
- Hot glue or craft glue (hot glue holds the crossed center best)
How to make it
- Cross the 3 sticks at the center like an asterisk. That gives you a six point star. Glue the center and let it set.
- Tie the yarn at the center with a dab of glue. Wrap it once around a spoke, move to the next spoke, and keep circling. Each lap moves a little farther from the center.
- Keep winding until the web looks full, then tuck the end behind a spoke with glue.
- Glue on the spiders and let everything dry.
What tends to go wrong: Wrapping too tight pulls the spokes toward each other and the web goes lopsided. Keep the tension snug and even, and check the shape after each lap.
11. Vampire Popsicle Stick Friend
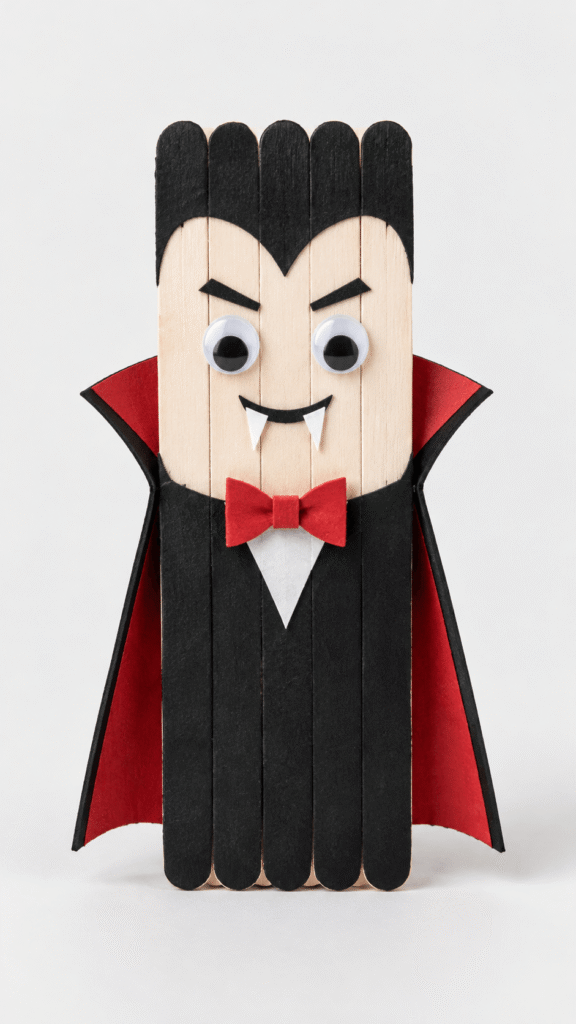
A pale face, a black cape, and tiny fangs. This one has a lot of paper pieces, so it’s a good project for a quiet table.
Skill: Intermediate. Time: 40 minutes. Mess: Low. Ages: 6 and up.
You need
- 6 to 8 popsicle sticks, plus 1 extra for the back
- Black, red, and white craft paper or foam (glossy black cardstock gives the cape a sheen)
- Googly eyes (or paper circles)
- Craft glue or a hot glue gun
- Scissors
- Black marker
- Small red and white paper pieces for details
How to make it
- Glue the sticks side by side into a tall body shape with the extra stick across the back. A coat of white or light gray paint gives a pale face, but natural wood reads as skin tone and works fine.
- Cut a black cape and red lining, glue the red onto the black, and attach it behind the face so it frames the head. Add black hair with a widow’s peak.
- Add googly eyes, eyebrows, a smile, tiny fangs, and a little bow tie from the paper pieces.
- Glue on jacket details and let everything dry flat.
What tends to go wrong: Fangs cut too large make the face look like a walrus. Keep them smaller than a fingernail.
12. Witch Hat Popsicle Stick Charm

A sleek black witch hat with a purple belt and a tiny bat looks good hanging by itself or in a group.
Skill: Intermediate. Time: 40 minutes. Mess: Medium if you paint, low with black sticks. Ages: 7 and up.
You need
- 4 wide (jumbo) craft sticks, painted black (or black dyed sticks)
- Black foam or cardstock for backing
- Purple polka dot ribbon (or plain purple ribbon, or a strip of purple paper)
- Purple glitter foam or cardstock (or purple paper with glitter glue)
- A scrap of black paper for the bat
- Craft glue
How to make it
- Glue two jumbo sticks at the top in an inverted V, then glue a third stick across the lower part to lock the angle. That’s your tall pointed hat. Glue the fourth stick across the base as the wide brim.
- Cut a black triangle slightly smaller than the frame and glue it behind so the hat looks solid.
- Wrap the purple ribbon around the lower part of the hat for the belt.
- Cut a small glitter square for the buckle, add a bat cutout, and glue both on.
Tip: Cut a smaller square out of the center of the buckle if you want it to look like a real buckle.
What tends to go wrong: The V spreads or collapses while the glue is wet. Clip the top with a clothespin until the cross stick sets.
13. Spooky Frame With Halloween Icons
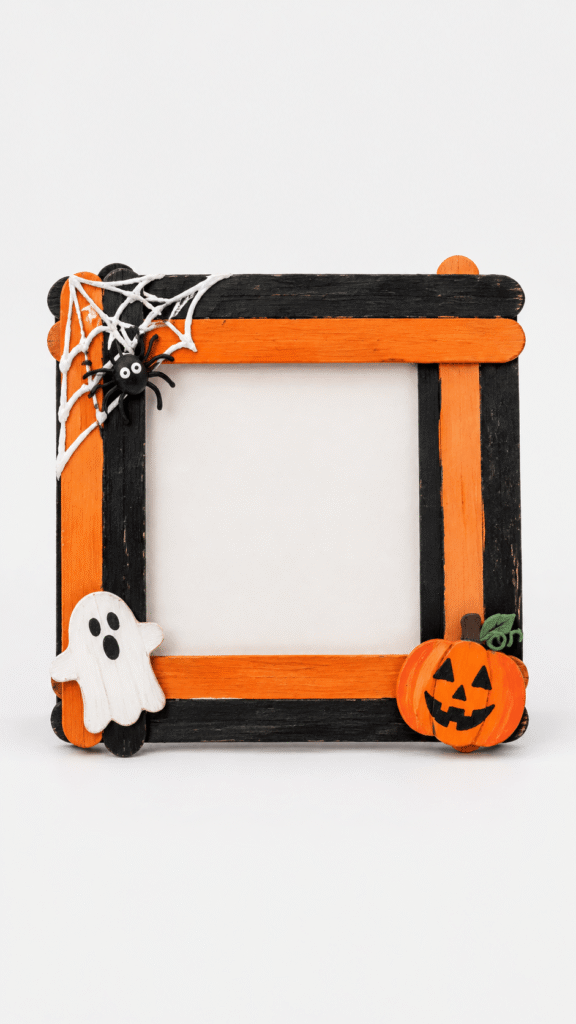
A little orange and black frame with a ghost, pumpkin, and spiderweb corner brightens a mantel or shelf. Pop a photo in the center and it becomes a keepsake.
Skill: Intermediate. Time: 40 minutes plus drying. Mess: Medium. Ages: 6 and up.
You need
- 6 to 8 popsicle sticks
- Black acrylic paint
- Orange acrylic paint
- White paint or cardstock for the ghost
- Craft glue
- Spider, ghost, and pumpkin decorations (or foam stickers or paper cutouts)
- A wallet size photo or drawing (optional)
How to make it
- Paint the sticks black and orange and let them dry completely.
- Glue the sticks into a square, with an orange stick on top and bottom and black on the sides, overlapping at the corners. With standard sticks the opening is about 3.75 inches, enough for a wallet size photo. A second layer of sticks on top makes it sturdier.
- Draw a spiderweb in one corner with a white paint pen and attach a spider.
- Glue on the ghost and pumpkin decorations. Tape a photo behind the opening if you like.
What tends to go wrong: Frames with only one layer twist at the corners. Use a double layer, or at least a small dab of glue at each overlap and a paperback on top while it sets.
14. Creepy Eyeball Wall Art

A giant monster eyeball turns plain sticks into a bold wall piece. The veins are what sell it.
Skill: Intermediate. Time: 40 minutes plus drying. Mess: Medium. Ages: 7 and up.
You need
- 9 to 11 popsicle sticks, plus 2 for the back
- White acrylic paint
- Green, black, and red paint, plus a little extra white for the highlights (or paint pens)
- Paintbrushes (or cotton swabs for small details)
- Craft glue
How to make it
- Glue the sticks side by side with the 2 back sticks across and let them dry. If you want a rounder outline, an adult can snip the corners at an angle with sturdy scissors.
- Paint the base white in two coats, drying between coats.
- Trace a jar lid lightly in pencil for the iris. Paint it green, add a black pupil in the center, and dot on a small white highlight.
- Add thin red vein lines around the eye with the tip of a fine brush or a red paint pen.
Tip: Veins look best when they’re thin, branching, and stop before the iris.
What tends to go wrong: Veins painted with a thick brush look like worms. Thin the red paint with a drop of water and use only the tip of the brush.
15. Popsicle Stick Halloween Garland

A line of ghosts, pumpkins, and bats on twine makes a mantel decoration and a great group project. Each kid can make one piece.
Skill: Intermediate. Time: 60 to 90 minutes. Mess: Medium. Ages: 6 and up.
You need
- Plain popsicle sticks, about 3 per ghost, 3 per pumpkin, and 1 per bat, plus 1 extra back stick for each ghost and pumpkin (a 100 count pack covers a mantel length garland)
- White and orange paint (or sticks in those colors)
- Black, green, and white craft paper or paint
- Twine or jute cord (or yarn)
- Craft glue
- Scissors
How to make it
- Build each piece. For ghosts and pumpkins, glue 3 sticks side by side with a back stick across. For bats, use one black stick with paper wings.
- Paint or cover the pieces, then add faces with paper or paint pens.
- Glue on small accents like stems, wings, and eyes.
- Lay the twine across a table, space the pieces about 4 to 5 inches apart, and glue each piece onto the twine along its back stick. Let it dry flat.
Tip: Leave 6 inches of extra twine at each end so you can tie it to hooks.
Practical note: If you hang the garland with removable strips, test one on a hidden spot first. On cheap flat paint, they can lift the finish when you peel them off.
What tends to go wrong: A single dot of glue lets pieces flip face down. Glue along the back stick so each piece hangs flat, and wait overnight before hanging anything with tacky glue.
Bigger Halloween Popsicle Stick Crafts for a Slow Afternoon
These take 45 to 90 minutes, more pieces, or small holes in wood. They suit kids 8 and up, or younger kids with a grown up doing the fiddly parts. Plan a snack.
16. Gothic Skeleton Plaque
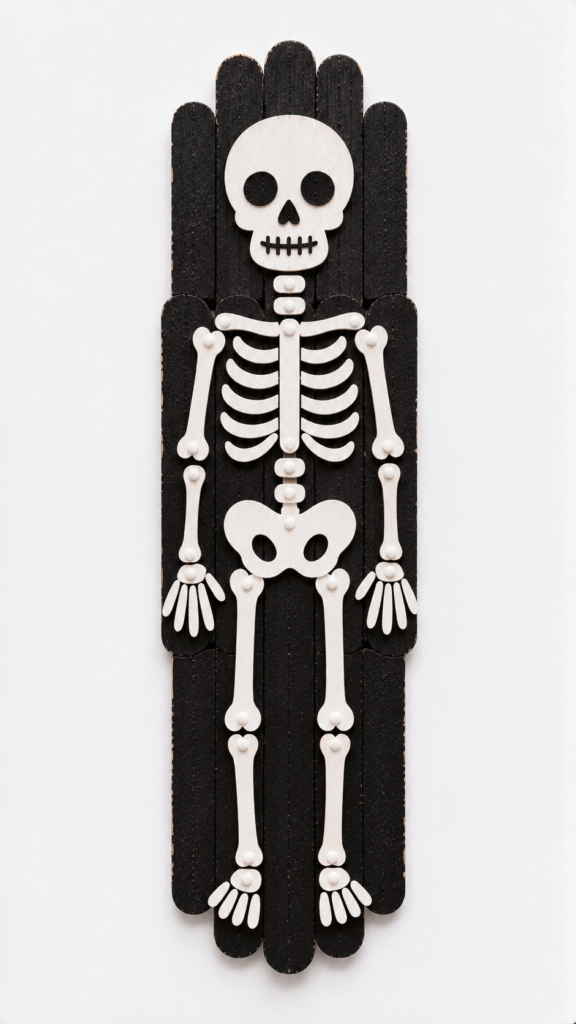
A black plaque with white skeleton pieces on it has a polished, grown up look that fits right in with Halloween decor.
Skill: Intermediate. Time: 45 minutes plus drying. Mess: Medium. Ages: 8 and up.
You need
- About 10 popsicle sticks, plus 2 to 3 for the back
- Black craft paint
- White foam or cardstock cutouts
- Hot glue or craft glue
- Small brads or white dots (white paint dots or stickers)
How to make it
- Make two rows of 5 sticks side by side, then glue one row end to end below the other to form a tall plaque. Glue 2 to 3 back sticks across, with one across the seam where the rows meet.
- Paint the plaque and back sticks black in two coats, and let them dry completely.
- Cut or layer the white pieces for the skull, ribs, arms, hands, and hip bones. Lay them out without glue first.
- Glue the pieces onto the plaque and add small dots or brads at the joints.
Tip: A tall rectangle reads as a coffin plaque once the skeleton sits on it. For a true coffin shape, an adult can snip the top corners.
What tends to go wrong: White foam on black shows every smudge of glue. Apply glue to the back of the foam with a toothpick, and use only small dots.
17. Moonlit Pumpkin Patch Sign
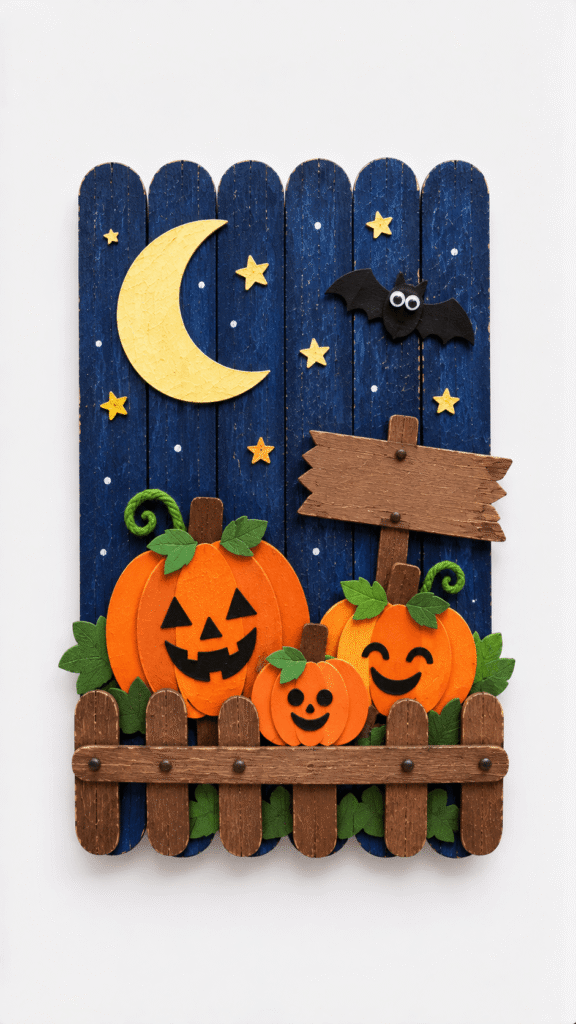
A night sky, a little fence, and a row of grinning pumpkins make a scene that looks great on a shelf.
Skill: Intermediate. Time: 60 minutes. Mess: Medium. Ages: 7 and up.
You need
- Navy and brown popsicle sticks (or plain sticks painted those colors)
- Orange craft paper or foam
- Green craft paper or foam
- Black paper for faces
- Yellow paper stars and a moon (and a black paper bat, if you like)
- Glue and scissors
How to make it
- Glue about 6 navy sticks side by side for the night sky and glue a back stick across.
- Add brown sticks for a fence and a small sign across the front.
- Cut out pumpkins, leaves, stars, a moon, and a bat, then glue them in place.
- Add simple pumpkin faces and write a pumpkin patch message on the sign with a marker.
Tip: Cut pumpkins in three sizes. Same size pumpkins look like stamps.
What tends to go wrong: Too many pieces crowd the scene. Lay everything out without glue first to check the spacing.
18. Playful Popsicle Stick Skeleton
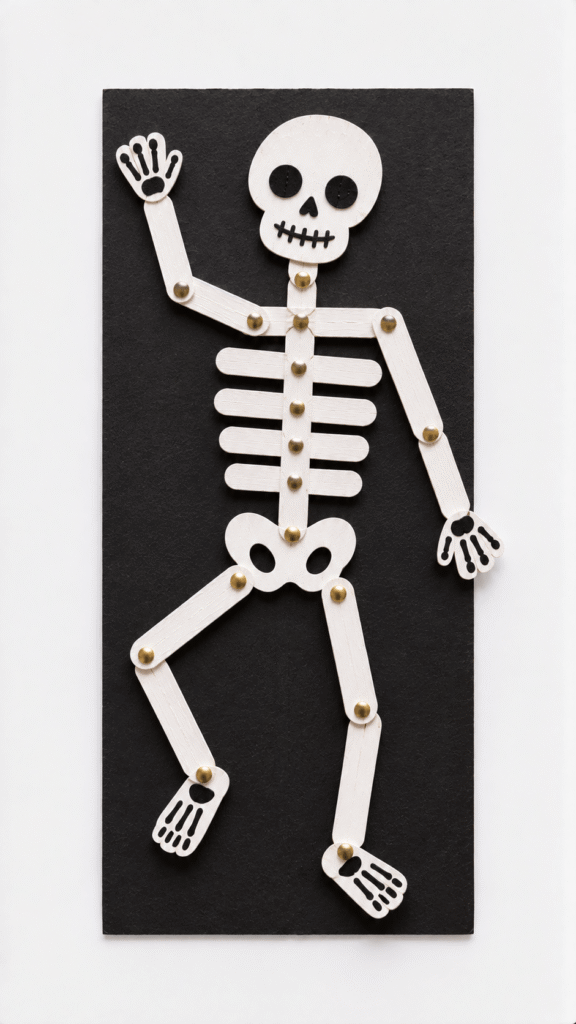
A skeleton with arms and legs that actually move is the one project here that earns its time. A brass fastener at each joint does the trick.
Skill: Advanced. Time: 45 to 60 minutes. Mess: Low. Ages: 8 and up (an adult makes the holes).
You need
- About 10 popsicle sticks
- White paint or white acrylic paint
- Cardboard or heavy black paper, about 6 by 8 inches, for the backing
- Craft glue
- 4 small brads or brass fasteners (or skip the moving joints and glue the limbs)
- Black marker
How to make it
- Paint the sticks white on both sides and let them dry completely.
- Glue one stick to the center of the backing for the spine. Cut three sticks short with sturdy scissors (an adult job) and glue them across as ribs. Add a hip piece, and make a skull from a white paper oval with a marker face.
- Have an adult poke a starter hole near the top end of each of the 4 limb sticks and through the backing, using a push pin on a scrap of cardboard. Push a brad through each limb into the backing, loosely, so it swings.
- Fold the brad prongs flat on the back and cover them with tape. Draw tiny hand and foot bones with the marker.
What tends to go wrong: Forcing a brad through unpierced wood splits the stick. Start every hole with a push pin, and keep the brads a little loose so the limbs move.
19. Spooky Popsicle Stick Haunted House
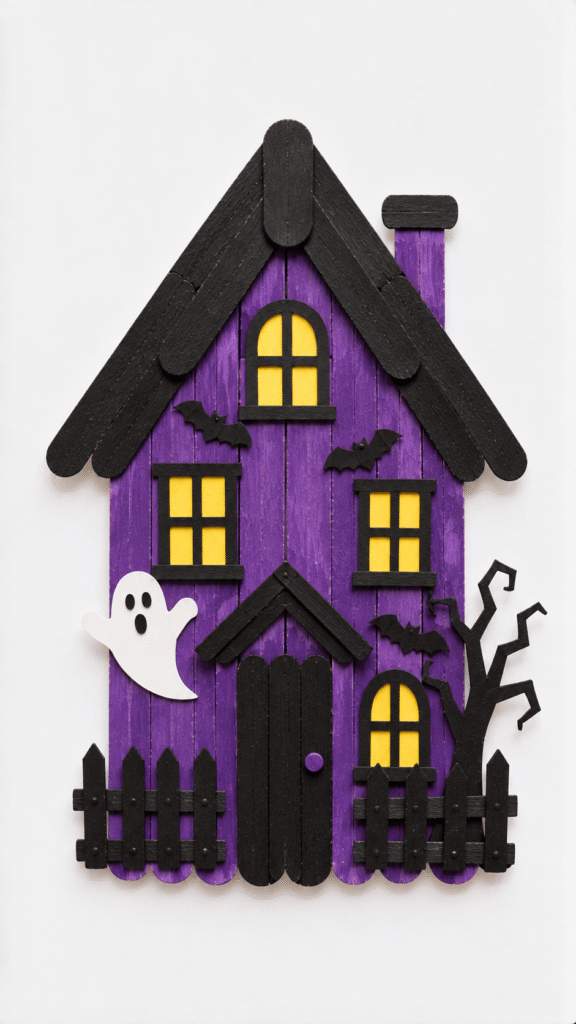
Purple walls, a black roof, tiny windows, and a handful of ghosts and bats. It’s the biggest project here and the one kids tend to keep.
Skill: Advanced. Time: 60 to 75 minutes plus drying. Mess: Medium. Ages: 8 and up (younger kids can paint and place the decorations).
You need
- 12 to 16 popsicle sticks, plain for the walls and black (or painted black) for the roof, door, and fence
- Purple craft paint (or purple washable paint)
- Black paint (or black sticks)
- Yellow cardstock or paper for the window panes
- White and black foam or paper scraps for the ghost, bats, tree, and trim
- Craft glue (hot glue helps with the roof)
How to make it
- Glue 8 plain sticks side by side for the front wall and glue 2 back sticks across. For the roof, cut a triangle from black foam or cardstock, glue it on top, and glue two black sticks along the slanted edges. Add a short stick or paper rectangle for the chimney.
- Paint the front wall purple in two coats. Paint the door and trim black.
- Cut window frames and yellow panes and glue them on. Add the door, bats, and a ghost.
- Finish with a small fence, a paper tree, and a dot of black paint for the doorknob.
Tip: Paint the walls before you glue on the roof. The overhang makes it fiddly to paint along the top edge later.
What tends to go wrong: Black sticks painted purple look muddy, so start with plain sticks. And a house with 20 tiny paper parts gets crowded fast, so lay it out without glue first.
20. Moonlit Haunted Tree
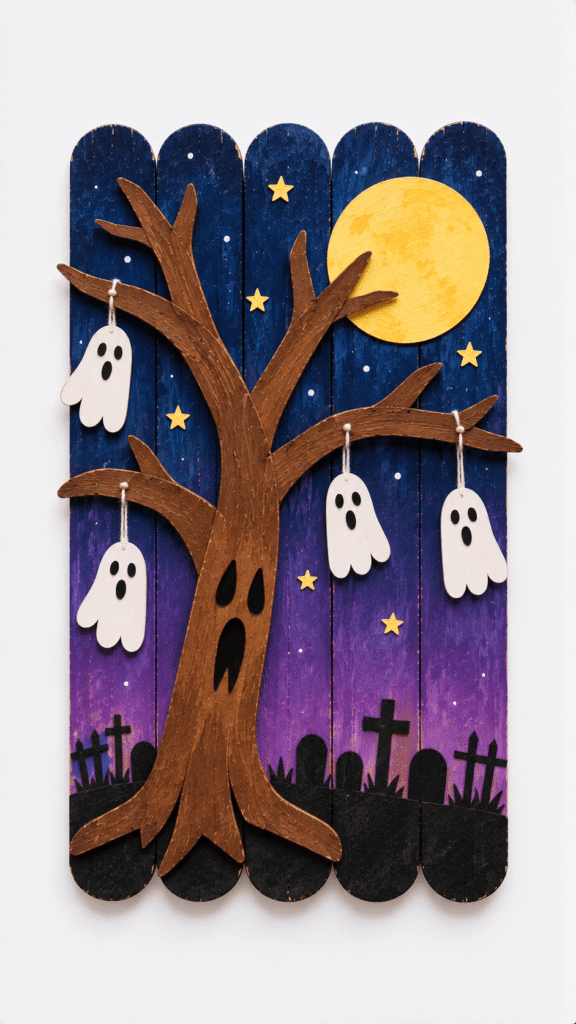
A glowing moon, a startled tree trunk, and a few dangling ghosts. It’s the messiest project here and the most dramatic.
Skill: Advanced. Time: 60 minutes plus drying. Mess: High. Ages: 8 and up (younger kids can paint the sky).
You need
- 8 jumbo popsicle sticks, plus 2 extra for the back
- Brown, black, blue, purple, yellow, and white acrylic paint (or washable paint)
- Paintbrushes
- White glue or a hot glue gun
- Black marker or paint pen
- White twine or string
- Cardstock for the ghost shapes
How to make it
- Glue 5 jumbo sticks side by side for the sky, with the 2 extra sticks across the back. Paint a blue to purple night sky, working in wide bands while the paint is still wet so it blends. Let it dry.
- Paint the 3 remaining sticks brown. Glue them across the front to make a tree, with one trunk and two branches spread wide.
- Cut small ghost shapes from white cardstock, draw on faces, tie each with a short piece of twine, and glue the twine to the branches.
- Add a yellow moon, a black ground line, a few tiny stars, and the graveyard details. Draw a face on the tree.
What tends to go wrong: Paint blends dry fast on bare wood and leave hard stripes. Work quickly, and keep the twine on the ghosts short so it doesn’t tangle.
Mistakes to Skip on Your First Batch
Most Halloween popsicle stick crafts go wrong in the same few places. These are the ones I’d warn a friend about before they start popsicle stick crafts for kids.
Gluing sticks edge to edge and calling it done. The glue surface on a stick edge is tiny. Always glue a stick or two across the back.
Expecting one coat of paint to cover. White and yellow on bare wood look streaky and gray after the first coat. Two thin coats beat one thick coat.
Painting over glue squeeze out. Glue that oozes out resists paint and shows up as a shiny patch. Wipe it off right away with a damp cotton swab.
Trusting brightly dyed sticks. The dye can bleed into wet paint, especially under white. Test one stick first, or use natural sticks.
Gluing googly eyes with thin glue. They slide around and fall off painted surfaces. Use tacky glue or a dot of hot glue.
Hanging projects too soon. Tacky glue feels dry in 30 minutes but takes about a day to reach full strength. Wait overnight before hanging anything.
FAQs
What is the best glue for popsicle stick crafts?
Tacky glue, such as Aleene’s Original Tacky Glue, is the best all around choice for kids. It grabs faster than school glue and doesn’t burn. Hot glue is stronger and sets in under a minute, but use a low temp gun and keep it an adult job for younger kids.
Are popsicle sticks and craft sticks the same thing?
Yes. “Popsicle stick” is the common name, and “craft stick” is the generic one on the package. Standard sticks are about 4.5 inches long and jumbo sticks are about 6 inches, so check the size before you buy.
What age can kids start making popsicle stick crafts?
Around age 3 with an adult, for simple gluing and decorating like the bat and mummy. By 5 to 6, most kids can paint and assemble paper details on their own. By 8, they can manage pinned joints with help.
How do you stop painted popsicle sticks from curling?
Use thin coats, paint both sides when you can, and dry the sticks flat under a light weight. Thick wet paint on one side is what makes them bow.
How do you make popsicle sticks stay together without hot glue?
Use tacky glue, hold the joint with a clothespin or binder clip for 15 to 20 minutes, and glue a stick across the back. Edge to edge joints on their own are weak.
How do you store finished Halloween crafts?
Store them flat in a box with tissue paper, away from damp. Paper and foam parts fade in direct sun, so keep them out of a sunny window.
