

The best mason jar Halloween crafts are glowing lanterns (ghost, pumpkin, haunted house, and lace jars lit with LED tea lights), character jars like a black cat or Frankenstein, and filled jars such as witch potions, candy holders, and tiny ghost scenes. Most take 30 to 60 minutes plus paint drying time and need only spray or acrylic paint, black vinyl or cardstock, and twine. To make a painted jar glow, mask the face or design before painting so light can shine through the bare glass, and use LED lights in anything decorated with paper, fabric, or paint.
Last October I lined up eleven jars on a sheet of cardboard in the driveway and spray painted them all in one afternoon: orange pumpkins, black bats, a green Frankenstein. They looked great on the porch at 4 p.m.
At 8 p.m., with LED tea lights inside, seven of them looked like dark soup cans. Paint blocks light. The jars that glowed were the ones where I’d left some glass bare.
That’s the one thing most mason jar Halloween crafts tutorials skip, so it’s the backbone of this guide. Every jar below tells you whether it glows, how to make it glow if you want it to, what paint actually sticks to glass, and how long it really takes once you count drying time.
These are adult DIY Halloween decor projects, with spray paint, craft knives, hot glue, and one real candle. The safety section covers ventilation and fire risk properly, because paper, lace, and twine don’t belong anywhere near a flame.
Supplies for Mason Jar Halloween Crafts (and Cheaper Swaps)
You don’t need twenty different products. A case of jars, two or three paints, black vinyl or cardstock, and a pack of LED tea lights cover most of these Halloween jar crafts.
Jars
Ball and Kerr jars are the standard, and a 12 pack of pint jars usually works out to a dollar or two per jar. Buy the full case, because once you start making mason jar crafts, a dozen jars goes fast. Wide mouth jars are worth the small upcharge for anything you fill or build inside, like the ghost scene or potion jar, because your hand actually fits.
The free option is your recycling: pasta sauce, salsa, and pickle jars work for almost every project here. The one catch is that their lids are mismatched sizes, so they’re harder to dress up with a witch hat or bat ears. Save the real Ball lids, though. Half the fun of mason jar lid crafts is that the lid becomes a hat, a pair of ears, or a tiny stage.
Paint: What Sticks To Glass
This matters more than anything else on the list. Regular craft acrylic on bare glass scratches off with a fingernail.
| Paint | Best for | Trade off |
| Spray paint that bonds to glass (Krylon Fusion All In One) | Solid matte or glossy jars: black, orange, green | Needs outdoor spraying and a respirator; overspray drifts further than you think |
| Craft acrylic (FolkArt, Apple Barrel) | Faces, details, small areas | Scratches off glass unless you prime first or seal with clear spray |
| Glass enamel paint (FolkArt Enamels) | Painted designs that need to last | Slower to cure; follow the label’s air dry or oven cure directions |
| Translucent glass paint (Pebeo Vitrea 160) | Colored glass that still glows, like stained glass | Pricier; streaks if brushed too thick |
| Frosted glass spray (Krylon Frosted Glass Finish) | Ghost jars and soft glow lanterns | Shows fingerprints until fully cured |
| Chalk style paint | Matte farmhouse finish | Grips glass better than acrylic, but chips without a clear topcoat |
Everything Else
| Supply | What I use | Free or cheaper swap |
| Adhesive vinyl | Oracal 651 (permanent) or Oracal 631 (removable, if you want the jar back after Halloween) | Black cardstock and Mod Podge |
| Cutting | Cricut or Silhouette for vinyl; a craft knife and self healing mat for paper | Small sharp scissors and simple shapes |
| Masking | Painter’s tape or FrogTape, plus round stickers for eyes | Leftover vinyl scraps |
| Glue | E6000 for heavy pieces, low temp hot glue for paper and felt | Tacky glue (slower, but no burns) |
| Decoupage | Mod Podge Matte or Gloss | Half school glue, half water |
| Lights | Warm white or amber LED tea lights | Battery fairy lights coiled inside |
| Ties | Jute twine, baker’s twine, black ribbon | Strips of black fabric from an old shirt |
| Dimensional paint | Tulip puffy paint for raised spider webs | Hot glue lines, painted once cool |
| Filler | Black shredded paper, craft sand, faux moss | Shredded junk mail spray painted black |
If you buy one upgrade, make it LED tea lights with a remote or a built in timer. Getting a hand into a jar topped with a felt witch hat to switch on a tea light every night gets old by October 3. It matters most for mason jar lid crafts, where the decoration sits right where your hand needs to go.
How to Make a Painted Jar Actually Glow
Two coats of opaque paint stop almost all light. A tea light inside a solid orange jar lights up the inside of the paint, and from across the room you see a dull orange can. It’s the biggest difference between mason jar crafts that look good in photos and ones that look good on a porch at night.
There are three ways around that, and each of the painted mason jar lanterns below uses one of them.
1. Mask it, Paint it, Peel it
Stick vinyl shapes, painter’s tape, or round stickers on the bare glass wherever you want light to come through: pumpkin eyes, a moon, a window. Paint over everything, then peel. The bare glass shapes glow and everything else stays dark.
Trade off: timing the peel. Pull the mask when the last coat is dry to the touch but not fully cured, usually within an hour. Wait a day and the paint film tears with the mask, leaving ragged edges. If you do wait, score around each shape with a craft knife first.
2. Use Paint you can see through
Frosted glass spray, translucent glass paint, and Mod Podge tinted with food coloring all color the glass without blocking the light. This is how you get a ghost jar that glows white all over, or an orange jar that glows like stained glass.
Trade off: these finishes look thin and streaky in daylight. A glowing jar at night and a solid jar by day are usually two different jars.
3. Scratch the Design Out
Paint the jar solid, let it cure for a full day, then scratch your design through the paint with a toothpick, a skewer, or the tip of a craft knife. Light shines through every scratched line. It’s the best way to make spider webs and fine details glow.
Trade off: this only works with paint that scratches cleanly, like craft acrylic or chalk paint. Spray paint made to bond to glass resists scratching, which is exactly why you’d use it anywhere else.
Prep that Applies to every Jar
- Wash the jar in hot soapy water and peel off any label residue (a little cooking oil lifts stubborn glue).
- Wipe the outside with rubbing alcohol and stop touching the glass. Skin oil makes paint bead up.
- For spray paint, push a paint stirrer or dowel into a cardboard box and set the jar upside down on it. You can spray the whole jar at once without touching it.
- Spray from about 10 inches away in light passes. Three thin coats beat one heavy coat, which runs and sags.
- Let the jar dry for a full day before adding vinyl, glue, or handling it much.
Practical note: Light color matters as much as paint. Amber or warm white LEDs make orange and black jars look like real candlelight. Cool white LEDs wash orange out and make the whole jar look cheap.
Safety And Workspace Setup
Most Halloween jar crafts are low risk, but three things in this medium deserve real attention: solvent fumes, sharp blades, and open flame near flammable decorations.
Spray paint and strong glue
- Spray outside, not in the garage. Even with the door open, fumes and overspray build up in a garage. Set a big cardboard box on its side as a spray booth on the lawn or driveway, on a calm day.
- Wear a real respirator. A dust mask does nothing for solvent vapor. A half mask with organic vapor cartridges (the 3M 6000 series with 6001 cartridges is a common setup) is what actually filters spray paint fumes.
- Nitrile gloves and old clothes. Spray paint and E6000 don’t come off skin or fabric easily.
- Check the can’s temperature range. Most spray paints want dry weather above about 50°F. In cold, damp air the finish comes out rough and stays tacky for days.
- E6000 fumes are strong too. Use it outside or next to an open window with a fan pushing air out, and let glued jars cure somewhere other than your bedroom.
Blades and hot glue
- Use a fresh craft knife blade. Dull blades skip and slip, and slipping is how you cut yourself. Cut on a self healing mat, keep your other hand behind the blade, and cap it when you put it down.
- Low temp glue for paper, felt, and lace. High temp glue burns skin badly and scorches thin paper. Keep a bowl of cold water nearby for fingertips.
- Inspect the glass. Run a finger around every rim and check for chips or cracks before you start, especially on thrifted jars.
Fire: the rule that matters most
Only one jar in this guide, the Pumpkin Spice Candle Jar, uses a real flame. Every other jar gets an LED, full stop.
Paper, tissue, lace, felt, cheesecloth, twine, glitter, and dried paint all burn, and a tea light sits close enough to scorch them within an evening. Plenty of jar tutorials say “tea light or LED” as if they’re interchangeable. For any decorated jar, it’s LED only.
For the real candle, follow the National Candle Association’s basic guidance: trim the wick to ¼ inch before each burn, burn no more than four hours at a time, stop when ½ inch of wax is left, and never leave it burning unattended.
Other small hazards
- Coin batteries. Most LED tea lights use them. Keep spares away from kids and pets, since a swallowed coin battery is a medical emergency.
- Potion jars look like drinks. Label them clearly, keep them out of reach of small kids, and never fill them with anything toxic like colored dish soap or cut open glow sticks.
- Painted jars aren’t food safe inside. Paint only the outside of anything that will hold candy, and hand wash painted jars.
All 20 Mason Jar Halloween Crafts at a Glance
The last column is the one to check first. If you want Halloween mason jars that light up the porch at night, pick one marked Yes. The rest are daytime display jars.
| # | Jar | Skill | Active time | Drying or curing | Main technique | Glows at night? |
| 1 | Spiderweb Glow Jar | Intermediate | 40 min | 24 hr before scratching | Paint, then scratch the web through | Yes, the web lines glow |
| 2 | Pumpkin Glow Jar | Beginner | 30 min | 1 hr to peel, 24 hr cure | Mask, paint, peel | Yes, the face glows |
| 3 | Bat Wing Lantern Jar | Intermediate | 45 min | 24 hr | Masked center, cardstock wings | Yes, the center glows |
| 4 | Skeleton Glow Jar | Intermediate | 1 hr | Overnight for clay, 24 hr | Clay bones with glow paint | The bones glow after charging |
| 5 | Ghost Glow Mason Jar | Beginner | 25 min | 24 hr | Frosted spray and vinyl face | Yes, the whole jar |
| 6 | Autumn Ghost Lantern Jar | Beginner | 45 min | 2 hr | Tissue paper and Mod Podge | Yes |
| 7 | Haunted House Lantern Jar | Advanced by hand, Intermediate with a Cricut | 1 to 1½ hr | None | Silhouettes over vellum | Yes |
| 8 | Mummy Eyes Glow Jar | Beginner | 20 min | 1 hr | Cheesecloth wrap | Yes, softly |
| 9 | Witch Hat Lantern Jar | Intermediate | 1 hr | 1 hr | Vinyl silhouette and felt hat | Yes |
| 10 | Lace Ribbon Lantern Jar | Beginner | 20 min | None | Lace wrap | Yes, through the lace |
| 11 | Frankenstein Face Jar | Beginner | 45 min | 24 hr | Spray paint, felt, hardware bolts | No, display jar |
| 12 | Black Cat Mason Jar | Beginner | 40 min | 24 hr | Spray paint and paper | No, display jar |
| 13 | Matte Pumpkin Face Jar | Beginner | 30 min | 24 hr | Mask, paint, peel | Optional, works as a vase |
| 14 | Whimsical Witch Mason Jar | Beginner | 45 min | 24 hr | Acrylic, yarn, felt | No, display jar |
| 15 | Halloween Memory Jar Charm | Beginner | 30 min | None | Layered paper and filler | No |
| 16 | Glowing Witch Potion Jar | Beginner | 20 min | None | Tinted liquid or dry filler | Under a blacklight |
| 17 | Eyeball Specimen Jar | Beginner | 30 min | 1 hr | Painted ping pong balls | Optional blacklight glow |
| 18 | Sparkly Ghost Jar Scene | Intermediate | 1 hr | Overnight for clay | Scene built on the lid | No |
| 19 | Candy-Filled Jack-O’-Lantern Jar | Beginner | 30 min | 24 hr | Outside paint and vinyl | No |
| 20 | Pumpkin Spice Candle Jar | Intermediate | 1 hr | 1 to 2 weeks for full scent | Soy wax and a wick | Yes, real flame |
Painted Jars That Still Glow
These five use the masking, frosting, and scratching tricks above, so they look finished in daylight and still light up after dark. If you only make one set of Halloween mason jars this year, make these.
1. Spiderweb Glow Jar

This was the first jar I remade after the driveway flop. Instead of painting a white web on a black jar (which looks nice and doesn’t glow at all), you scratch the web through the black paint so every thread lights up.
Skill: Intermediate | Time: 40 minutes plus 24 hours of curing before you scratch | Glows: Yes, along every web line
What you need
- 1 mason jar
- Black craft acrylic or chalk paint (it needs to scratch cleanly, so skip glass bonding spray paint)
- A foam brush or makeup sponge
- A toothpick, bamboo skewer, or craft knife
- White chalk or a white charcoal pencil for sketching
- White dimensional paint, such as Tulip puffy paint (for the daytime version)
- 1 small plastic spider
- E6000 or hot glue
- Black twine
- Warm white or amber LED tea light
How to make it
- Sponge on two or three coats of black paint, letting each dry for about 20 minutes. Sponging leaves fewer streaks than brushing.
- Let the jar cure for a full 24 hours.
- Sketch the web with chalk: six to eight spokes from a center point, then curved threads connecting them.
- Scratch along your chalk lines with a toothpick for fine threads or a skewer for bolder ones. Wipe away the paint dust as you go.
- Glue the spider near the center of the web.
- Wrap twine around the rim, tie it off, and drop in the LED.
Tip: Make the threads between spokes dip toward the center instead of running straight across. Real webs sag that way, and it’s the detail that makes the web look right.
What goes wrong: Scratching too soon. Paint that hasn’t cured peels away in flakes instead of leaving clean lines.
Daytime version: Skip the scratching and pipe the web on with white dimensional paint. It’s raised and crisp in daylight but won’t glow at night.
2. Pumpkin Glow Jar
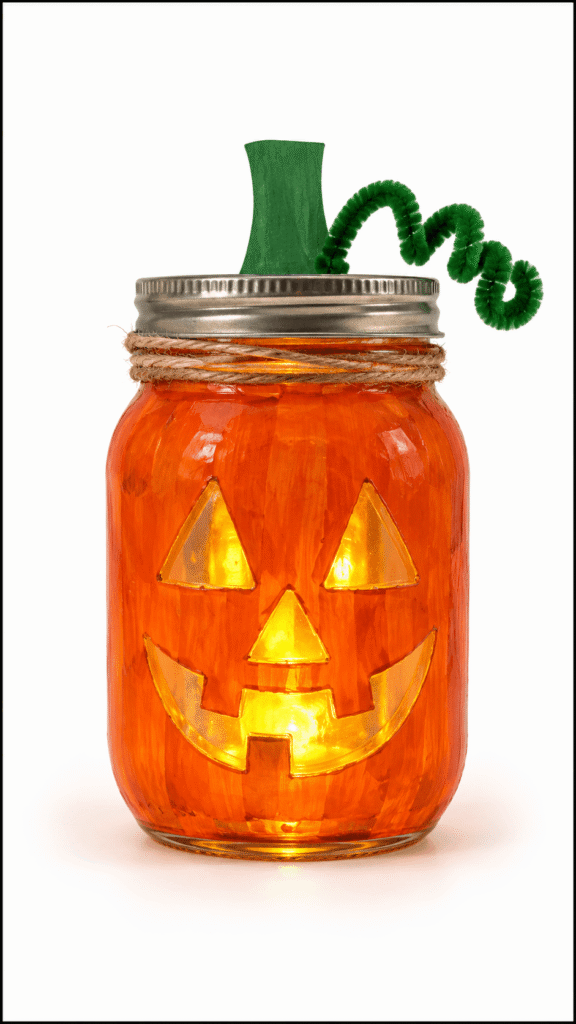
The easiest of the mason jar lanterns here, and the one that teaches you the mask and peel trick. The face is bare glass under the paint, so it glows like a real carved pumpkin.
Skill: Beginner | Time: 30 minutes plus about 1 hour before peeling and 24 hours to cure | Glows: Yes, through the face
What you need
- 1 mason jar
- Orange spray paint that bonds to glass (or translucent orange glass paint if you want the whole jar to glow)
- Black adhesive vinyl or painter’s tape for the face mask
- Twine
- Green cardstock stem and a curly vine (green floral wire or a green pipe cleaner)
- Paintbrush
- E6000 or hot glue
- White tissue paper or vellum
- Amber LED tea light
How to make it
- Cut triangle eyes, a nose, and a toothy grin from vinyl and press them onto the clean jar.
- Rub every edge of the vinyl down hard with a fingernail or an old gift card.
- Spray three light coats of orange, about 10 minutes apart.
- Peel the face pieces off once the jar is dry to the touch, within about an hour.
- Let it cure overnight, then glue the stem to the lid and curl the vine around a pencil before attaching it beside the stem. Gluing the stem to the lid instead of the glass keeps the lid removable for swapping the LED, which is the rule for all crafts with mason jar lids.
What goes wrong: Paint creeping under the mask. If the vinyl edges aren’t pressed down hard, you peel off a fuzzy, blurry face. Burnishing the edges is the step that makes it look professional.
Tip: The tissue paper inside matters. Without it, the clear face looks blank in daylight. With it, the face reads as a pale jack o’lantern by day and glows yellow at night.
3. Bat Wing Lantern Jar

A black jar with a glowing orange circle in the middle, foam wings, and two pointy ears on the lid. The masked circle is the trick: paint everything else black and it looks like a bat holding a little moon. Ears glued to the lid are one of the easiest crafts with mason jar lids, and they turn any round jar into an animal.
Skill: Intermediate | Time: 45 minutes plus 24 hours to cure | Glows: Yes, through the center circle
What you need
- 1 mason jar
- Black spray paint, or translucent black glass stain
- A round sticker or vinyl circle about 2½ inches across
- Black foam sheet (it holds its shape better than cardstock)
- Googly eyes
- White cardstock for fangs
- Translucent orange glass paint (optional)
- E6000
- Black paint pen
- Amber LED tea light
How to make it
- Press the circle onto the front of the jar and burnish the edges.
- Spray the jar and lid black in light coats, then peel the circle within an hour.
- For a stronger orange glow, brush translucent orange glass paint over the bare circle once the black is dry.
- Cut two bat wings and two pointed ears from foam. Glue the wings to each side of the jar and the ears to the lid.
- Add googly eyes on the circle, draw a smile with the paint pen, and glue on two tiny white fangs.
- Put the LED inside.
What goes wrong: Using hot glue for the wings on a porch jar. Hot glue lets go of smooth painted glass when it gets cold, and the first chilly night your bat loses a wing. E6000 holds through the weather.
4. Skeleton Glow Jar
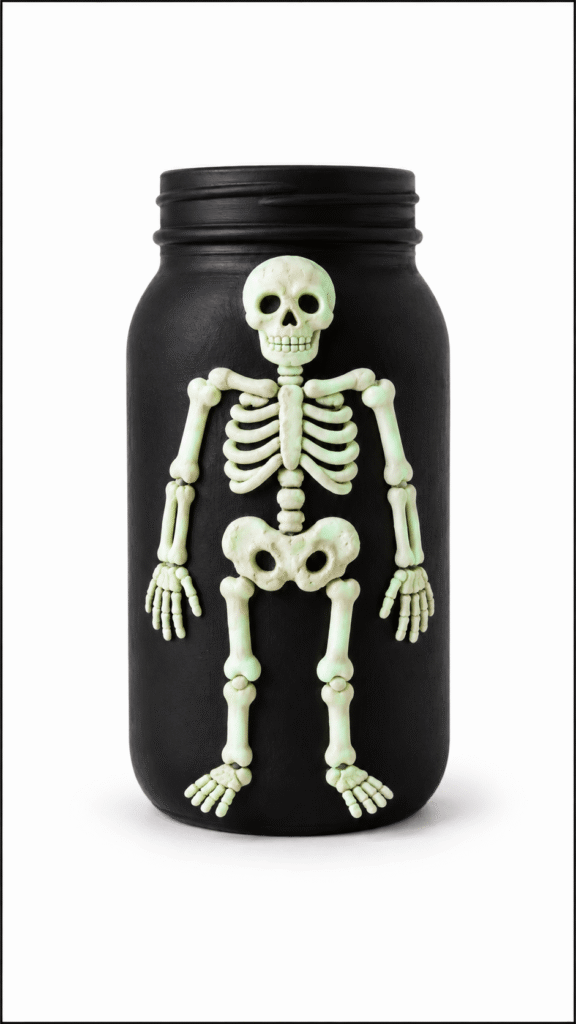
A matte black jar with white bones that glow in the dark. Here the glow comes from the bones themselves, painted with glow paint, rather than from a light inside.
Skill: Intermediate | Time: 1 hour plus overnight drying for clay and 24 hours of curing | Glows: The bones glow after charging under a lamp
What you need
- 1 mason jar
- Matte black spray paint or acrylic
- White air dry clay (Crayola Air Dry Clay or DAS), or white craft foam
- Glow in the dark paint
- Strong craft glue (E6000)
- A pencil for shaping
How to make it
- Paint the jar matte black and let it dry completely.
- Roll the clay into thin snakes for arm and leg bones, pressing a small knob onto each end. Make curved ribs and a flattened skull, using the pencil eraser to press in the eye sockets.
- Press the bones lightly onto the painted jar in a skeleton shape and let them dry there overnight.
- Once dry, pop them off. They’ll keep the curve of the jar. Glue them back on with E6000.
- Brush two or three coats of glow paint over the bones.
- Charge it under a bright lamp for 10 minutes, then switch off the lights.
Tip: Drying the bones on the jar is what makes them fit. Bones dried flat on a table rock against the curved glass and pop off.
Trade off: Air dry clay shrinks a little and can crack as it dries. Thicker bones crack less, and a hairline crack can be filled with a dab of wet clay.
5. Ghost Glow Mason Jar

Frosted glass spray turns a clear jar milky white, and an LED inside makes the whole thing glow like a ghost. It’s the quickest glowing jar on this list, and the one people ask about most when they see it lit in a window.
Skill: Beginner | Time: 25 minutes plus 24 hours to cure | Glows: Yes, the whole jar
What you need
- 1 mason jar
- Frosted glass spray (Krylon Frosted Glass Finish), or white paint applied thinly with a sponge
- Black adhesive vinyl or cardstock
- Twine or jute string
- Warm white LED tea light
How to make it
- Spray two or three light coats of frosted finish and let the jar cure overnight.
- Cut two tall oval eyes and an open “oooo” mouth from black vinyl.
- Press the face onto the front of the jar.
- Wrap twine around the rim and tie a bow.
- Place the LED inside.
What goes wrong: Using solid white acrylic paint instead of frosted spray. Two coats of white block the light, and your ghost turns into a white jar that barely glows. If you only have white paint, dab it on thinly with a sponge so some light gets through.
Variation: Stick the vinyl face on before you frost, then peel it off. The clear face glows brighter than the frosted body, which looks properly eerie in a dark window.
Paper, Fabric, And Silhouette Lanterns
No spray paint needed for these five. Light comes through tissue, vellum, lace, or cheesecloth, which makes them the easiest mason jar lanterns to make indoors on a weeknight. Every one of them is LED only, because everything on the outside will burn.
6. Autumn Ghost Lantern Jar

Tissue paper blended from yellow to orange to purple, with little black ghosts floating across it. Lit up, it looks like a stained glass sunset.
Skill: Beginner | Time: 45 minutes plus about 2 hours drying | Glows: Yes
What you need
- 1 clean mason jar
- Orange, yellow, and purple tissue paper
- Black ghost cutouts (black cardstock or vinyl)
- Mod Podge Matte or school glue thinned with water
- Foam brush
- Twine or jute string
- Warm white LED tea light
How to make it
- Tear the tissue into pieces about an inch across. Torn edges blend together; cut edges look like tiles.
- Brush Mod Podge on the top third of the jar and lay yellow pieces, then brush a thin coat over them.
- Work down with orange, overlapping a few pieces into the yellow so there’s no hard line.
- Finish the bottom third with purple, again overlapping into the orange.
- Let it dry completely, then glue the ghost cutouts on with a little more Mod Podge.
- Tie twine around the rim and add the LED.
What goes wrong: Cheap tissue paper bleeds its dye the moment it’s wet. Purple bleeding into yellow turns a muddy brown. Let the yellow and orange dry before you add the purple, and the blend stays clean.
Tip: Mod Podge looks milky white while it’s wet. It dries clear, so don’t panic and add more.
7. Haunted House Lantern Jar

A black silhouette wraps around the jar with a crooked house, bare trees, a broken fence, and bats, and yellow vellum inside makes every cut out window glow gold. It’s the showpiece of these mason jar lanterns and the one that takes the most patience.
Skill: Advanced if you cut it by hand, Intermediate with a Cricut or Silhouette | Time: 1 to 1½ hours | Glows: Yes, through the windows and around the silhouette
What you need
- 1 clean mason jar
- 1 sheet of black vinyl or cardstock
- 1 sheet of yellow vellum (or yellow tissue paper)
- 1 warm white LED tea light
- Small sharp scissors
- A craft knife with a fresh blade and a cutting mat
- Double sided tape or Mod Podge
How to make it
- Measure around the jar and draw the scene as one long strip that height. Keep a solid ground line along the bottom so it all holds together.
- Cut the small window openings first, while the paper is still stiff and easy to hold. Then cut around the outline.
- Cut the vellum to the jar’s height, roll it up, and slip it inside. It springs open against the glass on its own.
- Wrap the silhouette around the outside of the jar and secure it with double sided tape or a thin layer of Mod Podge.
- Add a few loose bats above the roofline and drop in the LED.
Tip: vellum glows more evenly than tissue paper. Tissue shows every wrinkle and crease once it’s lit.
Trade off: by hand, the fine details (fence pickets, tree branches) are slow and easy to snap with the craft knife. Keep branch shapes chunky, or let a cutting machine do it.
8. Mummy Eyes Glow Jar

Strips of cheesecloth wrapped around a jar, with two googly eyes peeking out of the gap. Soft, cute, and done in 20 minutes.
Skill: Beginner | Time: 20 minutes plus about 1 hour for the glue to set | Glows: Yes, softly through the wraps
What you need
- 1 clean mason jar
- White cheesecloth or gauze wrap (grade 10 or 20 cheesecloth, the loose open weave)
- Googly eyes (two large ones)
- Warm white LED tea light
- Craft glue or Mod Podge
- Optional: a black tea bag for an aged look
How to make it
- Cut the cheesecloth into strips about 2 inches wide.
- Dab glue in a few spots, then wrap the strips around the jar at slight angles, overlapping as you go.
- Leave a gap about an inch tall across the front for the face.
- Glue the googly eyes onto the glass inside the gap.
- Tug a few threads loose along the strip edges so they look frayed and fluffy.
- Add the LED.
Tip: Cheesecloth comes in grades by weave. Loose grade 10 or 20 lets light through and looks like real bandages. Tight grade 90 blocks the light and looks like a dish towel.
Variation: Soak the cheesecloth in strong black tea for 10 minutes and let it dry before wrapping. The aged, yellowed look is far creepier than bright white.
9. Witch Hat Lantern Jar

A graveyard or haunted house skyline wraps the lower half of the jar, and a little felt witch hat sits on the lid. The hat is what people pick up and look at. It’s my favorite mason jar lid craft on this list, because the lid does half the decorating.
Skill: Intermediate | Time: 1 hour plus about 1 hour for the glue to set | Glows: Yes, through the clear glass above the silhouette
What you need
- 1 clean mason jar
- Black vinyl or a paper silhouette band
- Battery operated LED tea light (one with a timer or remote is worth it here)
- Black felt or fabric scrap
- A piece of cardstock for the cone
- Purple ribbon
- Small pumpkin and spider embellishments
- Hot glue (low temp)
How to make it
- Clean and dry the jar, then wrap the black silhouette around the lower half.
- Set the LED inside so the light shows above and through the silhouette.
- For the hat, draw a circle about 10 inches across on cardstock and cut out a quarter of it. Roll it into a cone and glue the seam.
- Cover the cone with black felt, then cut a felt circle about 4½ inches across for the brim and glue the cone on top.
- Glue the brim to the lid, tie purple ribbon around the base of the cone, and add the pumpkin and spider.
Tip: That cone fits a regular mouth lid. For a wide mouth jar, start with a 12 inch circle.
What goes wrong: Felt alone flops over. The cardstock cone underneath is what keeps the hat standing tall and pointed.
10. Lace Ribbon Lantern Jar
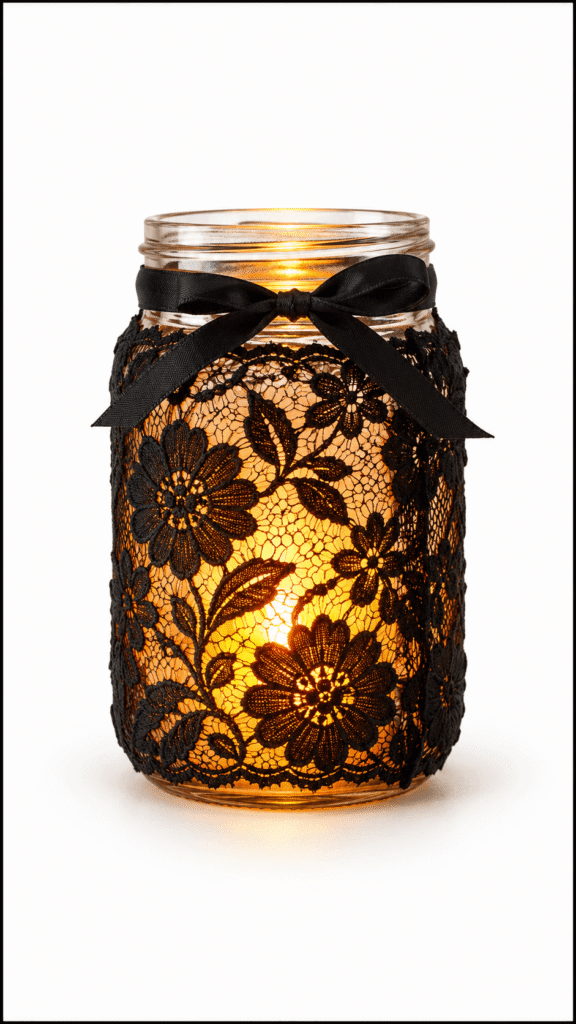
Black lace wrapped around the jar throws a pattern of light across the table. It’s the most elegant piece of DIY Halloween decor here, and also the fastest.
Skill: Beginner | Time: 20 minutes | Glows: Yes, through the lace
What you need
- 1 clean mason jar
- Black lace fabric or wide lace ribbon
- Black ribbon for the bow
- Amber LED tea light (for the orange glow)
- Low temp hot glue or craft glue
How to make it
- Wrap the lace around the jar and trim it so the ends overlap by about half an inch at the back.
- Secure the lace with small dots of glue along the back seam and at the top and bottom edges.
- Tie black ribbon around the neck of the jar and finish it with a bow on the front.
- Place the amber LED inside and switch it on.
What goes wrong: Big blobs of hot glue. Glue seeps through the holes in lace and shows as shiny patches on the glass. Use the smallest dots you can, only at the seam and edges.
Variation: Use the lace as a spray paint stencil. Wrap it tight, spray the jar black, and peel the lace away. The lace pattern is left printed on the glass, and the light shines through every gap.
Character Jars With a Face
These four Halloween mason jars are daytime pieces for a shelf, an entry table, or a kitchen counter. They’re painted solid, so they won’t glow, but they make good holders for pens, wrapped candy, or a few faux stems.
11. Frankenstein Face Jar
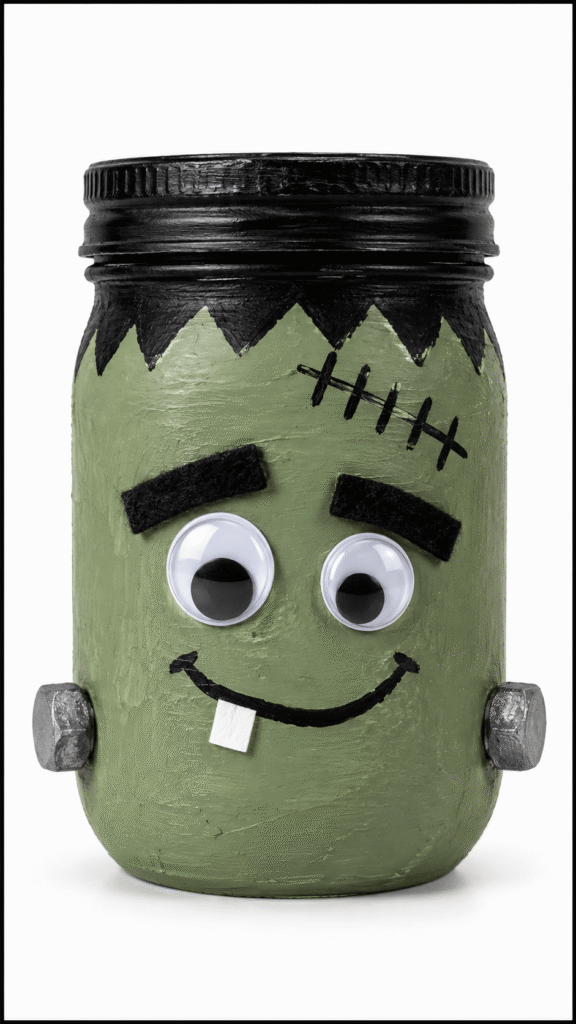
A green jar, a black lid painted as flat top hair, and two real hardware bolts on the sides. The bolts are what make people laugh when they pick it up. Painting the lid is the quickest of all mason jar lid crafts, and here it finishes the whole face.
Skill: Beginner | Time: 45 minutes plus 24 hours to cure | Glows: No, display jar
What you need
- 1 mason jar with lid
- Green acrylic or chalk paint (or green spray paint that bonds to glass)
- Black acrylic paint
- 2 googly eyes
- Black felt or foam
- White paper or foam scrap
- Two small hex nuts or bolt heads from the hardware store (or bottle caps painted gray)
- Black paint pen
- E6000 or craft glue
- Paintbrushes
How to make it
- Paint the jar green in two or three coats and let it dry completely.
- Paint the lid black, then paint a jagged hairline around the top of the jar just below the lid.
- Glue on the googly eyes and two thick felt brows above them.
- Draw a stitched scar across the forehead with the paint pen.
- Glue a hex nut low on each side of the jar for the neck bolts.
- Draw a curved smile and glue on one small white paper tooth.
Tip: A slightly muted, grayish green looks far more like a monster than bright lime green, which tends to read as a cartoon frog.
Trade off: Real metal nuts are heavy. Hot glue won’t hold them on glass for long, so use E6000 and let it cure overnight before you pick the jar up.
12. Black Cat Mason Jar

Bright green eyes, a pink nose, pipe cleaner whiskers, and orange tissue paper puffing out of the top. It’s a treat holder in disguise, so tuck wrapped candy under the tissue. Like the bat, it’s as much a mason jar lid craft as a jar craft, since the ears sit on the lid ring.
Skill: Beginner | Time: 40 minutes plus 24 hours to cure | Glows: No, display jar
What you need
- 1 clean mason jar with the lid ring (not the flat insert)
- Black paint or black spray paint
- Pink and green craft paper, or paint
- Black cardstock or foam for ears
- White pipe cleaners
- Orange tissue paper
- Scissors and E6000 or hot glue
How to make it
- Paint the jar and lid ring black and let them dry fully.
- Cut two triangle ears from black cardstock or foam, glue small pink triangles inside, and glue them to the outside of the lid ring so they stand up.
- Cut two green almond shaped eyes and add a thin black vertical slit to each for the pupil.
- Glue on the eyes and a small pink nose.
- Cut three short pieces of pipe cleaner per side and glue them out from the nose for whiskers.
- Fill the top with crumpled orange tissue paper so it puffs up through the ring.
Tip: The vertical slit pupils are the detail that makes this read as a cat instead of a generic monster. Round pupils make it look like an owl.
What goes wrong: Long whiskers get bent every time someone reaches in. Keep them about 2 inches long.
13. Matte Pumpkin Face Jar

A matte black jar with a bright orange pumpkin face, finished with a twine bow and filled with faux fall stems. It’s the piece of DIY Halloween decor that works as a vase all season, not just on October 31.
Skill: Beginner | Time: 30 minutes plus 24 hours to cure | Glows: Optional (see the tip)
What you need
- 1 wide mouth mason jar
- Black matte paint (chalk paint or matte spray)
- Orange acrylic paint and a makeup sponge
- Painter’s tape
- Matte clear sealer
- Twine
- Faux fall stems or flowers
How to make it
- Clean and dry the jar, then paint the outside with black matte paint. Let it dry fully.
- Make a stencil: stick a strip of painter’s tape on parchment paper, draw triangle eyes, a nose, and a toothy grin, and cut the shapes out of the tape with a craft knife.
- Stick the stencil onto the jar, press the edges down, and dab orange paint into the openings with a sponge.
- Peel the tape while the orange is still slightly damp.
- Once dry, spray a matte clear sealer. Matte black shows every fingerprint without it.
- Tie twine around the neck in a simple bow and fill with faux stems.
Tip: want it to glow too? Stick the face shapes onto bare glass before painting the black, peel them after, and use a light inside. Real flowers with water inside are fine either way, since the paint is only on the outside.
14. Whimsical Witch Mason Jar

An orange jar with a pumpkin face, cream yarn hair, a wooden bead nose, and a little felt hat. Basically a pumpkin dressed up as a witch.
Skill: Beginner | Time: 45 minutes plus 24 hours to cure | Glows: No, display jar
What you need
- Clean mason jar
- Orange acrylic paint
- Black felt hat (or felt and cardstock to make one)
- Cream yarn
- Orange ribbon
- Small wooden bead (a half bead, or one with a flat side)
- Craft glue and E6000
- Black paint marker
How to make it
- Paint the jar orange in two or three coats and let it dry completely.
- Draw a simple jack o’lantern face with the black paint marker.
- Glue loops of cream yarn around the top of the jar for hair.
- Glue on the wooden bead nose with E6000.
- Make a mini hat (the cone method from the Witch Hat Lantern Jar works here), add an orange ribbon band, and glue it on top.
What goes wrong: A round bead rolls right off a curved jar while the glue sets. Use a half bead, or sand a flat spot on one side of a round bead first.
Tip: Oil based paint markers glide smoothly over dry acrylic. Water based markers can skip and streak on a painted surface.
Filled Jars: Potions, Treats, Scenes, and a Real Candle
What goes inside matters more than the paint on these six. Wide mouth jars make all of them easier, and two of them (the potion and the eyeballs) belong on the same apothecary shelf.
15. Halloween Memory Jar Charm

This one turns into a family tradition if you let it. Decorate the jar once, then add a slip of paper every year with the costumes, the best candy, and one thing that happened that night.
Skill: Beginner | Time: 30 minutes, plus a few minutes every Halloween | Glows: No
What you need
- 1 large clear mason jar (quart size)
- Orange and black scrapbook paper
- Black cardstock bats
- A Halloween memory jar label
- Orange and black baker’s twine
- Small plastic spider
- Black shredded filler
- Mini pumpkin accent
- Craft glue or double sided tape
How to make it
- Put a layer of black shredded filler in the bottom of the jar.
- Cut the scrapbook paper and cardstock into layered shapes: a scalloped label backing, small moons, a row of bats.
- Attach the label to the front, then the bats and accents around the jar.
- Tie baker’s twine around the lid and finish with the spider and mini pumpkin.
- Write this year’s memory slip, date it, fold it, and drop it in.
Tip: Cut your paper slips the same size every year and keep a pen tied to the twine. After five or six years, pouring the slips out on Halloween night is the best part. Start a December one beside it, and you’ve got a keepsake for both holidays.
16. Glowing Witch Potion Jar

Bright green liquid, a black lid, a handwritten label, and a plastic spider. Painting the lid black is the smallest mason jar lid craft in this guide, and it’s what makes the jar read as a potion bottle instead of pickles. The “glowing” part comes from a blacklight, and it’s a real effect, not a trick of photo editing.
Skill: Beginner | Time: 20 minutes | Glows: Yes, under a UV blacklight
What you need
- 1 clean mason jar
- 1 black jar lid (or a metal lid painted black)
- Distilled water and green food coloring, or a dry filler like green dyed rice
- Twine or jute cord
- 1 spooky potion label
- 1 plastic spider
- Optional: a yellow highlighter and a small UV blacklight flashlight
How to make it
- Fill the jar with distilled water and a few drops of green food coloring, or pour in your dry filler.
- For the glow, pull the felt ink tube out of a yellow highlighter and soak it in the water for a few minutes until the water turns pale yellow green.
- Screw the lid on tight. Wrap twine around the neck and tie it in a loose knot.
- Attach the potion label to the front, and glue the spider to the lid or the twine.
- Shine the blacklight on it in a dark room.
Tip: Tonic water glows bright blue under a blacklight. Make two potion jars, one with highlighter water and one with tonic water, and the pair glows in two different colors.
Trade off: Tinted water stays clear for a couple of weeks, then can turn cloudy. Distilled water and a tight lid help. Dry fillers last forever but don’t glow.
Safety: Potion jars look like drinks. Label them clearly, keep them out of reach of small kids, and never cut open glow sticks into a jar.
17. Eyeball Specimen Jar

This one belongs right next to the potion jar. Ping pong balls painted as eyeballs, floating in yellowish water like a mad scientist’s lab specimen.
Skill: Beginner | Time: 30 minutes plus about 1 hour drying | Glows: Optional, under a blacklight
What you need
- 1 wide mouth mason jar
- 6 to 10 white ping pong balls
- Permanent markers in blue, green, or brown for irises, black for pupils, and fine red for veins
- Distilled water with a drop of yellow and a tiny drop of green food coloring
- A printed or handwritten label, like “Specimen No. 13”
- Twine
How to make it
- Draw a colored iris on each ping pong ball, then a black pupil in the center.
- Add thin, wiggly red veins running from the back of the ball toward the iris.
- Let the ink dry for an hour so it doesn’t smear in the water.
- Fill the jar with the tinted water and drop the eyeballs in.
- Add the label and tie twine around the neck.
What goes wrong: Sealing the eyeballs with regular Mod Podge before they go in water. It isn’t waterproof and turns cloudy and tacky. Permanent marker alone holds up fine.
Tip: The balls float, so they all bob at the top. That looks great. For eyeballs all through the jar, skip the water and pack them in dry faux moss. For a blacklight glow, use the highlighter water from the potion jar instead of food coloring.
18. Sparkly Ghost Jar Scene

A tiny white ghost, black trees, a little fence, and dark sparkly ground, sealed inside a clear jar. The trick is to build it on the lid instead of inside the jar.
Skill: Intermediate | Time: 1 hour plus overnight drying for the clay | Glows: No
What you need
- 1 clear mason jar (wide mouth is much easier)
- White air dry clay or polymer clay for the ghost (or a small foam ghost)
- Black glitter or craft sand
- Small black paper trees and fence
- Black ribbon or twine
- E6000 or hot glue
- Mod Podge
How to make it
- Shape a small ghost, about 1½ inches tall, and let it dry overnight (or bake polymer clay according to the package).
- Cut trees and a fence from black cardstock, leaving a small folded tab at the base of each so they stand up.
- Brush Mod Podge on the inside of the flat lid and sprinkle black glitter or sand over it. Tap off the excess.
- Glue the ghost, trees, and fence onto the lid.
- Screw the jar down over the scene and flip it over, so the lid becomes the base.
- Tie black ribbon or twine around the lid ring.
Tip: Building on the lid means you can see and reach everything. Gluing a scene through the mouth of a jar with tweezers is an exercise in frustration. It’s the same trick behind most snow globe style crafts with mason jar lids, and it’s how you’d build a winter version: swap the ghost for a tiny bottle brush tree and the black sand for white.
Trade off: Loose glitter inside the jar shifts every time you pick it up and ends up stuck to the glass. Gluing it to the lid keeps the ground where it belongs.
19. Candy-Filled Jack-O’-Lantern Jar
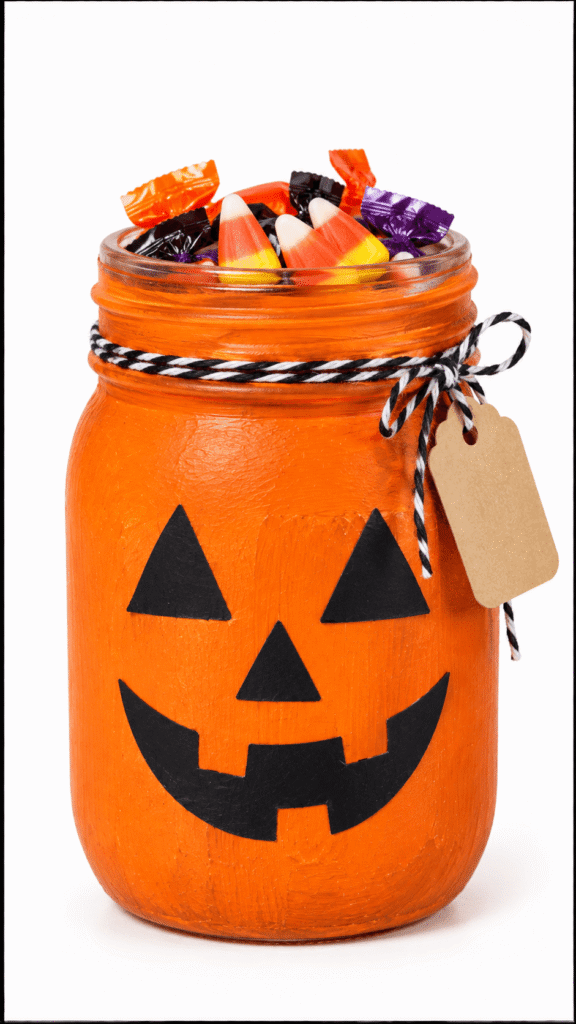
An orange jar with a pumpkin face, a twine bow, a tag, and candy corn inside. It sits on the party table and slowly empties all night.
Skill: Beginner | Time: 30 minutes plus 24 hours to cure | Glows: No
What you need
- 1 clean mason jar
- Orange acrylic paint or spray paint
- Black craft paper or vinyl
- Black and white twine
- Small tag
- Candy corn and Halloween candy
- Matte or gloss clear sealer
How to make it
- Paint the outside of the jar only, in two or three coats of bright orange. Leave the inside bare glass.
- Cut simple triangle eyes, a nose, and a smiling mouth from black paper or vinyl and attach them to the front.
- Spray a clear sealer over the outside so the paint doesn’t scratch at a busy party.
- Let it cure for a full day, then wash the inside.
- Tie twine around the neck, add a tag that says “take one,” and fill it with candy. Paint the lid to match, or glue a green felt stem on top, for a quick mason jar lid craft that hides the plain metal.
What goes wrong: Painting the inside for a smoother finish. That’s fine for display, but then only wrapped candy should go in. Keep the paint on the outside and unwrapped candy corn is fine.
20. Pumpkin Spice Candle Jar

This is the only real flame in the whole guide, so it gets the most detail. You’re pouring an actual soy candle into a mason jar, scented with pumpkin spice and finished with twine and a vintage label.
Skill: Intermediate | Time: About 1 hour, plus 24 hours to set and 1 to 2 weeks to cure for full scent | Glows: Yes, real flame
What you need
- 1 clean mason jar with no chips or cracks
- Soy container wax (Golden Brands 464 is a common choice), or orange wax
- A pretested cotton wick sized for your jar’s diameter, plus a wick sticker
- Two clothespins or a wick centering bar
- Pumpkin spice fragrance oil made for candles
- Orange candle dye chips (not crayons)
- A pouring pitcher, a pot for a double boiler, a thermometer, and a kitchen scale
- 1 pumpkin spice label or printed tag
- Twine for wrapping
How to make it
- Fill the jar with water to where you want the wax to stop and measure it. Multiply the fluid ounces by 0.86 to get roughly how many ounces of wax to weigh out.
- Stick the wick to the center of the jar bottom and clip it upright with clothespins across the rim.
- Melt the wax in the pitcher set in a pot of simmering water. Never heat wax directly on a burner.
- Add dye and fragrance at the temperature and amount your wax maker specifies (often around 6 to 10 percent fragrance by weight), then stir gently for two minutes.
- Let it cool to the pour temperature on the wax label and pour slowly.
- Let it set for 24 hours, trim the wick to ¼ inch, and let it cure for a week or two before the first burn.
- Add the label and twine around the outside of the jar, tight and trimmed short.
What goes wrong: Soy wax often shrinks into a sinkhole around the wick as it cools, and the top can develop a white, crystalline “frosting.” Both are normal. A quick pass with a heat gun or a small top up pour smooths the surface.
Safety: Hot wax is a fire hazard. Never leave melting wax unattended, keep a lid nearby to smother a flare up, and never use water on a wax fire. Mason jars are made for canning, not candles, so check every jar for chips. Burn your first candle on a heat safe surface and stay with it.
Tip: Your first burn tells you whether the wick is right. If the flame tunnels straight down and leaves wax on the sides, the wick is too small. If it smokes or the flame dances high, it’s too big.
LED version: If candle making isn’t for you, paint the outside orange, add the label and twine, and use an amber LED. It takes 15 minutes and looks nearly the same on a shelf.
Common Mistakes With Halloween Mason Jars
I’ve made every one of these, most of them in that same driveway batch. These are the specific ways Halloween jar crafts go wrong the first time, and most of them apply to any mason jar crafts, not just Halloween ones.
- Painting a jar solid and expecting it to glow. Opaque paint blocks the light. Mask, frost, or scratch through if you want light to come out.
- Skipping the rubbing alcohol wipe. Fingerprints and label residue make paint bead up, then peel in sheets a week later.
- Using regular craft acrylic on bare glass. It scratches off with a fingernail. Use spray paint made for glass, glass enamel, or prime first and seal after.
- One heavy coat of spray paint. It runs and sags into drips around the bottom. Three light coats, 10 minutes apart.
- Peeling the mask the next day. Cured paint tears with the vinyl. Peel within about an hour, or score around each shape first.
- Hot glue on porch jars. It lets go of smooth glass when the temperature drops. E6000 holds through cold nights.
- Real tea lights in decorated jars. Paper, lace, felt, tissue, and twine all burn. LED only, except for the poured candle.
- Spraying in the garage with a dust mask. Neither handles solvent fumes. Go outside and wear an organic vapor respirator.
- Cool white LEDs in orange jars. They wash the color out. Amber or warm white looks like candlelight.
Practical note: Make one test jar before you commit to a batch of ten. Paint it, light it, and look at it in a dark room. Ten minutes of testing tells you more about how your DIY Halloween decor will look at night than any photo online.
My advice: Buy one case of jars, one can of black spray paint, and a pack of amber LEDs. Make the Pumpkin Glow Jar first, because it teaches the mask and peel trick, then line your Halloween mason jars up on the porch steps at dusk. That first moment you switch them all on is when DIY Halloween decor stops feeling like a craft project and starts feeling like your house. And when November comes, peel the vinyl off the clear jars, because the same jars are ready for Christmas.
FAQs
What paint works best on mason jars?
Spray paint made to bond to glass, like Krylon Fusion All In One, gives the most durable solid finish. For designs, glass enamel paint lasts much longer than craft acrylic, which scratches off bare glass unless you prime first and seal after.
How do you make a painted mason jar glow?
Mask the shapes you want to glow with vinyl or tape before painting, then peel them off so light shines through the bare glass. You can also use frosted spray or translucent glass paint, or scratch a design through cured acrylic.
Can you put a real candle in a decorated mason jar?
Not if the jar has paper, lace, fabric, twine, glitter, or paint inside it, since those can scorch or catch fire. Use LED tea lights in decorated jars, and save real flames for a properly wicked candle poured into a plain jar.
Are mason jar lanterns safe to use outside?
Yes, with LED lights, E6000 instead of hot glue, and a clear outdoor sealer over any paint. Place them on a covered porch, since rain softens paper and tissue paper fades in strong sun.
How do you get vinyl to stick to a painted jar?
Let the paint cure for a full 24 hours first, and use a smooth or satin finish rather than chalky matte paint. Rub the vinyl down firmly with a scraper or an old gift card, especially around the edges.
How long do Halloween jar crafts take to make?
Most take 20 to 60 minutes of actual work. Painted jars need about 24 hours to cure before you add vinyl or glue, so plan to start them a day before you want to display them.
