
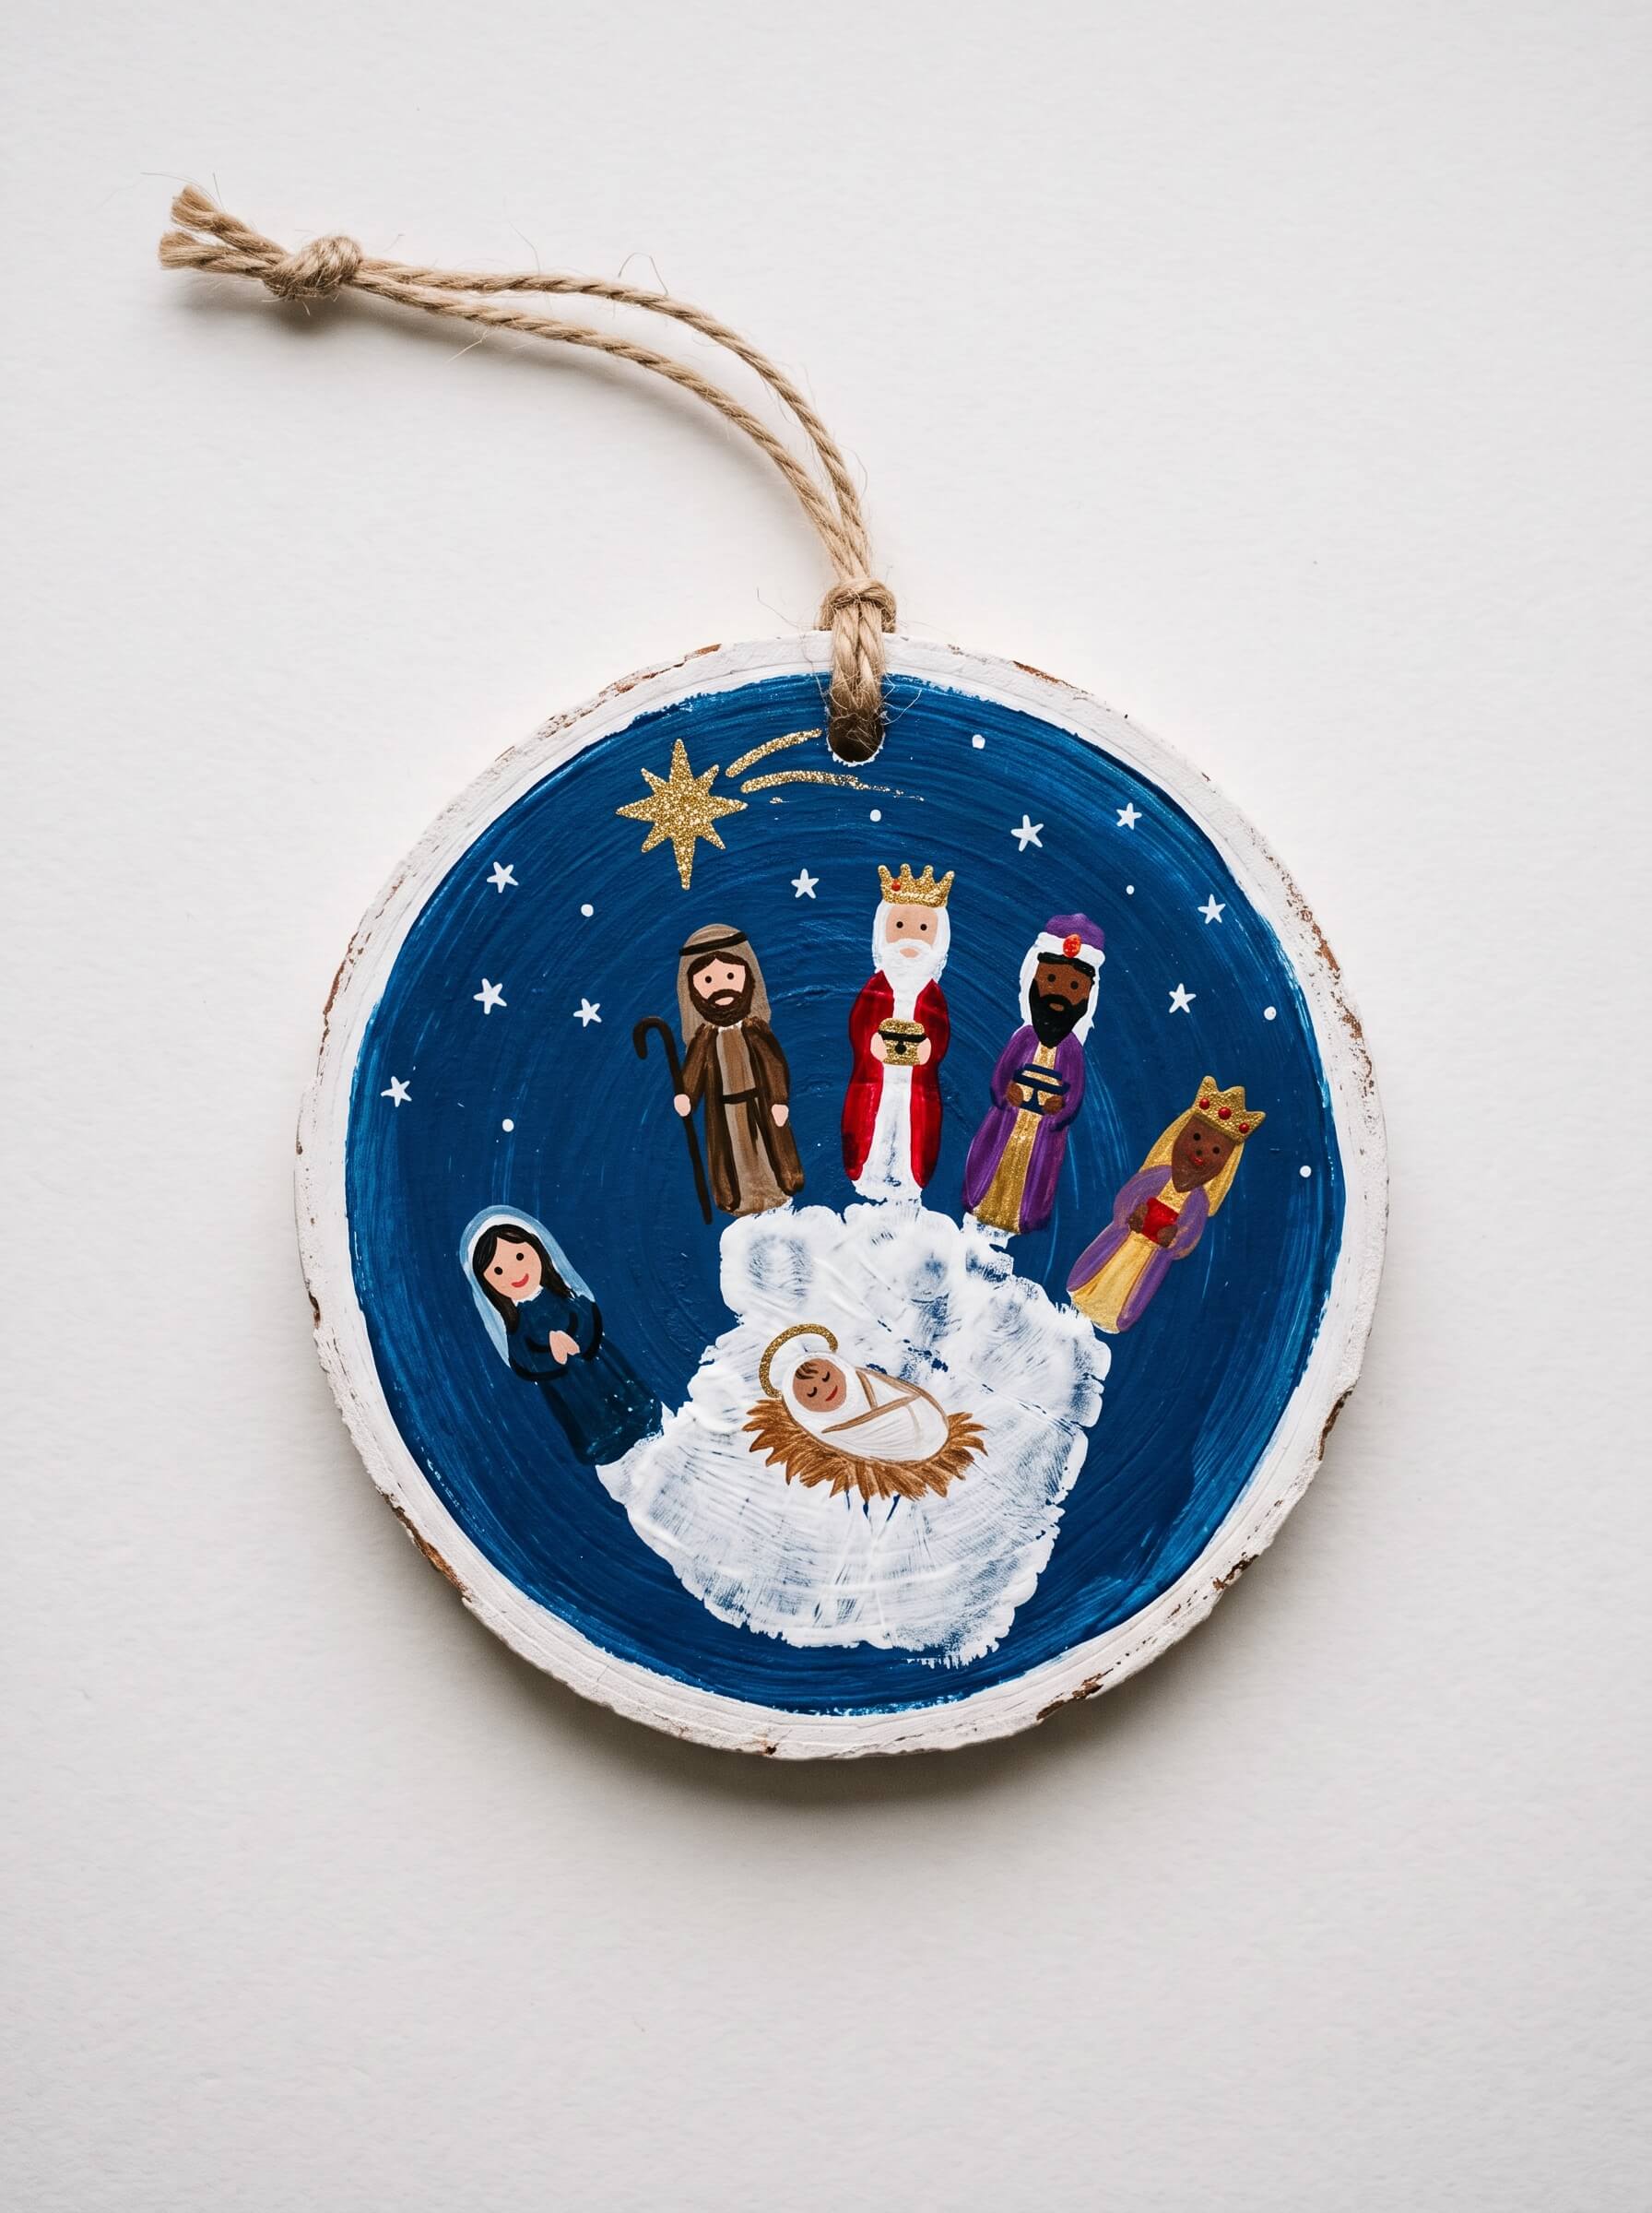
Last December a four year old at our craft table pulled the felt baby Jesus out of his popsicle stick manger and held him in his fist for the rest of the morning. He would not glue him down. He would not put him in the take home bag. He just carried him around like he had been handed a job.
That is why I keep coming back to nativity crafts for kids. The manger scene slows children down in a way a snowman craft never does. They want to hold the figures, they want to know why the baby is sleeping in a feeding trough, and they always, always ask about the star.
Below are the sixteen I actually use, with real timings, real mess levels, and the specific spot where each one goes sideways on a first try.
Quick Answer: Nativity crafts for kids are simple manger, angel, star, and Holy Family projects built from paper plates, craft sticks, cardboard tubes, clothespins, handprints, and jars. Most take 10 to 25 minutes of active work, suit ages 3 to 10, and need an adult only for hot glue, glass jars, and sealing a snow globe. If you have one session and want the whole story in front of the children, make the paper plate nativity scene. If you have fifteen minutes and want something that hangs on the tree, make the popsicle stick manger.
All 16 Nativity Crafts For Kids At A Glance
Mess levels here mean something specific. Low is dry supplies and a wipe of the table. Medium means paint or wet glue, so cover the surface. High means handprints or loose glitter, so plan on a smock and a change of clothes.
| # | Craft | Best ages | Active time | Mess | Adult job | Ends up as |
|---|---|---|---|---|---|---|
| 1 | Paper plate nativity scene | 3 to 7 | 20 min + 20 dry | Medium | Pre-cut the roof | Shelf display |
| 2 | Popsicle stick manger | 3 to 8 | 15 min | Low | None | Tree ornament |
| 3 | Handprint nativity ornament | 2 to 8 | 25 min + 1 hr dry | High | Press the hand | Dated keepsake |
| 4 | Toilet roll nativity figures | 4 to 9 | 25 min | Low | Trim tubes | Play set |
| 5 | Baby Jesus in a manger | 2 to 6 | 10 min | Low | None | Pocket figure |
| 6 | Paper cone angel | 4 to 9 | 15 min | Low | Staple the cone | Standing figure |
| 7 | Handprint angel | 2 to 7 | 20 min | High | Press the hands | Card or fridge art |
| 8 | Wise men crowns | 3 to 8 | 15 min | Low | Staple to fit | Wearable |
| 9 | “Jesus is born” hat | 3 to 7 | 15 min | Low | Staple to fit | Wearable |
| 10 | Handprint manger | 2 to 7 | 20 min | High | Press the hand | Dated keepsake |
| 11 | Popsicle stick star | 7 to 11 | 20 min + set | Low | Demo the weave | Tree topper |
| 12 | Clothespin nativity ornament | 5 to 10 | 20 min + dry | Medium | Hot glue | Tree ornament |
| 13 | Button nativity figures | 5 to 10 | 25 min | Low | Watch small parts | Play set or shelf |
| 14 | 3D standing nativity | 5 to 10 | 25 min | Low | Score the folds | Play scene |
| 15 | Nativity mason jar lantern | 4 to 10 | 20 min | Low | Handle the glass | Windowsill light |
| 16 | Nativity snow globe | 6 to 11 | 20 min + 24 hr cure | Medium | Seal the lid | Shelf keepsake |
If you are skimming this on your phone at ten at night with a lesson to plan, save it to your Christmas board now and come back to this table when you have your supply drawer open.
How To Adapt These For Toddlers, Middles, And Big Kids?
Ages 2 to 4. Pre-cut everything and pre-fold anything that needs folding. Toddlers can paint, press a handprint, stick a sticker, and glue a shape onto a marked spot. That is the whole job. Crafts 3, 5, 7, and 10 are their lane.
Ages 5 to 7. They can cut curves badly and straight lines well, use a glue stick with reasonable aim, and follow three steps in order without you standing there. Almost everything on this list works, and the wearables (8 and 9) go over best.
Ages 8 and up. Give them the fiddly ones or they will check out. The woven star (11), the button figures (13), the 3D scene (14), and the snow globe (16) all have a step that can genuinely fail, which is exactly what older kids want. Hand them the star and let them work out the weave themselves.
Practical note: mixed ages at one table works best when everyone makes the same scene but different pieces. The little ones do handprint mangers, the big ones weave the star, and you end up with one nativity the whole group built together.
Supplies To Keep On Hand (And What To Use Instead)
You can make thirteen of the sixteen from a basic drawer. Here is what I keep stocked, plus the free or cheap swap for every bought item.
| Supply | What I use | Free or cheap swap |
|---|---|---|
| Paper plates | Heavy Chinet style, not the thin ones | Circles cut from a cereal box |
| Cardstock | 65 lb white and gold | Manila file folders, cereal box panels |
| Craft sticks | Regular size, bulk bag of 500 | Coffee stirrers, strips of corrugated card |
| Paint | Crayola washable tempera | Construction paper shapes, no paint at all |
| Glue | Aleene’s Original Tacky Glue | School glue plus patience, or double sided tape |
| Straw | Raffia | Shredded brown paper bag, snipped yellow yarn |
| Clothespins | Plain wood, no spring | Wooden ice cream spoons, cardboard cut-outs |
| Cardboard tubes | Saved toilet and paper towel rolls | Rolled paper taped into a tube |
| Buttons | Mixed button tin | Bottle caps, punched cardboard circles |
| Gold accents | Gold foil paper | Foil from chocolate coins, aluminum foil colored with yellow marker |
| Jar light | Battery tea light | Phone flashlight set under the jar |
| Snow globe fluid | Glycerin | Clear corn syrup, or a squirt of clear dish soap |
| Glass jar | Small jam jar | Clear plastic peanut butter jar (better for under fives) |
Sourcing that actually saves money: gem stickers, sequins, tissue paper, and battery tea lights are all dollar store items and there is no reason to pay craft store prices for them. Craft sticks and clothespins are cheapest in bulk online. Ask families to start saving cardboard tubes in early November and you will have more than you need by Advent.
Mess, Supervision, And The Three Jobs Adults Should Keep
None of these crafts are dangerous, but a few have real hazards that most craft lists skip past.
Keep the hot glue. Craft 12 holds much better with hot glue than with school glue, and a low temp gun still burns. Adults only, at a separate table.
Keep the glass and the sealing. An adult handles the mason jar (15) and does the snow globe seal (16). If you are working with under fives, swap in a clear plastic jar and skip the glass entirely.
Keep the batteries. This is the one I wish more craft posts said out loud.
Practical note: The button cell battery inside a battery tea light is the most dangerous item on this whole list. Swallowed coin cells can cause serious internal burns very quickly. Before the lantern goes home, tape the battery compartment shut with a strip of duct tape, and tell the parent it is in there.
Small parts. The button figures (13) and any wooden bead heads are not for children who still mouth things. Use the standard rule of thumb: if a piece fits through a cardboard tube, it is a choking risk for under threes.
Paint and glitter containment. Handprint crafts run high mess. Old t-shirt on backwards beats a smock, work on a wipeable surface, and keep a damp cloth in your other hand rather than sending a painted child to the sink. Loose glitter belongs in a rimmed baking sheet so the excess funnels back into the pot.
16 Nativity Crafts For Kids
Pick one for a single lesson, or work through several as you count down to Christmas.
1. Paper Plate Nativity Scene

Ages 3 to 7 | 20 minutes plus 20 minutes drying | Mess: medium
The plate rim acts as a built-in frame, so the whole scene stays together instead of scattering across the table. This is the one I start with, because a child can see the entire story at once.
- Paint the center of a paper plate deep blue or black for the night sky and let it dry flat.
- Cut a brown stable roof from paper and glue it around the top edge.
- Color and cut Mary, Joseph, and baby Jesus in the manger, then glue them in the middle.
- Glue a small tuft of raffia or yellow paper strips under the manger for straw.
- Press a gold star sticker into the upper corner of the sky.
Tip: Load the brush lightly and paint in one direction. A soaked thin plate curls into a taco shape as it dries and never lies flat again. If you only have thin plates, glue on a circle of navy construction paper instead and skip the paint.
2. Popsicle Stick Manger

Ages 3 to 8 | 15 minutes | Mess: low
This zooms all the way in on the manger itself, and it hangs on the tree. Fastest win on the list.
- Glue two craft sticks into an X for the legs, then let that joint set for two or three minutes before you touch it again.
- Lay a third stick across the top of the X for the crib base.
- Add two or three more sticks across to build up the trough.
- Tuck raffia or snipped yellow paper into the trough for hay.
- Glue in a small swaddled baby Jesus and tape a ribbon loop to the back.
Tip: Use tacky glue, not a glue stick and not school glue. Aleene’s grabs in about ten minutes; white school glue on smooth wood can still slide after forty five, which means the whole manger racks sideways in the take home bag.
3. Handprint Nativity Ornament

Ages 2 to 8 | 25 minutes plus an hour to dry | Mess: high
One handprint becomes the entire scene. Baby Jesus sits in the palm and the figures rise up the fingers. This is the craft parents actually keep.
- Paint a round wooden disc or paper circle deep blue and let it dry.
- Brush paint onto the child’s palm and fingers with a foam brush, then press the hand down in the middle with the fingers spread wide.
- Turn the palm into a manger of golden straw with baby Jesus resting in it.
- Paint each finger into a standing figure behind him: Mary, Joseph, the kings.
- Add a bright star to one side, dot small white stars around it, and write the child’s name and the year at the bottom.
Tip: Brush the paint on rather than pressing the hand into a tray. A tray puts on far too much paint and you get a blob instead of fingers. Also spread the fingers before the paint goes on, because a painted hand clenches. Press the palm first, then roll each finger down one at a time.
Use a flat wooden or ceramic disc if you can. Paint slides right off a shiny plastic bauble and lifts as it dries. If you want the words of the story alongside the making, our pair well with this one.
4. Toilet Roll Nativity Figures
Ages 4 to 9 | 25 minutes | Mess: low
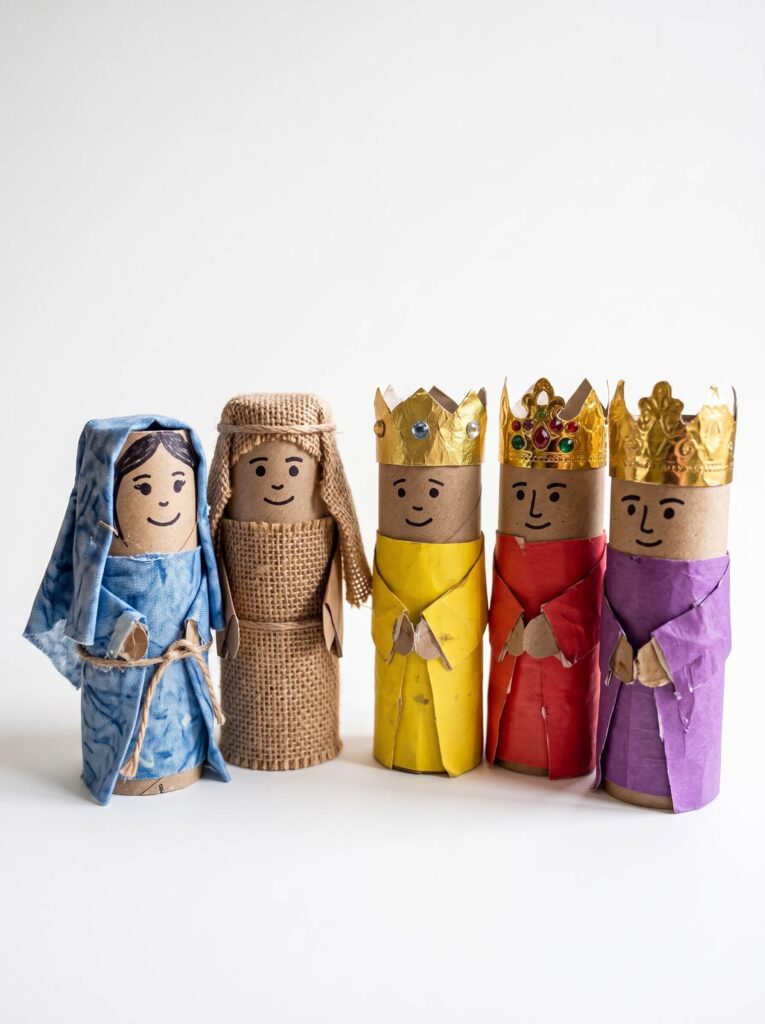
A saved tube becomes a standing figure, and a handful of them becomes a play set children retell the story with for weeks.
- Stand the tubes upright, trimming Mary and Joseph down to about three inches and leaving the kings full height.
- Draw each face directly on the bare cardboard near the top, adding a colored beard for the men.
- Wrap a band of colored paper or fabric around the lower half for the robe, leaving the face showing.
- For the kings, fold a strip of gold foil into points, wrap it around the open top for a crown, and add a sash.
- For Mary and Joseph, drape a small square of cloth over the open top for a veil and headdress.
Watch out: a glue stick will not hold paper on a curved tube. It peels back within the hour. Use tacky glue or a strip of tape at the seam. Press the base of each tube flat between your palms as well, or they topple on carpet.
5. Baby Jesus In A Manger

Ages 2 to 6 | 10 minutes | Mess: low
Where craft 2 is the empty manger, this is the baby himself, small enough to hold in a fist. Ten minutes, three supplies, and it works for the youngest child in the room.
- Wrap a wooden clothespin or peg doll in a one inch strip of felt, leaving the head clear.
- Put a dot of tacky glue at the start and the end of the strip so the swaddling stays snug.
- Draw a small sleeping face near the top.
- Cut a cardboard tube in half lengthways for the bed and fill it with raffia.
- Rest the baby down in the manger.
Tip: use felt, not woven fabric. Fabric frays at the cut edge and slips out of the glue. And test your marker on a spare clothespin first, because a Sharpie feathers along raw wood grain and the face goes fuzzy. A fine paint pen, or a thin base coat of white paint first, fixes it.
6. Paper Cone Angel

Ages 4 to 9 | 15 minutes | Mess: low
The angel who told the shepherds, standing up on her own. Good for children who want a figure rather than flat art.
- Roll white or gold cardstock into a cone and staple the seam from the inside.
- Glue a paper circle or wooden bead on top for the head.
- Cut two wings from paper or fold a paper doily in half and glue them to the back.
- Bend a pipe cleaner into a halo and rest it above the head.
- Draw a gentle face.
Watch out: copy paper will not hold a cone. It buckles the moment a child picks it up. You need cardstock, and tape on the outside seam will pop within a day, which is why the staple goes on the inside where it also cannot scratch anyone.
7. Handprint Angel

Ages 2 to 7 | 20 minutes | Mess: high
Two handprints for wings, flat enough to go on a card or the fridge. A nice pair with the cone angel above.
- Paint or trace and cut two handprints, then glue them at an angle for wings.
- Add a paper triangle or half circle below for the gown.
- Glue a circle on top for the head.
- Add a halo of gold pipe cleaner or draw one on.
- Draw a small face and add a touch of glitter if you like.
Tip: point the thumbs down and inward when you glue the wings. Thumbs up reads like a bird. Thumbs down reads like feathers. For a toddler who hates paint on their hands, trace around the hand on gold paper instead and nobody will know the difference in five years.
8. Wise Men Crowns
Ages 3 to 8 | 15 minutes | Mess: low
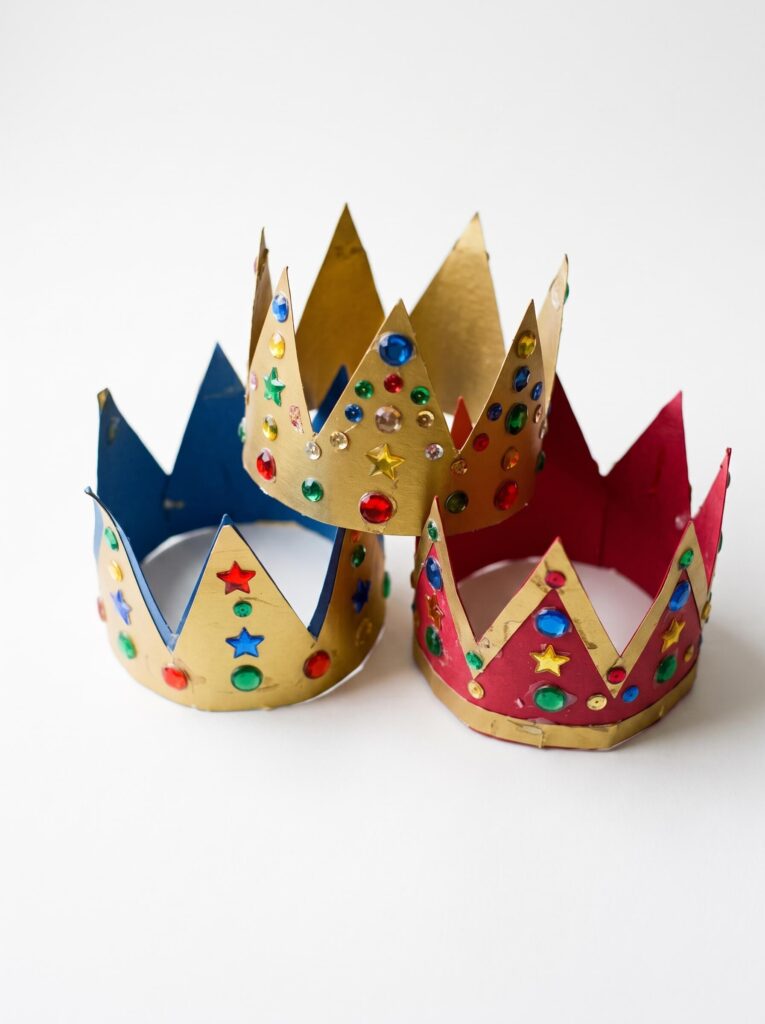
Wearable, which changes the energy of the whole room. Children stop making the story and start being in it.
- Cut a pointed crown shape from a strip of gold or colored paper.
- Decorate with gem stickers and sequins.
- Fit it around the child’s head, leaving a two inch overlap.
- Staple or tape the ends to size.
- Make three in different colors for the three kings.
Practical note: if the crowns are getting worn in the same session, skip the glitter glue. Glitter glue needs two to four hours to dry properly and a wearable craft goes straight into a child’s hair. Gem stickers and sequins give you the same sparkle and are ready instantly.
Cut your strips at about twenty two inches for a four year old and you will only be trimming, not splicing on extra paper mid-craft.
9. “Jesus is born” Nativity Hat
Ages 3 to 7 | 15 minutes | Mess: low
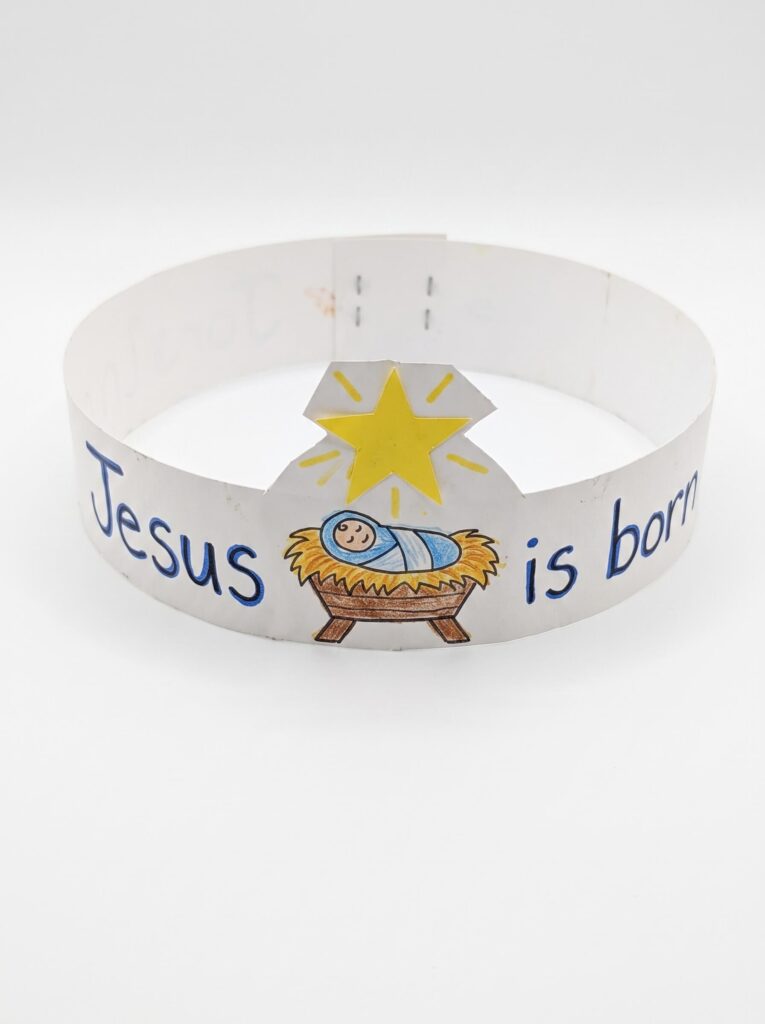
Part craft, part costume. The announcement goes right across the forehead.
- Start with a long strip of cardstock for the headband.
- In the center, color a simple manger with baby Jesus and a yellow star above it.
- Write “Jesus is born” across the front.
- Fit the band and trim to size.
- Staple or tape the ends together.
Tip: write the words on before you fit the band. Once it is a circle, children write uphill and run out of room, and cardstock does not forgive an eraser.
10. Handprint Manger
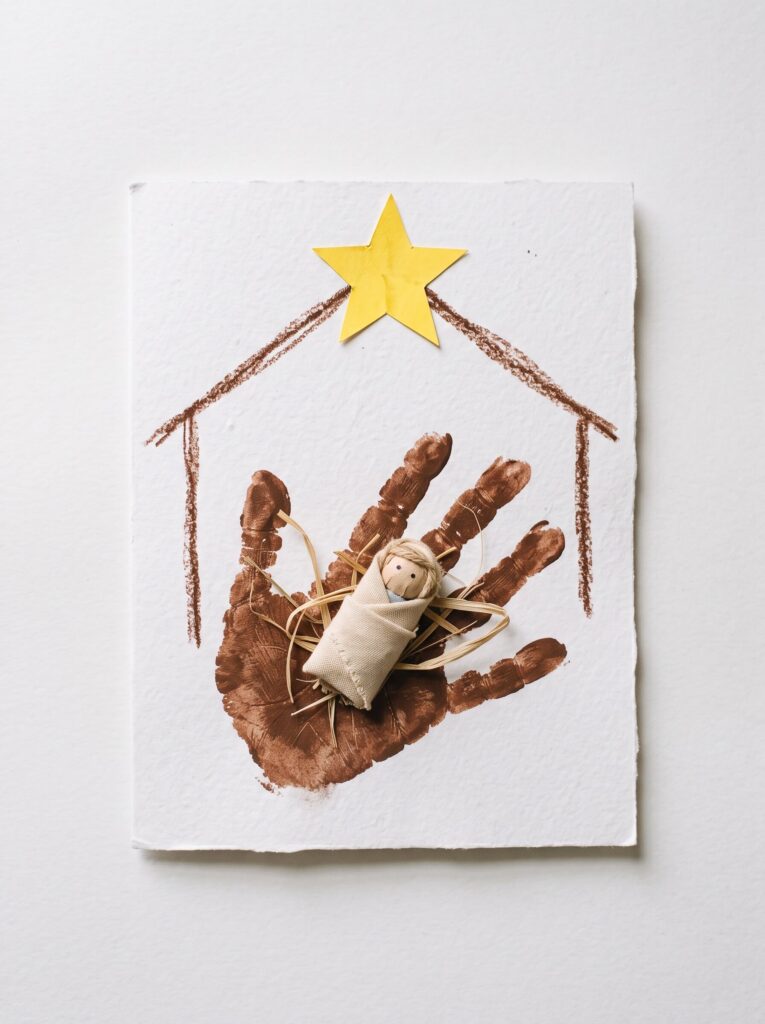
Ages 2 to 7 | 20 minutes | Mess: high
The third handprint craft, and the quietest. Here the hand is the manger, with the fingers curling around the baby like straw.
- Paint the child’s hand brown or tan and press it near the bottom of the page.
- Once dry, color and cut a small swaddled baby Jesus.
- Glue him resting in the palm.
- Add a stable outline and a star above.
- Write “away in a manger” underneath, plus the name and year.
Tip: angle the hand slightly, fingers curling to one side rather than pointing straight up. A flat vertical print reads as a hand. A tilted one reads as a cradle. Small change, completely different result.
11. Popsicle Stick Star Of Bethlehem

Ages 7 to 11 | 20 minutes plus setting time | Mess: low
The hardest craft here and the most satisfying. Five sticks woven into a five pointed star, no template, no cutting.
- Lay two sticks in a narrow X, then add a third across them to start forming the points.
- Weave the fourth stick over one and under the next.
- The fifth stick is the one that matters. It has to go under the first stick you laid down and over the next. That final tuck is what locks the whole star together, and it is why the shape holds tension on its own.
- Put a dab of tacky glue at each of the ten crossing points and clip a clothespin on each one while it sets.
- Paint it gold, sprinkle glitter while the paint is wet, and tie a ribbon loop to one point.
Watch out: if that fifth stick sits on top instead of tucking under, the star has no tension and it flops open the second you lift it. Nine out of ten first attempts get this wrong. Show it once slowly, then let them undo and redo it. Older kids genuinely enjoy this part.
Paint after weaving, never before. Wet paint makes the sticks slick and the weave slides apart in your hands.
12. Clothespin Nativity Ornament

Ages 5 to 10 | 20 minutes plus drying | Mess: medium
The Holy Family as three little painted pegs, grouped under a wire star. This is the one that comes out of the box every year.
- Paint three wooden clothespins as Mary, Joseph, and baby Jesus.
- Let them dry completely, then add faces and robe details with a fine marker.
- Bend gold pipe cleaner into a star.
- Hot glue the three figures into a small group with the star above.
- Glue a twine loop to the back.
Watch out: “dry to the touch” is not dry. Draw on tempera that is still curing and the marker skids and lifts the paint underneath. Give it a full hour, or paint at the start of your session and detail at the end. School glue will not hold pegs at an angle either, so this is a hot glue job for an adult.
For more little makes that keep Jesus at the center of the season, our [INTERNAL LINK: easy Jesus crafts for kids] collection runs right through Advent.
13. Button Nativity Figures
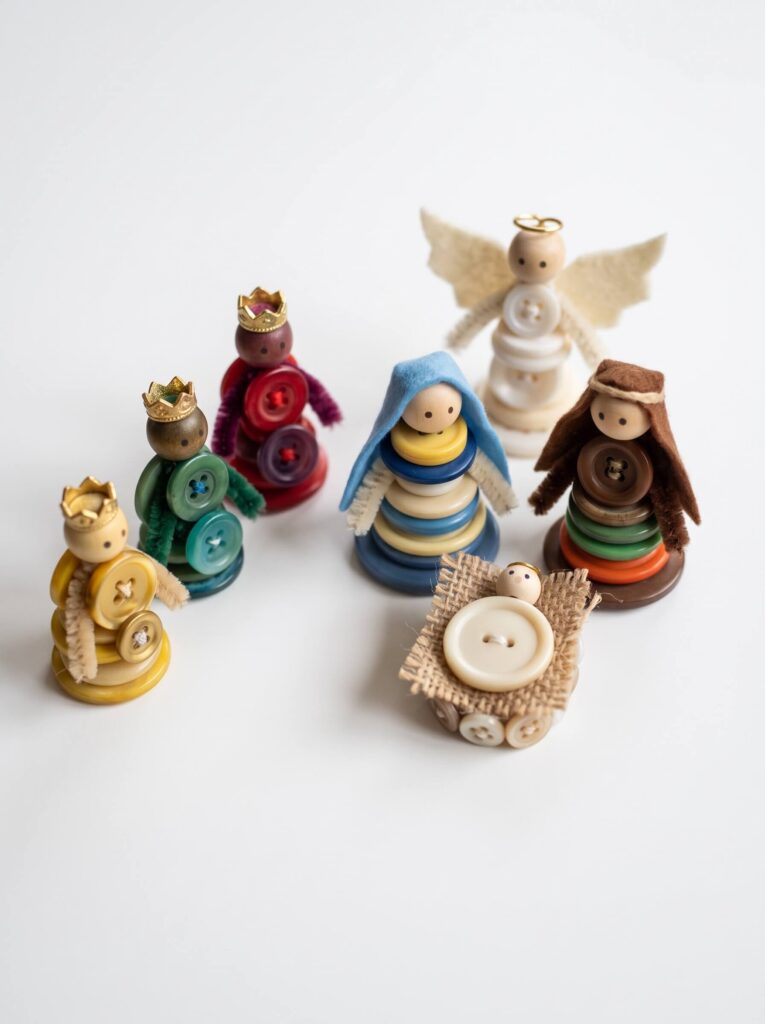
Ages 5 to 10 | 25 minutes | Mess: low
Ordinary buttons stacked into little figures. Excellent for using up the tin, and a genuinely satisfying sorting task for a child who likes order.
- Thread buttons onto a pipe cleaner starting with the largest at the bottom and working up to the smallest, so each stack tapers into a cone.
- Slide a wooden bead on top for the head and twist the pipe cleaner end over to lock the stack.
- Make Mary and Joseph this way, adding a felt scrap over each head for a veil and headdress.
- Add an angel with two small felt wings, then three taller stacks for the kings, each topped with a tiny gold button.
- For baby Jesus, lay one large flat button down and rest a small bead over it for the swaddled baby.
Tip: thread through one hole and back down through a second on each button. Straight through a single hole and the buttons spin freely, so the figure never sits square. Pipe cleaner beats string here because it holds the stack rigid.
Buttons and beads are small parts. Keep this one for over fives, and off the table entirely if a toddler is in the room.
14. 3D Standing Nativity
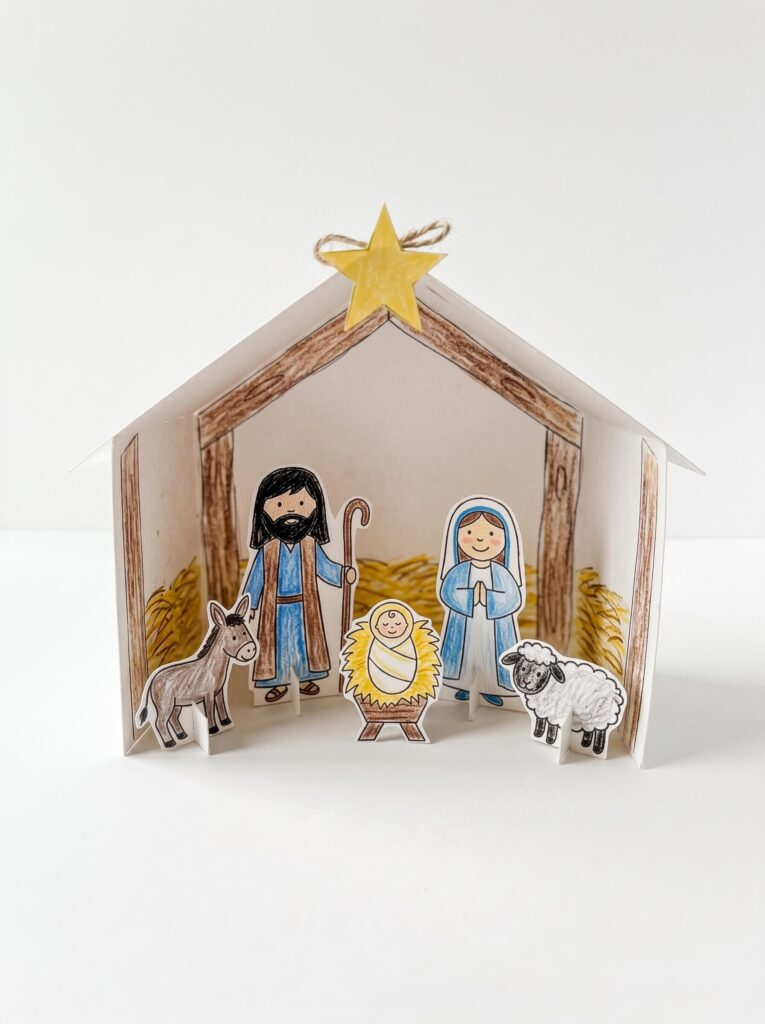
Ages 5 to 10 | 25 minutes | Mess: low
A folded stable with free standing figures inside, so children can look into the scene and move everything around.
- Draw and color a stable background, then fold it so it stands like a card.
- Color and cut Mary, Joseph, baby Jesus, and the animals.
- Fold a tab at the base of each figure so it stands.
- Set the figures inside the folded stable.
- Add a star to the roof peak.
Tip: score every fold with a ruler edge and a dry ballpoint before folding. Cardstock folded by hand cracks and goes fuzzy, and the base tabs need to be at least half an inch deep or the figures will not stand. This is the trade off with this craft: more prep than most, but it becomes a toy rather than a decoration.
15. Nativity Mason Jar Lantern
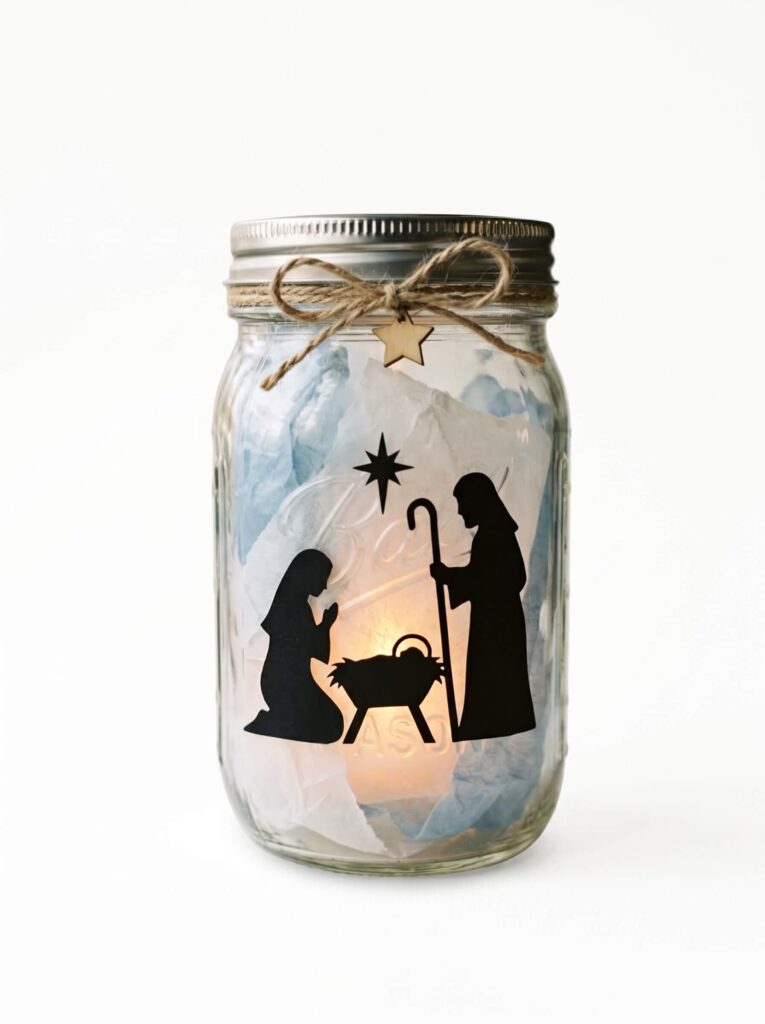
Ages 4 to 10 | 20 minutes | Mess: low
A glass jar with a black paper silhouette that glows from inside. Best of these on a dark windowsill in December.
- Cut a simple silhouette of Mary, Joseph, and the manger from black paper.
- Glue the silhouette to the outside of a clean, dry jar.
- Wrap white or blue tissue paper around the rest of the jar and glue at the seam only.
- Drop a battery tea light inside.
- Switch it on and turn the lights down.
Watch out: glue the tissue at the seam only. Coating the whole sheet in Mod Podge wrinkles it badly and clouds the glow. And use a battery light, never a flame, because there is paper and tissue against the glass. Tape the battery compartment shut before it goes home.
16. Nativity Snow Globe
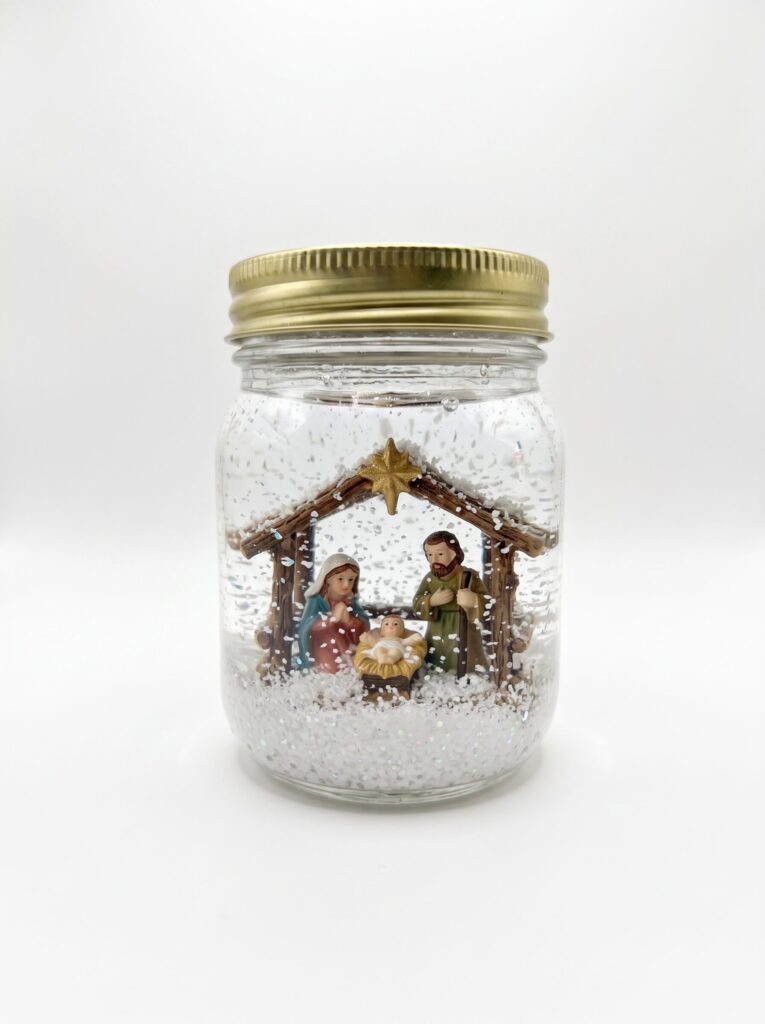
Ages 6 to 11 | 20 minutes, plus 24 hours to cure | Mess: medium
The showstopper, and the only one with a real technical step. An adult does the sealing.
- Glue a small plastic nativity figure to the inside of the jar lid with clear silicone sealant or E6000, and let it cure fully. Twenty four hours, in a room with the window open, because both give off strong fumes while curing.
- Fill the jar with distilled water, leaving about half an inch of air at the top.
- Add a spoonful of fine glitter or fake snow and a few drops of glycerin to slow the swirl.
- Run a ring of sealant around the inside of the lid rim and screw it down tight.
- Invert it over a towel, leave it twenty minutes, then check for drips before anyone shakes it.
Watch out for three things. Hot glue fails underwater over a few weeks, so it is not a substitute for silicone. Tap water goes cloudy and can grow cultures, so distilled water is worth the dollar. And a wooden or painted figure will shed its paint into the water, so use solid plastic.
Practical note: leave that half inch of air at the top. Fill the jar right to the brim and there is nowhere for the water to move, so the snow barely stirs. The bubble is what makes it swirl.
Common Mistakes To Avoid With Nativity Crafts For Kids
These are the ones I have made or watched happen at the table, not generic advice.
- Painting a thin paper plate. It dries into a curl and never flattens. Heavy plate, light brush, or colored paper instead.
- Sealing a snow globe with hot glue. It looks fine for two weeks, then weeps. Silicone or epoxy only.
- Using tap water in the snow globe. Clear in December, cloudy by February.
- Glitter glue on anything wearable. Still tacky at pick-up time, and it ends up in hair.
- Pressing a hand into a paint tray. Too much paint, no finger definition. Brush it on.
- Detailing wet paint with a marker. The pen skids and lifts color. Wait the full hour.
- Weaving the star with the fifth stick on top. No tension, instant collapse.
- Glue sticks on curved or wooden surfaces. They hold on flat paper and nowhere else.
- Planning a 45 minute class around a craft that needs 20 minutes of drying. Do the painting first thing, then tell the story while it dries, then finish. Build the wait into the lesson instead of fighting it.
- Forgetting the name and the year. Every undated handprint becomes a mystery within five years. Write it on the back before it leaves the table.
The Story Behind These Crafts
Mary and Joseph traveled to Bethlehem to be counted, and while they were there it came time for Mary to have her baby. There was no room at the inn, so Jesus was born in a stable and laid in a manger, wrapped in swaddling clothes. It was the humblest possible beginning for the King of kings.
That same night angels appeared to shepherds out in the fields with the news, and the shepherds hurried in to see him. Later, wise men followed a star from far away to worship him and bring him gifts.
That is the whole shape of it, and it is why the crafts land the way they do. A child holding a feeding trough made of five craft sticks understands something about that night that a lecture will not give them.
Let the story lead and let the craft be the container. If a child wants purple wings on the angel or ten wise men instead of three, let them. What you are after is the truth settling in while their hands are busy, and the memory of making it with you.
Running These With A Class Or A Big Group
Christmas Day 2026 falls on a Friday and Advent begins on 29 November, which gives you four Sundays. That is enough for four of these if you plan one per week, and it is worth mapping them out now rather than in the third week of December.
Prep the night before. Cut the stable roofs, trim the tubes, roll and staple the cones, and pre-cut headband strips to length. Fifteen minutes of prep turns a chaotic table into a calm one.
Batch what you can. For twenty children, the paper plate scene, the popsicle stick manger, the wise men crowns, and the “Jesus is born” hat all set up in trays and finish inside one session with no drying bottleneck.
Set up a drying shelf before you start. Label it with names in advance. Wet crafts with no home is how you end up with three children claiming the same handprint.
Have one adult on the glue gun table and nobody else. Children queue for it happily if it feels like a station rather than a scramble.
FAQs
What age are nativity crafts good for?
Most work well from three to ten. The paper plate scene, the handprint crafts, and baby Jesus in a manger suit toddlers and preschoolers with help, while the woven star, the button figures, the mason jar, and the snow globe are better for seven and up who can manage a step that might fail.
What are the easiest nativity crafts for a Sunday school class of twenty?
The paper plate nativity, the popsicle stick manger, the wise men crowns, and the “Jesus is born” headband. They use few pieces, set up in trays, and finish in one session without a drying bottleneck, so the whole room ends together.
How do I make a nativity snow globe that does not leak or go cloudy?
Use distilled water rather than tap, glue the figure with silicone sealant or E6000 instead of hot glue, and let it cure a full 24 hours before adding water. Run a ring of sealant around the lid rim, screw it tight, then leave it upside down on a towel for twenty minutes to check for drips.
Can I do nativity crafts without paint?
Yes, and eight of these sixteen need no paint at all. Swap painted backgrounds for colored construction paper, trace hands on gold paper instead of printing them, and use gem stickers instead of glitter glue. That is your no-mess set for a carpeted room or a rented hall.
What Bible verse goes with nativity crafts?
Luke 2:11, where the angel announces that a Savior is born, fits the whole set. Luke 2:12, about the baby wrapped in swaddling clothes and lying in a manger, works especially well alongside the manger and handprint crafts.
Which of these last as keepsake ornaments?
The popsicle stick manger, the woven star, the clothespin ornament, and all three handprint crafts. Handprints especially become treasures once children have grown, as long as you wrote the name and the year on the back.