
It’s 8:40 on a Tuesday and there’s a note in the backpack. Bring one Halloween decoration tomorrow. You have a drawer of pipe cleaners, a paper plate, and a kid who is mostly asleep but very clear on one point: the spider cannot be scary.
That’s the real use case for most Halloween spider crafts for kids. Not a photo shoot. A weeknight, a short attention span, and whatever is already in the house.
So I sorted these 22 projects by the things that actually matter when you’re the one at the table: what age they suit, how long they take once you count drying, and how much of your table ends up black.
The easiest Halloween spider crafts for kids start with a body you already own: a paper plate, a cardboard tube, an egg carton cup, a pom-pom, or a smooth rock. Add four black pipe cleaners bent across the body to make eight legs, plus two eyes, and most kids finish in 10 to 20 minutes with only drying time left to wait. For ages 2 to 4, stay with handprint and paper plate spiders and use drawn or paper eyes instead of small parts; kids 8 and up stay interested longer with felt, air dry clay, or a yarn web.
Pick The Right Project For Your Kid And Your Evening
Age is the wrong first question. Time is. Almost every spider here is 10 to 20 minutes of hands-on work, but glue and paint add 20 minutes to overnight before the thing can be hung, carried to school, or handed to a grandparent.
If you need it finished tonight, pick a marker and paper project. If you have until tomorrow afternoon, you can use paint or clay.
Ages 2 to 4. Big shapes, no small parts, adult holds the scissors. Handprints, egg carton cups, sponge and fork prints. Expect them to lose interest around the eight-legs stage, so do legs first while they still care.
Ages 5 to 7. They can cut a straight-ish line, bend a pipe cleaner, and use a glue stick without gluing their sleeve down. This is the range that most of these projects were built for.
Ages 8 and up. Give them something fiddly or they’ll be bored in four minutes. Clay, felt, sewn or threaded legs, painted rocks with fine detail, a full web they design themselves.
Adapting Up And Down
Same project, different kid. Here’s how I stretch one craft across a wide age range when siblings want to work at the same table:
- For younger kids: pre-cut everything, swap glue for double-sided tape, use paper circle eyes instead of googly eyes, and let them do the pressing and sticking only.
- For older kids: add fangs, a second body segment, a striped leg pattern, or a paper web backdrop. Ask them to make the spider’s two body parts (head plus abdomen) accurate and it turns into a quiet science conversation.
- For a mixed-age table: set out one shared bowl of pre-bent legs. Bending eight legs is the slowest step and the one that stalls a group.
Practical note: Spiders have eight legs and two body sections. Kids notice when a craft has six. If you want the finished thing to read as a spider instead of a bug, count the legs out loud as you attach them.
The Full Supply List, With A Free Swap For Everything
You don’t need all of this. Between the 22 projects below, these cover everything, and every bought item has a free or near-free stand-in that I’ve actually used when I ran out mid-craft.
| Item | Why it’s used | Free or cheap swap |
|---|---|---|
| Black pipe cleaners (chenille stems) | Bendy legs that hold a pose | Accordion-folded black paper strips, twisted strips cut from a black bin bag, black shoelaces, cut-up black t-shirt strips |
| Googly eyes | Instant character | Hole-punched white paper with a marker dot, white sticker dots, reinforcement labels, buttons from an old shirt |
| Black paper plates | Ready-made round body | Cardboard circle cut from a delivery box and painted, or a white plate covered with black paper (see the warning below) |
| Black pom-poms | Fuzzy texture | Black yarn wound around two fingers and tied in the middle, a rolled-up dark sock |
| Air dry clay | Sculpted body | Salt dough: 2 cups flour, 1 cup salt, 1 cup water, dried in a 200°F oven for 2 to 3 hours, then painted |
| Black felt | Soft ornaments that survive storage | Fleece or an old wool jumper, or black craft foam |
| Craft sticks | Web frame | Twigs from the garden, free and better looking |
| White yarn | Web strands | Dental floss (thin, strong, and it doesn’t fuzz), white sewing thread doubled, thin strips of a white plastic bag |
| Craft glue | Holds pipe cleaners and eyes | School glue plus patience for paper; flour and water paste for paper only |
Where to buy: dollar stores are the best value for black plates, black plastic cups, pipe cleaners, and bags of plastic spiders in October. Craft chains are worth it for felt by the sheet and for clay. Buttons, jars, and wool come cheaper from a charity shop or thrift store.
One glue note that matters. White school glue will not hold a plastic googly eye onto a painted surface. The paint seals the surface and the eye pops off within a day. Use a tacky glue such as Aleene’s Original, a glue dot, or a low temp glue gun with an adult holding it.
The Leg Trick That Makes Every Spider Craft Hold Together
This is the part most craft posts skip, and it’s the reason a spider ends up in the bin by November.
Legs glued flat against a surface fail. A pipe cleaner touches the paper or plate along a thin line, so there’s almost no glue contact, and the wire inside keeps trying to spring back to straight. Give it a day and the legs curl off.
Two fixes, both faster than they sound:
- Thread, don’t glue. Poke four pairs of holes with a bamboo skewer or a sharp pencil, then push one pipe cleaner through each pair so it enters and exits the body. One pipe cleaner crosses the body and gives you two legs. Four stems, eight legs, no glue at all.
- If you have to glue, glue a bend. Fold the last inch of the pipe cleaner flat and glue that folded section down. You get eight times the contact area.
Four pipe cleaners, not eight. The original version of this list called for eight stems and then told you to make eight legs from them, which leaves you with legs half the length you need. Full-length stems bent across the middle give a spider that actually stands up.
Practical note: Do legs first, eyes last. Eyes are the fun part, and if a kid glues them on in the first minute they treat the craft as finished and you’re left attaching legs alone.
Halloween Spider Crafts For Kids Ages 2 to 4
Big shapes, few pieces, and no small parts that end up in a mouth. Every one of these is finished before a toddler’s patience runs out.
1. Smiley Handprint Spider

The one you’ll still have in a drawer in ten years. A palm print is the body and the fingers become legs, so two prints side by side give you all eight.
Ages: 18 months and up | Time: 5 minutes plus 20 minutes drying | Mess: High | Skill: None needed
You need: Black washable paint, white or orange paper, googly eyes or paper circles, black marker.
- Paint the palm and fingers, not the thumb. Tuck the thumb in or it becomes a ninth leg.
- Press one handprint down, then press the other hand mirrored beside it so the palms overlap slightly and form one round body.
- Let it dry completely, then add eyes and a small smile.
Tip: Use washable kids’ paint (Crayola Washable Kids Paint is the reliable one), not black acrylic. Acrylic is permanent on clothing and stubborn on skin. I learned this the expensive way with a school jumper.
2. Egg Carton Spider
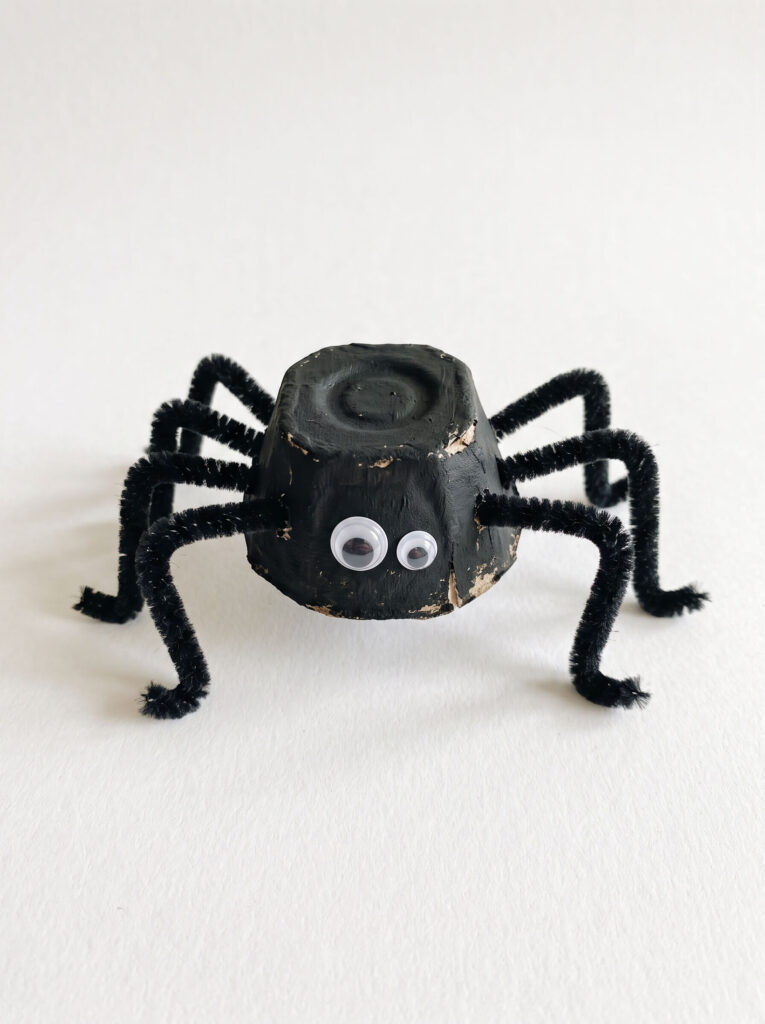
Free, quick, and the shape is already domed like a spider body. One egg carton makes six.
Ages: 3 and up | Time: 10 minutes plus paint drying | Mess: Medium | Skill: Beginner
You need: Cardboard egg carton, black paint, 4 pipe cleaners, eyes, skewer or pencil.
- Cut one cup from the carton and trim the rim flat so it sits level.
- Paint it black inside and out, then let it dry properly. Egg carton card soaks up paint and stays damp longer than it looks.
- Poke four holes down each side and push a pipe cleaner through so it crosses the inside and comes out the other side.
- Bend a foot into each leg tip and add eyes.
What goes wrong first try: kids paint one thick coat and the cup goes soggy and collapses. Two thin coats, or use a black carton if your eggs come in one.
3. Fork Print Web With A Spider On Top
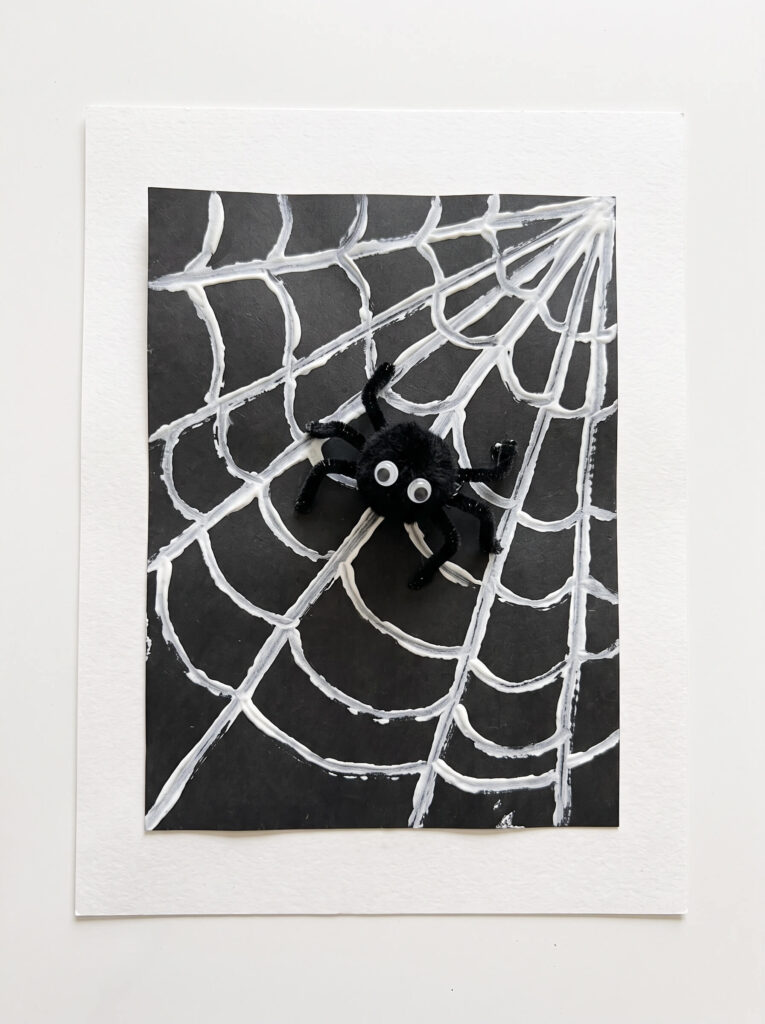
A plastic fork dipped in white paint stamps four web lines at once. It’s the fastest way to get a web that reads as a web when a toddler is holding the brush.
Ages: 2 and up | Time: 10 minutes | Mess: High | Skill: None needed
You need: Black paper or card, white paint on a plate, plastic fork, a black pom-pom or paper circle for the spider.
- Dip the fork tines in white paint and press onto the black paper, fanning the prints out from one corner like spokes.
- Add a few short curved lines between the spokes with a cotton bud.
- Glue a pom-pom spider near the middle once the paint is dry.
Tip: Pour the paint onto a flat plate, not into a pot. A toddler will submerge the whole fork in a pot and you’ll get a blob instead of lines.
4. Paper Plate Spider
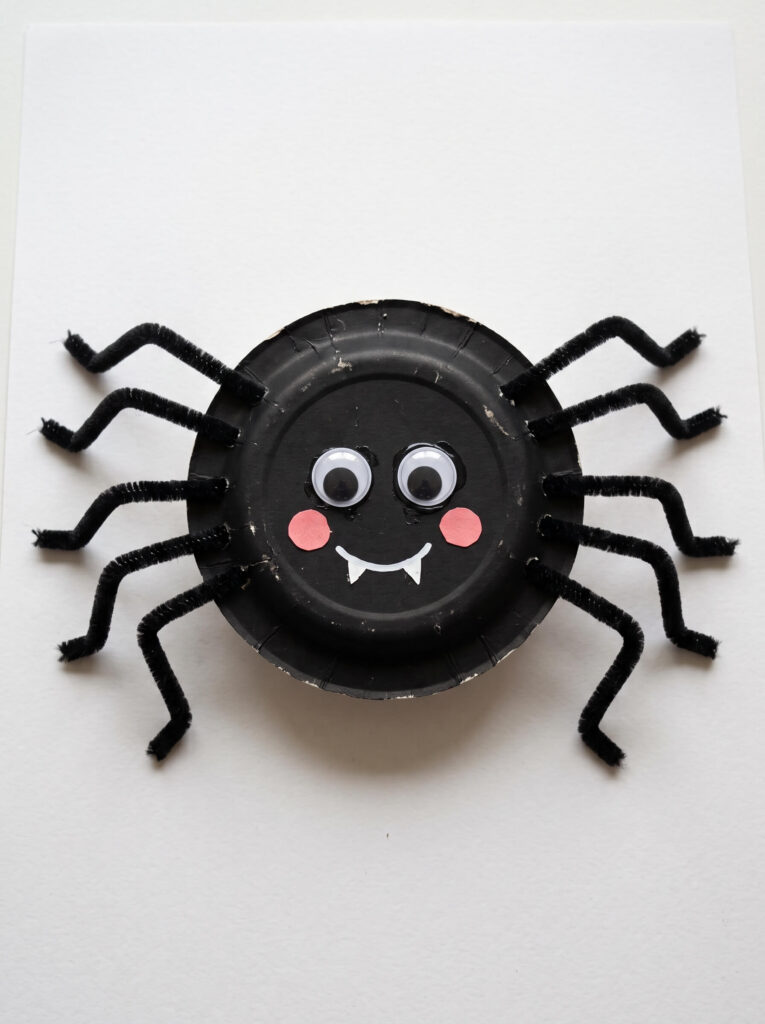
The starting point for a reason. It’s big, it’s forgiving, and it looks good on a classroom wall from across the room.
Ages: 3 and up | Time: 15 minutes plus drying | Mess: Low | Skill: Beginner
You need: Black paper plate, 4 black pipe cleaners, 2 googly eyes, pink or orange paper scraps, white gel pen or paint pen, tacky glue, skewer.
- Fold the plate in half and open it back up, just to find the centre line. This helps kids space the legs evenly.
- Poke four pairs of holes along each side with a skewer, adult job.
- Thread one pipe cleaner through each pair so it crosses the back of the plate, then bend both ends down into legs with a small foot at the tip.
- Glue on the eyes, add paper cheeks, and draw a smile with two small fangs using the white pen.
No pipe cleaners? Cut eight strips of black paper, accordion fold them, and glue four to each side of the back. The folded strips give a bouncy leg that kids like even more.
What goes wrong first try: buying white plates and painting them black. Wet paint warps a paper plate as it dries and you’ll wait 40 minutes for a cupped, wrinkled body. Black plates from the dollar store, or black card glued to a white plate, both beat painting.
Spider Crafts For Ages 5 to 7
The sweet spot. These need real cutting, bending, and placing, but nothing that ends in tears.
5. Cardboard Tube Spider
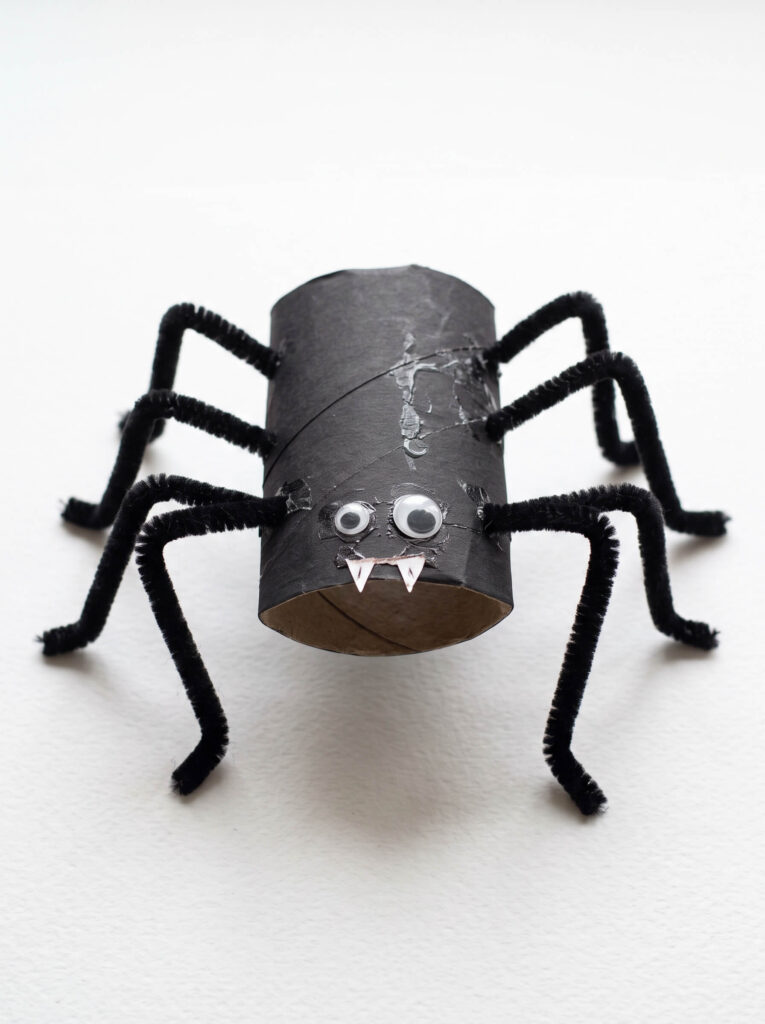
The tube gives you a standing spider instead of a flat one, which matters if it’s going on a shelf or a party table rather than a wall.
Ages: 5 and up | Time: 15 minutes | Mess: Low | Skill: Beginner
You need: Toilet roll or kitchen roll tube, black paper or black paint, 4 pipe cleaners, googly eyes, white paper scrap, glue.
- Wrap the tube in black paper and glue the seam, or paint it and let it dry.
- Poke four holes down each side, low on the tube so the legs reach the ground.
- Push one pipe cleaner through each pair of holes, then bend the ends down and out so the tube sits on the legs.
- Add eyes and a small white paper mouth with fangs.
Tip: Squash the tube slightly into an oval before you start. A round tube looks like a tube. A flattened one looks like a body.
6. Mini Cup Spider That Hides A Treat

An upside-down black plastic cup with legs. The reason to make this one over the tube: you can hide a sweet or a note underneath and use them as place markers at a party.
Ages: 5 and up | Time: 10 minutes | Mess: Low | Skill: Beginner
You need: Black plastic cup, 4 pipe cleaners, 2 googly eyes, tacky glue or glue dots.
- Turn the cup upside down so the base becomes the spider’s back.
- Poke or punch four holes down each side with a skewer. Plastic needs a bit of pressure, so this is an adult step.
- Thread the pipe cleaners through and bend them into a crouching pose with the knee higher than the body.
- Glue the eyes to the front and leave the glue to set before anyone picks it up by a leg.
7. Paper Cup Spider With Folded Paper Legs

Same idea, zero pipe cleaners. Good for a class of 25 where you don’t want to buy 100 stems.
Ages: 5 and up | Time: 20 minutes | Mess: Low | Skill: Beginner, more cutting than the rest
You need: Black paper cup, black construction paper, white and orange paper scraps, scissors, glue stick, black marker.
- Cut eight strips of black paper, roughly 1 inch by 6 inches.
- Fold each strip in sharp angled zigzags, like a paper fan but with only three or four folds. The angles become knees.
- Glue four legs to each side of the upturned cup, pressing the top fold flat against the cup for contact.
- Add paper eyes, orange cheeks, and a smiling mouth.
Tip: Score the folds against the edge of a ruler. Loose folds spring open and the legs sag by the next morning.
8. Pom-pom Spider
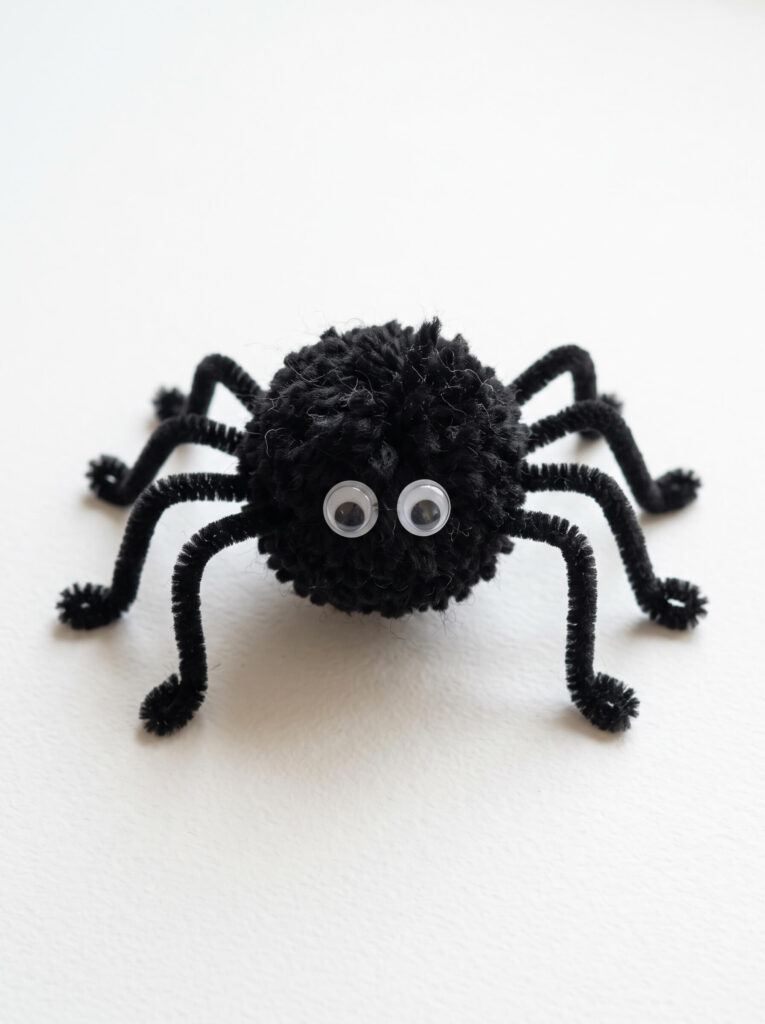
Softest one on the list and the one small kids carry around afterwards. Buy a bag of black pom-poms in mixed sizes and you can make a whole family in a sitting.
Ages: 4 and up | Time: 10 minutes | Mess: None | Skill: Beginner
You need: Black pom-pom (1.5 inch or larger), 4 pipe cleaners, googly eyes, tacky glue.
- Push a pipe cleaner straight through the middle of the pom-pom so equal lengths come out each side. The fibres grip the wire and hold it.
- Repeat with three more stems, spacing them so you end up with four legs a side.
- Bend each leg into a knee and a foot so the spider stands rather than rolls.
- Glue the eyes on and let them set. Glue soaks into pom-pom fibres, so give this one longer than you think, around 30 minutes.
What goes wrong first try: wrapping the stems around the outside instead of pushing them through. Wrapped legs rotate and slide off the moment the spider gets picked up.
9. Corrugated Cardboard Spider

Two circles cut from a delivery box, stacked. The ridges show through the paint and give it a handmade, slightly chunky look that photographs well.
Ages: 5 and up | Time: 20 minutes plus paint drying | Mess: Medium | Skill: Beginner
You need: Corrugated cardboard, black paint, 8 black paper strips or 4 pipe cleaners, googly eyes, glue.
- Cut one large circle and one smaller circle. Adults cut corrugated card, it’s too tough for kid scissors and blades slip.
- Paint both black and let them dry flat under a book so they don’t curl.
- Glue the small circle onto the large one for the head and body.
- Fold the paper strips into zigzag legs, glue four to each side of the back, then add the eyes.
Tip: Push the pipe cleaner into the open corrugated channels on the cut edge instead of gluing. Those little tunnels grip wire beautifully and no glue is needed at all.
10. Clothespin Spider
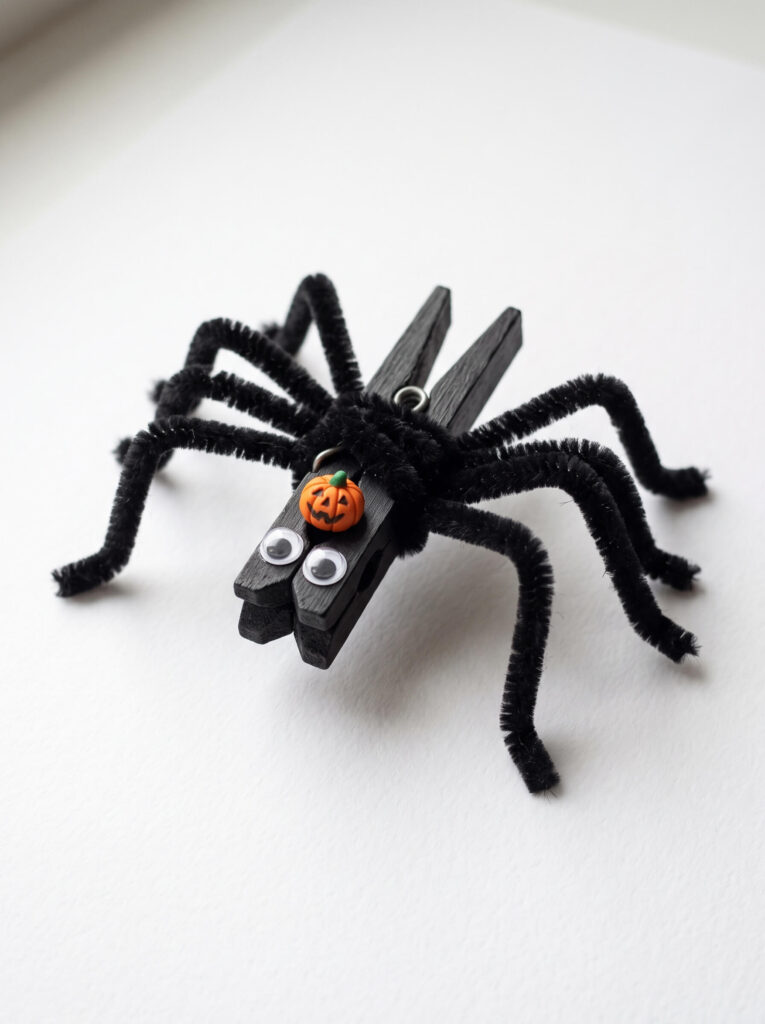
Because it clips. Onto a curtain, a plant pot, a card, the edge of a bookshelf. Clip-on decorations get moved around all month, which is more play value than a flat craft.
Ages: 5 and up | Time: 15 minutes plus paint drying | Mess: Low | Skill: Beginner
You need: Wooden clothespin (the spring type), black acrylic or poster paint, 4 pipe cleaners, googly eyes, small pumpkin charm or an orange bead, glue.
- Paint the clothespin black on all sides and let it dry fully, about 30 minutes.
- Wrap the middle of one pipe cleaner around the pin’s spring coil, then bend the two ends into legs. Repeat with three more.
- Glue the eyes near the clamping end so the mouth is at the front.
- Add the pumpkin charm on the front and leave it to set.
Watch out: paint the pin open, not clamped shut, or it dries stuck together.
11. Painted Stone Spider
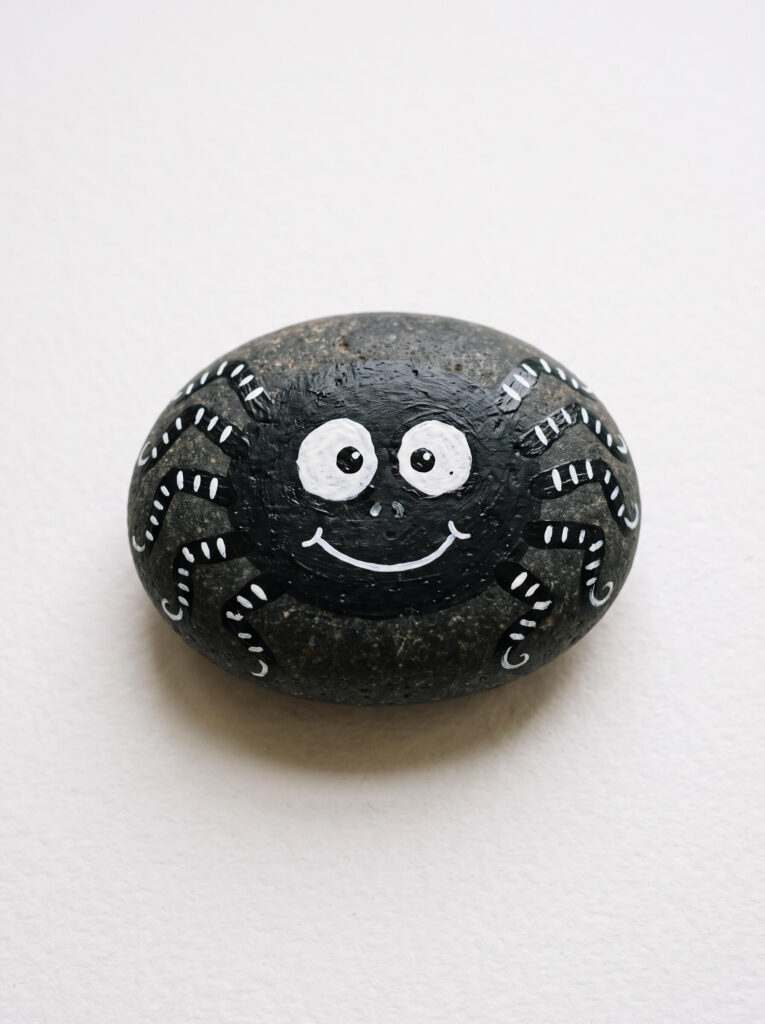
The one that survives. Rock spiders live outside by the front door for years and they cost nothing but paint.
Ages: 5 and up, and honestly adults enjoy this one | Time: 20 minutes plus drying between coats | Mess: Medium | Skill: Beginner to intermediate for the fine lines
You need: Smooth oval stone, black acrylic paint, white paint pen (a Posca PC-5M or similar makes clean lines that a brush won’t), fine brush, clear sealer if it’s going outdoors.
- Wash and dry the stone. Paint sticks badly to dust.
- Paint the whole stone black. On most stones you need two coats and the first one will look patchy.
- Once dry, draw eight legs curling around the sides, then add white stripes across each leg.
- Add big white eyes with black pupils and a small smile.
Tip: Let the black base dry for at least an hour before the white goes on. White pulls up grey streaks from a base coat that only feels dry on the surface. If it’s going outside, seal it with a clear outdoor spray in a well ventilated spot, adult only.
12. Paper Bag Spider Puppet

Treat it as a puppet, not a decoration, and this one earns its keep. The top flap becomes a mouth that opens.
Ages: 4 and up | Time: 15 minutes | Mess: Low | Skill: Beginner
You need: Brown or black paper lunch bag, googly eyes, black paper strips, white paper for teeth, glue stick, black marker.
- Flatten the bag with the folded base facing you. That base flap is the top of the mouth.
- Glue the eyes onto the flap and draw a smile along the fold so it splits open when the hand moves.
- Glue white paper fangs under the smile.
- Glue four paper strips to each side as legs. Keep them below the fold or the mouth won’t open.
Tip: Stuff the bag with two sheets of scrap paper and tape it shut instead, and the same craft becomes a chunky 3D spider you can hang.
13. Pinecone Spider

The most texture for the least effort. A pinecone already looks like a hairy body, so you can skip paint entirely and go straight to legs.
Ages: 4 and up with adult gluing | Time: 15 minutes, plus an hour if you bake the cones first | Mess: Low, but sappy | Skill: Beginner
You need: Pinecone, 4 pipe cleaners, googly eyes, tacky glue or low temp glue gun, black paint (optional).
- If the cones came from outside, bake them on a foil-lined tray at 200°F for 20 to 30 minutes to deal with sap and any hitchhiking bugs. Adult job, stay in the kitchen, they do smell.
- Push and twist one pipe cleaner between the scales on each side so it sits under a scale rather than on top of it. This holds without glue.
- Bend the legs down into feet so the cone sits level.
- Glue the eyes onto the flatter end.
What I’ve noticed: If you paint a pinecone with water-based paint, the scales pull inward as they take up moisture and then open again as they dry, which shifts anything you glued on in the meantime. Attach the legs and eyes after the paint has fully dried, or leave the cone unpainted. A natural brown pinecone spider still reads as a spider.
If you’re building a whole autumn shelf rather than a one-off, these sit well beside [INTERNAL LINK: Best Halloween Pumpkin Crafts For Easy Fall Decor].
Halloween Spider Crafts For Kids Ages 8 And Up
Older kids want something that takes real dexterity. These four have enough fiddly detail to hold attention for half an hour or more.
14. Bead Stack Spider Charm
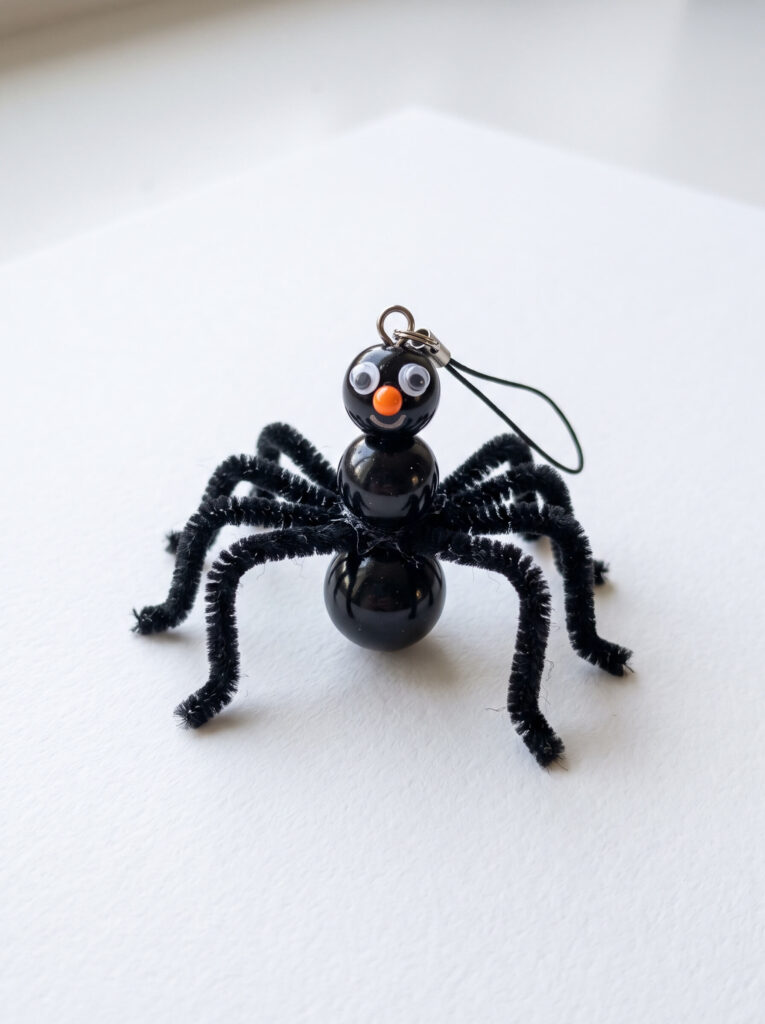
Three beads stacked into a body, small enough to hang off a zip or a bag. Fine motor work, and the finished thing is genuinely wearable.
Ages: 8 and up | Time: 25 minutes | Mess: None | Skill: Intermediate, fiddly threading
You need: 3 black round beads with holes, 4 thin pipe cleaners or 22 gauge black wire, 1 orange bead, 2 small googly eyes or a white paint pen, glue.
- Thread all three beads onto one pipe cleaner, largest at the back, and twist the ends to lock the stack.
- Wrap the remaining stems around the joints between beads, two on each side, then bend eight legs.
- Add the orange bead at the front as a nose or hang the charm from a loop of the leftover wire.
- Glue on tiny eyes, or dot them with a white paint pen if the beads are too small for stick-on eyes.
Watch out: small beads are a choking hazard for younger siblings. Work on a tray, and count the beads back into the pot at the end.
15. Button Spider
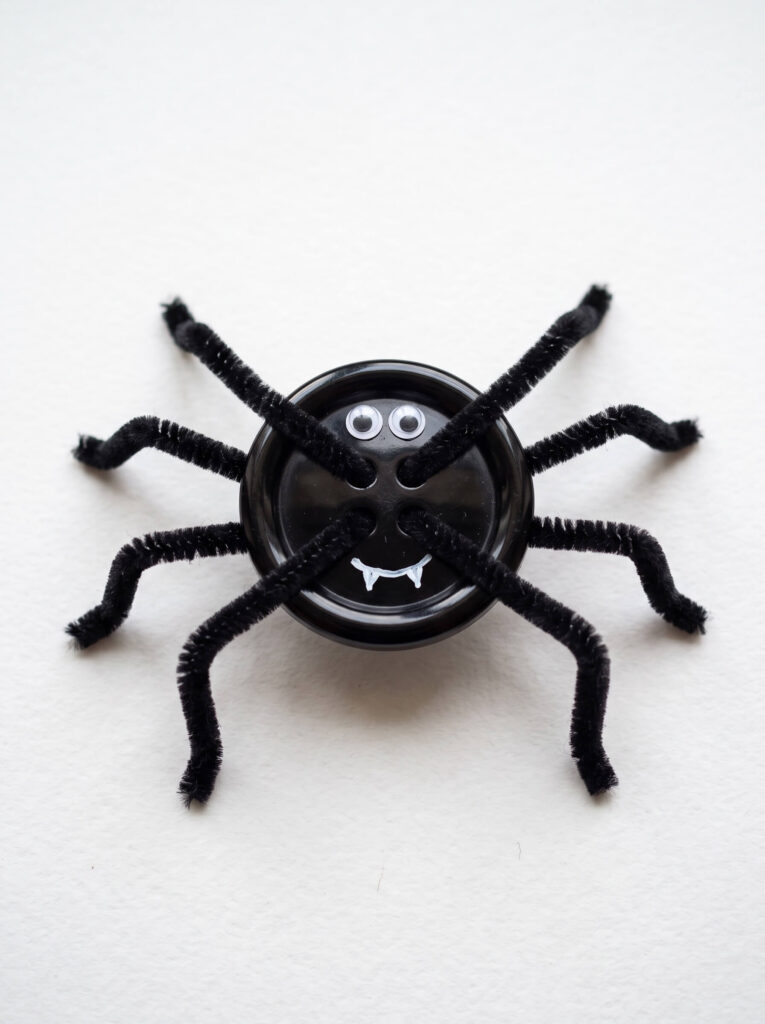
Uses up the button jar. A glossy black button has a shine that painted card can’t match, and the sewing holes are already there to thread legs through.
Ages: 7 and up | Time: 15 minutes | Mess: None | Skill: Intermediate
You need: Large black button (four holes if possible), 4 thin pipe cleaners or black thread, 2 tiny googly eyes, white paint pen, glue dots.
- Thread a pipe cleaner up through one hole and down through the next so it sits like a stitch, leaving two legs.
- Repeat through the remaining holes until you have eight legs, then bend each one.
- Stick the eyes on with glue dots. Craft glue slides straight off a plastic button.
- Add a tiny smile and two fangs with the white paint pen.
16. Felt Spider Ornament

The one that comes out of the Halloween box year after year. Felt doesn’t crease, tear, or fade in storage the way paper does.
Ages: 8 and up, or 5 and up if an adult runs the glue gun | Time: 30 minutes | Mess: None | Skill: Intermediate
You need: Black felt, 8 felt strips for legs, white and black felt scraps for eyes, string, fabric glue or a low temp glue gun.
- Cut two matching black circles, one slightly smaller for the head.
- Sandwich the leg strips between the two body pieces, four a side, and glue the body closed around them. Trapped legs never fall off.
- Bend each leg into a knee and glue a small fold to hold the shape.
- Layer white then black felt circles for eyes, add a felt or marker smile, and glue a loop of string at the top for hanging.
Tip: Use a low temp glue gun and press the felt down with the eraser end of a pencil, not a fingertip. Hot glue goes straight through thin felt and it burns. If a younger child is at the table, swap to fabric glue and give it an hour.
17. Air Dry Clay Spider

Real sculpting, and the only project here that ends up feeling like an object rather than a craft. Worth doing on a day when nobody needs it finished by bedtime.
Ages: 8 and up | Time: 30 minutes hands-on, 24 to 72 hours drying | Mess: Medium, gritty | Skill: Intermediate
You need: Black air dry clay (or white clay painted after, Crayola Air-Dry Clay is easy to find and DAS is denser and stronger), 4 short pipe cleaners, 2 small beads or craft eyes, a little water.
- Roll one ball for the abdomen and a smaller one for the head. Score both where they meet, brush on a little water, then press together. Scoring is what stops the head snapping off later.
- Push four pipe cleaners through the body while the clay is soft, so each one crosses through and out the other side.
- Bend the legs and stand the spider up now, while you can still adjust the balance.
- Press in the eyes and leave it somewhere with air on all sides. Turn it once during drying.
What goes wrong first try: rolling the legs from clay. Clay legs thinner than a pencil crack as the clay shrinks, and they snap the first time the spider is picked up. Pipe cleaner legs pushed into wet clay are the version that survives. Expect a fine crack somewhere anyway. Air dry clay shrinks slightly and a hairline crack on the underside is normal, not a failure.
Webs, Garlands, And Wall Displays
Bigger builds. These work well as a group project, a sibling activity, or the backdrop for all the small spiders above.
18. Craft Stick Web

A square black frame with a white web stretched across it. It hangs on a door and reads clearly from a distance.
Ages: 6 and up | Time: 25 minutes | Mess: Low | Skill: Beginner
You need: Black craft sticks (or plain sticks painted black), white yarn or dental floss, white glue or a low temp glue gun, one small plastic spider.
- Lay three or four sticks across each other in a star, all crossing at the centre, and glue each joint.
- Tie the yarn at the centre and spiral it outward, looping once around each stick as you pass it.
- Keep the tension loose. Pull it tight and the sticks bow inward into a flower shape instead of a web.
- Glue a plastic spider near the middle and add a yarn loop for hanging.
19. Twig Web Wall Art

Same build, free materials, better looking. A nature walk becomes half the activity.
Ages: 6 and up | Time: 30 minutes plus glue setting | Mess: Low | Skill: Beginner to intermediate, since twigs are uneven
You need: 4 or 5 straight-ish twigs, white yarn, black pom-poms, googly eyes, glue gun (adult) or garden twine.
- Snap the twigs to roughly matching lengths and arrange them crossing at one point.
- Lash the centre with yarn wrapped in a figure eight, then add glue. Lashing holds where glue alone gives out on bark.
- Spiral the yarn outward, looping around each twig.
- Make small pom-pom spiders and glue two or three onto the web at different heights.
Practical note: Bark is dusty and glue doesn’t grip it well. Rub each twig with a cloth before you glue, or lash and skip the glue entirely.
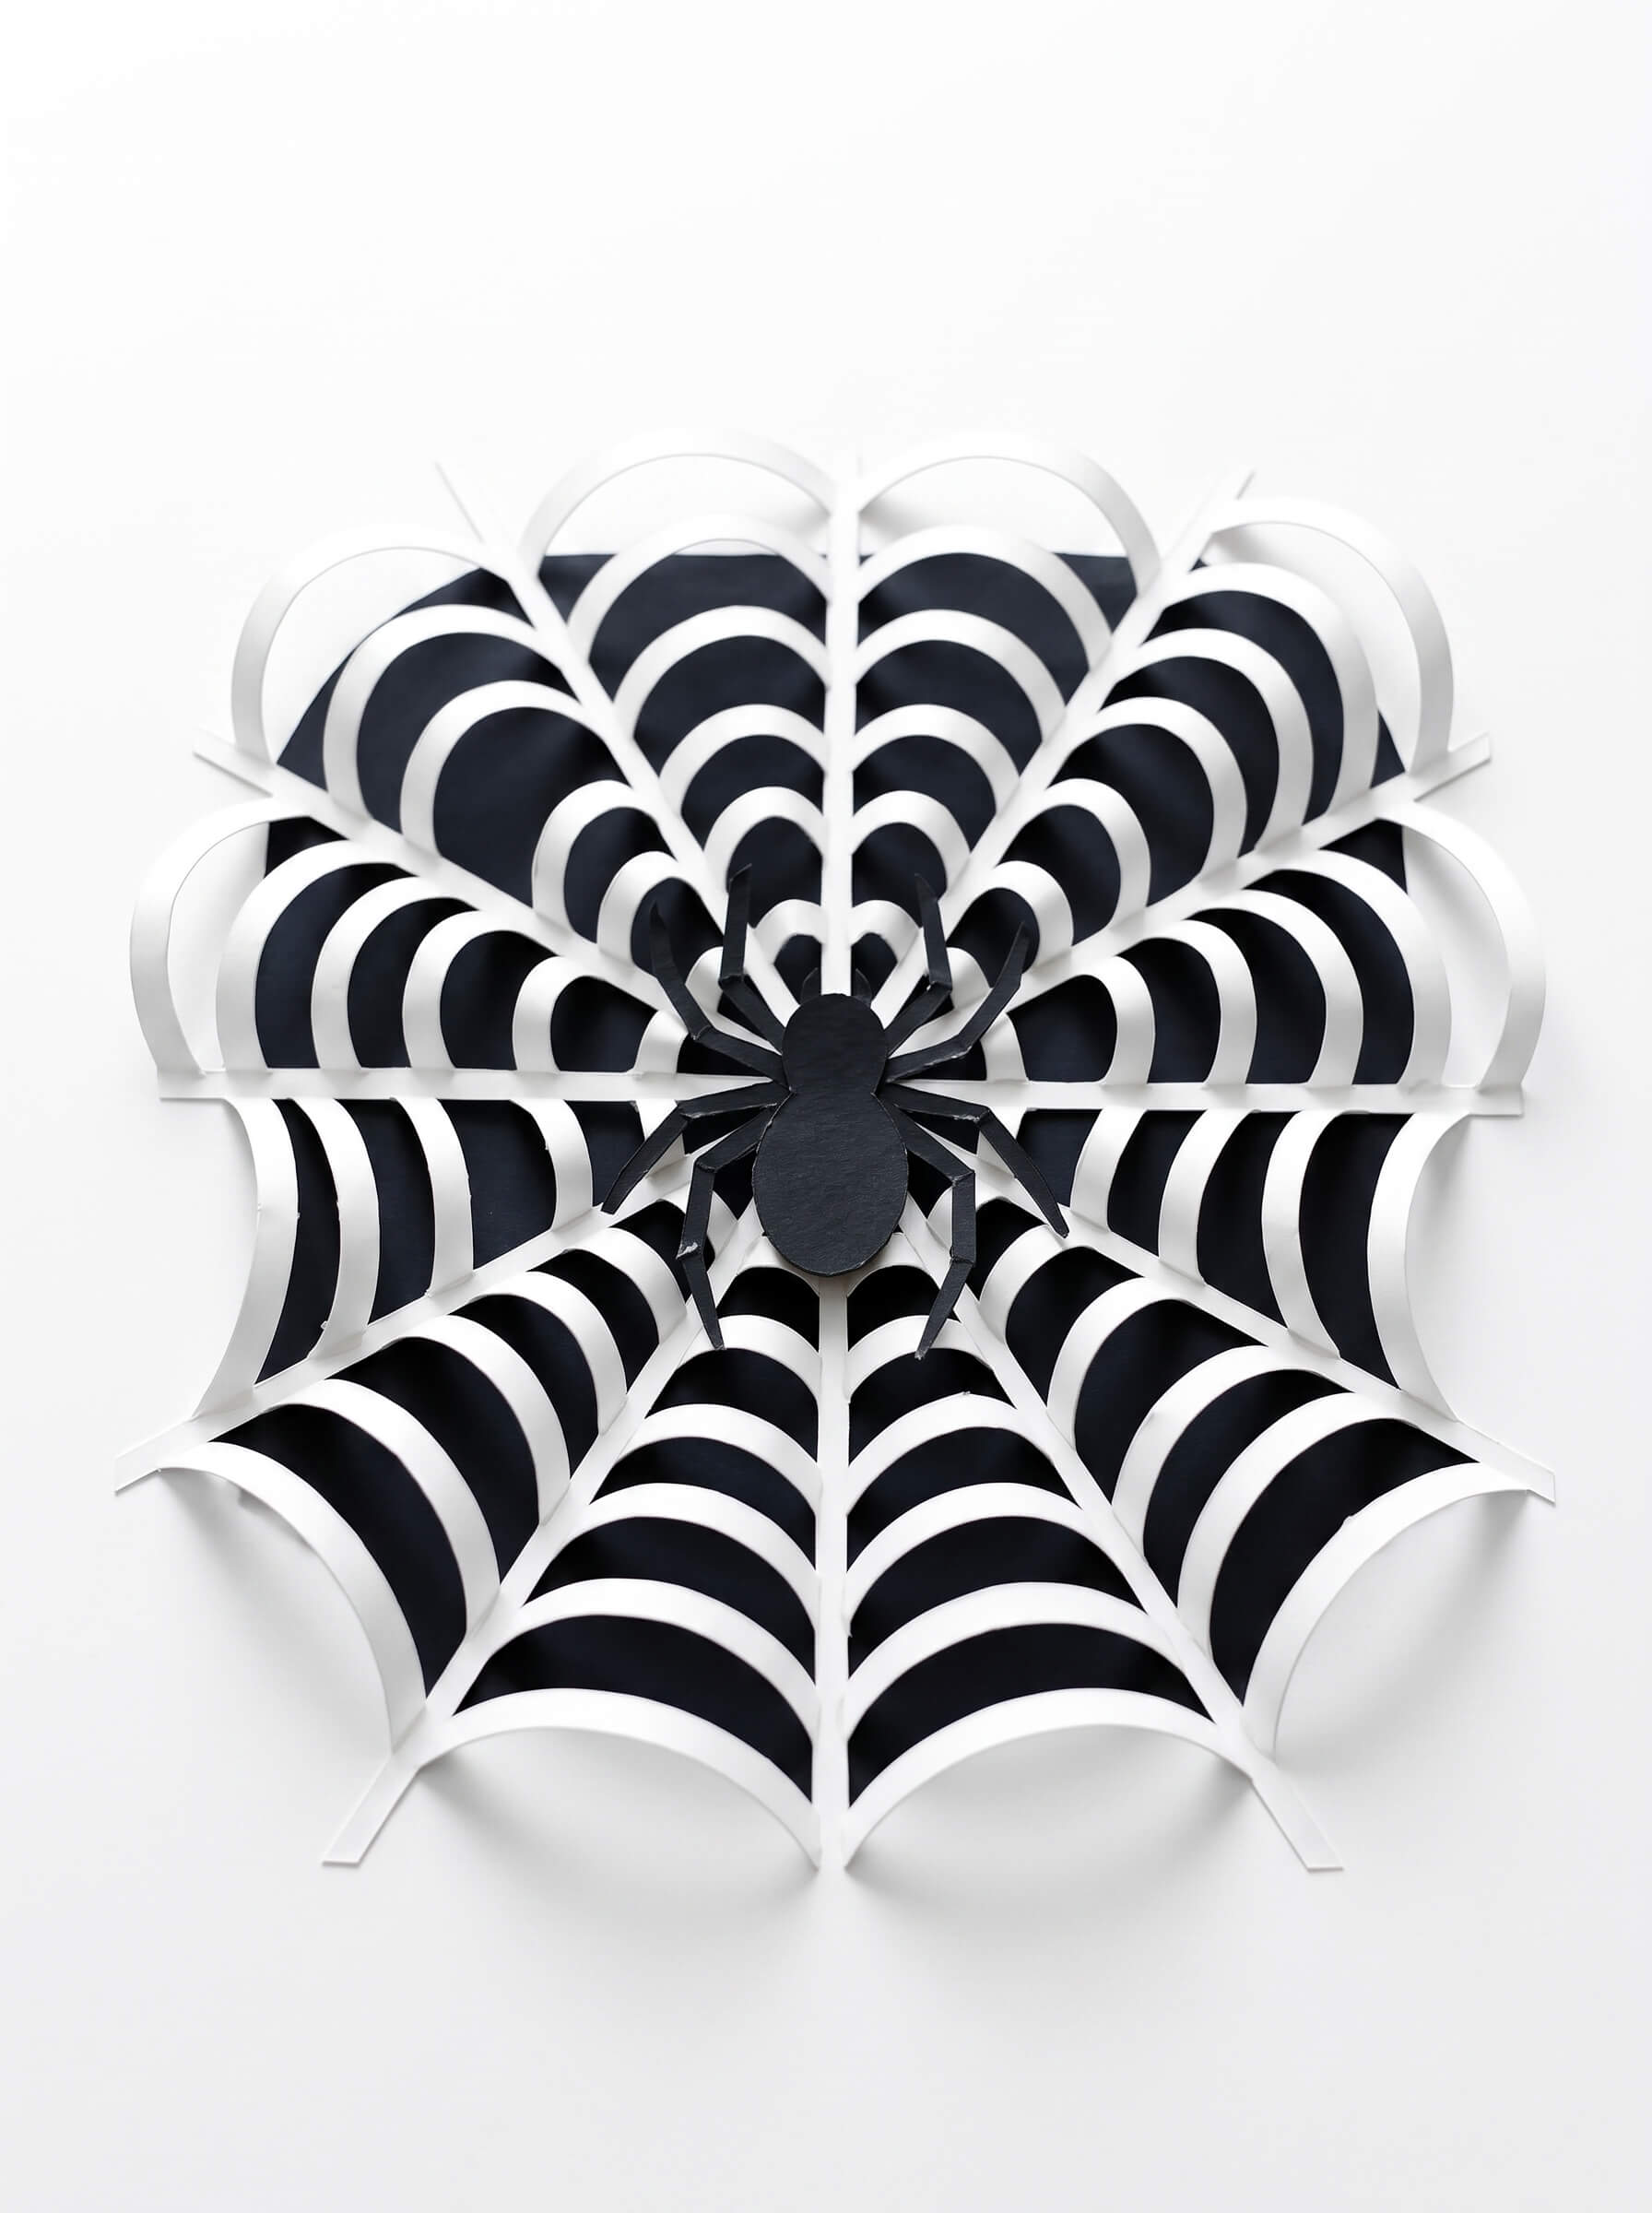
20. Layered Paper Web For A Window

Curved white paper strips glued into loops, so the web sits off the glass and casts a shadow. This is the one that gets the most comments from anyone walking past.
Ages: 6 and up | Time: 30 minutes | Mess: None | Skill: Intermediate, lots of small gluing
You need: White paper or cardstock, black paper, scissors, glue stick, tape.
- Cut a stack of white strips, roughly half an inch wide, in a few different lengths.
- Bend each strip into an arc and glue only the two ends down onto a black paper backing, leaving the middle raised.
- Build the arcs outward in rings from a centre point so they overlap into a web.
- Cut a black spider body and eight legs, then glue it over the centre so it looks like it’s sitting on top of the strands.
Tip: Glue the ends, not the whole strip. A flat-glued strip is just a line on paper. The raised loop is the entire effect.
21. Paper Plate Woven Web

Proper weaving, and a good quiet-hands project. Notch the rim of a plate and you have a loom.
Ages: 5 and up | Time: 25 minutes | Mess: None | Skill: Beginner, repetitive in a calming way
You need: Paper plate, white yarn, scissors, hole punch or scissor tip, black pom-pom, googly eyes.
- Cut the middle out of the plate to leave a ring, or keep it whole and paint it black first.
- Cut a dozen small notches evenly around the rim.
- Hook the yarn into a notch and stretch it across to the notch opposite, then to a neighbour, working round until the strands cross the middle. Any pattern works, it will still look like a web.
- Tie off the end and set a pom-pom spider on the strands, glued at two points so it doesn’t spin.
22. String Hung Spider Garland
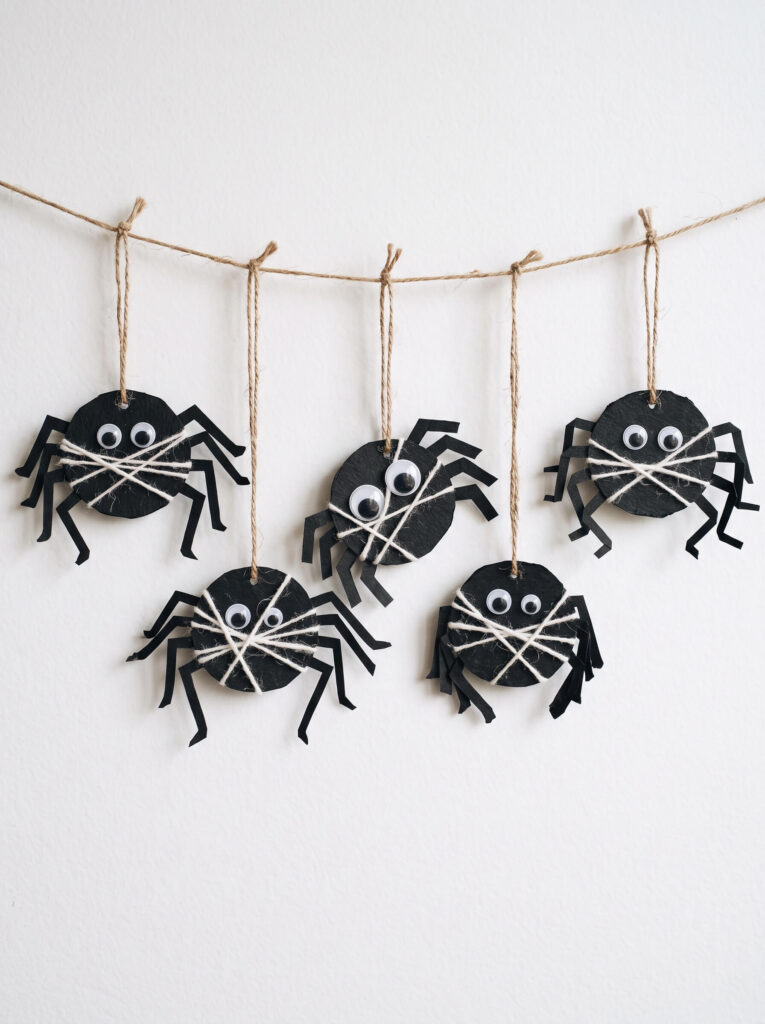
The finishing touch for a doorway or a party wall, and the best use for all the spare bodies once kids get into a rhythm of making them.
Ages: 5 and up | Time: 30 minutes for five spiders | Mess: Low | Skill: Beginner
You need: Black paper circles, black paper strips, googly eyes, white yarn, glue, scissors, tape.
- Cut one large circle per spider and eight short strips for its legs.
- Glue the legs behind each body, then bend the tips forward so they read as feet from the front.
- Add eyes, then wrap a short length of white yarn across the front of the body in a rough web shape and tape it at the back.
- Tape each spider to a long piece of string, spacing them unevenly. Even spacing looks like a shop display, uneven looks handmade.
Tip: Hang it before you glue the last details on. You’ll immediately see which spiders need a leg bent forward to face the room.
All 22 Spider Crafts Compared
| # | Craft | Best age | Hands-on time | Mess | Skill |
|---|---|---|---|---|---|
| 1 | Handprint spider | 18 months+ | 5 min | High | None |
| 2 | Egg carton spider | 3+ | 10 min | Medium | Beginner |
| 3 | Fork print web | 2+ | 10 min | High | None |
| 4 | Paper plate spider | 3+ | 15 min | Low | Beginner |
| 5 | Cardboard tube spider | 5+ | 15 min | Low | Beginner |
| 6 | Mini cup spider | 5+ | 10 min | Low | Beginner |
| 7 | Paper cup spider | 5+ | 20 min | Low | Beginner |
| 8 | Pom-pom spider | 4+ | 10 min | None | Beginner |
| 9 | Corrugated cardboard spider | 5+ | 20 min | Medium | Beginner |
| 10 | Clothespin spider | 5+ | 15 min | Low | Beginner |
| 11 | Painted stone spider | 5+ | 20 min | Medium | Beginner to intermediate |
| 12 | Paper bag puppet | 4+ | 15 min | Low | Beginner |
| 13 | Pinecone spider | 4+ | 15 min | Low, sappy | Beginner |
| 14 | Bead stack charm | 8+ | 25 min | None | Intermediate |
| 15 | Button spider | 7+ | 15 min | None | Intermediate |
| 16 | Felt ornament | 8+ | 30 min | None | Intermediate |
| 17 | Air dry clay spider | 8+ | 30 min | Medium | Intermediate |
| 18 | Craft stick web | 6+ | 25 min | Low | Beginner |
| 19 | Twig web wall art | 6+ | 30 min | Low | Beginner to intermediate |
| 20 | Layered paper web | 6+ | 30 min | None | Intermediate |
| 21 | Paper plate woven web | 5+ | 25 min | None | Beginner |
| 22 | Spider garland | 5+ | 30 min | Low | Beginner |
Times are hands-on only. Anything painted or glued needs 30 minutes to overnight on top before it can be moved.
Worth saving this table now if you’re planning a party or a class session. It’s easier to pick from a pin on your phone at the craft shop than to remember which four of these need pipe cleaners.
Mess, Safety, And What To Cover Before You Start
None of these involve fumes or blades, so the risks are small and specific rather than general. Here’s what actually needs watching.
Small parts. Googly eyes, beads, buttons, and plastic spiders are choking hazards for under-threes. If a toddler is in the room, not just at the table, swap to hole-punched paper eyes or draw them on.
Paint. Use washable kids’ paint for anything touching skin or clothing. Black acrylic and black poster paint both stain fabric permanently, and acrylic on a wooden table needs to be wiped while wet, not after.
Hot glue. Adult job, or a low temp gun with an 8 and up child sitting down and working slowly. Thin felt and paper both let heat straight through to fingertips.
Scissors. Corrugated cardboard, plastic cups, and thick card should be cut by an adult. Kid scissors slip on curved plastic and that’s where the cuts happen.
Oven step. Baking foraged pinecones needs an adult in the kitchen the whole time. Sap can melt out, so line the tray with foil, keep the temperature low, and don’t walk away.
Sealer spray. Only relevant if you’re sealing painted rocks for outdoors. Do it outside or by an open window, adult only, kids not in the room while you spray.
Mess control that actually works: a cheap plastic tablecloth, one shallow tray per child to catch beads and eyes, and baby wipes within arm’s reach. Black paint on white grout is the one stain that will still be there at Christmas.
Common First-Try Mistakes
These are the ones I see every October, in this order.
- Gluing pipe cleaners flat. Covered above, but it’s the number one reason a craft doesn’t last. Thread them through, or glue a folded end.
- Cutting pipe cleaners in half. Half-length legs can’t hold up a paper plate or a cup, and the spider tips over. Use four full stems, each one crossing the body.
- Eyes before legs. Kids treat the face as the finish line. Save it.
- Painting white paper plates black. They warp, they take ages, and you can buy black ones for less than the paint costs.
- Skipping dry time because it looks dry. Glued legs sag downward overnight if they were hung too soon. Lay the craft flat until the glue is properly set.
- Making the body too big for the legs. A large plate body needs long legs with a real knee bend, or it looks like a spider that’s melting.
- Trying to make it symmetrical. Crooked eyes and mismatched legs are what make these look creepy-cute rather than mass produced. Let the kid place the face.
FAQs
What is the easiest Halloween spider craft for kids?
A paper plate spider. You need a black paper plate, four pipe cleaners threaded through for eight legs, and two googly eyes, and most kids aged three and up finish in about 15 minutes with no paint and no drying time.
What can I use instead of pipe cleaners for spider legs?
Accordion-folded black paper strips are the best swap and they’re free. Twisted strips cut from a black bin bag, black shoelaces, or strips from an old black t-shirt all work too. Fold or knot the end you attach so the glue has something to grip.
How do you make a spider craft safe for toddlers?
Skip anything small enough to swallow. Draw the eyes or punch them from paper, use washable paint, keep scissors and glue guns with the adult, and choose handprint, paper plate, or sponge and fork printing rather than beads or buttons.
Why do the pipe cleaner legs keep falling off?
Because a pipe cleaner only touches a flat surface along a thin line, so there’s barely any glue contact, and the wire inside springs back. Poke holes and thread the stems through the body instead, or fold the last inch flat and glue that.
What paint should I use for a handprint spider?
Washable kids’ tempera, such as Crayola Washable Kids Paint. It comes off skin under a tap and washes out of most clothing. Acrylic gives a bolder black but it stains fabric permanently.
How many legs should a kids’ spider craft have?
Eight, in four pairs, plus two body sections if you want it to be accurate. Four pipe cleaners bent across the body give you exactly eight, which is why most of these projects call for four rather than eight stems.
Which spider craft works best for a whole classroom?
The paper cup spider with folded paper legs, or the paper plate spider. Both use materials you can buy in bulk, both survive being carried home in a backpack, and neither needs paint or drying time between steps.
Read next
If the spiders went well and you’ve still got a table covered in plastic sheeting, Best Halloween Pumpkin Crafts For Easy Fall Decor uses most of the same supplies and finishes the doorway display. For the younger end of the age range, Easy Halloween Handprint Crafts For Toddlers has more of the keepsake-style projects, the ones you end up laminating