
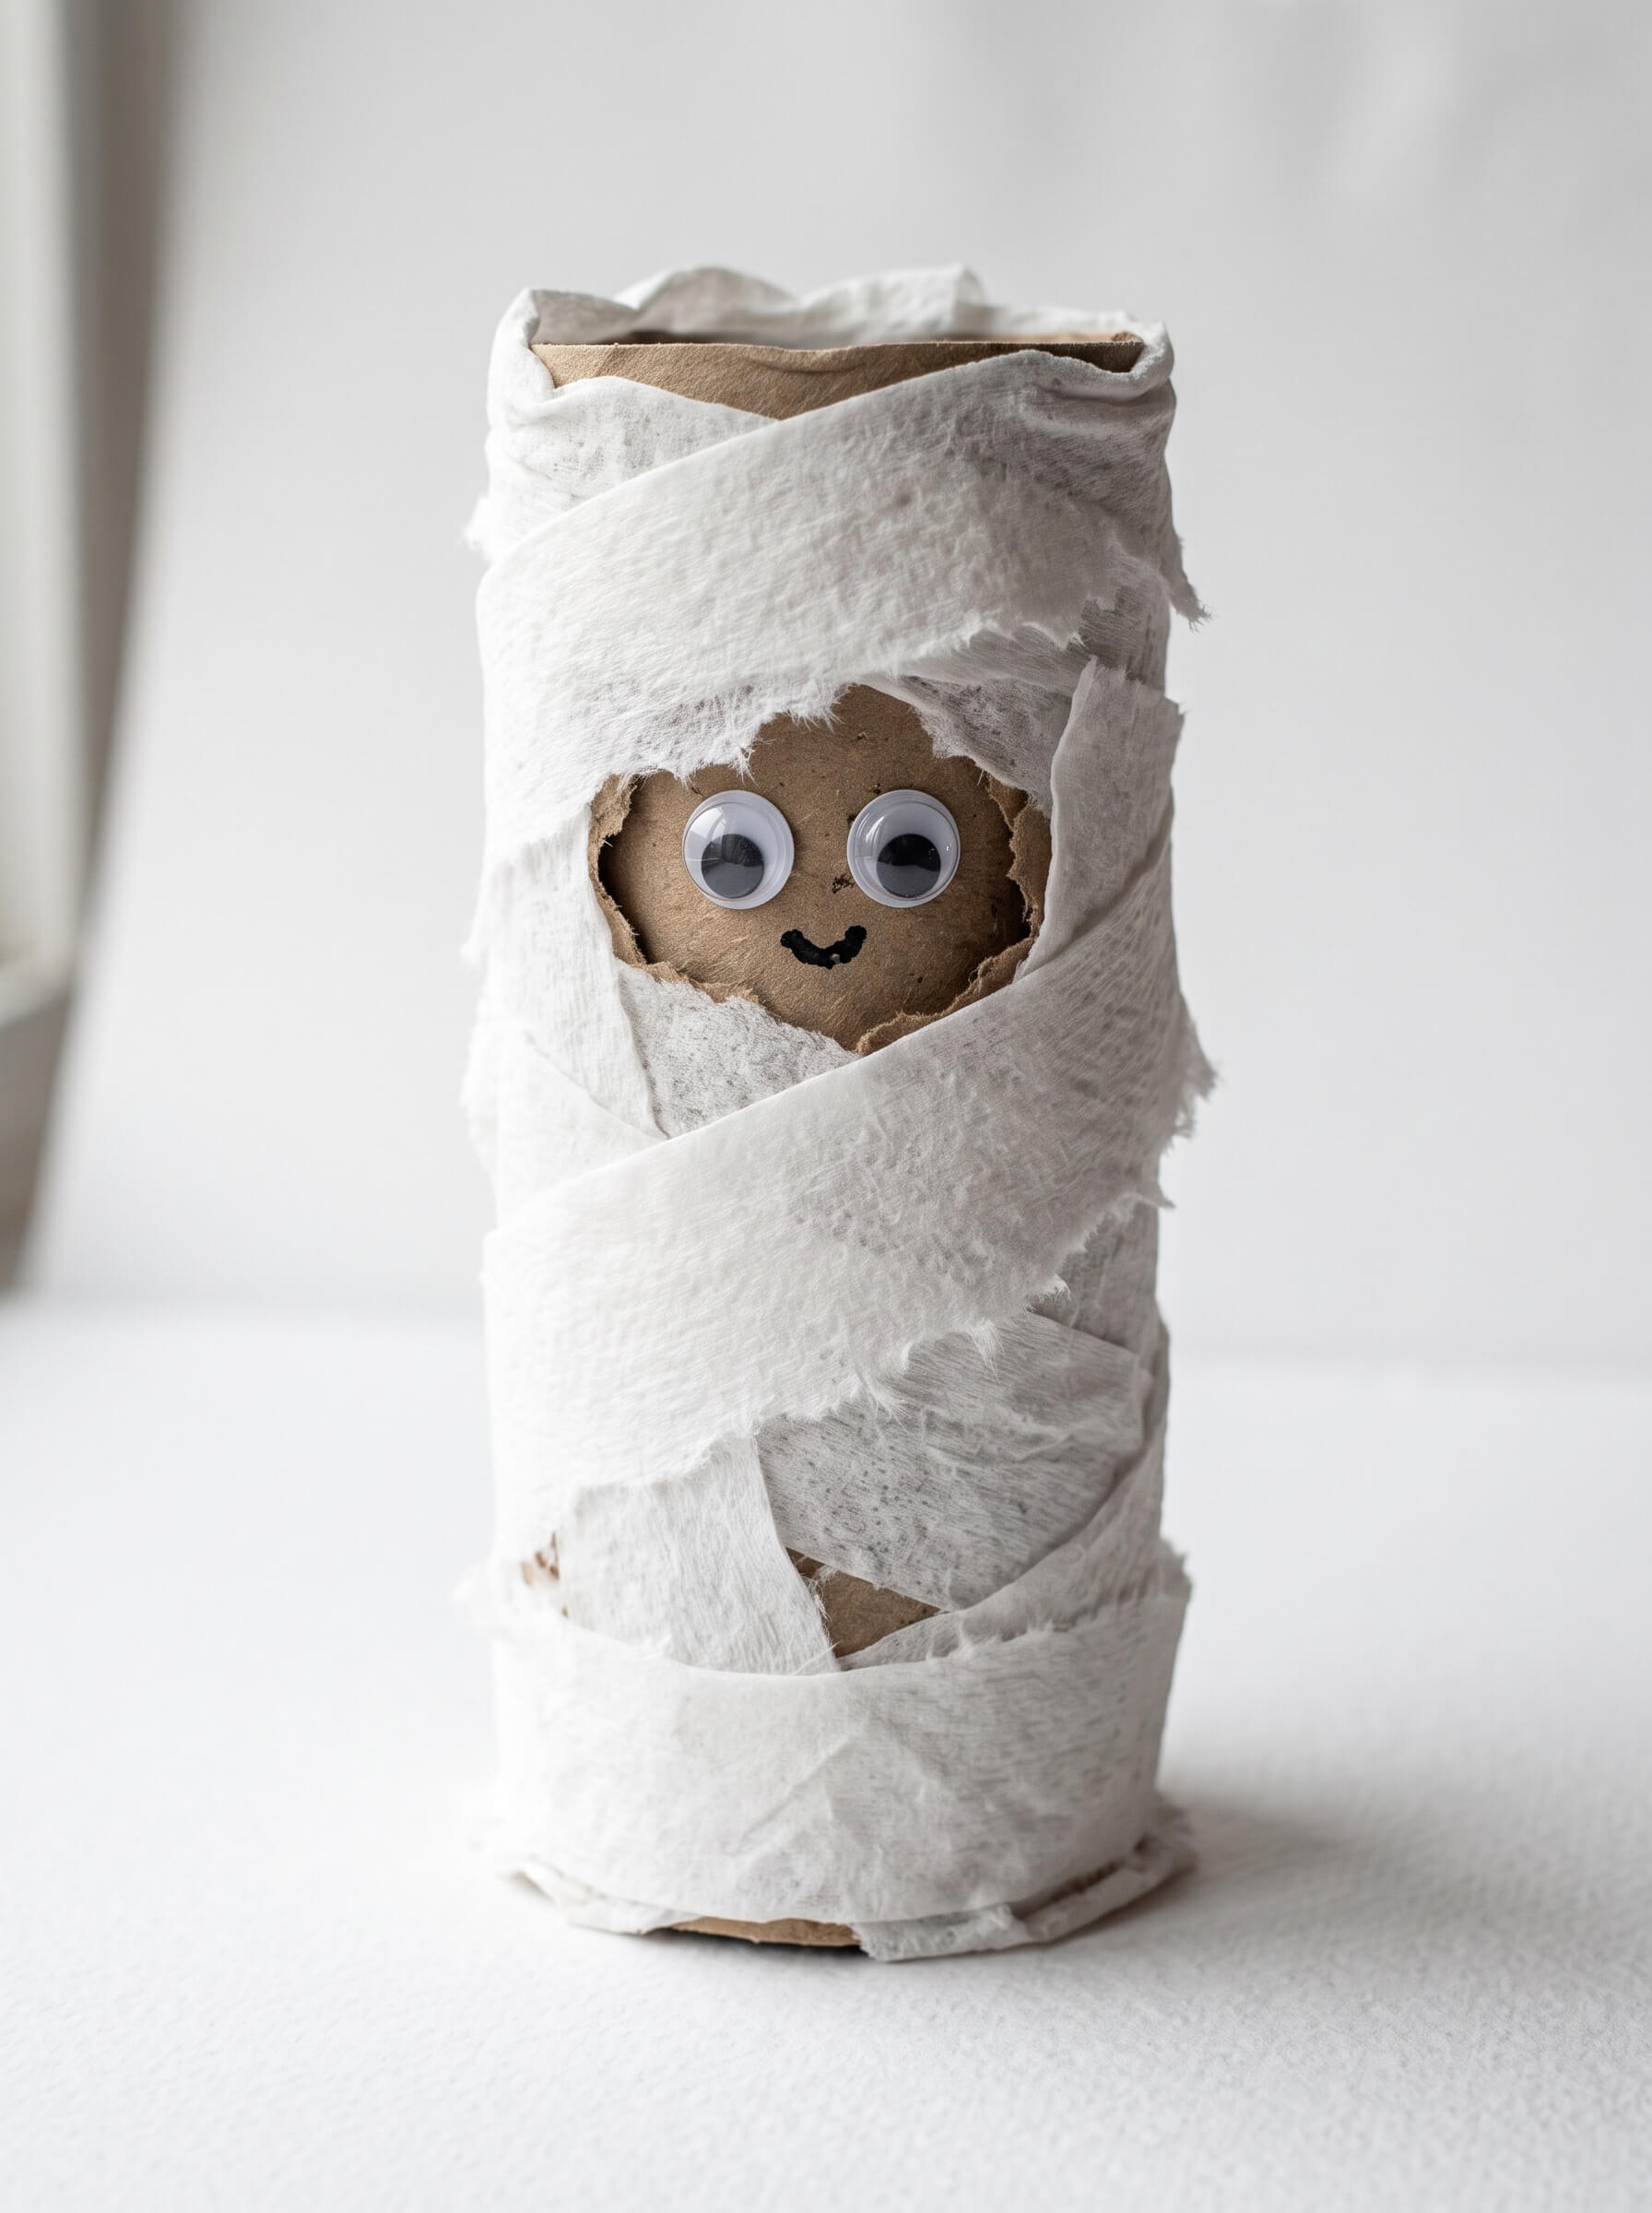
Halloween toilet paper roll crafts are cardboard tube projects you finish in about 10 to 20 minutes each using paint or paper, glue, scissors, and whatever is already in your craft bin. The easiest for young kids are bats, pumpkins, and mummies, because they only need a wrapped tube and two paper shapes, and the ones worth the extra effort are the cut out lanterns and the jack-o’-lantern garland. Wrapping tubes in construction paper instead of painting them cuts out the 30 minute dry time and stops the cardboard from drying into an oval, which is the single most common reason these crafts flop on a first try.
The Bag Behind The Bathroom door
Two years ago I got a class party email on October 28 asking for twelve cardboard tubes. I had five. You cannot rush this part. Tubes arrive at the speed your household uses toilet paper, and no amount of planning changes that.
So now I start a paper grocery bag behind the bathroom door around Labor Day, and by mid October there are enough tubes in it that my youngest keeps trying to build a tower out of them.
That is the real reason this list exists. Cardboard tubes are free, they are already in your house, and a tube plus one sheet of construction paper turns into a bat in about four minutes.
One timing note for this year: Halloween 2026 lands on a Saturday, so most school and daycare parties will fall on Friday the 30th. If you are making these for a classroom, work backward from that date, not from the 31st.
How Many Tubes You Actually Need
If you made every project on this list, you would need about 35 tubes, because the garland eats five, the monster group wants three, and the spy scope takes two. A four person household usually banks eight to twelve tubes a month. That is roughly a month of collecting, which is why September is the right time to start.
Faster ways to get there:
- Paper towel tubes. One cuts into two, sometimes three, tube sized pieces. Mark your cuts with a pencil first, because free handing it gives you one tall piece and one stubby one.
- Wrapping paper and mailing tubes. Much stiffer cardboard. Best for lanterns and anything you want to keep past November.
- Ask outward. Grandparents, a neighbor, your kid’s teacher. Teachers often already have a bin.
- Mega and jumbo rolls leave behind a wider, stiffer core that holds its round shape better than a thin store brand core.
One thing to know before you send tubes to school. Plenty of classrooms and daycares will not accept toilet paper tubes at all and ask for paper towel tubes instead, purely because of where the toilet paper tube has been sitting. Ask before you show up with a bag of them, and wipe the outside of yours with a disinfecting wipe and let them dry fully if you are working with a group.
Practical note: A standard tube is about 4 inches long and roughly 5.5 inches around. Cut your paper 4.5 by 6 inches and you get full coverage with a small overlap. One 9 by 12 sheet of construction paper wraps exactly four tubes, so a dollar pack of 50 sheets covers 200 of these.
Ages, Skill Level, And Real Timing
Every project here is beginner level for an adult. The difference is what the child can do without you taking over.
| Age | Can handle alone | Pre cut for them | Best picks |
|---|---|---|---|
| 2 to 3 | Gluing flat shapes, wrapping tape, stamping | Everything, including the wrap | Stamped pumpkin art, no paint pumpkin, mummy |
| 4 to 5 | Glue stick, big scissor cuts, painting | Wings, ears, hats, faces | Bat, ghost, candy corn, mummy, monsters |
| 6 to 8 | Fringe cuts, pipe cleaner legs, most assembly | Nothing, but draw cut lines | Spider, cat, skeleton, garland, treat tubes |
| 9 and up | Brads, threading, layered detail work | Nothing | Haunted village, yarn broom, haunted house, napkin rings |
Realistic timing, active hands on time only: a wrapped tube character takes 8 to 12 minutes. A painted one takes 10 minutes plus 20 to 30 minutes of drying you cannot rush. The garland is about 45 minutes for five pumpkins. The cut out village lantern is closer to an hour, and the knife work in it belongs to an adult.
Plan for one to two projects per sitting with kids under six. I have never once gotten a preschooler through four tubes in a row without the last one being a smear of glue and glitter.
The Full Supply List, With A Cheap Swap For Everything
Buy nothing until you have read the swaps. I own most of this and still use the swap half the time.
- Cardboard tubes. Free. Cheap swap: paper towel or wrapping paper tubes cut down.
- Construction paper, about a dollar for a 50 sheet pack at Dollar Tree or Walmart. Cheap swap: cereal box cardboard, paper grocery bags, old file folders, junk mail, magazine pages in the right color.
- Craft acrylic paint. Apple Barrel and FolkArt run about $1.25 a bottle at Walmart and Michaels. Cheap swap: the Crayola washable tempera already in your cabinet, or skip paint entirely and wrap.
- Tacky glue. Aleene’s Original Tacky Glue is the one that actually holds googly eyes and pipe cleaners to cardboard. Cheap swap: a low temp hot glue gun if an adult is doing the sticking. A glue stick works for paper on paper only.
- Googly eyes. Cheap swap: white paper circles from a hole punch with a Sharpie dot in the middle, or the dot stickers from the office supply aisle. Use the swap for any child under three.
- Pipe cleaners. Cheap swap: accordion folded strips of black paper, or the black twist ties off bread bags.
- Twine for garland. Cheap swap: yarn, kitchen string, or a strip cut from a plastic bag.
- LED tea lights. Two for a dollar at most dollar stores. Cheap swap: battery fairy lights you already own, or a phone flashlight set face up under the tube.
- White gauze or crepe for mummies. Cheap swap: torn strips of white paper towel. The texture is better than crepe paper and it is free.
- White gel pen (Uni-ball Signo or a Gelly Roll). This is the one specialty item I would actually buy, because nothing else shows up on black paper. Cheap swap: white crayon, pressed hard.
- Brads for the poseable skeleton. Cheap swap: a knotted length of thread through two pushpin holes.
- Pom poms. Cheap swap: crumpled squares of tissue paper.
Where to source: Dollar Tree for paper, tea lights, and googly eyes. Walmart or Michaels for the paint and Aleene’s. The Target dollar spot usually has Halloween foam stickers by late September that do a lot of the detail work for you.
The Paint Mistake That Ruins Most Halloween Toilet Paper Roll Crafts
Here is the thing nobody mentions in a project list. Cardboard tubes drink water. One thick coat of paint soaks the fibers, and as the tube dries it shrinks unevenly and sets into a soft oval with the glue seam standing proud. The kid comes back to a squashed bat.
Two thin coats fix it. So does wrapping.
The second problem is color. Orange craft paint over bare kraft cardboard dries rust brown, not pumpkin. Every time. You need a white base coat, then two coats of orange, which is 40 minutes of drying before anyone glues a face on. Orange construction paper skips all three steps.
The same goes for white. A white painted ghost or mummy shows the printed manufacturer text and the dark glue line through it unless you go three coats deep. White paper hides it instantly.
Practical note: Paint when the paint is the point (Frankenstein green, monster spots, a black base for a web). Wrap when the color just needs to be there. Wrapping is not the lazy version, it is the version that still looks good on November 1.
Two more things that make a real difference:
Work in batches. Wrap or paint every tube first. While they dry, cut all the wings, ears, hats, and eyes into little piles. Then assemble. Done in that order, five characters take about 35 minutes. Done one at a time, the same five take twice as long and you lose the kids halfway.
Contain the rolling. Wet painted tubes roll off tables. Work on a rimmed baking sheet and dry them on it. That one swap has saved my dining chairs more than once.
Safety And Mess Notes For Halloween Toilet Paper Roll Crafts
This is a low risk craft, which is exactly why the few real hazards get skipped.
Small parts. Googly eyes, brads, pom poms, and the little plastic spiders are choking hazards for kids under three. Swap in paper circles and dot stickers for that age group and keep the bag of eyes out of reach, not on the table.
Light sources. Never put a real tea light, birthday candle, or anything with a flame inside a cardboard tube. Cardboard is the fuel. Flameless LED tea lights only, and set finished lanterns away from curtains and paper decorations anyway, because a knocked over lantern still ends up somewhere you did not plan.
Craft knives. The cut out window lanterns need a blade, and that is adult only work. Do not try to cut a curved tube while it is round, because the blade skates. Flatten the tube first, cut your shapes through the flattened cardboard on a self healing mat, then squeeze it back into a round shape. You get cleaner windows and symmetrical pairs for free.
Hot glue. Low temp guns still burn. My rule is that the adult drives the glue gun and the child places the piece, and for anything under about eight years old, tacky glue instead.
Mess level. Paper and glue stick projects are a 2 out of 10. Anything with acrylic paint is a 6, because acrylic does not wash out of clothing once it dries. Paint in old shirts, use washable tempera when clothes matter, and put a garbage bag or newspaper under the whole work area. Glitter is a 10 forever, and I stopped bringing it near tubes years ago.
Adhesive smell. Not an issue with white glue or glue sticks. If you switch to spray adhesive or spray paint for a faster finish on a big batch, that moves outdoors, no exceptions.
25 Halloween Toilet Paper Roll Crafts For Kids
Five minute tubes with no paint and no drying
Start here if it is already late October, if you have a group, or if you have a three year old with a five minute attention span. Every one of these is wrap and stick.
1. Wrapped Black Bat
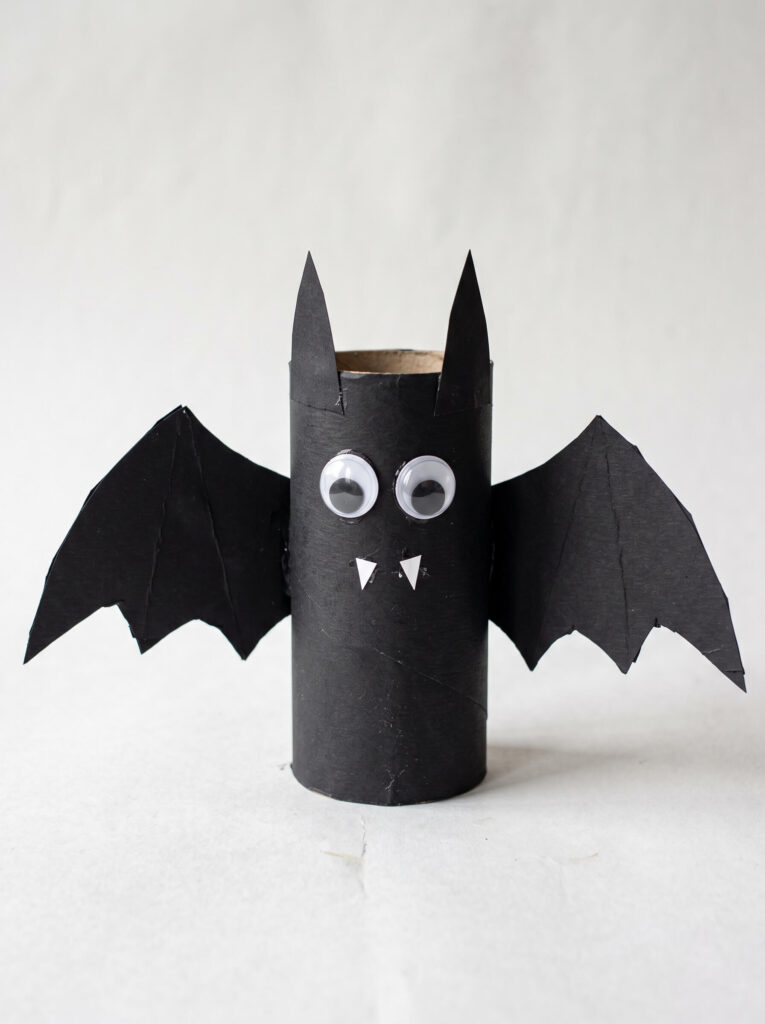
Cut the top of the wrapped tube into two points and you have ears without gluing anything extra on. That trick is the whole project.
Supplies: Tube, black construction paper, glue stick, scissors, googly eyes, scrap of white paper.
Swap: Cut the wings from a second flattened tube instead of paper.
- Wrap the tube in black paper, 4.5 by 6 inches, and glue the seam at the back.
- Snip a shallow V out of the top edge to leave two pointed ears.
- Cut two wings as one piece so they match, then glue across the back.
- Add eyes and two tiny white paper fangs.
Trade off: Under 10 minutes, almost no mess, but the wings make it top heavy. Cut two short slits in the bottom edge and fold the flaps out as feet, or drop a penny inside.
2. No Paint Pumpkin
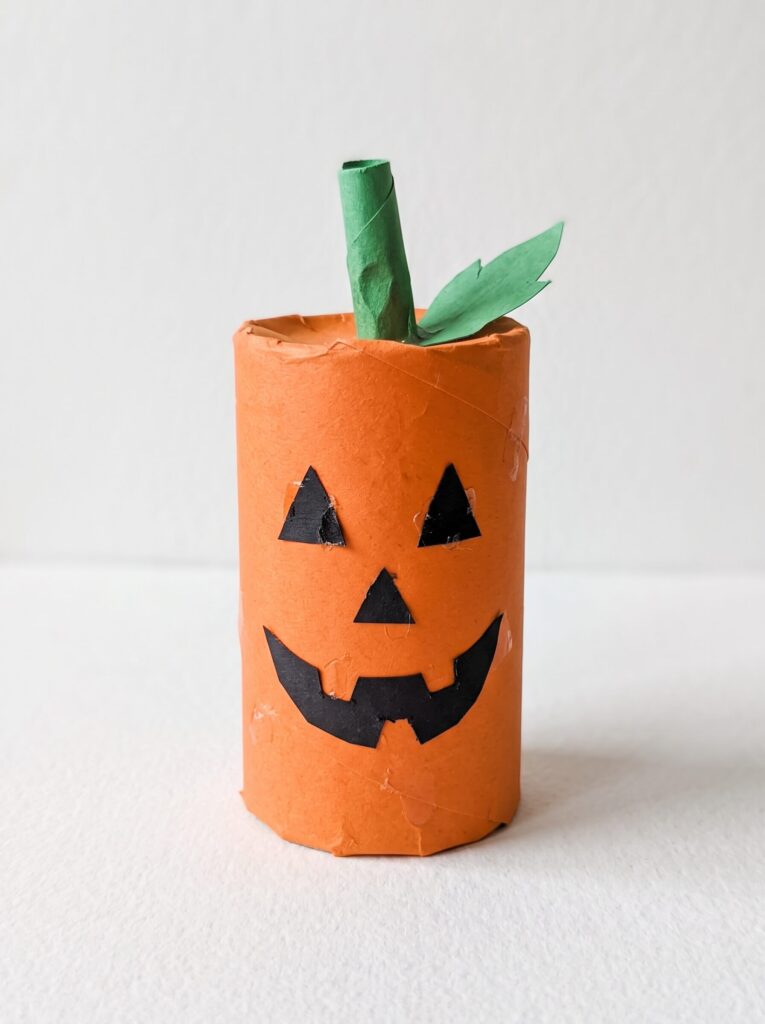
The green stem is what sells it. A pumpkin without one reads as an orange tube.
Supplies: Tube, orange paper, black paper scraps, green paper, glue stick, scissors.
Swap: An orange paper lunch bag, or a cereal box painted orange if you must paint.
- Wrap the tube in orange paper and glue the seam.
- Cut two triangle eyes, a small triangle nose, and a toothy mouth from black paper.
- Glue the face on, keeping the eyes wide apart. Faces crowded in the center look flat.
- Roll a short green tube for the stem, glue it inside the top rim, and add a curled leaf.
Trade off: 8 minutes, mess level 2. First timers glue the stem on top of the rim where it wobbles. Tuck it just inside the opening instead.
3. Mummy Wrap Tube
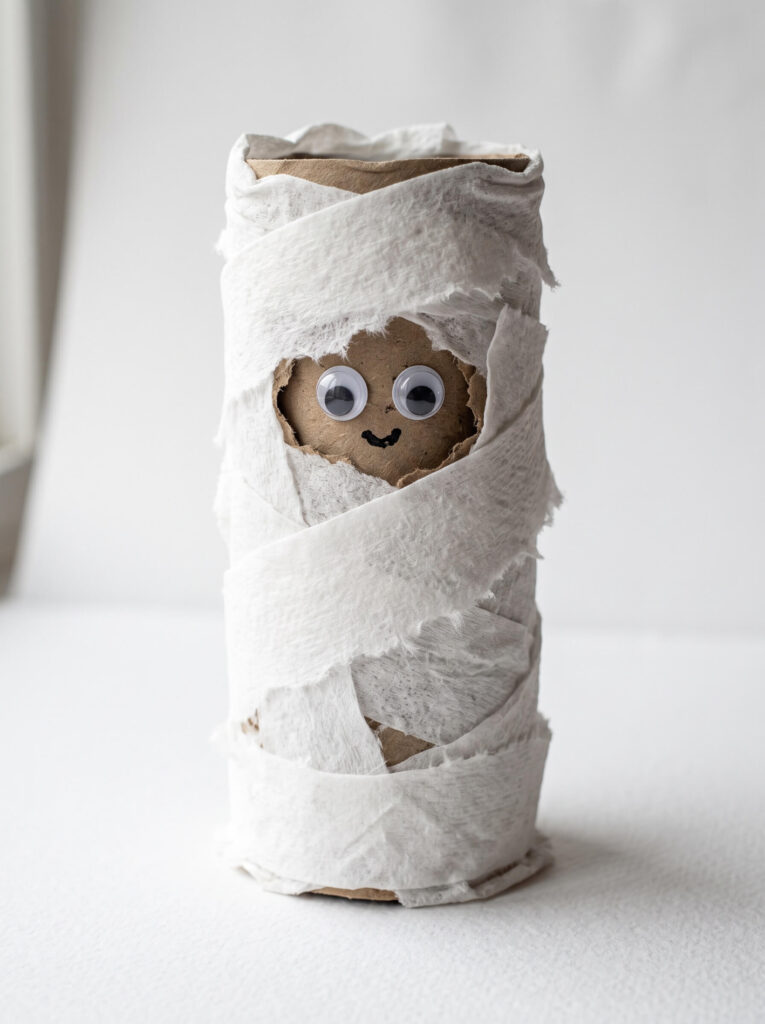
Torn paper towel makes a better mummy than gauze because the ragged edge looks aged. This is the most forgiving project on the list and the best one for a toddler.
Supplies: Tube, white paper towel or gauze strips, glue stick, googly eyes.
Swap: Strips torn from a white napkin or dryer sheet.
- Tear the paper towel into strips roughly an inch wide.
- Glue one end to the tube, wrap at a slight angle, and overlap as you go.
- Leave a gap near the top for the face and keep the wrapping loose enough to look messy.
- Glue two eyes into the gap.
Trade off: 5 minutes, mess level 1, works at any age. The only failure is wrapping too neatly, which makes it look like a bandaged thumb. Overlap on purpose.
4. Candy Corn Stripes
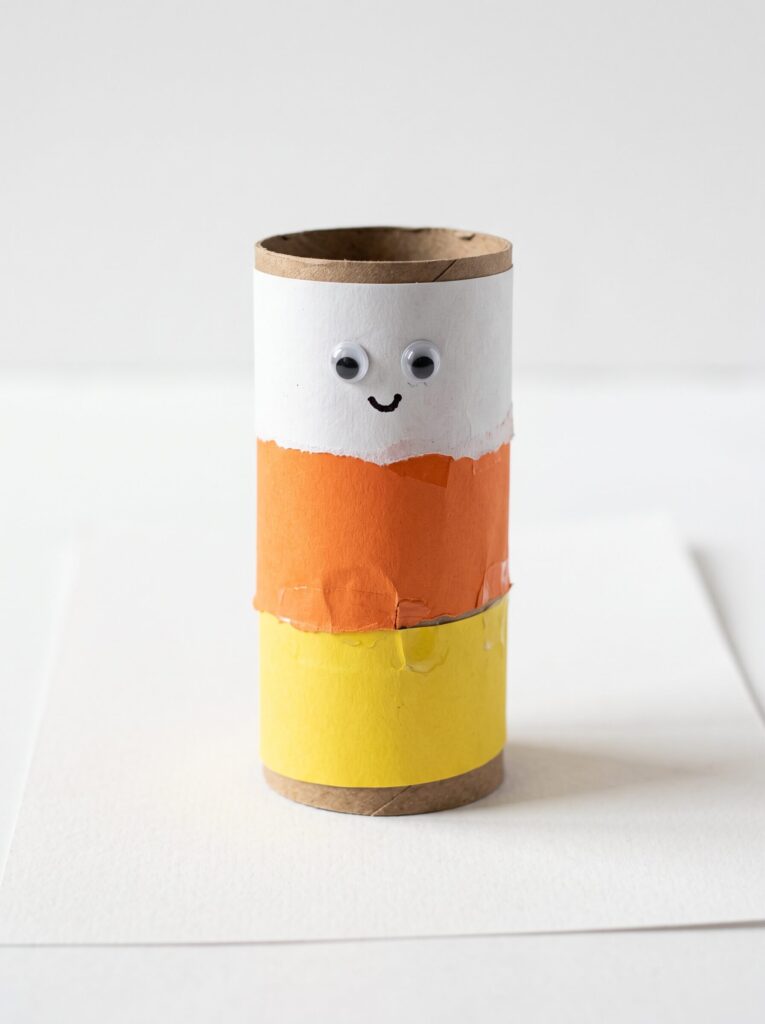
Three bands of color, no face needed. Good for the child who wants to be done.
Supplies: Tube, white, orange, and yellow paper, glue stick, black marker.
Swap: White tube plus two paper bands, since the cardboard top can stay bare if you are short on white.
- Cut three paper bands sized to wrap the tube: white for the top third, orange for the middle, yellow for the bottom.
- Glue them on in order, overlapping each seam slightly.
- Draw two eyes and a small smile on the white band.
Trade off: 7 minutes, mess level 1. Kids cut bands too narrow and leave cardboard gaps, so measure the first one and use it as a template for the rest.
5. Fringed Ghost
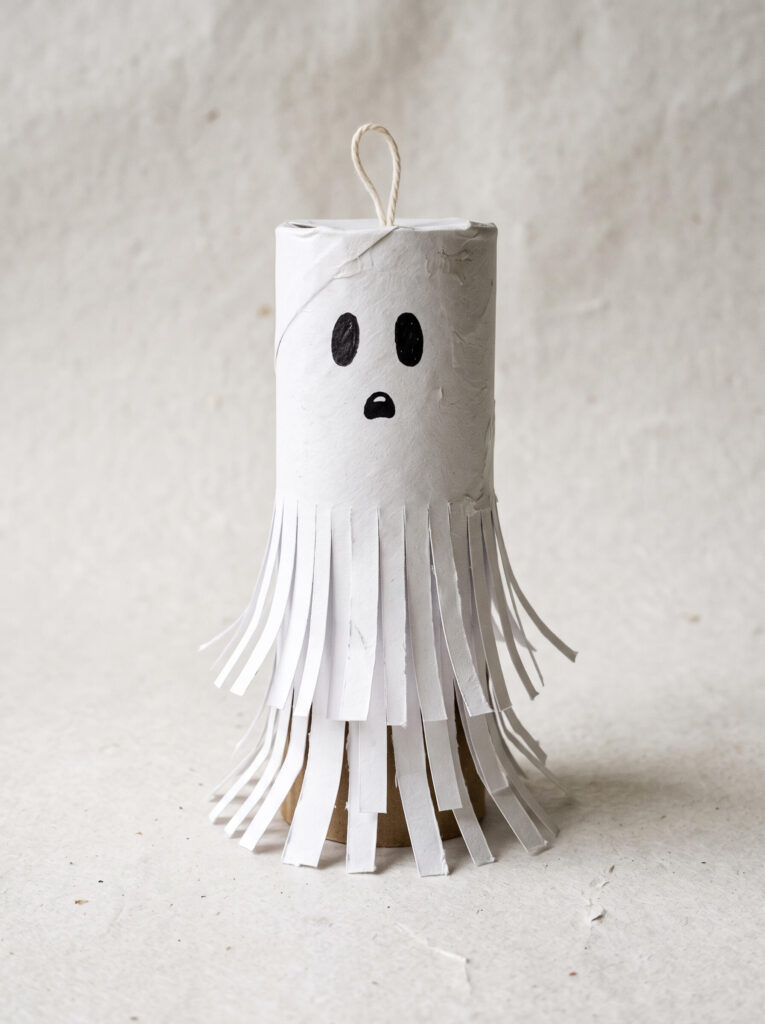
Draw a pencil line around the tube before anyone cuts. Without a stop line, a five year old will cut the tube in half. I have watched it happen twice.
Supplies: Tube, white paper, black paper or marker, glue stick, scissors, string.
Swap: A white paper napkin wrap for a softer, more see through look.
- Wrap the tube in white paper.
- Pencil a line about halfway up as a stop line for the cuts.
- Cut fringe strips up to that line, about a quarter inch wide.
- Add two oval eyes and an open mouth, then tape a string loop inside the top rim to hang it.
Trade off: 10 minutes, mess level 2. The fringe crushes if you store it flat, so this one hangs rather than stacks.
Save this one for later. If you only bookmark one group from this page, make it this section. These five are what you will want at 7pm the night before a class party, when you have a bag of tubes, a glue stick, and no time to wait on paint.
Classic Halloween Characters
These take longer because most involve paint or layered paper. Batch them: base coat everything, cut faces while they dry, assemble last.
6. Frankenstein Tube Friend
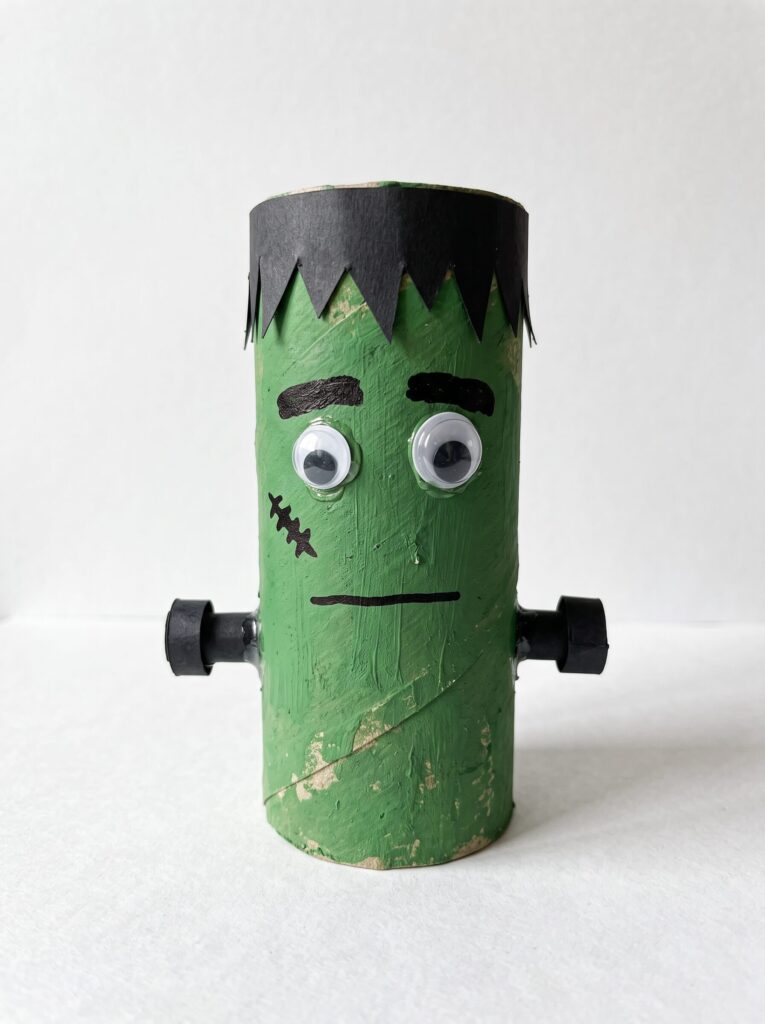
Green acrylic covers bare cardboard in two coats, which makes this one of the few projects where painting beats wrapping.
Supplies: tube, green acrylic paint, black paper, googly eyes, tacky glue, scissors.
Swap: Green paper wrap plus a black paper hair strip if you are skipping paint.
- Paint the tube green, two thin coats, 15 minutes between them.
- Wrap a black paper strip around the top and cut the lower edge into jagged points for hair.
- Glue on eyes, thick eyebrows, a straight line mouth, and a small scar drawn in black.
- Add two short black paper bolts to the sides at head height.
Trade off: 10 minutes of work, 30 minutes of drying, mess level 6 because acrylic stains clothes. Kids paint one heavy coat and get a warped oval, so insist on thin.
7. Green Faced Witch With A Tall Hat
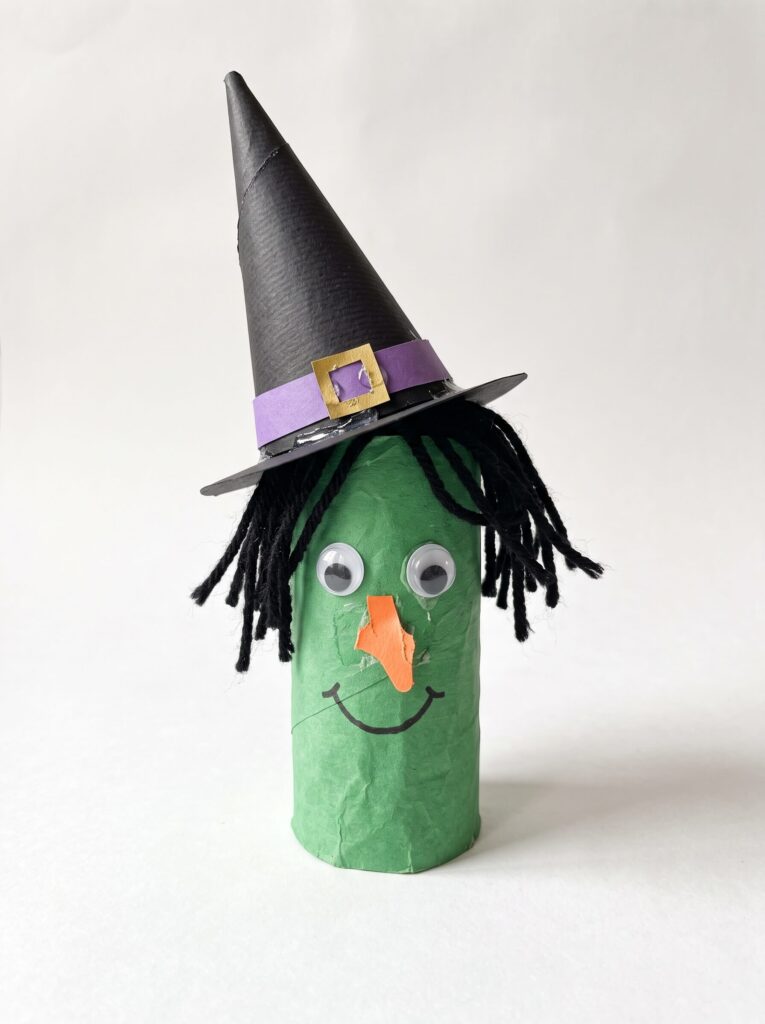
The hat is the hard part. Make the brim a full circle with a hole in the middle, slide it down over the cone, and it sits right instead of flopping.
Supplies: Tube, green paper or paint, black cardstock, purple paper, black yarn, googly eyes, tacky glue.
Swap: Yarn hair from an unraveled old sock, or black paper strips curled around a pencil.
- Cover the tube in green paper and let it dry if you painted.
- Glue on eyes, a small pointed paper nose, and a crooked smile.
- Cut yarn into 4 inch lengths and glue them across the top before the hat goes on.
- Roll a black cone, cut a circle brim with a center hole, thread the brim onto the cone, then glue the hat over the hair.
Trade off: 20 minutes, mess level 3. Cardstock holds a cone shape, regular construction paper does not. This is the project where first timers glue the hat straight to the tube and it slides off overnight, so glue it to the hair layer and the tube rim together.
8. Pipe Cleaner Spider
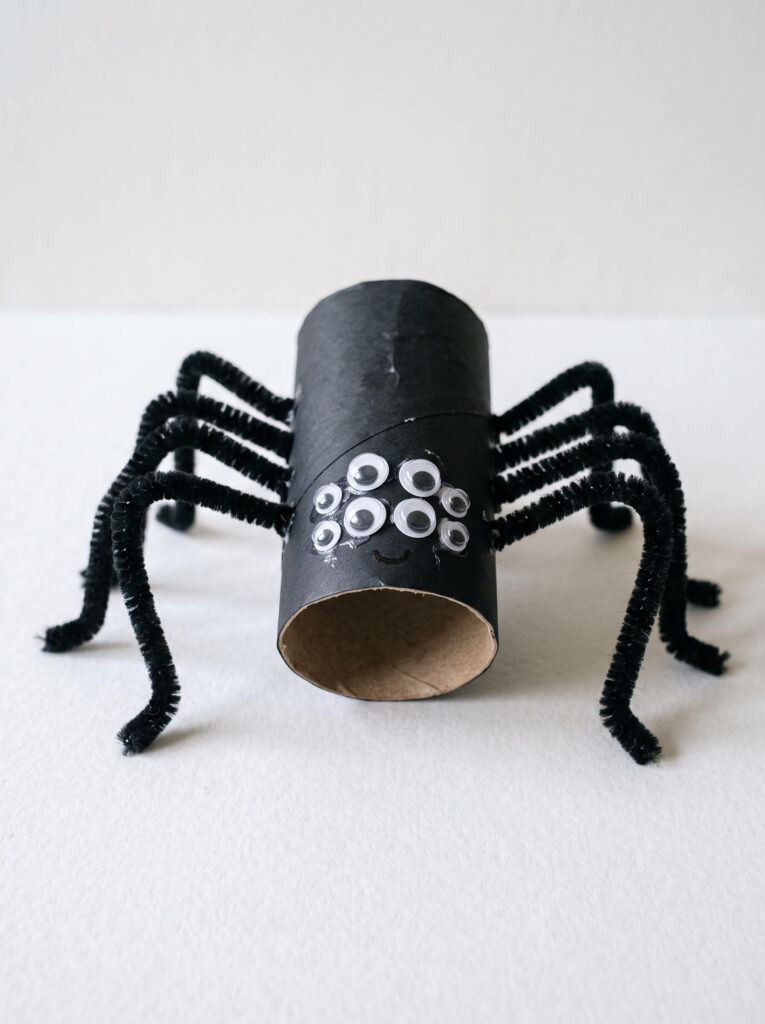
Do not glue the legs to the outside. Poke them through with a pushpin and bend the ends inside. They hold, they bend into a crouch, and they survive being played with.
Supplies: Tube, black paper, four black pipe cleaners, googly eyes, pushpin, tacky glue.
Swap: Accordion folded paper legs, though they will not pose.
- Wrap the tube in black paper.
- Use a pushpin to make four holes on each side, evenly spaced.
- Cut each pipe cleaner in half, push one through each hole, and bend a small hook inside to lock it.
- Bend each leg twice for a knee, then glue on eyes. Four large eyes with two small ones underneath looks more spider like than two.
Trade off: 15 minutes, mess level 2, best for six and up because of the pushpin. Legs bent only once make it look like a bug, not a spider.
9. Black Cat With A Curled Tail
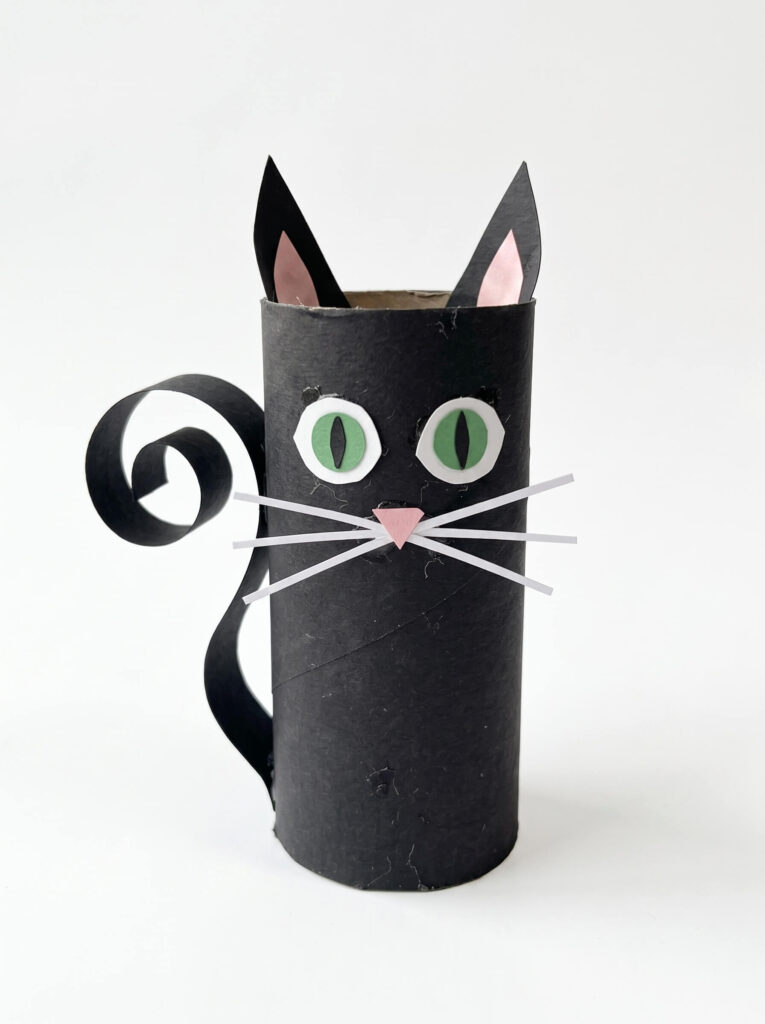
Curl the paper tail around a pencil and hold it for ten seconds. Uncurled tails hang like a stick.
Supplies: Tube, black paper, pink paper, green and white paper scraps, glue stick, scissors, white gel pen.
Swap: Draw the whiskers with white crayon.
- Wrap the tube in black paper.
- Cut two triangle ears with smaller pink triangles inside, then glue them inside the top rim so they stand up.
- Layer green ovals with black slit pupils for eyes, add a small pink nose.
- Cut a long tail strip, curl it around a pencil, glue it to the back.
- Draw whiskers with the white gel pen.
Trade off: 15 minutes, mess level 2. Ears glued flat to the front look like a bear, so tuck them inside the rim at an angle.
10. Caped Vampire
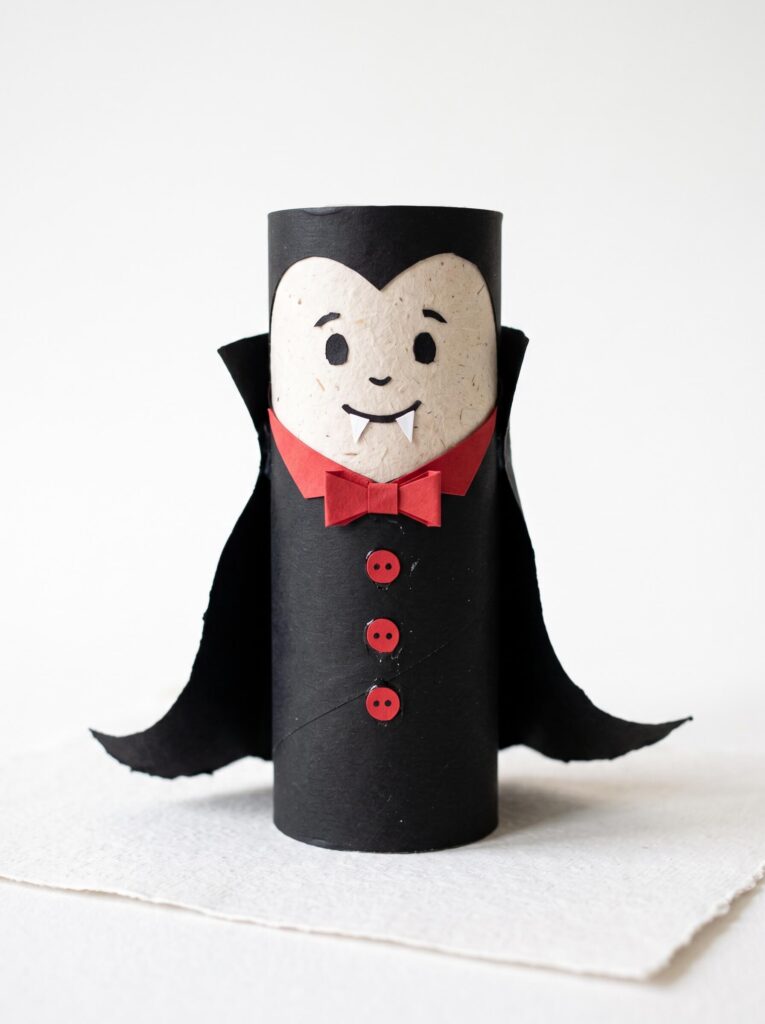
Cut the cape as one wide rectangle with a curve at the bottom and glue only the top corners. Left loose, it moves and reads like fabric.
Supplies: Tube, black paper, red paper, white paper, red marker, glue stick.
Swap: A black plastic bag scrap for a cape that actually drapes.
- Wrap the lower two thirds of the tube in black paper for the suit.
- Glue a pale face oval to the top third, then add eyes, dark eyebrows, and two small fangs.
- Cut a red collar shape and a small bow tie, glue on with three red paper buttons down the front.
- Attach the cape at the shoulders only.
Trade off: 15 minutes, mess level 2. Fangs cut too big turn it from a vampire into a walrus. Keep them under a quarter inch.
11. Poseable Skeleton
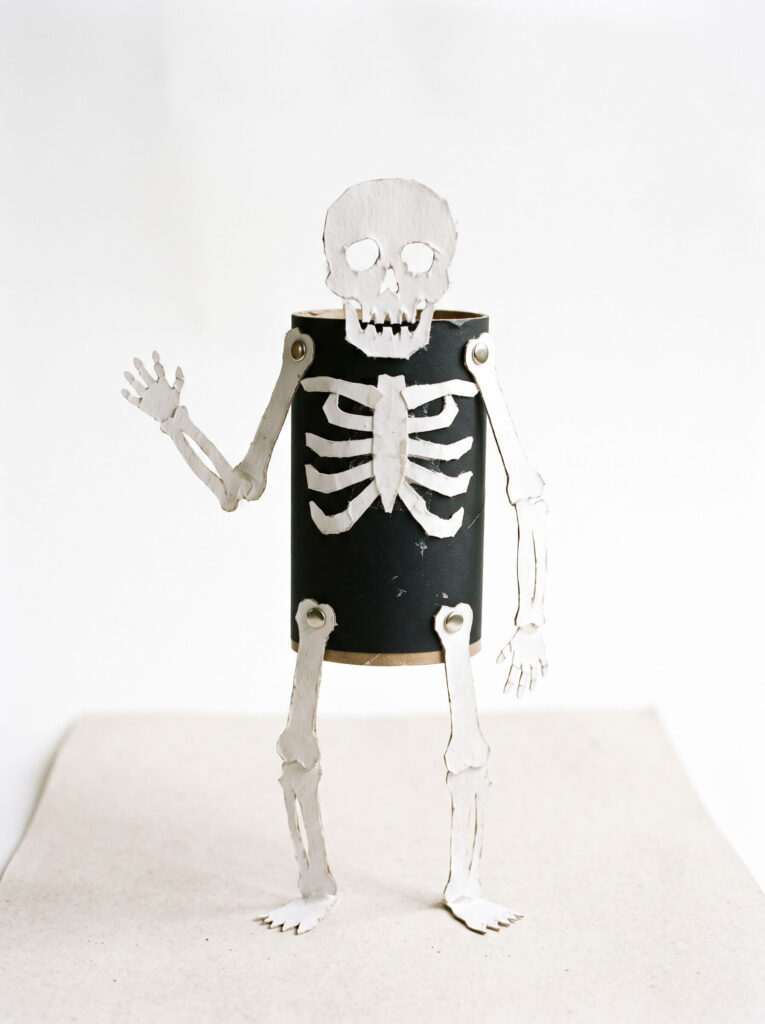
The brads are what make this one worth doing. Arms and legs that move mean it gets played with instead of looked at.
Supplies: Tube, black paper, white paper, four small brads, pushpin, glue stick, scissors.
Swap: Knotted thread through pushpin holes instead of brads.
- Wrap the tube in black paper.
- Cut a skull, a rib cage, two arms, and two legs from white paper.
- Glue the skull and ribs to the front.
- Punch holes at the shoulders and hips with the pushpin, then attach the limbs with brads so they swing.
Trade off: 25 minutes, mess level 2, ages eight and up. Brads pushed through wet glue tear the cardboard, so make the holes before anything gets glued.
12. Mismatched Monster Pals
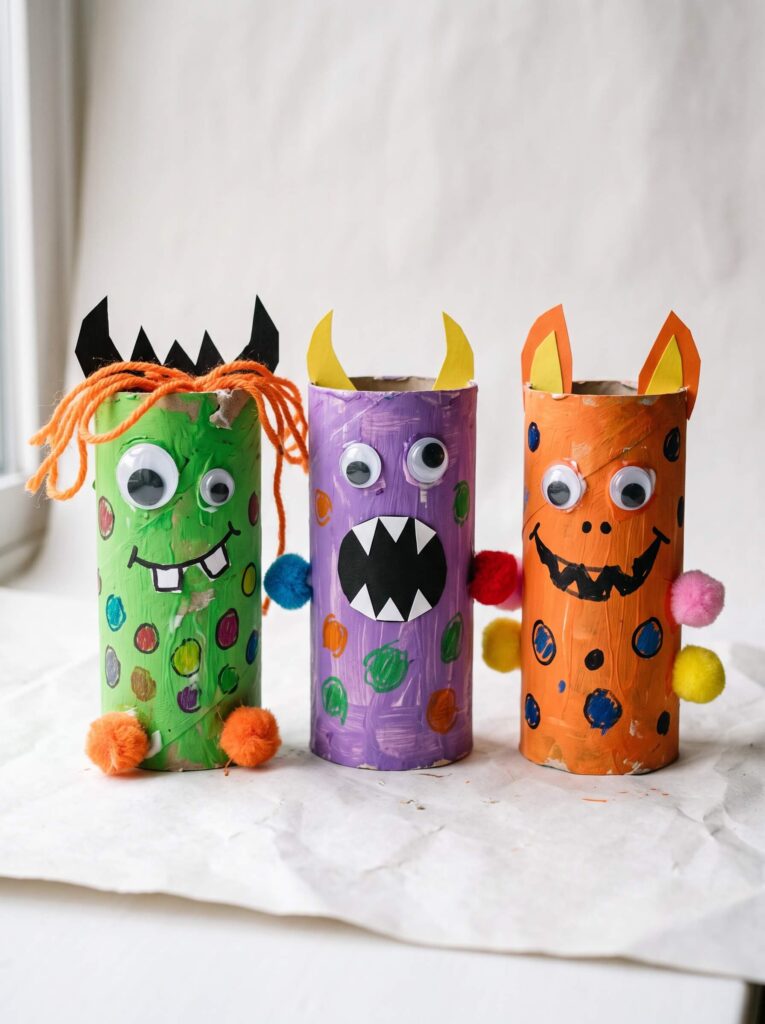
Do not plan these. Set out paint, scraps, and a bowl of eyes, and let every monster come out lopsided. It is the one project where uneven is the point, and it is my go to for a group of mixed ages.
Supplies: Three or more tubes, bright acrylic paint, paper scraps, googly eyes in mixed sizes, pom poms, tacky glue.
Swap: Wrap in colored paper instead of painting for a no dry version.
- Paint each tube a different bold color, two thin coats.
- Cut a pile of horns, ears, teeth, and mouth shapes with no plan for which monster gets what.
- Glue eyes on at different heights, one high, one low, or three in a row.
- Finish with pom poms, paper spots, and marker details.
Trade off: 30 minutes for three, mess level 6 with paint. Nothing really goes wrong here, which is why it works for a party.
13. Yarn Fur Werewolf
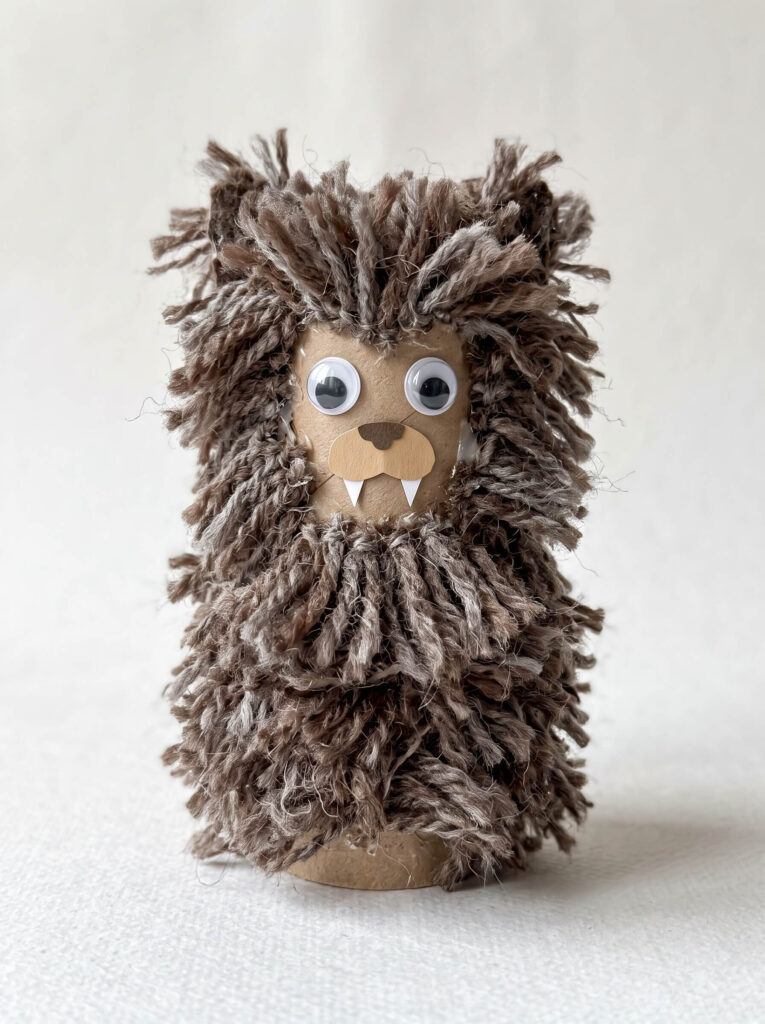
Glue the yarn in short overlapping rows from the bottom up, like shingles. Bottom down and you can see the tube through the gaps.
Supplies: Tube, brown or gray yarn, tacky glue, tan paper, googly eyes, white paper for teeth.
Swap: Fringe cut from a brown paper bag, or unraveled yarn from an old scarf.
- Cut yarn into 2 inch lengths, quite a lot of them.
- Run a line of tacky glue around the bottom of the tube and press yarn on, then work upward in rows.
- Leave a bare patch for the face, glue on a tan snout oval and two eyes.
- Add two small white paper fangs at the mouth line.
Trade off: 25 minutes, mess level 4, and the only project here that genuinely needs tacky glue. Glue stick will not hold yarn, and you will find fur on the floor by morning.
14. Fall Owl
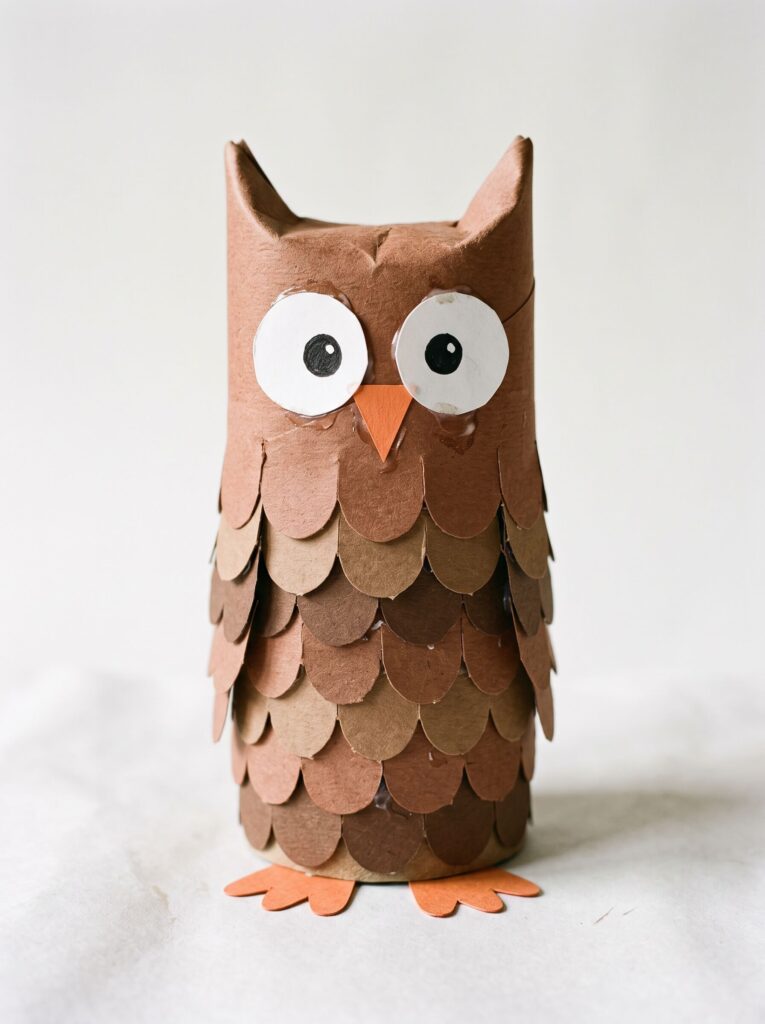
This one stays up past Halloween, which is the quiet reason to make it. Cut the feathers in three sizes and overlap them from the bottom.
Supplies: Tube, brown paper, orange and white and black paper, glue stick, scissors.
Swap: A paper grocery bag gives you the perfect owl brown for free.
- Wrap in brown paper, then pinch and fold the top corners in to make two ear tufts.
- Cut scalloped feather rows and glue them overlapping from the bottom up.
- Layer white circles with black pupils for the eyes and add a small orange triangle beak.
- Glue two orange feet to the front bottom edge so they stick out.
Trade off: 20 minutes, mess level 2. Feathers glued in one flat layer look like a bib, so overlap them by about half.
Garlands, Houses, And Glow
This is the group that actually decorates a room. It also has the only real safety rule on the page, so read the lantern notes before you hand anything to a child.
15. Jack-O’-Lantern Garland
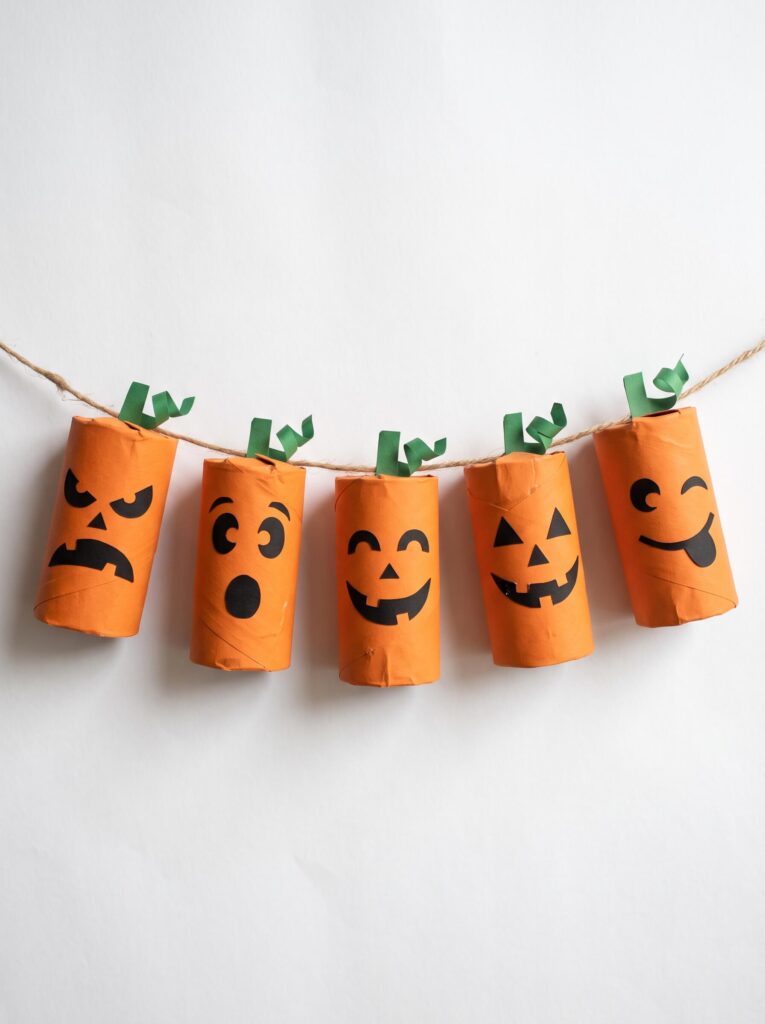
Thread the twine through two pushpin holes at the top of each tube instead of taping the tube to the string. Taped pumpkins spin around and show you their backs all evening.
Supplies: Five tubes, orange paper, black paper, green paper, twine, pushpin, glue stick.
Swap: Yarn or kitchen string for the twine.
- Wrap all five tubes in orange paper first, then cut fifteen face pieces in one go.
- Glue a different face on each pumpkin. Mixing angry, surprised, and toothy looks better than five identical ones.
- Punch two holes near the top rim of each tube, an inch apart.
- Thread the twine in one hole and out the other so each pumpkin sits flat, then space them about six inches apart.
- Add a green stem and a curled leaf to each top.
Trade off: 45 minutes, mess level 2, and the single best value project here for how much wall it covers. First timers space them unevenly, so lay the twine out on the floor and mark your spacing with a pencil before threading.
If pumpkins are where your kids want to stay, the shaped and painted versions go a lot further than tubes do. Best Halloween Pumpkin Crafts For Easy Fall Decor
16. Haunted House Tube
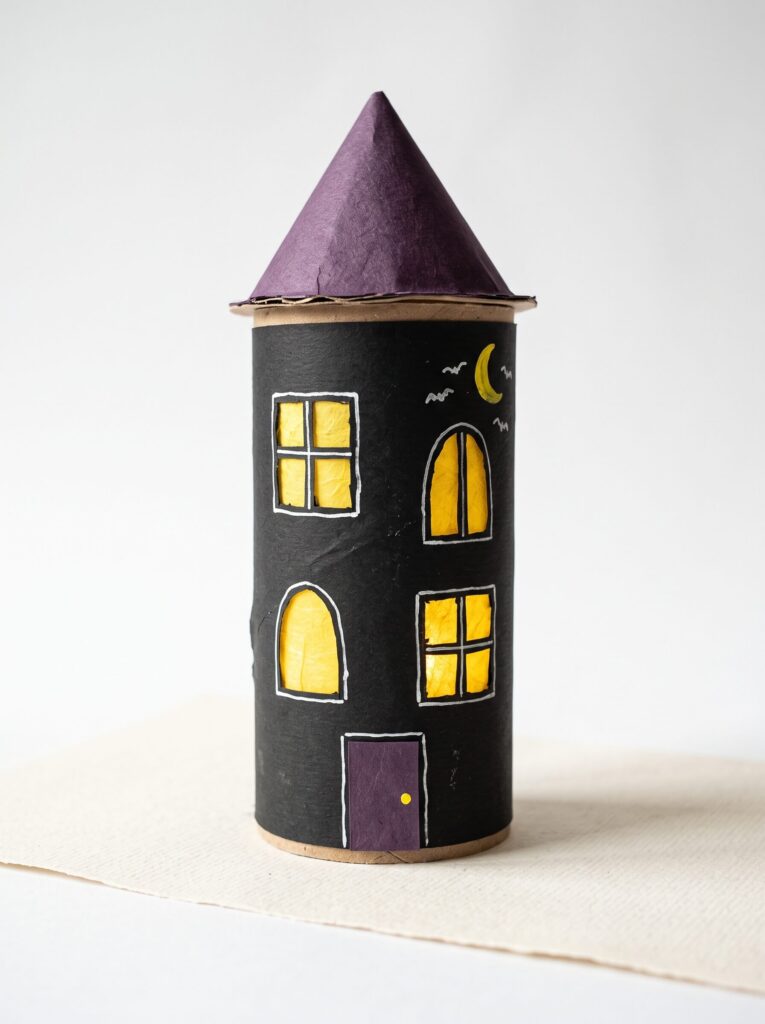
Yellow paper behind cut out windows reads as lit even without a light inside. That is the cheat that makes this one work on a shelf.
Supplies: Tube, black paper, purple cardstock, yellow paper, white gel pen, glue stick, scissors.
Swap: Yellow highlighter over white paper for the window glow.
- Wrap the tube in black paper.
- Cut three or four small square and arched windows out of the black wrap before gluing it down, which is far easier while the paper is flat.
- Glue yellow paper behind the openings from the inside.
- Roll a purple cone or fold a peaked roof and glue it to the top, then add a purple door.
- Draw window frames, a moon, and a few bats with the white gel pen.
Trade off: 25 minutes, mess level 2, ages seven and up for the window cutting. Cutting windows after the paper is glued down is the mistake, and it tears every time.
17. Ghost Lantern With An LED
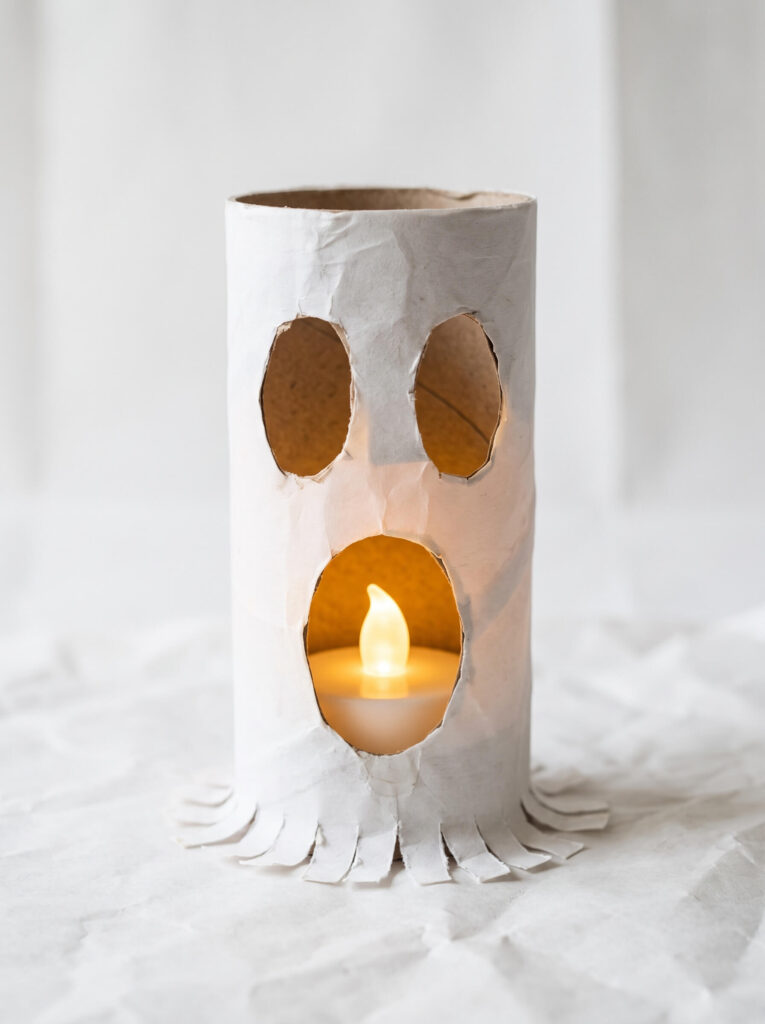
The original version of this craft gets called a lantern with no light in it. Add a flameless tea light and it becomes something worth putting in a window.
Supplies: Tube, white paper, black paper, LED tea light, tape, scissors.
Swap: Battery fairy lights threaded through several tubes at once.
- Wrap the tube in white paper, leaving the bottom open.
- Cut oval eyes and a mouth all the way through the paper and cardboard so the light shows through.
- Fringe the bottom edge up about an inch so the tube sits slightly off the surface.
- Switch on the LED tea light and set the tube over it.
Trade off: 15 minutes, mess level 2. Cut the eyes too small and the effect disappears, so go bigger than feels right.
Practical note: Flameless LED only, in this project and every other lit tube on this list. A cardboard tube over an open flame is a fire, not a craft. Dollar store LED tea lights are two for a dollar and they last the whole season.
18. Moonlit Haunted Village Lantern
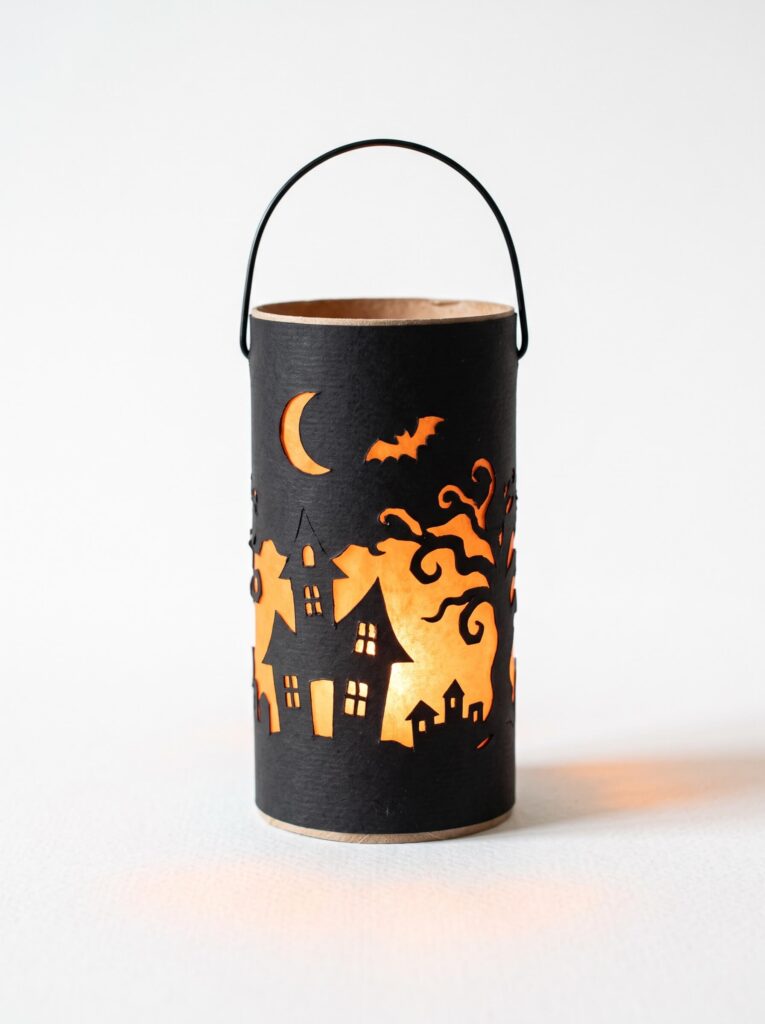
The most impressive project here and the only one with adult only steps. Flatten the tube, cut the silhouette through both layers, then round it back out. You get a matching skyline on both sides without measuring anything.
Supplies: Tube, black cardstock, orange tissue paper or vellum, craft knife, cutting mat, glue stick, LED tea light. Swap: An orange paper lunch bag cut into panels instead of vellum.
- Wrap the tube in black cardstock and let it set.
- Flatten the tube along its seam.
- On a cutting mat, cut a village skyline plus a moon, a bat, and a few windows with the craft knife. Adult only.
- Round the tube back out and glue orange tissue paper over the openings from the inside.
- Set it over an LED tea light in a dark room.
Trade off: About an hour, mess level 3, adult knife work throughout. Kids can design the skyline in pencil and glue the tissue. Cut too many openings close together and the tube loses its structure and collapses, so leave at least a quarter inch of cardstock between shapes.
19. Web Wrapped Spider Tube
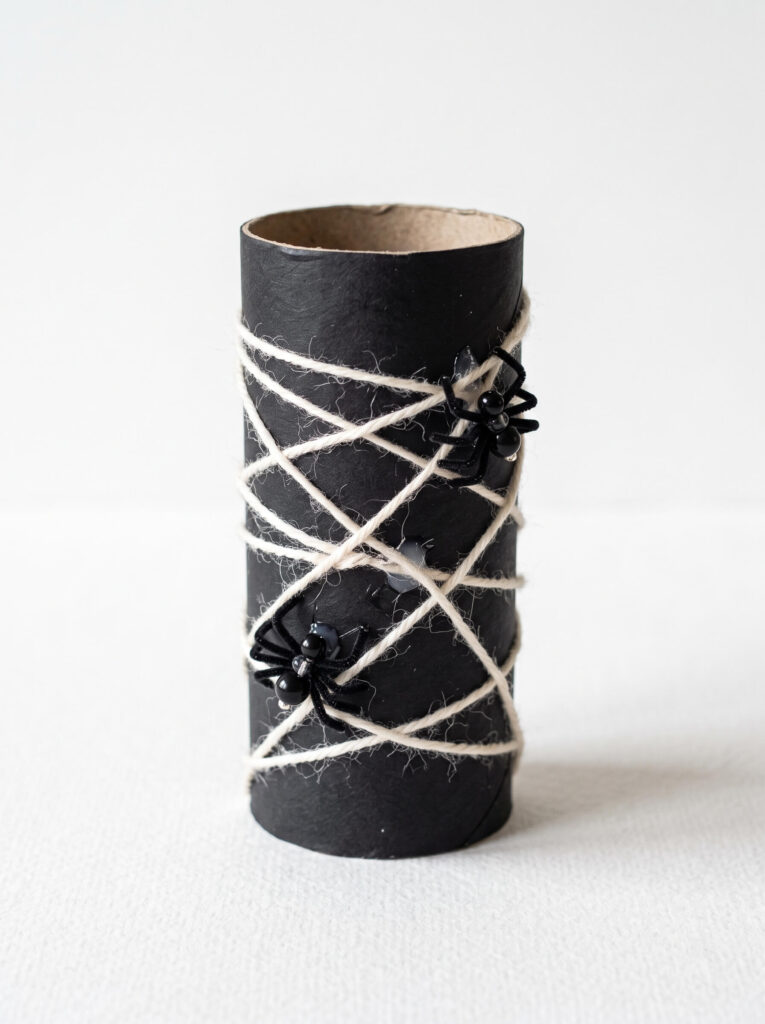
Wrap the yarn in triangles, not neat circles. Real webs are angular, and crisscrossed yarn catches light in a way flat paper cannot.
Supplies: Tube, black paint or black paper, white yarn, tacky glue, two small plastic spiders.
Swap: White thread or dental floss for the web, and a paper spider instead of plastic.
- Cover the tube in black, painted or wrapped.
- Dot tacky glue at random points around the tube.
- Wrap white yarn across the tube at sharp angles, pressing it into each glue dot.
- Glue the yarn ends inside the rim so nothing unravels, then attach the spiders.
Trade off: 15 minutes plus drying, mess level 3. Plastic spiders are a choking hazard for under threes, so use paper ones for that age. Wrapping too tightly dents the tube inward.
20. Witch’s Yarn Broom
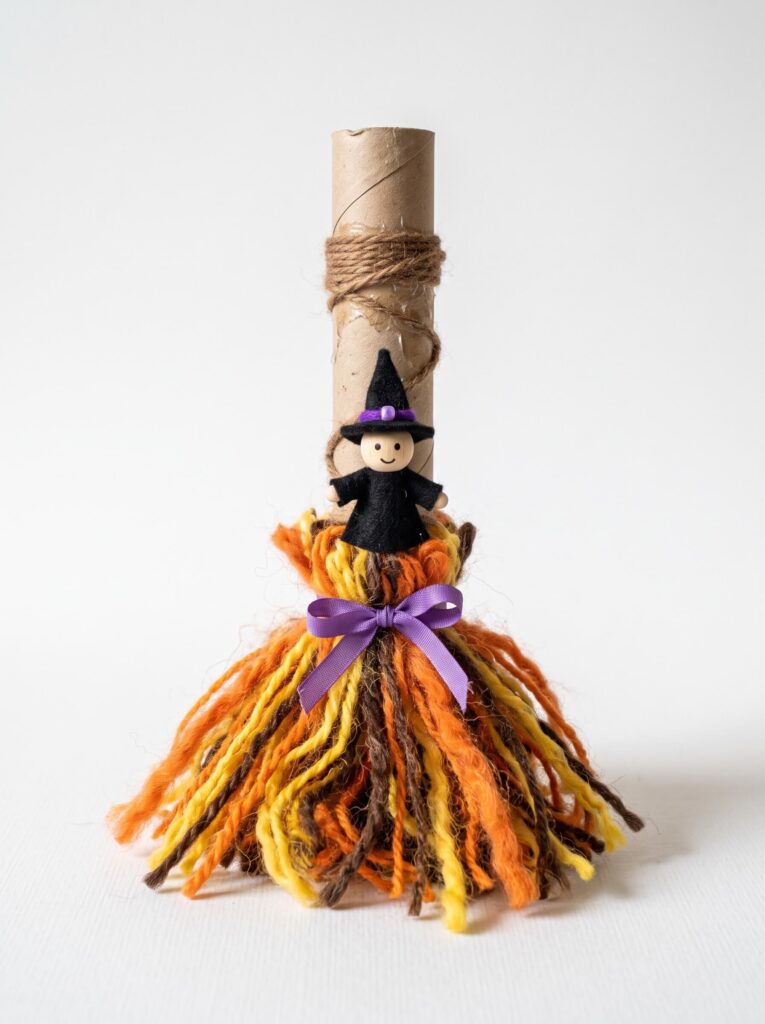
Tie the bristles on before you trim them. Cutting yarn to length first gives you a broom with a bald spot, which I have made and thrown away.
Supplies: Tube, orange and yellow and brown yarn, black felt or paper, small wooden bead, twig, tacky glue, purple ribbon.
Swap: A chopstick for the twig, and a scrap of black paper instead of felt.
- Wrap the lower half of the tube in brown yarn and glue the ends down.
- Cut long lengths of orange, yellow, and brown yarn, bunch them, and glue them around the base as bristles.
- Tie a purple ribbon around the bunch where it meets the tube.
- Cut a small witch shape from felt, add the wooden bead as a head and a paper hat, then glue her to the front.
- Trim the bristle ends level once everything is dry.
Trade off: 30 minutes, mess level 4 with all that yarn, ages nine and up or an adult project. The felt witch is fiddly. Skip her and it still looks like a broom.
Party And Treat Tubes
21. Bat Wing Treat Tube
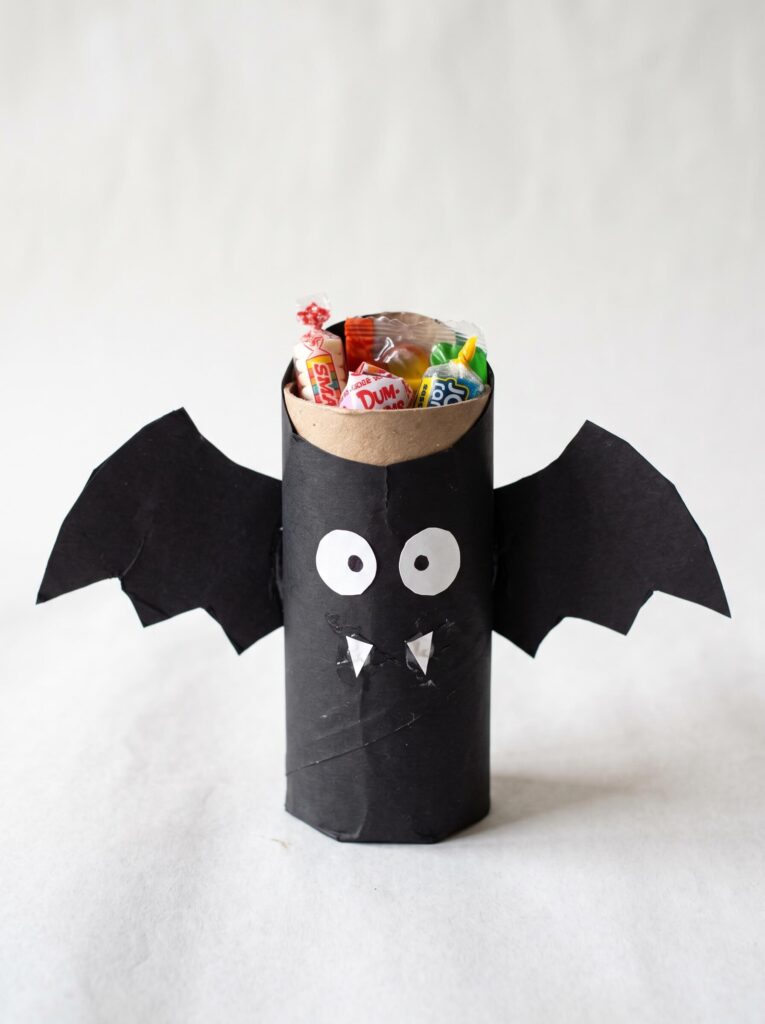
Fold the bottom of the tube closed before you fill it, otherwise candy goes straight through onto the floor.
Supplies: Tube, black paper, white paper circles, glue stick, scissors, wrapped candy.
Swap: A square of tissue paper glued over the bottom as a base.
- Press the bottom inch of the tube flat and fold both edges in, then tape them shut.
- Wrap the tube in black paper.
- Cut wings from a second flattened tube and glue them to the back.
- Add eyes and fangs, then fill from the top and pinch the top corners together.
Trade off: 12 minutes each, mess level 1, and they scale well for a party. Only send wrapped store bought candy in these if they are leaving your house, and check with the teacher about food allergies first, because plenty of classrooms are nut free now.
22. Boo Napkin Rings
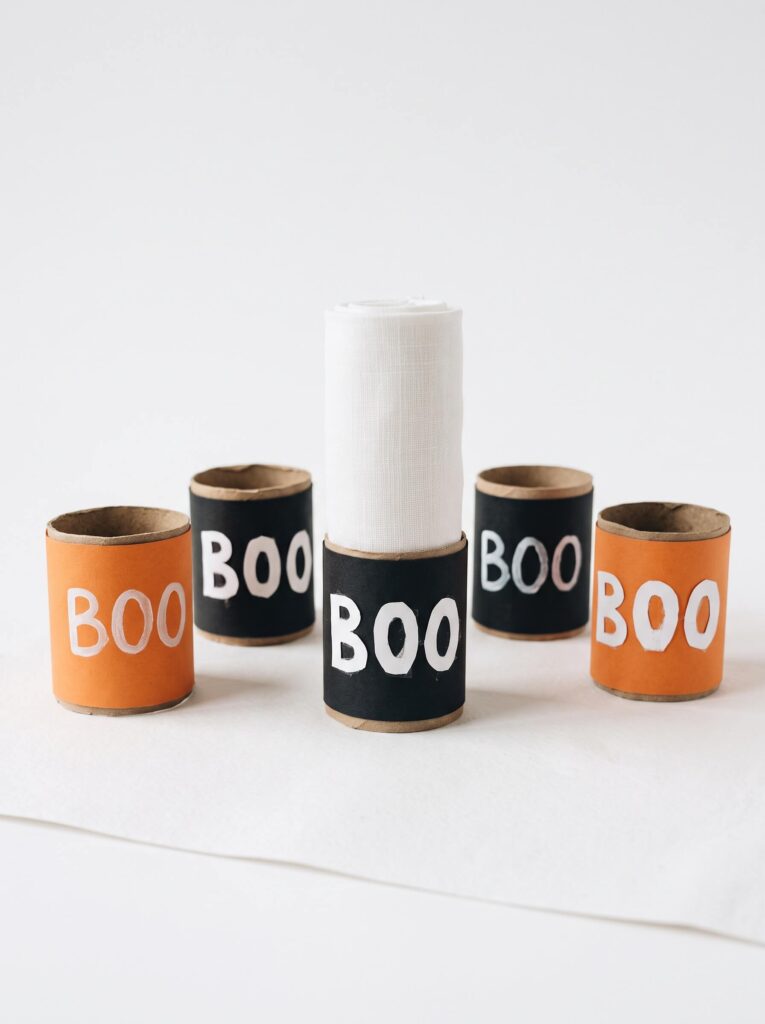
One tube cuts into four rings, which makes this the highest yield project on the page. Six tubes set a table for twelve.
Supplies: Tubes, orange or black paper, white gel pen or white paper letters, glue stick, scissors.
Swap: Strips cut from a cereal box, printed side in.
- Cut each tube into four rings about an inch wide. Press the tube flat first for a straight cut, then round it back out.
- Wrap each ring in paper.
- Write BOO or EEK on the front with the white gel pen, or glue on cut paper letters.
- Slide a rolled napkin through.
Trade off: 20 minutes for a dozen, mess level 1. Rings cut narrower than three quarters of an inch buckle when you slide a napkin in.
23. Monster Pencil Holder
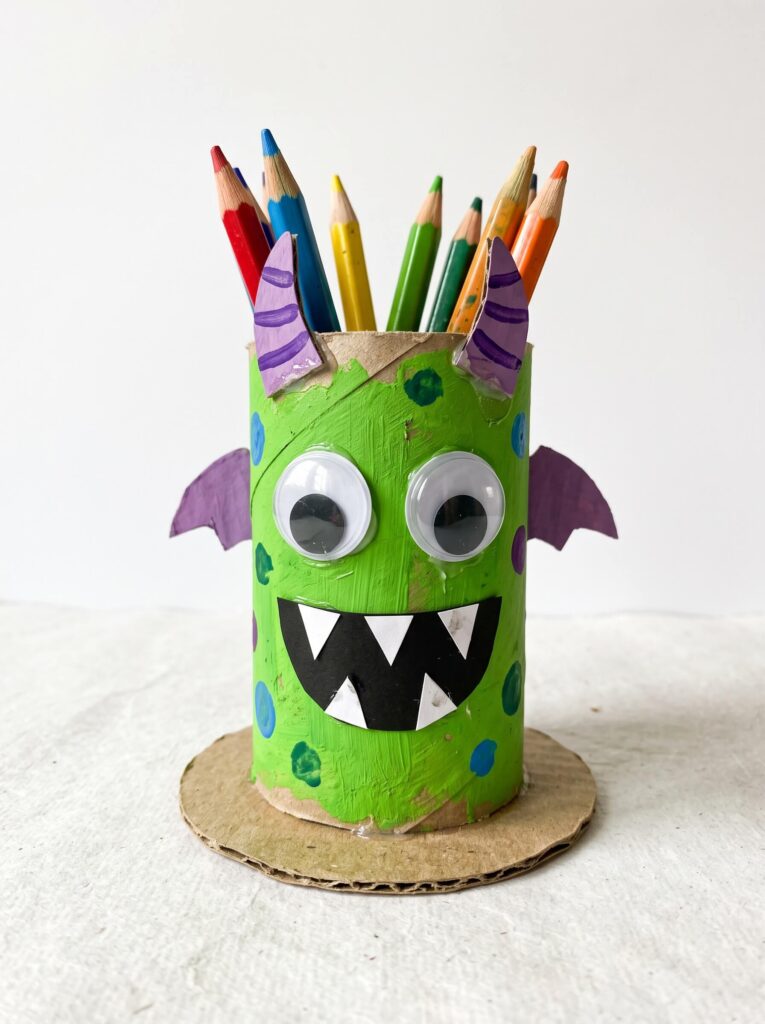
A tube alone tips the second a pencil goes in. Glue it to a cardboard base circle and it stays put, which is the difference between a craft and something that lives on a desk.
Supplies: Tube, bright acrylic paint, cardboard scrap for the base, orange and purple paper, googly eyes, tacky glue.
Swap: Glue the tube inside a bottle cap or onto a cereal box square.
- Paint the tube a bold color, two thin coats.
- Cut a two inch cardboard circle, snip small tabs around the bottom of the tube, fold them out, and glue them to the circle.
- Add striped paper horns, paper wings on the back, and a wide toothy mouth.
- Glue on oversized eyes and paint spots.
Trade off: 20 minutes plus drying, mess level 6 with acrylic. Without the base it falls over, every time.
24. Tube Stamped Pumpkin Art
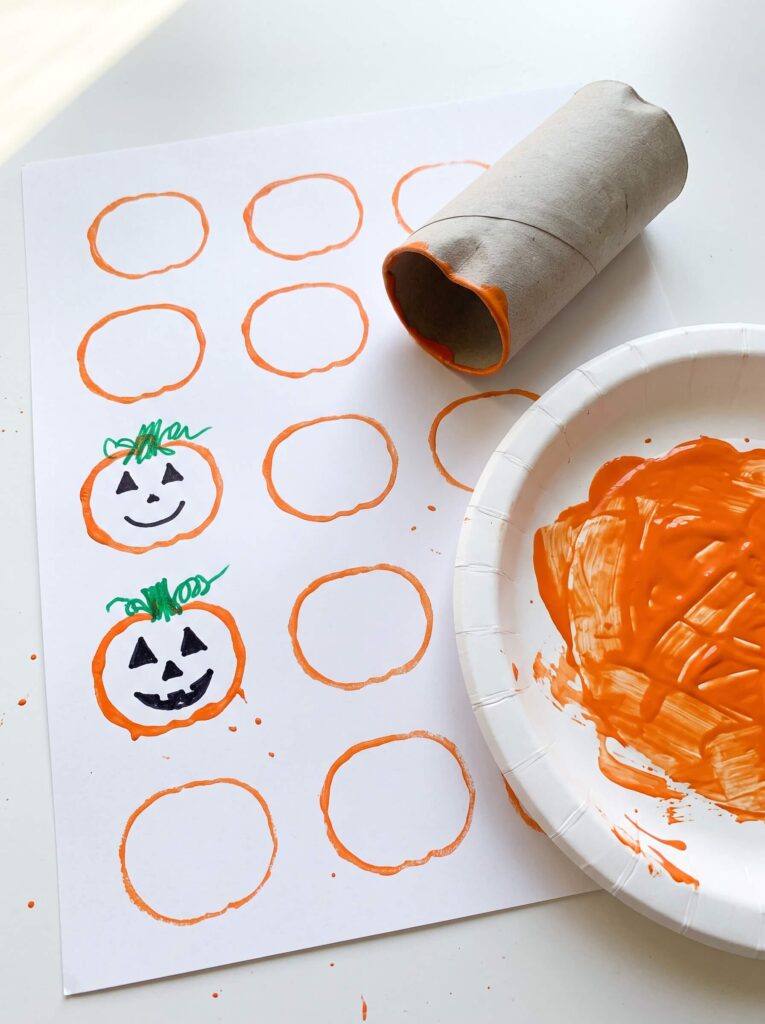
The tube is the brush here, not the body. Squeeze the end into a slight oval and it stamps a pumpkin shape instead of a plain circle. This is the best project on the page for a two year old, because there is nothing to cut and nothing to glue.
Supplies: Tube, orange paint on a paper plate, sheet of paper or card, green marker.
Swap: Any leftover paint color, and the back of a cereal box as your paper.
- Pinch the tube into a soft oval and hold the shape.
- Press the end into a thin layer of orange paint on a plate.
- Stamp rows across the paper, reloading paint every two stamps.
- Once dry, draw green stems and black faces with markers.
Trade off: 10 minutes, mess level 7 because toddlers and paint, but it wipes off a table easily. Too much paint on the plate gives you filled in blobs instead of outlines, so use less than you think.
25. Monster Eye Spy Scope
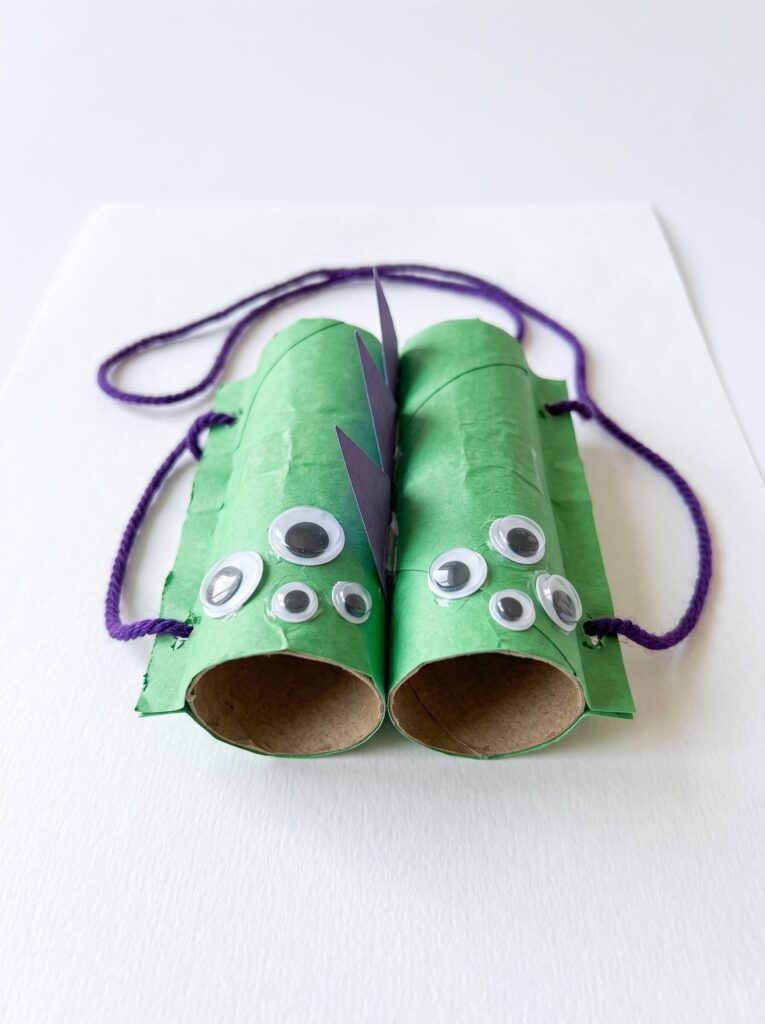
Two tubes taped side by side, and suddenly the decorations are a toy. Mine got used for a solid week of monster hunting in the backyard.
Supplies: Two tubes, tape, green or purple paper, googly eyes, yarn or ribbon for a neck strap, glue.
Swap: Cellophane or a colored candy wrapper over one end for a tinted lens.
- Tape the two tubes together side by side.
- Wrap the pair in one piece of paper so they read as a single unit.
- Punch a hole on each outer side and knot a yarn strap through.
- Glue oversized eyes and a few paper spikes on top.
Trade off: 12 minutes, mess level 2. The tubes come apart at the tape seam with rough handling, so tape generously before you wrap, and the wrap will hold everything together.
Halloween Toilet Paper Roll Crafts Compared
| If you need | Make this | Active time | Mess (1 to 10) | Best age |
|---|---|---|---|---|
| The fastest possible craft | Mummy wrap tube | 5 min | 1 | 2 and up |
| Something for a toddler | Tube stamped pumpkin art | 10 min | 7 | 2 to 4 |
| A group or class party | Mismatched monster pals | 30 min for 3 | 6 | 4 and up |
| The most decor per hour | Jack-o’-lantern garland | 45 min | 2 | 6 and up |
| A glow for the window | Ghost lantern with LED | 15 min | 2 | 5 and up |
| To impress an adult | Moonlit haunted village | 60 min | 3 | Adult cutting |
| Something to play with | Monster eye spy scope | 12 min | 2 | 4 and up |
| A Halloween table setting | Boo napkin rings | 20 min for 12 | 1 | 8 and up |
| No paint and no drying | Wrapped black bat | 10 min | 2 | 3 and up |
| Something to keep past Halloween | Fall owl | 20 min | 2 | 5 and up |
Mistakes I Still See Every October
One thick coat of paint. The tube absorbs the water, dries oval, and the seam lifts. Two thin coats, or wrap it.
Orange straight onto brown cardboard. Dries rust colored. White base coat first, or use orange paper.
Glue stick for anything that is not paper. Googly eyes, pipe cleaners, yarn, and pom poms all pop off within a day. Tacky glue for those.
No stop line before cutting fringe. The ghost ends up in two pieces. Draw the line in pencil first.
Assembling one character at a time. Batch the wrapping and cutting. It roughly halves the total time and keeps kids in their seats.
Taping garland tubes to the string. They rotate and show their backs. Two pushpin holes and thread through.
Forgetting the tube is top heavy. Wings, hats, and horns tip it over. Fold out tabs as feet, glue it to a cardboard circle, or drop a coin inside.
Cutting windows after gluing the wrap down. Cut them while the paper is flat, then wrap.
Starting on October 30. You will not have enough tubes. Start the bag in September.
Storing Them For Next Year
Most of these survive a year in a box if you pack them right, and the paper wrapped ones survive better than the painted ones.
Wrapped characters can be gently pressed flat and rubber banded in groups of five, then stored in a gallon zip bag with the year written on it. Lanterns and anything with a cut out silhouette need to stay round, so stuff a crumpled paper towel inside each one.
What does not make it: tempera painted tubes, because the paint chalks and rubs off on everything else in the box. Fringed ghosts, which crush. And anything hot glued, if your storage is an attic that gets hot, because the glue lets go.
The garland is the one to save properly. Coil it around a piece of cardboard like a spool and it comes out of the box ready to hang next October.
FAQs
How many toilet paper rolls do I need for Halloween crafts?
One per character, five for a garland, and about 35 if you want to make every project on this list. A four person household collects roughly eight to twelve tubes a month, so start about four weeks out or supplement with paper towel tubes cut into thirds.
What is the best glue for toilet paper roll crafts?
Tacky glue, such as Aleene’s Original, holds googly eyes, yarn, pipe cleaners, and pom poms to cardboard without soaking it. A glue stick is fine for paper on paper. School glue stays wet too long and warps the tube, and hot glue works but should stay in adult hands.
Should I paint or wrap toilet paper rolls?
Wrap them unless the color is the point. Painting adds 20 to 30 minutes of drying, needs two thin coats to avoid a warped oval tube, and orange or white over bare cardboard needs a base coat. Construction paper is one step, dries instantly, and hides the printed text and glue seam.
What age can kids make toilet paper roll crafts?
Two and three year olds can stamp and glue pre cut shapes, four and five year olds can wrap, paint, and make big scissor cuts, and by six most kids can do a full project alone if you draw the cut lines. Skip googly eyes and small brads entirely for children under three.
Are toilet paper rolls sanitary for kids’ crafts?
Many classrooms and daycares will not accept them and ask for paper towel tubes instead, because of where the tube has been stored. For home use, wipe the outside with a disinfecting wipe, let it dry fully, and have everyone wash hands afterward.
Can you put a candle inside a toilet paper roll lantern?
No. Cardboard is flammable and a tube sitting over an open flame is a fire risk. Use a flameless LED tea light or battery fairy lights, and keep finished lanterns away from curtains and paper decorations.