
The best New Year crafts using popsicle sticks are quick builds like a starburst wall art, a number countdown garland, a crown, and a time capsule jar, made with craft sticks, tacky glue, and a hot glue gun. Most take 20 to 45 minutes plus glue time, and the ones that need a drill, a craft knife, or lights call for an adult. Use LED lights, never real candles, with anything made of wood.
It’s the afternoon of December 31, the party starts at eight, and you have a pack of craft sticks, a hot glue gun, and no decorations.
That’s where popsicle sticks earn their keep. They’re cheap, they glue up fast, and a handful of them become a starburst, a crown, or a countdown garland before the first guest rings the bell.
These 15 New Year crafts using popsicle sticks cover New Year’s Eve party decorations, noisemakers, and keepsakes for the year ahead. Each one has a skill rating, a realistic time, and the safety note that matters, since a few involve a drill, a craft knife, or lights.
It’s early November, so you have about eight weeks. New Year’s Eve falls on Thursday, December 31, and New Year’s Day is Friday, January 1, so a weekend build in mid December leaves you time to spare.
How To Choose New Year Crafts Using Popsicle Sticks By Skill, Time, and Safety
I rate every project the same way, so you can pick without reading all 15.
- Beginner: Gluing, painting, and tying. Scissors and a glue gun are the only tools. Most take 20 to 45 minutes.
- Intermediate: Needs a drill, a craft knife, or a bit of building. Plan on an evening, and expect to redo one piece.
- Advanced: Nothing here is advanced, though the clock frame is the most fiddly.
Time includes cutting, gluing, and painting, but not drying. Tacky glue between two sticks needs about 20 to 30 minutes to hold, and a full cure takes a few hours.
Popsicle stick crafts are cheap, and most of these New Year’s Eve crafts work for a mixed crowd. Kids from about 4 can do the countdown garland, the crown, the wand, and the time capsule tags with an adult doing the hot glue. Teens and adults can take the clock frame, the shadow box, and the horoscope fan. That mix makes these easy New Year crafts for a family night.
Practical note: Use tacky glue for wood on wood, and hot glue for wood to something else. Tacky glue gives the stronger joint between two sticks. Hot glue sets in seconds, but a stick to stick joint can pop off later.
Safety, Tools, and Glue Notes Before You Start
Popsicle sticks are thin, dry wood, so they split, snag, and burn easily. Set up before you start.
Practical note: Never put a real flame inside or beside anything made of popsicle sticks. The sticks are thin and dry, and they catch fast. Use LED tea lights for lanterns, and keep real candles on the table, not in the craft.
- Hot glue: Even a low temp gun can blister skin. Keep a bowl of cold water close, and let kids handle only the cooled glue.
- Drilling: Craft sticks split under a hole punch. Clamp a stack to a scrap board and drill a 1/8 inch hole with a fresh bit. An adult does this.
- Craft knives: Cut on a mat, use a fresh blade, and keep fingers behind the ruler. To snap a stick cleanly, score it with the blade first and bend it away from you.
- Snapped edges and splinters: Sand broken ends smooth with fine sandpaper.
- Button batteries: The wand uses a coin cell battery pack. A swallowed coin cell is a medical emergency, so tape the battery cover shut and keep it away from small kids.
- Rubber bands and launching: The confetti popper flings paper. Launch it away from faces, and use paper confetti only.
- Glass jars and corks: Use a plastic jar for kids, and keep champagne bottles and corks away from children.
- Glitter: Use glitter glue for kids, since loose glitter ends up in eyes.
I do all my drilling and gluing at one table with a mat down.
Supplies, Where To Buy Them, and Free Swaps
Nearly everything here is a Walmart, Michaels, Hobby Lobby, or dollar store run, and a lot of it is already in the junk drawer. For New Year’s Eve party decorations, a big pack of sticks and a bottle of gold paint go a long way. Here are the items that come up most, with a free or cheap swap for each.
| Supply | Where to buy | Free or low cost swap |
| Standard popsicle sticks (4.5 inch) | Dollar store, Michaels, Walmart | Sticks from your own ice pops, washed and dried |
| Jumbo craft sticks (6 inch) | Michaels, Hobby Lobby, Amazon | Paint stirrers, or strips cut from a cereal box |
| Tacky glue | Walmart, Michaels (Aleene’s Original Tacky Glue) | A glue stick, for the paper parts only |
| Hot glue gun and sticks | Walmart, Michaels | Tacky glue with a clothespin to hold the joint |
| Acrylic paint | Walmart, Michaels (Apple Barrel) | Leftover wall paint or a kids’ paint set |
| Gold metallic paint | Walmart, Michaels | A gold paint pen, or yellow paint with a bit of glitter glue |
| Glitter glue | Dollar store | Skip it and use paint pens |
| LED tea lights | Dollar store, Walmart | Last year’s battery fairy lights |
| Twine and ribbon | Dollar store, Michaels | Yarn scraps or strips of fabric |
| Drill and 1/8 inch bit | Hardware stores | Borrow one from a neighbor |
| Clear packing tape | Walmart | Clear contact paper |
Practical note: A standard popsicle stick is about 4.5 inches long and a jumbo one is about 6 inches. Some designs here fail if you swap sizes, so check the pack before you buy.
I keep a bin of sticks, glue, and paint ready for party prep.
New Year Crafts Using Popsicle Sticks At A Glance
The projects below show up in a mixed order, so use this table as your index. It’s sorted from easiest to hardest, and each name jumps to its section.
| Craft | Skill | Time | Key tool | Best for |
| Pop-It Noise Maker | Beginner | 15 minutes | Hot glue gun | Party noise |
| Wishing Wand | Beginner | 25 minutes plus drying | Hot glue gun | Wearing or waving |
| Time Capsule Tags | Beginner | 30 minutes | Waterproof pen | Keepsake |
| Champagne Cork Place Holders | Beginner | 30 minutes | Hot glue gun | Party table |
| Photo Ladder Display | Beginner | 30 minutes plus drying | Tacky glue | Shelf |
| Starburst Napkin Rings | Beginner | 30 minutes per ring | Hot glue gun | Party table |
| Number Countdown Garland | Beginner | 40 minutes plus drying | Hot glue gun | Wall |
| New Year Crown | Beginner | 40 minutes plus drying | Tacky glue | Wearing |
| Mini Fireworks Wall Art | Beginner | 45 minutes plus drying | Tacky glue | Wall |
| Resolution Tree Display | Beginner | 45 minutes | Tacky glue | Shelf or wall |
| Confetti Pop Stick Poppers | Intermediate | 30 minutes | Rubber bands | Party play |
| Countdown Candle Holder | Intermediate | 45 minutes plus drying | Tacky glue | Table |
| Horoscope Fan Display | Intermediate | 45 minutes | Drill | Table |
| Memory Shadow Box | Intermediate | 1 hour plus overnight | Utility knife | Wall |
| Sparkling Clock Frame | Intermediate | 90 minutes plus drying | Drill | Wall |
If you’re planning a few craft nights before December 31, save this page to your New Year board on Pinterest so the table and supply list are easy to find at the store.
The 15 New Year Crafts Using Popsicle Sticks
Each project lists its skill level, time, mess, and the gear that matters. Pick the ones that match your tools and your evening, and skip the rest.
1. Time Capsule Tags
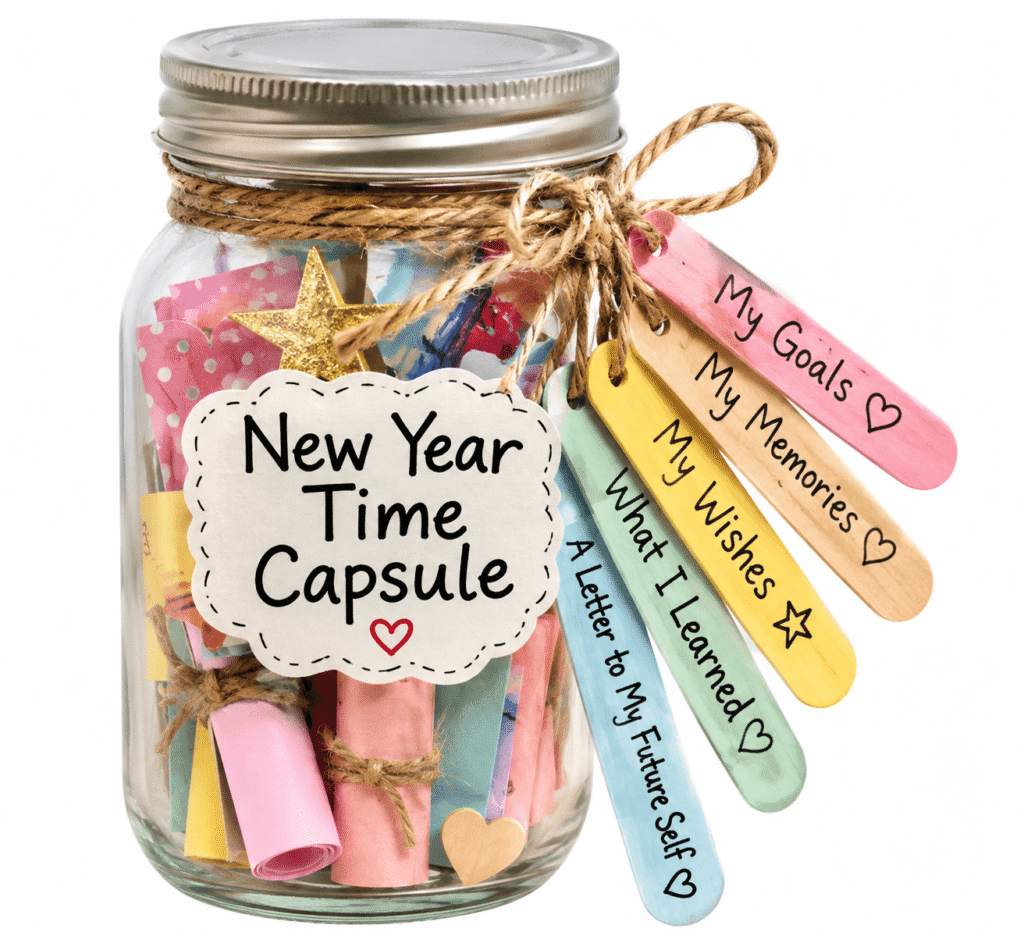
Seal a note inside a clear taped tag, tie it to a jar, and open it twelve months from now. It’s a small ritual with a real payoff, and it’s one of the more meaningful New Year’s Eve crafts here. The trade off is storage, since a jar in a hot attic or a damp basement ruins the notes. Pick a cool, dry closet.
Skill: Beginner. Time: 30 minutes. Mess: Low. Gear: waterproof pen, packing tape.
Materials Needed
- 6 standard popsicle sticks
- A waterproof, fade resistant pen, such as Sakura Pigma Micron
- Wide clear packing tape
- Twine, 6 pieces about 8 inches long
- Scissors
- A jar with a lid (plastic for kids, glass for adults)
How to Make It
- Write a short message or prediction on each stick, and put the date on the back.
- Cover each stick on both sides with wide clear packing tape. Press out the air bubbles and leave a 1/8 inch border of tape past the edge so it seals.
- Tie a piece of twine to one end of each stick with a double knot.
- Fill the jar with notes, ticket stubs, and small keepsakes.
- Tie the tagged sticks around the jar neck and write the open date on the lid.
Tip: Write the full open date on the lid, not just the year. Next December, you’ll want to know exactly when to open it.
2. Starburst Napkin Rings
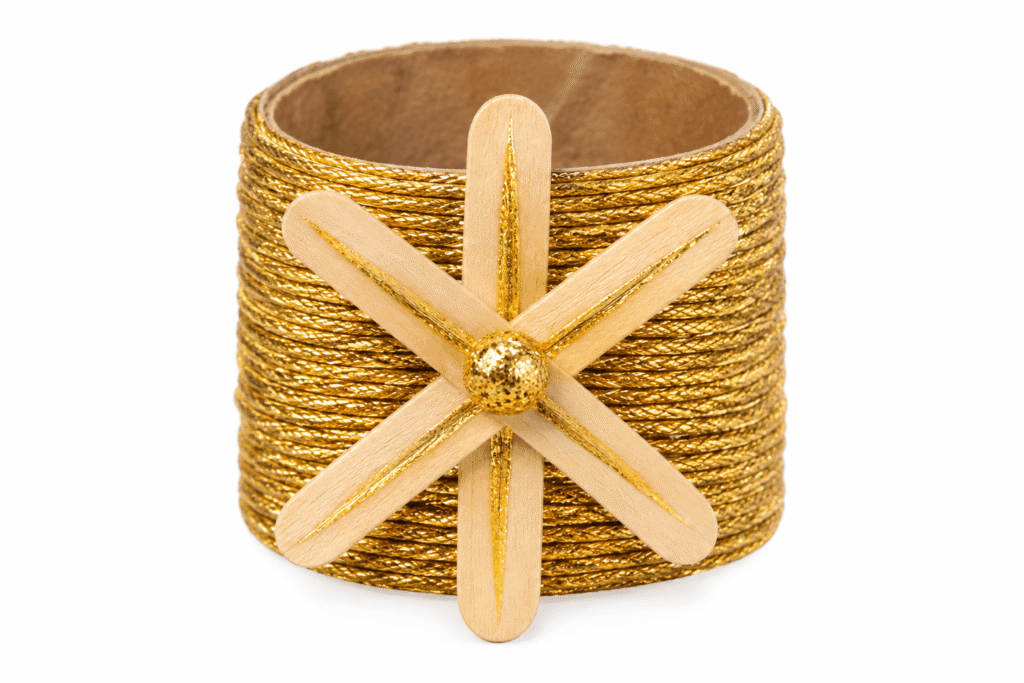
A tiny gold starburst on a ring dresses up a plain napkin, and these are quick New Year’s Eve party decorations for a dinner table. A star on its own can’t hold a napkin, so build the ring from a cardboard tube and glue the starburst on the front. The trade off is fussy wrapping, since floss slips if you start it loose.
Skill: Beginner. Time: 30 minutes per ring. Mess: Low. Gear: hot glue gun.
Materials Needed
- 2 standard popsicle sticks per ring
- A toilet paper tube, cut into 1.5 inch rings
- Gold embroidery floss
- A hot glue gun and sticks
- Scissors, a craft knife, and fine sandpaper
How to Make It
- Cut a 1.5 inch ring from the tube. Wrap it in gold floss and glue the start and end with a dot of hot glue.
- Score two sticks across the middle with the craft knife and snap them in half. Sand the broken ends smooth.
- Cross the four short pieces at the center like an asterisk and glue them with a dab of hot glue. Hold for 10 seconds.
- Wrap gold floss around each ray from the center outward, and glue the end.
- Hot glue the starburst to the front of the ring and let it cool before you slip on a napkin.
Tip: Tuck the floss tail under the first loop. Floss slips off bare wood if it starts loose.
3. Mini Fireworks Wall Art
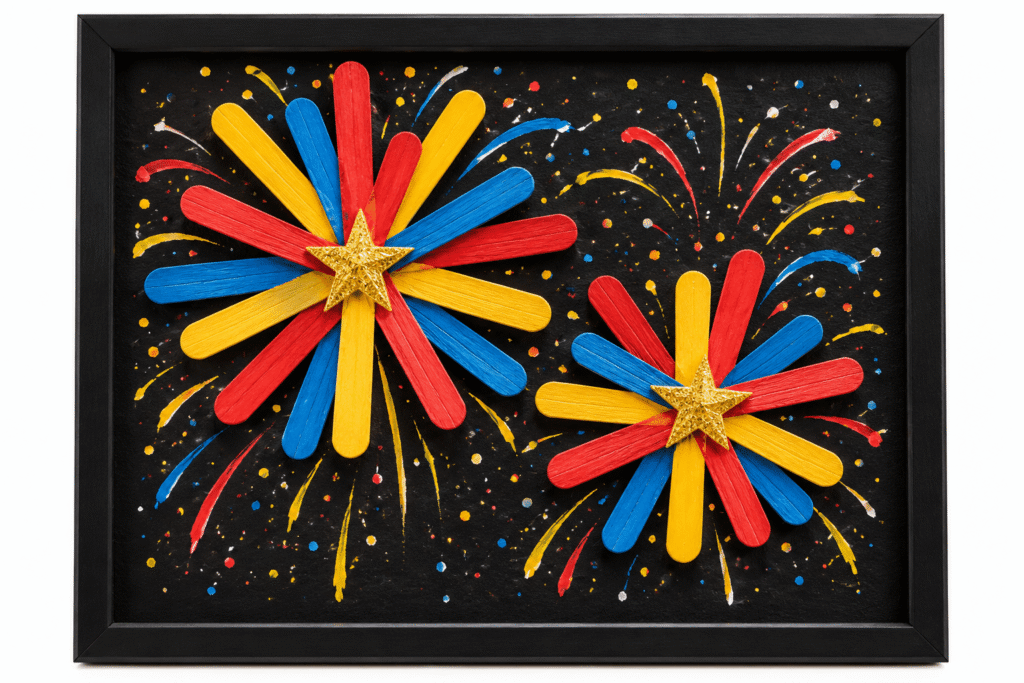
Bright bursts of color radiate from a dark background, in a frame you can hang every year. A true starburst comes from crossing sticks at the center like an asterisk, not laying them in a grid. The trade off is the paint, because acrylic on thin poster board makes it curl, so use heavy board.
Skill: Beginner. Time: 45 minutes, plus drying. Mess: Medium. Gear: brush, old toothbrush.
Materials Needed
- 10 standard popsicle sticks
- 8 by 10 inch black poster board (or foam board)
- Tacky glue
- Red, yellow, and blue acrylic paint
- A small paintbrush and an old toothbrush
- An 8 by 10 inch frame
How to Make It
- Paint the outer half of each stick in red, yellow, or blue, and let them dry for 15 minutes.
- Cross five sticks at the center like an asterisk and glue where they overlap. Press under a book for 20 minutes. Repeat with the other five.
- Dip the toothbrush in paint and flick it over the board for sparks. Cover your table first.
- Glue the two starbursts onto the board, one a little higher than the other. Let dry completely.
- Put the board in the frame and hang it.
Tip: Tape the board’s edges down while the splatter dries. It keeps it flat.
4. Horoscope Fan Display
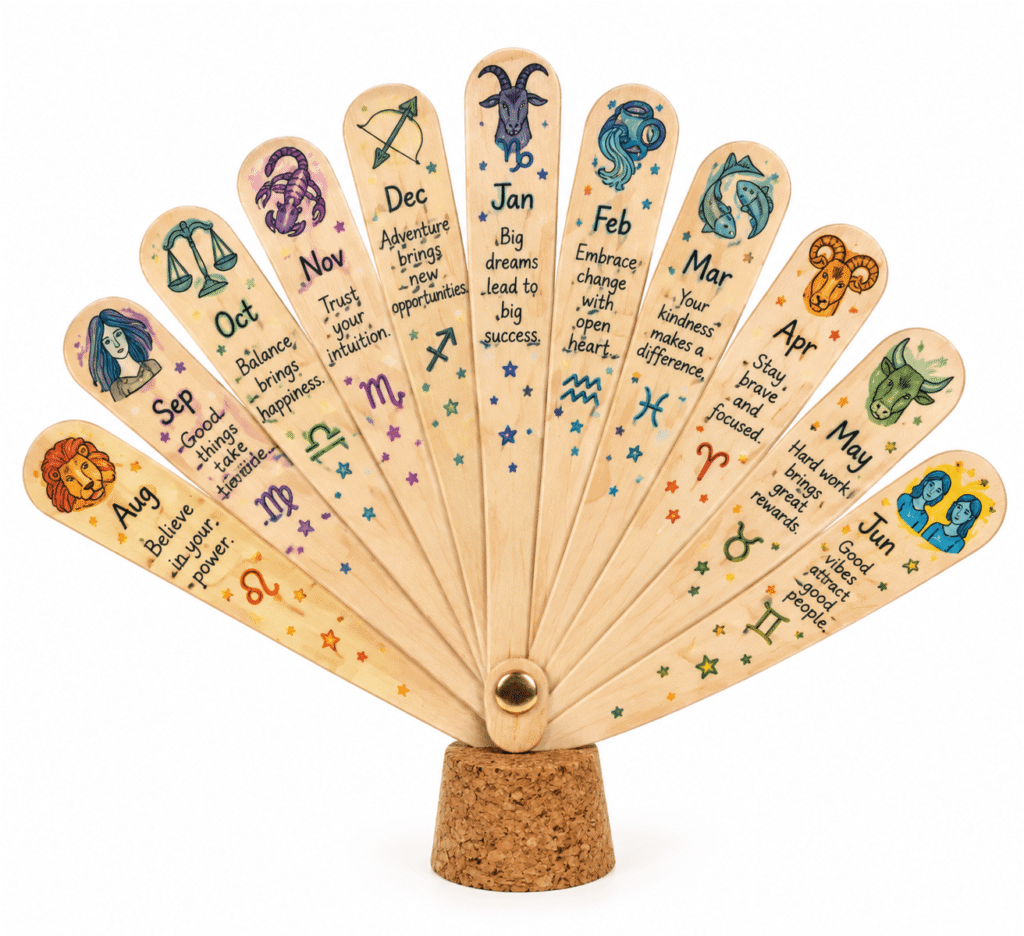
Twelve strips fan out from a hub, each showing a month and a playful prediction. Keep the predictions fun, not serious. The trade off is the drilling, because craft sticks split under a hole punch, so an adult drills them in a stack.
Skill: Intermediate. Time: 45 minutes. Mess: Low. Gear: drill, 1/8 inch bit, clamp.
Materials Needed
- 13 standard popsicle sticks
- Fine tip markers in 4 colors
- A paper fastener (brad)
- A drill and a 1/8 inch bit, plus a scrap board and a clamp
- A ruler and a pencil
- A cork or a lump of clay for a stand
How to Make It
- Mark each of 12 sticks into three sections with pencil. Write the month at the top and a short prediction in the middle. Use the 13th stick as the cover with a title.
- Stack all 13 sticks, clamp them to the scrap board, and drill one hole 1/4 inch from the bottom end through the whole stack. An adult does this.
- Slide the brad through the holes and spread the legs on the back.
- Fan the sticks out like a wheel.
- Glue a cork to the back of the hub as a stand, or press the brad legs into a lump of clay.
Tip: Write in pencil first. Marker on bare wood bleeds into the grain and can’t be fixed.
5. Wishing Wand
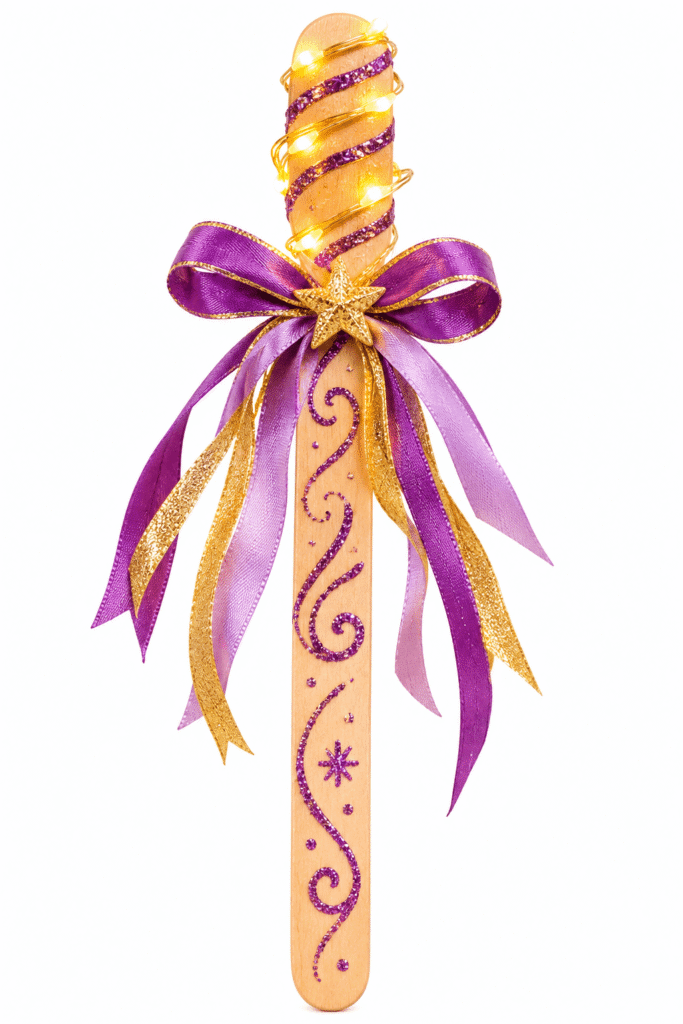
A glittery stick with a glowing tip is a wish wand for the first minute of the year. A tea light won’t stay on a stick, so use a battery powered LED micro light. The trade off is the battery pack. Tape it shut, and keep it away from small kids.
Skill: Beginner. Time: 25 minutes, plus drying. Mess: Medium. Gear: hot glue gun.
Materials Needed
- 1 jumbo popsicle stick
- Purple glitter glue
- 18 inches of ribbon
- A battery powered LED micro light with a coin cell pack
- Clear tape
- A hot glue gun and scissors
How to Make It
- Squeeze wavy lines of glitter glue along both sides of the stick. Let it dry for 30 minutes.
- Tape the battery pack along the lower half of the stick, and tape the battery cover shut.
- Wrap the LED wire in a spiral around the top inch of the stick. Secure it with clear tape and a dot of hot glue.
- Tie ribbons around the top, just below the lights.
- Switch it on and make a wish.
Tip: Test the lights before you glue anything down.
6. Number Countdown Garland
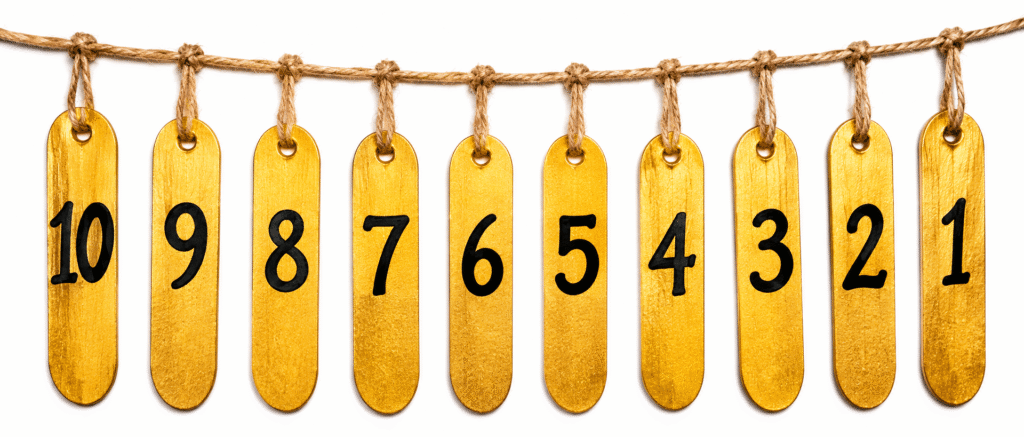
Ten gold numbers hang like pendants and count down the last ten days of the year. Paint first and write the numbers on top once dry. Painting over the marker erases them. The trade off is attaching the twine, because hot glue alone pops off, so reinforce it with tape.
Skill: Beginner. Time: 40 minutes, plus drying. Mess: Medium. Gear: hot glue gun.
Materials Needed
- 10 jumbo popsicle sticks
- Gold metallic acrylic paint and a small foam brush
- A fine tip black permanent marker, such as a Sharpie
- About 4 yards of twine (5 feet for the main line, plus ten 6 inch pieces)
- A hot glue gun, clear tape, and two hooks
How to Make It
- Paint one face of each stick gold with the foam brush. Let it dry for 15 minutes, and add a second coat if it’s streaky.
- Write the numbers 10 through 1 on the dry sticks, one per stick.
- Fold each 6 inch piece of twine into a loop and hot glue the ends to the back of a stick near the top. Cover the glue with a strip of clear tape.
- Tie the loops to the main twine, about 4 inches apart, in order from 10 to 1.
- Hang the main twine between two hooks.
Tip: Take one number down each night. It’s the easiest countdown you’ll ever do.
7. Memory Shadow Box
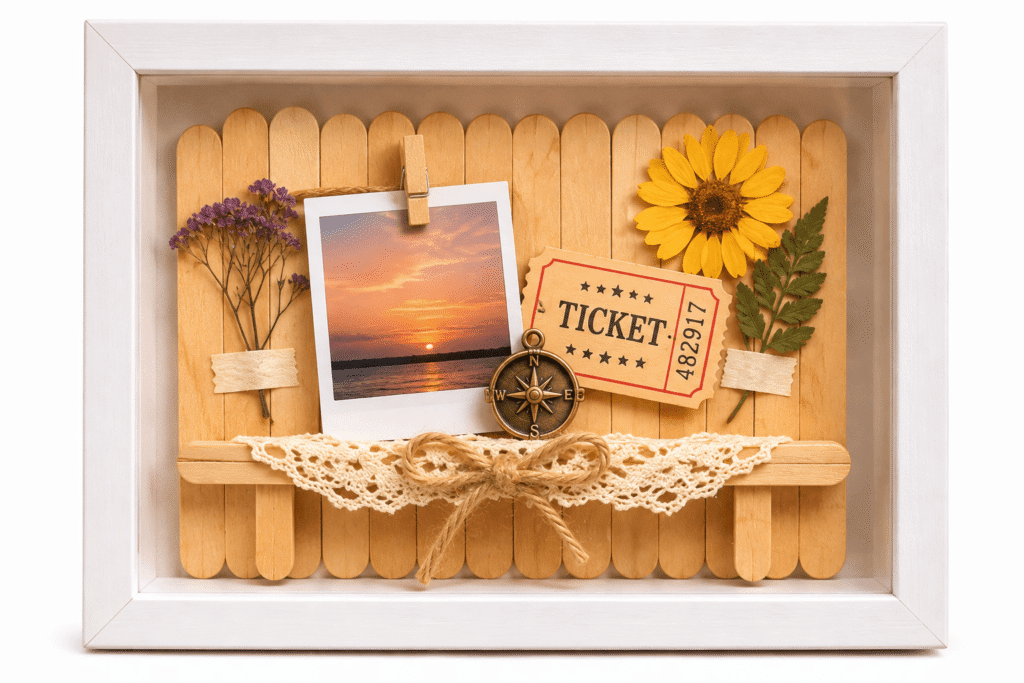
A shadow box holds a ticket, a photo, and a pressed flower in layers, and the stick platform lifts them off the backing for depth. Measure your frame before you cut the foam. The trade off is that glue ruins originals, so use copies of photos or photo corners.
Skill: Intermediate. Time: 1 hour, plus overnight to dry. Mess: Low. Gear: utility knife, cutting mat.
Materials Needed
- 8 standard popsicle sticks
- An 8 by 10 inch shadow box frame with depth
- A craft foam sheet
- Tacky glue and double sided foam dots
- Small keepsakes: a ticket stub, a printed copy of a photo, and a pressed flower
- A utility knife, a cutting mat, and a ruler
How to Make It
- Lay four sticks side by side and glue four more across them to make a solid square platform. Let it dry for 25 minutes.
- Measure the inside of the frame and cut the foam to fit.
- Glue the platform to the center of the foam and let it dry for 10 minutes.
- Arrange the keepsakes on the foam and the platform, and stick them down with foam dots or tacky glue. Let it dry overnight.
- Slide the foam backing into the frame and close it.
Tip: Dry the pressed flower completely first. Moisture behind glass turns it brown within weeks.
8. New Year Crown
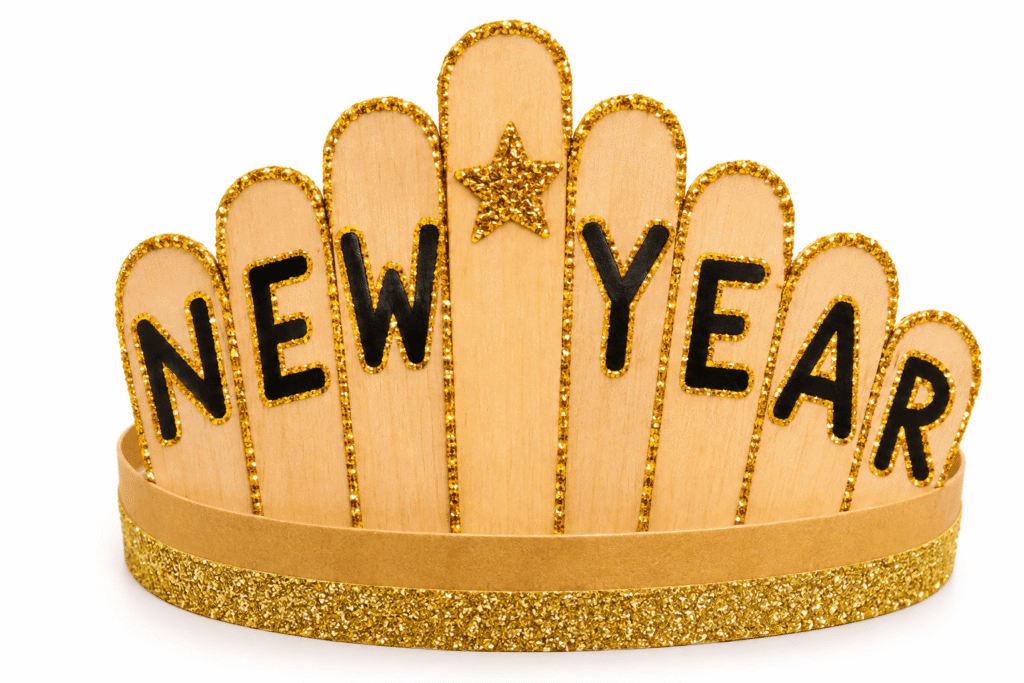
A crown with N E W on one side and Y E A R on the other makes a good photo prop and one of the easier New Year’s Eve crafts for a mixed group. Punching holes in jumbo sticks splits them, so glue the sticks to a cardstock band. The trade off is fit, so size the band on the wearer’s head first.
Skill: Beginner. Time: 40 minutes, plus drying. Mess: Medium. Gear: marker, glitter glue.
Materials Needed
- 8 jumbo popsicle sticks
- A black permanent marker
- Gold glitter glue
- A cardstock strip, about 2 by 22 inches
- Tacky glue, clear tape, and clothespins
- A star sticker or a small paper star
How to Make It
- Write one letter on each of seven sticks to spell N E W Y E A R, and put a star on the eighth stick as the divider.
- Outline each letter with gold glitter glue and let it dry for 30 minutes.
- Wrap the cardstock band around the wearer’s head, mark the overlap, and tape it closed.
- Glue the sticks upright onto the band in order, with the star in the middle, and alternate the heights by about half an inch for a jagged look. Hold them with clothespins until dry.
- Let it dry for 30 minutes, then wear it.
Tip: Tape the band closed. Staples near a head are not worth the risk.
9. Confetti Pop Stick Poppers
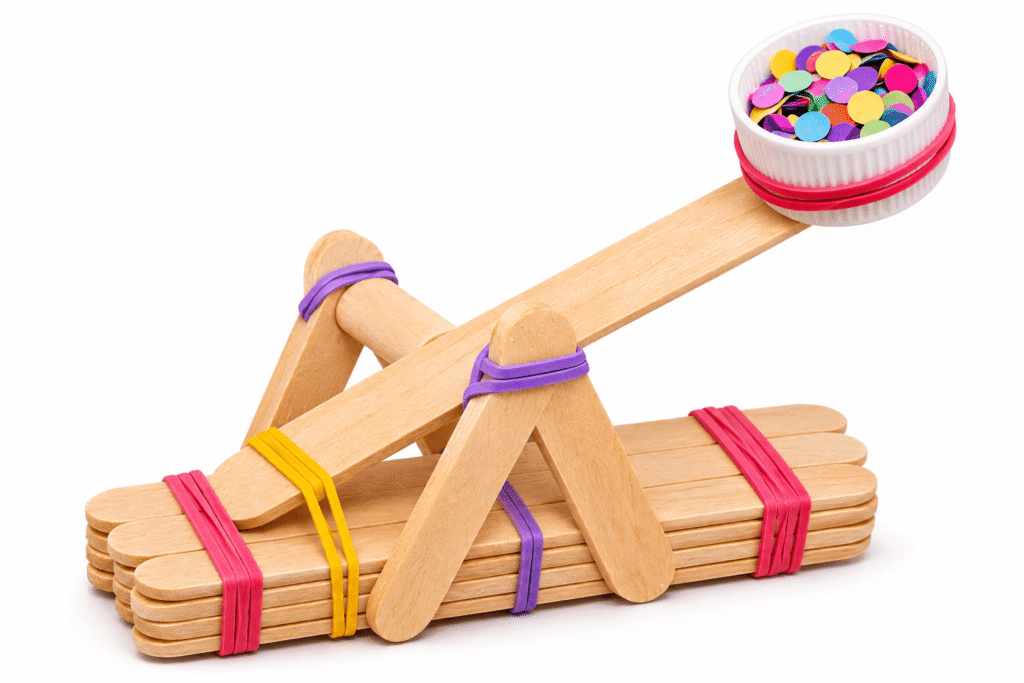
A craft stick launcher flings a pinch of paper confetti across the room at midnight. The usual rubber band bundle taped to a tube can’t launch anything, so this is the classic stick catapult. The trade off is aim. Confetti goes everywhere, so launch it away from faces and food.
Skill: Intermediate. Time: 30 minutes. Mess: High (confetti). Gear: rubber bands, hot glue gun.
Materials Needed
- 8 jumbo craft sticks
- 3 strong rubber bands
- A plastic bottle cap
- A hot glue gun
- 1/4 cup paper or tissue confetti (no glitter or metallic bits)
How to Make It
- Stack 6 jumbo sticks and wrap a rubber band tightly around each end. This is the fulcrum.
- Hold 2 more sticks together and wrap a rubber band around one end. Slide the stack between the two sticks, close to the banded end.
- Wrap another rubber band in an X around the junction so the stack stays put.
- Hot glue the bottle cap to the free end of the top stick.
- Put a pinch of confetti in the cap, press down on the cap end, and let go.
Tip: Test it with a pinch first and launch low over the table. Use thick rubber bands, because thin ones snap.
10. Photo Ladder Display
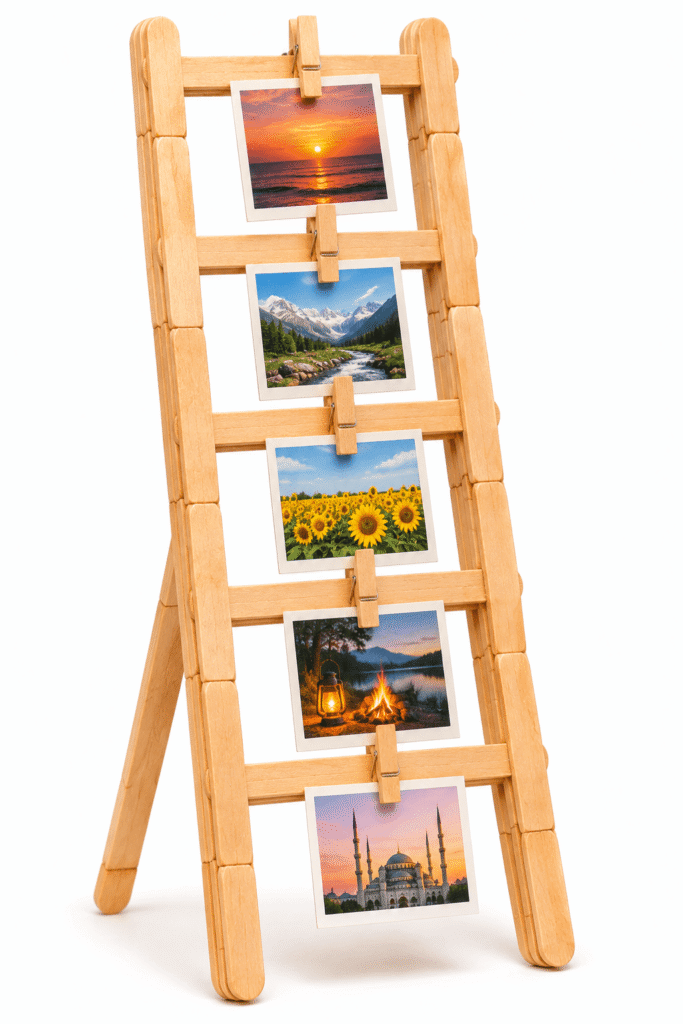
Tiny photos clip to the rungs of a small leaning ladder, a good spot for the year’s best moments, and it’s one of the easy New Year crafts that works as a gift. Rails made from two overlapped sticks give you the height for five photos. The trade off is wobble. A stick ladder is light, so lean it on a shelf or a wall.
Skill: Beginner. Time: 30 minutes, plus drying. Mess: Low. Gear: tacky glue.
Materials Needed
- 10 standard popsicle sticks
- 5 mini clothespins
- 5 photo prints, about 1.5 by 1 inches (use copies)
- Tacky glue
- A ruler and a pencil
How to Make It
- For each rail, overlap two sticks by 1 inch and glue them. Make two rails, about 8 inches long, and let them dry for 20 minutes.
- Lay the rails parallel, 4 inches apart, using the ruler.
- Glue five sticks across the rails as rungs, about 1.5 inches apart. Let it dry for 20 minutes under a book.
- Clip one photo to each rung with a mini clothespin.
- Lean the ladder against a wall or a shelf.
Tip: Use copies of the photos. Clothespins leave dents in originals.
11. Champagne Cork Place Holders
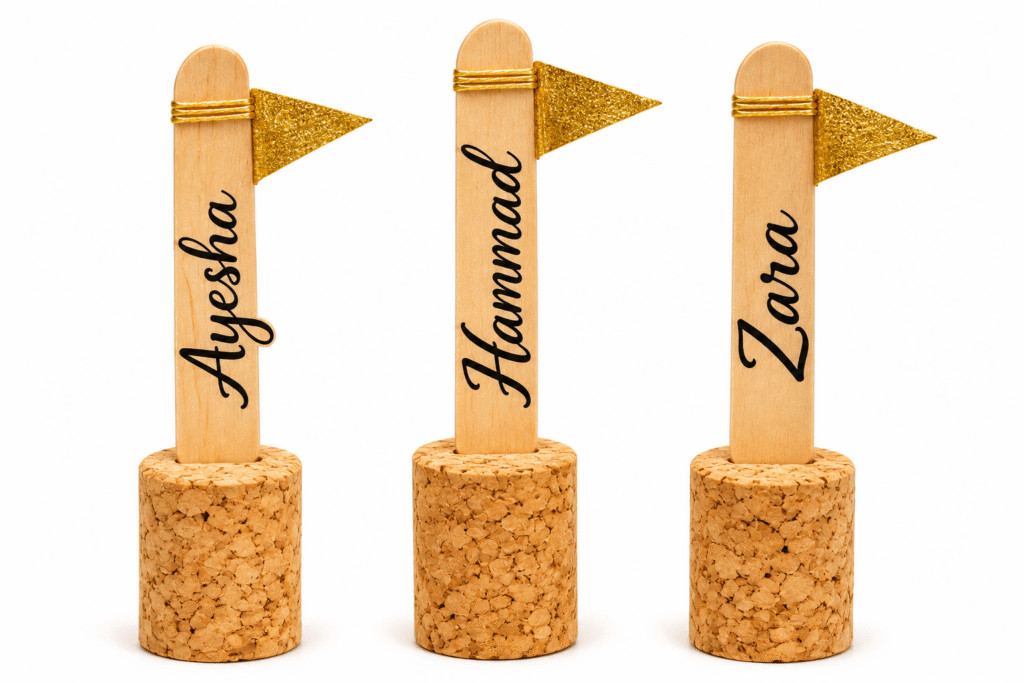
A named stick standing in a cork marks each guest’s seat, and these are simple New Year’s Eve party decorations for a dinner table. The usual instructions glue one stick across five corks, which doesn’t work, so each place holder is its own cork and stick. The trade off is the cork. Real champagne corks are compressed and hard to cut, so use wine corks if you’re short.
Skill: Beginner. Time: 30 minutes. Mess: Low. Gear: hot glue gun, calligraphy pen.
Materials Needed
- 1 standard popsicle stick per guest
- 1 cork per guest (wine corks work)
- A calligraphy pen or a fine marker
- A hot glue gun
- Paper triangles for little flags, optional
How to Make It
- Write each guest’s name on a stick with the pen.
- Stand a cork upright on its flat end.
- Put a dab of hot glue on top of the cork, press a stick’s end in upright, and hold for 10 seconds.
- Glue a paper triangle flag near the top of the stick if you like.
- Set one at each seat.
Tip: Write the names before you glue the sticks to the corks. Writing on a standing stick is a good way to smear the ink.
12. Sparkling Clock Frame
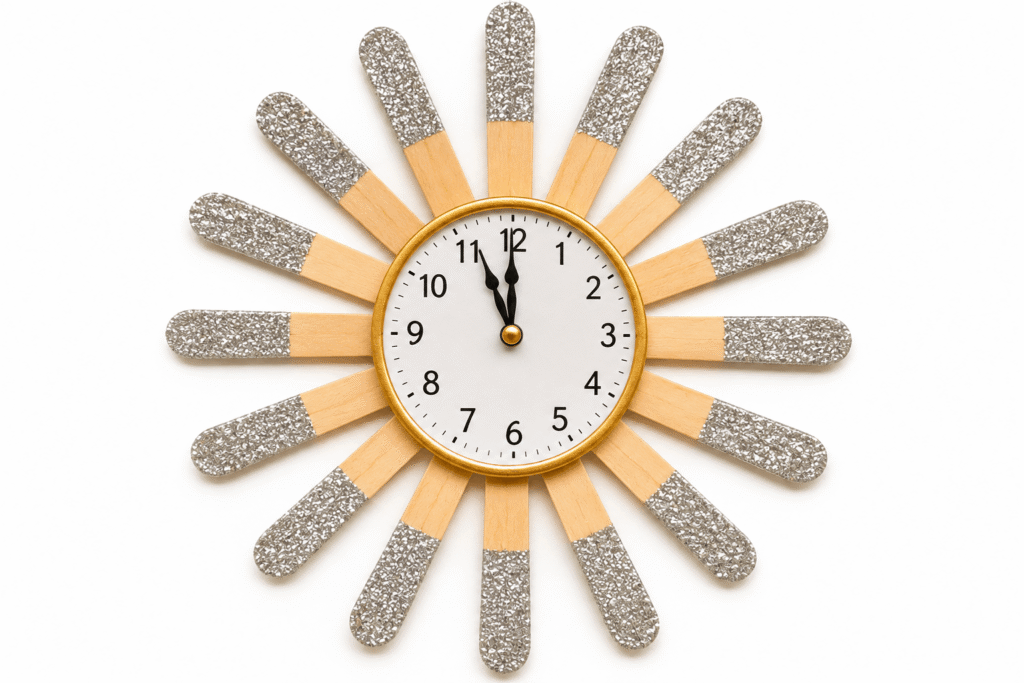
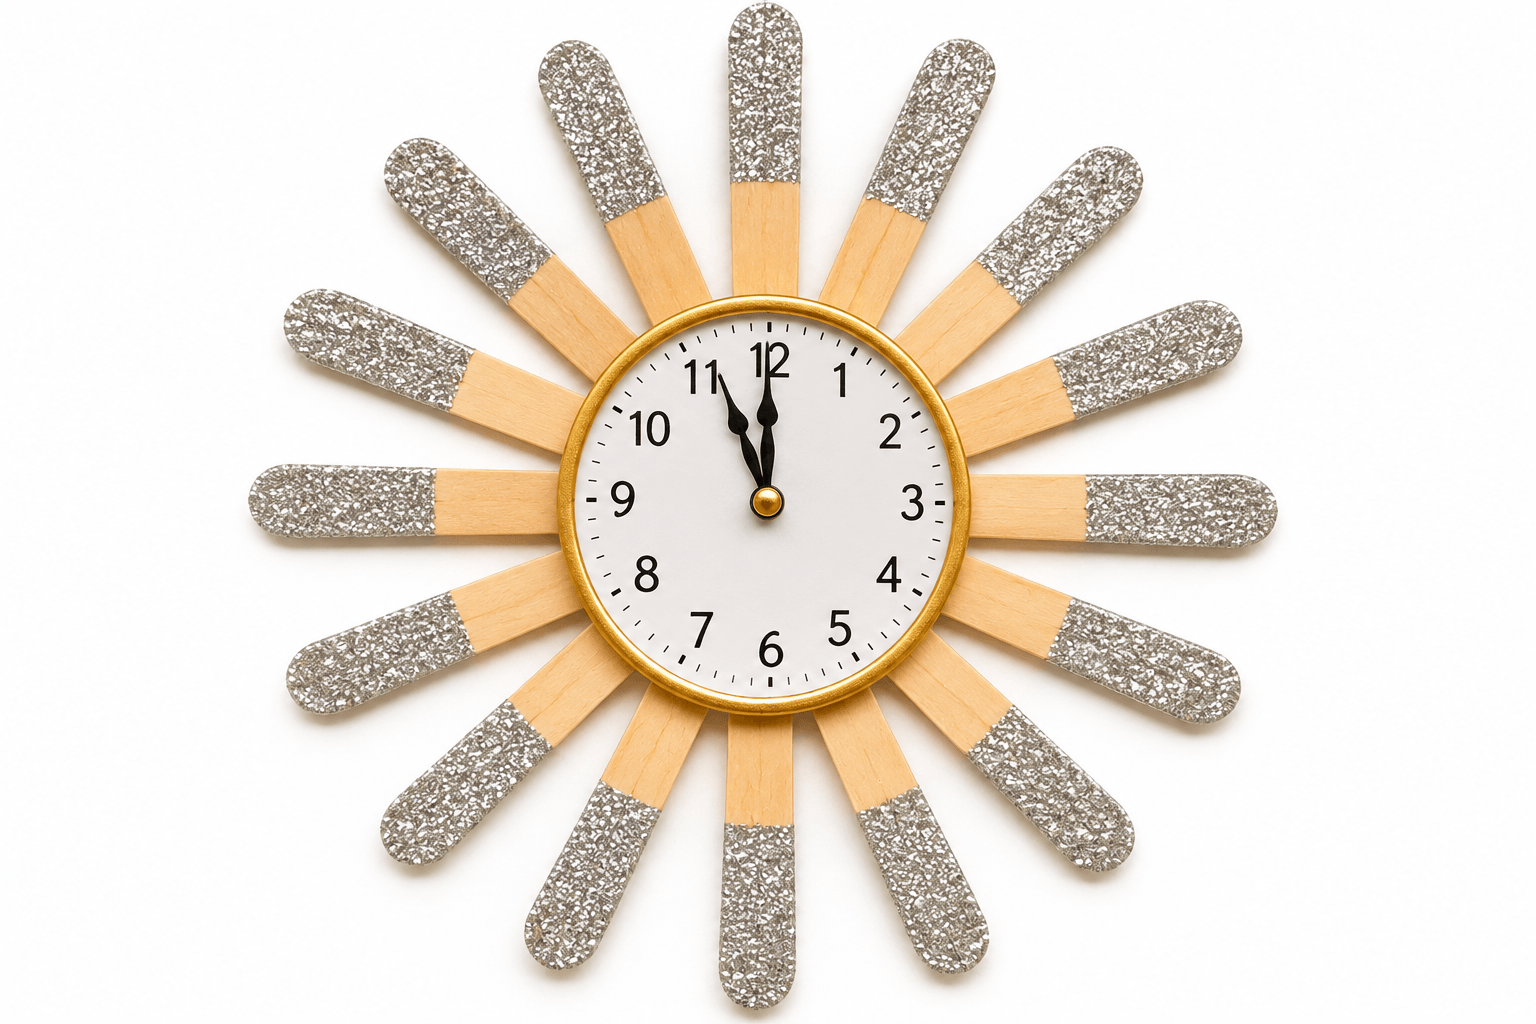
A sunburst of glittering sticks around a clock face counts the last minutes of the year, and it’s the showpiece of any set of New Year’s Eve party decorations. A ring of eight sticks forms an octagon that is far too big for a 6 inch clock, so this version fans 16 sticks outward from the clock. The trade off is the kit, so read its instructions before you glue anything.
Skill: Intermediate. Time: 90 minutes, plus drying. Mess: Medium (glitter). Gear: ruler, scissors.
Materials Needed
- 16 standard popsicle sticks
- A 6 inch round wooden clock kit (face, movement, hands, and battery)
- A 12 inch circle of cardboard or foam board
- Tacky glue
- Fine silver glitter (or glitter glue) and a small paintbrush
- A paper circle for folding, and a pencil
How to Make It
- Fold a 12 inch paper circle in half four times, then open it. The 16 creases mark your spokes. Copy them onto the cardboard circle.
- Glue one stick along each spoke, with the inner end about 1.5 inches from the center. Let it dry for 25 minutes.
- Brush glue on the outer half of each stick, sprinkle on silver glitter, and shake off the extra. Let it dry for 20 minutes.
- Make a hole in the center and mount the clock face over the inner ends, following the kit instructions.
- Add the hands and the battery.
Tip: The creased paper circle keeps the spacing even. Eyeballing 16 spokes never works.
13. Pop-It Noise Maker
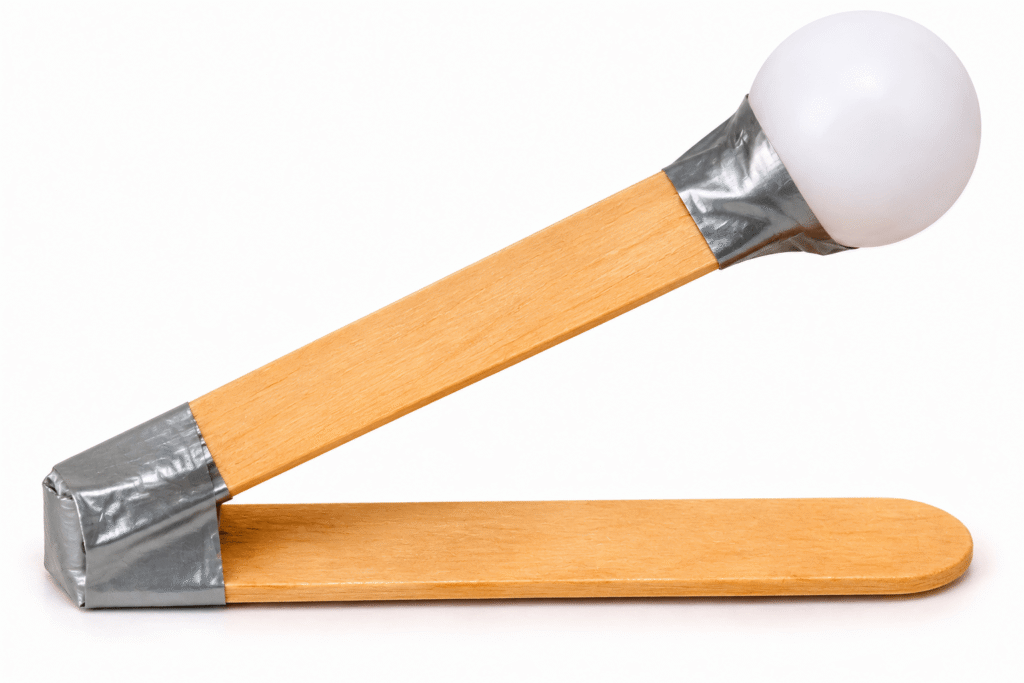
A hinged stick clapper with a ball at the end makes a sharp clack when you flick it. It’s the quickest build here and a good one for easy New Year crafts with a crowd. It’s a clack, not a firework bang, so keep your expectations at party noisemaker.
Skill: Beginner. Time: 15 minutes. Mess: Low. Gear: hot glue gun.
Materials Needed
- 2 jumbo popsicle sticks
- 12 inches of duct tape
- A ping pong ball
- A hot glue gun
How to Make It
- Hot glue the ping pong ball to the end of one jumbo stick and let it cool for a minute.
- Lay the second stick on top, lined up with the first. Wrap duct tape tightly around both sticks at the end away from the ball to make a hinge.
- Hold the taped end and flick the free ends down against your palm to make the clack.
Tip: Use two wraps of tape for the hinge. A single wrap works loose after a few dozen flicks.
14. Countdown Candle Holder
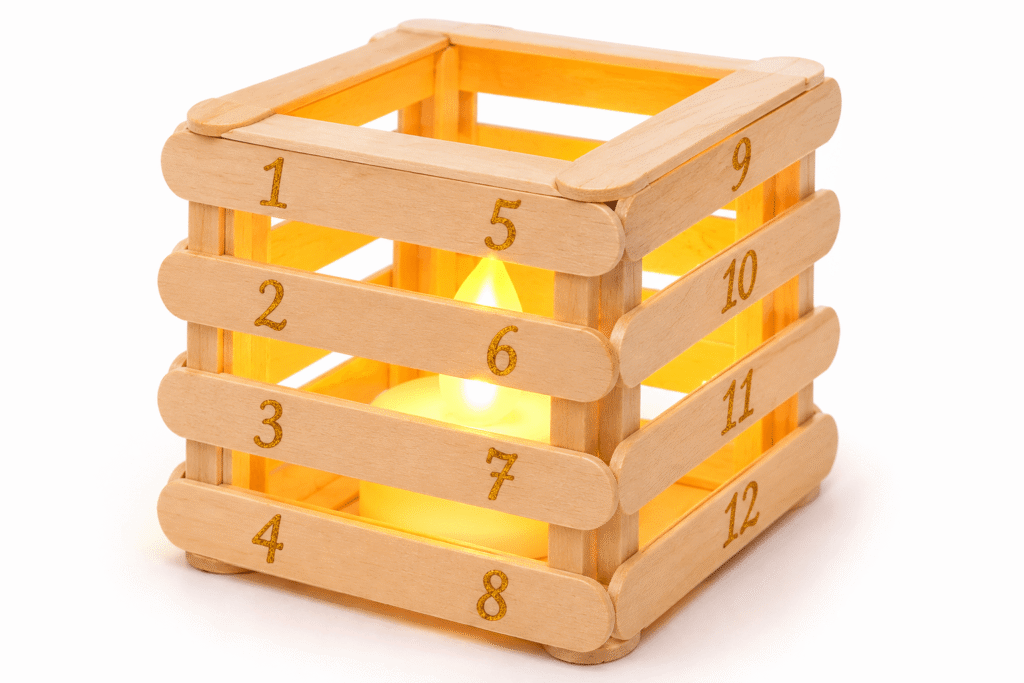
A small log cabin lantern glows through the gaps between sticks, and every stick is numbered for a twelve night countdown. The usual version puts a real tealight inside a stick box. That’s a fire hazard, so this one uses an LED tea light and numbers written by hand. The trade off is height, since 12 sticks make a short lantern.
Skill: Intermediate. Time: 45 minutes, plus drying. Mess: Low. Gear: tacky glue.
Materials Needed
- 12 standard popsicle sticks
- Tacky glue
- A fine tip marker or gold paint pen
- An LED tea light
- A strip of cardboard, about 1/8 inch thick, as a spacer
- Fine sandpaper
How to Make It
- Number the sticks 1 to 12 on one face with the marker.
- Build the first layer by laying two sticks parallel, about 2 inches apart, and gluing two more across their ends to make a square.
- Build two more layers the same way, gluing each one onto the layer below with the cardboard spacer between them to leave a small gap for light to shine through.
- Let the glue dry for 30 minutes, then pull out the spacers and sand any rough spots.
- Put the LED tea light inside and turn it on at dusk. Tick off a number each night.
Tip: Never use a real candle in this lantern. The sticks are thin and dry, and they burn.
15. Resolution Tree Display
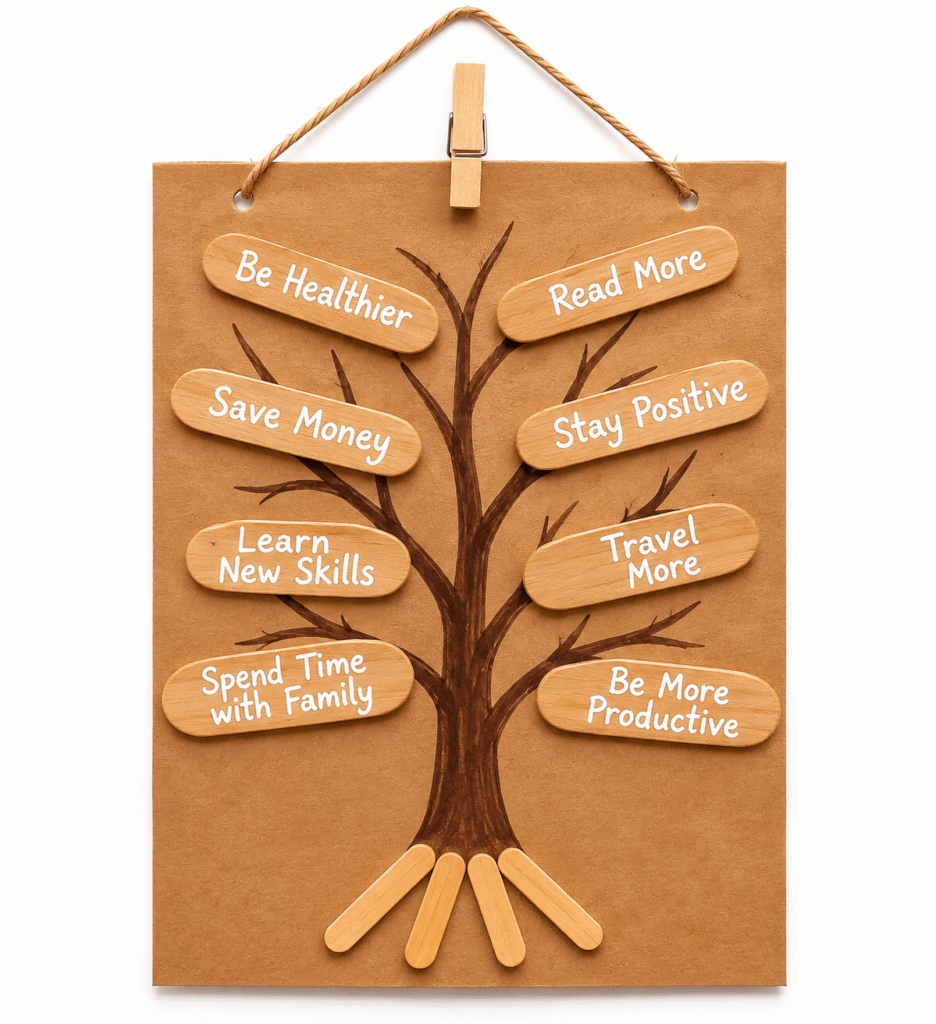
Bare branches on kraft paper hold handwritten resolutions, and the tree fills out as the year goes on. Stay flat and hang it from a clothespin, since folding the paper hides the tree. The trade off is permanence, so use poster putty if you want to add sticks through the year.
Skill: Beginner. Time: 45 minutes. Mess: Low. Gear: pencil, gel pen.
Materials Needed
- 20 standard popsicle sticks
- A 9 by 12 inch sheet of brown kraft paper
- A white gel pen
- A pencil
- Tacky glue, or poster putty
- A wooden clothespin and a piece of twine
How to Make It
- Draw a tree trunk and main branches on the kraft paper in pencil. Keep the upper branches sparse.
- Score 4 sticks in the middle with a craft knife, snap them in half, and sand the edges. These are the roots.
- Write one resolution on each of the 16 full sticks with the white gel pen.
- Glue the full sticks along the branches as leaves and the halves at the base as roots.
- Clip the top of the paper with the clothespin and hang it from the twine.
Tip: Leave a few branches bare. Those are for the resolutions you think of in July.
Common Mistakes First Timers Make
Most first timers hit the same few snags with popsicle stick crafts. Here are the ones that come up most.
- Using hot glue for every wood to wood joint. It sets fast but can pop off. Use tacky glue for stick to stick joints.
- Painting over the marker. Paint first, and write on top once it’s dry.
- Punching holes in sticks with a hole punch. They split. Clamp a stack and drill instead.
- Putting a real candle in a stick lantern. Use an LED tea light.
- Skipping the sanding. Snapped sticks leave splinters. Sand the broken ends.
- Laying sticks in a grid instead of crossing them at the center. A starburst needs the sticks crossed like an asterisk.
- Gluing originals. Photos, tickets, and notes get ruined by glue. Use copies or photo corners.
- Letting glued sticks dry unpressed. Wet glue warps them. Put a book on top.
- Mixing stick sizes. Standard sticks are about 4.5 inches and jumbo sticks are about 6 inches. Check the pack.
FAQs
What are easy New Year crafts using popsicle sticks?
The number countdown garland, the wishing wand, the time capsule tags, and the napkin rings are all quick and need no special tools beyond a glue gun. Each one takes about 30 to 40 minutes.
What glue works best for popsicle stick crafts?
Use tacky glue for wood on wood, since it gives the strongest joint, and hot glue for attaching sticks to other materials like corks, foam, and plastic. A glue stick won’t hold wood.
What are good New Year’s Eve crafts for kids?
The countdown garland, the crown, the time capsule tags, and the wishing wand work well for kids from about 4, with an adult doing the hot glue and the battery pack. Skip the drilling and the craft knife.
How do you cut or snap popsicle sticks cleanly?
Score the stick across the middle with a craft knife, then bend it away from the score to snap it. Sand the broken ends smooth. A pair of garden pruners also works for a clean cut.
Can I put a real candle in a popsicle stick lantern?
No. The sticks are thin, dry wood and they burn quickly. Use an LED tea light for the same glow without the fire risk.
What can I make for New Year’s Eve party decorations with craft sticks?
Try the countdown garland, the starburst wall art, the napkin rings, and the cork place holders. They cover a wall, a table, and every seat for about the cost of a pack of sticks.
