
The best Christmas scripture cards ideas pair one short verse with a simple format, like a printed minimalist card, a hand lettered keepsake, a mantel garland, or a pocket Advent calendar. Most take 20 minutes to a few hours with cardstock, a printer, and a few basic supplies, and the beginner versions need no special skills. Keep each verse under about 20 words, pick a translation you can quote, and print one test card before you make the whole set.
It’s the Sunday before Advent, and you’re at the kitchen table with a stack of blank index cards, a pen that’s nearly dry, and a list of verses you can’t decide between. Picking the verses is one job. Making the cards look good enough to display is a second one.
That’s what these 11 Christmas scripture cards ideas are for. They range from a one page printed card to a pocket calendar that runs the whole month, so you can pick the style that fits your home and your time instead of starting from nothing. You don’t need all eleven, just the one or two that fit your space.
Each idea has a skill rating, a realistic time, and a note on what tends to go wrong the first time. Most make good handmade scripture cards for gifts, stockings, or a mantel. It’s late October, so you have about five weeks before Advent begins on Sunday, November 29. Christmas lands on a Friday this year.
How To Choose Christmas Scripture Cards By Skill, Time, and Style
I rate every idea the same way, so you can pick without reading all 11.
- Beginner: Printing, trimming, and clipping. No special tools beyond a printer and scissors. A bad first try still looks fine.
- Intermediate: Needs a craft skill like watercolor, pressing flowers, or building a pocket calendar. Plan on an evening, and expect to redo one card.
- Advanced: Only the hand lettered card lands here, since layout and flourishes take real practice.
Time includes designing, printing, and assembling, but not drying or pressing. Mess is low for almost everything. The watercolor cards are the only ones that make a real mess.
Style matters more than skill for most of these Christmas scripture cards ideas. Minimalist and chalkboard styles read bold from across the room. Watercolor and pressed flowers are soft and look best up close. Kraft and farmhouse sit in the middle and suit a lived in home. For handmade scripture cards, pick the style that matches what’s already on your walls.
Kids can help with stickers, clipping, and tucking cards into stockings. The craft knife, laminator, and hot glue are adult jobs.
Practical note: Cap every verse at about 20 words. Longer passages force small type and crowd the card. If you love a long passage, split it across two cards.
Safety, Tools, and Printing Notes Before You Start
Most of this is paper, so the risks are small, but a few steps involve heat, blades, and fumes. Set up before you start.
- Craft knives and trimmers: Cut on a mat, use a fresh blade (a dull one slips), and keep your fingers behind the ruler.
- Laminators and hot glue: Both can burn. Let a laminator cool before you move it, and keep a bowl of cold water by the glue gun.
- Paint pens and markers: Use water based paint pens such as Posca for lettering. Oil based paint markers have a strong smell and need an open window.
- Resin: If you want to seal flowers in resin instead of laminating, you need nitrile gloves, a ventilated room, and a respirator with organic vapor cartridges. It’s an adult craft, so don’t hand it to kids.
- Candles and fire: Paper burns fast. Don’t hang a garland over a fireplace you plan to light, and use LED candles near cards, jars, and calendars.
- Glass jars: Skip any jar with a chip or a crack, and keep them out of reach of small kids.
- String and wire: Keep garland string short and above toddler reach. Bend the ends of any wire pieces over.
- Verses and permissions: King James and the World English Bible are public domain. Modern translations have permission rules, so check the publisher’s page before you sell cards.
Practical note: Printer ink decides how your cards behave. Laser toner doesn’t run when it meets paint or a damp finger. Many inkjet inks do. If you only have an inkjet, drip a little water on a test card before you commit.
I keep a corner of a table for cutting and printing so the cards stay clean.
Supplies, Where To Buy Them, and Free Swaps
Most Bible verse cards need cardstock, a printer, and a trimmer, and nearly everything is a Walmart, Michaels, Hobby Lobby, Amazon, or office supply run. Here are the items that come up most, with a free or cheap swap for each.
| Supply | Where to buy | Free or low cost swap |
| White and black cardstock | Walmart, Michaels, office supply stores | Printer paper glued to a cereal box, or a cereal box painted black |
| Kraft cardstock | Michaels, Hobby Lobby | A flattened brown paper grocery bag |
| Watercolor paper and paints | Michaels, Amazon (Canson XL paper, Winsor and Newton Cotman paints) | A kids’ watercolor set and heavy cardstock |
| White paint pen or gel pen | Michaels, Amazon (Posca, Sakura Gelly Roll) | A white crayon on black paper, for kids |
| Fine tip waterproof pen | Office supply, Michaels (Sakura Pigma Micron) | Any waterproof black pen, tested on scrap first |
| Clear laminating sheets or contact paper | Walmart, Amazon | Clear packing tape |
| Envelopes | Office supply, dollar store | Envelopes from your own mail, covered in paper |
| Mini clothespins and twine | Dollar store, Michaels | Yarn and regular clothespins |
| Canning jars and lids | Walmart, hardware stores | Jam jars and their lids |
| Ribbon | Dollar store, Michaels | Strips of fabric, or last year’s gift ribbon |
| Removable hooks | Walmart, Target (3M Command) | Painter’s tape, for very light pieces |
Practical note: Printers can’t print white. If you want white lettering on dark cardstock, hand letter it with a paint pen. Printing a black block with white text uses a lot of ink, curls the sheet, and smears.
I keep one bin of cardstock and pens for the whole holiday season.
Christmas Scripture Cards At A Glance
The ideas below show up in a mixed order, so use this table as your index. It’s sorted from easiest to hardest, and each name jumps to its section. Any of these Christmas scripture cards ideas can work as Advent scripture cards if you write a day number on the back.
| Idea | Skill | Time | Mess | Best for |
| Scripture Cards Tucked In Stockings | Beginner | 20 minutes | Low | Gifts |
| Minimalist Black And White Scripture Cards | Beginner | 30 minutes | Low | Shelf or desk |
| Scripture Cards In Mason Jars | Beginner | 30 minutes | Low | Ornament or daily pull |
| Farmhouse Style Scripture Card Display | Beginner | 45 minutes | Low | Table |
| Scripture Card Garland For Mantel | Beginner | 90 minutes | Low | Mantel |
| Rustic Kraft Paper Scripture Cards | Intermediate | 45 minutes per card | Low | Handmade card |
| Chalkboard Style Scripture Card Set | Intermediate | 1 hour for 12 cards | Low | A full set |
| Scripture Cards With Pressed Flowers | Intermediate | 1 hour plus 1 to 2 weeks pressing | Low | Keepsake or bookmark |
| Watercolor Nativity Scripture Cards | Intermediate | 2 hours for 4 cards | Medium | Gift cards |
| Daily Advent Scripture Card Calendar | Intermediate | 3 to 4 hours | Low | The whole month |
| Hand Lettered Scripture Card Inspiration | Advanced | 1 to 2 hours per card | Low | Keepsake |
If you’re planning a few craft nights before Advent, save this page to your Christmas board on Pinterest so the table and supply list are easy to find at the store.
Christmas Scripture Cards Ideas For Every Style
Each idea starts with a look at one finished example, then walks you through making your own. Pick the style that fits your space and your evening, and skip the rest.
1. Minimalist Black And White Scripture Cards
One Verse, Black Ink, and a Wooden Board
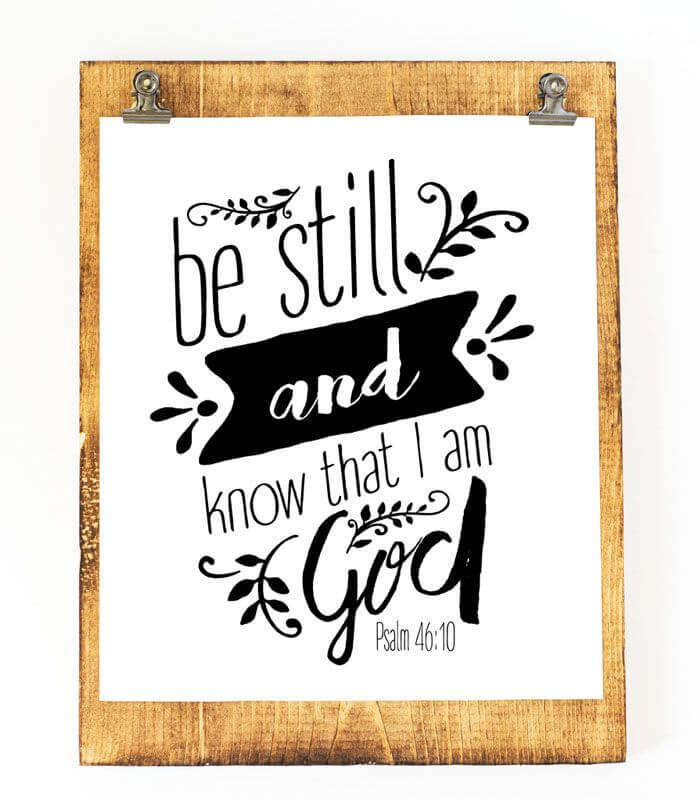
Hand lettered black type on a white sheet reads Be still and know that I am God, with Psalm 46:10 tucked into the lower right corner. Leafy flourishes curl around the words, and a solid black banner behind the word and gives the lettering one heavy anchor. Two silver bulldog clips pin the print to a stained wooden board, so the white page and the orange brown grain frame each other.
This is the lightest lift on the list. For Bible verse cards this simple, the typeface does all the work, so choose one and stick with it. The trade off is that there’s nowhere to hide, so spacing mistakes show.
Skill: Beginner. Time: 30 minutes. Mess: Low. Gear: printer, paper trimmer.
What you need
- White cardstock, about 110 lb (or printer paper glued onto a cereal box)
- A printer, laser if you have one (toner won’t smear under a damp finger the way dye inkjet ink can)
- A paper trimmer, such as Fiskars, or scissors and a ruler
- Bulldog clips and a board (a scrap of stained wood or a clipboard)
- One verse under 20 words
How to make it
- Pick one short verse and one typeface. Use two sizes at most, one for the verse and one for the reference.
- Set up a 5 by 7 inch page in Canva or Google Docs with at least half an inch of margin.
- Print a test on plain paper to check the spacing.
- Print on cardstock and trim it to size.
- Clip it to the board and prop it up on a shelf or a desk.
Tip: Leave a lot of white space. If the verse touches the edges, the card reads as crowded instead of calm.
2. Scripture Card Garland For Mantel
A Little Helper and a Line of Clothespins
A young girl in a navy ruffle sleeve top smiles over her shoulder while she clips a card to a string stretched across a white mantel. Mini wooden clothespins hold the cards in a row. The first few cards are watercolor nativity scenes with small captions and Bible references, such as Journey to Bethlehem from Luke 2, and the next ones are deep blue night sky cards with silver moons, stars, a snowflake, and big numbers like 6 and 7. A wooden bead garland droops in a soft curve just below the string.
A garland fills a mantel with no extra decor, and it doubles as Advent scripture cards your kids can reveal one at a time. The trade off is the string, which sags if you don’t pull it tight, and which needs a safe spot away from flame.
Skill: Beginner. Time: 90 minutes for 25 cards. Mess: Low. Gear: printer, scissors, removable hooks.
What you need
- 25 cards, about 3.5 by 5 inches (print four to a page)
- About 8 feet of jute or cotton string (or yarn)
- 25 mini wooden clothespins (or regular clothespins)
- 2 removable adhesive hooks, such as 3M Command
- A wood bead garland, optional
How to make it
- Print and cut the cards, and write the day number on the back of each one.
- Stick the hooks to the wall at each end of the mantel and tie the string between them. Pull it tight.
- Clip the cards on, about 4 inches apart. Use one card as your spacing guide.
- Drape the bead garland below the string.
- Each day, flip that day’s card to show the verse, or take it down and read it aloud.
Tip: Clip the cards at the top corners, not the middle. Cards clipped in the middle spin and show their backs.
3. Rustic Kraft Paper Scripture Cards
Aged Paper, Twine, and a Mustard Seed Verse
A layered handmade card sits on a white crocheted doily in front of dark branches. A scalloped brown frame cut like lace surrounds a tan, aged panel printed with Matthew 17:20 about faith as small as a mustard seed, in a mix of bold type sizes. Translucent green leaves tuck in at the corners, twine wraps across the lower edge, and a small copper cross charm hangs from a stitched brown tab.
Kraft paper is the quickest way to get a handmade look. The trade off is that printers can’t print white, so plan on black or brown text, and expect to age the edges by hand. This is one of the most forgiving handmade scripture cards if you like a worn, textured look.
Skill: Intermediate. Time: 45 minutes per card. Mess: Low. Gear: scissors, ink pad, sponge.
What you need
- Kraft cardstock, or a flattened brown paper bag
- A brown ink pad, such as Tim Holtz Distress Ink, and a blending sponge (or a damp tea bag wiped over white paper to age it)
- Dark brown cardstock for the frame, with decorative edge scissors (Fiskars makes scalloped ones)
- Twine
- Green paper leaves, punched or cut by hand
- A small cross charm
- Craft glue
How to make it
- Print the verse on kraft cardstock with a laser printer, or stamp it with alphabet stamps and black ink.
- Cut the verse into a label shape and rub brown ink along the edges with a sponge.
- Cut a larger frame from dark brown cardstock with the decorative edge scissors.
- Layer the frame, the label, and the leaves, and glue them down.
- Wrap twine across the bottom and tie on the charm.
Tip: Ink the edges before you glue anything. You can’t age an edge once it’s stuck down.
4. Scripture Cards In Mason Jars
A Jar Lid Turned Hanging Ornament
A round white paper insert carries Psalm 103:1 in looping script, framed by the gold metal band of a canning jar lid. A bright red satin ribbon is tied in a bow across the top, and a loop of wire hooks it onto a dark doorframe. The words wrap around the circle in four curving lines, with the reference in smaller type underneath.
There are two ways to use jars here. You can fill a jar with rolled cards and pull one each morning, or you can turn a lid into an ornament like this one. The trade off is paper weight. Rolled cards need thin paper, while an ornament insert needs a stiffer one.
Skill: Beginner. Time: 30 minutes. Mess: Low. Gear: scissors, double sided tape.
What you need
- Canning jars with two piece lids (the flat lid and the screw band), or jam jar lids
- Cardstock for the ornament circle, and text weight paper (about 24 lb) for rolled cards
- A pencil, scissors, and double sided tape
- About 18 inches of red satin ribbon (or fabric strips)
- A wire ornament hook
- Thread, for tying rolled cards
How to make it
- Trace the flat lid on your paper and cut a circle to fit. A regular mouth lid is about 2 5/8 inches across.
- Print the verse centered inside a circle, or letter it by hand.
- Tape the circle onto the face of the flat lid and screw the band over it to frame it.
- Tie the ribbon in a bow around the band and add the hook.
- For rolled cards, print 25 narrow strips on the thin paper, roll each around a pencil, tie with thread, and stand them in a labeled jar.
Tip: Roll text weight paper, not cardstock. Cardstock cracks at the crease and won’t stay curled.
5. Chalkboard Style Scripture Card Set
A Whole Deck Fanned Out on a Wooden Table
Dozens of rounded corner square cards overlap on a worn wooden tabletop in red, navy, olive green, gray, and white. A red card with a white wreath reads love was born in a stable, and an olive card with white lettering says the Lord is good and His love endures forever, from Psalm 100:5. A white card pairs a green evergreen tree with I have come that they may have life, from John 10:10, and another shows a dark deer silhouette under an everlasting love verse. Near the center, a navy card with white script lists Wonderful Counselor, Mighty God, Everlasting Father, and Prince of Peace above a leafy vine, with Isaiah 9:6 below. That navy card is the closest match to a true chalkboard look.
Chalkboard style cards read bold from across the room, and a whole set stacks neatly near a mantel. The trade off is the lettering. Printers can’t print white ink, so you hand letter these with a paint pen.
Skill: Intermediate. Time: 1 hour for 12 cards. Mess: Low. Gear: white paint pen.
What you need
- Black or navy cardstock, 80 lb or heavier
- A white paint pen, such as Posca PC 3M, or a white gel pen like Sakura Gelly Roll (a white crayon works for kids)
- A white chalk pencil or a white colored pencil for sketching
- A ruler and a paper trimmer
- Scrap paper for testing the pen
How to make it
- Trim the cardstock to 4 by 6 inches, or 4 by 4 for a square set.
- Sketch the verse lightly with the white pencil. Plan the line breaks so the words fill the card evenly.
- Trace the letters with the paint pen in two passes, letting the first pass dry for a minute.
- Add a simple leaf border or a ruled line, then put the reference small at the bottom.
- Let the cards dry flat for 10 minutes before you stack them.
Tip: Shake the pen and test it on scrap first. The first stroke on a new paint pen is often a blob.
6. Watercolor Nativity Scripture Cards
Painted Figures With the Verse Just Below
A handful of square watercolor cards fan out on a dark wood table beside a sprig of green cedar, a glass jar of wooden matches, and cream envelopes. Each card holds one small painted figure with a short verse in tiny spaced capitals underneath. There’s a pale winged angel with Luke 2:14, Mary in a blue veil beside Joseph in a green robe, a wise man in a navy and gold cloak with James 1:17 about every good and perfect gift, and a shepherd in a rust red robe holding a staff with a small lamb at his feet, paired with Psalm 23:1. One hand steadies the corner of a card while another holds a fine black pen at the edge of the shepherd.
These are the most giftable handmade scripture cards on the list, since each one looks like a tiny painting. The trade off is the paint. Watercolor needs the right paper and patience, and one wet pass over printed ink can ruin a card.
Skill: Intermediate. Time: 2 hours for 4 cards. Mess: Medium. Gear: brush, fine liner pen.
What you need
- 140 lb cold press watercolor paper, such as Canson XL (or heavy cardstock)
- Pan watercolors, such as Winsor and Newton Cotman, or a kids’ watercolor set
- A size 4 round brush
- A waterproof fine liner, such as Sakura Pigma Micron 01
- A gold gel pen or metallic watercolor, optional
- Masking tape, and envelopes for gifting
How to make it
- Cut the paper into 5 by 5 inch squares and tape the edges to a board so the paper stays flat.
- Sketch each figure lightly in pencil, keeping the faces simple.
- Paint the robes in pale washes and let them dry fully before adding a second layer.
- Add details with the liner and the gold pen once the paint is bone dry.
- Letter the verse underneath in small capitals with the liner, or print it first with a laser printer before you paint.
- Scan the finished cards at 300 dpi if you want to print extra copies.
Tip: Laser toner resists water, but many inkjet inks run when paint touches them. Print the verse first only if you have a laser printer.
7. Daily Advent Scripture Card Calendar
A Fan of Cards in Front of a Pocket Wall
A hand with glossy red nails fans five white rounded cards with gray double borders, each headed by a category such as Activity, Service, or Discuss. One card prompts a family to pick a favorite story about Christ and share why it matters to them, and another suggests visiting an older neighbor. Behind the hand, a softly blurred linen wall hanging holds rows of pockets with white cards peeking out of the tops, with a small burlap bow and a bit of greenery hanging at the edges.
This is the biggest project on the list, and it’s the one that works as Advent scripture cards for the whole month. Advent 2026 begins on Sunday, November 29, though many families start on December 1 and run 25 days. The trade off is setup time, so build it once and reuse it every year.
Skill: Intermediate. Time: 3 to 4 hours. Mess: Low. Gear: hot glue gun, scissors.
What you need
- 25 envelopes, such as kraft A2 envelopes (or junk mail envelopes covered in paper)
- A base for the pockets: a linen or burlap hanging, a foam board, or a large piece of cardboard
- Number stickers or stamps
- 25 printed cards, about 3.5 by 5 inches
- Hot glue, and removable hooks or ribbon for hanging
A good card mix for 25 days is 12 verse cards, 5 activity cards, 4 service cards, and 4 discussion cards.
How to make it
- Write your 25 cards and print them four to a page. Cut them out.
- Number the envelopes 1 to 25 with stamps or stickers.
- Lay the envelopes in five rows of five on the base, with the openings facing up. Glue the bottom and sides, and keep the tops free.
- Hang the base with removable hooks or ribbon.
- Tuck a card into each pocket.
Tip: Keep a master list of what’s in each pocket, so you can swap day 23 if you’re traveling that day.
8. Scripture Cards With Pressed Flowers
Real Blossoms Sealed Beside the Verse
Two tall clear strips lean on a weathered driftwood branch, each holding a printed verse panel surrounded by pressed daisies, pale pink larkspur blooms, tiny green sprigs, and flecks of gold leaf. The left strip carries Philippians 4:6 in small type about not being anxious, and the right strip reads Romans 8:18 in larger centered letters about pain and the joy that’s coming. A dusty pink ribbon and a deep teal ribbon trail behind them across a pale stone surface.
The flowers add soft color without competing with the text, which makes these good bookmarks and ornaments. They’re fragile, so seal them well. The trade off is time, because the flowers need one to two weeks to dry flat.
Skill: Intermediate. Time: 1 hour, plus 1 to 2 weeks pressing. Mess: Low. Gear: laminator or contact paper, tweezers.
What you need
- Pressed flowers, such as daisies, pansies, larkspur, and small ferns (from your garden or a dried bouquet)
- A heavy book and parchment paper for pressing
- Clear self adhesive laminating sheets or contact paper (or a laminator with 3 mil pouches, or clear packing tape)
- Imitation gold leaf flakes, optional
- Tweezers, scissors, a hole punch, and ribbon
- Your verse, printed and trimmed
How to make it
- Press the flowers between parchment sheets in a heavy book for 1 to 2 weeks, until they feel papery.
- Print and trim the verse panel.
- On the sticky side of a laminating sheet, arrange the flowers with tweezers, lay the verse panel in place, and sprinkle on a few gold flakes.
- Cover with a second sheet and press the air out from the center to the edges.
- Trim with a quarter inch border so the edges stay sealed, punch a hole, and add ribbon.
Tip: Use a dry makeup brush to nudge the gold flakes. They stick to fingers and fly everywhere.
Practical note: Don’t seal damp flowers. Moisture trapped under the film turns brown and moldy within weeks.
9. Hand Lettered Scripture Card Inspiration
White Script on a Burgundy Card
A deep burgundy portrait card stands upright on a white tabletop in front of tall gridded windows, lettered entirely in white. The words He will be called Wonderful Counselor, Mighty God, Everlasting Father, and Prince of Peace stack in different sizes, mixing tall capitals with looping script, and a small boxed Isaiah 9:6 sits at the lower left. A thin border with notched corners frames the verse, and a small heart finishes the last line. Red berries on leafy stems, gold beaded sprigs, a red glass dish, and a green glass dish sit alongside.
If you enjoy lettering, this is the most personal card here, since every letter comes out a little different. The trade off is skill. It’s the only Advanced project on the list, because layout is harder than the letters themselves.
Skill: Advanced. Time: 1 to 2 hours per card, plus practice. Mess: Low. Gear: paint pen, chalk pencil.
What you need
- Dark cardstock in burgundy or navy, cut to 5 by 7 inches
- A white paint pen, such as Posca PC 3M (or a white gel pen)
- For light cards, a brush pen such as Tombow Fudenosuke
- Tracing paper (or printer paper) and a pencil
- A white chalk pencil and a ruler
How to make it
- Draft the layout on tracing paper first. Decide which words are big, which are small, and where the flourishes go.
- Rub a white chalk pencil over the back of the draft, tape it face up on the card, and trace over the lines with a pen to leave a faint white outline.
- Letter over the outline with the paint pen. Thicken the downstrokes by drawing a second line next to them and filling it in.
- Add the border and the flourishes last.
- Scan the finished card and print copies at a print shop. A solid burgundy block prints better there than on a home inkjet.
Tip: Don’t letter straight onto the card on your first try. Messy drafts on tracing paper are where the layout gets solved.
10. Farmhouse Style Scripture Card Display
A Wire Basket Stuffed With Sticker Tabbed Cards
A small yellow vintage wire basket sits on a polished wooden table, packed with cards topped with sticker tabs in teal, white, and pink with hearts, flowers, and crosses. A handwritten verse about the kingdom of God is partly visible on the front card. Beside it, a wire photo holder with a burlap flower base props up a yellow card with a handwritten Matthew 4:10 verse about worshiping the Lord, a little bluebird tab, a magenta amen sticker, and a teal give me JESUS label. Pastel egg and butterfly stickers and springtime decor in the background give the whole setup an Easter feel.
Handwritten cards in a basket are the lowest pressure idea here, since nobody expects perfect lettering. For Christmas, swap the egg stickers for stars and holly. The trade off is consistency, because mixed pens and mixed sticker styles look cluttered fast.
Skill: Beginner. Time: 45 minutes. Mess: Low. Gear: fine tip pen.
What you need
- 25 index cards, 3 by 5 inches (or cardstock cut to size)
- A waterproof fine liner, such as Sakura Pigma Micron
- Sticker tabs and Christmas stickers
- A wire basket, a rack, or a small tin from a thrift store (a loaf pan works too)
- A wire photo holder from a dollar store (or a clothespin glued to a wood block)
- A burlap scrap and an LED lantern, optional
How to make it
- Write one verse per card in the same pen, so the set looks matched.
- Add a sticker tab to the top edge of each card so you can find it.
- Number each card in a corner.
- Stack the cards in the basket.
- Each morning, pull one card and set it in the photo holder.
Tip: Pick one ink color and one sticker style for the whole set. Mixing five of each is what makes it look cluttered. Bend the ends of any wire over so nothing scratches.
11. Scripture Cards Tucked In Stockings
A Gift Box Verse Among Wrapped Presents
A square white card leans against a pile of wrapped gifts. A watercolor stack of three gift boxes in tan, pink stripe, and green gingham sits above four centered lines of spaced capital letters from 2 Corinthians 9:8, about God being able to bless you abundantly, with the reference in tiny type below. Gray and cream striped paper tied with cream twine, a kraft package with a deep red velvet bow and a frosted evergreen sprig with red berries, and red buffalo plaid paper with a mustard velvet ribbon surround it, and a pink ribbon trails beneath the card.
A square card like this slips into a stocking beside the usual candy and gives the stocking a little more meaning. Bible verse cards for stockings are quick to make in a batch. The trade off is paper weight. Thick cardstock sits flat in a stocking, but it cracks if you roll it.
Skill: Beginner. Time: 20 minutes for 6 cards. Mess: Low. Gear: printer, paper trimmer.
What you need
- White matte cardstock, about 100 lb
- A printer and a paper trimmer
- Art for the card: a small watercolor gift illustration you paint and scan yourself, or art you have the rights to use
- Stockings
- Text weight paper and ribbon, if you want to roll the cards
How to make it
- Make a 4 by 4 inch document and drop in a small watercolor style gift illustration.
- Type the verse in small spaced capitals, centered, with the reference in smaller type below.
- Print on the cardstock and trim the edges clean.
- Write each person’s name on the back.
- Slide one card into each stocking with the top edge peeking out, so it’s the first thing they find.
Tip: Add a line on the back about why you chose that verse for that person. That’s the part they keep.
Common Mistakes First Timers Make
Most first timers hit the same few snags with Bible verse cards. Here are the ones that come up most.
- Choosing a long verse. It forces small type and a crowded card. Cap it at about 20 words or split it across two cards.
- Printing white text on black. Printers can’t print white, and a black block curls the sheet and smears. Hand letter with a paint pen.
- Using an inkjet near water. Many inkjet inks run when watercolor or a damp finger touches them. Use a laser printer, or test first.
- Rolling cardstock. It cracks at the crease. Roll text weight paper instead.
- Sealing damp flowers. They go brown and moldy under the film. Press them until they feel papery.
- Gluing before inking the edges. You can’t age a kraft edge once it’s stuck down.
- Hanging a garland over a lit fireplace. Paper and string burn fast. Keep them well clear of flame.
- Mixing translations in one set. It reads sloppy. Pick one translation and use it for every card.
- Copying another maker’s art. Paint your own, or use art you have the rights to use.
- Leaving off the reference. A verse without its book, chapter, and verse is hard to look up later.
FAQs
What are good Christmas scripture cards ideas for beginners?
Start with the minimalist printed card, the stocking cards, or the mantel garland. You print, trim, and clip, and none of them need special skills.
What Bible verses work best for Christmas scripture cards?
Short verses fit best, such as Isaiah 9:6, Luke 2:11, Luke 2:14, John 1:14, and Matthew 2:10. Pick a translation first and stay with it across the whole set.
How do I make Advent scripture cards?
Write 25 short cards, number them on the back, and store them in pockets, envelopes, or on a garland. Mix verses with simple activity or service prompts, and start on December 1, or on the first Sunday of Advent, which is November 29 this year.
What size should scripture cards be?
A 4 by 6 inch card fits most frames and garlands, a 4 by 4 inch card fits a stocking, and a 3 by 5 inch index card suits a basket. Pick one size for the whole set so it stacks and hangs evenly.
What paper is best for handmade scripture cards?
Use 100 to 110 lb cardstock for flat cards, 24 lb text weight paper for rolled cards, and 140 lb watercolor paper if you plan to paint. Matte paper takes pen and paint better than glossy.
Can I sell Bible verse cards I make?
It depends on the translation and the art. King James and the World English Bible are public domain, but modern translations have permission rules, so check the publisher before you sell. Don’t copy another maker’s artwork or lettering.
